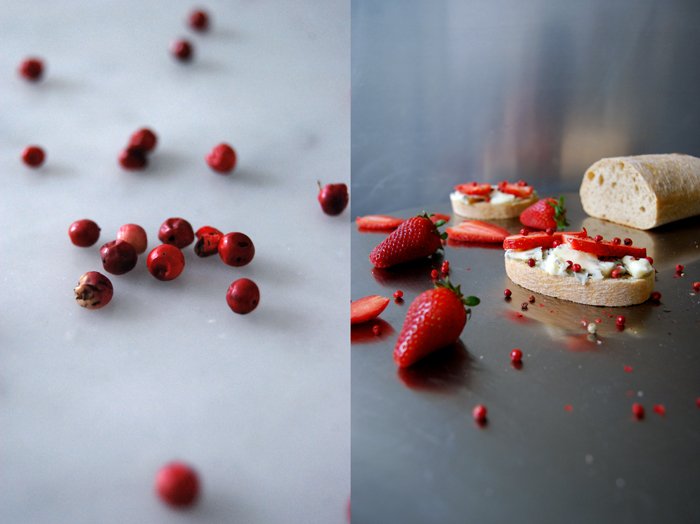
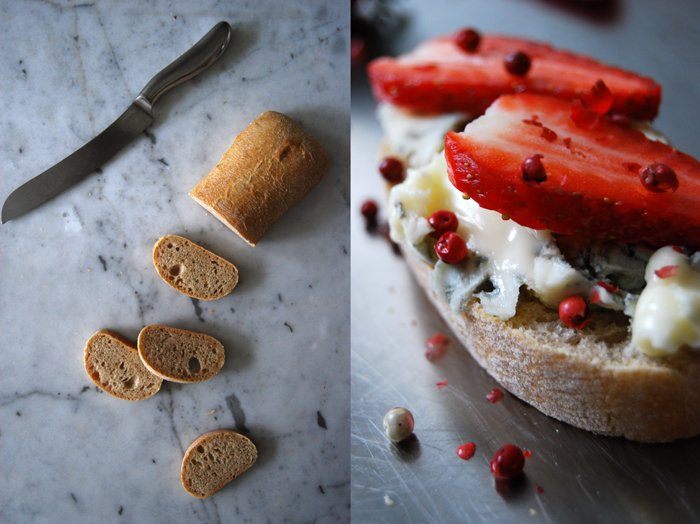
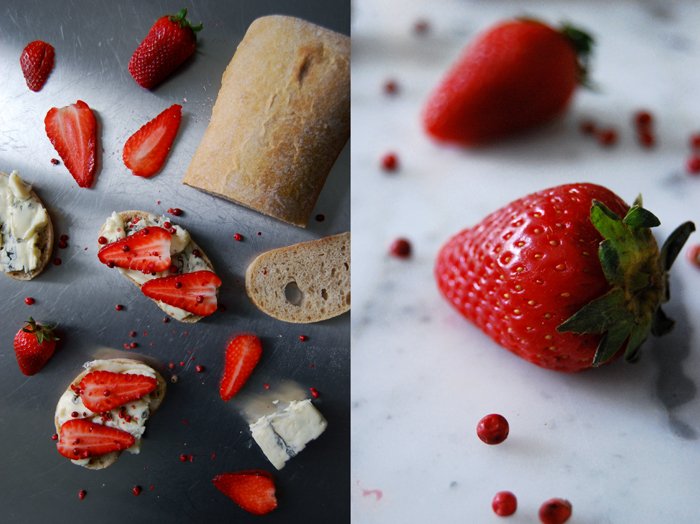
Gorgonzola, Strawberry and Pink Peppercorn Sandwich
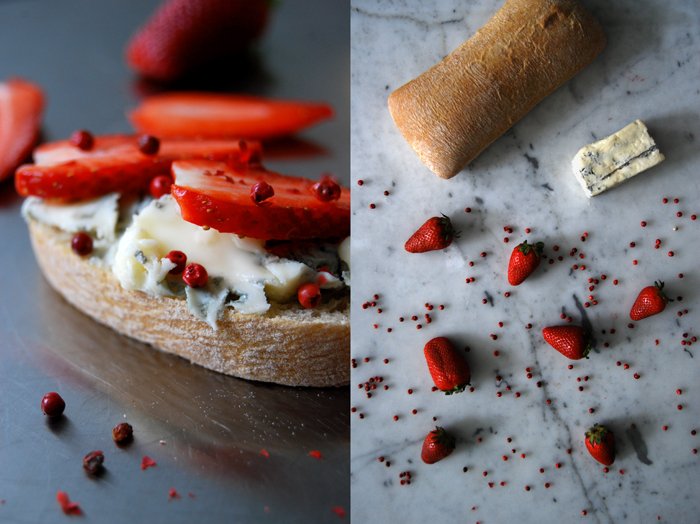
My first strawberries this year find their place on a sandwich together with the creamiest blue cheese of all, Gorgonzola! This cheese gets its name from its place of origin, the commune of Gorgonzola in the province of Milan. It's not as sharp and spicy as Roquefort or Stilton, it's more on the mild side, perfect for when I feel like a soft cheese aroma. That's what my strawberries needed, especially because their season has just begun here and they haven't reached their full spectrum of flavours yet. To bring some spice into this combination I added a few pink peppercorns, also gentle enough for the red fruits.
This sandwich is so sweet and creamy that a fluffy ciabatta bread felt like the right choice. I spread Gorgonzola (about 100g / 3.5 ounces for 2 people) in thick lumps on a few slices of the fresh loaf, I didn't want to spare on the milky creaminess before I covered the sandwiches with a couple slices of strawberries. Sprinkled with the pink peppercorns which are best when softly pressed before they join the red fruits, I felt a bit hesitant to take the first bite, this week's sandwich really is beautiful!

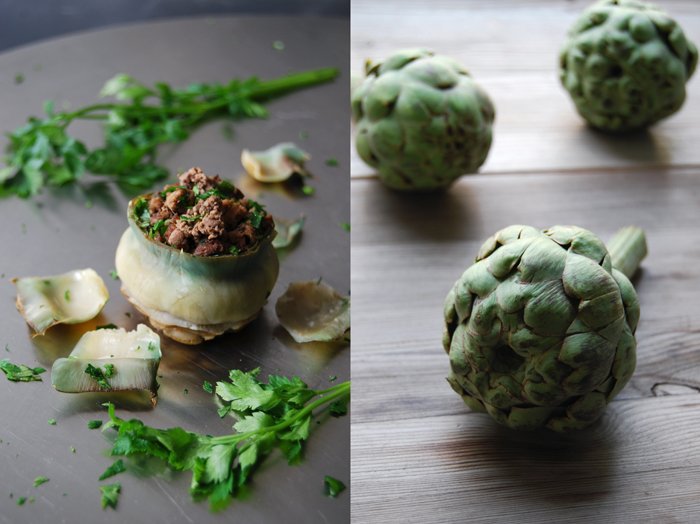
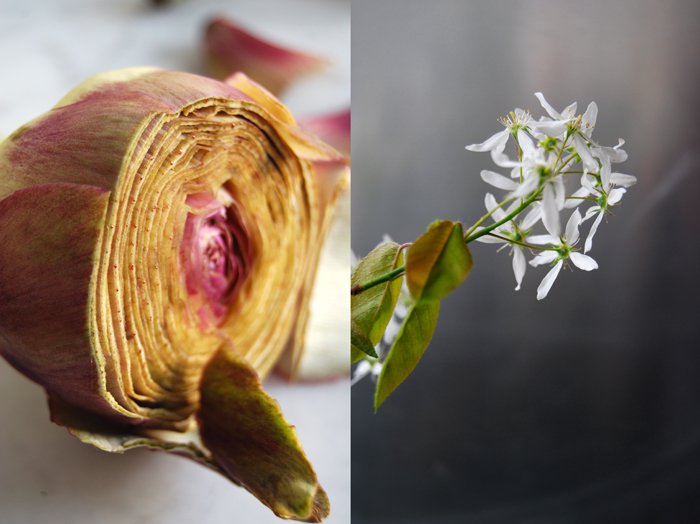
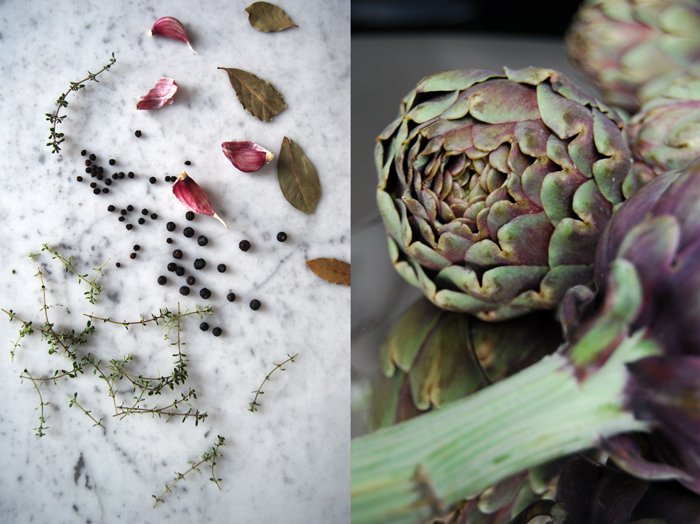
Stuffed Maltese Artichokes with Meat and Brandy
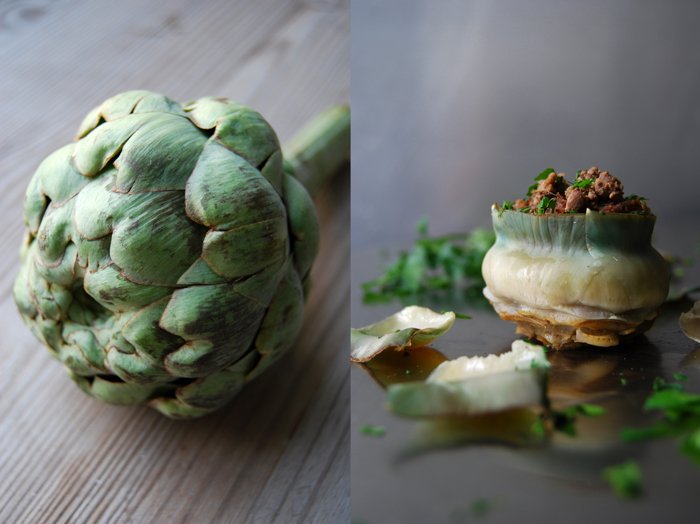
In Maltese cuisine, stuffed vegetables have a long tradition. The island's soil and climate offer the right conditions for fruits and vegetables to grow and ripen under the Mediterranean sun with strong tastes and in huge quantities. Tomatoes, onions, marrows, zucchini, aubergines, pumpkins, all fruits and vegetables that are perfect to be filled! Be it with meat, seafood, herbs or other vegetables, you can combine flavours of all kinds or even use your leftovers to create a completely new dish you would have never thought of before. When I'm in an experimental mood, I bravely mix whatever I find in my fridge and shelves, sweet, sour, spicy or bitter, I've never been disappointed, but often surprised!
A few weeks ago I wrote about my stuffed zucchini, the filling was light and fluffy, made of ricotta, basil and lemon, perfect for the fruit's soft taste. When I decided to stuff some baby artichokes I had a stronger filling in mind, hearty, with minced pork and chicken liver which is an old, traditional Maltese recipe. To refine the meat's flavours I deglazed it with sweet brandy and infused it with an aromatic bay leaf and a pinch of cumin. I prepared everything in advance and warmed it up in the oven for a few minutes before dinner, in my little ramekins. The meal pretty and delicious!
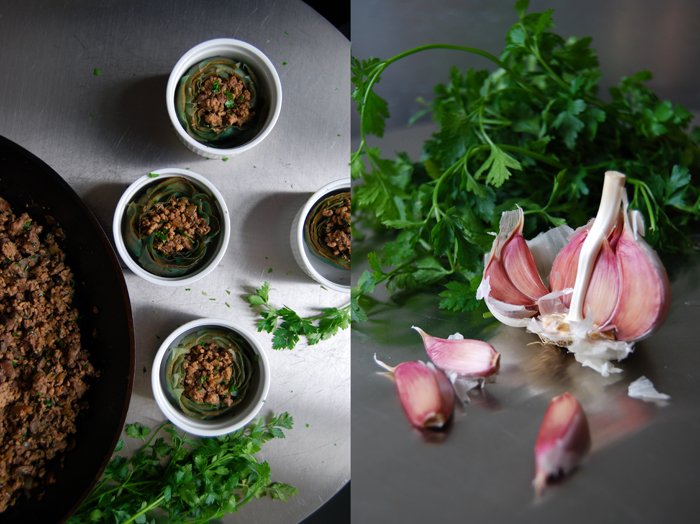
Stuffed Artichokes with Minced Pork, Chicken Liver and Brandy
The artichokes can be prepared in advance and warmed up in the oven before serving.
For 6 stuffed baby artichokes you need
baby artichokes 6
minced pork 220g / 8oz
chicken liver, cleaned and finely chopped, 150g / 5 1/2oz
medium sized onion, finely chopped, 1
garlic, crushed, 2 cloves
brandy 40ml / 1 1/2fl oz
white wine 160ml / 5 1/2fl oz
bay leaf 1
cumin, ground, a pinch
parsley, chopped, the leaves of a small bunch
salt and black pepper
olive oil
juice of 1/2 lemon
Cut off the artichoke stems. If they are soft, peel and chop them finely and set aside. Pluck the hard outer leaves and cut the artichokes' tips off (1/3 – 1/2 of the artichoke), just the soft, fleshy part of the leaves should be left. Loosen the hairy choke with a knife and scoop it out with a spoon. Keep the prepared artichokes in a bowl of cold water and the juice of half a lemon once they are cut.
In a large pot, cook the artichokes in lots of salted water for about 10 minutes or until soft.
Set the oven to 200°C /390°F.
In a large heavy pan, heat a splash of olive oil and sauté the onion and garlic on medium for a few minutes until soft. If the artichoke stems are soft add them as well. Add a little more olive oil and fry the minced meat for 2-3 minutes. Add the liver, stir and fry for a minute. Add the bay leaf, parsley and cumin, deglaze with brandy and pour in the white wine, cook it down for 2 minutes. Season with salt and pepper and fill the artichokes with the minced meat mixture.
Place the artichokes in a big baking dish or 6 single ramekins, add a dash of white wine to cover the bottom of the dish and cook them in the oven for 5 minutes.


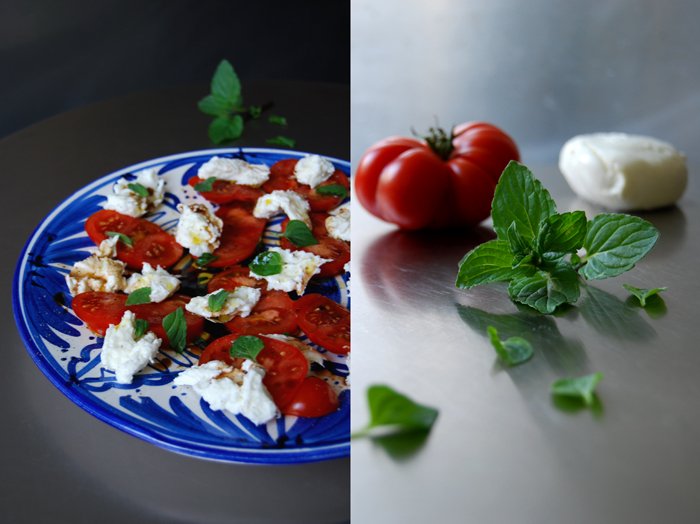
Buffalo Mozzarella, Cuore Di Bue Tomato and Mint Salad
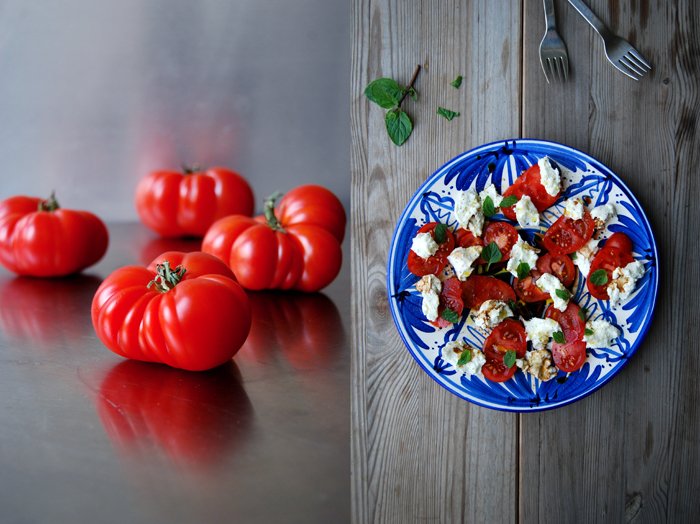
When I saw these beautiful Cuore Di Bue Tomatoes in the vegetable department of my local organic shop I had to buy them. I know these tomatoes from Malta where farmers sell them from their vegetable trucks at every street corner in the towns. These mobile shops are piled high with ripe, colourful fruits and vegetables from the island, surrounded by women chatting and exchanging the latest gossip while waiting to have their vegetables weighed. Many of them have been going to the same farmer for years and I gladly follow this tradition. Whenever I'm there I buy my groceries from my vegetable man, Leli, twice a week he parks his truck under pink oleander trees in the middle of Msida. He is one of the most friendly, calm and humble people I know, he doesn't talk much but he always has a little smile on his face. Before we leave the island at the end of our holidays, we visit him one last time to say good-bye, I never know who is more sad, him or us!
Back to the Cuore Di Bue Tomatoes, I buy and eat them in bulk when I'm Malta. Their taste is far away from most of the tomatoes you can buy in the cities, they are strong and sweet, very intense, they taste like real tomatoes! Their name comes from their shape and size which is similar to an ox heart but I thought that the Italian name, Cuore Di Bue sounds a bit nicer than Oxheart Tomatoes!
I had a buffalo mozzarella in my fridge which had to be used soon, a quick salad mixed with my beautiful tomatoes was the first idea that came into my mind. I still love this Italian classic which can be a delicious starter or snack when it's made with good quality ingredients. Unfortunately, lots of restaurants offer it made with tasteless tomatoes and mozzarella, which has damaged its image a little over the years. Buffalo milk however creates a very strong mozzarella which is great for this salad, to add a green taste as strong as this cheese, I replaced the traditionally used basil with mint. Our salad for 2 was ready within seconds, 125g / 4.5 ounces of buffalo mozzarella roughly torn into bite sized pieces mixed with 2 ripe Cuore Di Bue tomatoes sliced thinly and a few leaves from my mint plant. The dressing was as easy, 3 tablespoons of olive oil whisked with 2 tablespoons of Balsamico vinegar, salt and pepper.


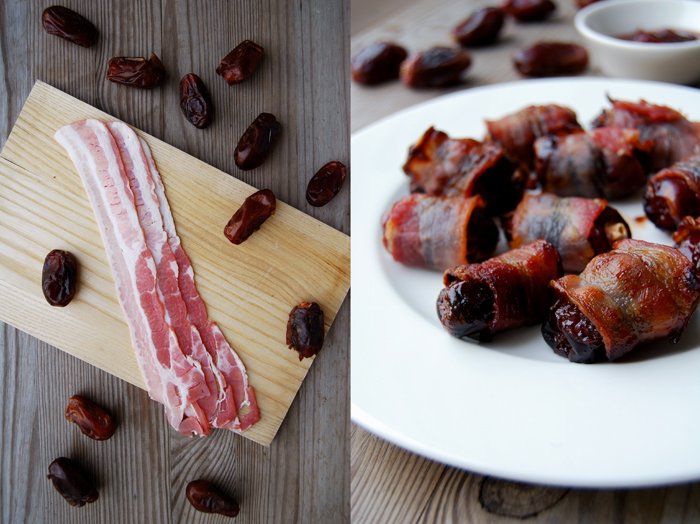
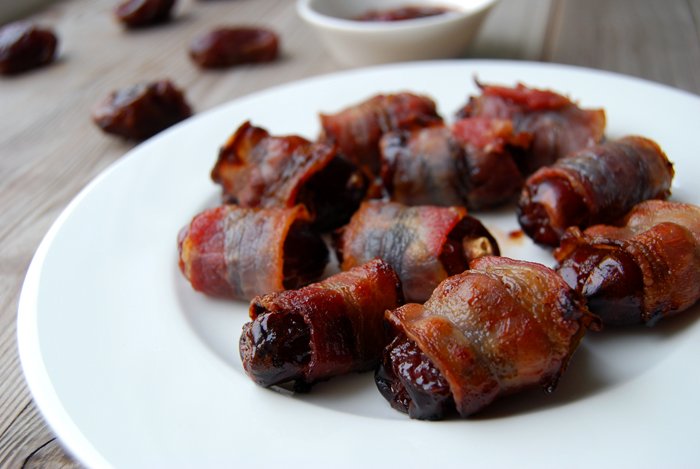
Chutney filled Dates wrapped in crisp Bacon
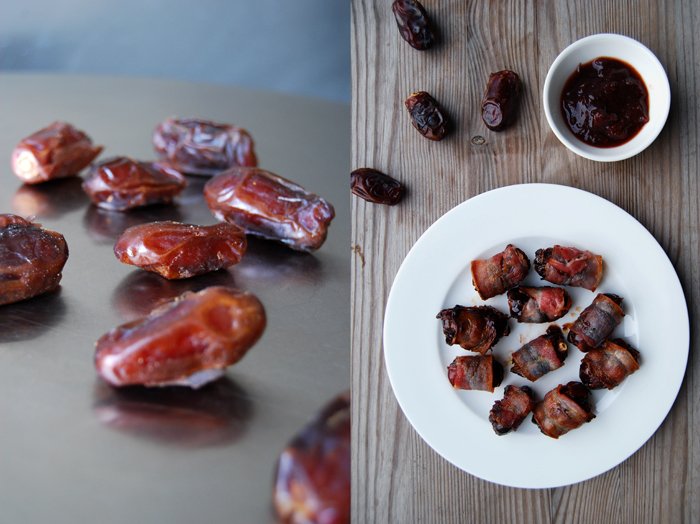
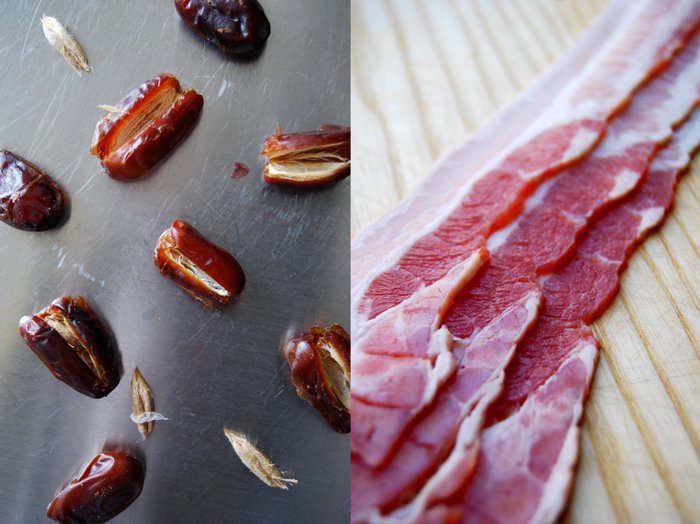
Devils on Horseback, dried fruit wrapped and baked in bacon, are a typical winter dish, but the temperature dropped, it's a bit grey outside and I wanted to try something new with my chutney. It's still a great finger food nibble, even in spring! After I made my rhubarb chutney I thought about new combinations besides the classics with cheese, meat or sandwiches. A package of dried dates caught my attention, I had bought them a couple weeks ago from a Turkish shop I discovered while strolling through the streets. I went inside to check out their meat section as you can get the best lamb from Turkish butchers but I was a bit late and the shop was closing. On my way to the cash point I grabbed a package of dates unsure of what I would use them for and hopped back out onto the busy streets.
The dates finally found their purpose, I filled them with chutney, wrapped them in slices of bacon and baked them in the oven. Sweet and sticky, salty and a bit sour, my chutney filled dates wrapped in crisp bacon! It sounds like an attack on the taste buds but it's actually a very harmonic combination, all the flavours melt together smoothly. My rhubarb chutney hasn't sat yet, I want to give it a couple more weeks, so I used my plum chutney (the same recipe, just with plums).
It's very easy to prepare these nibbles, you just need a few dried dates (as a snack for 3, I used 15 dates) and replace their seeds with some chutney (the plum chutney was very good but I tried one with rhubarb and it was good too). I cut a strip of thinly sliced bacon into 3 and wrapped each piece around a filled dated. Baked in the oven on 200°C / 390°F they turned golden and crisp after a few minutes!

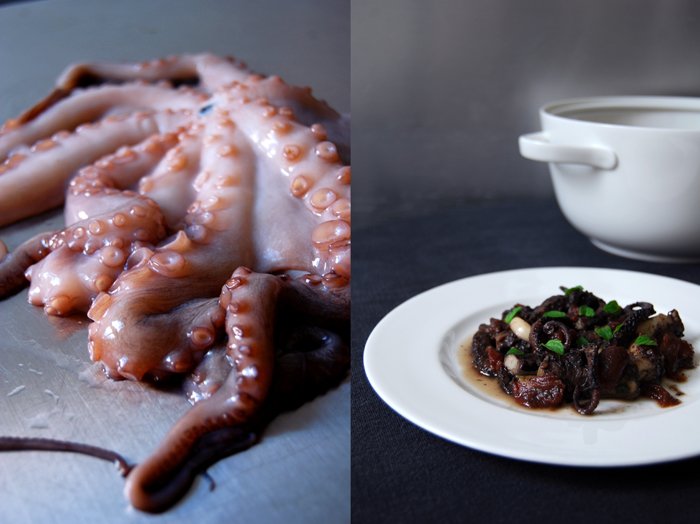
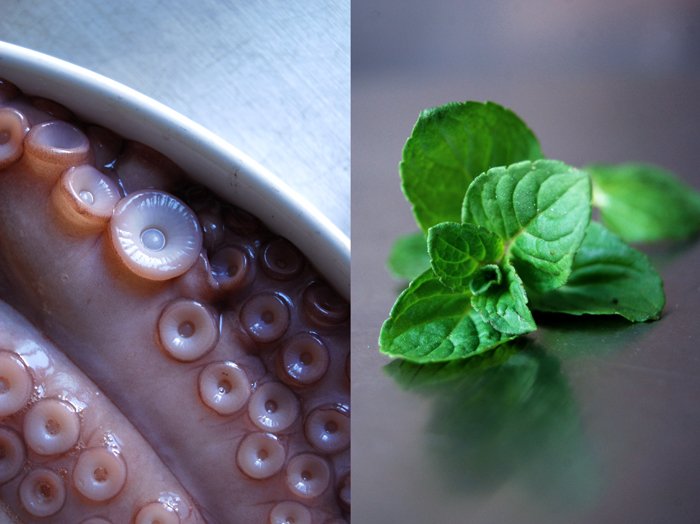
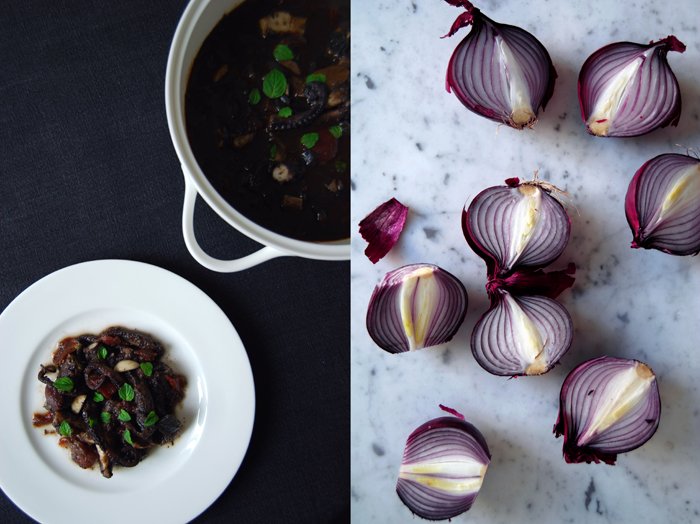
Octopus Stifado, a Greek Stew with Octopus, Onions and Mint

A spontaneous decision took me to the island of Naxos in the Aegean sea on a warm early autumn evening a few years ago. My summer holidays had been cancelled due to my work and in late September I felt an urgent need for a break. I had never been to Greece before and when I saw the photos of this dry, quiet island and it's long and lonely beaches I knew that this was exactly what I had been looking for! Only a handful of the typical Greek houses in white and blue lined the coast, a picture of peace and seclusion. I'm a friend of quick decisions so in mid October I found myself on a ferry crossing the Aegean sea, passing all its beautiful small islands, Santorini, Ios, Irakleia and Paros before I reached the tiny harbour of Naxos in a golden sunset. I fell in love with this island there and then!
A bumpy path through a green valley dense with bamboo led me to my tiny hotel which turned out to be one of the most peaceful places I have ever been to. It was run by a lovely and caring couple from Athens who made me feel like I was part of the family. Most of the rooms were vacant at the time as it was well past the high season. My room was so close to the sea that I could here the soft waves reaching the shore all night, no city noise, no other hotels, no cars, just the sea and a lonely beach! In the morning I found out that I wasn't the only one enjoying this peaceful place on earth, as the sun rose on the horizon a sea turtle took her morning swim right in front of my hotel!
One night, the lady of the house asked me if I would like to join their dinner, she had made her traditional octopus stifado, a dark, rich stew with octopus and lots of red onions, garlic, tomatoes, red wine, bay leaves and vinegar. The octopus was unbelievably tender, the sauce thick and aromatic, I had to ask for the recipe! We had already enjoyed our dinner and sat together over a few glasses of wine when I wrote down a few notes as she didn't have a written recipe. It was a beautiful night, unforgettable, under the dark Aegean sky, nearly as black as my stifado!
Octopus Stifado
The octopus has to simmer softly on low temperature for 1 hour 45 minutes.
For 4 people you need
octopus, skinned and cleaned, 1.2kg / 2.5 pounds (around 2 octopus)
medium sized red onions, roughly chopped, 5
tinned tomatoes, 400g / 14 ounces
red wine 300ml / 10 ounces
garlic, peeled and quartered, 5 cloves
bay leaves 4
fresh mint leaves, roughly chopped, a small handful
salt and pepper
balsamic vinegar to taste
olive oil for frying
In a large pot, heat a splash of olive oil and fry the the onions on a medium heat for 5 minutes till soft. Add a little more oil and the whole octopus, turn the temperature down and fry for a few minutes. Add the other ingredients, close the lid and simmer on a low heat for 1 hour. After an hour, take off the lid and let the stew simmer for another 45 minutes on low temperature. Season with Balsamico vinegar, salt and pepper to taste and add the mint. Cut the head and tentacles into bite sized pieces and serve with either white bread or spaghetti.
This recipe makes a lot of sauce, we usually eat the octopus with bread on the side on the first day and the next day we enjoy the leftovers with pasta.


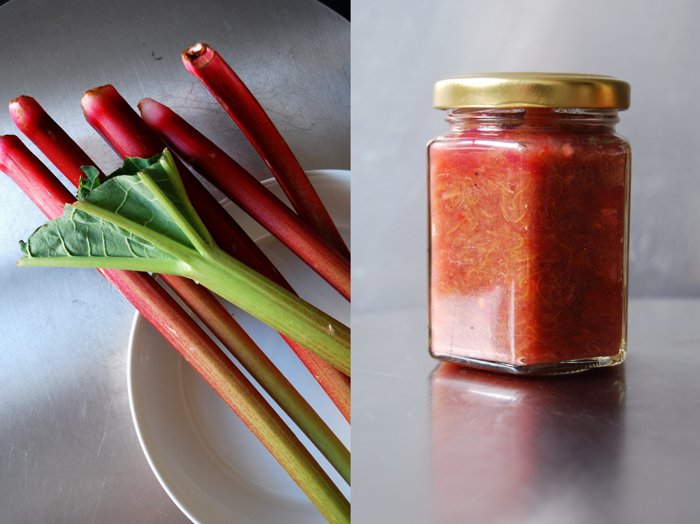
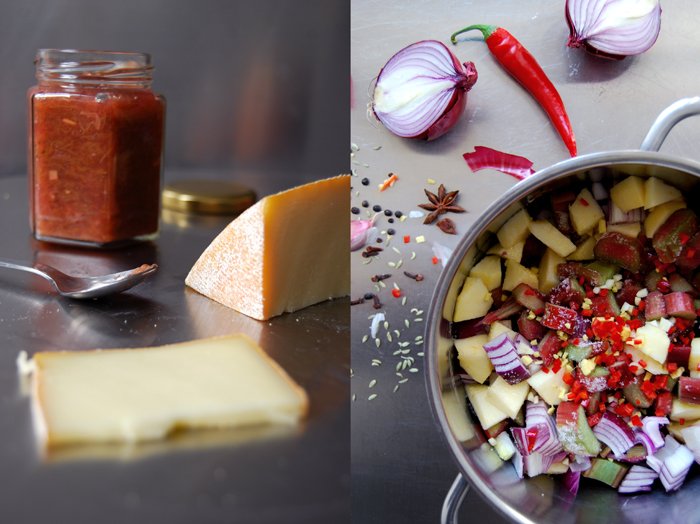
Sweet and spicy Rhubarb Chutney
My love for chutney developed quite late, almost nine years ago while I lived in England for a couple months. One night I found out about the glorious combination of Yorkshire Wensleydale cheese and chutney. I knew about a similar duo, ripe cheese and fig mustard, a great alternative to a sweet dessert, heavenly when the cheese's milkiness unites with the spicy and fruity flavours in your mouth! When my dear friend Audrey, a lady who likes good cheese as much as I do, offered me this North Yorkshire delicacy I was taken after the first bite. My favourite was a young cheese, mildly flavoured with cranberries, a bit crumbly and just perfect together with sweet onion chutney. Sometimes, after we had been out, we used to chat in Audrey's kitchen, get out some jars of pickles, chutneys and a truckle of Wensleydale and we quite often ate more than just a midnight snack!
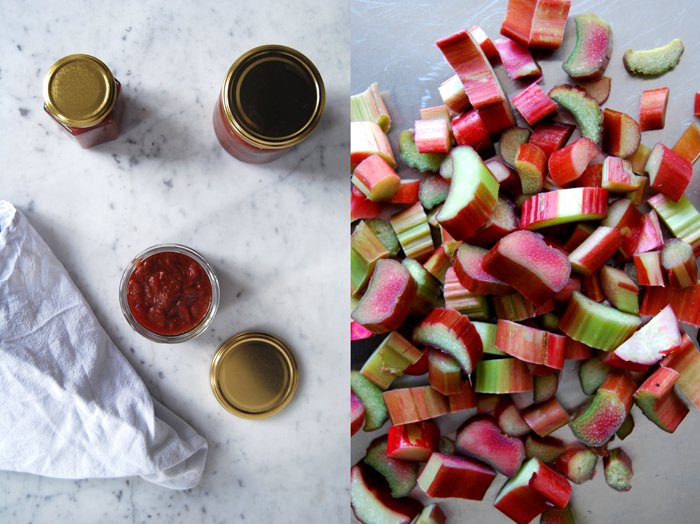
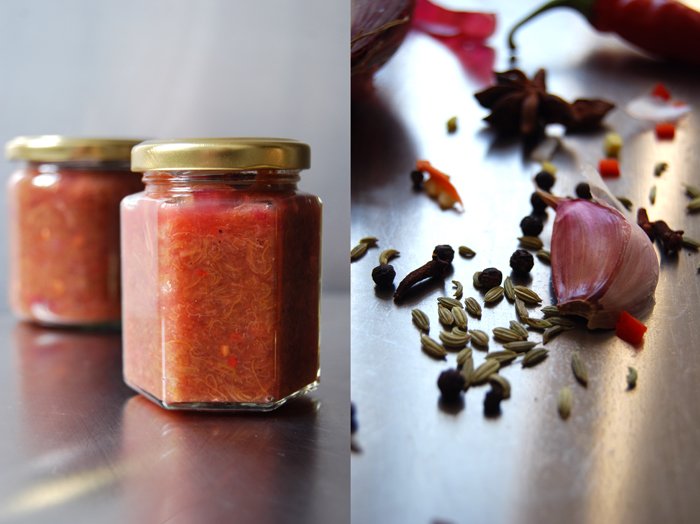
Not too long after this culinary discovery I started to make my own chutneys. I experimented for a while and came up with a recipe which I now use for all kinds of chutneys, plums, apples, onions or rhubarb. Depending on the fruit's taste I adjust the spices a little bit but the basic recipe remains untouched. Most of the time I mix in red onions and red hot chili peppers for the spiciness, a couple apples to thicken the texture and lots of spices, turmeric, cloves, star anise, fennel seeds, black pepper, garlic and ginger. Rhubarb is at its seasonal peak at the moment, the best time to turn it into a sweet and spicy chutney!
Cheese and chutney isn't the only way to enjoy chutney, you can also use it to flavour aromatic gravies, eat it with slices of warm or cold roast meat or spread it on sandwiches.
Rhubarb Chutney
For 3 medium sized jars you need
rhubarb, sliced 550g / 19 ounces
apple, peeled and roughly chopped, 125g / 4.5 ounces
red onion, medium sized, roughly chopped, 1
cider vinegar 220ml / 7.5 ounces
granulated sugar 150g /5.5 ounces
fresh hot chili pepper, without seeds, finely chopped, 1/2
garlic, chopped, 1 clove
fresh ginger, grated or chopped, 1 heaping teaspoon
For the spice mixture (makes 2 teaspoons, you might only need 1 1/2)
turmeric, ground, 1/8 teaspoon
cinnamon, ground, 1/2 teaspoon
cloves, ground in the mortar, 12
star anise, ground in a mortar, 2 single pieces
fennel seeds, ground in a mortar, 1/2 teaspoon
small dried chili, ground in a mortar, 2
spirit to sterilise the rims of the jars
Sterilise the jars in boiling water for 5 minutes.
In a large pot, bring all the ingredients together with 1 1/2 teaspoons of the spice mixture to the boil. Cook for about an hour on medium temperature until the chutney thickens. You can add more of the spice mixture if you like before you fill the chutney into the jars.
Dip the rim of your jars in spirit and wash out the lids with the alcohol as well. Fill your jars with the chutney and close well immediately.
You can eat the chutney right away but I prefer to let it sit for 3 weeks. You should keep an open jar in the fridge (mine stays fresh for months) and the closed jars in your pantry.
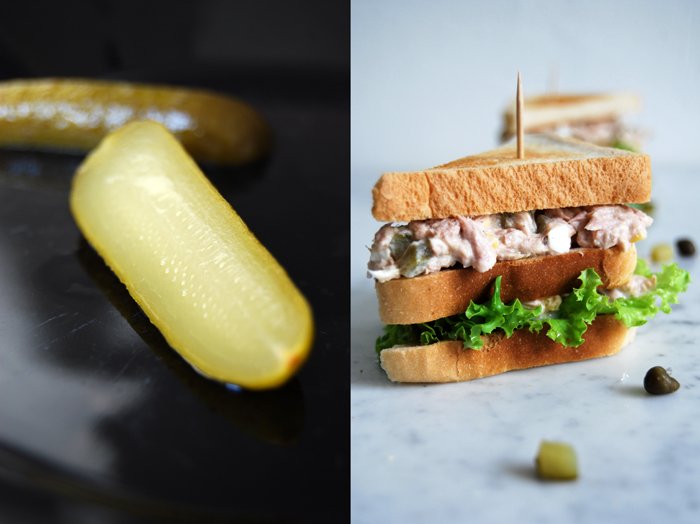
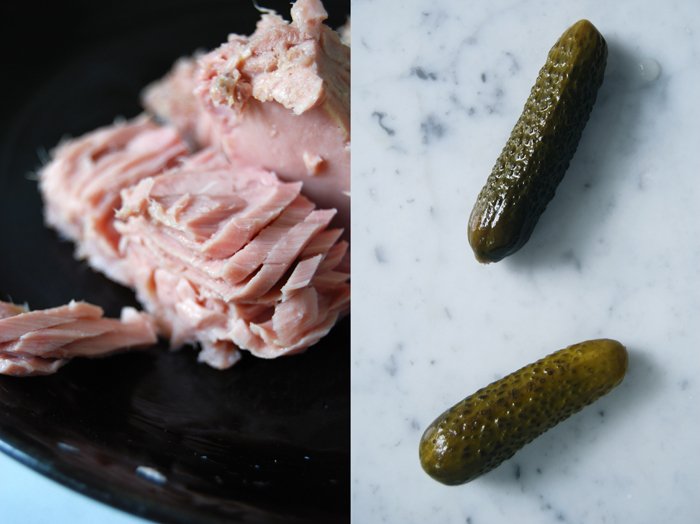
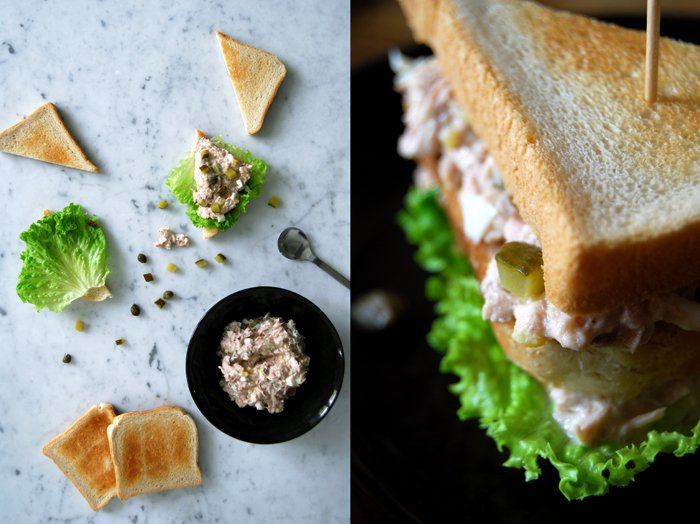
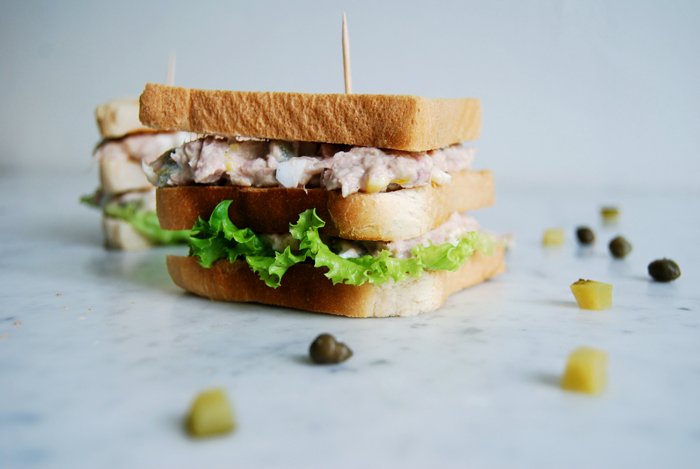
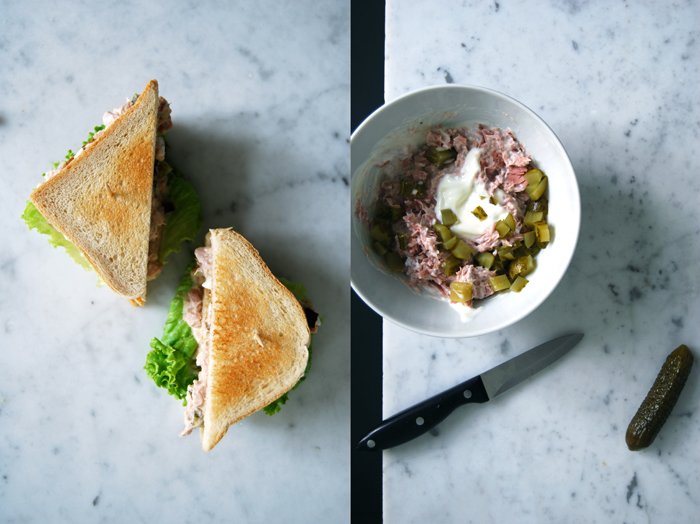
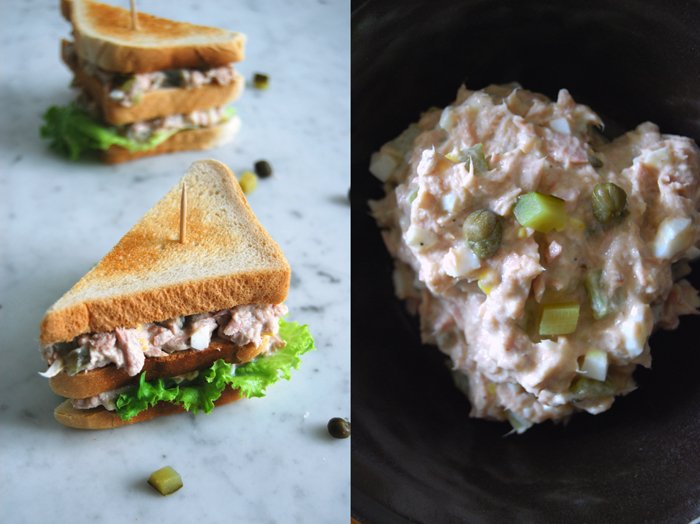
Tuna Club Sandwich and the advantages of old fashioned traveling

When I visit my mother I usually take the train as I prefer to cross the country on the ground rather than in the air. I like this old fashioned, slow kind of traveling, when you see the different landscapes passing by, the busy train stations, cities and villages flying passed your window. You really feel the distance and enjoy the changes instead of just getting it done.
My choice of transportation has another advantage. Before I jump on my train back home, my mother and I follow one of our many traditions, this one started many years ago. We have a cappuccino, a glass of wine or champagne and a little snack at an elegant hotel right opposite the city's famous, nearly 800 year old cathedral. Most of the time we sit right next to the windows of the hotel's old fashioned bistro, always amazed by the sight of the imposing gothic building which seems to grow right into the sky. Sometimes we sit at the bar, on leather covered bar stools, surrounded by a couple strangers reading newspapers, served by waiters who are as elegant as the women and gentlemen sitting at the small tables quietly talking. It's as if time stops at this place and I always loved it for this reason!
We enjoy our drinks and our last hour together before we go separate ways again. To feed my constant hunger I usually eat a snack as old as the hotel, a club sandwich. The earliest written proof of this sandwich's existence is from 1899, the hotel opened in 1857 and the current building was completed in 1893. The classic recipe for a club sandwich is made with turkey, bacon, lettuce, tomato and mayonnaise. Today I will share my club sandwich variation filled with a tuna dip mixed with gherkin, egg, capers, tomato paste and mustard, another one of my mother's recipes.
Unfortunately our favourite hotel is closed for renovations at the moment and we're still waiting impatiently for the reopening!
Tuna Club Sandwich
For 4 club sandwiches with 2 layers of tuna dip you need
white bread, toasted, cut in half, 12 slices
green lettuce 4 small leaves
For the tuna dip
tinned tuna in water, drained well (it's best to squeeze the water out), 185g / 6.5 ounces
organic egg, hardboiled and finely chopped, 1
gherkins, finely chopped, 2
capers, finely chopped, 7-10
yoghurt 7 tablespoons
olive oil 1 tablespoon
freshly squeezed lemon juice 1 teaspoon
liquid from the gherkins 1 teaspoon
mustard to taste
tomato paste to taste
salt and black pepper
Mix the ingredients for the dip with a fork and adjust the flavours to taste. Lay a leaf of lettuce on half a slice of toasted bread, spread with tuna dip, put another slice of bread on top covered with tuna dip and a final layer of bread, fix with a tooth pick.

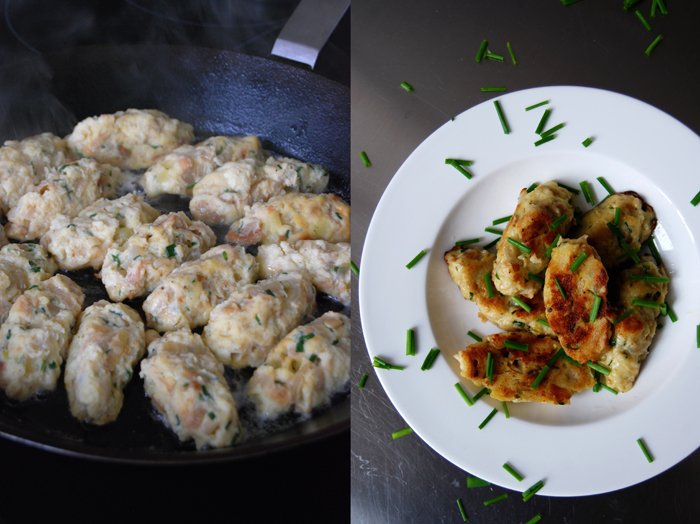
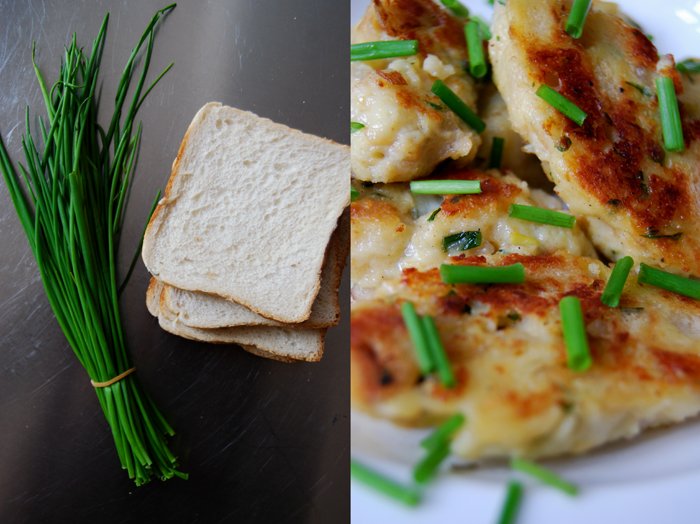
Tyrolean Cheese and Bread Dumplings
A traditional Tyrolean dumpling is one of the nicest things that can happen to white bread! Mixed with eggs and milk, enhanced with spices, herbs or bacon and finally poached in salted water, the bread turns into delicious little dumplings. Together with roast meat they are the ultimate mountain dish, their spongy texture is perfect to soak up the juices and gravy. They are usually cooked in big batches so that the leftovers can be sliced and fried in butter till golden and crisp.
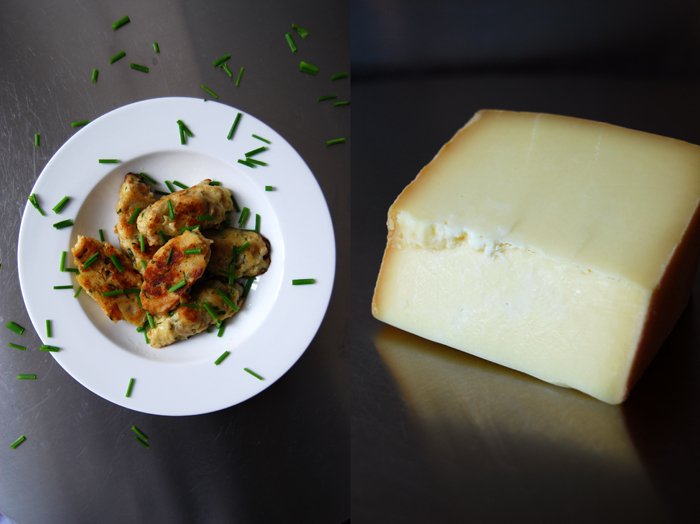
Sometimes I just skip the first meal, the meat and the gravy and I fry the dumplings right away, filled with aromatic cheese like a strong, ripe mountain cheese, a Tyrolean grey cheese or Swiss raclette. You could also mix all the cheese leftovers which you find in your fridge, I do that sometimes and it can create some interesting results. This time I went for a ripe Swiss cheese, strong without being overpowering and it melted into the bread perfectly. I didn't wait until the next day to fry them, I just let the cooked dumplings dry on a wire rack for about half an hour before I threw them in hot butter and oil. Sometimes, the leftover meal is at least as good as the main!
Tyrolean Cheese and Bread Dumplings
For 3-4 people you need
white bread or buns, cut into 1 x 1cm / 1/2 x 1/2" cubes, 350g / 12.5 ounces
milk 250ml / 8.5 ounces
organic eggs 4
plain flour 130g / 4.5 ounces plus more if the mixture is too moist
salt 2 teaspoons
hard mountain cheese (like Appenzeller, Gruyère or Raclette), finely chopped, 100g / 3.5 ounces
medium sized onion, finely chopped, 1
butter for frying
olive oil for frying
salt and black pepper
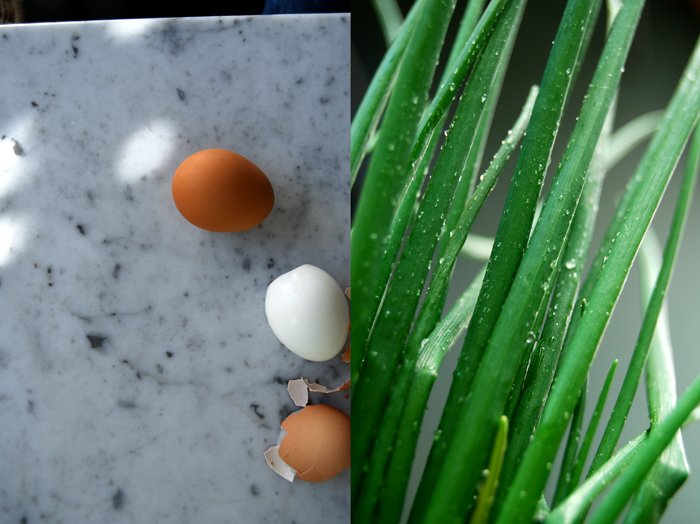
chives, snipped, a small bunch
In a large pot, bring lots of salted water to a boil.
Fry the onion in a little butter for a few minutes till golden and soft. In a large bowl, mix the bread, fried onions, cheese and chives, leave a few tablespoons for topping. Whisk the milk with the eggs, salt and pepper and pour over the bread. Add the flour, mix with a spoon or your hands. The mixture will be sticky but shouldn't be runny, the dumplings should keep their shape. Add a little more flour if it's too soft. Fill a little bowl with water, wet your clean fingers and form the dumplings into long egg shapes (you need around a heaped tablespoon of the mixture). If you wet you fingers once in a while the mixture won't stick to your hands and it will be easier to form the dumplings.
Simmer the dumplings, in batches on a medium-low heat for about 12 minutes. Take one out with a slotted ladle to check if they are done. Let them dry and cool on a wire rack before you cut them in half (lengthwise) and fry them in a splash of olive oil and around 2 tablespoons of butter on medium temperature till golden brown and crisp on both sides. Season with salt and pepper to taste and sprinkle with chives.

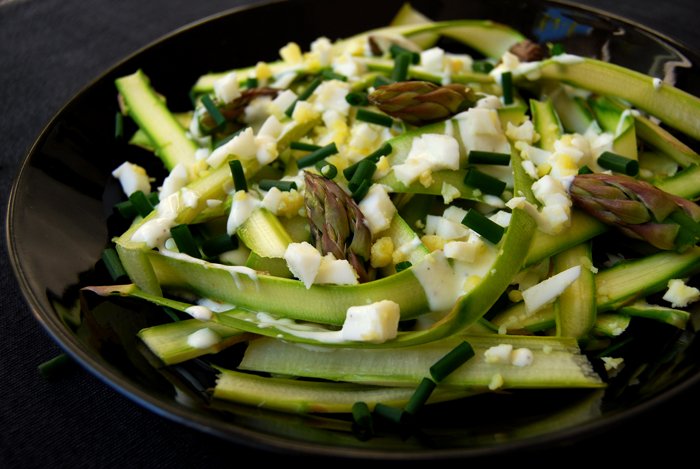
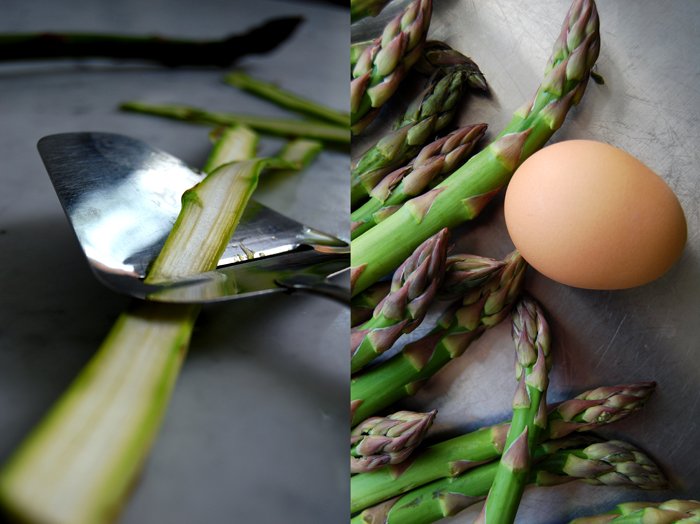
Green Asparagus with my Egg and Lemon Yoghurt Dressing
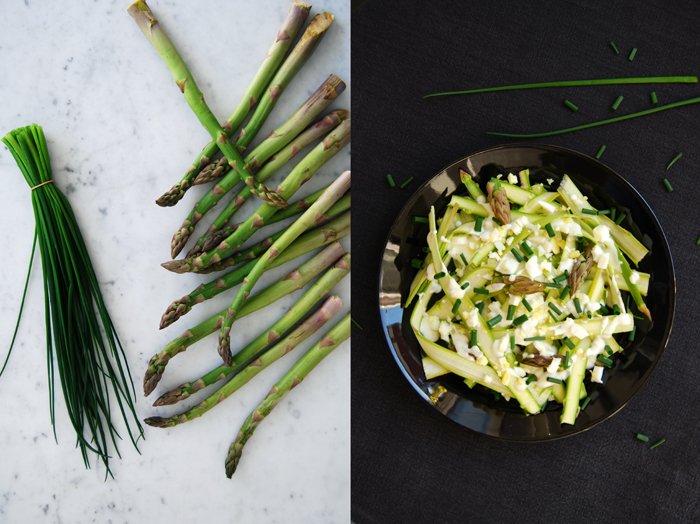
Here is another variation on my raw green asparagus salad, I enjoyed it so much that I tried a few others since I wrote about it on the blog last month. This time I mixed the crunchy vegetable with boiled egg crumbles, chives and a sweet and sour creamy dressing. After my Mediterranean style salad with cherry tomatoes and parmesan I felt like a fresh and Nordic combination. I sliced the green stems thinly with my cheese slicer, they curled up around the eggy crumbles and mixed well with the thick and creamy dressing.
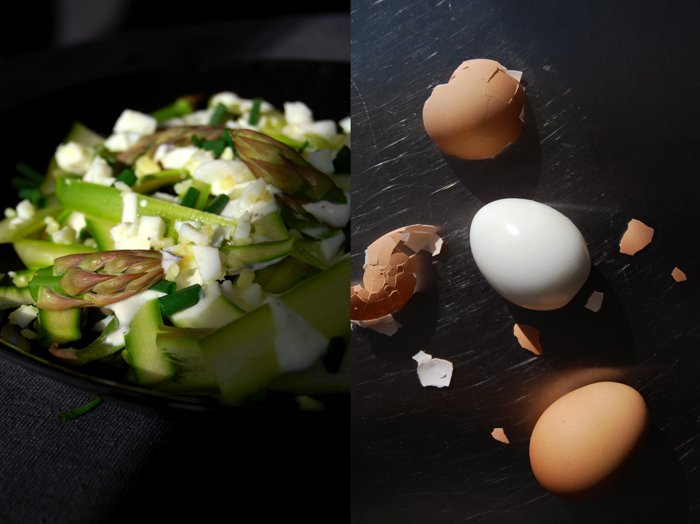
As a starter for 4 or a lunch for 2, you need 500g / 1 pound of raw green asparagus (the woody bottom part cut off), rinsed and thinly sliced (lengthwise). For the dressing I whisked 3 heaped tablespoons of yoghurt, with 3 tablespoons of heavy cream and 2 teaspoons of lemon juice but you should adjust the ratio of milky and sour to your taste. Seasoned with salt, pepper and 1/4 teaspoon of sugar, I dolloped it on the asparagus and finished it off with 2 hardboiled eggs, chopped and crumbled and a small bunch of chives, snipped on top.
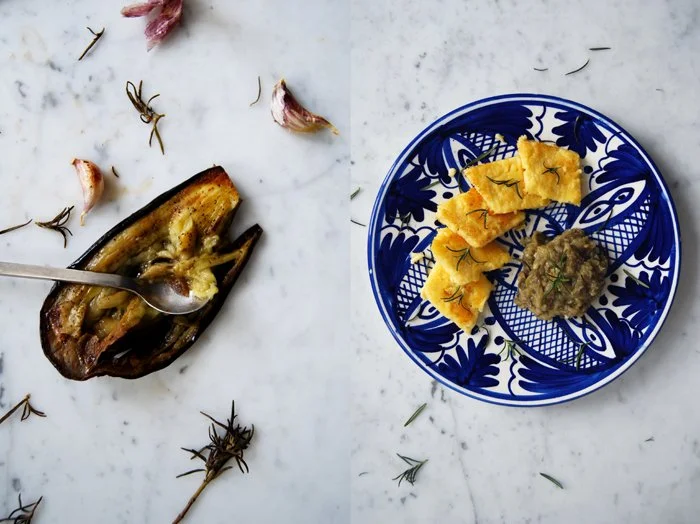
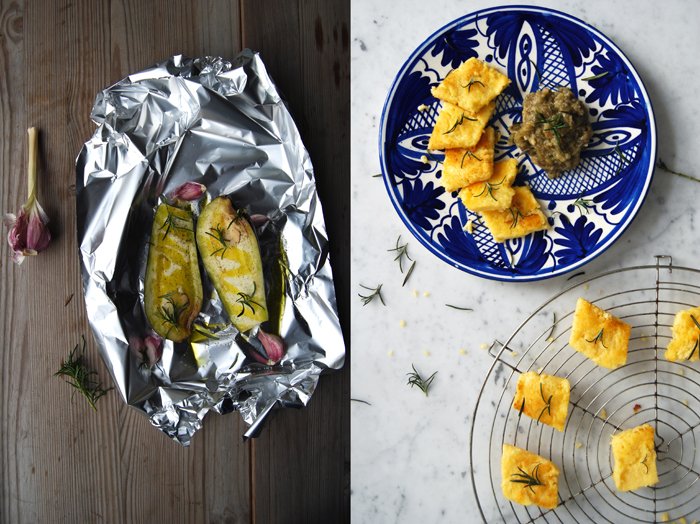
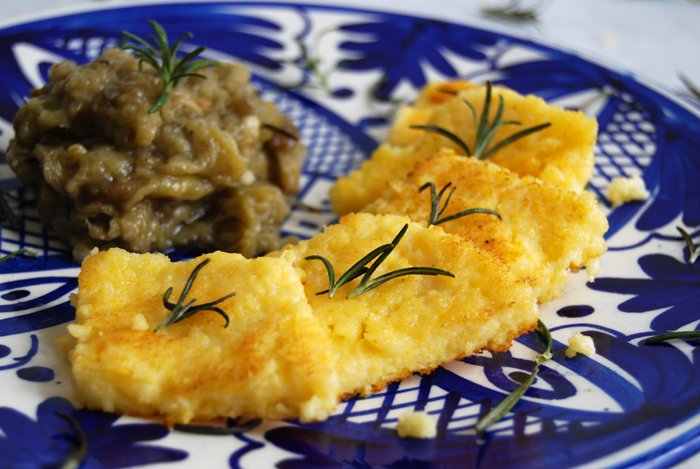
Baked Aubergine Mousse with Rosemary and golden Polenta Slices

This pale aubergine mousse isn't a beauty but its taste and smooth texture make up for it! Something changes in the purple fruit's flavour when it has been cooking in the oven. If you fry it in a pan or cook it in a stew it's nice but only oven baking manages to extract the aubergine's finer qualities. Sliced, grilled and filled like my aubergine rolls or baked in foil which turns the aubergine into a soft mousse. Both recipes leave no doubt as to why aubergines are so popular in Mediterranean cooking!
Baking aubergines al Cartoccio together with spices and herbs allows them to become infused with lots of different flavours. The spongey flesh, its soft texture is perfect to absorb tasty liquids and aromatic steam which is why they are also know to soak up so much olive oil! Rosemary was my herb of choice this time which I also used for the golden fried polenta slices. I'm a big fan of this yellow corn, either turned into a thick purée and mixed with gravy and meat or fried, buttery and crisp.
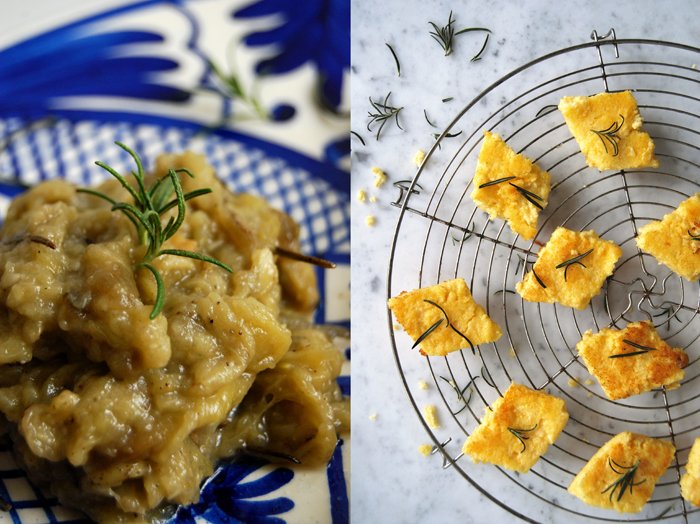
Baked Aubergine Mousse with Rosemary and golden Polenta Slices
For 2-3 people you need
aubergine, cut in half, 1
garlic, 4 cloves in their skin
rosemary, the needles of 3-4 sprigs
olive oil 2 tablespoons
salt and pepper
Set the oven to 200°C / 390°F.
Place the aubergine on a big piece of aluminum foil, sprinkle with olive oil and some rosemary and season with salt and pepper. Turn the fruit's cut side down, add some more rosemary and the garlic and close the pouch. Bake on a baking sheet for about 40 minutes till soft. Check if the flesh is soft and scrape it out with a spoon. Mix in a bowl together with the soft roasted garlic, some of the roasted rosemary and season with salt and pepper, mash with a fork.
For the polenta
polenta 120g / 4 ounces
water 250ml / 8.5 ounces, plus around 100ml / 3.5 ounces for cooking
milk 250ml / 8.5 ounces
salt 1 teaspoon
olive oil 2 tablespoons plus more to grease the baking dish
butter for frying 3-5 tablespoons
rosemary, the needles of 2 sprigs
In a sauce pan, heat the water and milk, add the salt and bring to a boil. Take the pan off the heat, add the olive oil and polenta and whisk. Turn down the heat to the lowest temperature and put the pan back on. Cook the polenta for 10 minutes mixing and adding more water once in a while.
Grease a 28 x 20cm / 11 x 8" baking dish with olive oil. Pour the polenta into the baking dish, let it cool for around 10 minutes. When the polenta is cold and a bit hard, flip the baking dish gently around, either on cling film or directly on your working surface, mine is made of marble and it worked fine. Cut the polenta into diamond shapes and fry in hot butter together with the rosemary on both sides, just for a couple minutes till golden.

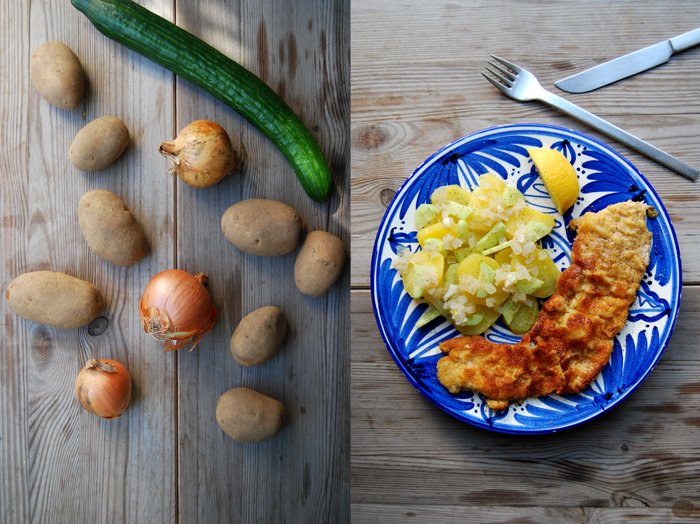
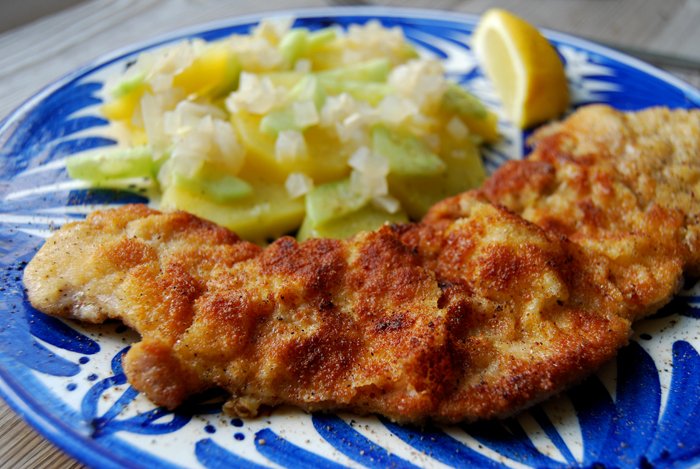
The secret to the perfect Schnitzel and a light Swabian Potato Salad
Thin, juicy and tender, with a golden crust, crisp and light, that's what a Schnitzel should be and it's easier to achieve than you may think! You just have to follow a few rules and you'll be rewarded with a delicious breaded cutlet on your plate.
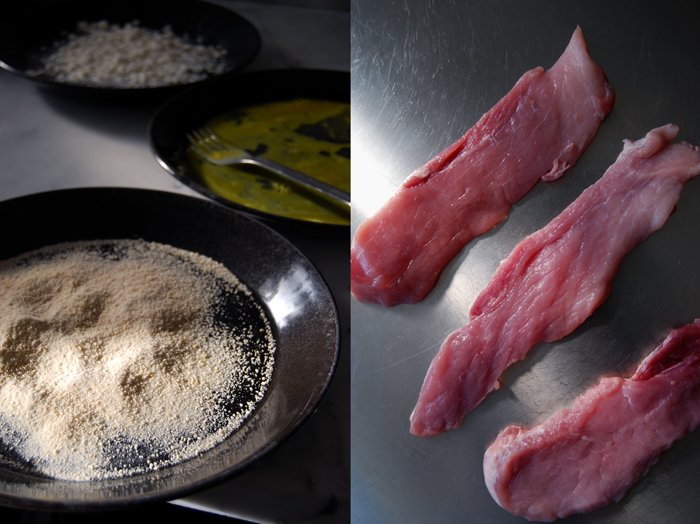
First and foremost, you need good quality meat, fresh and thinly cut, about 4mm / 1/4" thin. Schnitzel have to fry in a mixture of oil and butter or lard which has to stay hot throughout, otherwise the breading will soak the oil. Try to avoid cutlets which are too thick as they will take too long to get done, they just turn dry and tough. If your cut of meat is too thick, you could also cut it in half yourself and open it like a butterfly. For a more tender texture you should pound the meat lightly with a meat tenderizer or the back of your fist. You can either use pork which is very popular or veal, which is used for traditional Wiener (Viennese) Schnitzel. It's a bit more expensive and I like both.
The breading is made in three steps, first you have to turn the meat in flour, then in lightly beaten egg followed by breadcrumbs. The fried crust should be crisp, thin and light, the breading shouldn't stick to the meat but form light waves around the Schnitzel when it has been fried.
To fully enjoy a Schnitzel and its great crust, I prefer to eat it without a sauce, just salt and pepper and some fresh lemon juice drizzled on top. It's a hearty meal, but not as heavy as the cliché of German food suggests, to keep it light I serve a traditional Swabian potato salad on the side. The sweet dressing is made of lots of finely chopped onions shortly cooked in white Balsamico vinegar and water. I just add some crunchy cucumber and a little olive oil, salt and pepper to the salad. My step father is from Swabia in the South of Germany and he added this salad to our family recipes which is loved so passionately by all of us that we regularly fight over the last bits left in the bowl!
Schnitzel with Swabian Potato Salad
For 4 people you need
For the Schnitzel
cutlets, pork or veal, 4mm / 1/4" thin, lightly pounded, 4 (around 600g / 21 ounces)
plain flour, for the breading
organic eggs, lightly beaten, 2, for the breading
dry breadcrumbs, for the breading
vegetable oil for frying
butter for frying 5 tablespoons plus more depending on the size of the pan
lemon wedges 4, for serving
In a large heavy pan, heat a generous splash of oil and 2 tablespoons of butter over a high temperature. The bottom of the pan should be covered in fat and allow the meat to swim. I fry 2-3 Schnitzel in my pan at the same time but depending on your pan you may have to fry less.
Prepare 3 big and deep plates, fill one with the egg, the other with flour and the last with breadcrumbs. Lightly dust and turn the meat in the flour, turn it in the egg and then quickly in the breadcrumbs until covered. You have to work quick now as you have to fry the Schnitzel and prepare the other cutlets at the same time. Put the breaded meat in the hot pan immediately and fry for 1 - 2 minutes on each side until golden brown. Take the meat out, season with salt and pepper and set aside. Add more oil and butter to the pan and let it heat before you fry another batch of Schnitzel. You may have to add some more butter in between flipping the meat as well. Serve with lemon wedges and Swabian potato salad.
For the Swabian potato salad
potatoes, peeled, cooked and thickly sliced, 1 kg / 2 pounds
cucumber, cut in half and thinly sliced, 1
onions, finely chopped, 160g / 6 ounces
white balsamic or white wine vinegar 100ml / 3.5 ounces
water 100ml / 3.5 ounces
olive oil 2 tablespoons
salt 1 teaspoon
black pepper
In a sauce pan, bring the onions, vinegar and water to a boil. Cook for 3 minutes on medium heat. Take it off the heat, close with a lid and let it sit for 5 minutes. In a large bowl, gently mix the potatoes, cucumber, onions in vinegar, olive oil, salt and pepper, season to taste.
The salad tastes great the next day if you manage to keep some leftovers.


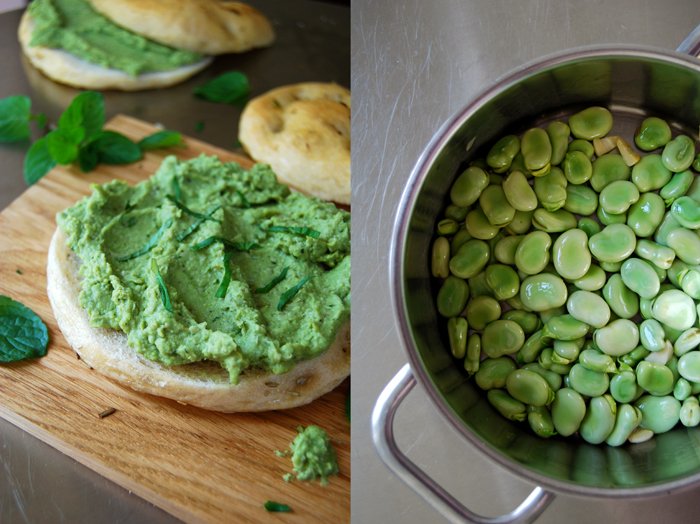
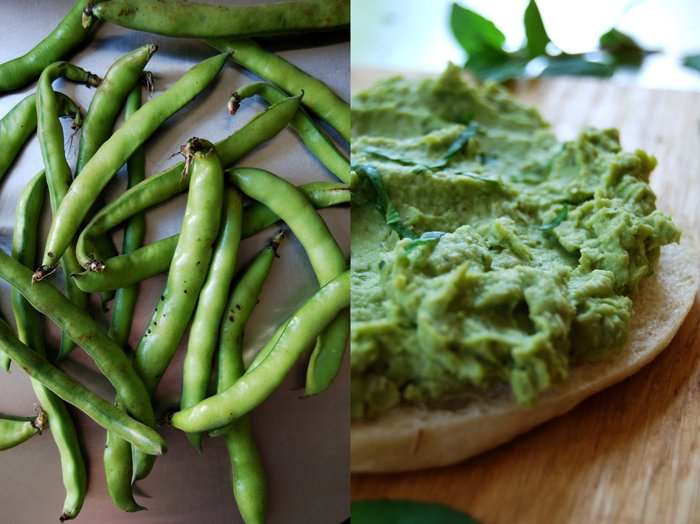
Fava Bean Pesto with Mint on a Sandwich
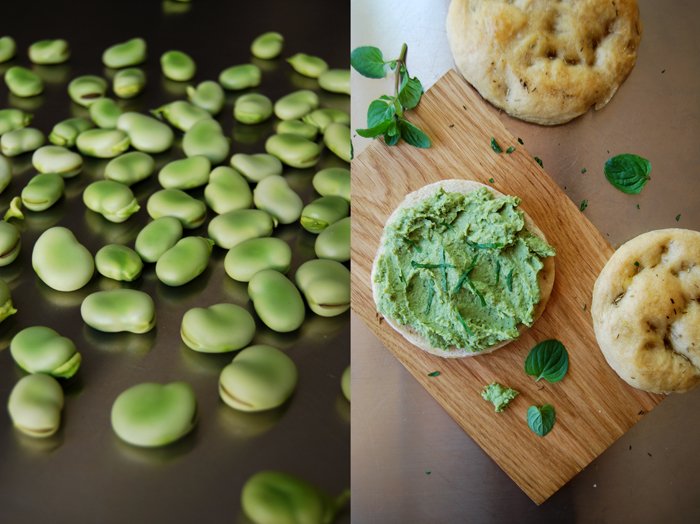
Finally, fava beans are back in season and just peeling them is a sensual experience! These beans are crunchy beauties wrapped in silky transparent shells, protected by the velvety inside of their fleshy pods. To peel them, smell them and finally taste them is a spring highlight to me! I know it sounds a bit overwhelming, but spring vegetables have this effect on me. Luckily, the preparations have a meditative side effect as you have to buy lots of beans to end up with just a handful of this green treasure, but the effort is worth it. The firm texture and fresh green taste stands for everything I love about spring!
Usually I peel the beans out of the shells to achieve a finer taste but for my pesto I skipped this part. The beans were so young, the skin so tender and soft that I could keep them in their shell which also has a nutritional value.
This time, I made a pesto out of my fava beans, cooked only 5 minutes and mixed with garlic, freshly squeezed lemon juice, olive oil and fresh aromatic mint. You could mix it with pasta and some grated Pecorino but I spread it on a sandwich. I covered my juicy focaccia bun with a thick layer which I sprinkled with even more chopped mint leaves.

Fava Bean Pesto and Mint Sandwich
For 4 sandwiches you need
focaccia or soft buns 4 (you could also use thick slices of ciabatta bread)
fava / broad beans, peeled out of the pods, in their shells, 900g / 2 pounds for around 260g / 9 ounces of peeled beans
garlic, quartered, 1 clove
water 100ml / 3.5 ounces
freshly squeezed lemon juice 3 teaspoons
olive oil 1 tablespoon plus more for frying
fresh mint, chopped, 1/2 - 1 teaspoon
salt and black pepper
In a sauce pan, fry the garlic in a little oil on medium heat for 1 minute and mix in the beans. Add the water, season with salt and pepper, close with a lid and simmer for 5 minutes. With a slotted ladle (you will need some of the liquid), take the beans and garlic out of the pan and purée in a blender (or with a stick mixer) together with 1 tablespoon of the liquid from the beans, the lemon juice ,1 tablespoon of olive oil and 1/2 teaspoon of mint. Season with salt, pepper and mint to taste and spread voluptuously on your sandwich.


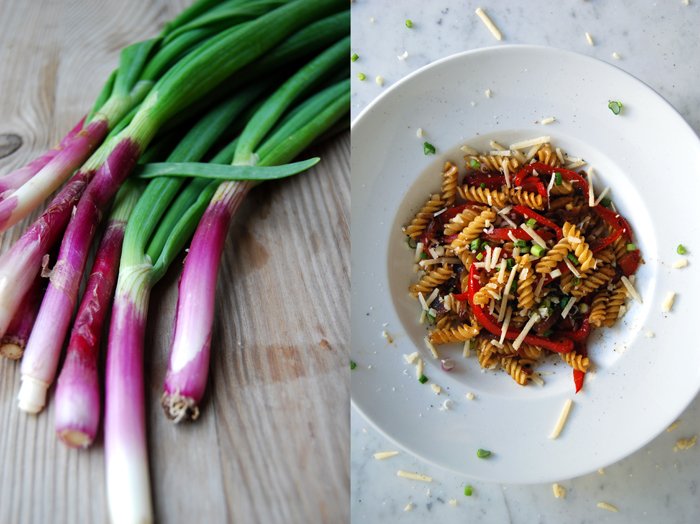
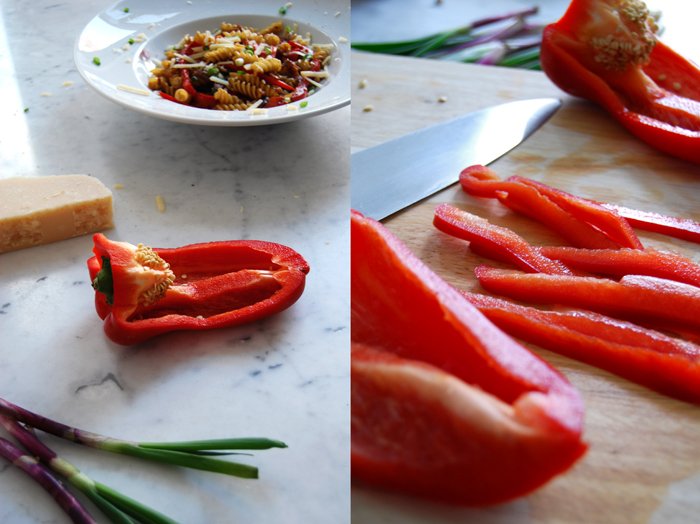
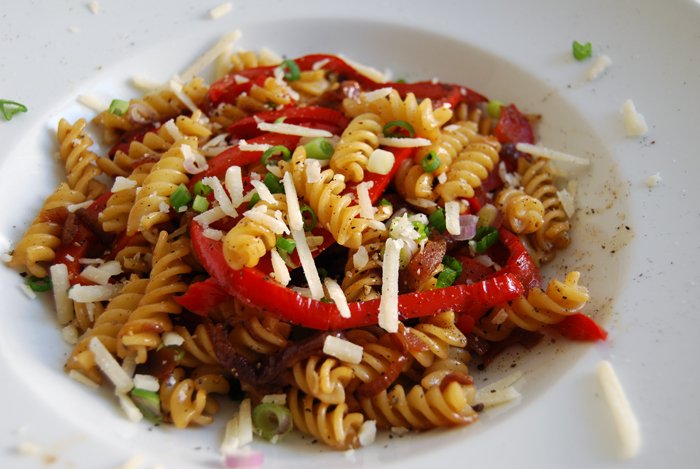
Fusilli with sweet Bell Pepper and Red Onions
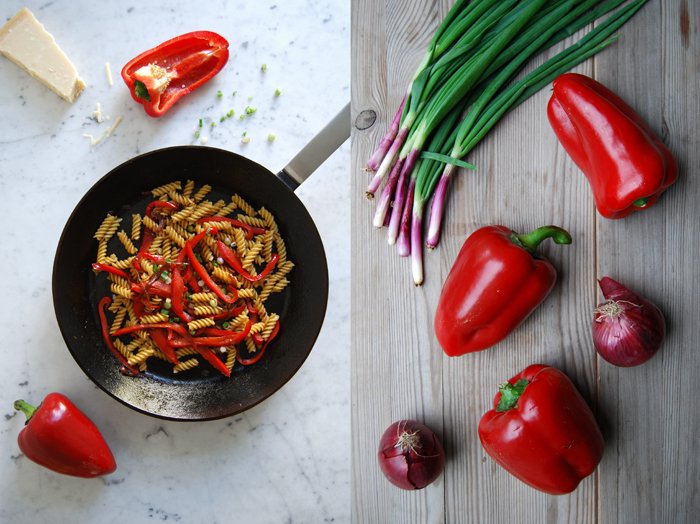
This pasta dish is one for those nights when I just want to get cosy on the sofa with a plate of hot pasta on my lap and relax! It's quick to prepare, it's hearty but still light and all it requires is usually to be found in my kitchen anyway, pasta (for this meal I prefer fusilli as it mixes well with the long strips of the vegetables), red bell pepper, red onions or shallots, garlic and parmesan. This time I added finely chopped spring onions, it's not necessary but the added spiciness was a nice contrast to the sweet flavours. When I fry the bell pepper and onions and they start to brown I deglaze them with white wine or vermouth or I just use the water from the pasta. The liquid helps the juices and roasted bits and pieces to combine to a thick sauce, perfect to glaze the spiral pasta.
For 2, I cooked 200g / 7 ounces of fusilli in lots of salted water al dente and kept 75ml / 2.5 ounces of the water used to cook the pasta. I always start frying the onions and cooking the pasta at the same time which allows me to take out the water when I need it. I cut 1 big red onion in half and sliced it finely, likewise the bell pepper (about 3mm / 0.1 "). In a large heavy pan, I fried the onions in a splash of olive oil on medium heat for about 5 minutes till golden and soft and added the slices of bell pepper. After a few minutes of frying and tossing I deglazed the vegetables with a splash of vermouth which you could replace with white wine, preferably a sweeter one, and poured the water I kept from the pasta on top. I immediately covered it with a big lid, let it simmer for a few minutes until soft and seasoned it with salt and pepper. Mixed with the pasta I filled everything in big plates and sprinkled it with thinly sliced spring onions and freshly grated Parmesan, time to get cosy!
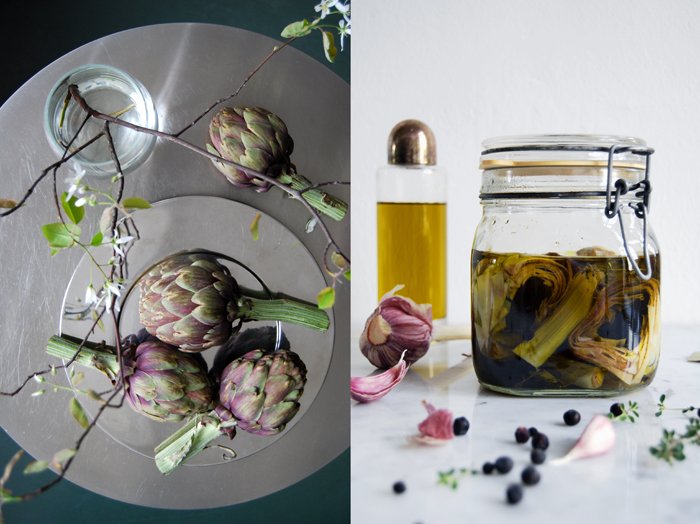
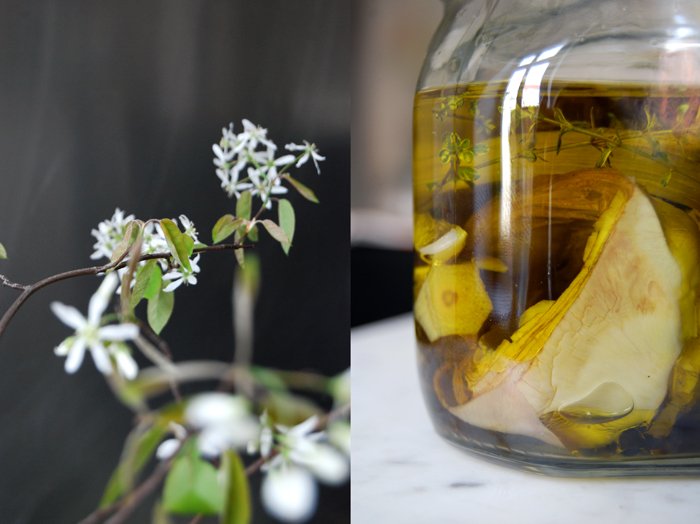
Preserved Artichoke Hearts with Spices and Thyme

I've been wanting to marinate artichokes for so long, ever since I had my own kitchen in fact, which is quite a while ago. I took my time and over the years I discovered the advantages of a pantry packed with jars of homemade jams, chutneys, preserved lemons and fruits but now I want to see some artichoke hearts cooked in wine and vinegar, with lots of spices on my shelves as well. I love to fill this space with all the jars that make my favourite food so handy and always available, I don't have to worry about industrial preservatives which are banned in my kitchen.
The process of preserving has a wonderful side effect, it's so relaxing! I understand why my grandmother used to have a room in her cellar packed to the ceiling with preserving jars and bottles, cherries, pears and plums, German apple purée, gherkin, jams, so much that even my big family didn't manage to eat everything that she produced. I imagine that she enjoyed preserving food as much as I do now, standing peacefully in her kitchen, keeping an eye on the bubbling and steaming food in the pots. When I'm done with cooking and have filled my culinary products into the jars and line them up on a table, I feel so satisfied and rewarded for the work I've done, it's truly therapeutical!
Artichoke hearts preserved in olive oil are great on bread sprinkled with parsley, on crostini or pizza, mixed with pasta or in a risotto. You could also fry them together with your omelet, mix them into a Mediterranean salad or enjoy them pure on a summery antipasti platter.
Preserved Artichokes Hearts
For 6 artichoke hearts preserved in an 800ml jar you need
baby artichokes 6
water 900ml
white wine 350ml
white wine vinegar 150ml
garlic, quartered, 2 cloves
bay leaves 2
black peppercorns 8
juniper berries 5
thyme 8 small sprigs
salt 1 teaspoon
lemon 1/2, to prevent the artichokes from turning brown
olive oil to fill the preserving jar
spirit to sterilise the rim of the jar
Peel the artichoke stems, if it isn't soft but woody you have to cut it off. Pluck the hard outer leaves and cut the artichoke's tip off (1/3 - 1/2 of the artichoke), just the soft parts of the leaves should be left. Loosen the hairy choke with a knife and scoop it out with a spoon. Keep the prepared artichoke heart in a bowl of cold water and the juice of half a lemon to avoid it discolouring while you're finishing the rest.
In a large pot, bring all the ingredients to a boil, add the artichoke hearts and cook for 10 minutes.
Sterilise the preserving jar in boiling water for 5 minutes. Take it out, let it dry for a few minutes and dip the rim of your jar in the spirit and wash out the lid with the alcohol as well.
Drain the artichokes and put them in the sterilised jar, fill with olive oil till covered and add some of the spices and thyme sprigs. The jar should be filled with oil to the top! Close the jar, keep in your pantry or enjoy immediately.

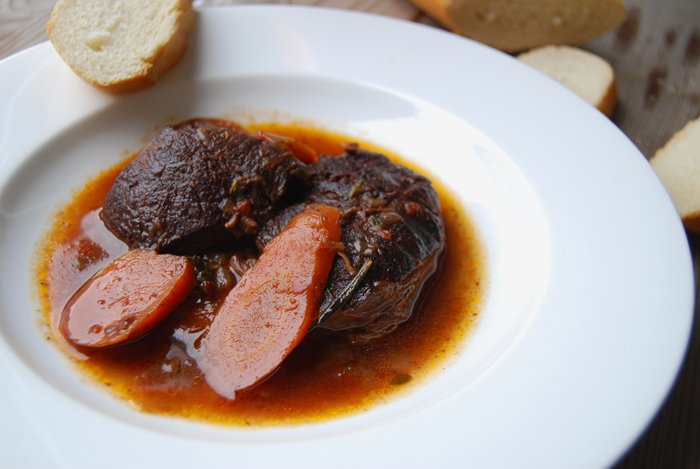
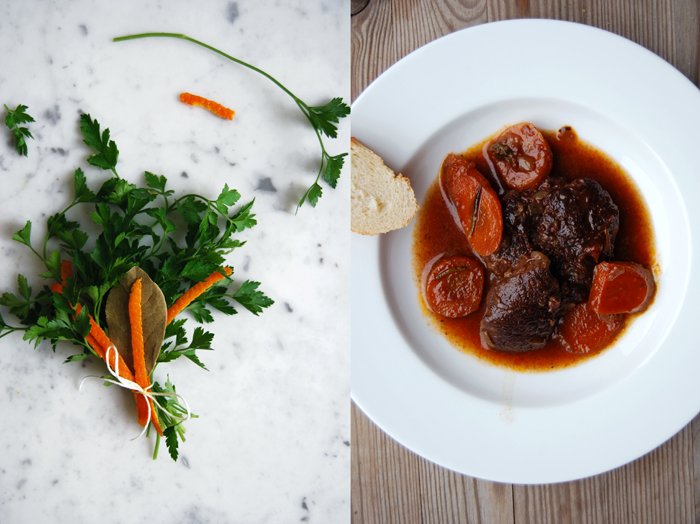
Daube de Boef Provençale, a most tender and aromatic Beef Stew
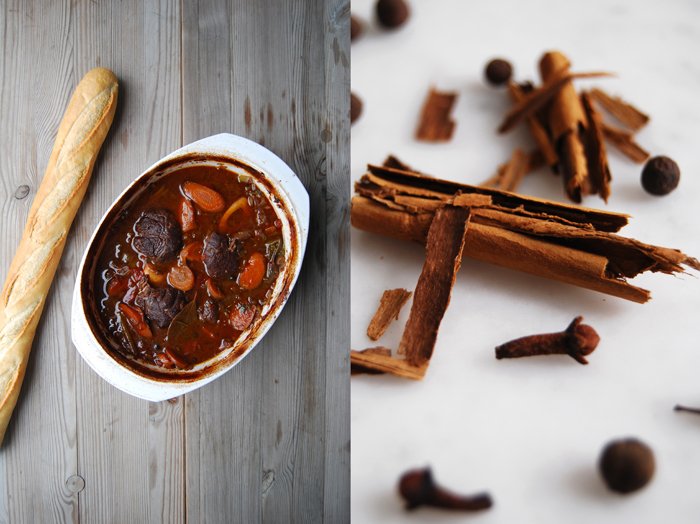
French food is on my mind! The creamy vichyssoise I wrote about yesterday put me in the mood for more treats from the French cuisine. I haven't had a stew in along time so that's first on my list. Meat braised for hours rewards your patience with the most tender and juicy meat. While it's simmering slowly (for nearly 6 hours in the case of my stew) on low temperature it soaks up all the wonderful flavours, the red wine, herbs and spices. You just put it in the oven, forget about it and take out the finished meal. I like to use beef shank for stews, gelatinous with a bit of fat, it guarantees a succulent result, not dry at all and so tender that you could easily cut it with a fork.
This stew is called a daube because in Southern France, it's traditionally made in a daubière, a clay pot with a round belly, a narrow neck and a lid with a well which is filled with water. The evaporating water causes the cooking liquids to condense inside the lid, simple physics but more importantly it makes a great stew! Unfortunately, I don't have a daubière but I found out that a casserole dish with a tight lid works just as well.
The wine, herbs and spices have a big impact on the quality and taste of a daube just as much as the right kind of meat and cooking dish. As much as I love recipes that focus on single strong flavours, I accept that a stew follows its own rule, more is more! I prepared two different bouquets garni, one with parsley, bay leaf and orange peel and the other with rosemary, sage and thyme, combining all the aromas ripening under the sun of the Provençe. My open spice box inspired me to throw in a few cloves, allspice and cinnamon as well, they mixed in perfectly with the meat's juices, the red wine, brandy, tomatoes, carrots and garlic.
I've praised the meat's tenderness already and the sauce impressed me just as much. It was so concentrated that I just had to dip a piece of baguette into the dark red juices to taste the whole spectrum of aromatic flavours united in this stew. A sip of my glass of French red wine made the Provençe experience complete!

Daube de Boef Provençale
You need a big casserole dish with a tight lid. The daube has to cook in the oven for nearly 6 hours.
For 4-5 people you need
beef shanks, with the bone, 4 slices (around 1.8kg / 4 pounds) (I didn't cut the meat into pieces, I braised the slices with the bone to keep it juicy)
carrots, sliced, 800g / 28 ounces
medium sized onions, chopped, 4
garlic, chopped, 4
brandy 150ml
strong red wine 1000ml
broth 400ml
canned tomatoes 800ml
cloves 8
allspice 14
cinnamon 1 stick
olive oil for frying
salt and pepper
For the 2 bouquets garni
bouquet garni no. 1
parsley, a small bunch
bay leaves 2
long strips of orange peel 8
Divide and bind with strings into 2 bouquets.
bouquet garni no. 2
thyme, a small bunch
rosemary 2 sprigs
sage leaves 8
Divide and bind with strings into 2 bouquets.
Set the oven to 180°C / 355°F top/ bottom heat.
In a large casserole dish, heat a splash of olive oil and fry the meat for a few seconds on both sides (in batches), season with salt and pepper and set aside. Add some more oil and fry the onions, garlic and carrots for a few minutes on medium heat. Deglaze with the brandy, add the meat and layer alternating with the vegetables, add the tomatoes, spices, broth and wine, the liquid should just cover everything. Season with salt and pepper and add the 4 bouquets garni.
Put the casserole dish in the oven. After 45 minutes, turn the temperature down to 140°C / 285°F and cook for 4-5 hours or until very tender.
When the meat is done, remove the bouquets garni and cinnamon stick and season the daube with salt and pepper to taste. Serve with baguette or cooked potatoes.


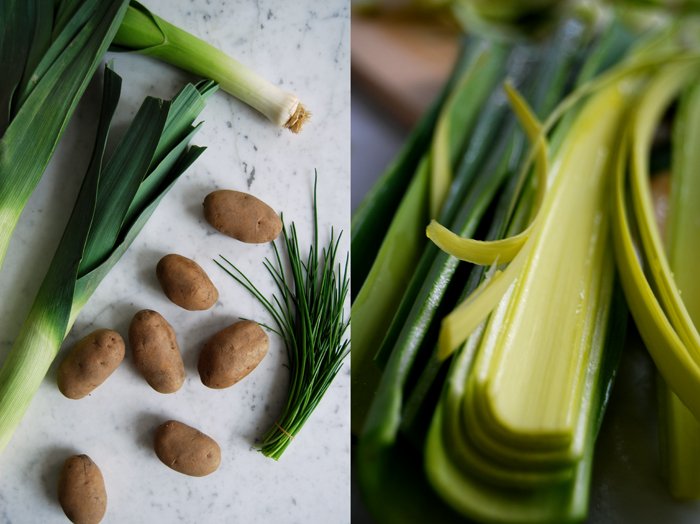
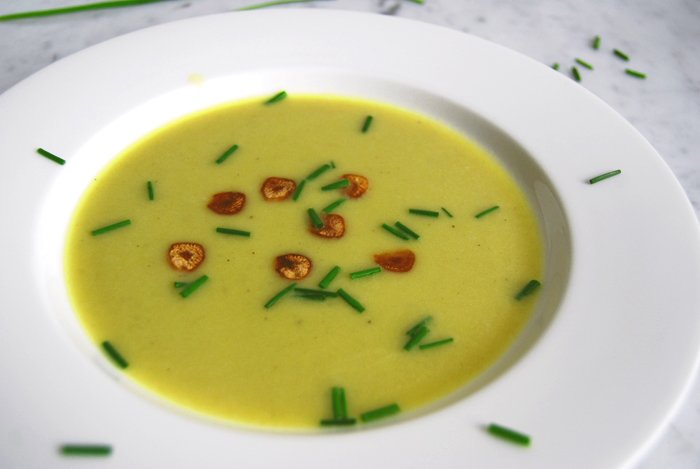
Vichyssoise with crunchy Garlic Chips
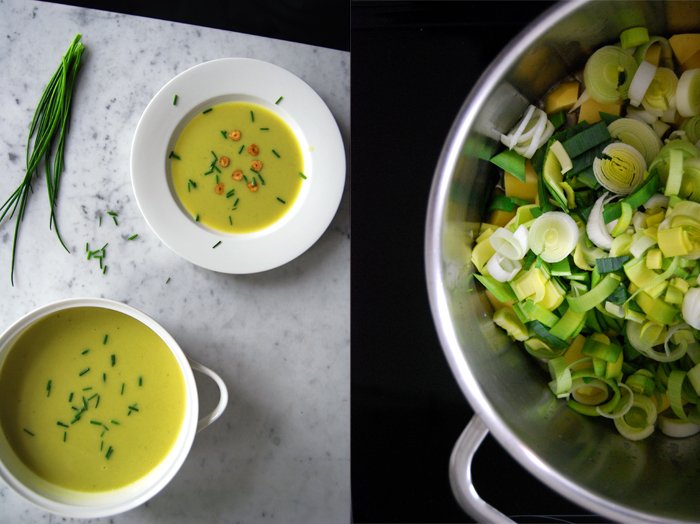
Velvet in a bowl, vichyssoise! This traditional soup is made with only a few ingredients, potatoes, leek, heavy cream and broth besides the spices which were garlic, bay leaf, salt, pepper and nutmeg in my case. There is an ongoing dispute if the recipe is a French or an American invention. Louis Diat from a French town close to Vichy who was a chef at the Ritz Carlton in New York claimed that he cooked the first vichyssoise in the early 20th century, in remembrance of his mother's and grandmother's cold potato and leek soup. The first written proof is found in 1923 in French culinary magazines which relate it to the American cooking. Either way, it's such a simple yet delicious soup and one of the first recipes I made on my own when I started cooking.
I always preferred to eat this soup warm and not cold as I'm not too fond of cold soups in general. My vichyssoise is quite leeky and light, I go easy on the cream and want the vegetable's flavours to be prominent. My addition of garlic and bay leaf is also a variation on the original recipe. That's what recipes are for, to evolve and adapt them to your own taste!
Vichyssoise with Garlic Chips
For 4 people you need
potatoes, peeled and cut into cubes, 450g / 16 ounces
leek, sliced, 350g / 12.5 ounces
vegetable or chicken broth 1300ml
heavy cream 75ml
bay leaf 1
nutmeg, freshly grated
salt and pepper (black or white, as you prefer)
butter 1 tablespoon
olive oil for frying
garlic, thinly sliced, 4 cloves, for the topping
chives, snipped, a small bunch, for the topping
In a large pot, heat the butter and a splash of olive oil and sweat the potatoes and leek for a few minutes. Add the broth and spices and simmer for 25 minutes on low heat. Take out the bay leaf and purée the soup in a blender or with a stick mixer. Whisk in the cream and bring to a boil, cook for about 5 minutes and season with salt, pepper and nutmeg to taste.
In a sauce pan, heat a splash of olive oil and fry the slices of garlic for a few seconds until golden and crisp on both sides. Don't burn them as they will taste bitter.
Either serve the soup immediately, sprinkled with the garlic chips and chives, or let it cool and chill in the fridge.

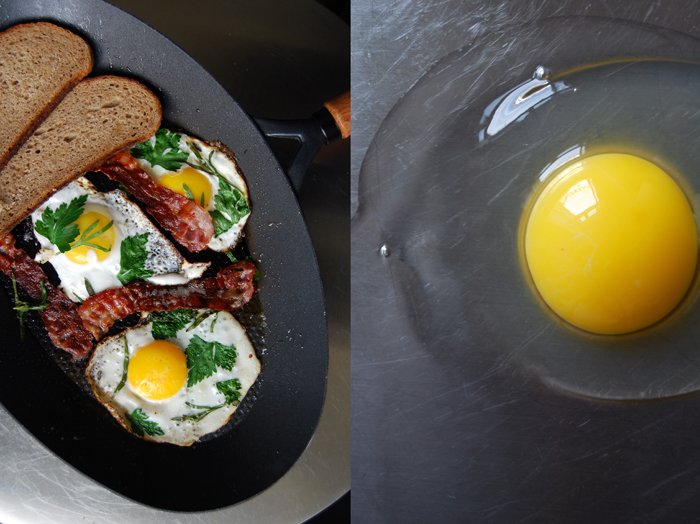
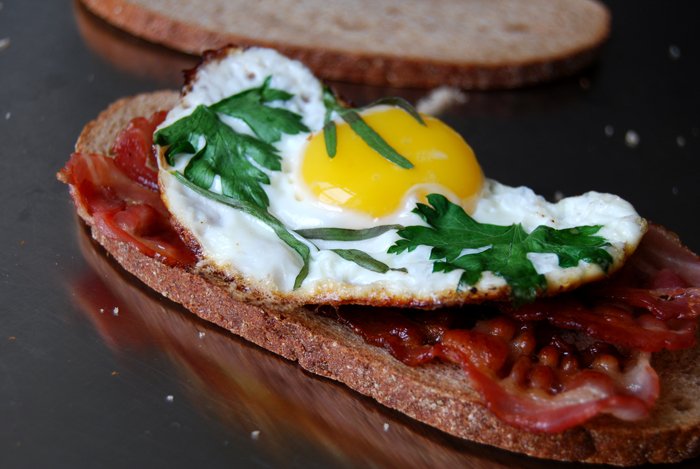
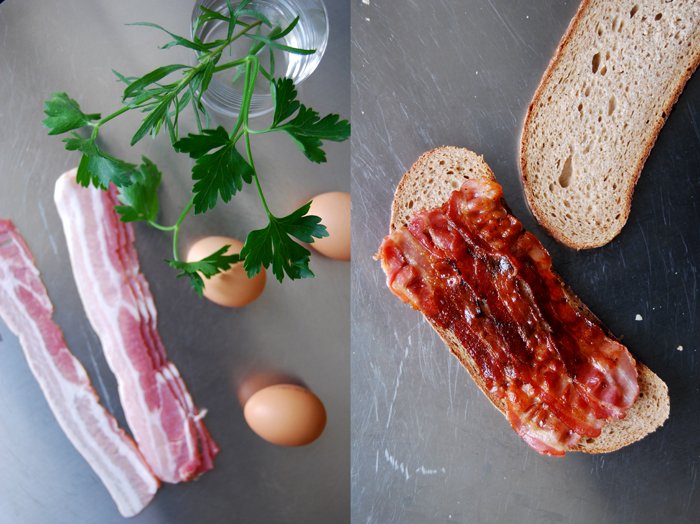
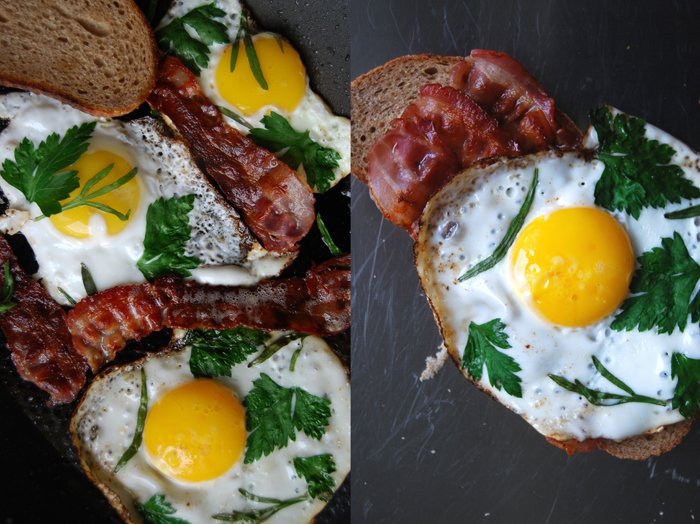
A Fried Egg and Bacon Sandwich with Tarragon and Parsley
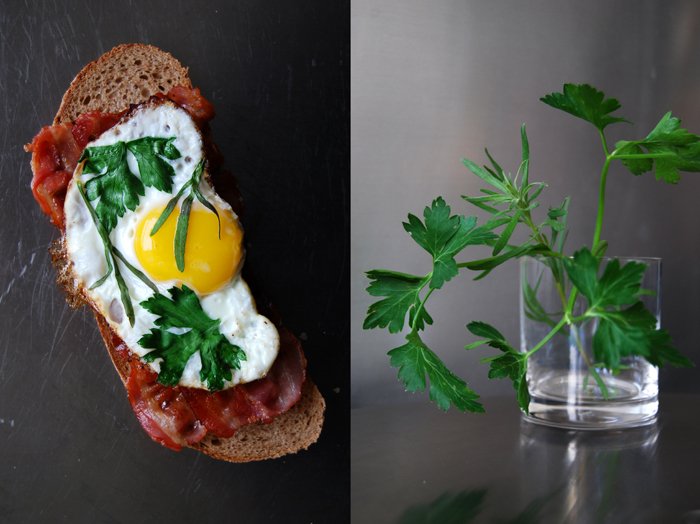
One morning we decided to "decorate" our fried eggs with fresh herbs and it became a morning classic in our kitchen. It looks really pretty and tastes even better. The variations are endless and change all the time depending on the herbs growing in our terracotta pots, and there are plenty at the moment! Usually the small plants don't survive the cold winter, the roots aren't really as protected as they should be. I tried to keep the herbs inside on my kitchen window sill during the cold season but they tend to suffer from bugs and mildew, so I gave up. I wish them the best of luck, protect them with some leaves and hope for the best. To my surprise, a fragile, skinny tarragon plant, an offshoot which I dug out of my mother's herb garden managed to bear the cold and frost and it's shining again in its recaptured bloom and beauty. I love its strong aroma which reminds me a bit of aniseed.
For my fried eggs, I picked a few of the tarragon's long leaves, about 6 slim ones for each egg, and some crunchy parsley, the Italian one with big flat leaves. The combination works well, I just went easy on the parsley, 2-3 leaves per egg were enough as it can easily be too overpowering. I fried the eggs in a little butter on medium heat in a non-stick pan, put the herbs gently on top of the liquid egg whites and yolks and covered the pan with a big lid until the whites turned solid. I kept the egg yolk soft as I wanted it to soak into the hearty bread when I cut it open. To finish off my sandwich, I fried 3 slices of bacon golden brown and crisp and put a few slices of my dark spelt bread into the pan as well. When you roast the bread in the fatty juices, just in the end for a minute or two, it becomes a bit crunchy and is infused with the meaty aroma. I didn't add any salt, just crushed black pepper, thanks to the strong bacon!

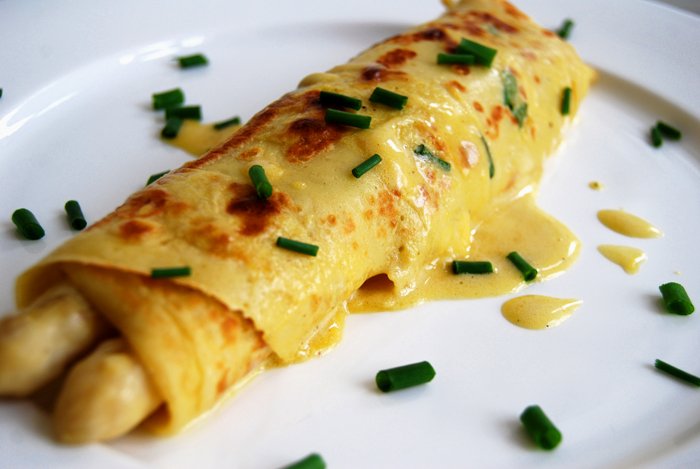
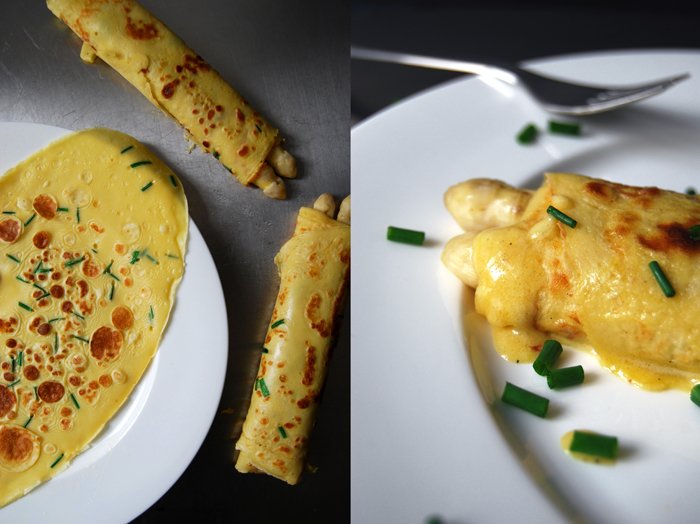
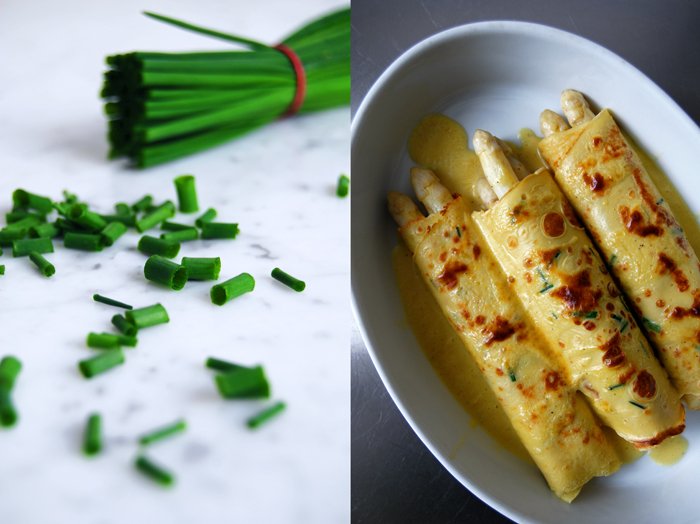
White Asparagus wrapped in Crêpes with Sauce Hollandaise
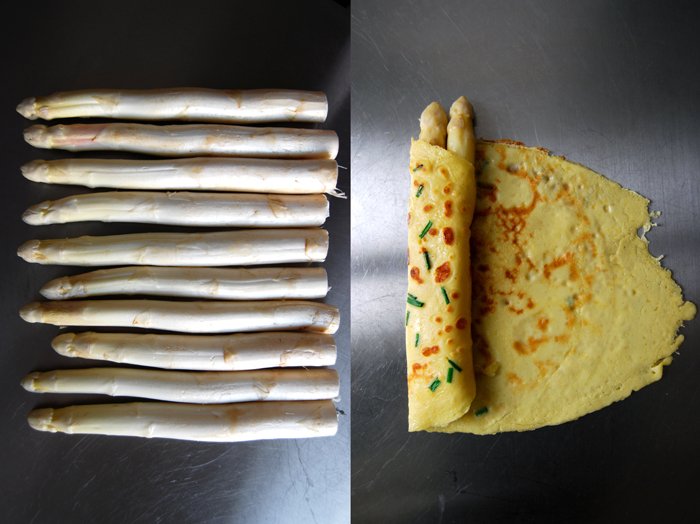
A bag full of white asparagus is laying on my kitchen top, so crunchy and fresh, that its juices start running as soon as I cut the bottoms off. Their short season which ends in late May or early June has just started. It's a delicate gem, also referred to as the royal vegetable, white gold or edible ivory. While green asparagus grows above the ground, the white shoots stay covered in soil and ripen in the dark which prevents photosynthesis, hence the white colour. This technique is called blanching in horticulture, it creates a delicate flavour and makes them tender and less bitter. Unlike their green relatives, white asparagus has to be peeled and also needs to cook a little longer, around 8 minutes to keep them al dente.
One of the most common recipes which puts the focus on the pure taste of the asparagus, is white asparagus served in brown butter with breadcrumbs and slices of cooked ham and new potatoes on the side. A very popular variation on this meal which is also my favourite, is to replace the butter with a sauce Hollandaise, homemade of course as it's not as complicated as one may fear. The taste of this sauce, buttery, eggy, enhanced with Dijon mustard and lemon brings the best out of this royal vegetable. There is some helpful information put together on Food52 for dressings which demand emulsification like sauce Hollandaise or aioli.
I wrapped my first white asparagus of the year in thin crêpes with chives and baked them with a thick and fluffy sauce Hollandaise under the grill, just for a few minutes until it had a golden bubbly crust.

White Asparagus wrapped in Crêpes with Sauce Hollandaise
For 4 people you need
white asparagus, peeled, the bottoms cut off, 1.5kg / 3 pounds
In a large pot, cook the asparagus in plenty of salted water for about 8 minutes till al dente.
For the crêpe
organic eggs 4
milk 400ml
plain flour, sieved, 200g / 7 ounces
salt 1 teaspoon
chives, chopped, 1 bunch
Whisk or mix the ingredients for the pancakes until well combined, stir in the chives at the end. Fry the crêpes thinly in a large non-stick pan in a little butter for 1-2 minutes. They should be golden on both sides.
For the sauce Hollandaise
butter melted 120g / 4.5 ounces
organic egg yolks 4water 4 tablespoons
freshly squeezed lemon juice 2 tablespoons
Dijon mustard 2 tablespoons
salt and black pepper
In a sauce pan, whisk the egg yolks with the water, lemon juice, mustard, salt and pepper for the sauce Hollandaise till fluffy. Put the pan on a low temperature, the pot should become warm but not hot. Whisk the melted butter into the egg mixtures, adding just a tablespoon at a time and whisk well in between. If the sauce becomes too hot, take it off the heat immediately or add a little more water. When its all combined continue whisking for 1-2 minutes, off the heat if it's already thick and creamy or on the heat, but mind the temperature. Season with salt and pepper and more mustard to taste.
For the crêpe roll
Roll 2-3 asparagus in each crêpe, put the wraps flat onto a large baking dish and pour the sauce over it. Bake under the grill for a couple minutes until the sauce starts bubbling and turns a golden brown. Serve immediately.
If you don't need all of the sauce for the asparagus you can keep it in the fridge until the next day and eat it with potatoes or mixed in an omelet, both are great with chopped chives!

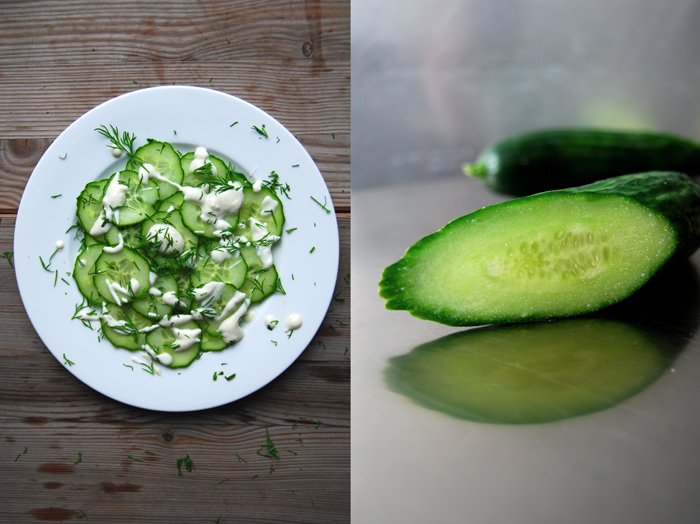
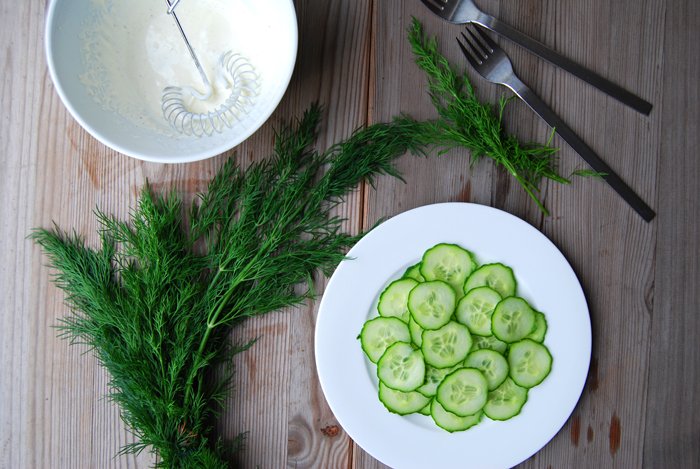
Cucumber Salad with Dill and Sour Cream Dressing
Lots of amazing food was gathered on my own and on my friend's and family's tables in the past couple days, we enjoyed some special culinary treats, had a great time, and of course ate lots of sweets, cakes and chocolate. No complaints but it's time for a break! I love to feast for days, especially together with the ones I love. Treating others and myself to good homemade food, spending time together at a long table, trying out and sharing new recipes, I need and appreciate this so much. It's like taking a break from the daily routine when time is tight and work is always waiting. These feasts caress my soul, I treasure these moments highly and most of the time they become my most beloved memories!
But each feast has its end, otherwise it wouldn't be so special. Therefore I gladly enjoy a light salad, simple and quick. It combines a lot I love about spring, juicy and tasty cucumber which is such a pleasure after months of watery winter cucumbers, fresh dill, strong and aromatic, and a smooth dressing with sour cream and lemon. For the two of us, I sliced 1 small cucumber very thinly and dolloped my milky dressing over it. I whisked 2 heaped tablespoons of sour cream with 1 tablespoon of olive oil and 2 tablespoons of heavy cream and added 1 tablespoon of freshly squeezed lemon juice, salt, pepper and a pinch of sugar. This is just a rough guideline, adjust the ingredients to your own taste, or add some more herbs like chives or parsley or some other vegetables like cherry tomatoes or lettuce. I was happy with my puristic combination, just cucumber, the dressing nicely balanced between sweet, sour and milky, and some freshly chopped dill sprinkled on top.


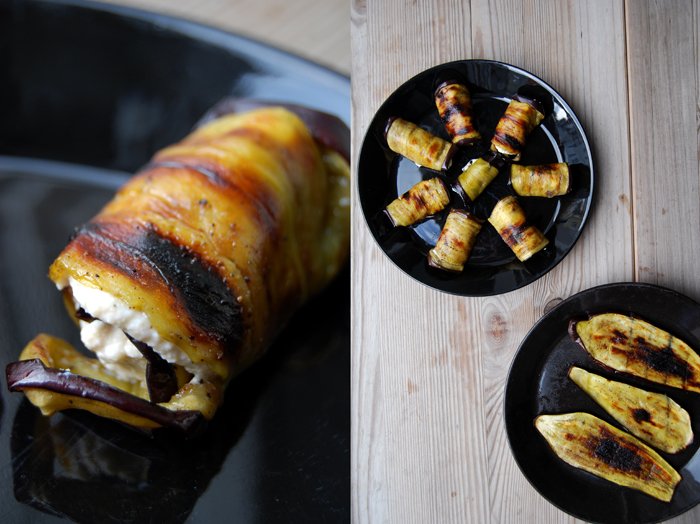
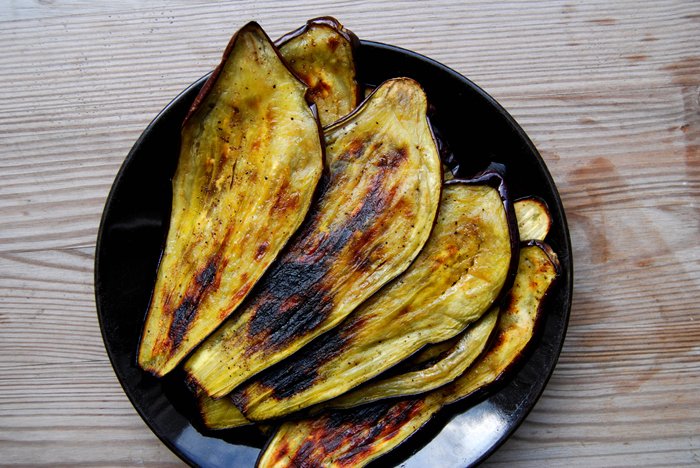
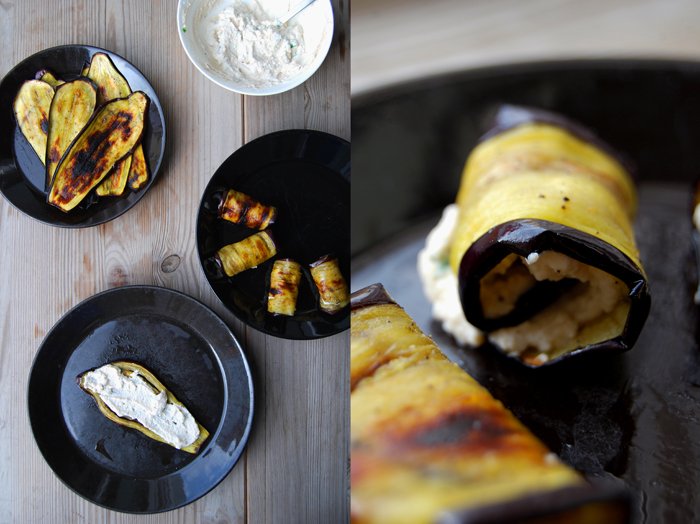
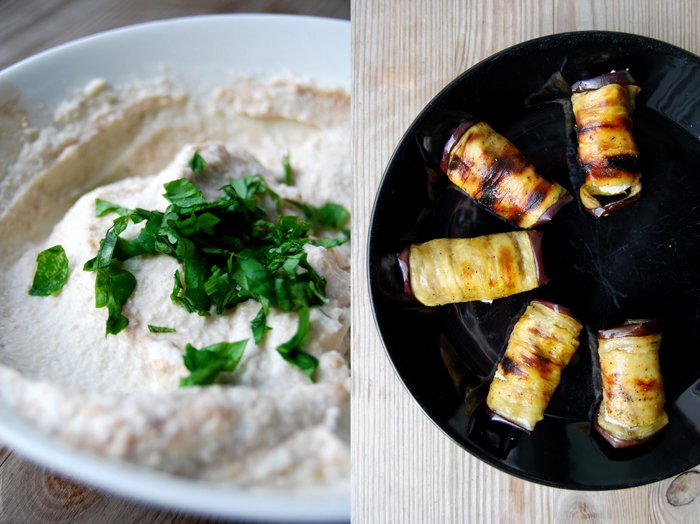
Grilled Aubergine Rolls filled with Ricotta and Basil
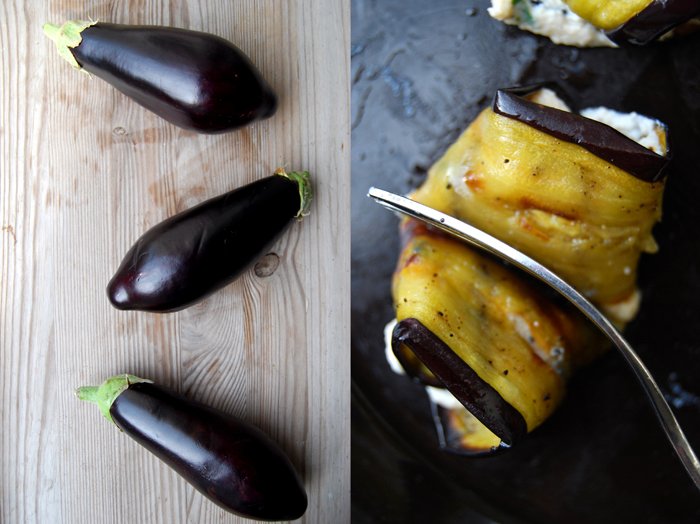
Imagine creamy, milky ricotta enhanced with sweet and thick balsamic vinegar, some fresh basil leaves stirred in and all this spread on grilled slices of aubergine, and you'll have a combination so smooth and velvety that it melts in your mouth! This to me is an absolute perfect match, maybe my favourite way to enjoy aubergine.
I like to make this as a starter for a dinner party, it's easy to prepare and my guests always love it, or as a luscious in between nibble. What's even better is to roll them for a relaxed dinner on a warm evening, with windows wide open, some ciabatta bread on the table and wine, cheese, thin slices of prosciutto or Mortadella di Bologna. I love it, it feels like a little holiday, for only a few hours but with the same effect as being in a restaurant in Italy. That's what I love about food, it's like music, it can put you in a different time, place and mood and it's all in your hands!
Grilled Aubergine Rolls filled with Ricotta, Balsamico Vinegar and Basil
As a starter for 4 you need
large aubergines (eggplants), cut into 1/2cm / 1/4" slices, 2
olive oil to brush the slices of aubergine, around 75ml, depending on the size of the aubergines
fresh ricotta 140g / 5 ounces
heavy cream 2 tablespoons
balsamic vinegar 2 tablespoons or more to taste
fresh basil leaves, cut into strips, around 10 or more to taste
salt and black pepper
Set your oven to grill (broiler).
Brush the aubergines with olive oil on both sides and season with salt and pepper. Grill in the oven until golden brown and soft on both sides, they will darken partly but that's fine. Mine needed 7 minutes on one side and 5 minutes on the other but that depends on the oven. Set the aubergines aside and stack them, that will keep them moist and soft.
Whisk together the ricotta, cream and balsamic vinegar, season with salt and pepper to taste and stir in the basil. Spread a teaspoon of the ricotta cream on top of each slice of aubergine and roll lengthwise into a wrap.