ISCHIA / ISOLA VERDE

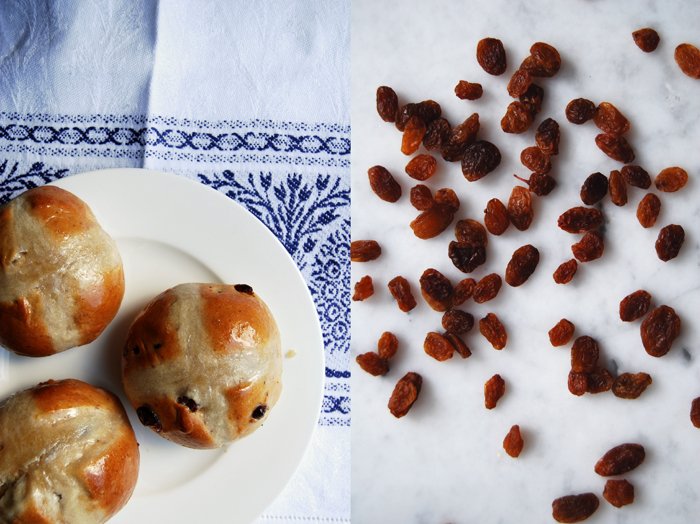
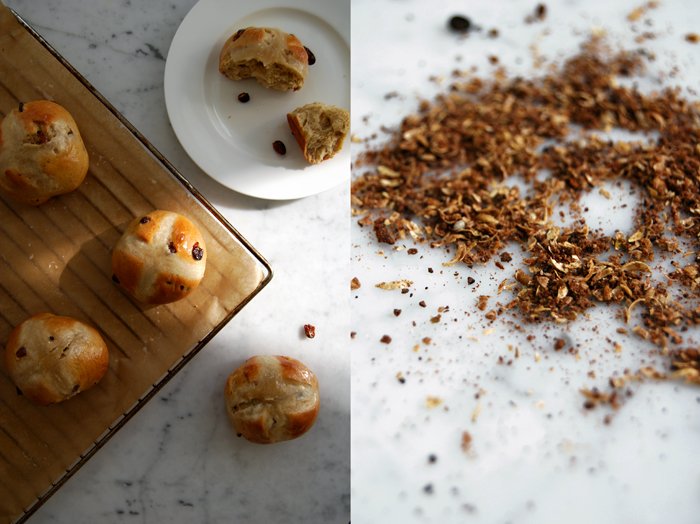
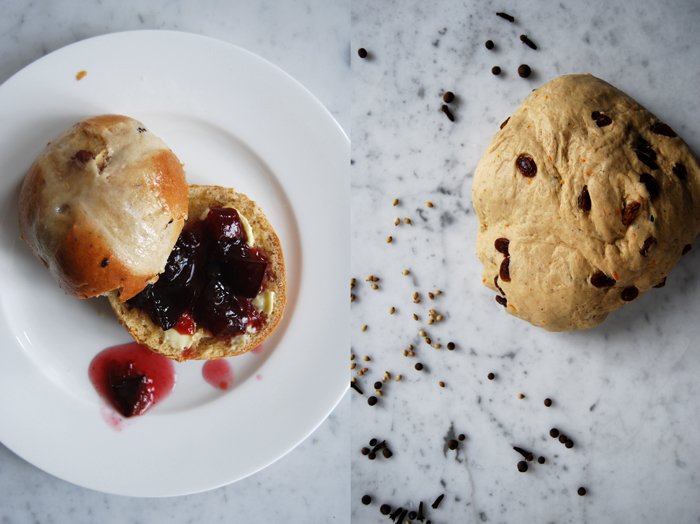
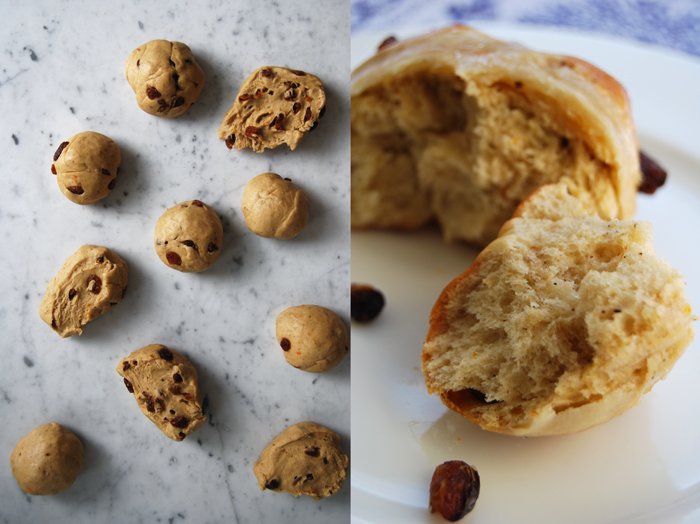
Spiced Hot Cross Buns with Orange Zest

My first Hot Cross Bun baking experience lies way back in the past and it wasn't very successful - one morning I managed to destroy two doughs in a row. The water I used was a bit too warm and knocked out the yeast. I was so desperate that I even baked the buns from the second batch of dough but it was hopeless. I could have used the buns as cannon balls, they were as hard as a rock and impossible to eat. I needed a few years to recover from this experience but now I'm totally at peace with them again.
Hot Cross Buns are traditional Easter buns but to me they are a great treat for a big weekend breakfast or brunch all year round. They are made with lots of aromatic spices such as cinnamon, coriander, allspice, nutmeg, ginger and cloves and I also add lots of orange zest and raisins. Spices ground in a mortar unfold their entire range of aromas, I find them stronger and without the artificial touch which industrial mixtures tend to have. These buns are complex in their taste and the texture is nice and fluffy. I love to tear them with my fingers when they are freshly out of the oven and spread some butter on them, or my homemade plum jam with lots of cinnamon. I even ate one bun with liver paté, both sweet and aromatic, they make a perfect match.
Traditionally, Hot Cross Buns were eaten during Lent, always marked with a cross standing for the Crucifixion. Besides the religious connections there are further meanings passed on, sharing a bun with someone else is supposed to ensure friendships and each bite should bring good health.
Hot Cross Buns
For 10 buns you need
For the dough
plain flour 500g / 1 pound
dry yeast, 1 package (for 500g / 1 pound of flour)
sugar 60g / 2 ounces
salt 1 teaspoon
ground cinnamon 2 1/2 teaspoons
2 1/2 heaping teaspoons of ground mixed spice, or a spice mixture made of:
coriander, ground in a mortar, 1/2 teaspoon
allspice, ground in a mortar, 7
cloves, ground in a mortar, 5
nutmeg, grated, 1/4 teaspoon
fresh ginger, grated, 1 teaspoon
zest of 1 orange
butter, melted, 60g / 2 ounces
milk, lukewarm, 190ml
organic egg 1
raisins, soaked in warm water for 4 minutes, 100g / 3.5 ounces
For the cross paste
plain flour 4 tablespoons
milk 3-4 tablespoons
vegetable oil 2 teaspoons
For the glaze
milk 5 tablespoons
icing sugar 5 tablespoons
For the dough, combine the dry ingredients (including spices and orange zest). Mix the hot melted butter with the cold milk and the egg, this way the liquid mixture will have the right lukewarm temperature (check with a finger). Mix the dry and the liquid mixture with your dough hooks for 5 minutes until well combined. Continue kneading with your hands for a few minutes until you have an elastic dough ball. Mix the raisins into the dough and put it back into the bowl, cover with a tea towel. Let the dough rise in a 35°C / 95°F warm oven for 70 minutes. This works really well but make sure that your oven is set to top/ bottom heat and not to fan.
Take the dough out, punch it down and knead for 1 minute. Divide into 10 pieces and roll into balls. Put them on a baking sheet lined with parchment paper and let them rise for 30 minutes, covered with a tea towel, in a warm place.
Set your oven to 200°C / 390°F.
For the cross paste, mix the flour, milk and oil with a spoon. For the glaze, cook the icing sugar together with the milk in a sauce pan for 5 minutes on medium heat until bubbly and syrupy.
Cut a cross into the surface of each bun, wet your fingers and form slim rolls with the cross paste mixture. Lay the rolls into the crossed slits on top of each bun, wet your fingers in between. Bake the buns for 12 minutes or until golden brown. Glaze with the sweet syrup immediately. If the glaze is too thick, add a little water before you brush the tops of the buns.


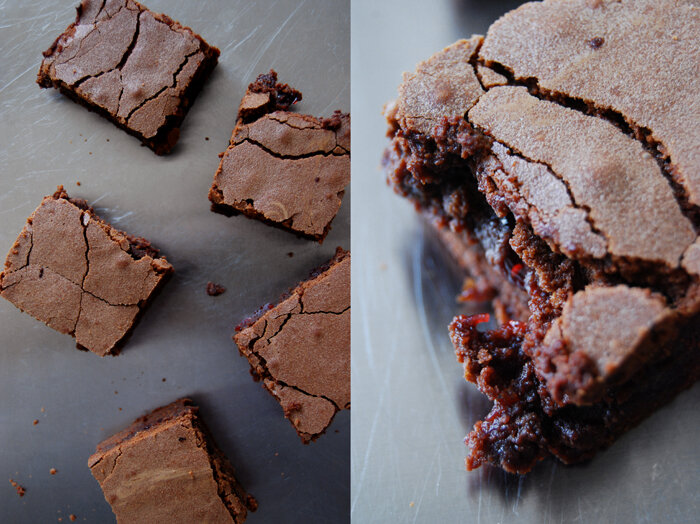
Fudgy Raspberry Chocolate Brownies

The first bite of these chocolate brownies changed my opinion about this cakey treat completely. After a few rather dry, too heavy or painfully sweet experiences with brownies I already felt like giving up on them. I never felt inspired and motivated to give them a try in my own kitchen but this recipe changed everything! They are fudgy, dense, chocolaty and juicy and a thin layer of sweet raspberry jam even adds a hint of fruitiness. You can't really ask for more when you pull a chocolate cake out of your oven!
It's important to use good quality chocolate, bittersweet, the kind you like to eat without putting it in a cake. Mine is 50% cocoa, I tried stronger ones but this works best for me. Sometimes I make the recipe without the jam layer which doesn't effect the brownie's fudginess, they just have to bake shorter as the fruit keeps the dough soggy for a bit longer. When I want chocolate, pure and intense than that's my choice! I like both, so much that I always make a big tray right away, even if there's just the two of us. I also like to make them for easy dinner parties, a sweet finger food dessert, no plates, just napkins and everybody gets a big brownie in their hands.
This recipe comes from my boyfriend by the way. One day he went into the kitchen, came up with this recipe and baked these wonderful brownies. I don't remember why or how, I don't ask questions, I just enjoy them!
Raspberry Chocolate Brownies
For a 28,5 x 23,5 cm / 11 x 9 " baking dish making 24 brownies you need
butter 350g / 12.5 ounces
bittersweet chocolate 350g / 12.5 ounces
a pinch of fresh vanilla
organic eggs 6
granulated sugar 320g /11.5 ounces
plain flour 250g / 9 ounces
salt 1 teaspoon
raspberry jam, whisked with a fork, 100ml
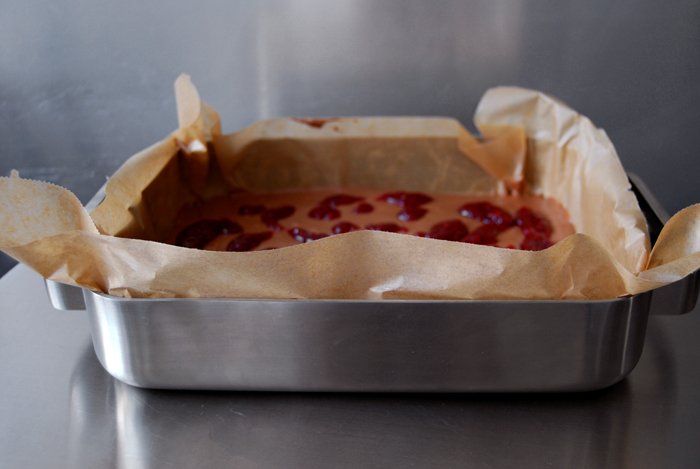
Set the oven to 175°C / 350°F (fan-assisted oven) and line a 28,5 x 23,5 cm / 11 x 9" baking dish with parchment paper. (It must be roughly this size).
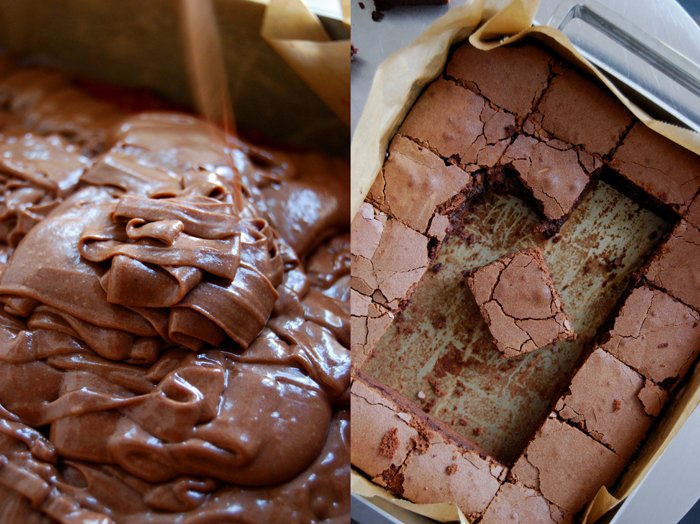
Melt the butter together with the chocolate and vanilla in a sauce pan. Set aside and let cool for a couple minutes. Beat the eggs together with the sugar till fluffy and add to the chocolate mixture. In a large bowl, combine the flour and salt, add the liquid mixture and mix with your mixer until everything is combined. Pour half of the dough into the baking dish, even it out and spread the jam on top, carefully so that the layers stay separate. Add the rest of the dough and spread evenly.
Bake in the oven for 55 minutes. The top will be a pale brown and speckled. When you push in the middle you should feel a soft but spongy resistance. Let it cool for 10 minutes before you cut it into small squares.
If you make the brownies without the jam layer, check them after 30 minutes. It should look and feel as described above.


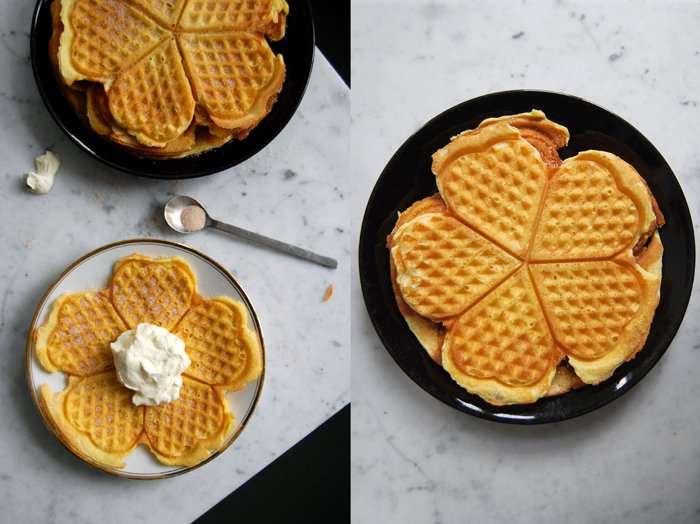
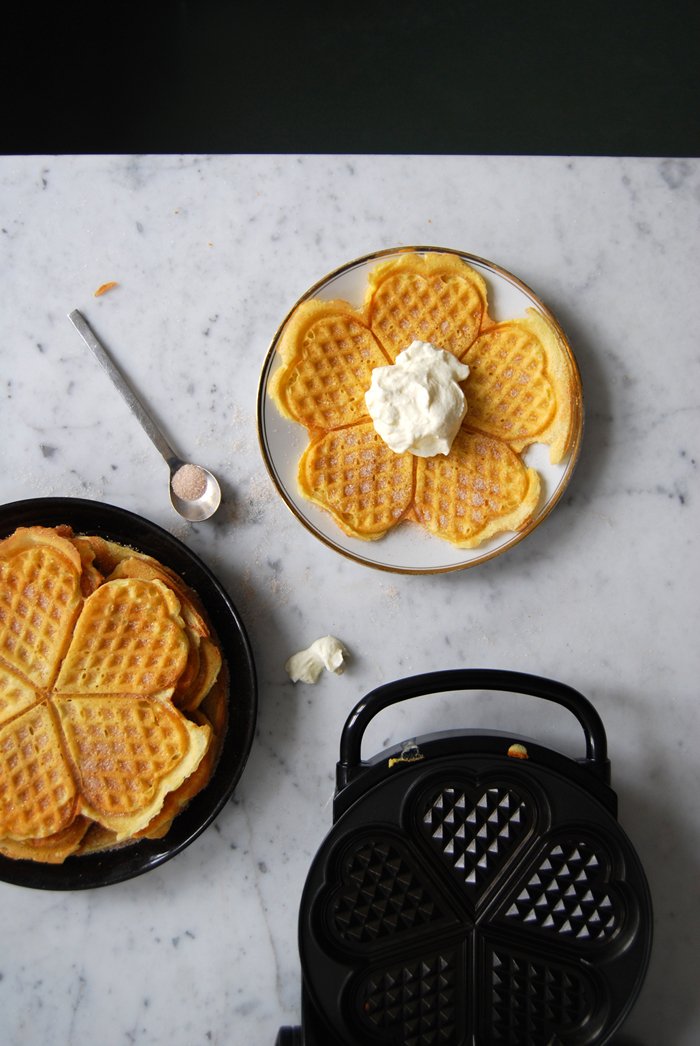
The Family Waffles and Prokofiev's Peter and the Wolf
I used to have cosy tea time ceremonies with my mother and my sister on the weekends, just the three of us. We lit candles, got comfy in between piles of cushions and listened to music. I always wanted to play either Prokofiev's Peter and the Wolf or Ravel's Bolero, both dramatic and mesmerising. It fascinated me as a child, especially Prokofiev's musical fairy tale, just a narrator telling the exciting story and an orchestra interpreting the characters and scenes. It made me feel like I was right in the story, I could see Peter following the cat through the grass and then, the scene when the duck escapes through the garden gate which little Peter had left open! He shouldn't have because of the wolf (his grandfather had told him a million times) and as one can imagine, it doesn't look so good for the duck. I don't want to reveal the end of the story, I still love listening to it!
When we had our girly afternoons, we either baked a cake or made waffles, my grandmother's waffles who passed her much-loved recipe on to my mother and her siblings before the grandchildren started baking them as well. I'm one of them, still enjoying them as much as my family does. I never made any other waffle recipe myself but I've obviously had others. I'm biased, I know, never as good as my granny's! Hers are light and fluffy, not too sweet as the dough is made with only a pinch of sugar. She used to sprinkle the sugar on top of the waffles after they were baked, still warm out of the waffle maker, which is how I make them too, sometimes with some cinnamon mixed in.
When I thought of my grandmother, I remembered her gold rimmed plates which I don't use very often. I ate my waffles like I always do, sandwiched with whipped cream in between and I played Peter and the Wolf, all the sweet memories came back and with them a happy and thankful feeling!
This recipe has been featured by Food52!
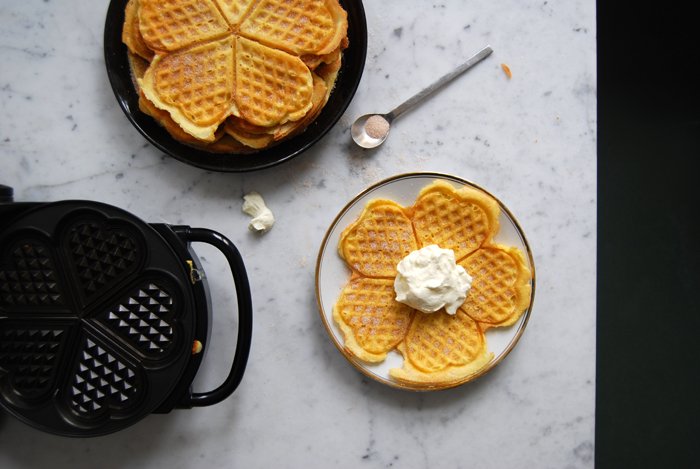
Waffles with Cinnamon Sugar and Whipped Cream
For the 8 waffles you need
butter 50g / 2 ounces
milk 175ml (if you use a Belgium style waffle maker you need only 150ml of milk)
organic eggs 3
a pinch of salt
granulated sugar 1 teaspoon
plain flour 100g / 3.5 ounces
baking powder 1/2 teaspoon
a pinch of fresh vanilla
For the topping
granulated sugar 70g / 2.5 ounces plus 1 tablespoon for the whipped cream
ground cinnamon 1/2 teaspoon
whipping cream 200ml
Warm up your waffle maker.
Combine the sugar and cinnamon to sprinkle on the waffles and whip the cream together with a tablespoon of sugar.
Melt the butter and mix with the milk. Combine the flour and baking powder. Beat the egg whites with a pinch of salt till stiff. Mix the egg yolks with the sugar and vanilla till fluffy and add the milk and flour, mix well. With a spoon, fold the stiff egg whites gently into the dough until well combined.
Pour a ladle of the dough onto the waffle maker and bake until golden brown. Sprinkle with the cinnamon sugar while the waffles are still warm and served with whipped cream.


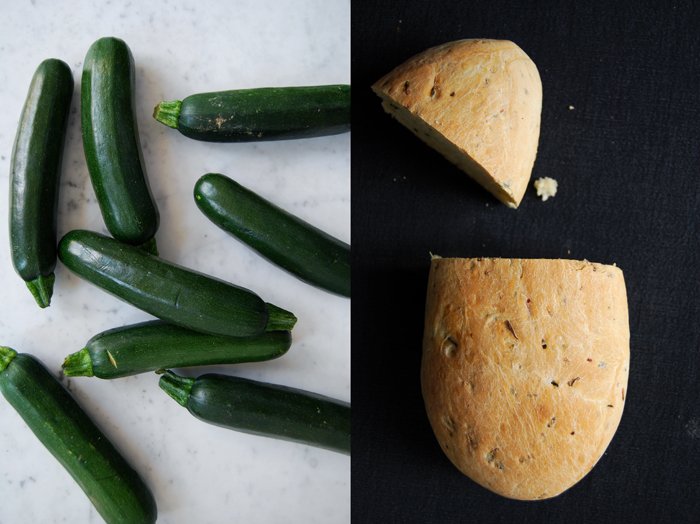
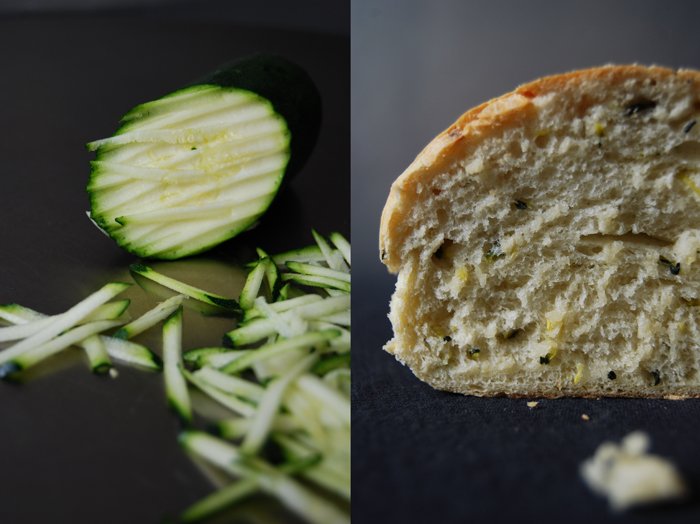
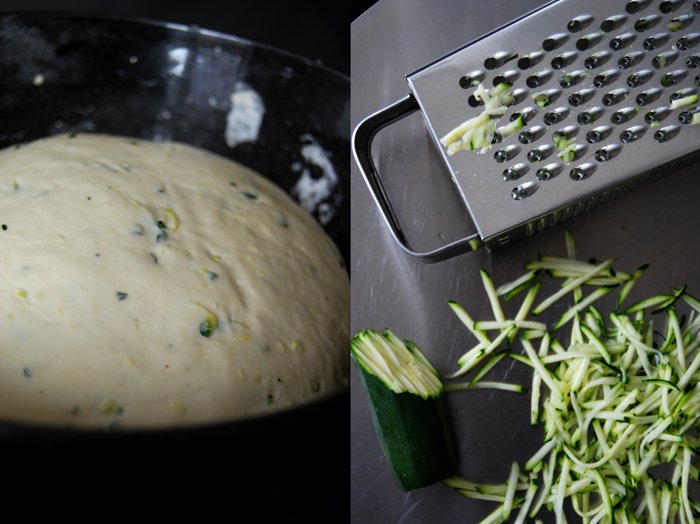
Savory Zucchini Bread
I've wanted to learn how to bake sourdough bread for years, the only problem is that I bake and love so many of my yeast bread recipes that, so far I've never approached this adventure. Dry or fresh yeast allows me to make a fresh and warm bread within a couple hours where as sourdough demands days of preparation. Most of the time, my baking isn't really planned far ahead, my mood decides what I will put in the oven. With the right ingredients a yeast bread is wonderfully juicy and spongy but I have to admit that it never creates a crust comparable to the more time-consuming alternative which also has the advantage that you can keep it for days. This is impossible with yeast bread, but to be honest that has never been an issue as all the fresh bread coming out of my kitchen doesn't survive for more than a day or two!
I know that one day sooner or later I will give the sourdough a try, but till then there is still a lot of bread to bake. One option, which is as juicy as my olive bread, is a loaf made with grated zucchini (courgette) which makes the texture so soft and spongy that it doesn't need more than some olive oil or butter spread on top. I served it with ramp (yes, again) butter when we had some friends over and I liked that a lot as well, it made it a bit garlicky.
It's really quick to bake, it only needs 20 minutes in the oven!
Savory Zuchini Bread
For 2 loaves of bread you need
plain flour 500g / 1 pound
dry yeast 1 package (for 500g / 1 pound of flour)
salt 1 heaping teaspoon plus 1/2 teaspoon for the zucchini
zucchini, grated 200g / 7 ounces
water, lukewarm, 225ml
olive oil for brushing
Put the grated zucchini in a sieve over a bowl, add 1/2 teaspoon of salt and mix with your fingers. Set aside for 15 minutes, rinse under cold water for a few seconds and squeeze the water out with your hands. Spread the zucchini on a tea towel and push another towel on top to dry. Scrape off the towel and set aside.
Combine the dry ingredients, add the zucchini and water and mix with your dough hooks for 5 minutes until well combined. Continue kneading with your hands for a few minutes until you have an elastic dough ball. Put the dough back into the bowl and cover with a tea towel. Let the dough rise in a 35°C / 95°F warm oven for 45 minutes. This works really well but make sure that your oven is set to top/ bottom heat and not to fan.
Take the dough out, punch it down and knead for 1 minute. Form 2 long loaves and put on a baking sheet lined with parchment paper. Cover with a tea towel and let them rise for 30 minutes in the warm oven.
Set your oven to 220°C / 430°F.
Brush the loaves with a thin layer of olive oil and bake for 18 minutes or until cooked through. If you’re not sure if it’s done turn the bread around and knock on its underside, it should sound hollow. Let it cool for a couple minutes before you enjoy the first slice of your freshly baked bread.

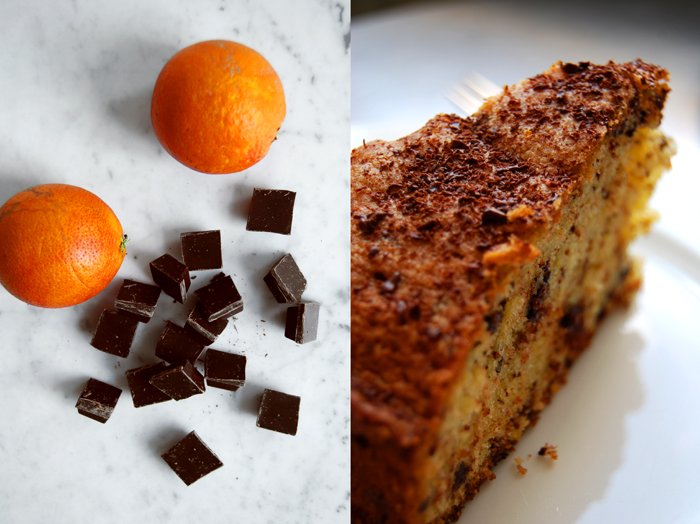
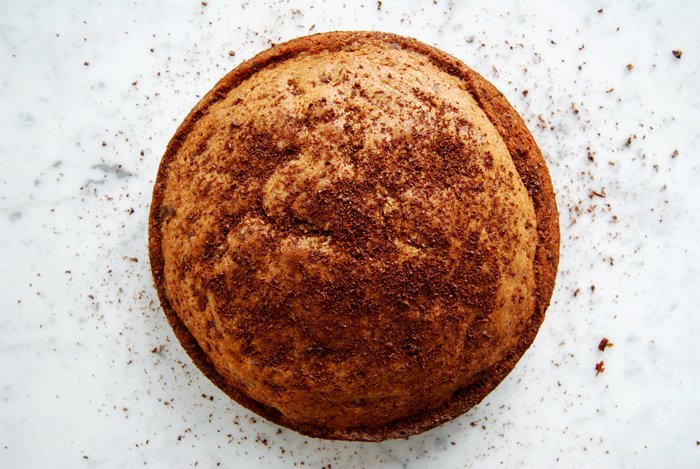
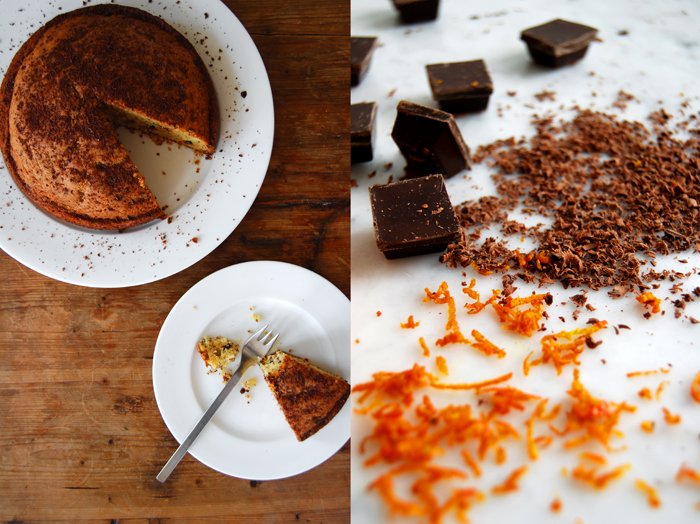
Bittersweet Chocolate and Orange Sponge Cake

Last week I wrote about one of my numerous phone calls with my Maltese granny who is actually my boyfriend's granny but over the years, after so many stays on her home island and through our shared passion for food she "adopted" me. That's how it feels, she became my granny. In our last conversation she gave me a wonderful recipe for the Maltese tea time cookies with vermouth and she also mentioned a cake made with bittersweet chocolate and orange (juice and zest). I love this combination but my boyfriend isn't so fond of it and I didn't want to end up eating a whole cake on my own. But she insisted on giving it a try, she knows her grandson after all, and she was right!
We both agreed that this cake is amazing, simple but so aromatic. The texture is very spongy and on top it has a fine sugary crust, a bit flaky. I sprinkled it with some more chocolate when the top was still a bit warm and it melted into the crust. Granny Edith was right, I didn't have to eat the cake on my own and it didn't even last for 2 days!
Bittersweet Chocolate and Orange Sponge Cake
For a 20cm / 8″ cake pan you need
butter 180g / 6.5 ounces
granulated sugar 210g / 7.5 ounces
plain flour 180g / 6.5 ounces
baking powder 2 teaspoons
a pinch of salt
organic eggs 3
orange juice 2 tablespoons
orange zest 1 1/2 tablespoons
bittersweet chocolate, chopped coarsely, 100g / 3.5 ounces plus 1 tablespoon finely grated for the topping
Set the oven to 175°C / 350°F (fan-assisted oven) and butter the cake pan.
Mix the butter with the sugar and orange zest till fluffy. Add the eggs, one at a time and mix well for a couple minutes. Add the flour, baking powder, salt and orange juice and mix quickly until everything is combined. Stir in the chopped chocolate and scrape the dough into the prepared pan. Bake for 40 minutes or until golden brown. Check with a skewer, it should come out clean. Let the cake cool for 5 minutes and sprinkle with finely grated chocolate.


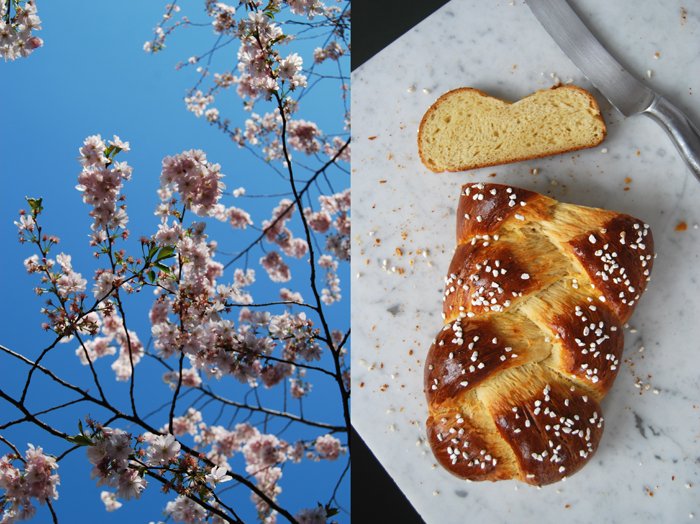
Challah - Sweet and Fluffy Braided Yeast Bread
As passionate as I am about my dinner, I feel the same about breakfast which is quite late in my case. I always start the day with a cup of green tea with freshly squeezed lemon as I don't like to eat early in the morning but then after a couple hours my body needs some energy which I gladly deliver. Bread, fresh vegetables and fruit, my coffee of course, and some cheese. To me, it's all about bread, dark or white, buns, croissant, during the week it's a dense spelt loaf from my bakery most of the time but then on the weekend I love to bake my own bread. It's the most relaxing and delicious way to end the week!
Where I grew up, I used to buy a brioche like loaf of bread, fluffy and sweet, a bit dark on the outside, sometimes made with raisons, it's called Stuten or Blatz. It's baked square shaped and best when cut into thick slices, spread with butter or, one of my favourites, with liver pâté. I never managed to bake a Stuten as good as the one I bought from my hometown's bakery which unfortunately doesn't even exist anymore. I'm still working on it!
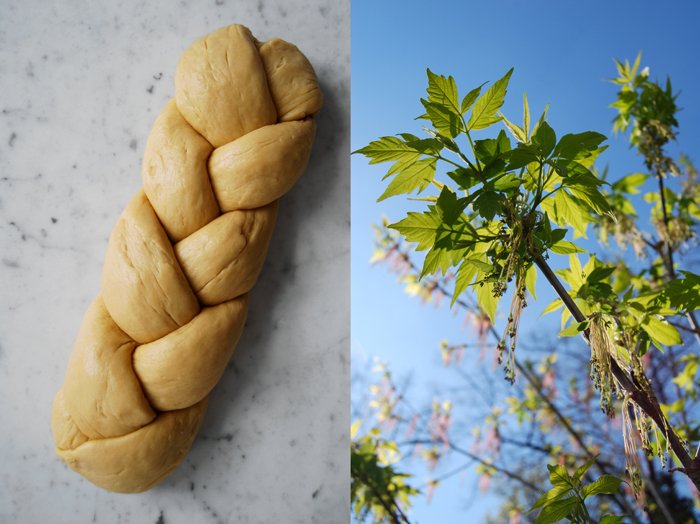
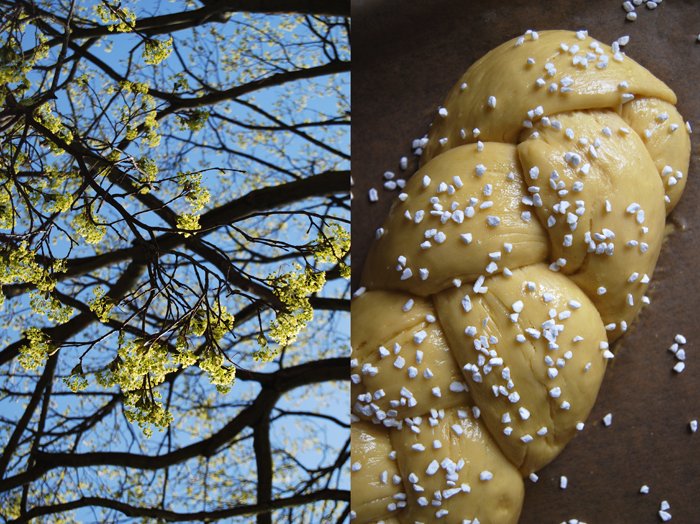
For now, I enjoy a similar bread, in a different shape and made with a slightly different dough. The wonderful Challah! The braided yeast bread is just as sweet and fluffy, I eat it either with butter or liver pâté, or with one of my homemade jams, like the blood orange or tangerine marmalade.
The trees and flowers around have been bursting in the past days, I had to catch these moments and share it as I enjoy this beauty as much as a fresh and warm loaf out of my oven!
Sweet and Braided Yeast Bread
For one braided loaf of bread you need
plain flour 500g / 1 pound
dry yeast 1 sachet (7g / 1/4 ounce)
granulated sugar 60g / 2 ounces
salt 1/2 teaspoon
butter, melted, 100g / 3.5 ounces
milk, lukewarm, 150ml
organic eggs 2
pearl sugar, for sprinkling
organic egg yolk 1, for the glaze
milk 1 tablespoon, for the glaze
Combine the dry ingredients. Mix the hot melted butter with the cold milk and the 2 eggs, this way the liquid mixture will have the right lukewarm temperature (check with your finger). Mix the dry and the liquid mixture with your dough hooks for 5 minutes until well combined. Continue kneading with your hands for a few minutes until you have an elastic dough ball. Put the dough back into the bowl and cover with a tea towel. Let the dough rise in a 35°C / 95°F warm oven for 70 minutes (I tried it for 60 minutes but the last 10 minutes make a big change). This works really well but make sure that your oven is set to top/ bottom heat and not to fan.
Take the dough out, punch it down and knead for 1 minute. Divide it into 3 pieces and roll them into long sausage shapes. Lay the ends of the rolls on top of each and start to braid them tightly. Bend both ends under the loaf and put on a baking sheet lined with parchment paper. Let it rise for 30 minutes, covered with a tea towel, in the warm oven.
Set your oven to 200°C / 390°F (top / bottom heat).
Whisk the egg yolk and milk for the glaze, brush the bread, sprinkle with pearl sugar and bake in the oven for 10 minutes before you turn it down to 180°C / 355°F and bake for another 15 minutes until golden brown.

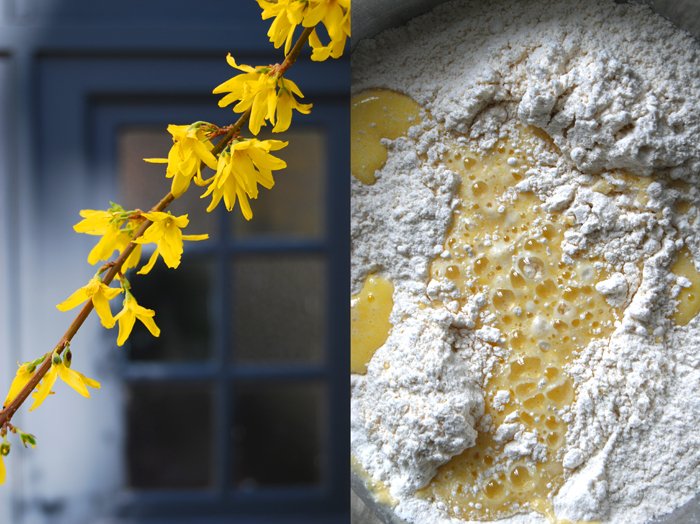


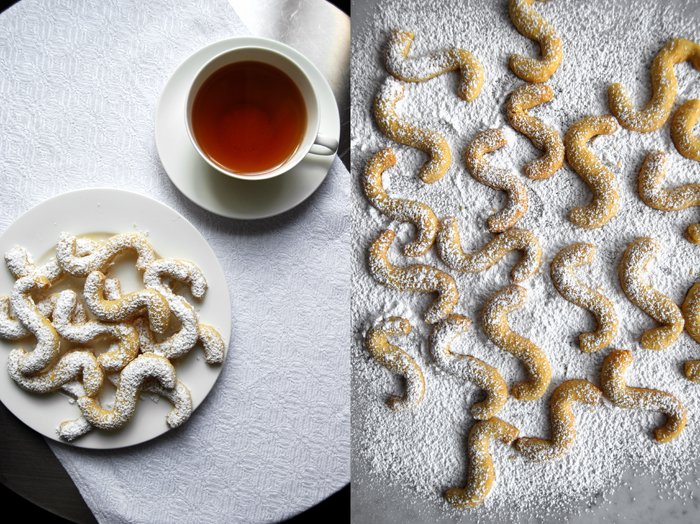
Essijiet - Maltese Tea Time Cookies with a shot of Vermouth
When I'm on the phone or video chat with our family in Malta, you can be sure it will go on for hours, it will involve many people, coming and going, lots of laughing and very often the exchange of recipes. Especially when I talk to Granny Edith who has been cooking and baking all her life, so you can imagine her large recipe collection, influenced by her mother, grandmother and all the close relatives and friends which are quite numerous in a Maltese family. I found so many traditional dishes in her collection, true treasures! Like everybody else in the family, I love to sit with Edith at her kitchen table in her beautiful old villa in Msida at the sea, talking about life, cooking, men, fashion, the offers at the vegetable man and the butcher, normal daily life, it feels so easy on this island! We enjoy a cup of tea, some sweets from our local confectionary (which is the best in Malta in our opinion) and appreciate every second!
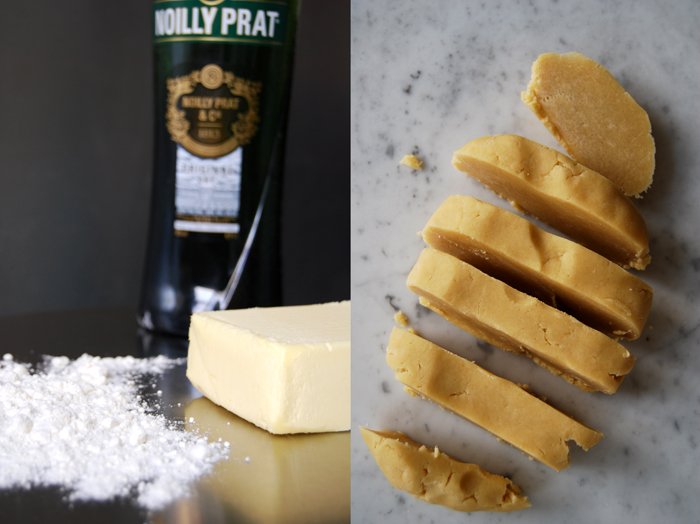
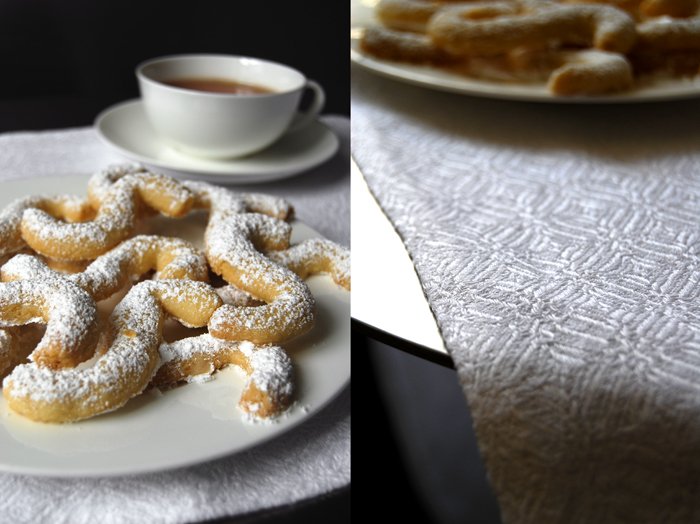
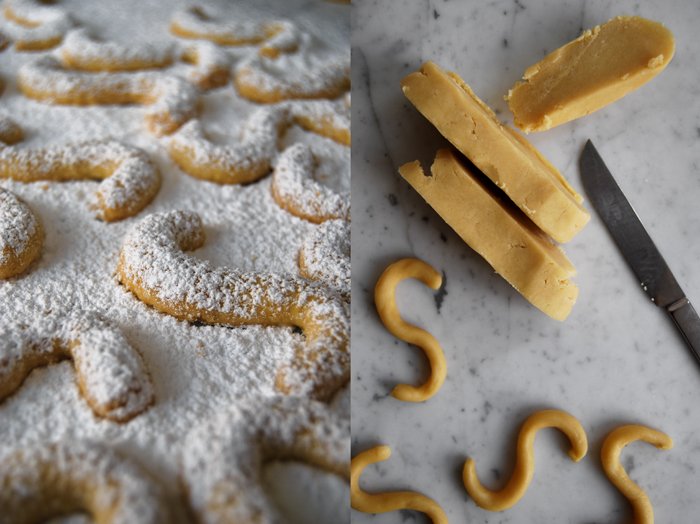
Recently I've been talking to her about baking and she handed some recipes over to me which caught my attention. One is a traditional tea time cookie recipe from her mother-in-law Maria, she used to make them for the family, Edith continued the tradition and now she passes it on to the next generations. It's a very easy cookie recipe, made with so little ingredients that I thought I had left some out when I started preparing the dough. It's just butter, flour, baking powder, salt, sugar and a shot of vermouth making a delicious cookie, fine in taste, buttery and crumbly. I couldn't have asked for more for tea time! The cookies don't really have a proper name apart from the family given one, referring to their shape they are called Essijiet, meaning many "S" in Maltese.
Essijiet - Maltese Tea Time Cookies
For around 60 cookies you need
plain flour 300g / 10.5 ounces
baking powder 1/2 teaspoon
granulated sugar 1 tablespoon
a pinch of salt
butter 200g / 7 ounces
vermouth 2 tablespoons
icing sugar for dusting
Combine the flour with the baking powder, sugar and salt. Cut the butter with a knife into the flour until there are just little pieces of butter left. Continue with your fingers and work the butter into the flour until combined (there shouldn’t be any lumps of butter left). Add the vermouth and continue mixing with the hooks of your mixer until you have a crumbly mixture. Form a ball, wrap in cling film and put in the fridge for an hour or in the freezer for 15 minutes.
Set the oven to 175°C / 350°F and prepare a baking sheet with parchment paper.
Cut thick slices off the dough, make thin rolls and cut into 12cm / 5" pieces. Form the cookies into an S-shape and bake for 9 minutes or until lightly golden (they stay light in colour). Let them cool for a couple minutes and dust with icing sugar.
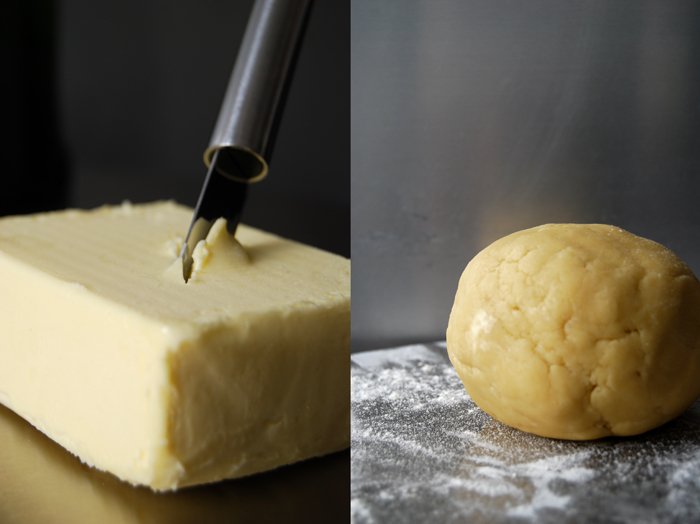

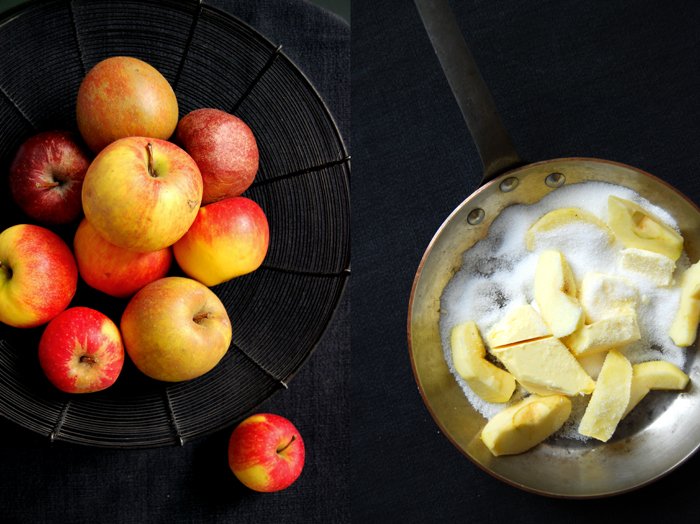
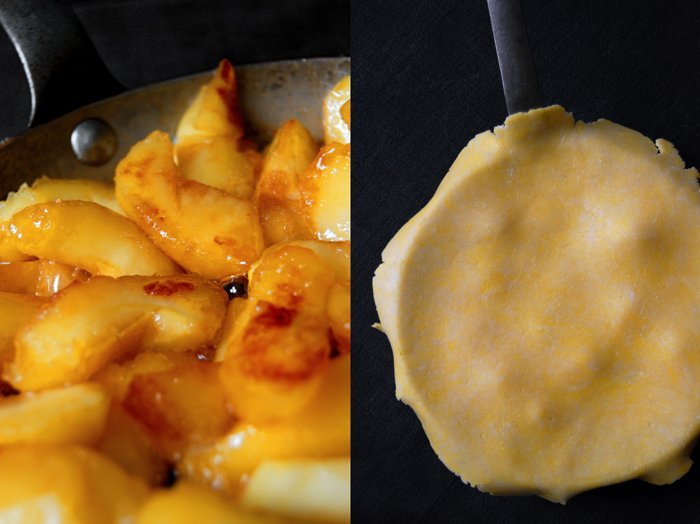
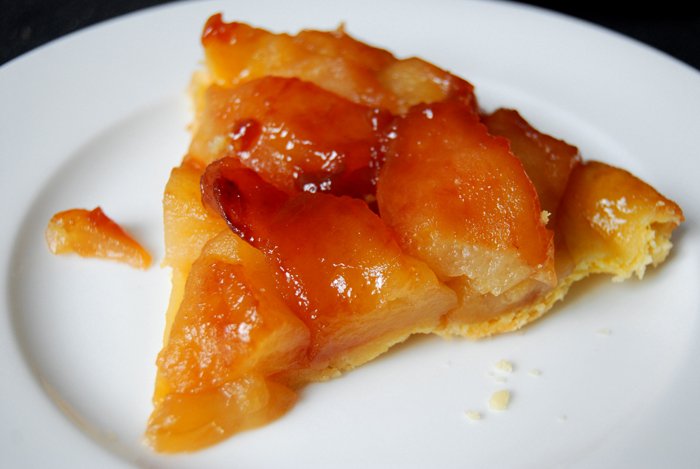
My Mother's delicious Tarte Tatin
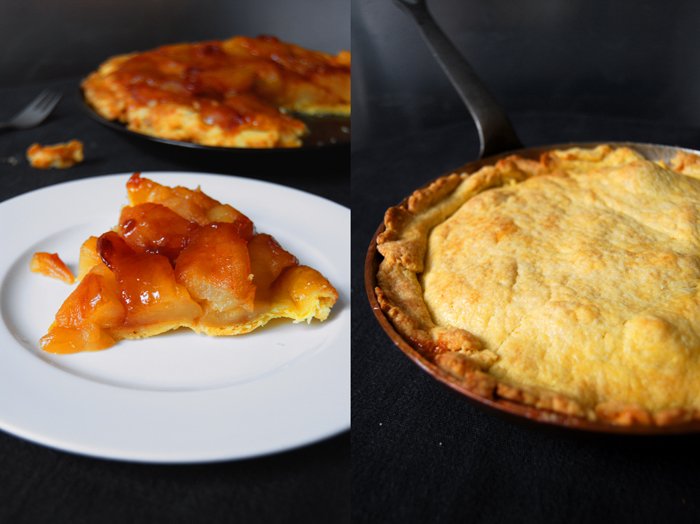
Tarte Tatin, I know so many people who call this their favourite dessert! Buttery apples fried with lots of sugar until golden brown and caramelised, topped with a crisp shortcrust baked in the oven. It's like a traditional pie, just upside down! There is something very French about it and it's not just the amount of butter and sugar, or its origin. Legend has it that this tarte was first created accidentally by Caroline Tatin. She ran the Hotel Tatin in Lamotte-Beuvron together with her sister Stéphanie. A stressful kitchen moment made her forget about the apples on her cooker, they caramelised and Caroline had an idea. She left them in the pan, put the dough on top and baked the first delicious Tarte Tatin ever. The guests in her hotel were impressed and her signature dish was born!
Now, there are many different ways to bake a Tarte Tatin. I make mine like my mother, with a crisp and buttery shortcrust (it's the one I also use for my Sandwich Cookies). I cut the apples in eight slices each so that they can caramelise evenly on all sides (I find it easier than quarters). I fry them in plenty of butter and sugar, the apples soak up all the syrup and the base stays crisp.
Tarte Tatin
For the tarte you need a 21cm / 8" Tarte Tatin dish or frying pan which is ovenproof.
big sour baking apples, peeled, cored and cut into eight slices each, 4
granulated sugar 90g / 3 ounces
butter 90g / 3 ounces
For the shortcrust
plain flour 130g / 4.5 ounces
butter, cold, 75g / 3 ounces
egg yolk 1
granulated sugar 1 tablespoon
a pinch of salt
cold water 1 1/2 tablespoons
For the shortcrust, combine the flour with the sugar and salt. Cut the butter with a knife into the flour until there are just little pieces of butter left. Continue with your fingers and quickly work the butter into the flour until combined. Add the egg yolk and the water, continue mixing with the hooks of your mixer until you have a crumbly mixture. Form a disc, wrap in cling film and put in the freezer for 10 minutes.
Set the oven to 200°C / 390°F.
In a pan (or Tarte Tatin dish), melt the butter together with the sugar and the apples on high temperature. Let the apples caramelise, watch them and turn gently, mine needed 10 minutes.
Roll out the dough, big enough to cover the pan and lay on top of the apples tucking the edges down the sides. Bake in the oven for 15 minutes or until golden brown. When the tarte is done, place a large heat resistant plate on top and turn the pan carefully upside down, keep in mind that it's very hot!
You can serve the warm Tarte Tatin with whipped cream or vanilla ice cream.


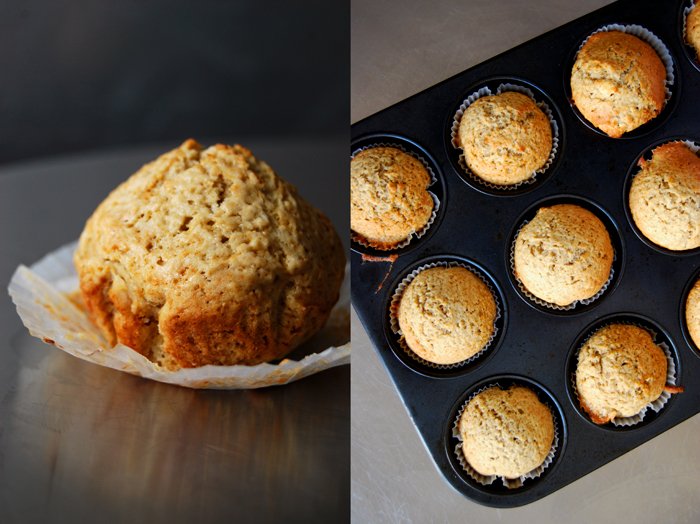
Irish Coffee Muffins

Saint Patrick's Day is close and although it is a religious feast to praise the patron saint of Ireland, it reminds me of a rather profane culinary pleasure, Irish Coffee. It's one of my favourite hot drinks! Sitting at a fireplace, cosy and relaxed, with a glass of warming Irish Coffee in my hands is unbeatable! I like it so much that I decided to put it in my muffins as well.
I mix some Irish whiskey, coffee and cream into the dough to be rewarded with the most delicious and fluffy muffins, but they are for adults only as I also topped them with whiskey infused whipped cream. I wanted strong spirit and coffee flavours and I got it! After cleaning the last drops of dough off the bowl with my fingers I already felt a bit tipsy!
If you like muffins as much as I do you can also try my Blood Orange Cinnamon Muffin recipe.
Irish Coffee Muffins
You need a muffin tray with 12 molds and paper baking cups.
plain flour 270g / 9.5 ounces
granulated sugar 150g / 5.5 ounces
baking powder 1 1/2 teaspoons
baking soda 1/2 teaspoon
salt 1/2 teaspoon
whiskey 50ml
strong espresso 50ml
heavy cream 100ml
butter, melted, 100g / 3.5 ounces
organic eggs 2
For the topping
whipping cream 200ml
whiskey 1 tablespoon
a pinch of fresh vanilla
Set your oven to 180°C / 355°F.
Combine the dry ingredients in a large bowl. Whisk the cream, espresso and whiskey and add the melted butter and eggs. Pour the liquid mixture into the dry mixture and stir with a wooden spoon until you have a lumpy dough. The more you mix it the more it will lose its light texture so don’t mix it too long.
Fill the muffin tray and bake the muffins for 15 minutes or until golden. Check with a skewer, it should come out clean.
Beat the whipping cream with the vanilla and stir in the whiskey.
Cut the tops off the muffins, dollop a spoonful of cream on and put the tops on again.


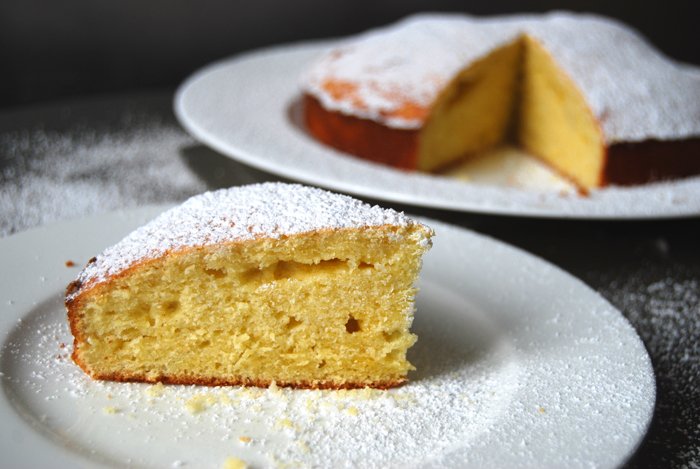
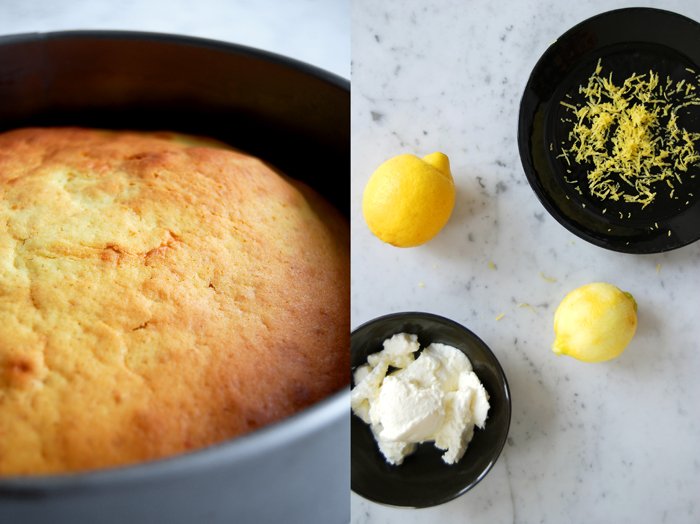
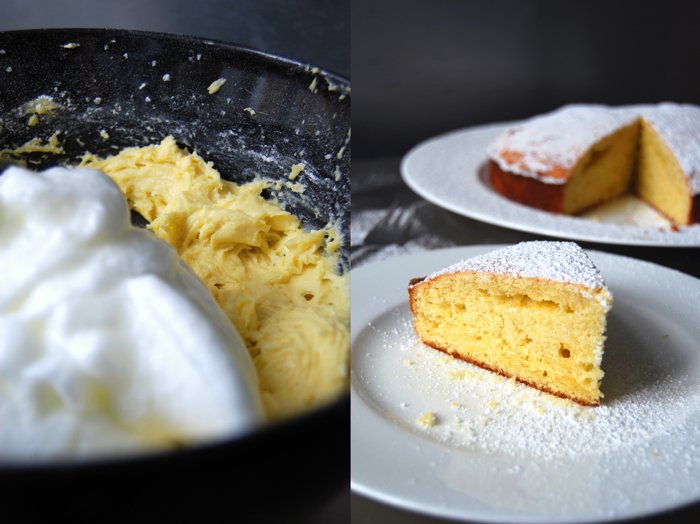
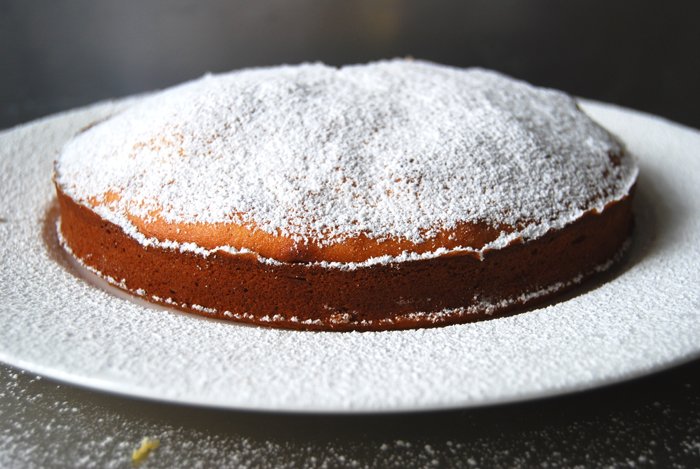
Lemon Ricotta Cake for Afternoon Tea
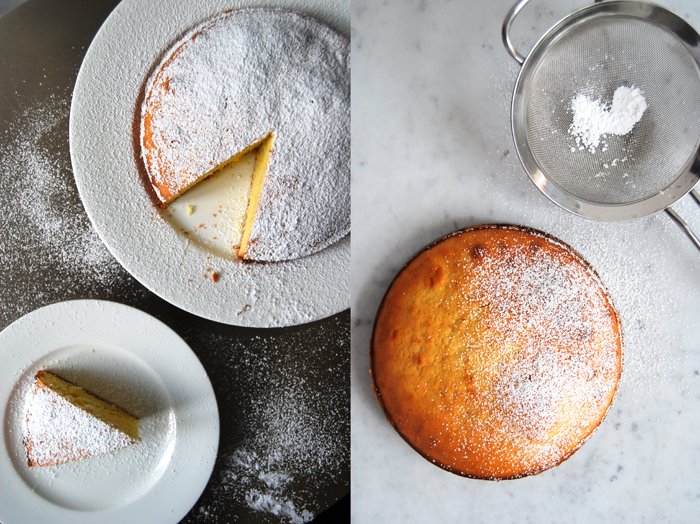
I open the door to my fridge and find a package of ricotta that needs to be used soon. Dinner is already planned so I'm thinking about a sweet solution. My eyes pass the big pile of lemons on my window sill and my decision is made. A cake, spongy, simple and aromatic, with lots of lemon juice and zest and creamy ricotta! Some icing sugar on top and it looks as pretty as a Sunday tea time cake should look.
Sometimes, especially on a Sunday, I need something sweet to go with my tea but I'm too lazy to leave my cosy sofa and my books and magazines for too long. In these moments a quick and spongy cake can satisfy all you need, half an hour in the oven and it's done. The air is filled with the sweetest smell and a golden piece of cake is waiting on my plate.
The ricotta lemon combination is one I use (and like) a lot, mixed with spaghetti and crushed black pepper, it makes one of the pasta dishes I cook the most, all year round. Tangy and smooth, it's a balance the two manage to keep, on the sweet and on the savory side!
Lemon Ricotta Cake
For a 20cm / 8" cake pan you need
butter, soft, 80g / 3 ounces
granulated sugar 150g / 5.5 ounces
ricotta, 80g / 3 ounces
organic eggs, separated, 3
freshly squeezed lemon juice 4 tablespoons
zest of 1 lemon
plain flour 200g / 7 ounces
baking powder 3/4 teaspoon
a pinch of salt
icing sugar to dust the cake
Set the oven to 180°C / 355°F (fan-assisted oven) and butter the cake pan.
Beat the egg whites with a pinch of salt till stiff. Combine the flour and baking powder.
Beat the butter and sugar till fluffy, add the ricotta and mix for a couple minutes. Add the egg yolks and continue mixing for 2 minutes. While still mixing, add the lemon juice and zest followed by the dry ingredients, mixing well for another minute. Stir 2 tablespoons of the stiff egg whites into the dough before you carefully fold in all of the egg whites. The dough is a bit firm so it may take some time to combine everything.
Scrape the dough into the prepared pan and bake for 30 minutes or until golden brown. Check with a skewer, it should come out clean. Let the cake cool and dust with icing sugar.

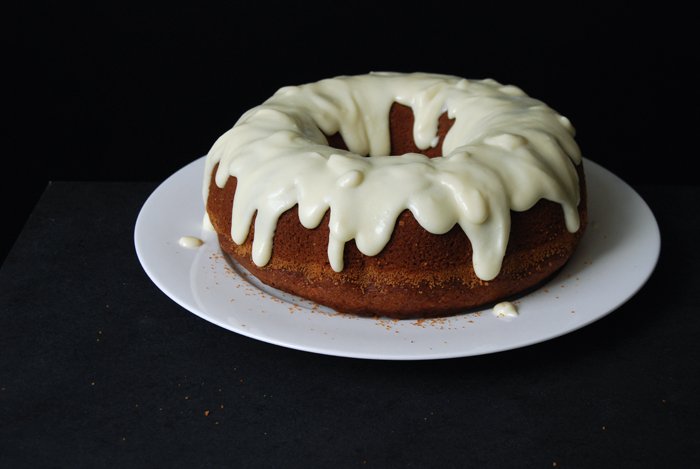
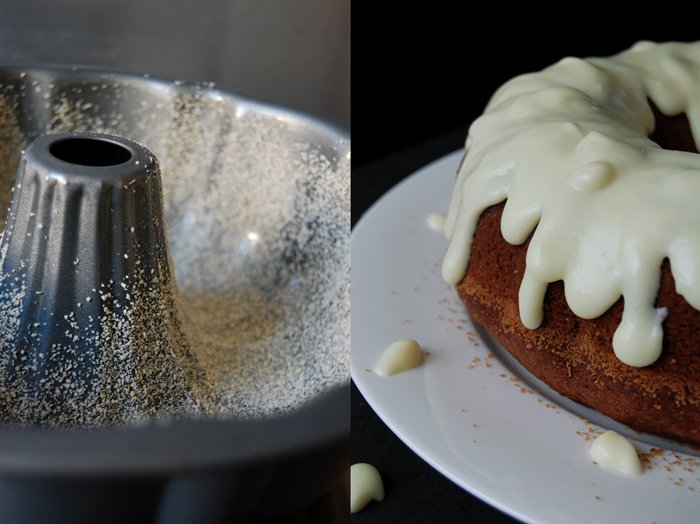
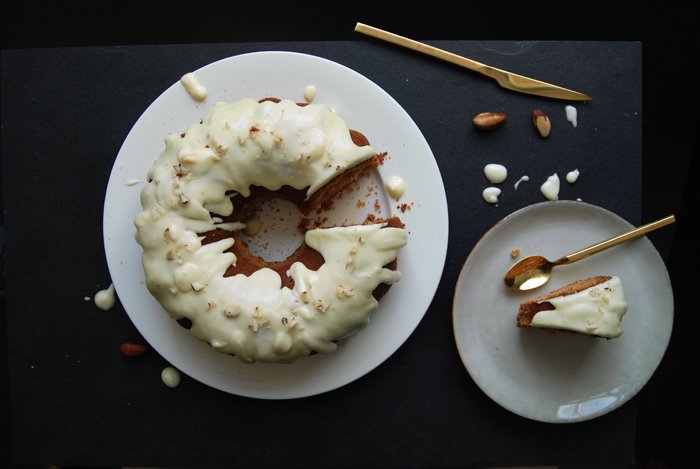
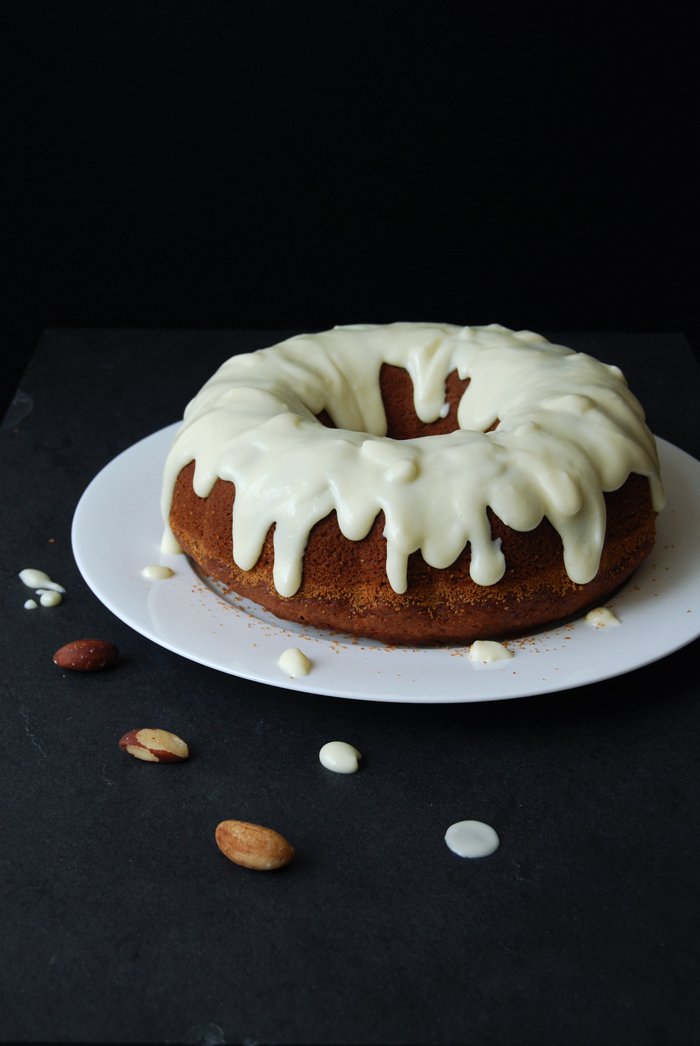
My favourite Carrot Cake from the Sunshine State
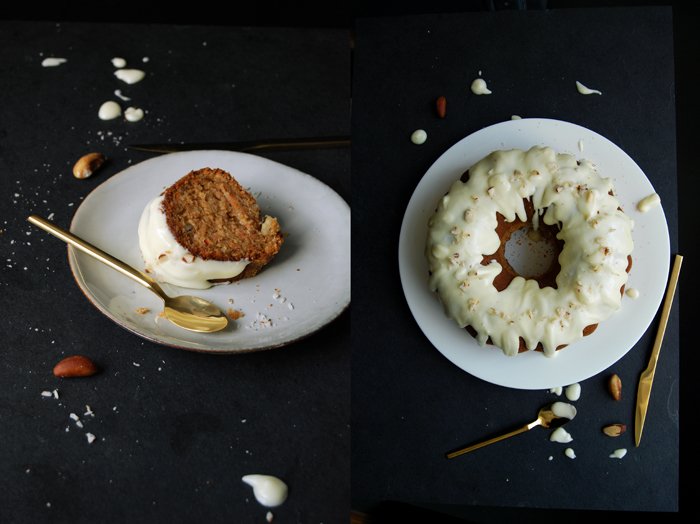
The recipe for this amazing carrot cake comes from the Sunshine State, more precisely from our Granny Doris in Florida who is also responsible for the best Peanut Butter Cookies. It's unbelievably spongy and juicy, with lots of carrots, pineapples and Brazil nuts. This is the kind of cake you eat within a day without knowing where it went! It's glazed with a deliciously creamy icing made of cream cheese and lemon, it combines everything a great carrot cake needs.
When I visited Doris for the first time in Florida, my partner's grandmother knew exactly how to make me feel at home: she welcomed us with a table full of cakes, brownies and muffins. We started every day with a luscious breakfast, with pancakes, bacon and all kinds of sweet treats, so, unfortunately, the holiday ended with 10 pounds more on the scales (although I went jogging almost every morning!). I felt no regrets, our daily feasting was worth it, I have a sweet tooth so I was in heaven. Of all the nice food we enjoyed, Doris' carrot cake impressed me the most. I asked for the recipe which she happily handed over and I knew this would be a keeper. Since our visit to the Sunshine State, I bake it every couple months and it never lasts long.
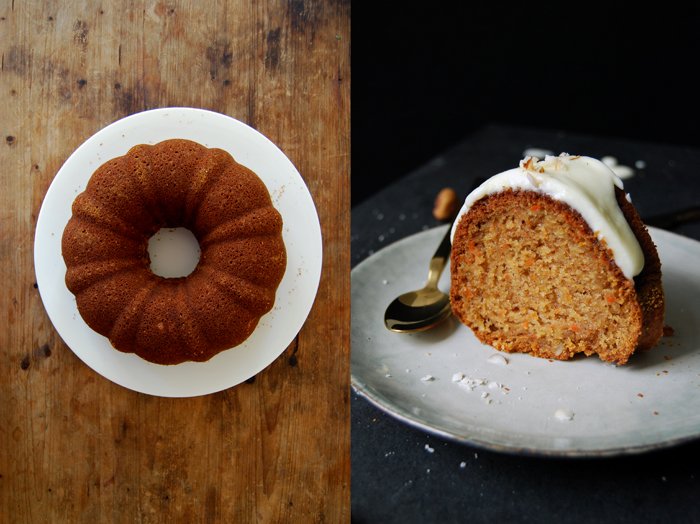
Carrot Cake
Note from 27th March 2015: I changed the recipe for the icing a little, you can find the old recipe at the end, the pictures show the new icing which is thicker and more creamy.
For a 23cm / 9" bundt pan you need
For the cake
plain flour 300g / 10.5 ounces
granulated sugar 200g / 7 ounces
baking powder 3 teaspoons
baking soda 1 1/2 teaspoons
salt 3/4 teaspoon
ground cinnamon 3 teaspoons
sunflower oil 250ml
organic eggs 4
carrots, grated 150g / 5.5 ounces
canned pineapple, drained and crushed, 250ml
Brazil nuts, chopped, 50g / 2 ounces
butter, for the bundt pan
dry breadcrumbs, for the bundt pan
For the icing
butter, soft, 3 tablespoons
cream cheese 100g / 3.5 ounces
heavy cream 1-2 tablespoons
icing sugar 125g / 4.5 ounces
lemon juice 1 tablespoon
a pinch of salt
Set the oven to 180°C / 355°F (fan-assisted oven), butter the bundt pan and sprinkle with breadcrumbs.
Combine the dry ingredients in a large bowl. Add the oil and eggs and mix for a couple minutes. Stir in the carrots, pineapple and nuts and continue mixing until combined. Scrape the dough into the prepared pan and bake for 45 minutes or until golden. Check with a skewer, it should come out clean. Let the cake cool for 10 minutes before you flip it around (I put the pan in a kitchen sink of cold water for a few minutes, that makes it easier to take the cake out).
For the icing, beat the butter for 1-2 minutes until light and fluffy, add the cream cheese and a splash of heavy cream and continue mixing. Add more heavy cream until the mixture resembles a creamy yoghurt. Add the lemon juice, icing sugar and salt and continue mixing until well combined, the frosting should be thick and slightly runny. Pour the icing over the cake.
The old icing recipe
icing sugar 125g / 4.5 ounces
sour cream 100g / 3.5 ounces
cream cheese 1 tablespoon
butter, soft, 3 tablespoons plus more if you want the icing to be more stiff
lemon juice 1 tablespoon
a pinch of salt


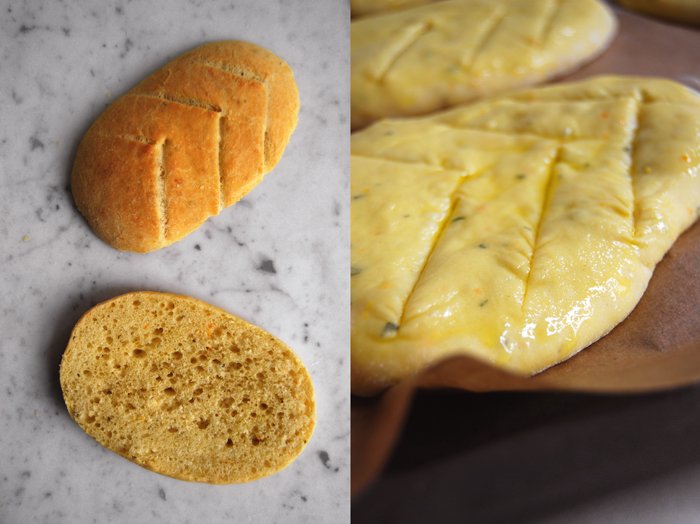
Fougasse Bread with Orange, Sage and Olive Oil
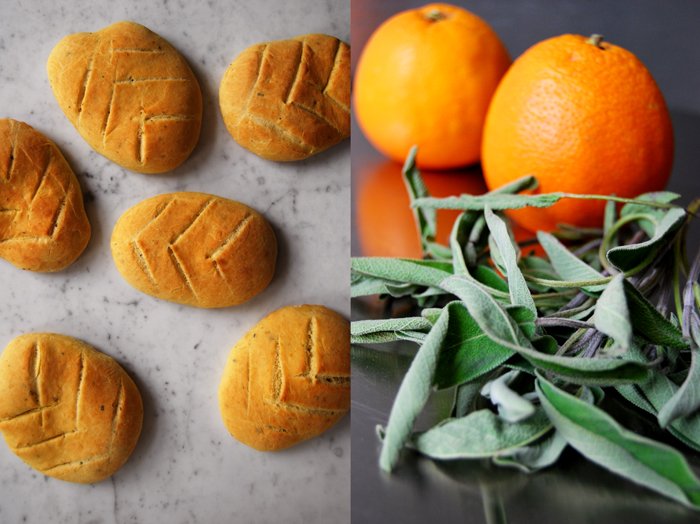
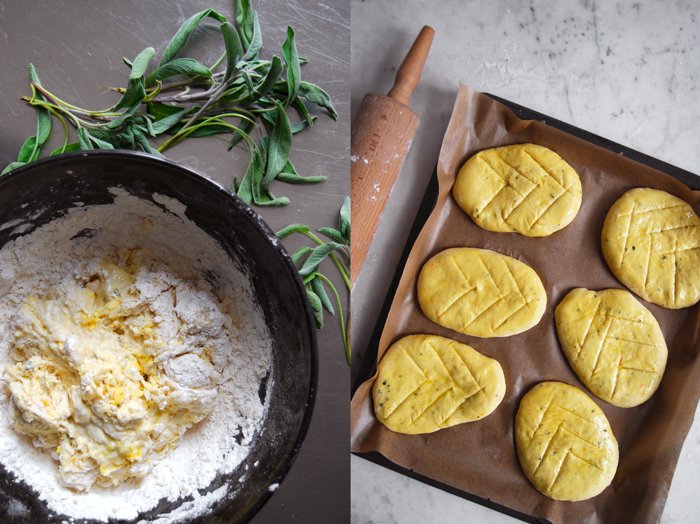
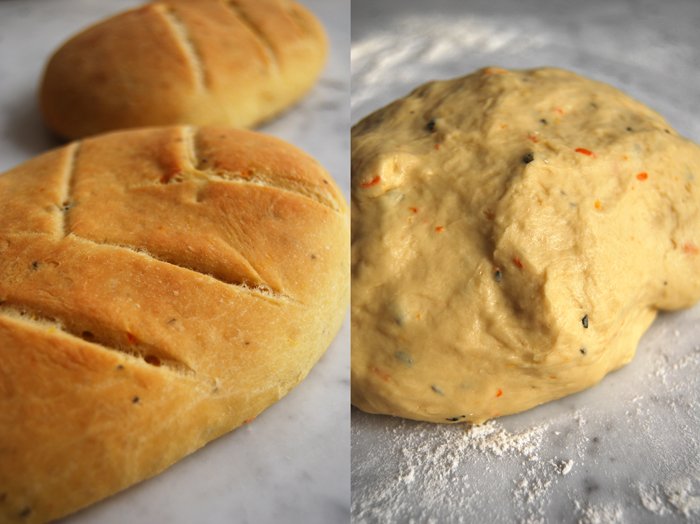
It's time to bake bread again! I use a recipe which involves sage and my beloved blood oranges, they'll be out of season soon, so I'm using every possible occasion that allows me to cook or bake with my sweet citrus fruits. I mix generous amounts of their zest and juice into the dough and the result is impressive!
My bread is a light and aromatic Fougasse, a French flatbread very popular in Provence where it's often made with olives, herbs and cheese. It's similar to the Italian Focaccia but with a leaf pattern of cuts in the dough. In some recipes, the cut goes all the way through creating holes in the bread while it's baking which makes the bread harder. I prefer to leave mine juicy with shallow cuts on the surface. Besides the orange and sage I add good olive oil in and on the bread. I use the wonderful extra virgin olive oil from the Molise region which I got from Marilena. Its strong and fruity taste is just what my Mediterranean flatbread needs!
I already have a great idea for a sandwich I can make with this bread for tomorrow's Sandwich Wednesday!
Fougasse with Orange, Sage and Olive Oil
For 6 flatbreads you need
plain flour 400g / 14 ounces (I use spelt flour type 630 but you can use any other plain flour)
dry yeast 1 package (for 500g / 1 pound flour)
salt 1 teaspoon
fresh sage, chopped, 8-10 leaves
zest of 1 medium sized orange
freshly squeezed blood orange or orange juice 100ml
water, lukewarm, 100ml
olive oil 5 tablespoons plus more for brushing the bread
organic egg 1
Combine the flour, yeast, salt, orange zest and sage in a large bowl. Add the water, orange juice and egg and mix with your dough hooks for 5 minutes. On a floured surface, continue kneading with your hands for a few minutes until you have an elastic dough ball. Put the dough back into the bowl and cover with a tea towel. Let the dough rise in a 35°C / 95°F warm oven for 45 minutes. This works really well but make sure that your oven is set to top/ bottom heat and not to fan.
Take the dough out and punch it down. Divide it into 6 pieces and roll them out into egg shaped discs (on a floured working surface, around 1 1/2 cm / 1/2″ thick). Put them on a baking sheet lined with parchment paper, cover with a tea towel and let them rise for 20 minutes.
Set your oven to 210°C / 410°F.
Brush the flatbread with olive oil and cut a pattern of 6-8 diagonal slashes into the dough to make a leaf pattern. Bake the flatbread on the lowest level for 12-15 minutes or until golden brown. Take them out and let them cool for 2 minutes.
I cut the warm flatbread in half and drizzled some more olive oil over it, it merged perfectly with the orange and sage aromas!

Marilena's Milk Pan di Campobasso, a traditional Dolci del Molise
I have wonderful news, eat in my kitchen is in the final of the Kitchn's "Best Daily Read Cooking Blog" together with nine other blogs! Thank you for your support and help to come so far!
It would be great if you could vote (one last time, I promise) for the final vote of the "Best Daily Read Cooking Blog" here.
A few weeks ago a very sweet lady, Marilena, got in touch with me. It was the day I wrote about Mussel with Ginger, Lemon Grass and Coriander and we got to talking about seafood recipes, cakes and olive oil. At one point she asked me if I would like to try one of her cake recipes, the Milk Pan di Campobasso.
Marilena lives in Italy in the Molise region (in the Campobasso province) which is north-east of Napoli. She loves to bake, beautifully decorated cakes for weddings and special events and she produces her own olive oil, Marilena has 300 olive trees! She already sent me some of her wonderful extra virgin olive oil which is divine, a few drops on fresh bread and some salt, delicious!
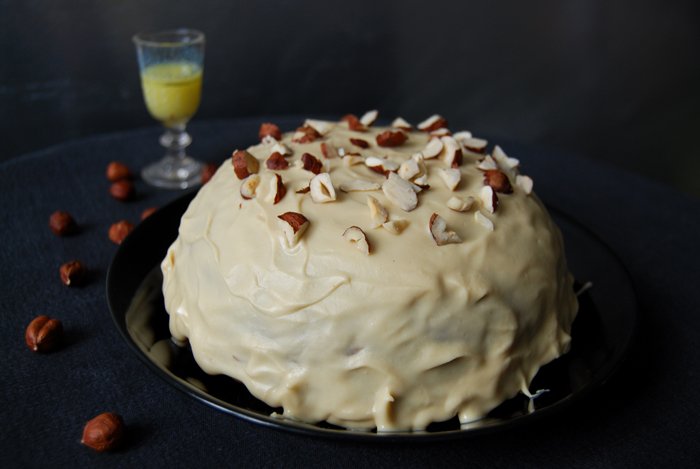
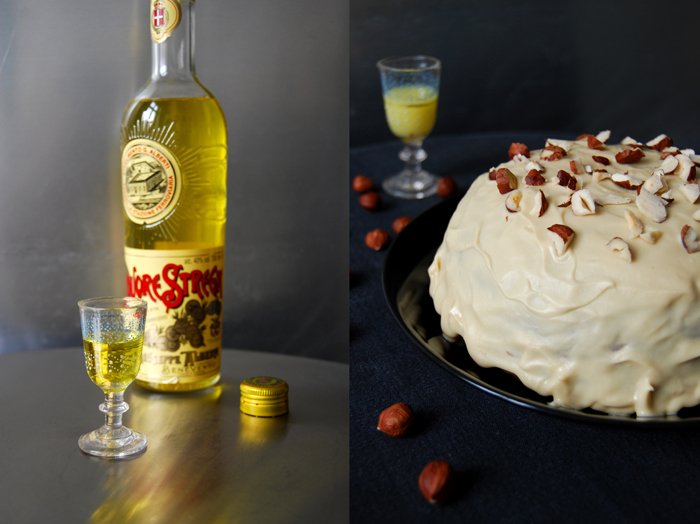
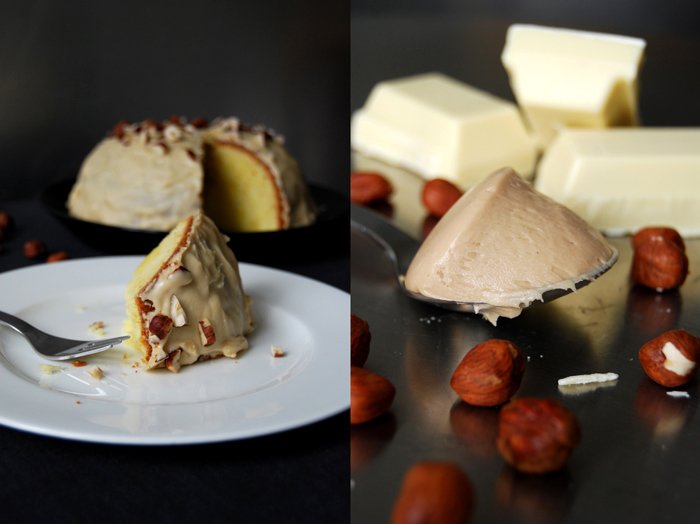
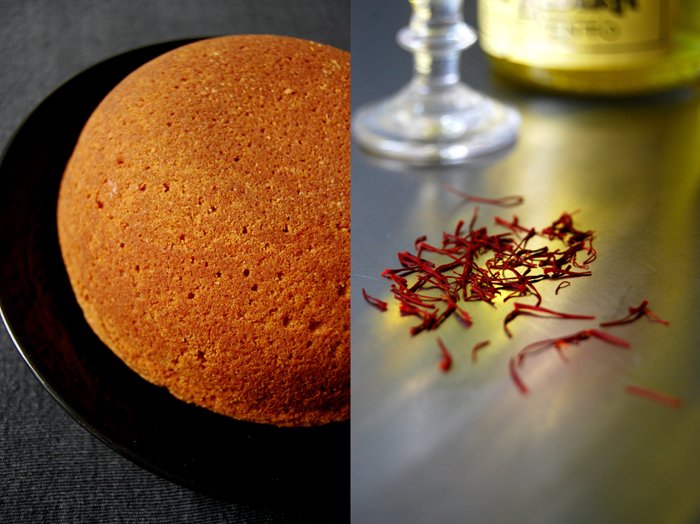
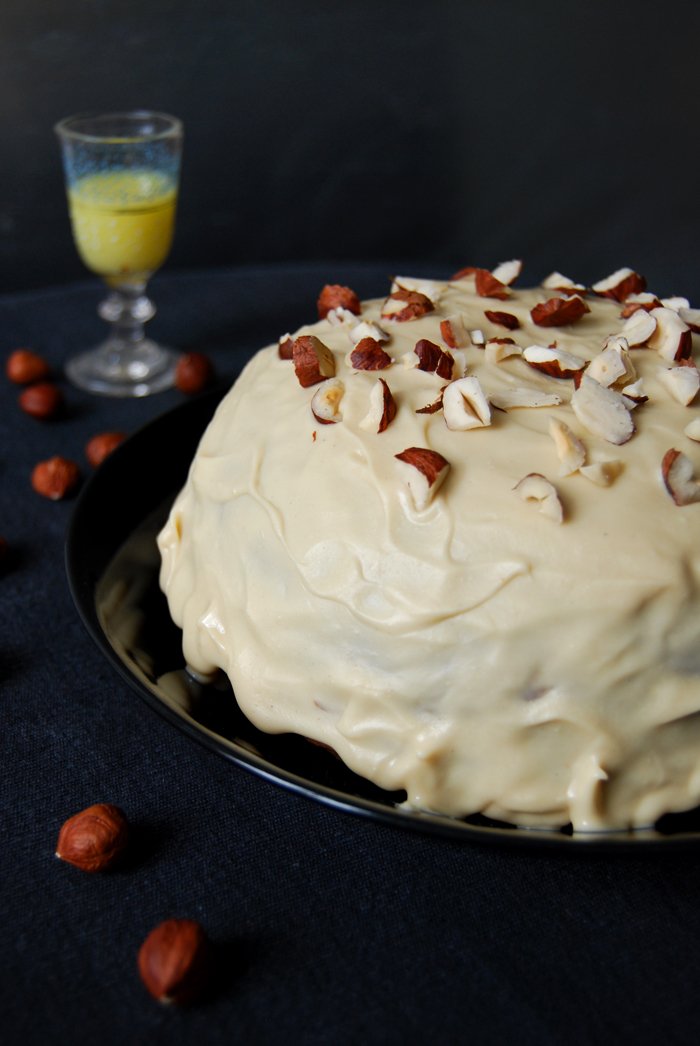
So finally I baked her cake, Marilena's Milk Pan di Campobasso. I was excited, it's a special recipe, a traditional Dolci del Molise and it required a few preparations. First I had to get a special liqueur, the Italian Strega (meaning "witch") which is a herbal liqueur produced since 1860, bright yellow made with saffron, mint and fennel. I ordered it and when it arrived I prepared the "liqueur milk". A mixture made of milk, Strega liqueur, sugar, saffron, vanilla and lemon peel which has to sit overnight, it gives the Milk Pan its typical taste and yellow colour. The cake is baked in a dome cake tin, it's very juicy, a bit moist but still light. It is covered with a glaze of nocciola cream, a hazelnut spread, mixed with white chocolate and sprinkled with hazelnuts. It's hard to describe the taste, it's the taste of Italy, wonderfully sweet and aromatic, with a slight hint of saffron which is a great match to the hazelnuts. I love it, thank you Marilena!
Milk Pan di Campobasso
For this cake you need a 1 liter dome cake tin (mine is ceramic, you can also use a metal one).
For the liqueur milk
I made more liqueur milk than I needed for the cake as I want to use it for other dessert recipes as well. You will need around 50ml (one espresso cup) of this mixture for the cake.
milk 50ml
granulated sugar 50g / 2 ounces
Strega liqueur 50ml (you can also use another herbal liqueur with fennel and saffron)
a tiny pinch of saffron
the seeds of 1cm / 1/2" vanilla bean
a long strip of lemon peel
Mix all the ingredients in a bowl, cover and let them infuse overnight.
For the hazelnut chocolate icing and topping
white chocolate 150g / 5 ounces
nocciola cream (hazelnut spread) 2 big tablespoons
sunflower oil 2 tablespoons plus more for mixing
hazelnuts, chopped, 3 tablespoons, or more if you like for the topping
In a sauce pan, melt the chocolate on low temperature and stir in the hazelnut spread and oil. It should be smooth and liquid, if it's not liquid enough you will have to add a little more oil.
For the cake
butter, soft, 150g / 5.5 ounces
granulated sugar 150g / 5.5 ounces
organic eggs 3
pinch of salt
plain flour 80g / 3 ounces
potato starch 80g / 3 ounces
baking powder 1/2 teaspoon
liqueur milk, 1 espresso cup (around 50ml)
Set the oven to 180°C / 355°F ( (fan-assisted oven), butter the dome cake tin and sprinkle with breadcrumbs.
Beat the egg whites with a pinch of salt till stiff. Combine the flour, potato starch and baking powder. In a large bowl, beat the butter and sugar till fluffy, add the egg yolks, one at a time. Stir in the dry ingredients and the liqueur milk and continue mixing until well combined. Gently fold in the egg whites.
Scrape the dough carefully into the prepared tin and bake until golden. Check with a skewer, it should come out clean. Marilena told me to check it after 30 minutes, mine needed 55 minutes. The baking time depends on the shape, size and material of your tin.
Let the cake cool (I put the tin in cold water which makes it easier to take the cake out), carefully flip it over on a big plate and ice it with the hazelnut chocolate icing. Sprinkle with hazelnuts and enjoy its beauty (and taste)!

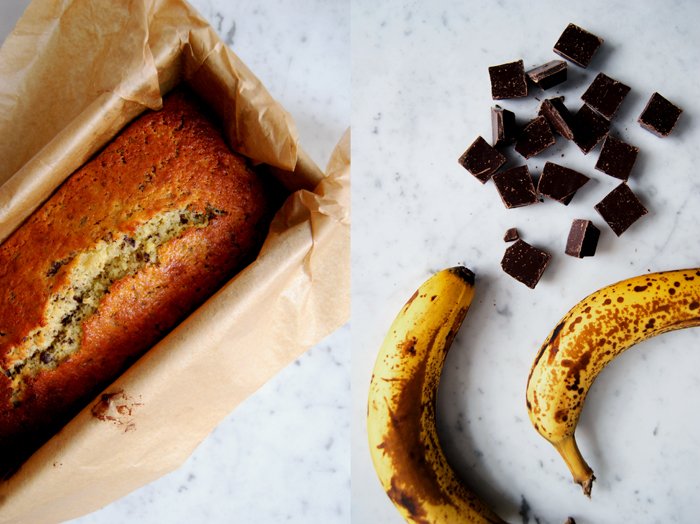
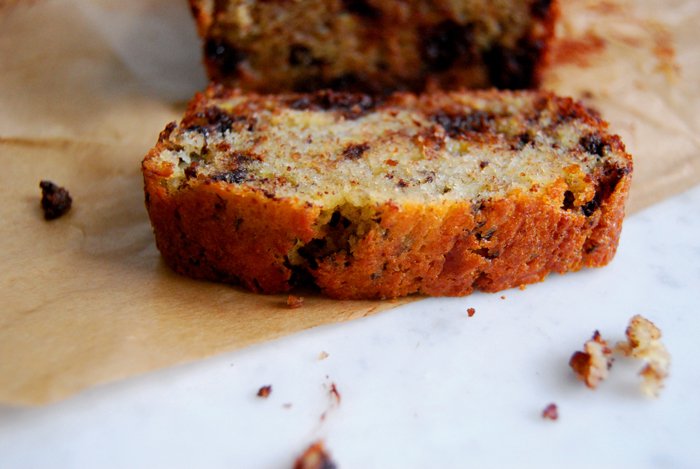
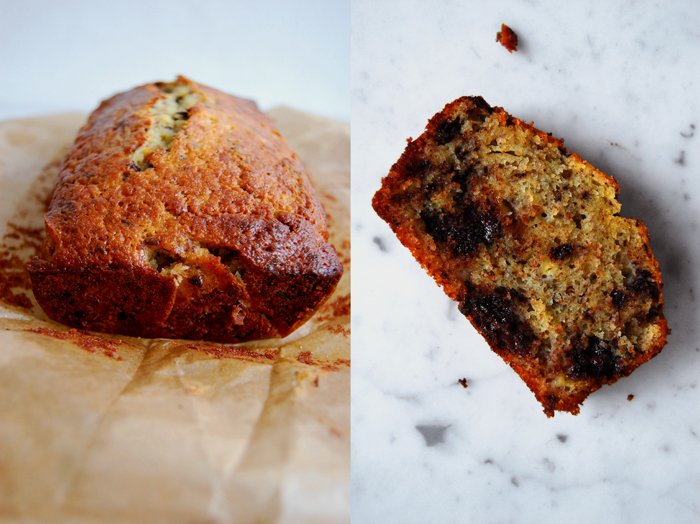
Sweet and Spongy Banana Chocolate Bread

This is another perfect weekend breakfast treat, Banana Chocolate Bread. I like mine juicy, almost moist, with lots of big pieces of banana and bittersweet chocolate chunks. When you take the bread out of the oven, golden and warm and you cut the first thick slice off the loaf, pushing the knife through sweet banana chunks and melted chocolate, you'll understand why there's no better start to the weekend. It feels, smells and tastes just right! I never wait for the bread and chocolate to cool, I have to eat a slice immediately as soon as it's done, the chocolate still warm and liquid.
The combination of banana and bittersweet chocolate is a special one as the sweetness and the bitterness balance each other out perfectly. I love it in ice cream, cookies and cakes, but to me nothing beats this duo when their big chunks merge into a warm cake, or morning bread. For one loaf I use three big bananas and 100g / 3.5 ounces of bittersweet chocolate, I don't want a hint of their flavours, I want an explosion on the taste buds.
Banana Chocolate Bread
For a 24cm x 10,5cm / 9.5″ x 4″ loaf tin you need
butter 120g / 4.5 ounces
granulated sugar 100g / 3.5 ounces
vanilla sugar 1 package (you can also use vanilla extract)
organic eggs 2
large and ripe bananas, quartered, 3
plain flour 120g / 4.5 ounces
baking powder 2 teaspoons
salt 1/2 teaspoon
bittersweet chocolate, chopped roughly (leave a few bigger chunks), 100g / 3.5 ounces
Set the oven to 160°C / 320°F (fan-assisted oven) and line the loaf tin with parchment paper.
Combine the flour, baking powder and salt. Mix the butter together with the sugar and vanilla sugar till fluffy. Add the eggs, one at a time, and continue beating for a couple minutes. Add the bananas, beating for 10-20 seconds and stop before they get too smooth, they should be a bit chunky. Gently fold in the flour mixture with a spoon, add the chocolate chunks and fold them in, carefully as well. Scoop the dough into your prepared tin and bake for 55 minutes or until golden brown. Check with a skewer, it should come out clean.
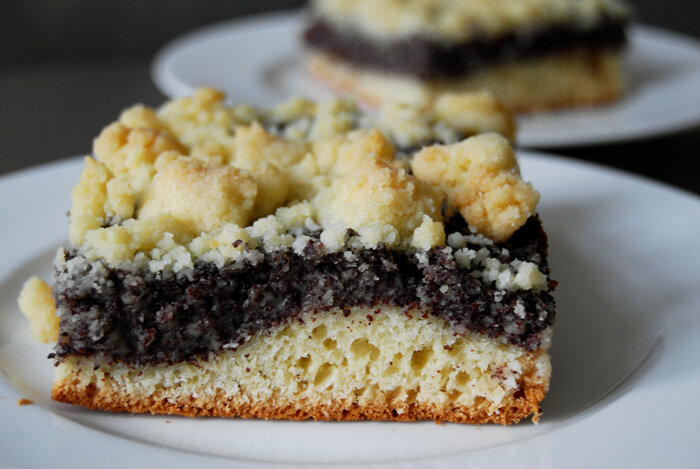
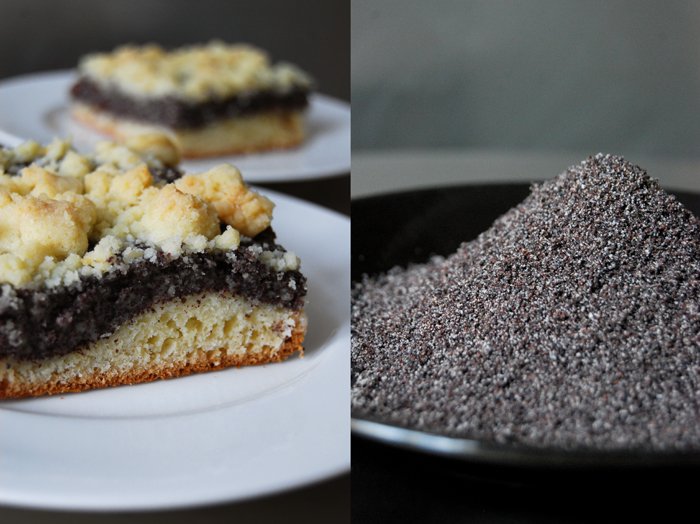
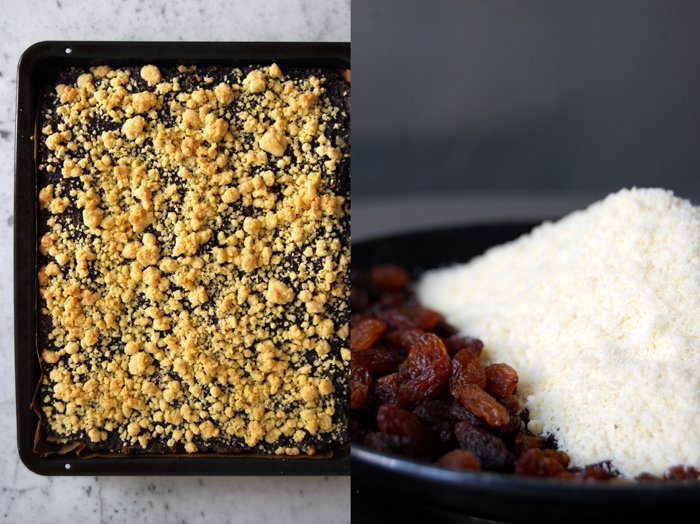
Elsa's Poppy Seed Crumble Cake
My aunt asked me for a helping hand in the kitchen because she had a baking marathon of three cakes to manage in one day, so I decided to bake one of them. She let me choose, they all sounded nice but I went for a recipe which I wouldn't usually bake. It's a poppy seed crumble cake with a sweet yeast dough, an old German recipe which she got from her friend Elsa many years ago.
I'm happy about my choice as the yeast dough alone is already wonderful, light and not too sweet. I will definitely use it for other recipes soon, maybe a Sunday morning Challah (plaited yeast cake). Although it's so light and spongy it's still strong enough to carry the thick layer of smooth poppy seed cream, semolina, ground almonds and raisins. If this wasn't enough, the cake is topped with crunchy buttery crumbles (I used the crumble recipe of my Apple Crumble Cake).
When I was a child, I loved poppy seed swirl cake. I couldn't get enough of it, but then at one point I lost interest for no apparent reason. So for years I haven't baked with these crunchy black seeds at all but I think they will return to my kitchen after this cake!

Poppy Seed Crumble Cake
For a 39 x 32cm / 15.5 x 12,5" tray of cake you need
For the yeast dough
plain flour 500g / 1 pound
dry yeast 1 package (for 500g / 1 pound of flour)
granulated sugar 60 g / 2 ounces
a pinch of salt
milk, lukewarm, 150ml
butter, melted and cooled, 100g / 3.5 ounces
organic eggs 2
Combine the dry ingredients, add the milk, butter and eggs and mix with your dough hooks for 5 minutes. Continue kneading with your hands for a couple minutes. Put the dough back into the bowl, cover with a tea towel and let it rise in a 35°C / 95°F warm oven (top / bottom heat) for about 45 minutes until well risen.
Prepare a baking sheet with parchment paper. Roll out the yeast dough and put it on the baking sheet. Cover with a tea towel and let it rise for 15 - 20 minutes in a warm place.
Set the oven to 175°C (top / bottom heat) and prepare the poppy seed mixture and crumbles.
For the poppy seed mixture
semolina 125g / 4.5 ounces
granulated sugar 150g / 5.5 ounces
salt 1/4 teaspoon
milk 1000ml
organic egg yolks 2
poppy seeds, crushed, 250g / 9 ounces
almonds, ground, 100g / 3.5 ounces
raisins 50g / 2 ounces
zest of 1 lemon
In a large pot, bring the milk, semolina, sugar, salt and egg yolks to the boil, stirring constantly. Continue stirring and let it cook for 5 minutes on medium heat. Add the poppy seeds, almonds, raisins and lemon zest, combine everything and set aside.
For the crumbles
The crumbles need good preparation as you have to make sure that the mixture is neither too moist nor too dry. Have some extra flour and melted butter close at hand so that you can add some immediately if necessary.
plain flour 200g / 7 ounces (plus more if the crumbles are too sticky)
granulated sugar 125g / 4.5 ounces
vanilla sugar 1 teaspoon
butter, melted, 125g / 4.5 ounces (plus more if the crumbles are too fine)
Combine the dry ingredients in a bowl. Pour the melted butter on top and mix quickly with the hooks of your mixer, this shouldn’t take longer than 20 seconds. If the crumbles are too moist and sticky add a bit more flour (1-2 tablespoons). If they are too fine and don’t form bigger crumbles add more melted butter.
For the cake, spread the poppy seed mixture over the yeast dough and sprinkle with the crumbles. Bake the cake for 40 minutes or until the crumbles are golden.

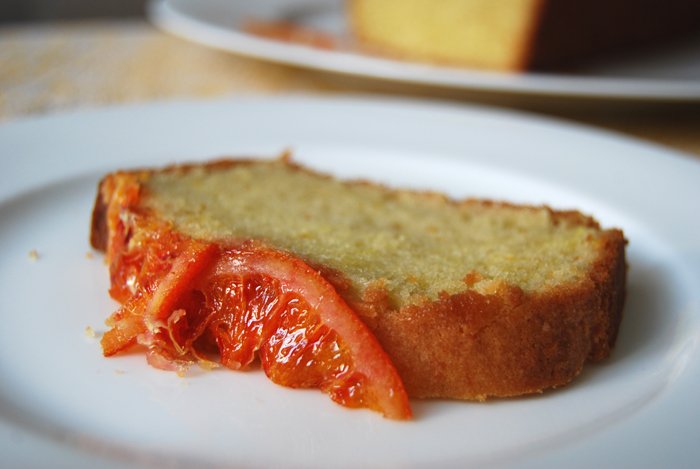
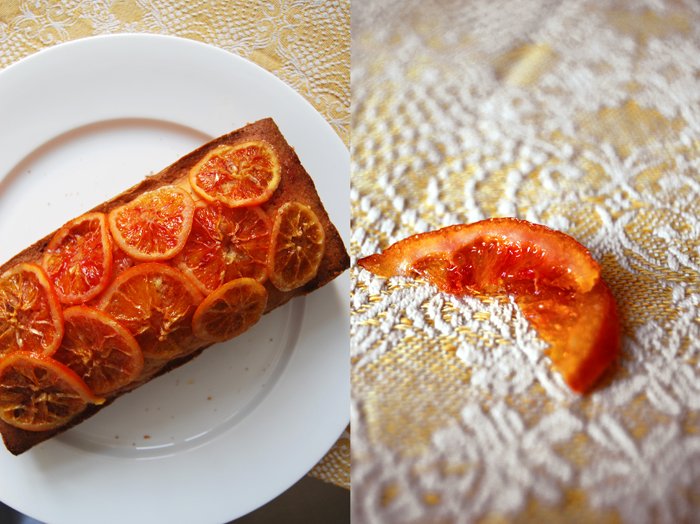
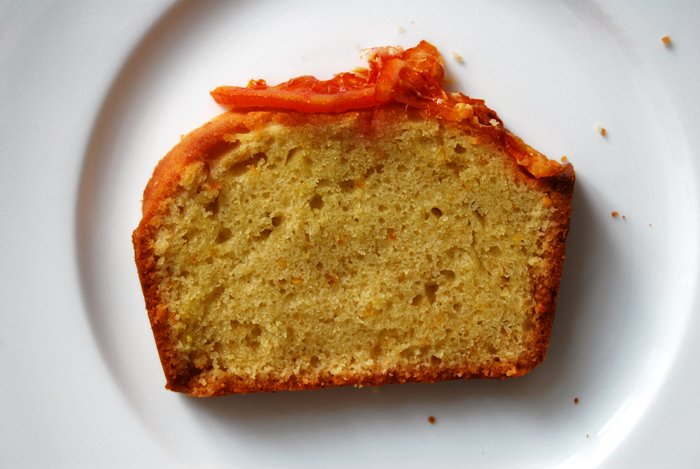
Blood Orange Cake
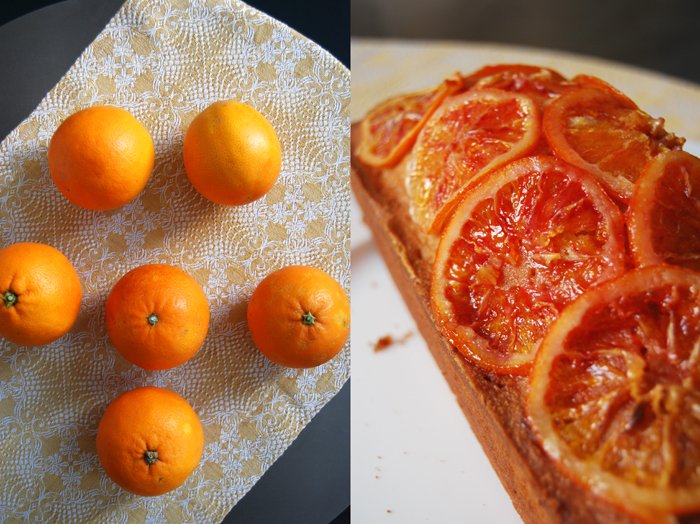
Two things led to this cake, firstly, I haven't written about blood oranges in more than two weeks, secondly, my mother. She reads (nearly) everything I share on eat in my kitchen, she is my mother after all. She recently mentioned that my photos could do with some new decoration. She's a woman of action, so within a few days she sent me a parcel packed with some pots, silver plates and a selection of her favourite linen from an artisan weaver in the Italian Dolomite Alps. I'm not really a big decorator, I'm more of a minimalist but I'm open to some inspiration, especially when it comes from my mother.
The package arrived, with beautiful handwoven craftsman's work, a table cloth and runners in various colours and designs. One of them caught my attention, a golden yellow design, a bit more frilly than my usual style but I liked it. I knew it would need to be paired with the right food to unfold its beauty. The inspiration came within a split second, a spongy blood orange cake with sugared slices on top, a bit opulent and the fruits are also from Italy, like the cloth.
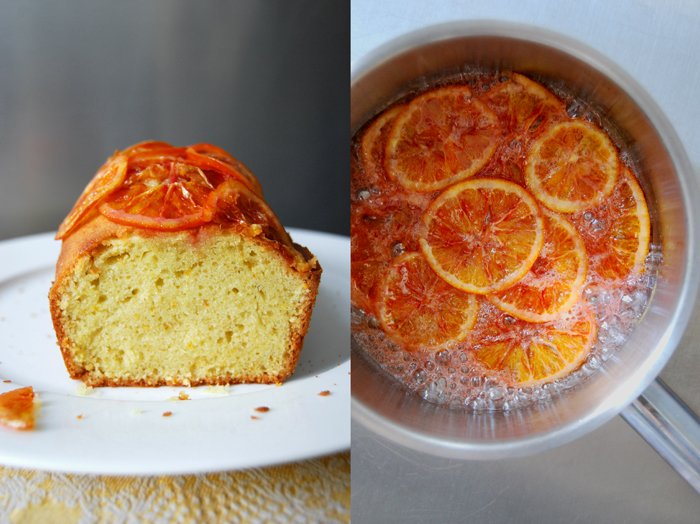
Blood Orange Cake
For this recipe you need a 24cm x 10,5cm / 9.5" x 4" loaf tin.
butter, soft, 180g / 6.5 ounces
granulated sugar 180g / 6.5 ounces
organic eggs 3
blood orange zest 2 tablespoons
freshly squeezed blood orange juice 3 tablespoons
plain flour 210g / 7.5 ounces
baking powder 1 teaspoon
For the topping
blood orange, cut into very thin slices, 1
granulated sugar 50g / 2 ounces
water 2 tablespoons
icing sugar 2 tablespoons, for the syrup
freshly squeezed blood orange juice 4 tablespoons, for the syrup
Set the oven to 160°C / 320°F (fan-assisted oven) and line your loaf tin with parchment paper.
For the topping, cook the orange slices, sugar and water in a sauce pan on high temperature for around 5 minutes until the water has evaporated. Put aside.
Mix the butter together with the sugar till fluffy. Add the eggs, one at a time, and continue mixing for a couple minutes. Mix the orange juice and zest into the mixture, gently fold in the flour combined with baking powder and scoop into your prepared tin.
Bake for 35 minutes, take it out and arrange the sugared orange slices on top. Bake for another 15 minutes. Check with a skewer, it should come out clean.
Mix the icing sugar with 4 tablespoons of blood orange juice for the syrup and pour over the cake (you can spike the top of the cake first).

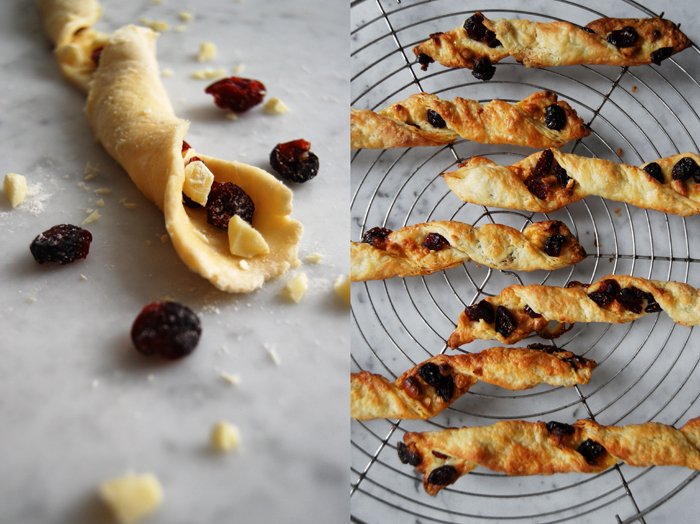
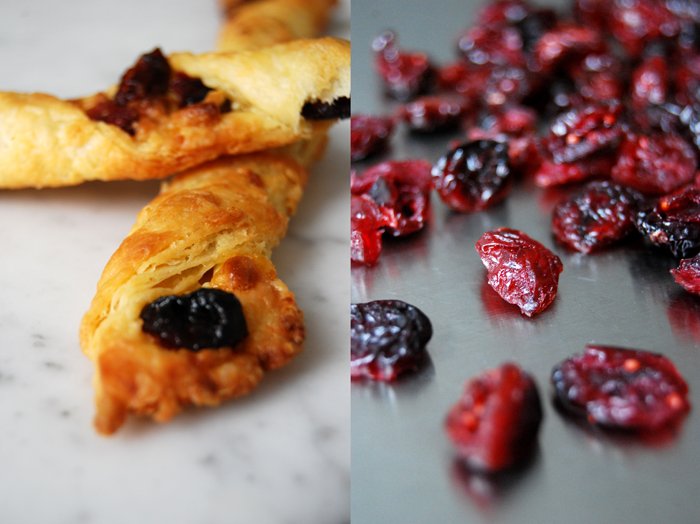
Flaky White Chocolate and Cranberry Twists
I've been wanting to bake something with white chocolate and cranberries since December but this idea never reached my oven - too much to bake, too little time. I was drawn to this combination last winter when I mixed them into my crunchy cookie recipe. The chocolate and the berries gave them a nice sweetness, milky and fruity. I enjoyed them so much that I decided to share them with our family and friends in Malta, so I sent them a big parcel stuffed with these cookies at Christmas time. The box was emptied within moments as we witnessed on Skype.
This weekend I felt like this duo again but didn't want to bake cookies. Croissants are more what I had in mind, just without the hassle of making two different doughs for the perfect puff pastry. I thought of my buttery flaky Rugelach, this dough is made to be wrapped around a sweet filling but I wanted something bigger, not just a mouthful - a handful! This is a Sunday morning pastry which you hold in your buttery fingers while you sip your coffee. I went for a long and twisted shape, quick to prepare, easy to eat, no hassle on a Sunday - Good morning everybody!
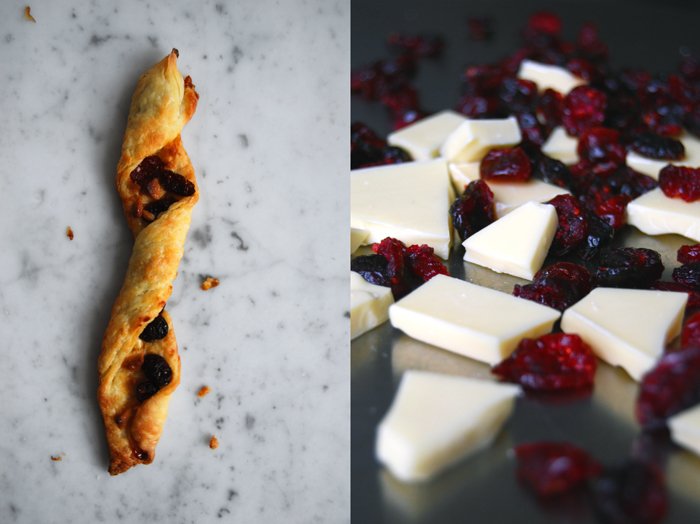
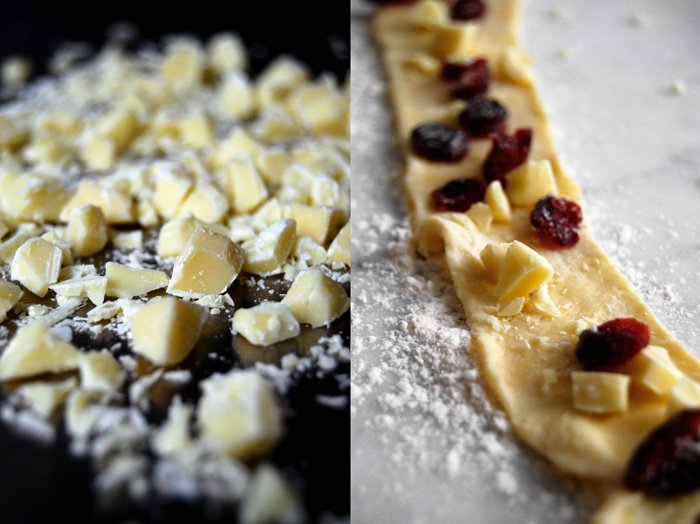
White Chocolate and Cranberry Twists
For 16 twists you need
plain flour 150g / 5 ounces
icing sugar, 1 heaped tablespoon
butter, cold, 125g / 4.5 ounces
cream cheese, at room temperature, 120g / 4.5 ounces
a pinch of salt
white chocolate, chopped, 70g / 2.5 ounces for the filling
dried cranberries 70g / 2.5 ounces for the filling
For the filling, mix the chocolate and cranberries.
Combine the dry ingredients. Cut the butter with a knife into the flour mixture until there are just little pieces of butter left. Mix with your dough hooks for a few seconds. Add the cream cheese and work it into the mixture with a spoon or the mixer until you have a crumbly mixture. Form 2 discs and put them in the freezer for 30 minutes. The dough should be very cold but not too hard, still rollable.
Preheat the oven to 185°C / 365°F and prepare a baking sheet with parchment paper.
Take out one disc, leave the second one in the fridge while you're preparing the first batch. Roll out the disc between floured cling film as the dough becomes very sticky at room temperature. Give it a rectangular shape, the width will be the length of your twists. Cut off a 4.5cm / 2" strip and pull it off the foil (don't worry if it's sticky, it's an elastic dough, you can also use a knife to lift it). Lay the pastry strip flat on your working surface, sprinkle with the filling, pushing it a little into the dough. Carefully, twist the pastry, starting on one side twisting it up to the middle and then continue from the other side. This way you don't loose too much of the filling. Place the twist on the baking sheet and continue with the rest of the dough. Bake the pastry for 12 minutes or until puffy and golden brown. It’s best to check them after 10 minutes to be sure that they don’t get too dark. Let them cool on a wire rack for a few minutes.

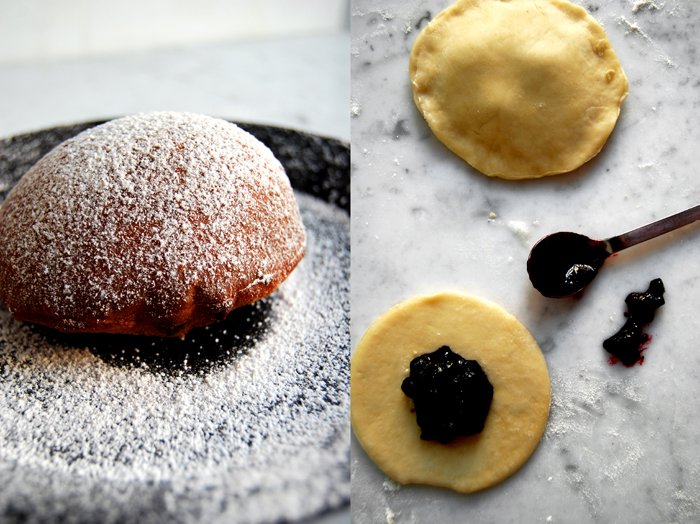
A Sweet Berliner - Our Family Feast

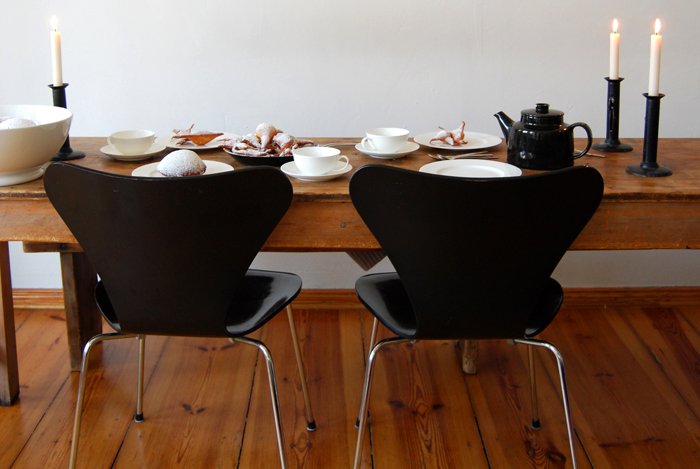
A long time ago, my family started a beautiful tradition. All my sisters, their children and friends of the family meet at my mother's house in the countryside to celebrate carnival. We listen to silly carnival music, the children dress up in funny costumes and we make huge amounts of a special traditional carnival pastry - the famous "Berliner". When the sweets are done, we fill them in my mother's large white bowls from Tuscany, place them on her long table and enjoy the fruits of our work, which usually goes on for hours. In general, I can't say that I'm too fond of the 5th season (the name given to carnival time in Germany) but the mood and the food at my mother's home makes me love it!
The sweet speciality we make looks a bit like a doughnut without a hole, it's made of yeast dough, filled with jam and deep fried in vegetable shortening. It has different names in different regions but where I come from, which is the center of carnival in West Germany, they are called "Berliners". Funnily enough, they are called "Pfannkuchen" in Berlin, which means pancakes. In the Swabian area in the South of Germany where my step father comes from, people call them "Fastnachtskuechle". I could continue endlessly with even more names "Krapfen", "Kreppel", seemingly every region wanted to give them a name of their own.
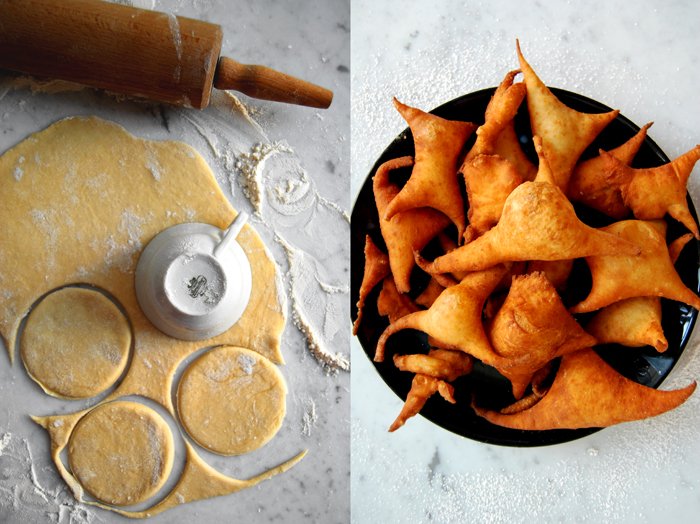
So we all gather in my mother's kitchen and each of us has a specific job to do in the making of our "Berliners" - which never changes. For years now, my job is to watch the sweets together with my step father while we fry them in a large cast iron pot. We have to turn them and dust them with sugar when they are done. My mother and sisters, on the other side of the kitchen, take care of the dough and filling the "Berliners". On my photos you can also see some free shaped sweets which are the bits and pieces of dough that are left after cutting out circles.
Carnival is still a month away (and I'm also not at my mother's house at the moment) but there is a reason I made my own "Berliners" at my home now. I was asked to participate in a blog tour with 13 other blogs from America and Australia and write about "Hearts At Home". My heart is always where good food is and that's at my home most of the time but also at carnival at my mother's together with my family. Our tradition, to meet at this time and to make this special food means a lot to me. I look forward to seeing my loved ones and spend a few wonderful, silly days together with them. That's where my heart is and that's home to me. Making "Berliners" without my family was still a fun experience. I was a bit worried that I wouldn't manage on my own but I did, and even more so it was surprisingly easy which makes me think about having this adventure more than just once a year!

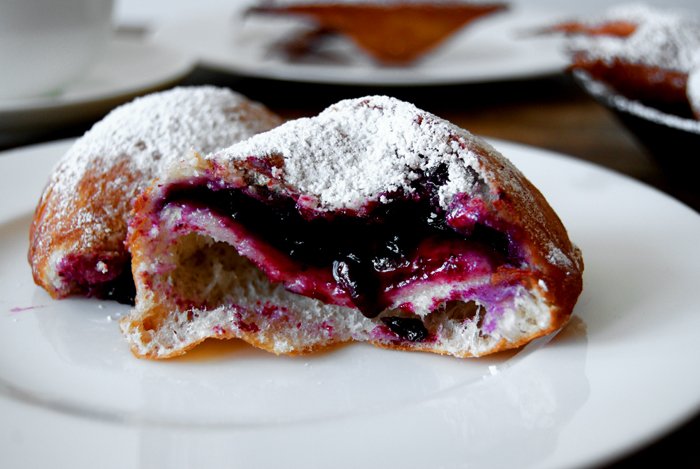
Blueberry Jam Filled Berliner
I made 12 jam filled "Berliners" plus several free shaped sweets (without filling), all in all of 500g / 1 pound of flour. I melted 1kg / 2 pounds of vegetable shortening for deep frying in a large pot, enough to allow the sweets to float freely. My mother uses a much bigger pot and 3kg / 6 pounds of shortening but she starts off with 3kg / 6 pounds of flour as she has to feed more hungry people than I did.
plain flour 500g / 1 pound
dry yeast 1 package (for 500g / 1 pound of flour)
granulated sugar 3 tablespoons
vanilla sugar 1 package
salt scant 1 teaspoon
milk, lukewarm, 250ml
butter, melted and cooled down, 80g / 3 ounces
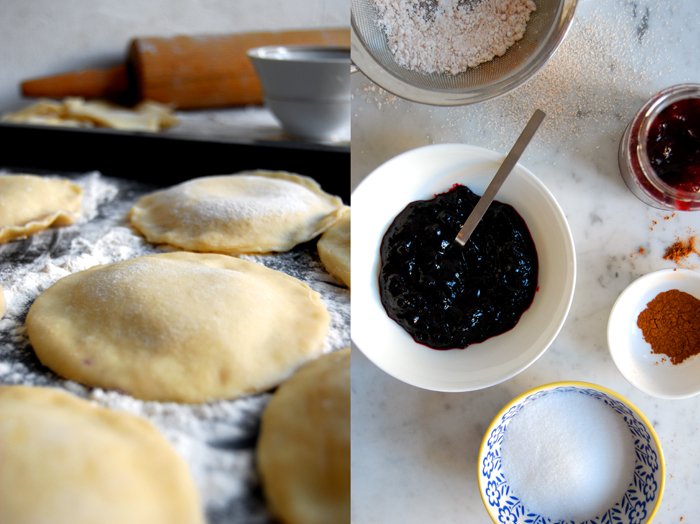
blueberry jam, around 200g / 7 ounces for the filling
egg white, mixed with a fork, 1-2 (to stick the discs of dough together)
vegetable shortening 1kg / 2 pounds for frying
For dusting
50g / 2 ounces of icing sugar sieved together with 3/4 teaspoon of cinnamon
Combine the dry ingredients, add the milk and butter and mix with your dough hooks for 5 minutes. Continue kneading and punching with your hands until you have an elastic dough ball. Put the dough back into the bowl, cover with a tea towel and let it rise in a 35°C / 95°F warm oven (top / bottom heat) for about an hour.
When the dough has doubled in size, take it out, punch it down and knead with your hands for 2 minutes. On a floured working surface, roll the dough out in batches and cut out 10cm / 4" circles (I used an old tea cup from my grandmother). Put the bits and pieces of dough which are between the circles aside as you will fry them as well (without filling).
Heat the shortening in a large pot on highest temperature.
Take one disc of dough, drop a teaspoon of jam in the middle and brush the edge with egg white. Put a second disc on top, sealing well by pushing with your fingers along the outline twice to make sure that they won't open in the hot fat.
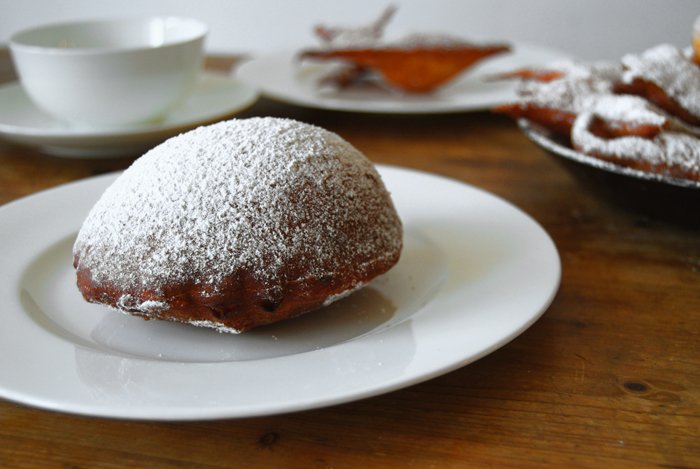
To check the temperature of the fat, put a piece of dough inside, carefully as it's very hot! Turn it with wooden spatulas or spoons, it should be done within a few seconds. The "Berliners" might take a few seconds longer. They will become a bit dark, that's normal, but they shouldn't burn, so adjust the temperature if necessary. Keep in mind that if it's too low the inside won't cook through. I always cut the first "Berliner" in half when I think it's done to see if I have to change the setting.When you take them out, let them cool for a few seconds before you dust them with your cinnamon icing sugar.
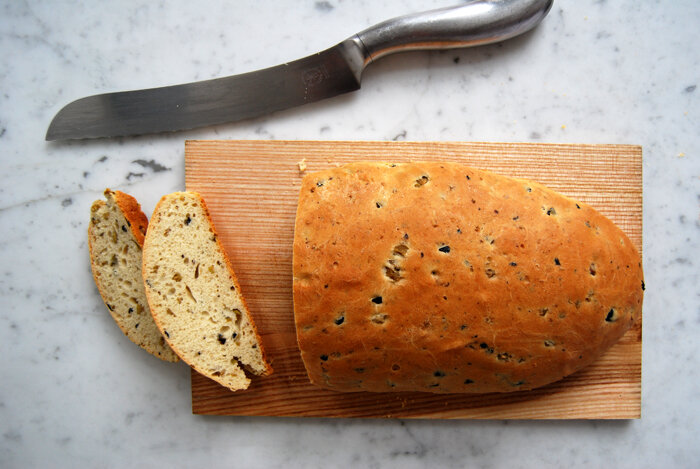
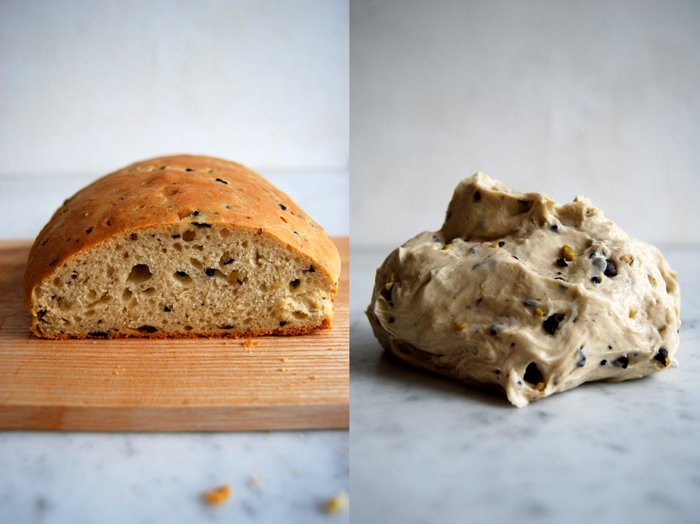
Luscious Bread with Black and Green Olives

Baking bread is a very relaxing and satisfying ritual. You mix the dough and watch it rise slowly, then you shape it and bake it in the hot oven where it doubles in size again. It's such a simple yet wonderful food, one of my favourites! Nothing beats a slice of fresh warm bread spread with butter or sprinkled with olive oil. So many people from different cultures celebrate this ritual, with similar recipes even though they live on opposite sides of the world. It's one of our traditions that connects us and shows how much we have in common.
I have a good friend who lives in Sydney and whenever he comes to Berlin we all meet at our's together with a few of our friends. Sometimes it's a big dinner, sometimes we just have some wine and snacks. The only problem is that he never tells me in advance, it's a very spontaneous thing, he's just here at one point. Followed by another 10 - 15 people. This calls for some improvisation tricks in the kitchen, we just have to eat what my fridge offers!
Around two years ago he called to announce his arrival and I was lucky to have a few pumpkins in my kitchen, so a soup for 10 was quickly thrown together. For whatever reason I had lots of black olives as well. I like to have more than enough good bread on my table when it's a long night so I decided to bake 2 loaves of olive bread with lots of olives and olive oil, juicy enough to nibble on after finishing the soup. The texture is light but you taste and feel the olives and the olive oil, it makes the bread really smooth. Everybody loved it and couldn't stop eating it. This was a feast to me, it always is, sitting together with friends at my long wooden table, talking, laughing and enjoying some red wine and nice bread.
Tomorrow it's my Sandwich Wednesday again and I will make a special sandwich with this bread which is very popular in the Middle East!
A Juicy Bread with Black and Green Olives
For 1 loaf of bread you need
plain flour 250g / 9 ounces (I use spelt flour type 630 but you can use any other plain flour)
dry yeast 1 tablespoon
salt 1/2 teaspoon
a pinch of sugar
water, lukewarm, 70ml
milk, lukewarm, 70ml
butter 1 tablespoon
olive oil 2 tablespoons
black and green olives, chopped, 60g / 2 ounces
Combine the dry ingredients and add the water, milk, butter and olive oil. Mix with your dough hooks till everything is combined. Add the olives and continue mixing for a few minutes. Continue kneading and punching with your hands until you have an elastic dough ball, it will be a little sticky but that's fine. Put the dough back into the bowl and cover with a tea towel.
Option1:When I prepare the dough the day before I bake it, I put the bowl with the dough in the fridge (covered with cling film) and let it rise overnight. You will have to take it out of the fridge 30-60 minutes before you can continue with the next steps.
Option 2:In case I want to bake my bread the same day, I let the dough rise in a 35°C / 95°F warm oven for 45 minutes. This works really well but make sure that your oven is set to top / bottom heat and not to fan.
When the dough has doubled in size, take it out, punch it down and knead with your hands for 2 minutes. Form the dough in a long loaf shape and put it on an oiled baking sheet. Cover with a tea towel and let it rise for another 25 - 35 minutes in a warm place.
Set your oven to 200°C / 390°F top / bottom heat.
Bake the bread for 30 minutes or until cooked through. If you're not sure if it's done turn the bread around and knock on its underside, it should sound hollow. Let it cool for 5 - 10 minutes, cut a thick slice off it and drizzle some olive oil on top, just a bit, and sprinkle with salt.


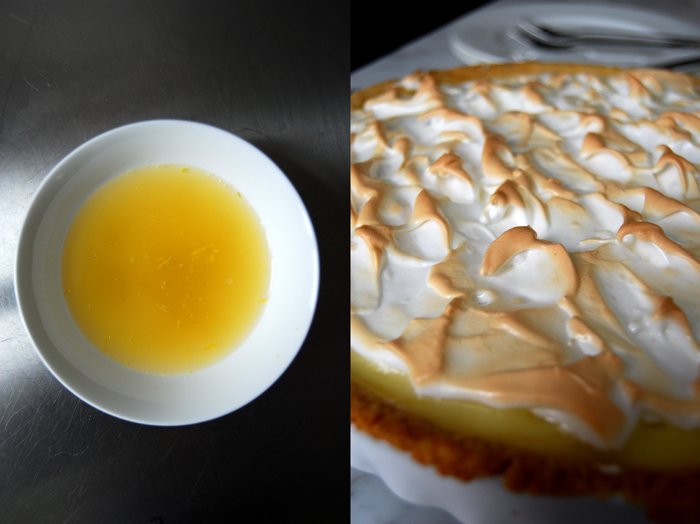
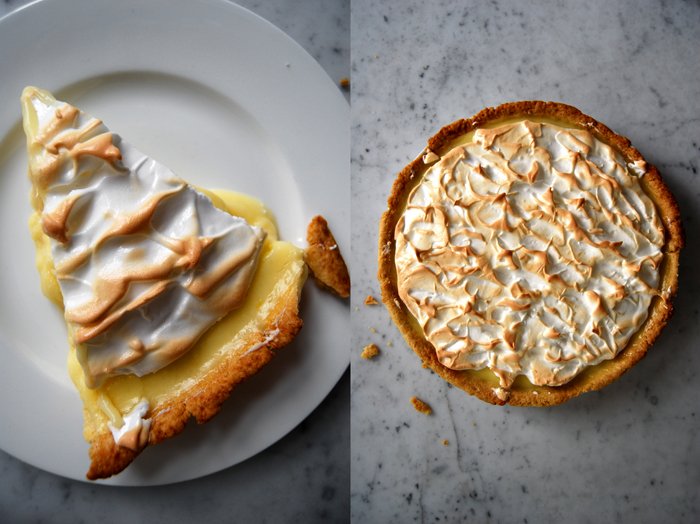
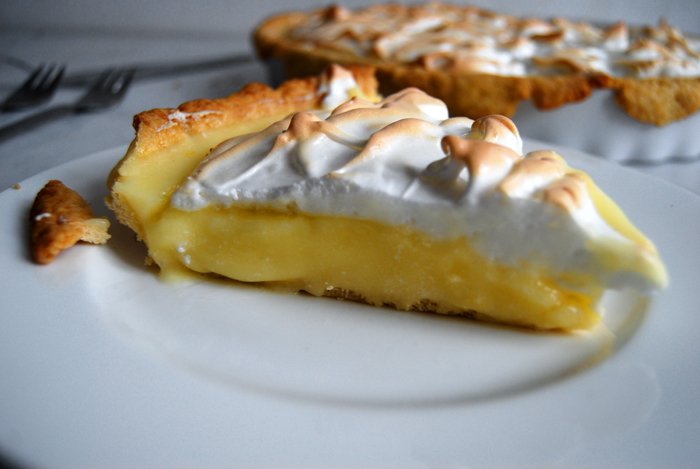
Jenny's Awesome Lemon Meringue Pie
I had the first lemon meringue pie of my life in Malta, just a few years ago. It was one of those things I always wanted to try but always took second place. Whenever I went to a Patisserie and spotted a pretty meringue, my mood still took me somewhere else and chose something different. Now I know that was a mistake!I
t was summer and we stayed at Jenny's house in Malta. It was hot (as always) and everybody met in the kitchen, also as always. My Maltese Mama made a lemon meringue pie for a party and I followed her baking curiously but not overly excited. I must admit that its delicate beauty appealed to me and the fact that she had squeezed the juice of countless lemons - from her own lemon tree! - into the curd caught my attention. Maltese lemons taste amazing, they are spoiled with sunlight, juicy and strong. And Jenny's are simply the best! So, I tried the pie and it it was awesome. A crunchy base, buttery and crisp as I love it, the lemon curd perfectly balanced between sweet and sour, and the meringue was fluffy and slightly sweet. I had to get her recipe!
She gave it to me, and since then I made it, with little changes numerous times, mostly eating more of it than I want. It's the perfect dessert for a dinner party. It looks beautiful and you can prepare it in advance, it should actually sit for a few hours so that the curd can become firm. I skipped this point as you can see in the photos, the curd is still a bit soft. The smell of butter and lemon in my kitchen was too much of a teaser, I had to try it. I gave the pie 10 minutes to cool on my balcony (in arctic temperatures), impatiently, waiting for my first bite of Jenny's awesome Lemon Meringue Pie!
Lemon Meringue Pie
For one pie you need a round 27cm / 10.5″ baking dish or tart pan.
For the crust
plain flour 210g / 7.5 ounces
butter 120g / 4.5 ounces
granulated sugar 1 tablespoon
salt 1/2 teaspoon
water (cold) 4 tablespoons
Combine the flour with the sugar and salt. Cut the butter with a knife into the flour until there are just little pieces of butter left. Continue with your fingers and work the butter into the flour until combined (there shouldn’t be any lumps of butter left). Add the water and continue mixing with the hooks of your mixer until you have a crumbly mixture. Form a disc, wrap in cling film and put in the freezer for 15 minutes.
Set your oven to 210°C / 410°F top/ bottom heat. Roll out the dough between cling film and line your baking dish with the flat pastry. Prick it with a fork and blind-bake in the hot oven for 18 minutes or until golden. Let it cool completely.
For the curd
granulated sugar 150g / 5 ounces
cornstarch 50g / 2 ounces
pinch of salt
water 450ml
egg yolks, beaten 2
butter 90g / 3 ounces
freshly squeezed lemon juice 150ml
zest of 1 lemon
Combine the sugar, cornstarch and salt and mix together with the water in a small sauce pan. Bring to the boil on medium heat, stirring constantly. When the mixture starts to bubble, turn down the heat, and cook for another 3 minutes, again, stirring constantly, it will become thick. Take the pan off the heat. Mix 1 tablespoon of this mixture into the egg yolks, stir and pour everything back into the remaining mixture in the sauce pan. Bring to the boil, stirring, let it bubble for a few seconds and take it off the heat. Stir in the lemon juice and zest and the butter and let it cool.
For the meringue
egg whites 3
granulated sugar 80g
a pinch of salt
Beat the egg whites together with the salt, adding the sugar gradually while beating, until the white is stiff.
The Pie
Set the oven to 210°C / 410°F top/ bottom heat.
Pour the lemon curd over the short crust and spread the stiff egg whites on top. Bake for 6 minutes or until the top is golden and crisp. Let it sit for 2-3 hours in a cool place.