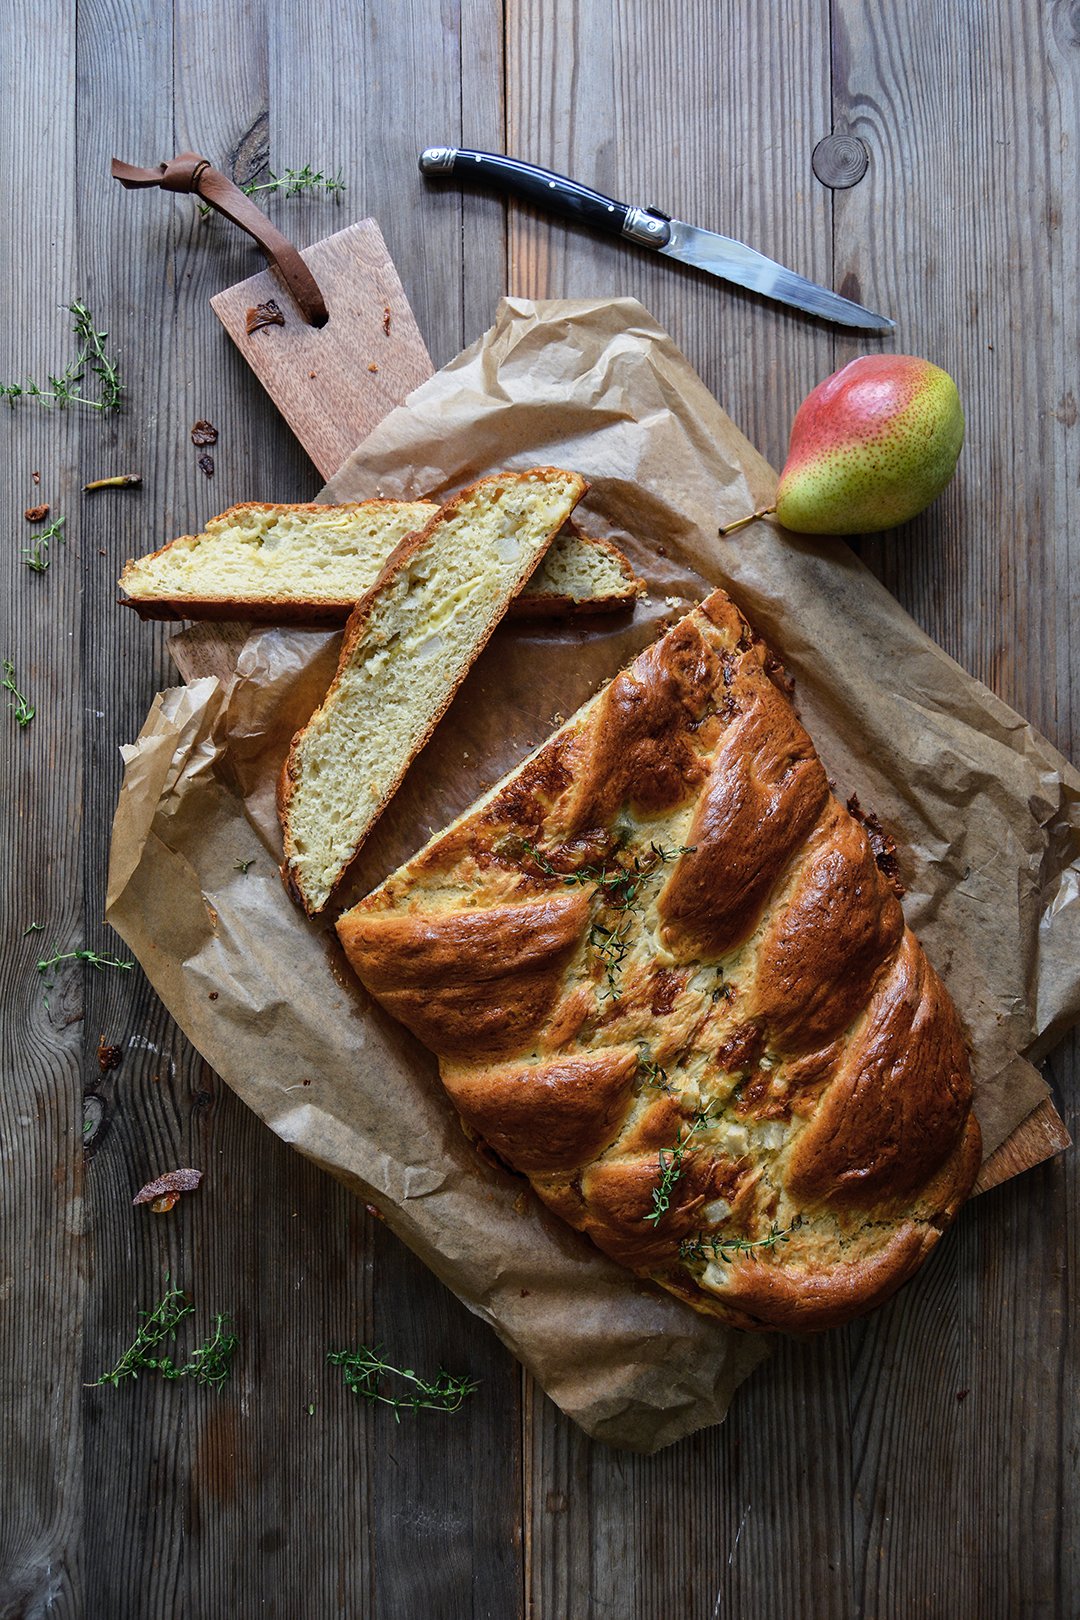
ISCHIA / ISOLA VERDE
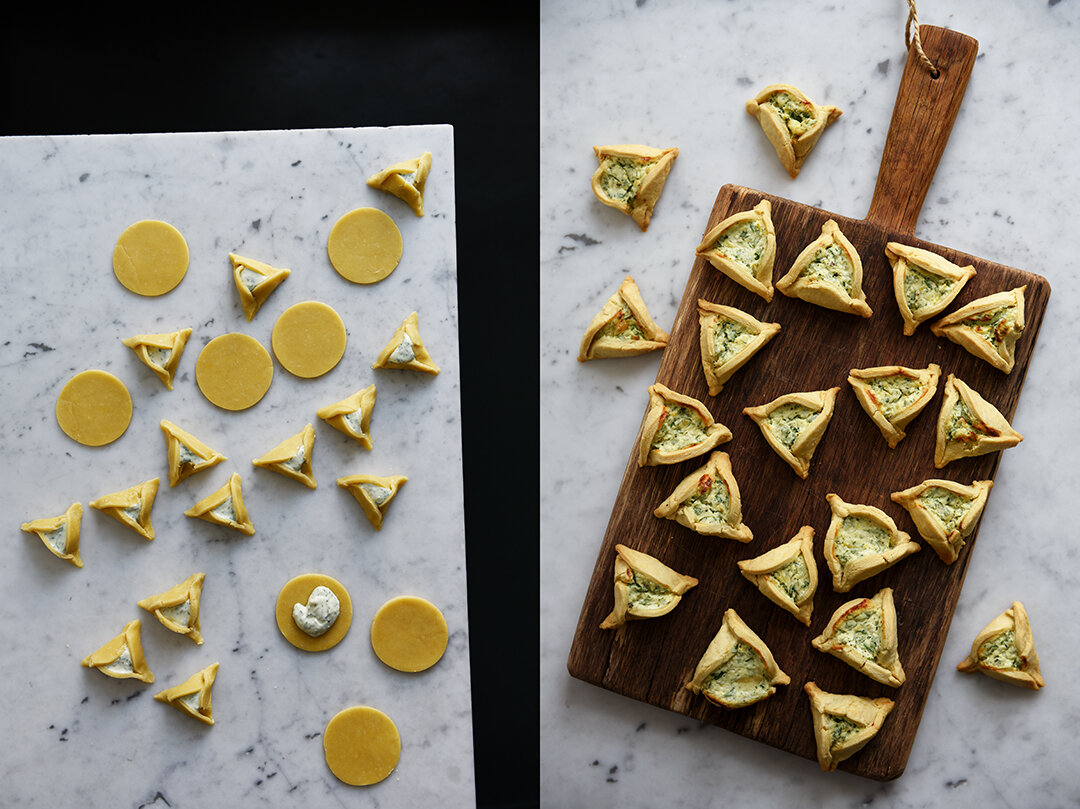
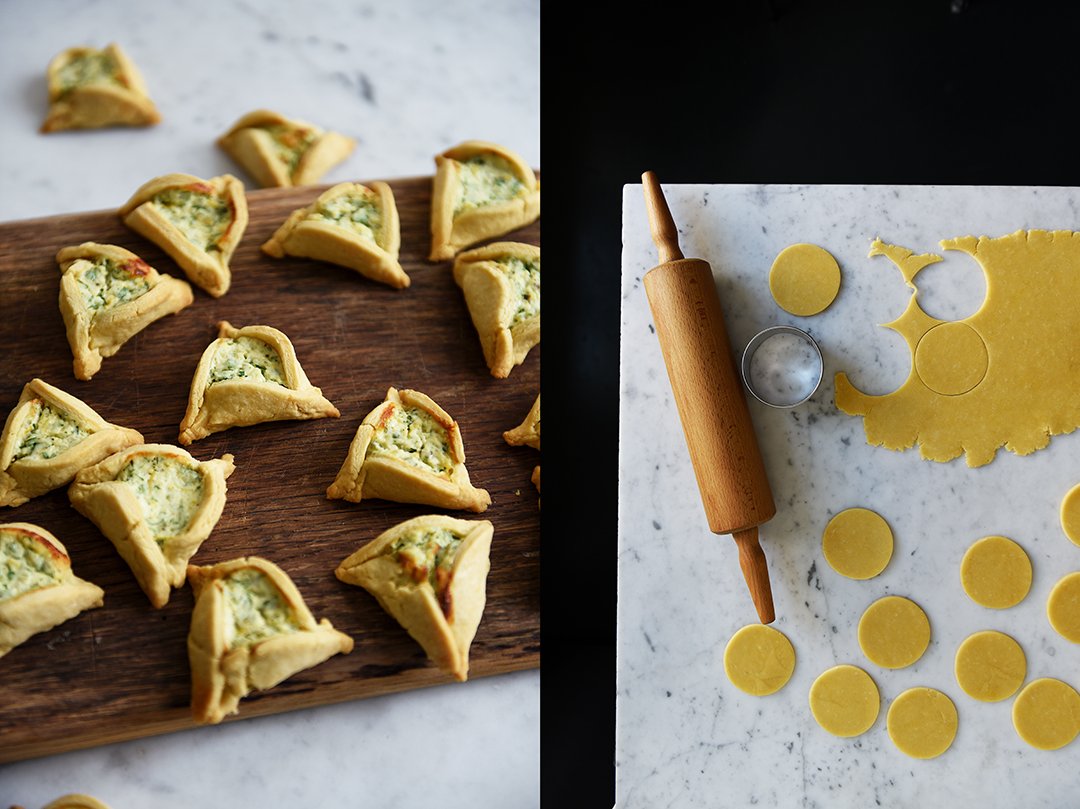
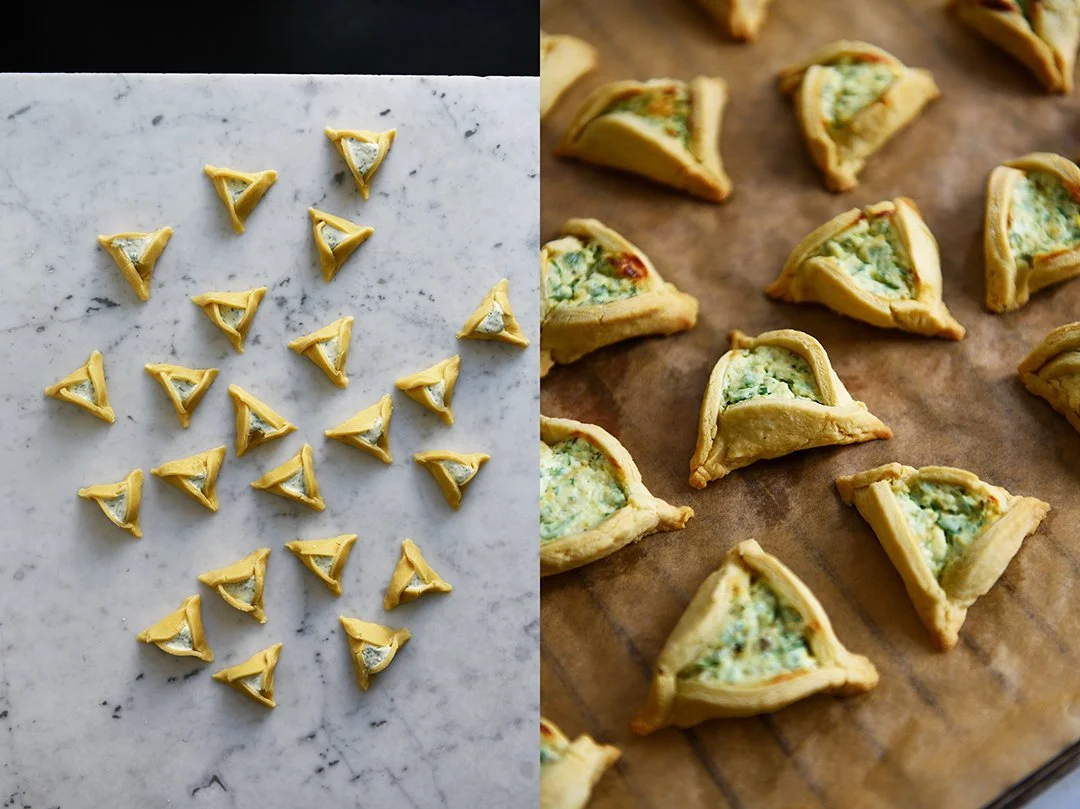
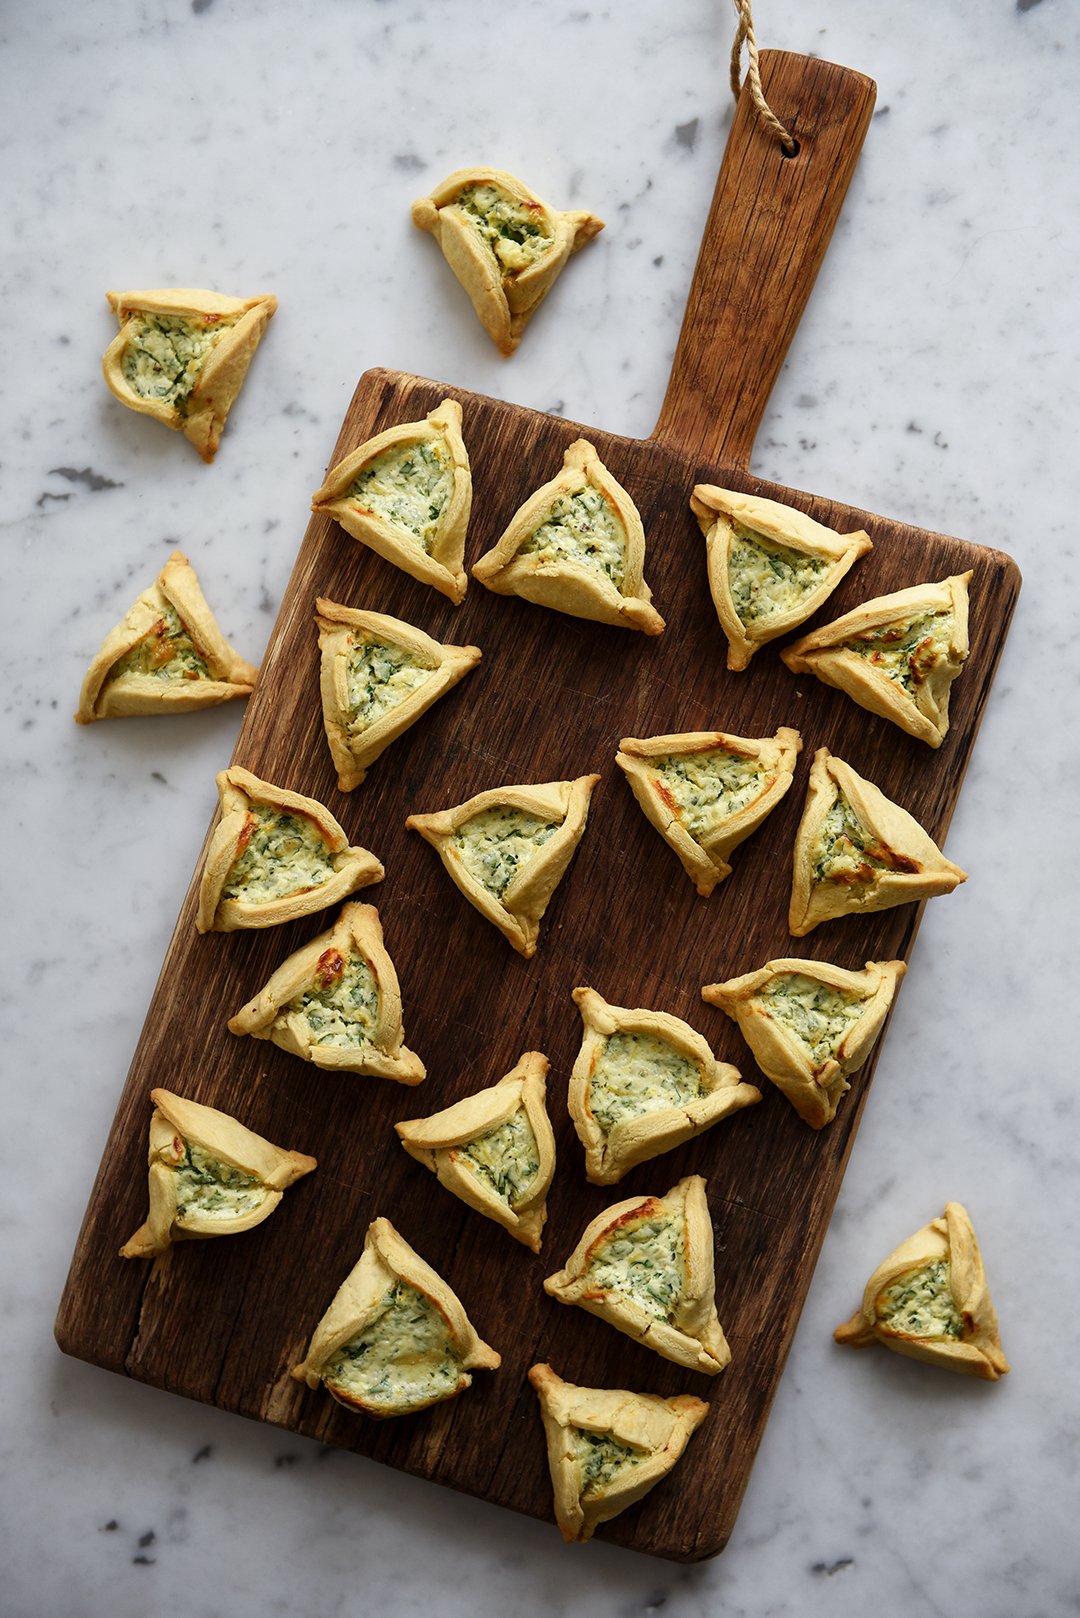
Hamantashen with Lemon-Parsley Ricotta

Hamantashen are little pastry pockets, not more than a small bite, usually sweet and filled with poppy seeds, jam, or dried fruit. I turned them into a savory treat with a very lemony ricotta filling refined with lots of chopped parsley. It's a traditional Ashkenazi pastry, baked and shared during the Jewish holiday of Purim, starting this year on the evening of March 16th and ending 24 hours later. So why am I baking them? And why now?
My friend, the Berlin-based American baker Laurel Kratochvila of Fine Bagels spontaneously started Hamantashen for Ukraine, a show of worldwide bakery solidarity for the people of Ukraine. Profits of the sales are being donated to the Polish Humanitarian Action to help and support Ukrainian refugees at the Polish border. Laurel and her bakery friends will bake and sell hamantashen between now and March 17th, the 14th day of the Hebrew month of Adar. To find out where you can buy the charity pastries click here for the ever expanding list of participating bakeries all over the world.
Purim is celebrated to remember the saving of the Jewish people - thanks to queen Esther - from Haman, a vizier of the First Persian Empire who wanted to kill all Jews in the empire. Traditionally, food, drinks, and gifts are shared on this holiday, hamantashen are enjoyed together in the community, donations are given to the poor, and children and adults alike dress up in costumes. Maybe most importantly, these days there's often a reflection on modern day Hamans in the world. That's where this fundraiser comes in.
Laurel shared her recipe for sweet hamantashen with poppy seeds with me and I'll share my first attempt to bake hamantashen with you. Not sweet but packed with lemon-parsley ricotta.
Thank you, Laurel!

Hamantashen with Lemon-Parsley Ricotta
Makes 22 hamantashen
For the pastry
285g / 2 1/4 cups all-purpose flour
1 teaspoon fine sea salt
120g / 1/2 cup plus 1 teaspoon unsalted butter, cold
1 large egg
For the filling
125g / 4.5 ounces fresh ricotta, drained
1 large egg
30g / 1 ounce Parmesan, finely grated
1 small bunch fresh flat-leaf parsley, leaves only, finely chopped
1 scant tablespoon freshly grated lemon zest
1/4 to 1/2 teaspoon fine sea salt
Coarsely ground pepper
For the pastry, combine the flour and salt in the bowl of a stand mixer fitted with the paddle attachment. Add the butter and use a knife to cut it into the flour until there are just small pieces left. Quickly rub the butter into the flour with your fingers until combined. Add the egg and briefly mix with the paddle until crumbly. Form the dough into a thick disc, wrap it in plastic wrap, and chill in the fridge for 1 hour.
Preheat the oven to 180°C / 350°F (preferably convection setting). Line a baking sheet with parchment paper.
For the filling, whisk together the ricotta, egg, Parmesan, parsley, lemon zest, 1/4 teaspoon salt, and a generous amount of pepper in a medium bowl. Season to taste with additional salt.
On a work surface, place the dough between 2 sheets of plastic wrap and use a rolling pin to roll out until it’s about 3mm / 1/8 inch thick. Using a 7cm / 3 inch round cookie cutter, cut out circles, re-rolling any pastry scraps. Place 1 teaspoon of the filling in the middle of each circle. To shape, fold 3 sides inward to make a triangle, either overlapping or pinching where the edges meet. Transfer to a large platter and chill in the fridge for 10 minutes.
Transfer the hamantashen to the prepared baking sheet and bake for about 18 minutes or until the pastry is golden and just baked through. Let them cool for a few minutes and enjoy!
______________________________
Hamantashen with Poppy Seeds
by Laurel Kratochvila / Fine Bagels
Makes 40 hamantashen
For the pastry
440g / 3 1/3 cups all-purpose flour
240g / 1 cup plus 1 teaspoon unsalted butter, cold, cut into cubes
130g / 1 cup plus 1 tablespoon finely ground almonds
120g / 1 cup confectioners sugar
1/4 teaspoon fine sea salt
2 large egg, beaten
1 teaspoon vanilla extract
For the filling
150g / 1 1/2 cups ground poppy seeds
75g / 1/3 cup plus 1 tablespoon granulated sugar
210ml / 3/4 cup plus 3 tablespoons whole milk
2 teaspoons unsalted butter
1/2 lemon, juice only
2 tablespoons honey
For the pastry, in the bowl of a stand mixer fitted with the paddle attachment, mix the flour and butter on low speed until sandy in texture, no bits of butter remaining. Add the ground almonds and confectioners sugar and mix until well combined. Add the salt, eggs, and vanilla and mix on low until the dough has just come together and no dry bits remain. Press the dough into a thick disc, wrap it in plastic wrap, and chill in the fridge for 2 hours or up to 48 hours.
For the filling, in a heavy, medium saucepan, bring the poppy seeds, sugar, milk, butter, and lemon juice to a gentle boil over medium heat. Reduce the heat to low and simmer until thickened. Remove from the heat, stir in the honey, and let cool completely before using. Covered airtight, you can refrigerate it for up to 1 week.
Preheat the oven to 170°C / 340°F. Line a baking sheet with parchment paper.
To use the chilled pastry, you must break it: Fold it in half and roll it out once. It will crack. Fold the dough back up and roll out a second time. Now it's ready.
On a work surface, place the dough between 2 sheets of plastic wrap and use a rolling pin to roll out until it’s about 3mm / 1/8 inch thick. Using a 7cm / 3 inch round cookie cutter, cut out circles, re-rolling any pastry scraps. Place 1 teaspoon of the filling in the middle of each circle. To shape, fold 3 sides inward to make a triangle, either overlapping or pinching where the edges meet. Transfer to a large platter and chill in the fridge for 20 minutes.
Transfer the hamantashen to the prepared baking sheet and bake for about 15 minutes or until the pastry is golden and just baked through. Let them cool for a few minutes and enjoy!


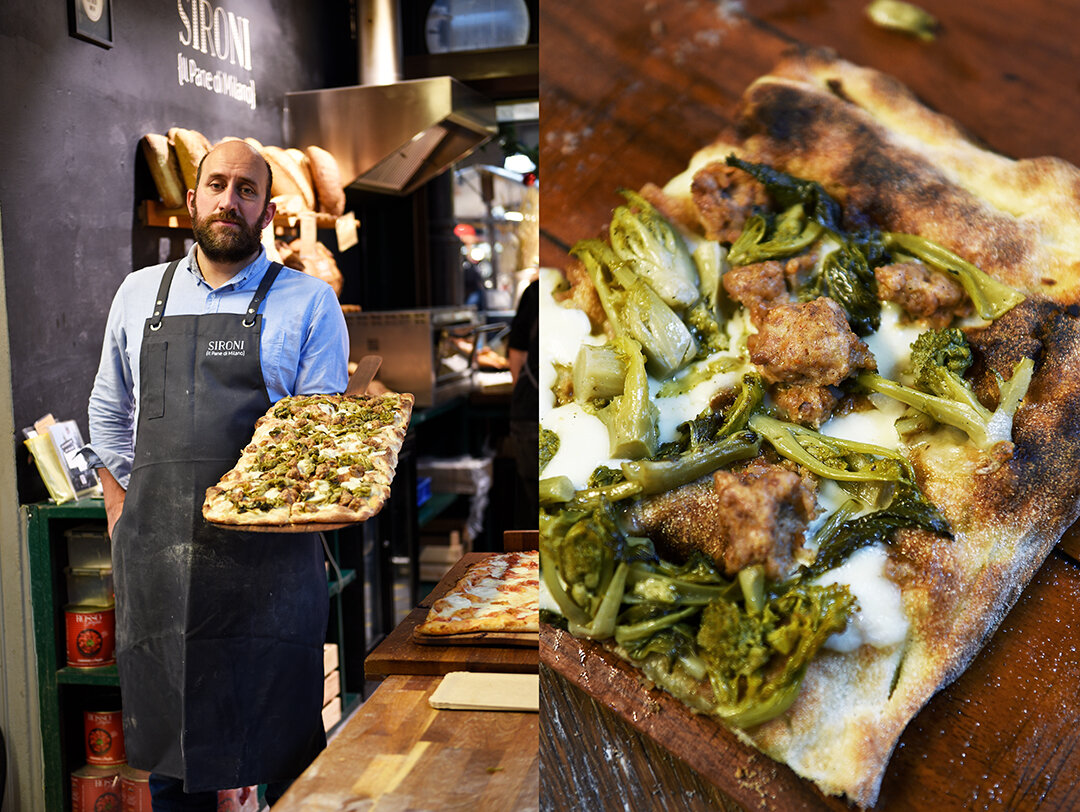
Meet In Your Kitchen | Alfredo Sironi's Pizza with Cima di Rapa and Salsiccia

This post is part of my Meet in My Kitchen podcast: How did we get to where we are in life & what does food have to do with it
"Food means a lot, not everything, but a lot. I enjoy cooking more than eating." - Alfredo Sironi
There are two things Alfredo Sironi does all the time: chatting and eating while constantly moving around. When I sat with him outside his Sironi La Pizza restaurant in Berlin's Goltz Kiez, an endless flow of children, neighbors, staff, and guests stopped by to talk to the baker, always having his full attention. When we were at his Sironi il Pane di Milano bakery, at Kreuzberg's Markthalle Neun, he grabbed the pepper grinder from one of the stalls next to him, exchanging it for a piece of pizza and a quick chat with the chef. He nibbles bites of warm salsiccia from a tray while passing by and allows himself a couple minutes to indulge in the pizza bianca that we just baked together, but he won't sit still. Only quick moments of pleasure, before the man moves on to the next venture.
Alfredo says he's a better cook than eater. He blames his childhood. When you basically grow up right in a family restaurant you're always on the run, always looking out for problems that need to be solved and people who need to be taken care of. You have a quick nibble in between chats but you barely sit down to eat. It runs through his family, he says.

"Everything we describe as tradition is fake. There weren’t potatoes in Germany, there weren’t tomatoes in Italy. Noodles, pasta come from China. It’s a cultural process, every day rewritten over and over again." - Alfredo Sironi
Growing up on a farm in Lombardy - between Milan and Como, close to northern Italy's buzzing industrial center yet at the same time, you're surrounded by lush green fields, paddocks, and horses - his life was about his parent's restaurant, his family and friends, and the restaurant's regular guests. Women always played an important role in his world. Although his father started the business, and he's also the most passionate cook in the family, it was Alfredo's mother who kept the motor running smoothly. Due to the region's economic success, the women in northern Italy already ran thriving businesses in the 50s. The cliché of the mother, cooking and staying at home in the kitchen, wasn't Alfredo's reality.
The Sironi family comes from Piedmont, Lombardy, Veneto, and Emilia-Romagna so the family's home cooking mirrors the best of what the four regions bring to the table. Bread and pasta is a staple, always homemade and part of every day's lunch and dinner. Everyone knows how to make it, it's in their blood. And exactly this would become one of Alfredo's greatest assets.

"You can’t prepare yourself for your failure but you have to be prepared for your success. When you start a business, you only focus on avoiding that it crashes. You hope that customers will come, that you can pay your bills, and that it will all work out. But in reality, everything can be totally different, that you are successful. And then the bakery was too small, I hadn’t considered this option in the beginning." - Alfredo Sironi
Until Alfredo moved to Berlin at the age of thirty, he never questioned his cosmos circling around the food and the people that were simply there all his life. It could have been so easy for him to just stay there, to take over the family business at one point, to live this beautiful life in this beautiful place with all the people he loves - but he was hungry for something else. So when Alfredo came up north to move to Germany's capital, he used his memories of the people and the food in Italy, the memories of his daily life, to found his own bakery. Although he studied history in Milan and already saw himself following an academic career, things changed.
In 2010, Berlin's food scene was buzzing and hungry for the new. Carbs are Alfredo's passion. Every day, bread was freshly baked and pasta freshly rolled at his family's restaurant and he helped out whenever a hand was needed. For him, good bread isn't science, it's knowledge and experience. He knew Berlin didn't have anything like the Milan-style bread he grew up with and felt the city would love it yet he was also aware of the risks.
In the end, there was nothing to worry about. It only took a few months for the Berliners to fall in love with the baker and his goods. Right from the start, you could always find Signor Sironi on the annual Berlin's Best Bread lists. His sourdough loaves are praised, his sheet-pan pizza is the reason for ongoing pilgrimages of the carb loving crowds to his bakery in Kreuzberg and to his new pizzeria where the pizza is round. Alfredo Sironi knows his dough, maybe it's as simple as that.
Alfredo shared the recipe for his Pizza Bianca with Cima di Rapa and Salsiccia with me. It's a recipe that I love so much that when I first ate it a few years ago, I came up with my own take on it for the blog. It proves that reducing the toppings for pizza often leads to the best results.
The podcast episode with Alfredo Sironi is in German. You can listen to the Meet in My Kitchen podcast on all common podcast platforms; there are English and German episodes. You can find all the blog posts about these podcast episodes including my guests’ recipes here on the blog under Meet in Your Kitchen.
Listen to the podcast episode with Alfredo on:
Spotify / Apple / Deezer / Google / Amazon / Podimo
On Instagram you can follow the podcast @meetinmykitchenpodcast!
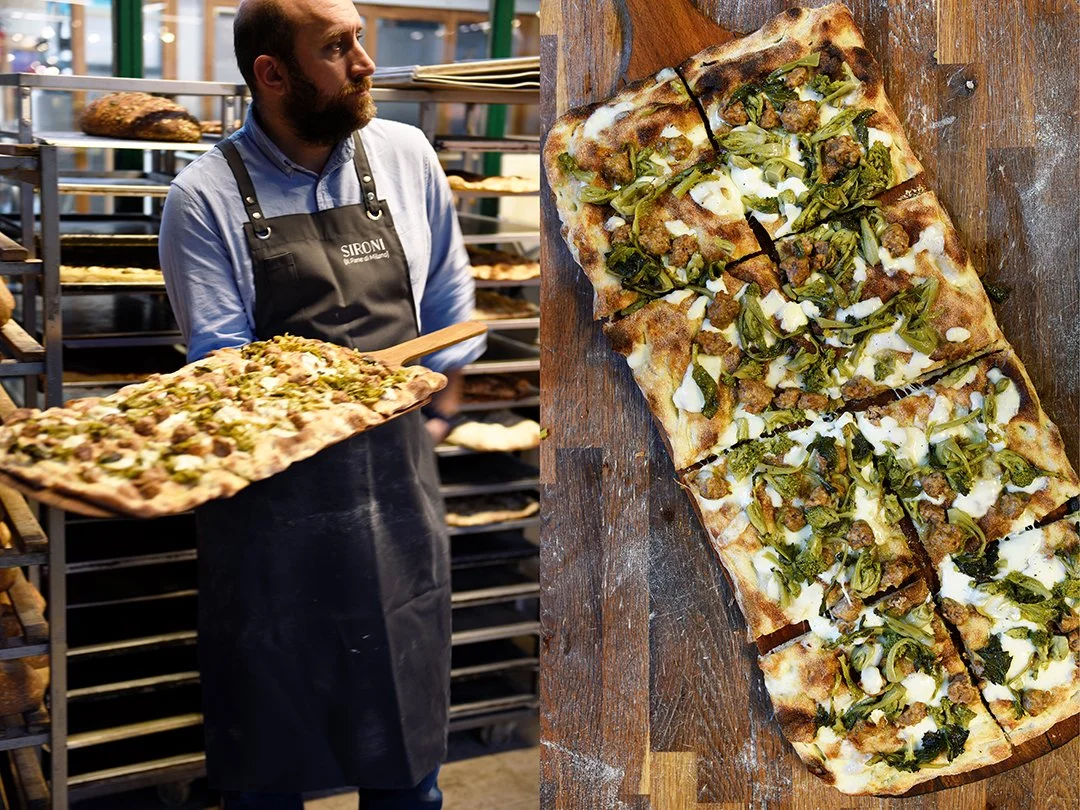
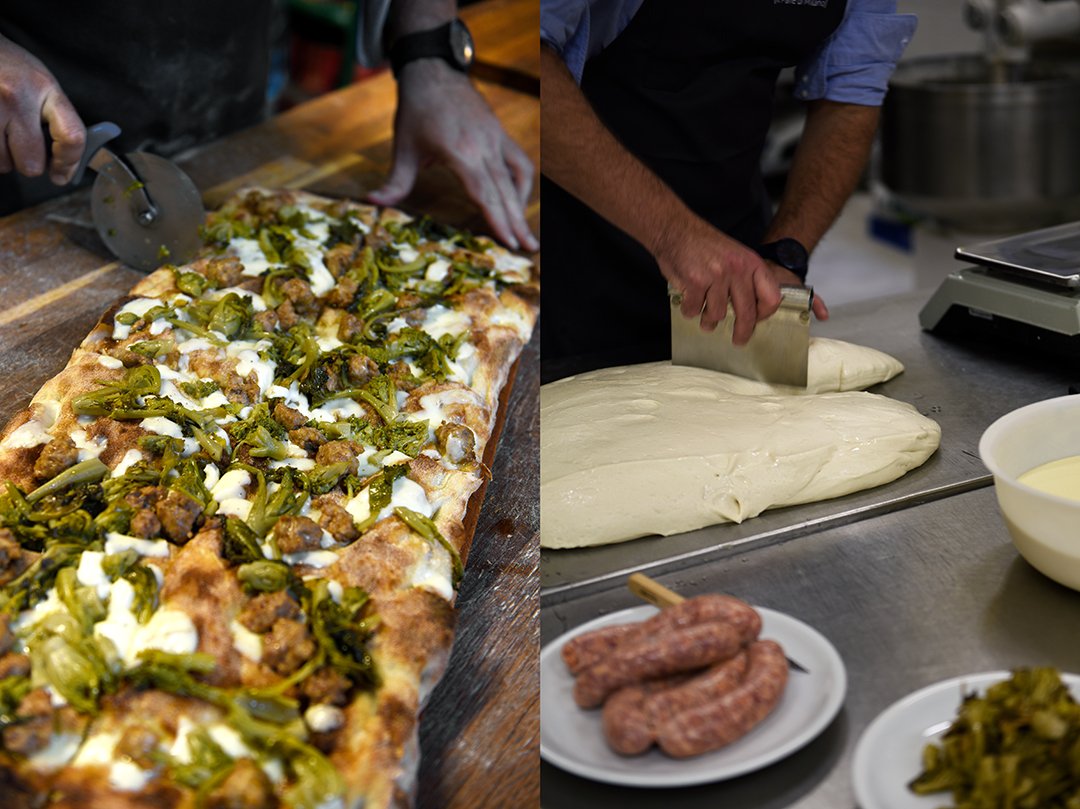
Pizza Bianca with Cima di Rapa and Salsiccia
by Alfredo Sironi
Makes 2 to 3 pizza sheets (using 30 x 40cm / 12 x 16“ baking sheets; if you make 3 sheets the pizza base will be thinner and crunchier, 2 sheets will lead to a thicker, softer base)
For the dough
700ml / 3 cups water, lukewarm, plus more as needed
10g / 1/3 ounce fresh yeast, crumbled
1kg / 7 2/3 cups high gluten wheat flour (German flour type 1050)
20g / 1 tablespoon barley malt syrup (or rice syrup, or molasses)
20g / 4 teaspoons fine sea salt
For the topping
4 - 6 salsiccie (or any other coarse sausage), skin removed, sausage torn into bite size pieces
800g - 1.2kg / 1 3/4 pounds - 2 2/3 pounds cime di rapa, blanched or sautéed (you can also use drained jarred cime di rapa or replace it with broccoli)
500 - 750g / 1 - 1 2/3 pounds drained mozzarella, cut into french fries-shapes
Olive oil
Freshly ground black pepper
In the large bowl of a stand mixer, fitted with the hook attachment, whisk together the water and yeast and let it sit for a minute. Add the flour, syrup, and salt and knead well for about 5 minutes or until smooth; add more water if the dough is too firm. Cover the bowl and let the dough sit for 10 minutes (the ideal ambient temperature is 26-30°C / 80-86°F; you can use the oven or place the bowl on a heater).
After 10 minutes, leaving the dough in the bowl, grab the dough from underneath and fold it on top of itself then turn the bowl by 90° and repeat folding and turning the bowl for 4-5 times. Let the dough sit for 15 minutes then repeat the same procedure once again. Cover the bowl with plastic wrap, or put it in a rubbish bag and close it; you can also use a container with a tight fitting lid. Keep the dough in the fridge for 18-24 hours.
After 18-24 hours, divide the dough in 2 or 3 portions, roll out each portion so that it’s roughly the size of your baking sheet then oil 2-3 baking sheets and arrange the prepared dough on top and cover with kitchen towels. In a warm place, let the dough rise until it roughly doubles in size; depending on the ambient temperature, this will take 30-60 minutes.
Preheat the oven to the highest temperature setting (at least 250°C / 480°F).
Divide the salsiccia, cime di rapa, and mozzarella among the prepared baking sheets and bake for about 10-13 minutes or until golden brown and crunchy. Drizzle with a little olive oil, sprinkle with some pepper, and enjoy immediately!


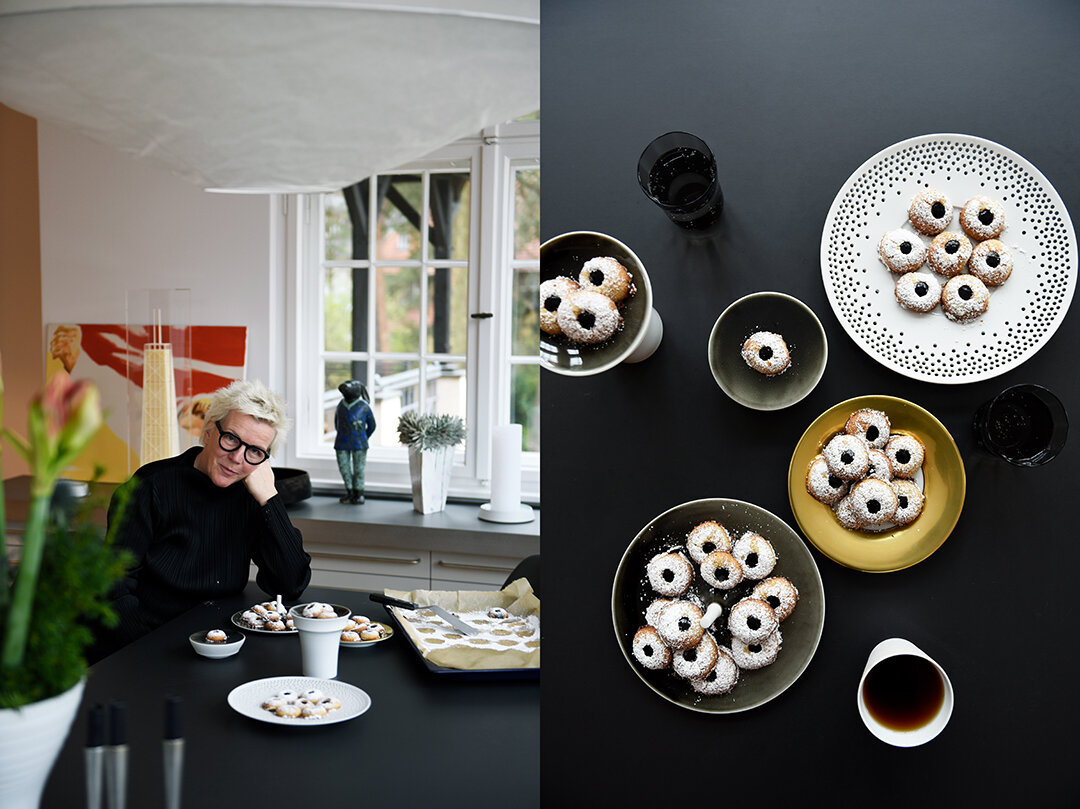
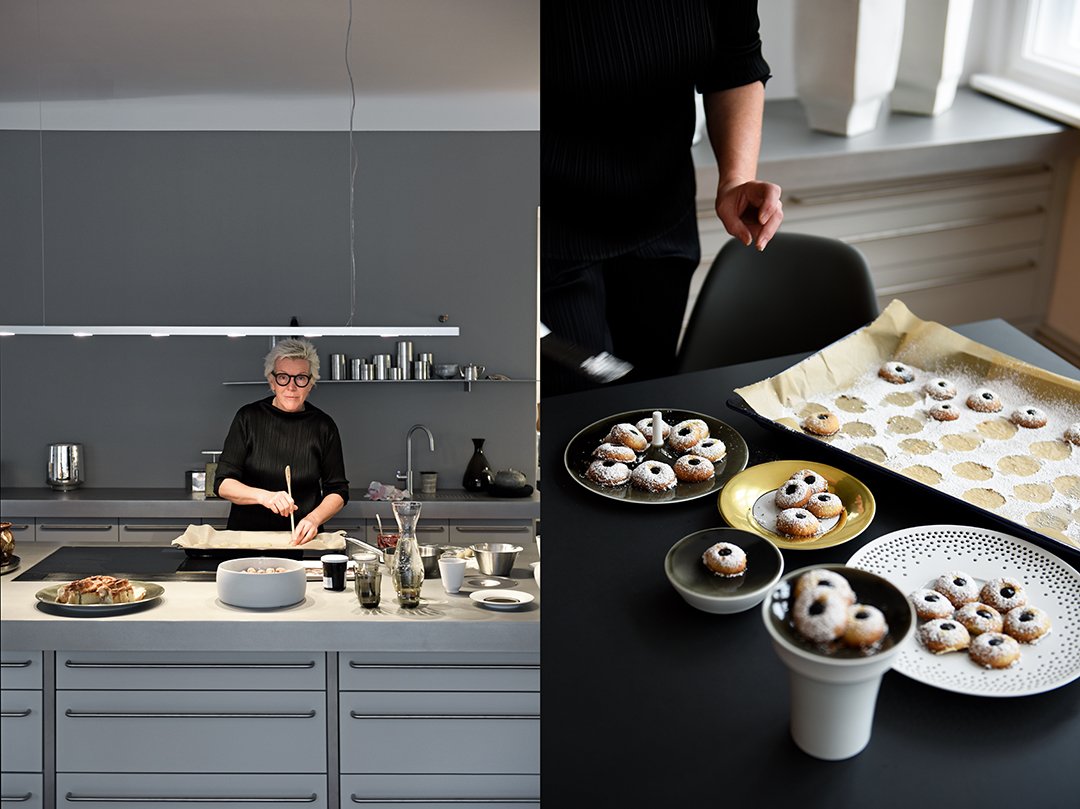
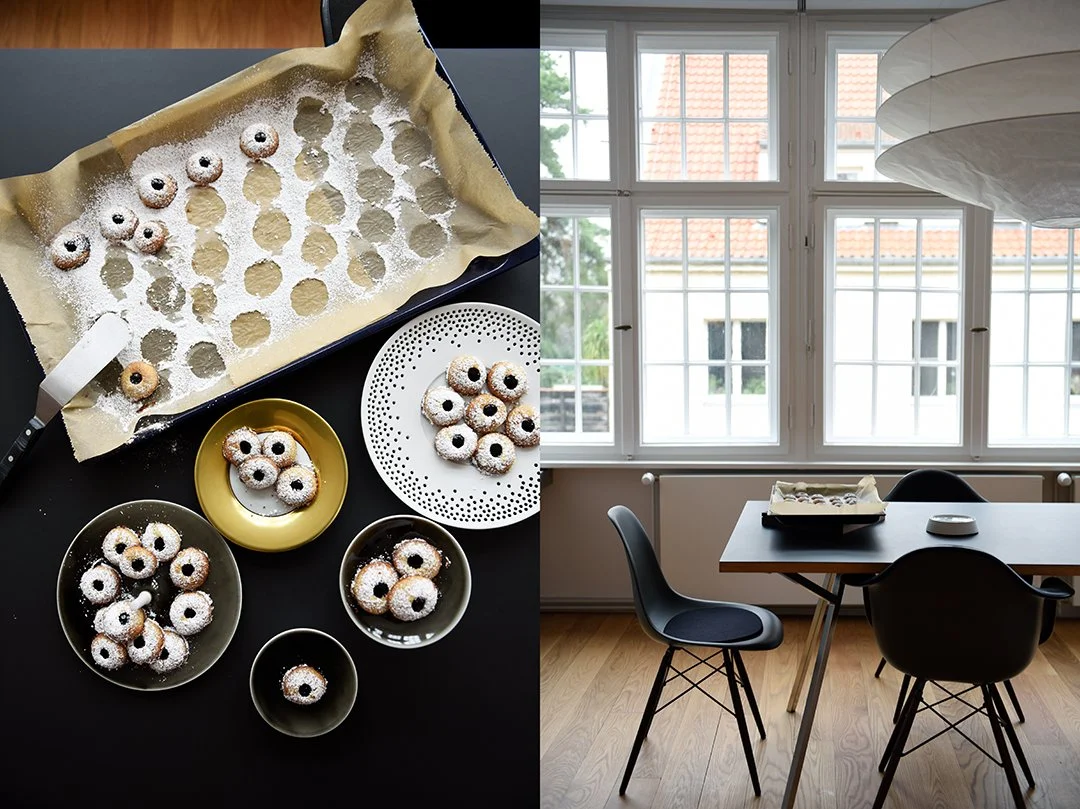
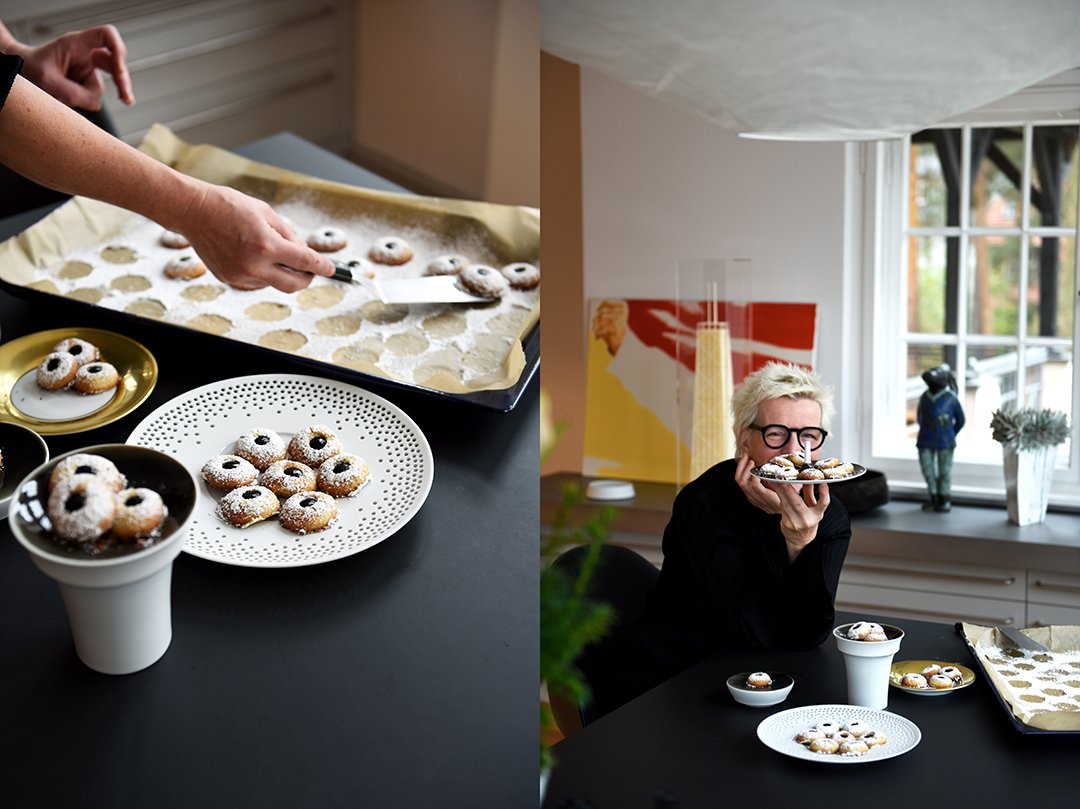
Meet In Your Your Kitchen | Husarenkrapferl - Stefanie Hering's Christmas Family Cookies

This post is part of my Meet in My Kitchen podcast: How did we get to where we are in life & what does food have to do with it
"Innovation - but always based on tradition. Never neglect tradition." - Stefanie Hering
There's something very calm and focussed about this woman. Stefanie Hering is the opposite of agitated. Things feel possible, manageable, even in times of disruption she doesn't forget that the potential to create joy and beauty always lies in her hands, literally.
Stefanie is the founder of Hering Berlin, a traditional Berlin based ceramic manufacturer who changed the way we experience porcelain tableware. Lenny Kravitz, Nicole Kidman, Oprah Winfrey, and the chefs of more than 250 Michelin starred restaurants fall for her bold and uncompromising design. Tom Aikens, Heinz Winkler, Thomas Keller, Daniel Boulud, they all trust the designer's vision to present their culinary creations, allowing her to create a frame for their food that's anything but shy yet doesn't distract from the chefs' work.
"We were at the fair in Chicago and there were Charlie Trotter and Thomas Keller talking, saying It’s bloody expensive but damn good." - Stefanie Hering
The first plate from Hering's manufactory that I held in my hands many years ago gave me a sense of a designer who had traveled into the future and came back with an approach to design that dared to question the prevalent, established ideas of porcelain. It was a plate of the Cielo collection, the rim perforated with a pattern of small holes that are drilled into the unglazed biscuit (or bisque) porcelain by hand.
It takes 80 steps to make this plate. So, 80 times, this plate can break or crack, but also, 80 times, the craftsperson gets the chance to approach perfection in a plate that seems so fragile, so delicate, but that is so robust. When I anxiously asked Stefanie how to clean it, she answered "Just put it in the dishwasher." She's pragmatic and never forgets that good design should work but also create and accumulate fun and satisfaction in your kitchen.

Hering's success came sudden, almost too sudden. When Bergdorf Goodman ordered their products for their NYC department store, when MoMA put a picture of one of Stefanie's objects on their annual catalogue, she became famous and noticed that she would soon reach the limits of her manufactory's oven capacities. The time had come to expand and grow, which she managed to do several times in her career, which also included setbacks. But somehow Stefanie always manages to connect with that deep trust in herself and her work that she was already aware of when she was young.
Stefanie is her hardest critic, she wants to excite and surprise her customers with her creations, she wants to impress them with her high standards of hand-crafting, but most importantly, when she started her career, she said to herself "I'll stopp doing this job as soon as it bores me and I don't enjoy it anymore. That's 30 years ago and it never bored me a single day."
"Food is love. It’s an elixir. It’s something I could never live without." - Stefanie Hering
It's tempting to romanticize a career like Stefanie's. Working with a craft that is so rewarding in the process of creating and also in the final products that become a part of many people's everyday life all over the world, yet Stefanie doesn't hide the tough times and painful decisions. The more successful a company becomes, the higher the risk, the more people are affected by your decisions. You do need to stay calm within yourself to deal with the pressure, the uncertainties, the fact that the final responsibility will always be on your plate.
Stefanie shared one of her Christmas family cookie recipes with me, the Husarenkrapferl that she's been baking for her children for years, can now fill your pretty cookie jars. These are Austrian-style thumbprint cookies, however, Stefanie doesn't use her thumb but the stick of a wooden spoon and she fills the cookies twice, before and after baking them.
The podcast episode with Stefanie Hering is in German. You can listen to the Meet in My Kitchen podcast on all common podcast platforms; there are English and German episodes. You can find all the blog posts about these podcast episodes including my guests’ recipes here on the blog under Meet in Your Kitchen.
Listen to the podcast episode with Stefanie on:
Spotify / Apple / Deezer / Google / Amazon / Podimo
On Instagram you can follow the podcast @meetinmykitchenpodcast!

Husarenkrapferl
by Stefanie Hering
Mind that the dough needs to cool in the fridge for at least 1 hour.
Makes about 40 cookies
140g / 1 cup plus 1 tablespoon all-purpose flour
70g / 1/2 cup plus 1 tablespoon ground hazelnuts (or almonds)
70g / 1/3 cup granulated sugar
1/4 teaspoon ground cinnamon
A pinch of salt
140g / 1/2 cup plus 1 tablespoon unsalted butter, at room temperature, cut into small pieces
2 large egg yolks
150g / 5 ounces black currant jelly (or any other red jam or jelly)
Confectioners' sugar, for dusting the cookies
In a large bowl, combine the flour, ground hazelnuts, sugar, cinnamon, and salt. Add the butter and egg yolks and, using a knife, chop the butter and egg yolks to combine them with the flour mixture until crumbly. Quickly crumble the dough with your fingers and squeeze and form it into a ball and then into a thick log. Wrap the dough in plastic wrap and put it in the fridge for at least 1 hour.
Preheat the oven to 175°C / 350°F and line 2 baking sheets with parchment paper.
In a saucepan, briefly warm up the jelly over medium heat, whisking constantly, until liquid; this will make it easier to fill the cookies.
Cut slices of dough off the log and, using your hands, roll each piece into a ball, around the size of a small walnut. Spread the balls of dough on the prepared baking sheets, leaving enough space between them as they will expand during baking. Using the stick of a wooden spoon, make a small hole in the middle of each cookie.
Using a teaspoon or an icing bag with a small tip, fill the cookies with the jelly then bake for 15-18 minutes or until the cookies are golden and tender; mind that they don't get dark. Let the cookies cool on the baking sheet for a few minutes then transfer to a large plate or cooling rack. Dust them with confectioners' sugar and fill up the holes with a little more jelly. Let them cool completely then enjoy them or gently layer them in a cookie box or jar.


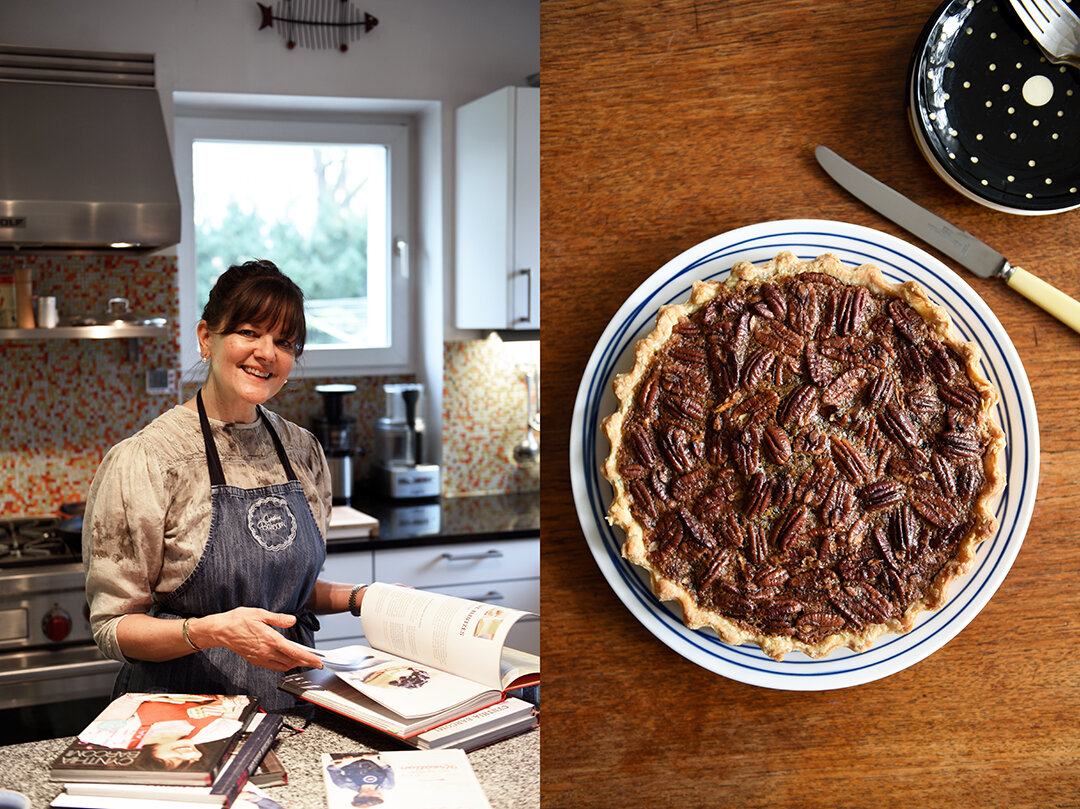
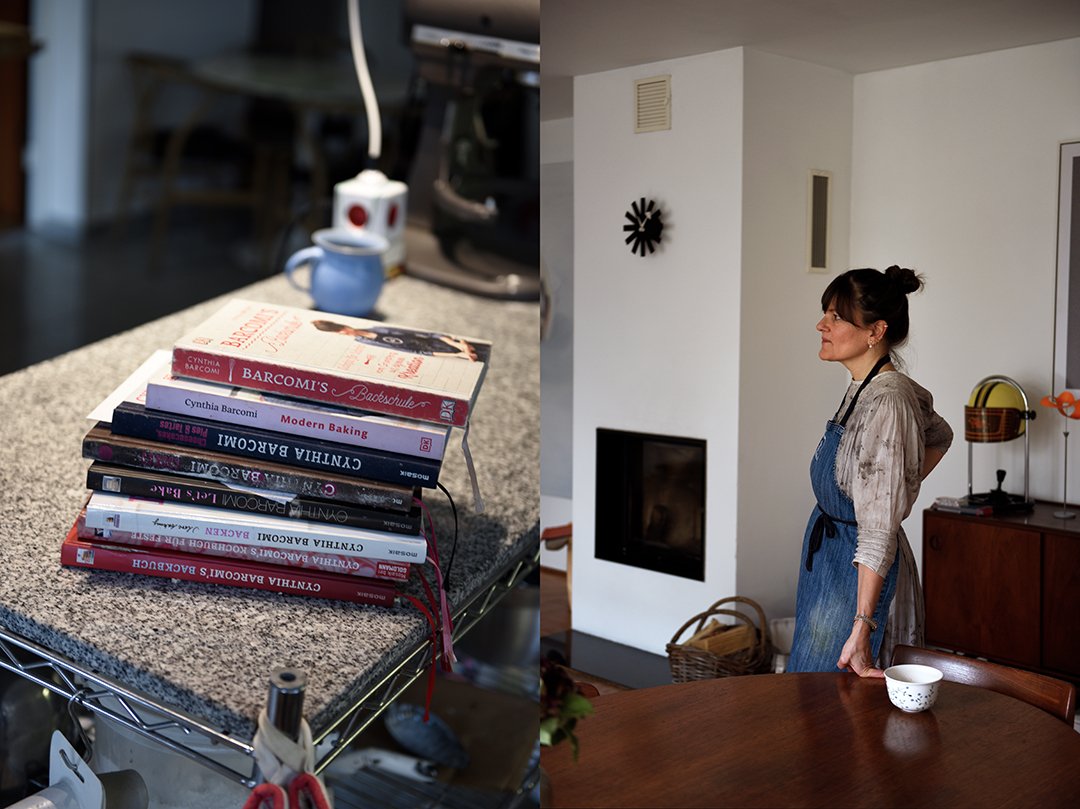
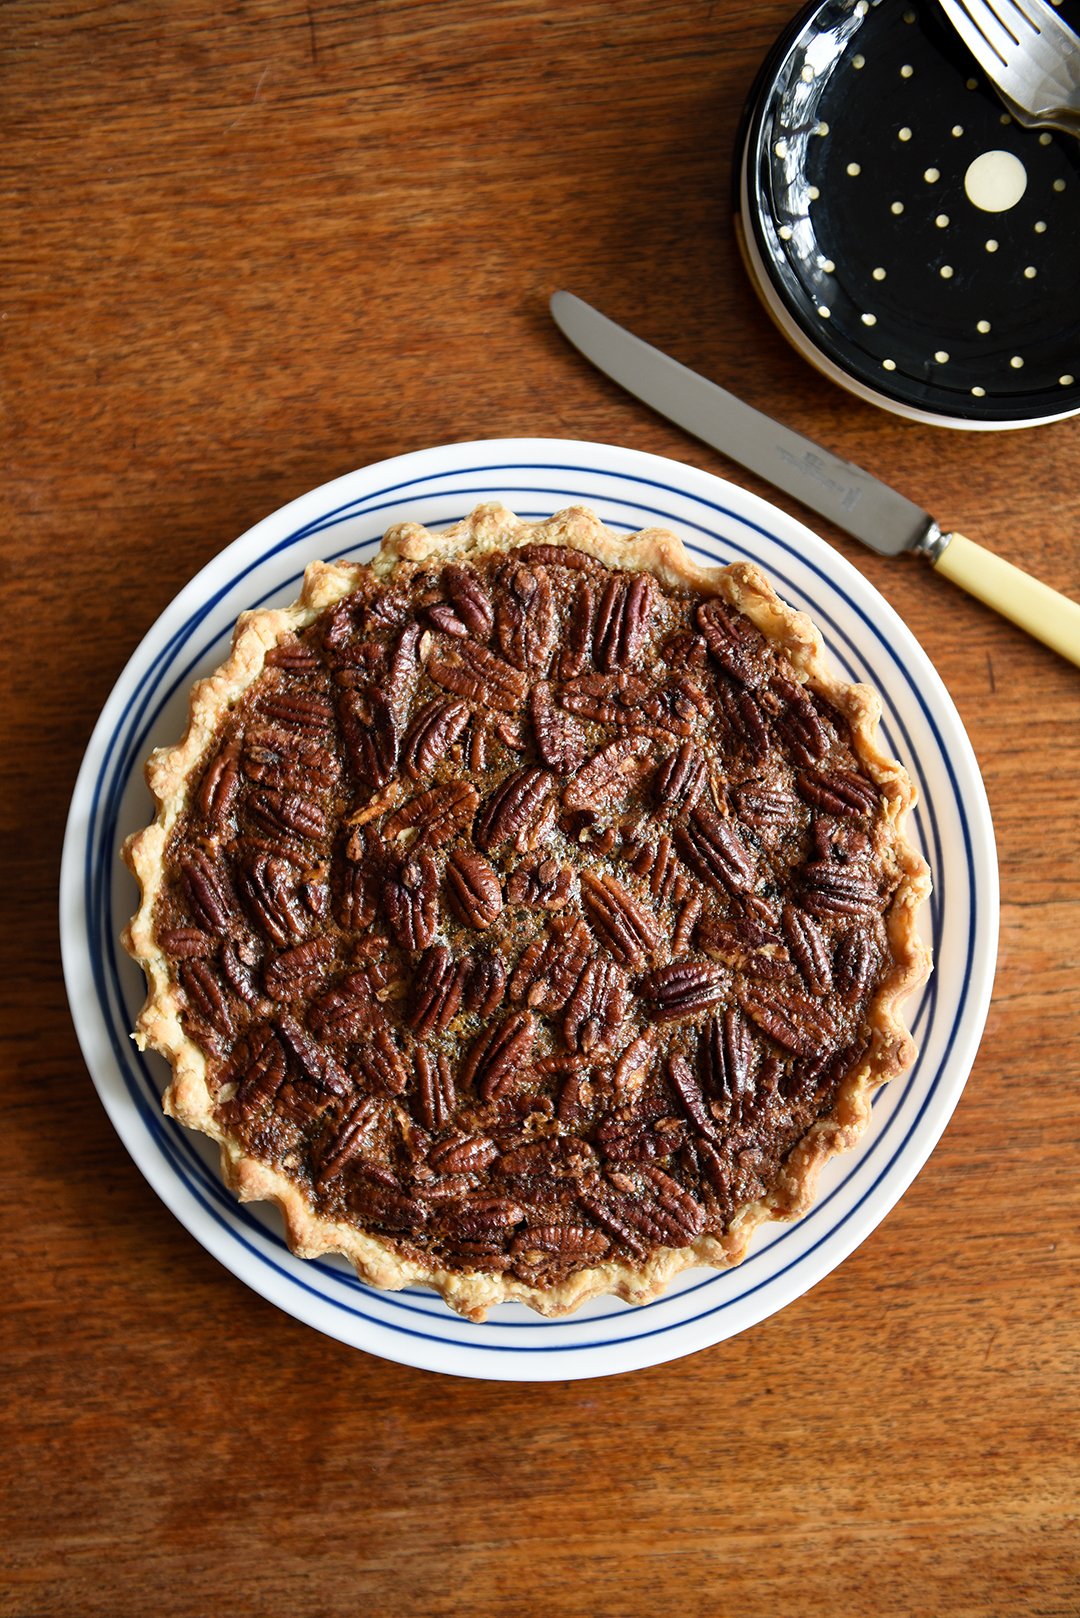
Meet In Your Kitchen | Cynthia Barcomi's Pecan Pie with Chocolate and Cranberries

This post is part of my Meet in My Kitchen podcast: How did we get to where we are in life & what does food have to do with it
“I do feel that with time I have learned the necessity to calculate my risk. In the beginning I was uninterested in calculating risk, I wasn’t even necessarily interested in spending the time of thinking How risky is this. I was much more focussed on what I wanted to do.” – Cynthia Barcomi
Before I moved to Berlin I used to have a little ritual, every time I came here I made it a point to visit Cynthia Barcomi's Deli at Hackescher Markt. I was in love with this place, obsessed with her chocolate cherry muffins, with her tuna sandwich made with the juiciest potato bread, and the world's best New York cheesecake. Whenever I set on the black and white leather benches in the tall lofty room of her Deli, Cynthia managed to make me feel home and taken care of but at the same time hungry and excited for everything that was new to me in this big city.
There was a lot that this American lady taught me - without ever meeting her: my first carrot cake was hers and the frosting of that cake seemed like a miracle for a German girl in the nineties, almost impossible that something tasting so good is only made of cream cheese, lemon, butter, and sugar. Four simple ingredients creating sweet magic. No one masters the genius simplicity of comforting American-style baking like she does, at least in my world. She approaches her recipes like everything else in her life: with curiosity, discipline, passion, and stubborn persistence. Cynthia only stops working on a recipe - be it for her café, for one of her nine books, or for her TV shows - when she's 100% sure that she nailed it. She never compromises.

"There was definitely a time when I was like I have to do this and this, more and more, and now I kind of feel like it is really important for me to stay focussed. And it is really important for me to protect this part of myself, which feels incredibly inspired and curious and creative and all these different things, where I know if I get too bogged down by the many other things that are going on in the world or in my life that I cannot access that."– Cynthia Barcomi
Cynthia came to Berlin in the nineties, tumbling out of a rather protected childhood in Seattle, Washington State, and a few wild years in New York City, studying philosophy, theatre and drama at Columbia University and becoming a dancer at the same time. Those were the eighties and Cynthia lived the Flashdance-life. Although it can't really get much better than that Cynthia felt pulled to Europe, to Pina Bausch, Paris, Florence, and at one point to Berlin.
Always moving, she can't stand still. With two kids, she started looking for a more steady life in the food world (maybe the only thing she ever miscalculated), so she decided to roast her own coffee beans and open her first café in Kreuzberg. Today this wouldn't be such an adventurous career move, but back in 1994, this was a risky endeavor. There were no American-style cafés, people didn't really care much about American cakes, pies, and cookies, there was simply no demand for it. Germans drank their old-fashioned filter coffee in questionable quality, and were happy with it, and enjoyed their German cakes for their Kaffee und Kuchen. So now Cynthia popped up in the city, ready to conquer and change it all - and she succeeded.

"I think it’s really important that you do stay true to yourself and that you spend less time comparing yourself and your work to other people, which I think is going down a rabbit hole that will suck all the energy out of you. And I really do encourage especially women to kind of not have quite so much shit in their head and just do it."– Cynthia Barcomi
Three years after starting her first café, she opened her Deli, which is the reason why I moved to the area where I live now. I had to be close to that place. Almost 30 years ago, Cynthia changed they way people eat in the capital. Less competition may make it sound easier compared to today but this also meant that the risk was much higher. She had to pioneer a market that was so unfamiliar with her vision that even the banks told her "Look lady, if this were a really good idea, we'd already have it." Her answer was "What are you talking about. Society lives from new ideas. We wouldn't have washing machines, we wouldn't have cars, we'd be lighting fire, we'd be cavemen. I mean come on. Jesus!" So she just put a plate of her cookies on the guy's desk and at one point she got the loan.
Sometimes in life you have to swim against the current, ignoring the anxious voices around you. It worked out in Cynthia's case but it wasn't always a smooth journey. Last year she had to close her Deli to save her business. A decision so painful that it still hurts her to talk about it. A chapter came to an end, after writing a beautiful story that will always be a part of Berlin, but Cynthia wouldn't be the person who she is if she didn't get back on her feet to write another story - to be continued.
Cynthia shared the ultimate Christmas or New Year's Eve dessert with me: Pecan Pie with Chocolate and Dried Cranberries.
The podcast episode with Cynthia Barcomi is in English. You can listen to the Meet in My Kitchen podcast on all common podcast platforms; there are English and German episodes. You can find all the blog posts about these podcast episodes including my guests’ recipes here on the blog under Meet in Your Kitchen.
Listen to the podcast episode with Cynthia on:
Spotify / Apple / Deezer / Google / Amazon / Podimo
On Instagram you can follow the podcast @meetinmykitchenpodcast!

Pecan Pie with Chocolate and Dried Cranberries
by Cynthia Barcomi
Makes one 23cm / 9" - pie
For the crust
125g / 1/2 cup cold unsalted butter
25g / 1 1/2 tablespoons vegetable shortening
180g / 1 1/4 cups all-purpose flour
25g / 3 1/2 tablespoons cornstarch or wholegrain flour
1 teaspoon granulated sugar
1/2 teaspoon salt
75ml / 1/4 cup plus 1 tablespoon ice cold water
For the filling
100g / 1/2 cup muscovado sugar
3 large eggs
200ml / 3/4 cup plus 2 tablespoons maple syrup
1/4 teaspoon salt
1 tablespoon vanilla extract
25g / 1 1/2 tablespoons unsalted butter, melted
100g / 3 1/2 ounces dark chocolate, coarsely chopped
100g / 3 1/2 ounces dried cranberries or dried cherries, lightly floured
200g / 7 ounces pecans, left whole
For a light and flaky crust, cut the butter and the shortening into small pieces and chill in the fridge while you prepare the rest of the ingredients.
In a large bowl, combine the flour, starch, sugar, and salt. Blend in the cold butter and shortening with your fingertips or a pastry blender until the mixture resembles coarse meal. Add cold water and stir with a fork until a dough just forms. Transfer the dough onto a lightly floured work surface and quickly knead the dough into a circle. Wrap the dough in parchment and chill for about 2 hours (the dough will keep in the fridge for several days and in the freezer for several months).
Preheat the oven to 200°C / 400°F (convection setting). Have a 23cm / 9"-pie or tart form at your side. No need to butter it.
On a lightly floured work surface, roll out the dough to about 3mm / 1/8" thick. Work with a light dusting of flour on your rolling pin and on your work surface. Do not use too much flour or the crust will become hard and dry. Place the rolled-out dough into the pie dish and gently press into the sides. Trim the edges to an about 5mm / 1/4" overhang. With your fingertips, crimp the edges. Chill while you make the filling.
Make the filling. In a large bowl, whisk the brown sugar with the eggs, then stir in the syrup. Add the salt, vanilla extract, and melted butter and stir to combine.
Place the chopped chocolate onto the bottom of the pie dough, followed by the dried fruit, and the pecans. Carefully pour the egg mixture over the pecans. Bake for 10 minutes at 200°C / 400°F, then reduce the heat to 190°C / 375°F and bake for another 10 minutes. If it seems to be getting brown too quickly, cover the pie with parchment. Reduce the heat once again to 180°C / 350°F and bake for another 14–16 minutes until golden. Leave to cool on a rack for several hours before serving.


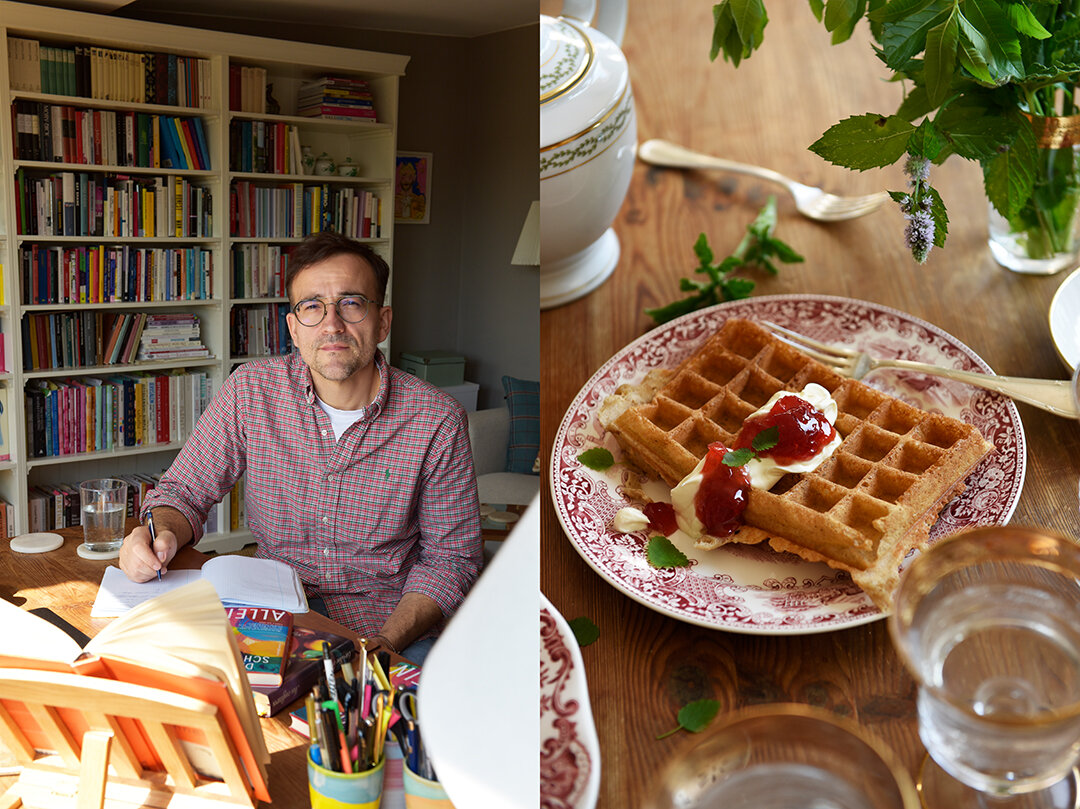
Meet In Your Kitchen | Daniel Schreiber's Sourdough Waffles with Plum-Apple Jam

This post is part of my Meet in My Kitchen podcast: How did we get to where we are in life & what does food have to do with it
"Through food we connect with the world’s gift and also with the gift of the knowledge of other generations." - Daniel Schreiber
Daniel Schreiber writes books that touch a sensitive spot. He writes about his own experiences yet these are experiences that we all share in one way or the other. In his last three books - 'Nüchtern' (Sober), 'Zuhause' (Home), and 'Allein' (Alone) - he touches the fears we know but learned to sail around, he writes about his own life but reminds us of our own.
Every word he chooses says the truth, very direct, very blunt, you can feel that, and by this, in a way that is hard to describe, he creates a fragile beauty. It's the beauty of togetherness, that we are all in this together, that we're not alone, we're not the only one struggling, and that we can share our struggles and be open about them. It sounds almost too sweet but despite the pain that is present in his books, there is so much warmth. Like in real life.
It's like your favorite tea cup, it's cracked, it's chipped, you glued it back together, but when you feel its uneven surface drinking your tea in the morning, you don't think of the pain you felt when it broke. Each crack makes it even more familiar, makes it even more a part of yourself, your story, and who you are. You learn to love these cracks. Daniel manages to transport this feeling in his books. Each crack we have makes us the person who we are. It's a long and beautiful story of life, love, and learning, and yes, sometimes it also hurts.

"When I came to New York it was quite a depressive period for me but something happened at that time in connection with food that helped me a lot. I started cooking through the Larousse Gastronomique and practically cooked every evening. I went shopping to the market or supermarket every day to try out new recipes. That gave me a lot of strength." - Daniel Schreiber
And what does food have to do with it? Daniel's eyes start sparkling when he's talking about his mother's garden in a tiny village in Mecklenburg-Vorpommern (Mecklenburg-Western Pomerania) where he grew up. When he talks about picking fruit and vegetables and filling a bucket up to the rim with the harvest to take home to his kitchen in Berlin every time he visits his parents. His mother's cooking and recipes - some of which she keeps secret until today - laid the foundation for Daniel's love for cooking. A love that taught him that there's light even in the darkest of times - and he can choose to switch it on.
Food and literature were held up high in his family's house and became his companions on his own journey. Studying literature in Berlin and New York City put the young man in touch with buzzing metropolitan life and helped him shape his identity as a young man. His original academic dreams faded and instead he worked for newspapers and magazines. He wrote a celebrated Susan Sontag biography followed by three books, weaving his own experiences into a scientific, psychological, and philosophical context.

"Most of us have problems to say what we really want to say. Society and our families don’t educate us to really find an authentic relationship with ourselves. We have to fulfill certain roles, certain expectations, that we ourselves and society force upon us, economical and social expectations. And these internalized expectations and roles are in our way most of the time." - Daniel Schreiber
No matter how rocky his life got at times, no matter how far he drifted away, Daniel always searched for and found the way to the kitchen and with this, a way back to himself. Working as a private chef, cooking and catering for families and events in Manhattan and the Hamptons, strengthened his confidence as a cook and sparked his curiosity. Cooking through a vast collection of books, experimenting with recipes, turned Daniel into a person who knows the tastiest recipes for almost every dish you can think of.
His sourdough bread and waffles reach perfection in taste and texture, the homemade jam collection on his kitchen shelves can easily compete with a professional jam manufactory. Whatever he sets his mind on becomes his passion. His terrace looks like a dense green jungle speckled with colorful blossoms in all shapes and sizes - and he can tell you the name of every single plant there is in his green kingdom. He turns piles of wool into the favorite scarves, quilts, and sweaters of family and friends. And he puts words and letters together in ways that I want to read his books even when they force me to face my own fears.
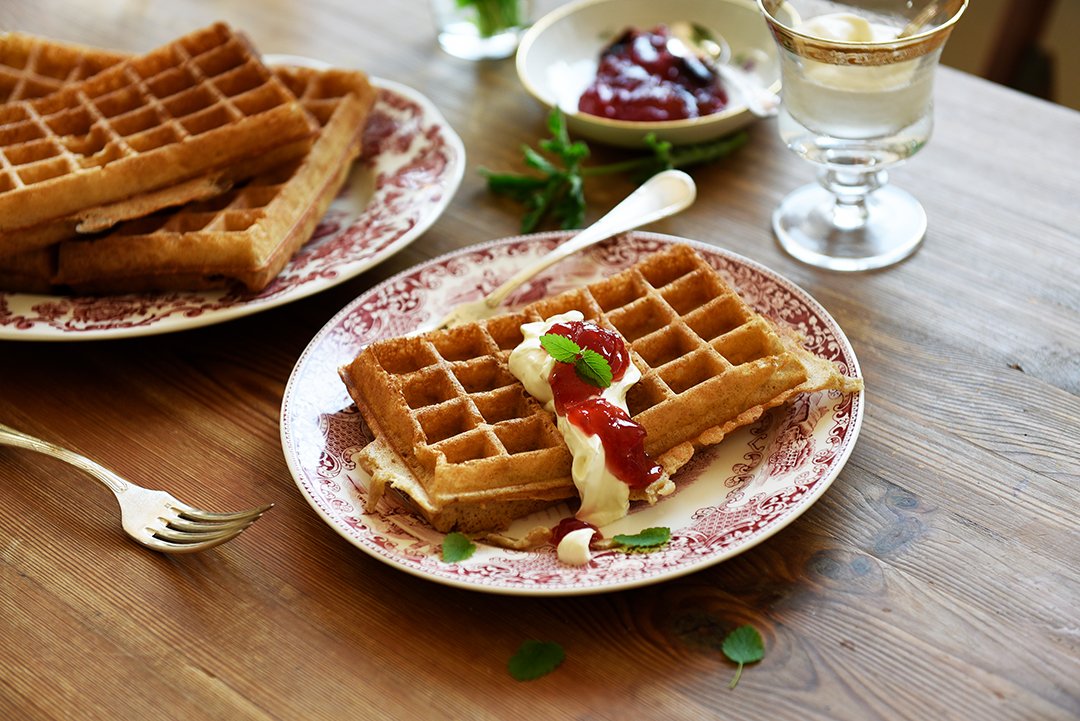
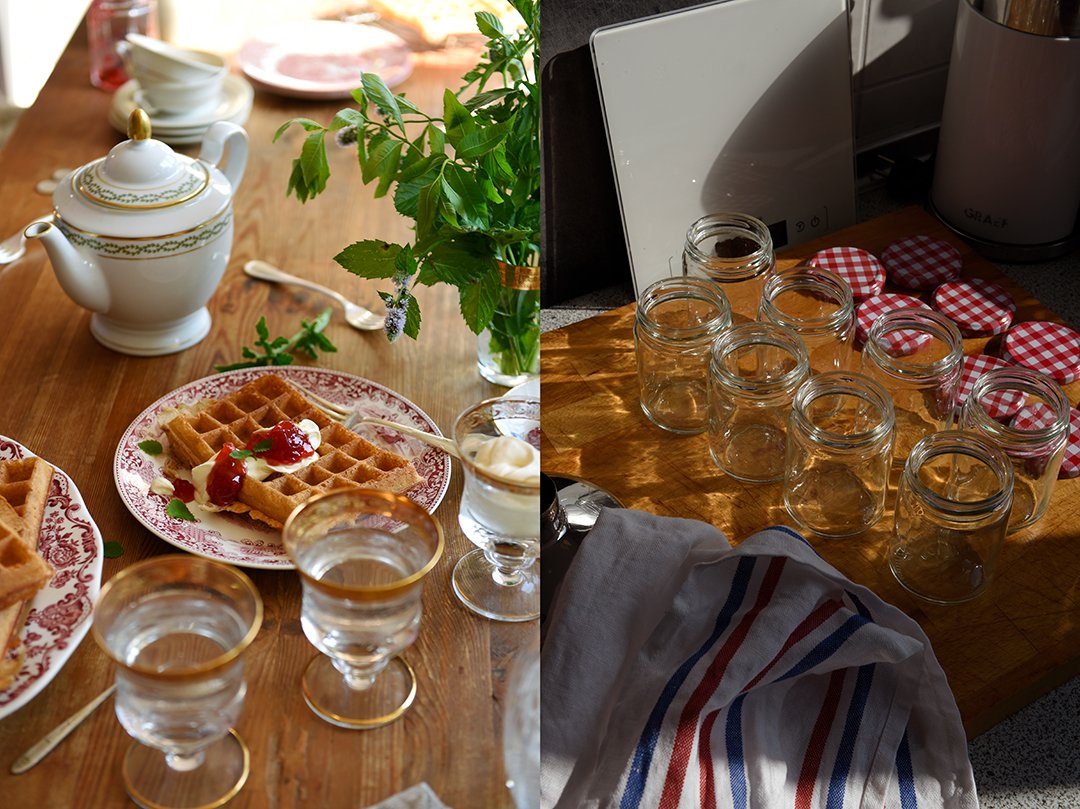
Daniel shared two recipes with me that are perfect for an autumn brunch or cozy teatime: Sourdough waffles, crisp on the outside and spongy inside, crowned by dollops of crème fraîche and crimson colored jam made of dark plums and firm apples infused with star-anise and vanilla.
The podcast episode with Daniel Schreiber is in German. You can listen to the Meet in My Kitchen podcast on all common podcast platforms; there are English and German episodes. You can find all the blog posts about these podcast episodes including my guests’ recipes here on the blog under Meet in Your Kitchen.
Listen to the podcast episode with Daniel on:
Spotify / Apple / Deezer / Google / Amazon / Podimo
On Instagram you can follow the podcast @meetinmykitchenpodcast!

Sourdough Waffles with Plum-Apple Jamand Crème Fraîche
by Daniel Schreiber *
* The waffle recipe is adapted from a New York Times recipe and the jam recipe is adapted from a recipe by Christine Ferber.
For the plum-apple jam
Mind that the jam needs to sit overnight before you finish cooking it the next day.
Makes 6-7 small jars
680g / 1 1/2 pounds dark plums (Zwetschgen, Italian Prune Plums), cut in half and pitted (weight without pits: 500g / 18 ounces)
750g / 1 2/3 pounds firm, sour apples (Granny Smith, Golden Delicious, Idared), peeled, quartered, cored, cut crosswise into very thin slices (final weight: 500g / 18 ounces)
800g / 1 3/4 pounds granulated sugar
2 star-anise
1 vanilla pod, split in half
2 medium lemons, juice only
7 small jars with their lids, sterilized
The day before you want to cook the jam, combine all the ingredients in a tall, large pot and let it sit for 1 hour. Over high heat, stirring gently, bring the jam to a boil. When the jam starts bubbling and rising, immediately remove the pot from the heat, cover with a lid, and let it sit overnight.
The next day, place a saucer in the freezer. Remove the lid from the pot and bring the jam to a boil over high heat, stirring gently. Cook the jam for 10-15 minutes or until it thickens and reaches its setting point. To see if the jam reached its setting point either use a sugar thermometer, the temperature should be 105°C / 220°F, or place a small spoonful of jam on the chilled saucer that you kept in the freezer, wait 20-30 seconds then push the jam with your finger. The jam should wrinkle up. Remove and discard the vanilla pod and star-anise. Using a ladle, fill the jam into the sterilized jars, close them tightly with their lids, and store in a dark place.
For the sourdough waffles
For this waffle recipes, you make use of the sourdough starter that you usually discard every day when you refresh your sourdough starter. Just make sure that you take 240g / 1 cup sourdough starter aside before (!) you refresh your starter. Mind that you need to prepare the batter the night before you want to bake your waffles and finish it the next day.
Serves 2-4
240g / 1 cup sourdough starter that hasn't been refreshed (fed)
220g / 1 cup buttermilk
120g / 1 cup all-purpose flour (German flour type 550)
1 tablespoon light brown sugar or granulated sugar
1 vanilla pod, split and scraped, or 1/2 teaspoon vanilla extract
1 large egg
60ml / 1/4 cup olive oil
1/2 teaspoon fine salt
1 teaspoon baking soda
The night before you want to bake the waffles, whisk together the sourdough starter, buttermilk, flour, sugar, and vanilla seeds in a large bowl until smooth. Cover with plastic wrap and let it sit at room temperature overnight.
The next day, when you're ready to bake the waffles, preheat a waffle iron (ideally a square Belgian waffle iron). Add the egg, olive oil, salt, and baking soda to the sourdough mixture and whisk to combine.
Pour a ladle of the batter into the hot waffle iron and bake until golden brown and crisp. Transfer the waffle to a cooling rack and let cool for a few minutes. Continue baking more waffles with the remaining batter.
For serving
Crème fraîche
Place a dollop of crème fraîche and a dollop of jam on a warm waffle and serve immediately.


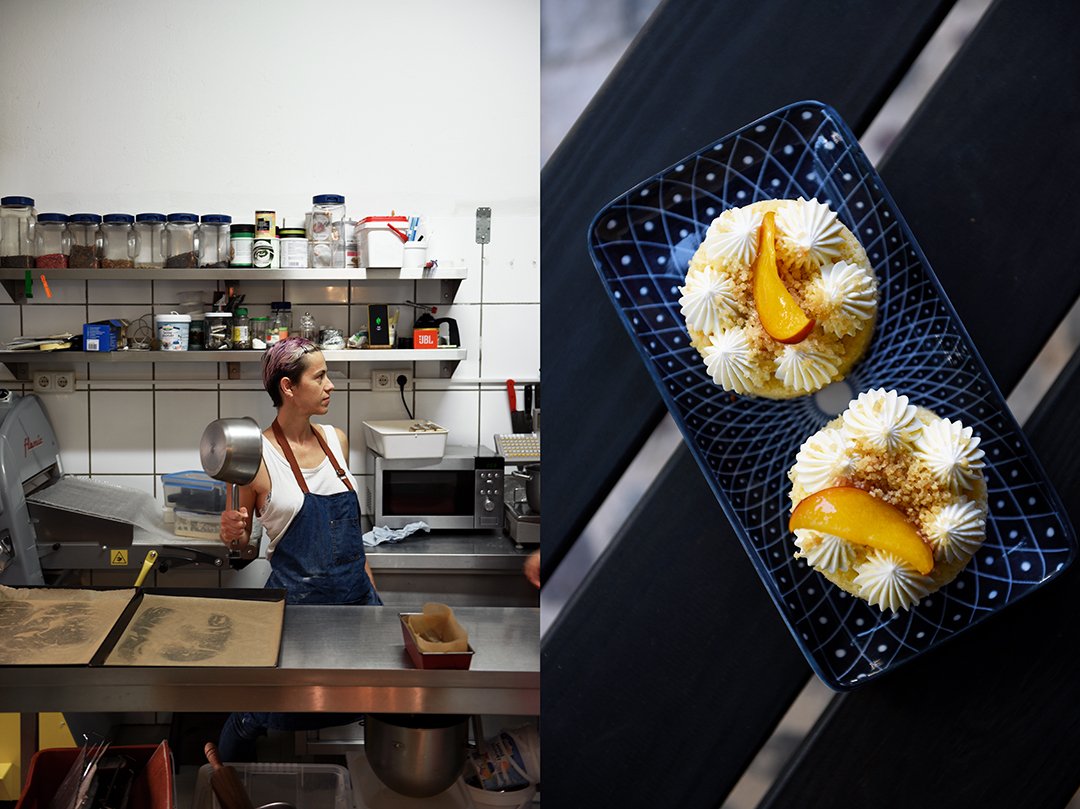
Meet In Your Kitchen | Cookies & Co's Ricotta Lemon Cake with Yuzu Cream

This post is part of my Meet in My Kitchen podcast: How did we get to where we are in life & what does food have to do with it
“Food is existence. It’s therapy. In our case, food is a way of expression. It’s a reflection of our personalities and our believes. Food in general is pure pleasure.” – Mira and Ori
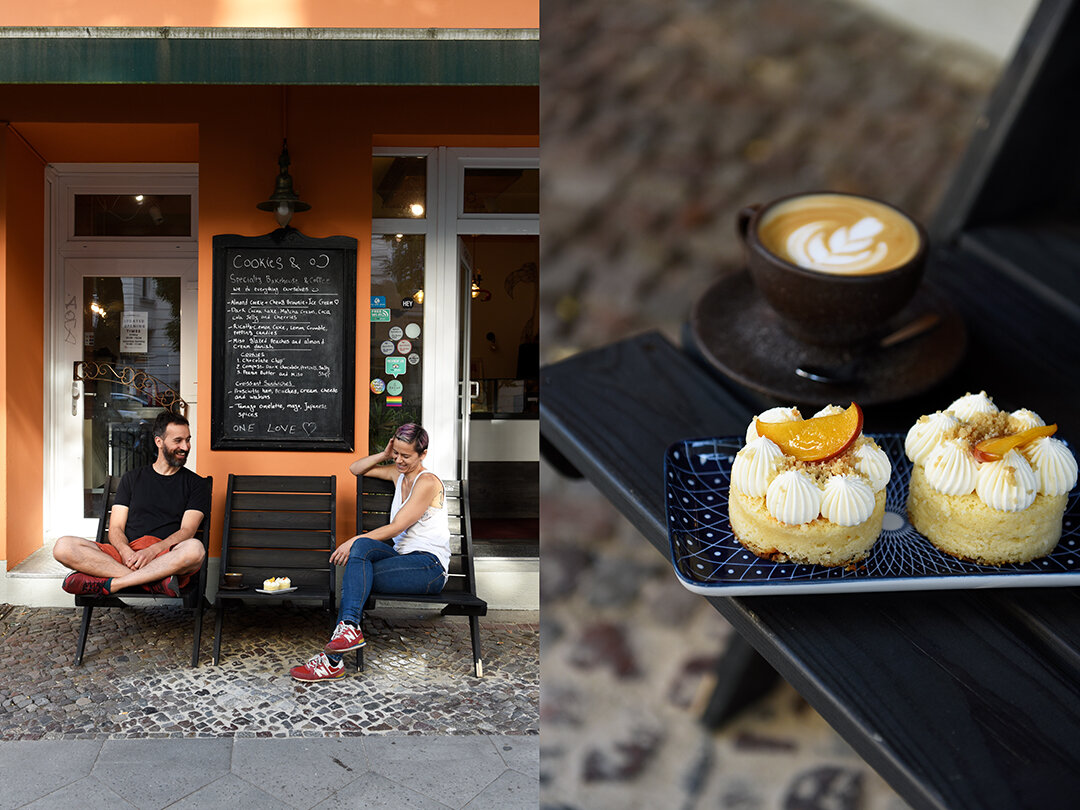
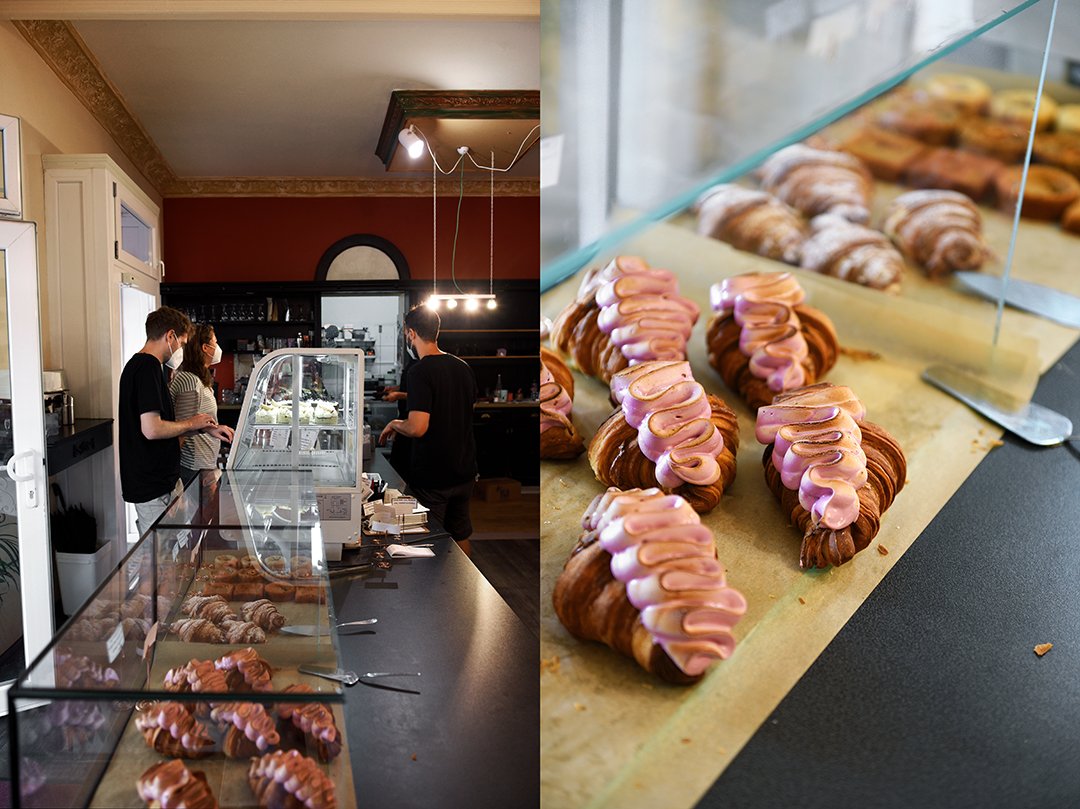
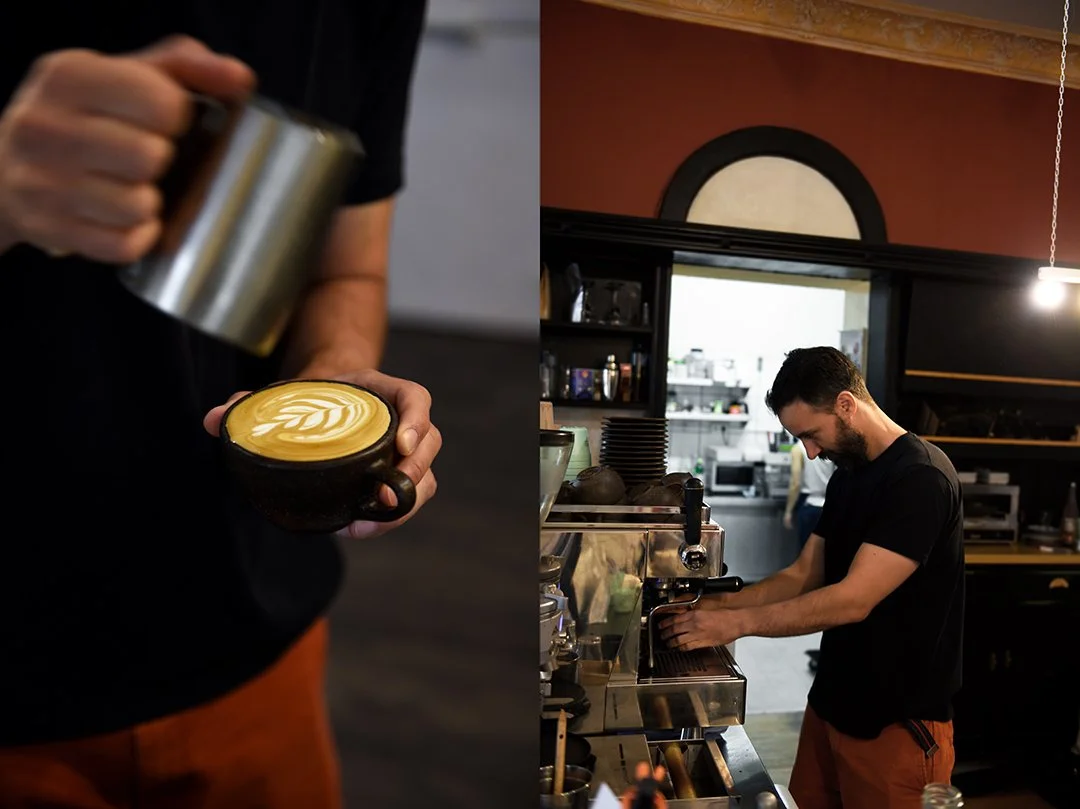
She loves baking, he loves coffee. She grew up in the Soviet Union before it became Russia, he grew up under the hot sun of Israel. She calls herself a lazy perfectionist - she's anything but lazy - and dances around with her two little kids while preparing filigree cakes for the bakery, tired but happy. He tells you about the most painful moment in his life and how it became one of the most beautiful moments of his life. Mira Koretsky and Ori Kidron of Cookies & Co are two opposite poles, two planets orbiting and dancing around each other. There's so much energy, so much trust. They are one of the most positive couples I've ever met and together they are riding life's turbulent waves as they come.
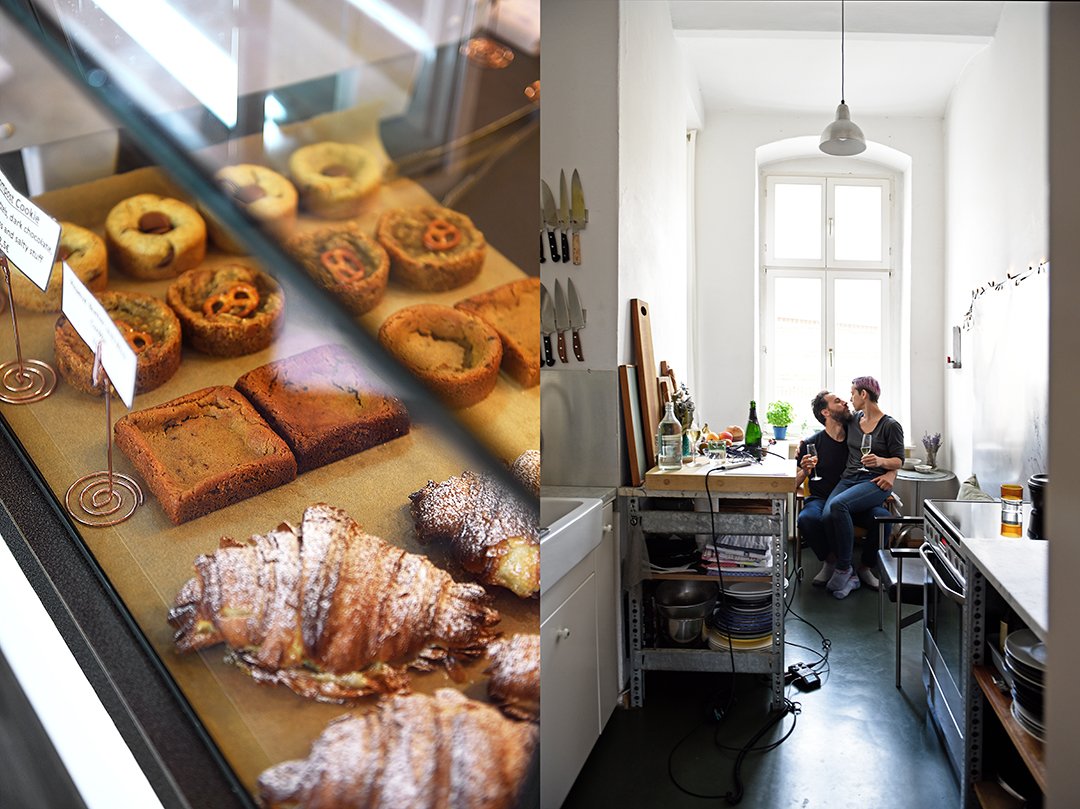
Cookies & Co is one of Berlin's highly praised cafés / bakeries. The two owners never compromise to please everybody. Instead, they attentively take care that their place keeps its unique soul. A lot comes from Mira's style of baking, which - despite its perfect look and taste - never loses its charm. She's a professional baker with the soul of a flexibel home baker. Unpredictable influences cause that not every pastry looks the same. Taste and texture vary slightly according to the seasons or changing weather conditions, which means that every cookie, every cake, and croissant is unique. This is not a baking factory, it's the opposite. All pastries are made by Mira and her assisting pastry chef, Lior - who is at least as passionate about baking as he is about Beyoncé. The two bakers share the same quality standards and values and also curiosity to dive into unexplored baking adventures.

"Once you move your body, you’re moving forward. That’s the circle of life. As long as there is movement something is happening." - Mira
Maybe it's because Mira grew up in a political system that didn't allow culinary abundance but had a strong baking tradition, her recipes simply work and impress even if she left out the firework. However, let her start her firework and you will see the most colorful sweet feast. Fascinated by Japan's modern baking culture, she tops her perfectly moist Ricotta Lemon Pound Cake with a flowery-sour Yuzu Cream (recipe below). Her Black Forest Cake is refined with miso and the bakery's popular Compost Cookies stay true to their name: take a thick and chewy cookie and add chunky pretzels, chocolate, and potato chips to it. It sounds funky but it's so good!
One of the masterpieces from the Cookies & Co bakery, it's like the movie star that everybody wants to take a picture of, is their glorious, beautifully laminated Croissant with Yuzu Filling and flamboyant purple Italian Meringue. It's a diva, you're almost too shy to cut it. It's dramatic, it's loud but it keeps its promise: it looks like something that will excite you and it definitely does. And then the husband comes in, serving you a cappuccino or espresso that is just right. Ori is the barista in the family, obsessed with good coffee, and also taking care of the guests while his wife is getting creative in the kitchen. Sometimes Ori has to slow Mira down otherwise the guests would never see their beloved Cookies & Co classics on the menu again. If she could, Mira would change the menu every day. Luckily, he stops her so that we can enjoy her creations more than once.

"And you’re thinking to yourself, how do I deal with this now, how do I go on, how do I make the most out of this, how do I optimize myself 'cause this requires so much more out of me, out of us as people, as parents, actually being there for someone who needs you so desperately. And you don’t even know in what sense, what is going to be required of you. Then all of a sudden came a song by Sade. It’s called Long Hard Road and the chorus says There’s a long hard road ahead but a voice inside me said it's gonna be alright. It was just exactly what I needed at that point. And I just started crying right there in the street and as emotional as all of this was, I remember telling myself this is one of the most beautiful moments I have ever had in my life." - Ori
There are many bakeries offering perfect pastries all over the world but the ones we stick to, we keep going back to, are the ones that touch us, the ones that have a soul. Mira and Ori do almost everything on their own, keeping the quality level they once defined for themselves without compromises. Even if their energy is running low, they keep the motor running constantly. They are young parents, their youngest daughter was born with trisomy 21. The situation challenged them but they decided to face it with the same stubborn energy and positivity that they, individually and as a couple, activate every day to deal with all facets of life. They are honest, they know the gifts they got. They don't look for the easiest way but they always find a beautiful way to enjoy life as it is: an endless circle of ups and downs. And in Mira's and Ori's case it's a dance.
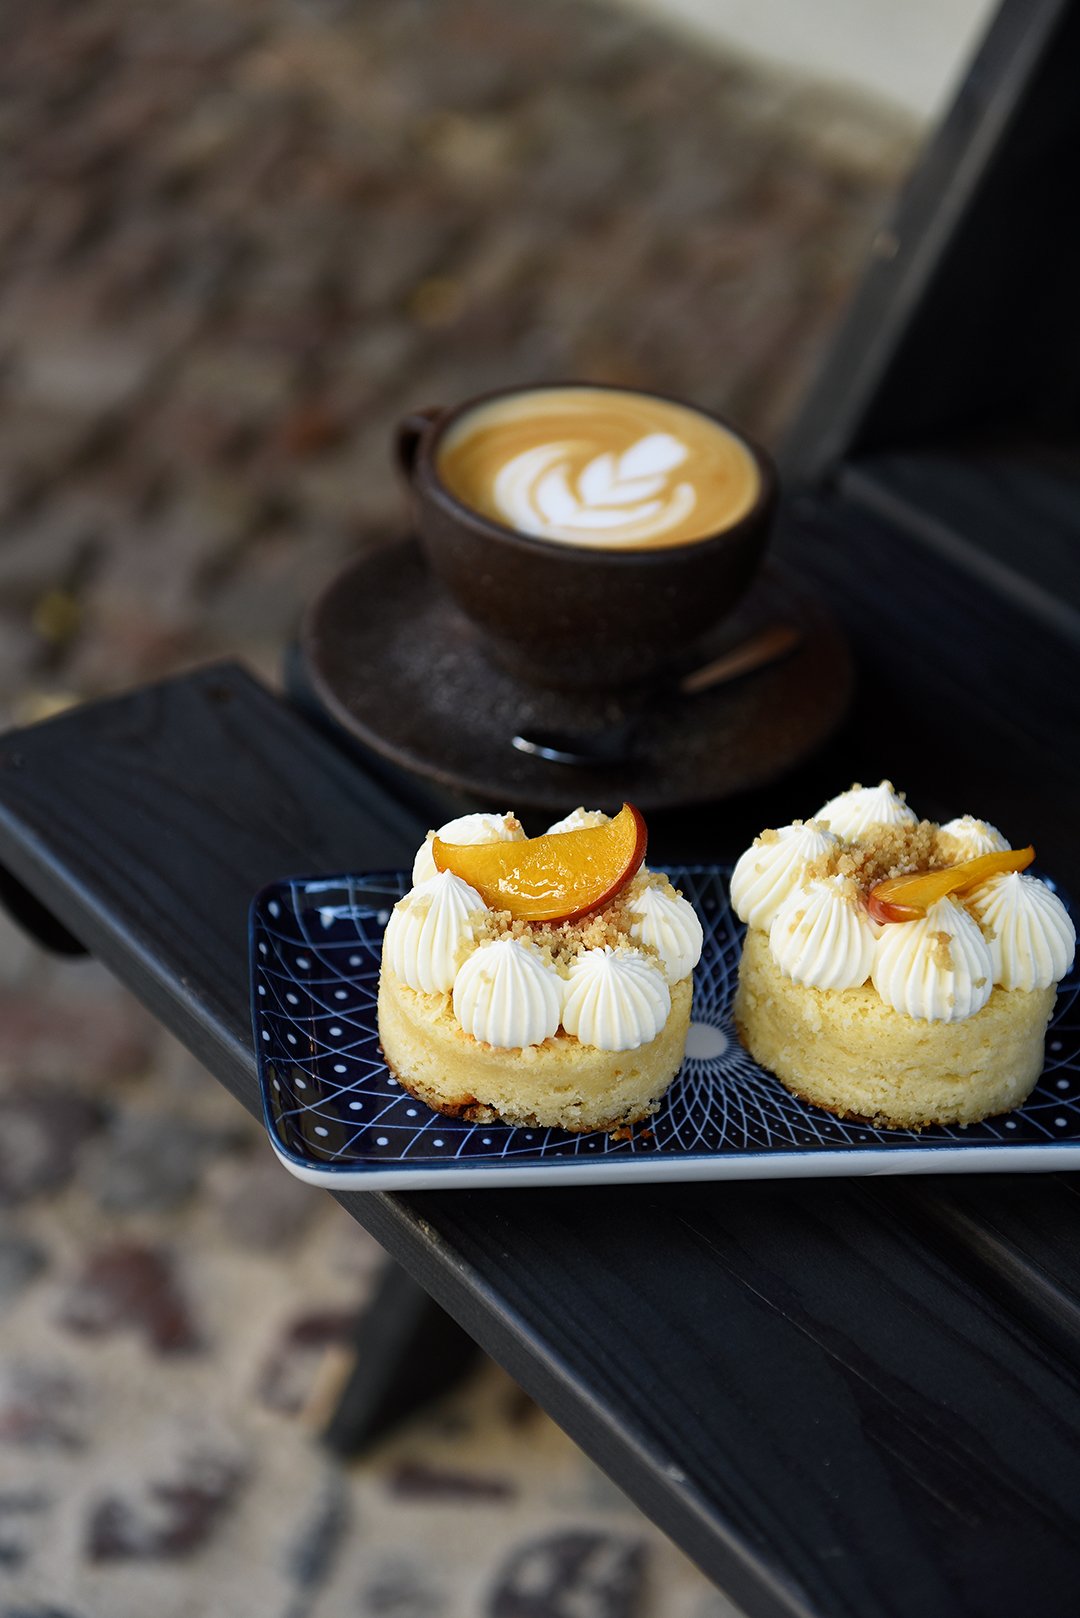
Mira shared the recipe for her Ricotta Lemon Pound Cake with Yuzu Cream with me. You can either bake the cake in a loaf tin and serve it with dollops of the fruity cream or go for the pâtissier-style serving and bake the cake in a deep baking dish, cut out circles, and pipe the cream delicately on top. Just like they do at the Cookies & Co bakery.
The podcast episode with Mira and Ori is in English. You can listen to the Meet in My Kitchen podcast on all common podcast platforms; there are English and German episodes. You can find all the blog posts about these podcast episodes including my guests’ recipes here on the blog under Meet in Your Kitchen.
Listen to the podcast episode with Mira and Ori on:
Spotify / Apple / Deezer / Google / Amazon / Podimo
On Instagram you can follow the podcast @meetinmykitchenpodcast!

Ricotta Lemon Pound Cake with Yuzu Cream
by Mira Koretsky / Cookies & Co
It's best to prepare the yuzu cream the night before you serve the cake.
For the yuzu cream
2g / 2/3 teaspoon powdered gelatin
1 tablespoon cold water
80g / 3 ounces white chocolate
120ml / 1/2 cup heavy cream (divided into 2 x 60ml / 1/4 cup)
70ml / 1/4 cup plus 1 teaspoon yuzu juice
For the pound cake
You can either bake the cake in a 26 x 12cm / 10 x 5" loaf tin or for the pâtissier-style serving, cutting the cake into circles or squares, use a baking dish of roughly double the size.
170g / 3/4 cup unsalted butter, at room temperature
350g / 1 3/4 cups granulated sugar (or 300g / 1 1/2 cups sugar if you prefer it less sweet)
3 large eggs, at room temperature
360g / 13 ounces ricotta, at room temperature
1 tablespoon freshly squeezed lemon juice
200g / 1 2/3 cups all-purpose flour
2 teaspoons baking powder
1 teaspoon salt
For the yuzu cream, stir the gelatin into the water in a small bowl and let sit for 5 minutes. In a small saucepan, melt the white chocolate in 60ml / 1/4 cup of heavy cream over medium heat, whisking constantly; remove the pan from the heat. Add the cream mixture to a blender (or leave it in the saucepan and use a whisk), add the remaining 60ml / 1/4 cup of heavy cream, the yuzu juice, and the gelatin-water mixture and blend, or whisk, until smooth; cover and let sit overnight.
The next day, preheat the oven to 160°C / 325°F. Butter and line a 26 x 12cm / 10 x 5" loaf tin with parchment paper, or a baking dish of roughly double the size.
In the bowl of a stand mixer, fitted with the paddle attachment, beat the butter and sugar until light and fluffy. Add the eggs, one at a time, incorporating each egg before adding the next one, and continue beating for a few minutes until creamy and light yellow. Mix in the ricotta and lemon juice then add the flour, baking powder, and salt and mix until smooth and shiny. Transfer the dough to the prepared loaf tin or baking dish and bake for around 40-50 minutes, checking after 30 minutes, or until the cake is golden; if you insert a skewer in the middle of the cake it should come out clean. Let the cake cool completely.
For serving, whisk the yuzu cream to fluff it up. You can either cut the cake into slices and serve the yuzu cream separately or cut the cake baked in a baking dish into circles (using a round cookie cutter) or squares and, using a piping bag, pipe the yuzu cream on top.
Enjoy!


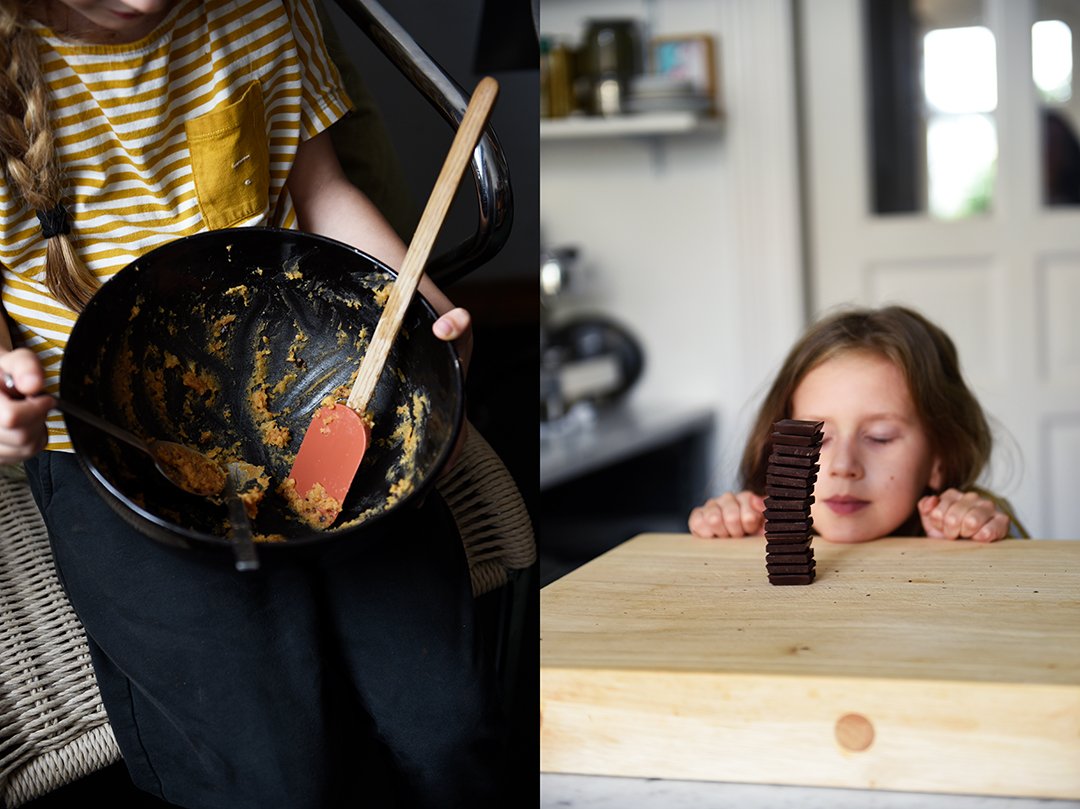
Meet In Your Kitchen | Marta Greber's Chocolate Chickpea Cookies for Breakfast

This post is part of my Meet in My Kitchen podcast: How did we get to where we are in life & what does food have to do with it
"Food is comfort. Food makes me happy." - Marta Greber
Marta is an adventurer - driven by curiosity and trust. She explored New Zealand in a camper van with her 2-year old daughter and even when the van broke in the middle of nowhere she felt they were safe. She travelled around South America on her own, taking precautions and cutting her hair short as matches and adorning her face with not the cutest glasses to cause anything but attraction. Marta avoids risks but she doesn't miss a chance when she sees it. Australia, South East Asia, Europe, there isn't really a dirt road she hasn't been on yet.
When it comes to very spontaneous, very intuitive decisions that always lead to a good ending, no one beats the Grebers: be it on her own or together with her husband, Tomasz, and their daughter, Mia, living in their camper van called Thelma - Marta says she's Louise but hopes for a better ending than in the movie; be it backpacking, or moving to a new country for good.
I first heard of Marta when I started my own blog and found endless inspiration in hers, on What Should I Eat for Breakfast Today?. Her photography drew me into her digital wonderland of breakfasts and traveling. Her pictures are full of joy, depth, and color. Marta has a great talent, she can tell a story in a single picture. Once, many years ago, she shared a picture of a dish that was shoot on an old Yves Klein-blue door. The contrast of the blue surface and the spring green food made the dish almost pop out of the screen. Marta is the reason why both of my books have blue covers.
Always drawn to breakfasts - years ago she told me it's the only time of the day that you can really plan - it was in Australia when she felt overwhelmed by the variety and excitement that this meal of the day can bring to your life and table. Banana bread and pancakes, Dutch baby and chunky cookies, Finish pannukakku, shakshuka, Portuguese pastel de nata - her insatiable Wanderlust and appetite became the endless source of inspiration for her food blog, one of the most popular blogs in the last 10 years.

"It’s about living in a van. Imagine when it’s raining, you sit in your apartment, you have this awesome window, you look through the window, you look at people running on the street and hurry somewhere and I am always in a different place. So when it’s raining I’m looking, for instance, at the sea, and at the storm over the sea. There’s the wind, the beach is empty, a bird is fighting with the wind. For me it’s amazing and whenever things like this happen, it’s like each second day, I tell Tomasz: This is the reason why we’re here!" - Marta Greber
Her life wasn't meant to be so adventures from the beginning. Marta grew up in Poland, still experiencing the communist system in her childhood years. She studied law, married early, and for a long time she didn't even question that she would live a settled life in Poland. However, her first long trips to the US, staying in Las Vegas as part of a work and travel program for Polish students - there couldn't have been a bigger contrast between her country's communist past and this flashing capital of capitalism - living in and exploring Australia together with her husband followed by various adventures in South East Asia, they all changed her.
So as she went back to Poland, reflecting about where she sees herself at that point in her life, after all those impressions and experiences, she decided to take the time to figure exactly that out. She didn't want to be a lawyer but she had no idea what the next steps should be, she couldn't see her future yet as a successful blogger, photographer, and journalist but she grabbed the chance to find that out.
When you hear her talk about her beloved mornings when the family is on the road, stepping out of her camper van welcomed by silence and the sun rising over a lonely beach, or misty hilltops, her cup of coffee in one hand, she's the happiest person in the world. And I totally understand why. To see someone being so brave to actually make all those radical changes in her life and to do what many just talk about, to see the peace she found, this is very touching. There's so much I learn from this woman and I'm sure this will never change.

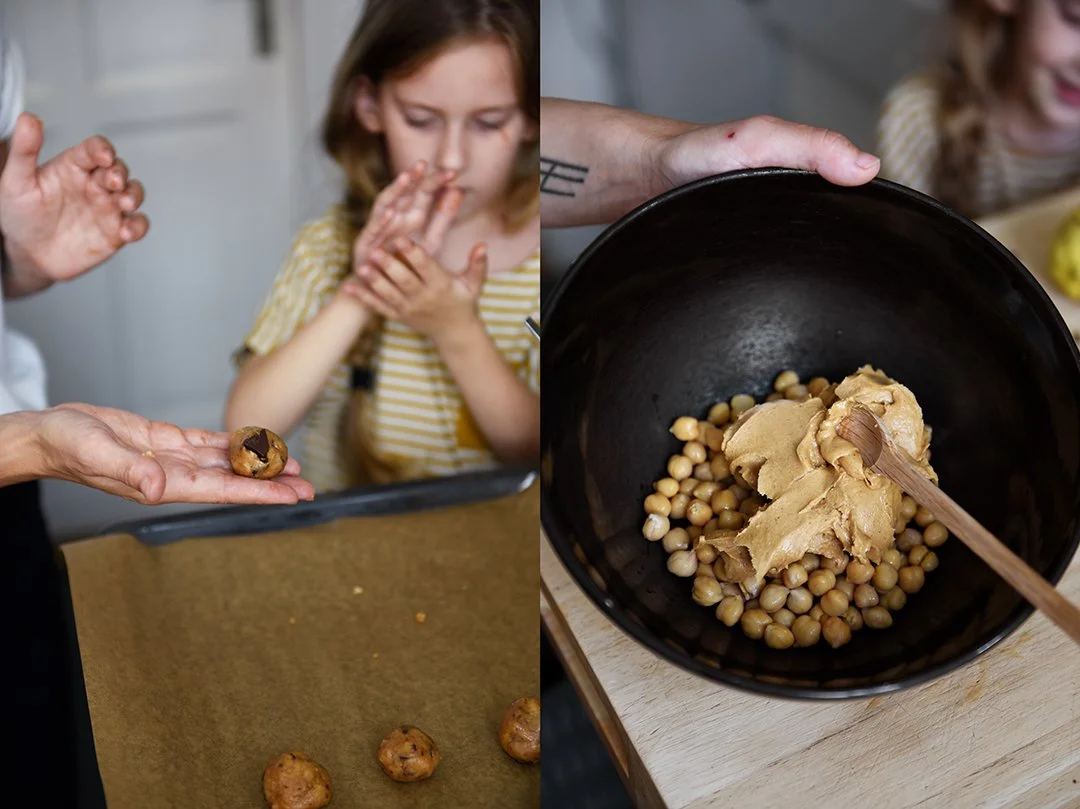
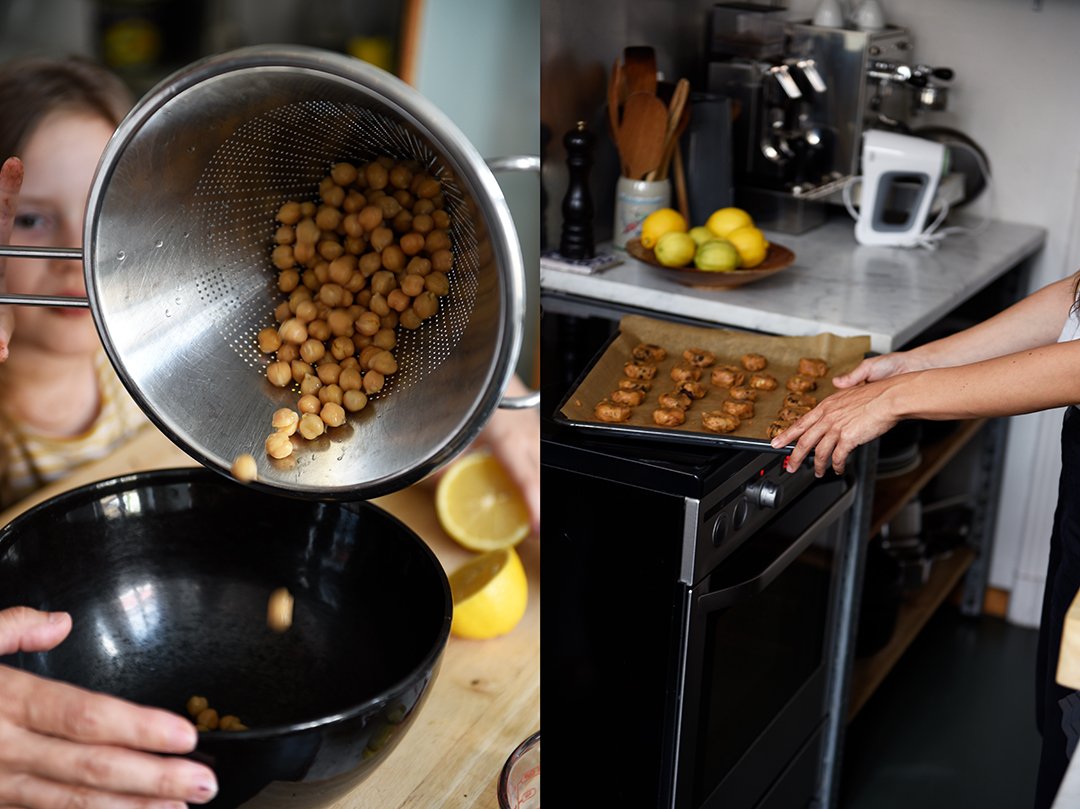
Recently Marta had to change her diet and she reduced her consumption of flour but she didn't want to spoil the fun so she got experimental. For the Meet in My Kitchen podcast, she shared a flourless cookie recipe with me, made of chickpeas, peanut butter, bittersweet chocolate, and a squeeze of lemon. The cookies taste so good and have such a moist texture that we emptied the tray before the cookies had a chance to cool. The recipe is adapted from one of Marta's blogger friends, Texanerin.
Giving up their apartment in Berlin - actually while we recorded the podcast - and now moving to Lisbon, the Grebers are ready for a new chapter in their life. This is the reason why we shot the recipe in my kitchen and not in Marta's. Thank you, Mia, for being an awesome kitchen assistant, reliable cookie tester, and for patiently waiting behind the closed kitchen door until Marta and I finished the podcast recording before we could start baking together.
The podcast episode with Marta Greber is in English. You can listen to the Meet in My Kitchen podcast on all common podcast platforms; there are English and German episodes. You can find all the blog posts about these podcast episodes including my guests’ recipes here on the blog under Meet in Your Kitchen.
Listen to the podcast episode with Marta on:
Spotify / Apple / Deezer / Google / Amazon / Podimo
On Instagram you can follow the podcast @meetinmykitchenpodcast!

Chocolate Chickpea Cookies
by Marta Greber
Makes about 22 small cookies
240g / 1 1/3 cup drained and rinsed canned chickpeas
175g / 2/3 cup smooth peanut butter, at room temperature
60ml / 1/4 cup agave syrup, or maple syrup
1 teaspoon baking powder
A pinch of salt
A squeeze of lemon
100g / 3,5 ounces bittersweet chocolate, roughly chopped
Preheat the oven to 175°C / 350°F (preferably convection setting) and line a baking sheet with parchment paper.
Combine the chickpeas, peanut butter, agave syrup, baking powder, salt, and lemon juice and, using a food processor or blender stick, briefly puree but keep the mixture a little chunky. Using a large spoon, fold in the chocolate.
Shovel a spoonful of dough into your hand, form into a ball, and transfer to the prepared baking sheet. Slightly flatten the dough with a teaspoon. Repeat to make around 21 more cookies, leaving a little space between them.
Bake for around 10 minutes or until golden; they will still be very soft and moist in the center. Let them cool for at least 10 minutes before you transfer them to a cooling rack; they will stay quite soft. Enjoy!


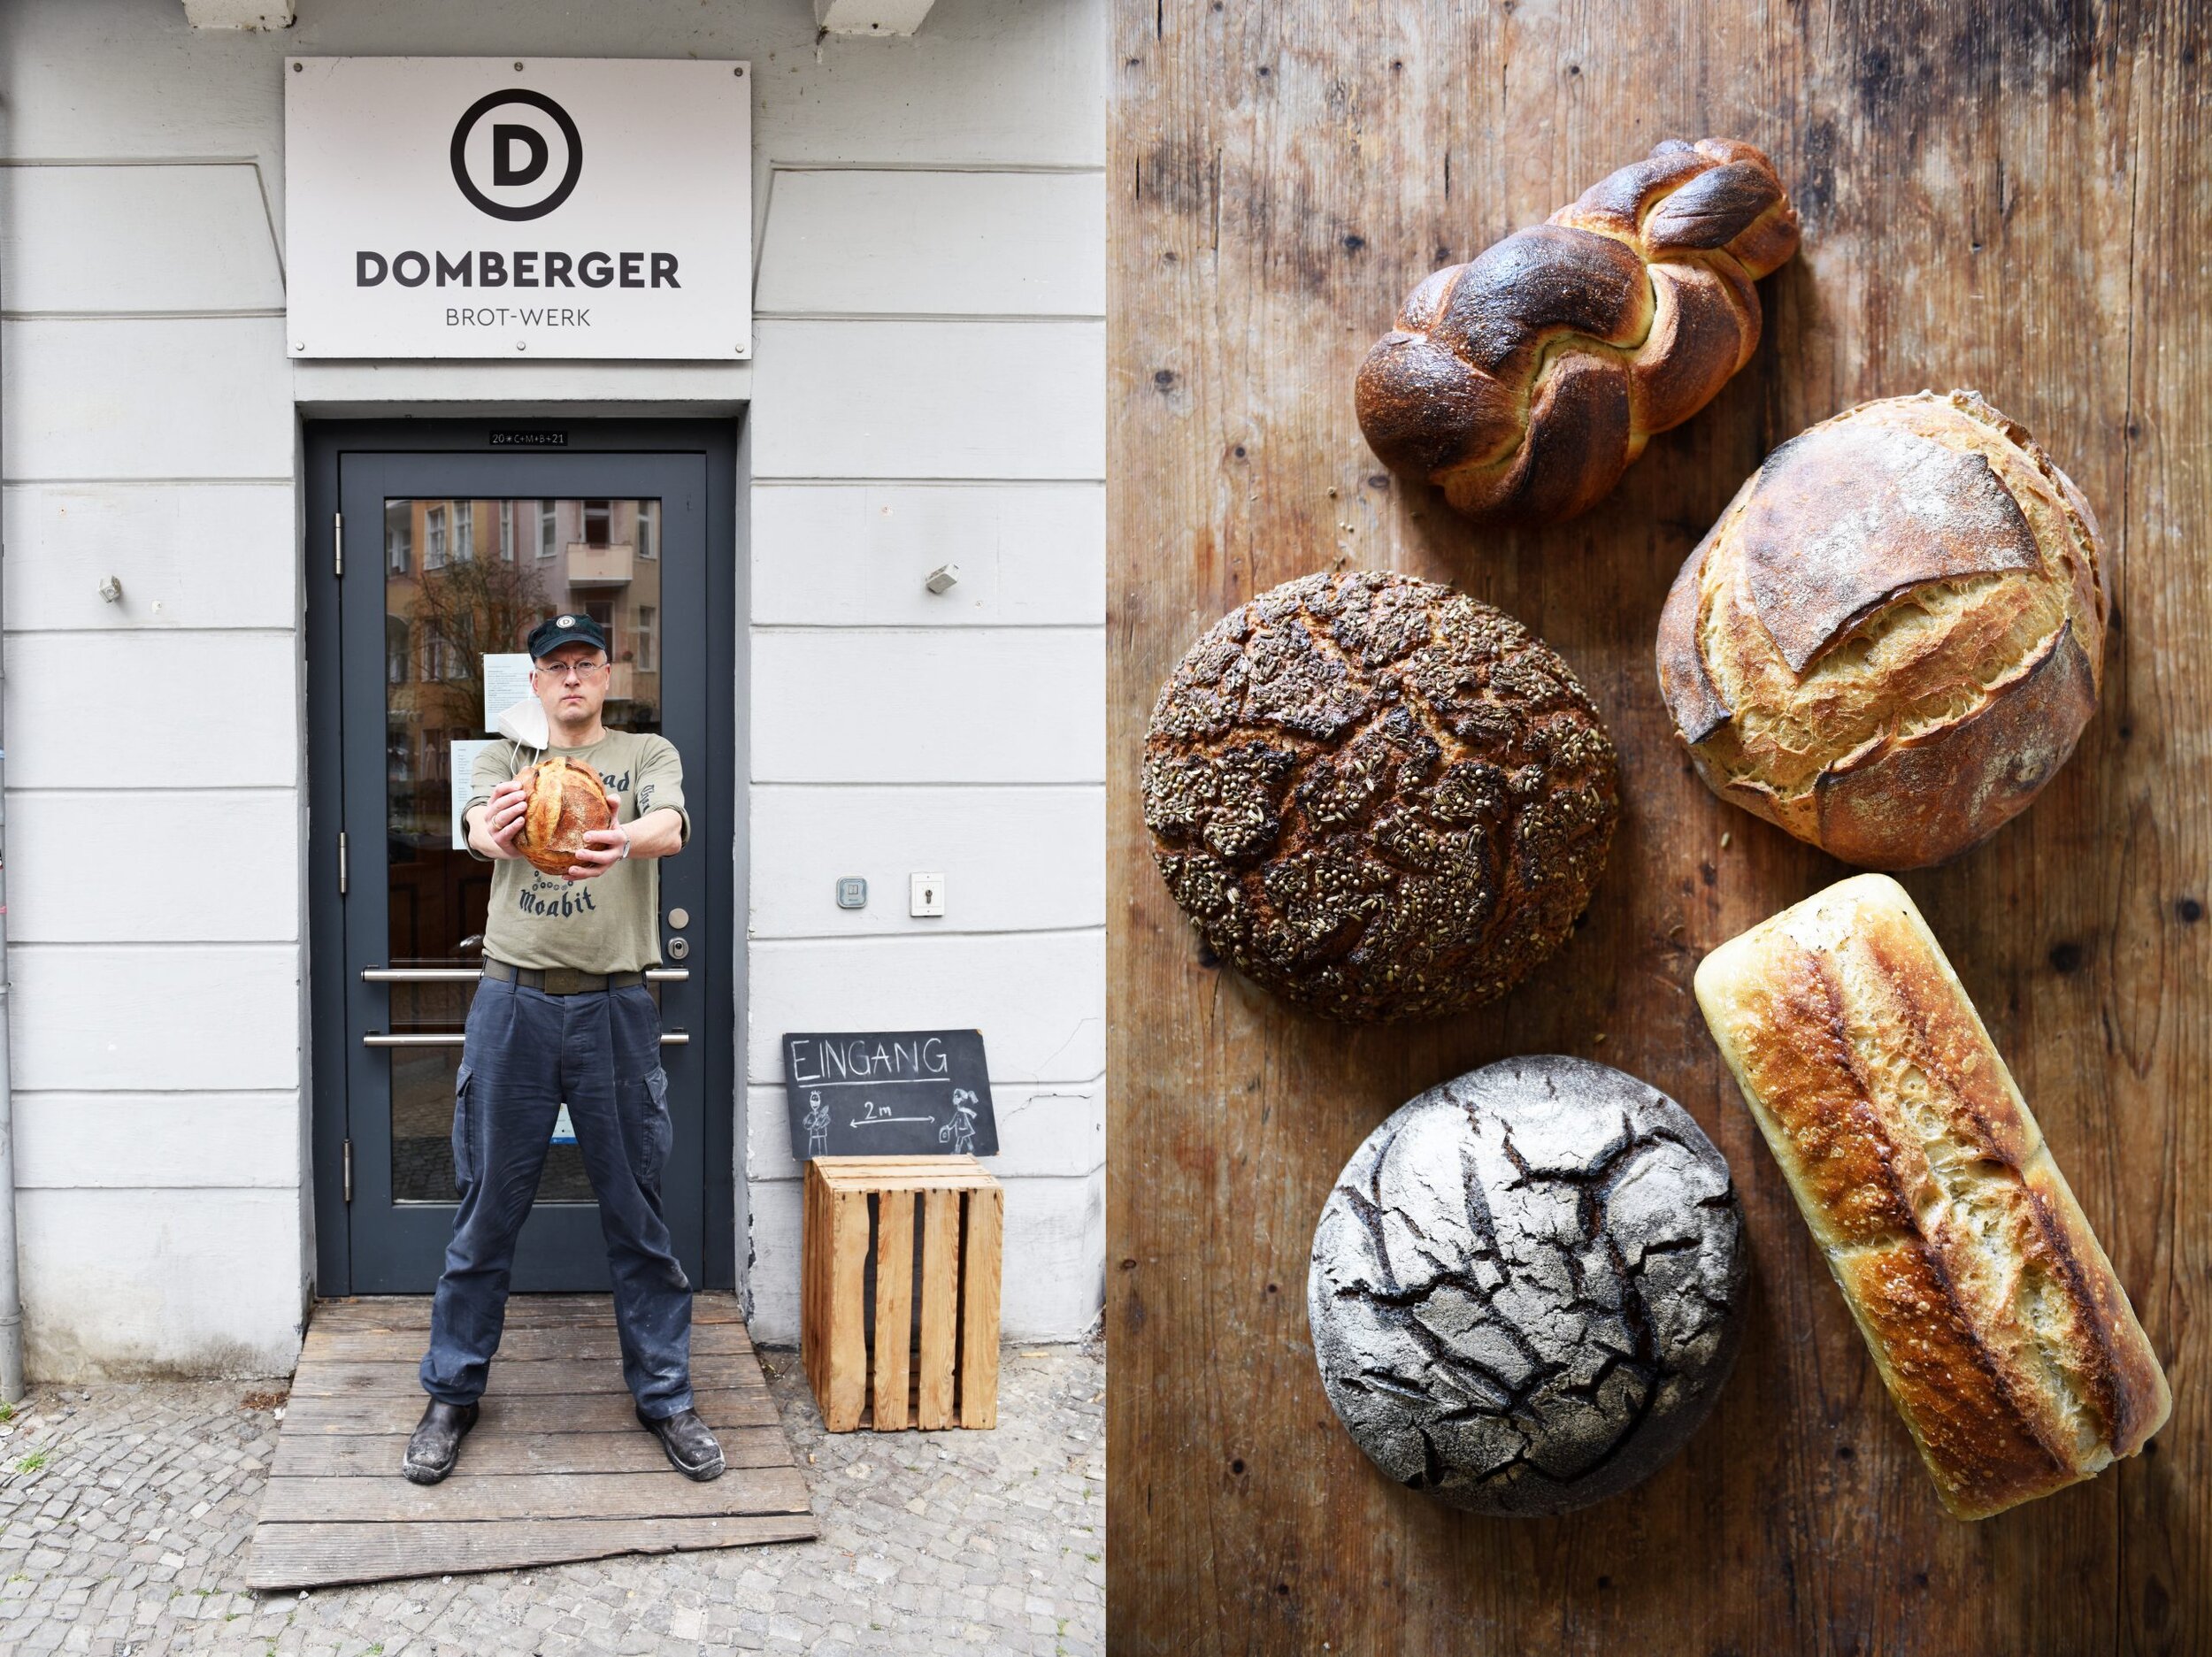
Meet In Your Kitchen | Domberger Brot-Werk's Secret to German Bread

This post is part of my Meet in My Kitchen podcast: How did we get to where we are in life & what does food have to do with it
“Food is kind of everything. It’s a source of conflicts, of love. It connects, it’s sharing, it differentiates. It’s absolutely underrated in Germany.” - Florian Domberger
The first time I visited Florian Domberger's bakery, Domberger Brot-Werk, in Berlin's Moabit neighborhood I tried (almost) everything I saw on the wooden shelves: pretzels, croissants, fragrant loaves of crusty German rye and spice bread and traditional buns, such as Vinschgerl, Schrippen, Seelen, and Schusterjungs. All made with sourdough, all made with love. I was hooked. So I sat outside on a bench in front of the bakery in the golden late morning sunlight, all that baked deliciousness spread out in front of me, and every bite reminded me of how bread used to taste in my childhood.
Florian and his team master more than just savory traditional German baking, their sweets are also a generous gift to your palate and hips. His Butterkuchen (a yeasted sheet cake topped with lots of butter and sugar) and his Zimtschnecken (cinnamon rolls) are both the best I ever had in my life. So what is the secret behind this bakery? Florian says it's just "flour, water, salt, time - and love!", and I agree, he and his bakers truly understand the core of what their craft is about.

The craft of a baker demands a lot of fascination - and love - for the ingredients, for the flour, the process, the desire to approach perfection and improve each move every day. A baker needs the humble understanding of the importance of time, working and watching your dough slowly and attentively, you can't rush sourdough bread. And that's the tricky point where commercial bakeries lost the craft and with this loss they turned the taste of good bread into a faded memory. Commercial yeast and ready-made bread mixes replaced the elaborate simplicity of "flour, water, salt, and time" and paved the way for an industrialization that is conflicting when it comes to food that achieves its taste and quality from a slow process. An undertaking that could only fail and threaten the tradition and variety that once Germany became famous for.
Twenty years ago, driving through my home country, I could stop at almost any bakery in any town, village, and city. Those were still individual bakeries who had their family name written outside on the shop's sign and inseparably connected to their name was the responsibility, and the pride, to only deliver quality to their customers. And that's where Florian decided to go back to. He put his name on the sign. After a successful international career in shipping and logistics, after leaving his family's business and telling his father he's not going to follow in his footsteps, he learned the craft of the baker with the goal to open his own bakery. Five years ago, his wife, Vanessa, and their two daughters followed their husband and father to Berlin and together they built up one of Berlin's most acclaimed bakeries.
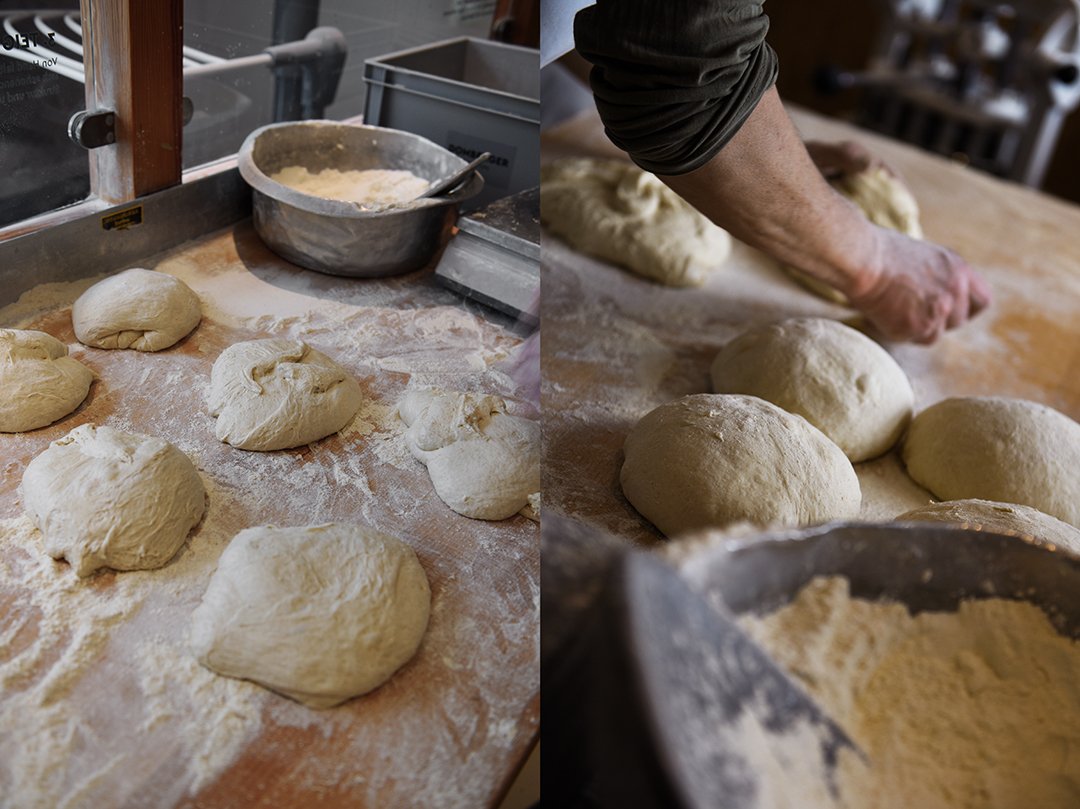
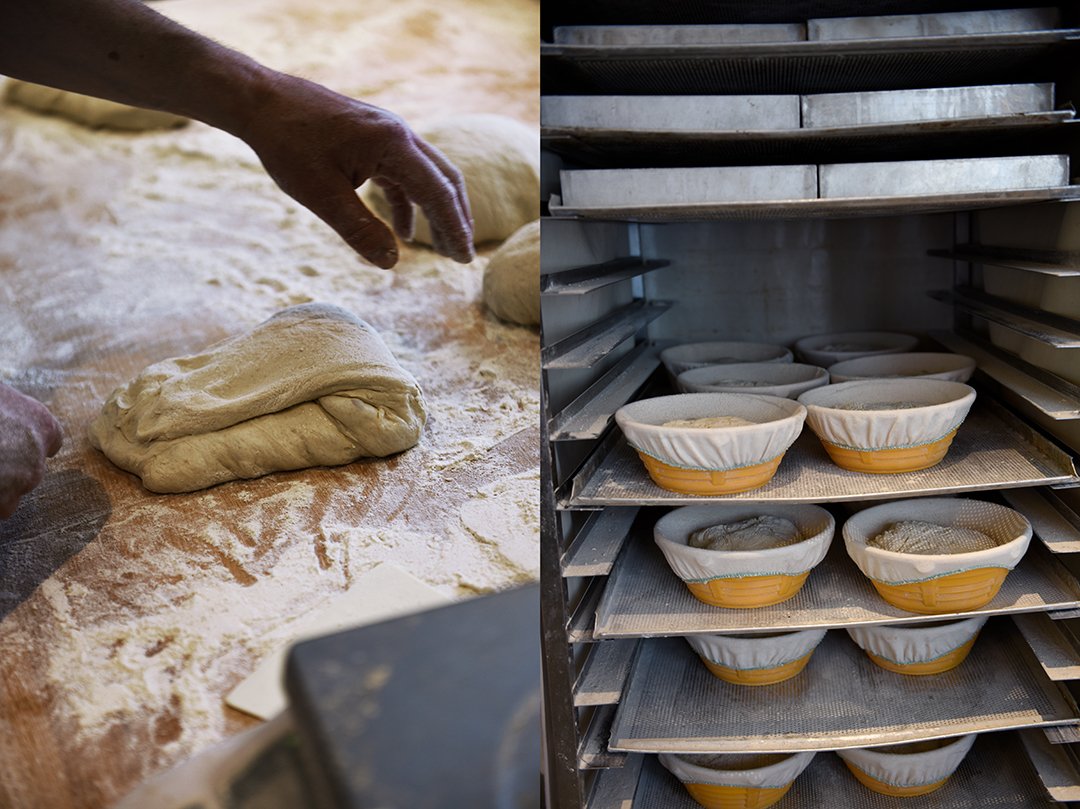
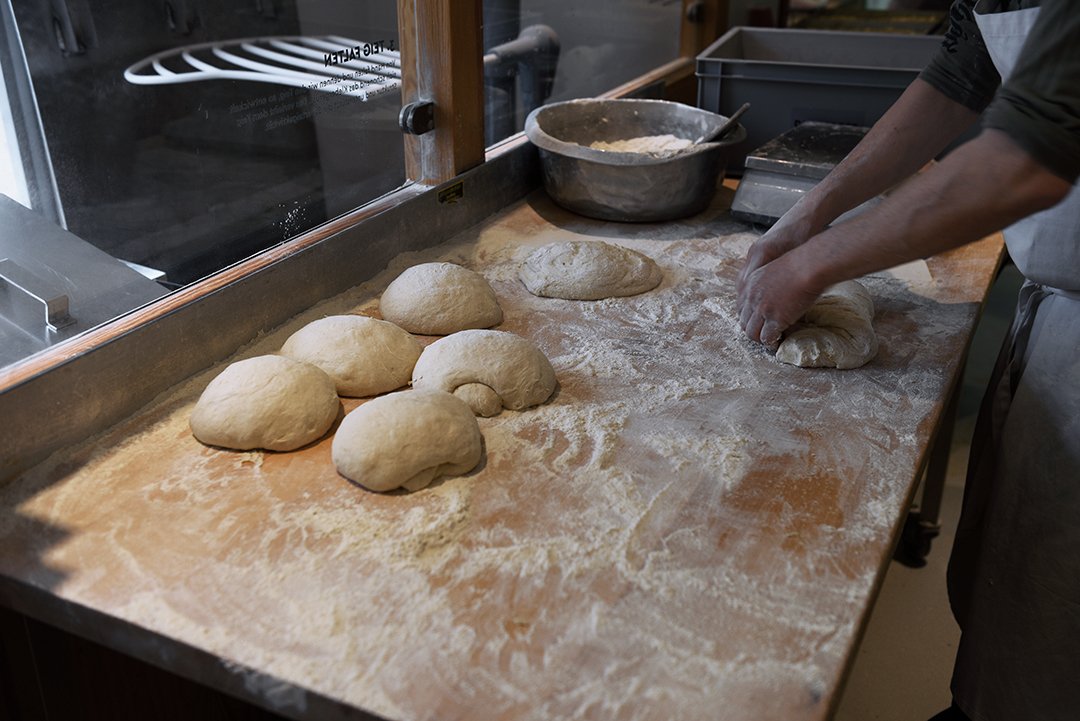
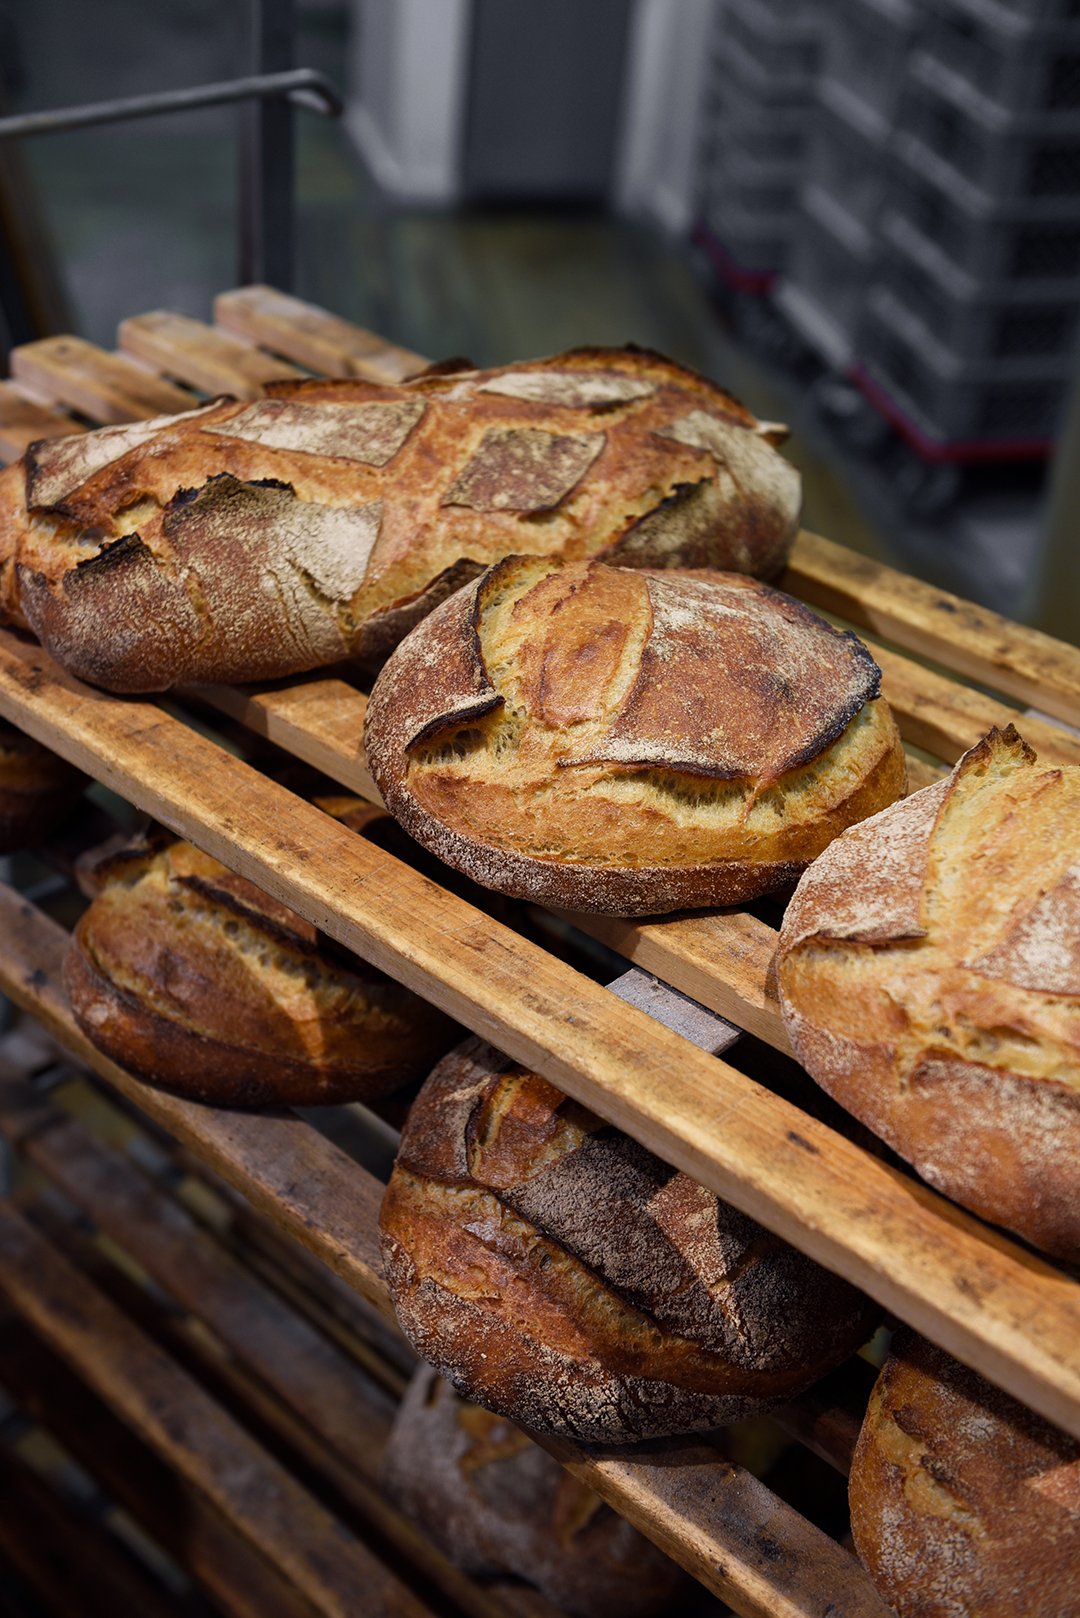
One of Florian's most popular breads - and the recipe that he shared with me (see below) - is his Beutebrot. A white sourdough bread made with wheat and a little spelt flour, with a firm crust and an open almost moist crumb (the double-picture at the bottom of this post showing the loaf cut in half is the bread that I baked in my kitchen, which worked out perfectly). If you happen to have an active sourdough starter in your kitchen you can enjoy Florian's Beutebrot in less than 24 hours and feel the sweet satisfaction of a real bread baker.
The podcast episode with Florian Domberger is in German. You can listen to the Meet in My Kitchen podcast on all common podcast platforms; there are English and German episodes. You can find all the blog posts about these podcast episodes including my guests' recipes here on the blog under Meet in Your Kitchen.
Listen to the podcast episode with Florian on:
Spotify / Apple / Deezer / Google / Amazon / Podimo
On Instagram you can follow the podcast @meetinmykitchenpodcast!
Beutebrot / Wheat and Spelt Sourdough Bread
by Florian Domberger / Brot-Werk
You will need a cast iron cocotte (Dutch oven) with a lid to bake the bread and a very sharp razor blade (bread lame / scoring knife) to score the loaves before baking - and of course, you will need an active sourdough starter.
Makes 2 loaves of sourdough bread
900g / 7 cups unbleached wheat flour (type 550)
100g / ¾ cup whole spelt flour
750ml / 3 cups plus 2 tablespoons lukewarm water
100g / 3 ½ ounces active sourdough starter *
25g / 5 teaspoons fine sea salt
* Your sourdough starter is active when you refresh it and it doubles its volume within roughly 4-5 hours. For this recipe, use the refreshed sourdough starter as soon as it has risen to its peak, before deflating. To test the activity of your starter, you can add a spoonful of it to a glass of water: it should float, it should not sink, then it's ready to be added to the dough. On my Instagram you see how I grew a sourdough starter from scratch, it's in the Highlight Story 'Sourdough', click here.
This is my bread baking schedule: On Day 1, I refresh my sourdough starter in the late morning/ around noon, I start mixing the dough at around 5 pm then, after folding and shaping the dough, I leave it in the fridge overnight and remove it from the fridge the next day at around 8:30am. On Day 2 at around 10am, I preheat the oven and bake one loaf after the other in a round cast iron cocotte (Dutch oven) with a lid.At the bakery, Florian shapes the loaves on Day 2, however I find that my schedule works easier for a home baker.
Day 1
In a medium bowl, combine the wheat flour and the spelt flour. In a large bowl, whisk together the water and sourdough starter. Add the flour mixture and, using your hands, mix for about 3 minutes until well combined; it will be a little sticky. Cover with a kitchen towel and let it rest at room temperature for about 40 minutes.
Sprinkle the salt on top of the dough and, using your fingers, push and rub the salt into the dough. Fold the dough on top of itself a few times then cover with a kitchen towel and let it rest at room temperature (about 21°C / 70°F in my kitchen) for 30 minutes.
Now the bulk fermentation starts, which will take about 3-4 hours: Every 30 minutes, wet your hands with a little water and , grabbing underneath the dough on one side, lift the dough and fold it on top of itself then turn the bowl by 90° and repeat folding the dough the same way on top of itself; turn the bowl by 90° and repeat folding the dough two more times so that the dough has been folded on top of itself from all 4 sides. Cover the bowl, let the dough rest at room temperature for 30 minutes then repeat folding the dough the same way (each time from all 4 sides) every 30 minutes. After 3-4 hours the dough will feel softer and smoother, more cohesive and less stretchy, and it will have risen by roughly 30%. This process will fasten when the room temperature is higher and take longer when the room is colder.
After the bulk fermentation, gently pour or scrape the dough out of the bowl and onto a work surface, dust the dough's top with a little flour then flip the dough and gently cut the dough into 2 pieces. Take one piece of dough, fold it onto itself so that the top and the bottom surface is dusted with flour. Using a bench knife or your hands, gently pull and turn the dough, giving it a round shape and building surface tension (you can find tutorials about shaping sourdough loaves online). The top should be round, smooth, and very taut. Shape the second piece of dough the same way then let both pieces rest for about 10 minutes.
Line 2 bread baskets or bowls (about 20cm / 8" diameter) with kitchen towels and dust the towels with flour. For the final shaping, dust one piece of dough with a little flour and, using a bench knife, flip the dough. Gently stretch and pull the side of the dough that's lying closest to you a little up and fold it over the middle of the dough. Pull the right side of the dough up and fold it to the left generously over the middle of the dough then pull the left side up and fold it to the right generously over the middle of the dough. Now pull the side furthest away from you up and fold the dough onto itself towards you then lay your hands, shaped like a dome, on top of the dough and pull and rotate the dough, while the seams stay at the bottom, towards you. This builds surface tension and creates a taut, round top. Using a bench knife, lift the dough then transfer and flip it into the prepared basket; the seam should be at the top and the round surface at the bottom. Repeat the same way with the second piece of dough. Wrap both baskets with the loaves in large freezer or rubbish bags and transfer to the refrigerator. Leave the dough to rise in the fridge overnight (for about 11-12 hours).
Day 2
After 11-12 hours, remove both baskets from the fridge, leaving them in the bags at room temperature. After 2 hours, place a cocotte (Dutch oven) closed with its lid on the bottom rack of the oven and preheat the oven to the highest setting (at least 250°C / 475°F) for about 30 minutes. The cocotte should be very hot. Remove one basket from the bag. Line a large wooden board with parchment paper, place it on top of the basket, and flip the basket so that the loaf lies on the parchment paper. Quickly score the top of the loaf with the razor blade (you can find tutorials about scoring sourdough loaves and different scoring patterns online) then immediately, and very carefully (!), remove the hot cocotte from the oven, placing it onto a trivet. Be cautious and mind that the cocotte is very hot and can cause severe injuries! Immediately remove the lid from the cocotte then transfer the loaf (on the parchment paper) to the hot cocotte and quickly but carefully place the loaf (on the parchment paper) in the cocotte. Close with the lid, place the cocotte on the rack in the oven then reduce the heat to 230°C / 450°F and bake for 20 minutes. Remove the lid and bake open for another 20-25 minutes until golden brown. Transfer the bread to a cooling rack. Let the bread cool for at least 20-30 minutes before you cut it.
To bake the second loaf, raise the oven temperature to the highest setting again (at least 250°C / 475°F), place the cocotte closed with its lid in the oven, and heat for 10-15 minutes. Then repeat the steps described above but mind to reduce the heat to 230°C / 450°F when you transfer the scored second loaf into the oven (a step I often forget).
The bread tastes best in the first 3 days. It also freezes well, you just defrost the frozen loaf, sprinkle the defrosted (or partly defrosted) loaf generously with water then bake it at 200°C / 400°F for about 10-20 minutes.


Meet In Your Kitchen | Berlin's Best Bagel Baker

This post is part of my Meet in My Kitchen podcast: How did we get to where we are in life & what does food have to do with it
“Food is making other people love me, it’s very manipulative. That’s how I use food!”- Laurel Kratochvila
For months, a friend who knows how much I love to talk, question, and discuss has been bugging me to start a podcast. So thanks to my friend Anne's persistence, here's my new baby: the Meet in My Kitchen podcast!
For this new series, I invite guests to my kitchen in Berlin, people whose journey in life I find inspiring, to find out how they got to where they are in life, to learn about the struggles they had to overcome, how the highs and lows shaped them - and what food has to do with it. My guests are chefs and home cooks, farmers, bakers, and artists, they are all curious adventurers who share a deep zest for food and life. I also visit each guest in her or his kitchen, or restaurant, or bakery, where they share a recipe with me, which you can find in my blog's Meet in Your Kitchen series.
You can listen to the Meet in My Kitchen podcast on all common podcast platforms, there will be English and German episodes.

Many years ago, I discovered a small book shop in my Berlin neighborhood, specializing in English literature. It was a quiet, dark space with wooden floors and vintage furniture, and a little counter filled with the loveliest loaf cakes. I came back almost every week, mainly for the sweets, and soon found out that the shop was run by an American/ Czech couple: Laurel from Boston, responsible for baking, and her husband Roman Kratochvila from Prague, taking care of the books.
They left my neighborhood too soon, creating a void that could never be filled, but they re-opened a much brighter and bigger spot just as charming. This became the famous Shakespeare and Sons / Fine Bagels on Berlin's lively Warschauer Strasse, praised and loved for Jewish baking classics - and good books. Laurel's bagels, challah knots, and rugelach are known across town and get me to hop on my bicycle regularly to enjoy her sweet and savory treats.

I'm intrigued by Laurel's passion and dedication, and her irresistible smile that wipes away all sorrows. She started as a home baker and then deepened her knowledge and education in French bakeries, but she still has this relaxed aura of 'a friend who's just baking in her kitchen.' Laurel treats her dough like a baby, she knows it well, watches and works it precisely, until it unfolds its true beauty.
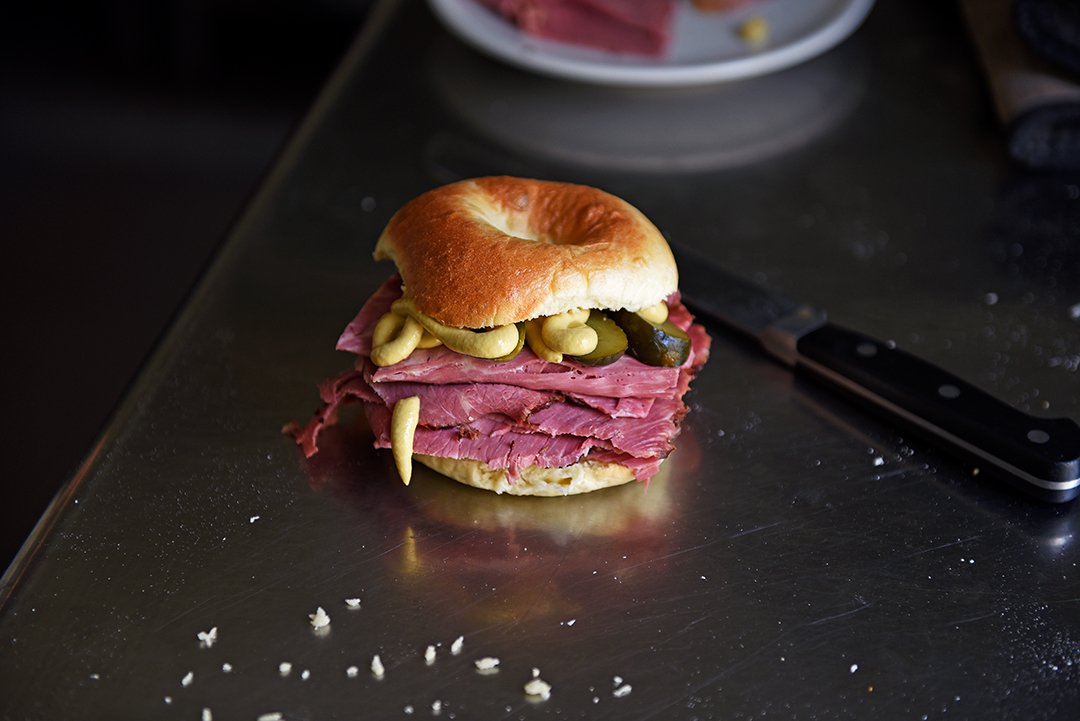
For this podcast episode, Laurel shared her recipe for Brick Lane bagels with me (named after London's famous Brick Lane Beigel bakery). She calls it a mix of a New York and a Montreal bagel. Quick to prepare, a little chewy, and perfect for a luscious sandwich filled with salt beef, mustard, and gherkins, you can now satisfy your bagel cravings in your own kitchen any time.
The podcast episode with Laurel Kratochvila is in English. You can listen to the Meet in My Kitchen podcast on all common podcast platforms; there are English and German episodes. You can find all the blog posts about my podcast episodes including my guests' recipes here on the blog under Meet in Your Kitchen.
Listen to the podcast episode with Laurel on:
Spotify / Apple / Deezer/ Podimo
On Instagram you can follow the podcast @meetinmykitchenpodcast!

Laurel’s Brick Lane Bagels
Makes 12 bagels
1 kg / 7 2/3 cups bread flour or all purpose flour (type 550 in Germany, T55 in France)
50 g / 1/4 cup white sugar
1 envelope (7 g / 1/4 ounce) fast-acting yeast or 18 g / 2/3 ounce fresh yeast
10 g / 2 teaspoons fine sea salt
420 ml / 1 3/4 cups lukewarm water
1 large egg
15 ml / 1 tablespoon vegetable oil
sugar for boiling the bagels
sesame and / or poppy seeds for the topping
For the sandwich
salt beef, very thinly sliced
mustard
gherkins, sliced
Preheat the oven to 230°C / 450°F (or the highest temperature setting of your oven). Line 2 baking sheets with parchment paper.
In a large bowl, whisk together the flour, sugar, yeast, and salt then, in a medium bowl, whisk together the water, egg, and vegetable oil, and add to the flour mixture. Mix into a shaggy mass by hand or with a wooden spoon. Then knead by hand for 10 minutes or until the dough is smooth. Avoid adding more flour as you knead it. Form the dough into a ball and set into a lightly oiled bowl. Cover with plastic wrap or a damp cloth and let rise for 30 minutes in a warm environment. Meanwhile, set a large pot of water on the stove to boil.
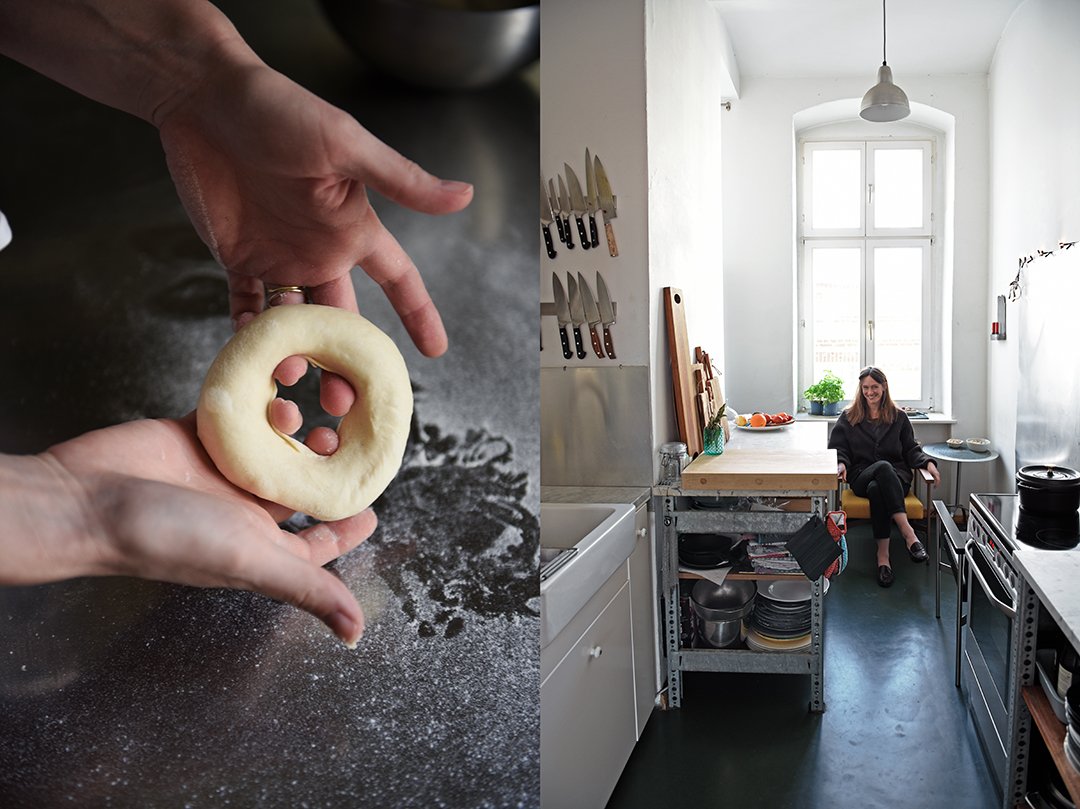
Divide the dough into 12 pieces and roll them into tight balls, cover with plastic wrap. After ten minutes, press a hole through the middle of each ball of dough with your thumb or elbow (see pictures below). Stretch out the bagel a bit and place on a lightly floured work surface.
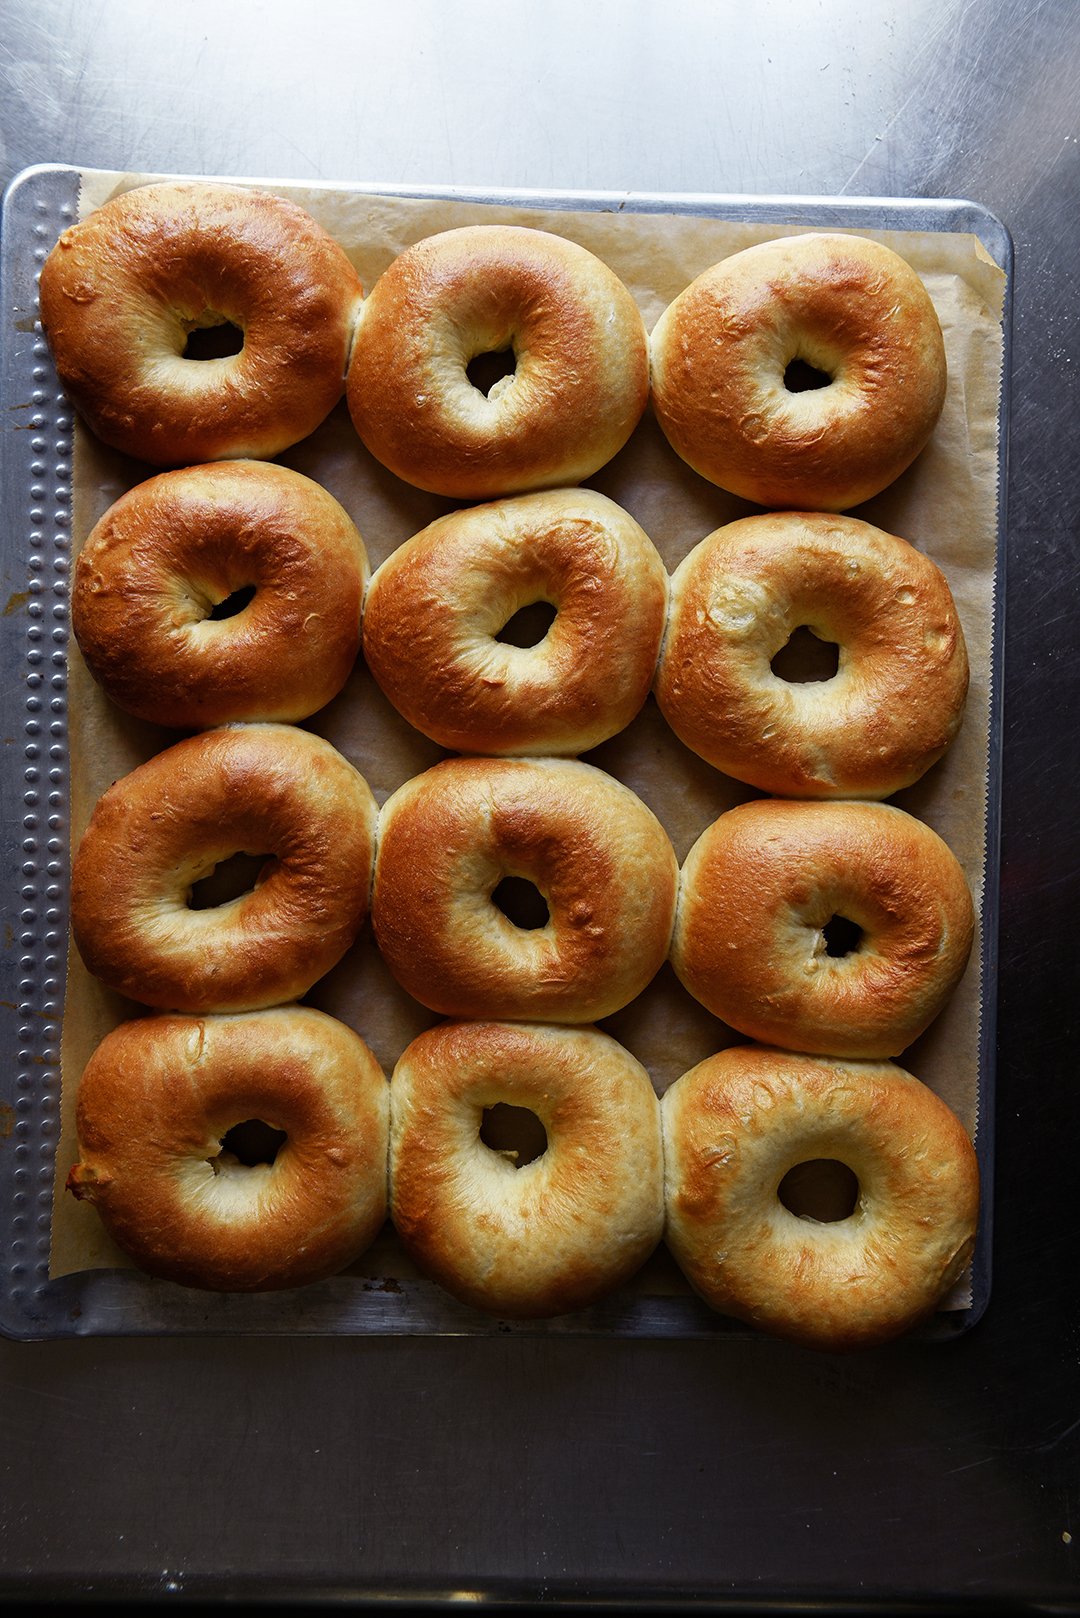
Add a couple spoonfuls of sugar to the boiling water. In batches (2-3 bagels at a time), boil the bagels for 30 seconds to 1 minute, flipping them once. Don’t overdo it! Using a slotted spoon or spatula, remove the bagels from the water and transfer to the prepared baking sheets. Top with seeds of your choice. Bake the bagels for about 10 minutes or until golden.
To make the sandwich, cut a bagel in half, stuff it generously with thinly sliced salt beef, drizzle with mustard, top it off with a few slices of gherkins, and close the bagel with its top.
Enjoy!


Pumpkin Seed and White Chocolate Babka
Sundays are for sugar rushes
I'll be honest, my oven has been off most of the time in the past few months. There was a humble apple pie, a few quiche variations and the obligatory cookies in December to fill the jars - and to fill my apartment with that buttery smell - but apart from that I've been a lazy baker. Yet to compensate for the lean supply of baked goods from my own kitchen - and still satisfy my voracious sweet desires - I dove into a new old passion: regular visits to my trusted Berlin bakers.
My favorite bakeries in the city offer all I would need to never ever have to turn on my oven again (not to say that would ever happen!). Flaky pastries for the mornings, experimental cookie creations from Cookies & Co for my espresso break, and for the afternoons, there's a café/ bakery I've visited for almost 16 years, SowohlAlsAuch Kaffeehaus. They have a decadent hazelnut mascarpone torte, which often crowns my Sunday coffee table. And then there's Café Boulangerie, with their chocolate covered Bundt cake it is a favorite place to go to when I meet my girls for walks in the neighborhood.
Almost any time I'm up for a longer trip across the city just to nibble on Laurel's bagels, Challah knots and rugelach from Fine Bagels, or have my traditional Pfannkuchen (filled doughnuts without a hole, called Berliner where I come from) at New Years and carnival from KaDeWe.
And for sudden cravings, around the corner from my home is a small bakery particularly talented at yeast baked goods like Puddingbrezel (vanilla custard pretzel), tender brioche buns, sticky poppy seed twists and a relatively new discovery: a glorious pumpkin seed twist. I had never before thought of using squash seeds for sweet baking. For pesto, or crunchy salad toppings, yes, but it never occurred to me that it would make sense to mix it, for example, with white chocolate chunks and use that for a babka filling. So I just did that, loved it and here's (finally!) a new recipe on the blog.
It's a wintery variation of my blueberry lemon cheese babka and my poppy seed babka and it fits particularly well to gloomy Sundays in February, when the heart needs some sweetness to fill the gap until spring. And anyway, Sundays are for sugar rushes - doesn't matter if homemade or from your favorite neighborhood bakery.

Pumpkin Seed and White Chocolate Babka
Mind that the babka has to rise twice, the first time overnight (for about 8 hours) in the fridge.
Makes 1 loaf cake.
For the dough
275g / 2 cups plus 2 tablespoons all-purpose flour
50g / 1/4 cup granulated sugar
1 1/2 teaspoons fast-acting yeast
1/4 teaspoon fine sea salt
60ml / 1/4 cup whole milk, lukewarm
1 large egg
1 large egg yolk
75g / 1/3 cup butter, at room temperature, cut into cubes
sunflower oil, to grease the bowl
For the filling
240ml / 1 cup whole milk
50g / 1/4 cup granulated sugar
1 teaspoon cinnamon
150g / 5 ounces pumpkin seeds, finely ground in a food processor
110g / 4 ounces white chocolate, roughly chopped
For the glaze
45ml / 3 tablespoons water
50g / 1/4 cup granulated sugar
Day 1 – in the evening:
For the dough, in the large bowl of a stand mixer fitted with the dough hook attachment, whisk together the flour, sugar, yeast and salt.
In a medium bowl, whisk together the milk, egg and egg yolk and add together with the butter to the flour mixture. Mix with the hook for about 8 minutes then continue kneading and punching the dough with your hands for a few minutes until you have a soft and silky ball of dough. Transfer the dough to a clean, oiled bowl, cover with plastic wrap and leave it in the fridge overnight, or for about 8-10 hours (don't be alarmed, the dough will only rise a little).
Day 2 – in the morning:
Take the dough out of the fridge and let it sit in the bowl at room temperature for about 1-2 hours (this time I even let it sit for 4 hours and the babka rose beautifully).
For the filling, in a medium saucepan, bring the milk, sugar, cinnamon and ground pumpkin seeds to a boil and cook, whisking constantly, over medium-high heat (bubbling) for 5 minutes or until the mixture is spreadable. Let the filling cool completely (I put the pot in the snow on the balcony, whisking occasionally).
Butter an 23 x 10cm / 9 x 4″ loaf pan and line the bottom with a piece of parchment paper.
Punch the dough down, take it out of the bowl and knead for 30 seconds. Roll the dough with a rolling pin into a 40 x 28cm / 16 x 11″ rectangle. Spread the pumpkin seed filling on top, leaving a 2cm / 3/4″ border then sprinkle with the white chocolate. Starting from one long side, roll the dough up into a log (8th picture, below). Use your fingers to squeeze the overlapping dough then flip the roll over so that the seam is at the bottom. Using a sharp knife, cut the roll in half lengthwise (3rd picture, top). The cut sides facing up, place both pieces next to each other then quickly lift one half over the other, repeating to form a twist (4th picture, top). Using the blade of a large knife, gently lift the babka and transfer quickly to the prepared pan. Cover with a tea towel and let it rise in a warm place (I kept the bowl on the heater) for about 60-90 minutes or until puffy.
Preheat the oven to 190°C / 375°F (conventional setting).
For the glaze, in a small saucepan, bring the water and sugar to a boil and cook for 2 minutes or until syrupy then take the pan off the heat and set aside.
Bake the babka for 35-40 minutes or until golden brown and spongy, covering the top of the babka with tin foil after 30 minutes if it gets dark. After 35 minutes, check with a skewer, it should come out almost clean. Take the babka out of the oven and immediately brush the top with the syrup. Let it cool for 10-15 minutes then remove from the pan. Enjoy the babka warm or cold.


Cherry Chocolate Cake
I desperately craved chocolate and cherries - sometimes it's so easy to come up with a new recipe! I used my favorite chocolate cake recipe from my 365 book - recipe no. 189 crowned by a marbled raspberry whipped cream - and topped it off with Turkish sweet cherries and German sour cherries. The cake is made with melted bittersweet chocolate, which I much prefer over cakes made with cocoa powder and water. I find the taste more complex when using proper chocolate. The egg whites are beaten stiff, which gives the cake enough oomph to rise. However, I wasn't sure if the cherries would be too heavy and drag it down so I added a little baking powder. I decreased the amount of sugar to balance the fruit's natural sweetness and was more than pleased with the result. It's a very comforting cake, hassle-free and easy to love.
As I watched the humming mixer slowly swirl the melted chocolate into the batter, I noticed a pattern. Every time July rolls around, I develop a new cherry-chocolate recipe. It's not really a surprise, the fruit's sweet juices and the depth of bittersweet chocolate is a genius combination. Yet seeing it become - unintentionally - a blog tradition struck me. There's a Cherry Chocolate Meringue Pie in the archives, recipes for Black Forest Pancakes, Cherry Chocolate Marble Bundt Cake and a Cherry Chocolate Tart. All posted in July and August. And every year I ask myself "is this combination summery enough? Is this what you really want to nibble on on a hot afternoon?." The answer is a resounding yes! and the reason is just as simple: our mind tells us exactly what we need. When we crave a certain ingredient or combination and when we notice this craving, it's usually the best thing you can possibly put into your mouth. A chocolate and cherry cake answers the pleading cravings of every chocolate and summer fruit lover and is just as perfect for breakfast and brunch as for afternoon tea or dessert after dinner.


Cherry Chocolate Cake
140g / 5 ounces bittersweet chocolate
150g / 2/3 cup unsalted butter
1/4 teaspoon ground cinnamon
1/4 teaspoon ground cardamom
4 large eggs, separated
1/8 tsp fine sea salt
150g / 3/4 cup granulated sugar
130g / 1 cup all-purpose flour (or white spelt flour type 630)
1/4 teaspoon baking powder
140g / 5 ounces pitted sweet cherries (weight without pits!)
60g / 2 ounces pitted sour cherries (weight without pits!)
Preheat the oven to 180°C / 350°F (preferably convection setting). Butter an 20 cm / 8-inch springform pan.
For the cake, melt the chocolate, butter, cinnamon, and cardamom in a small saucepan over low heat, whisking until smooth; let cool for a few minutes.
In the bowl of a stand mixer fitted with the whisk attachment, whisk the egg whites and salt for a few minutes or until stiff, transfer to a large bowl, and set aside.
In the same bowl of the stand mixer fitted with the whisk attachment, whisk the egg yolks and sugar for 2 minutes or until thick and creamy. Add the chocolate mixture and mix for 1 minute or until well combined. Combine the flour and baking powder, add to the butter-chocolate mixture, and mix until well combined then fold the egg whites into the batter (it will be a bit sticky and takes some time, be patient). Spread the batter evenly in the prepared pan and arrange the cherries on top, pushing them just a little into the batter (see picture below). Bake for about 45 minutes (slightly longer if using a conventional oven) or until golden brown and spongy. If you insert a skewer in the center of the cake, it should come out almost clean. Let the cake cool for 10 minutes then take it out of the pan.

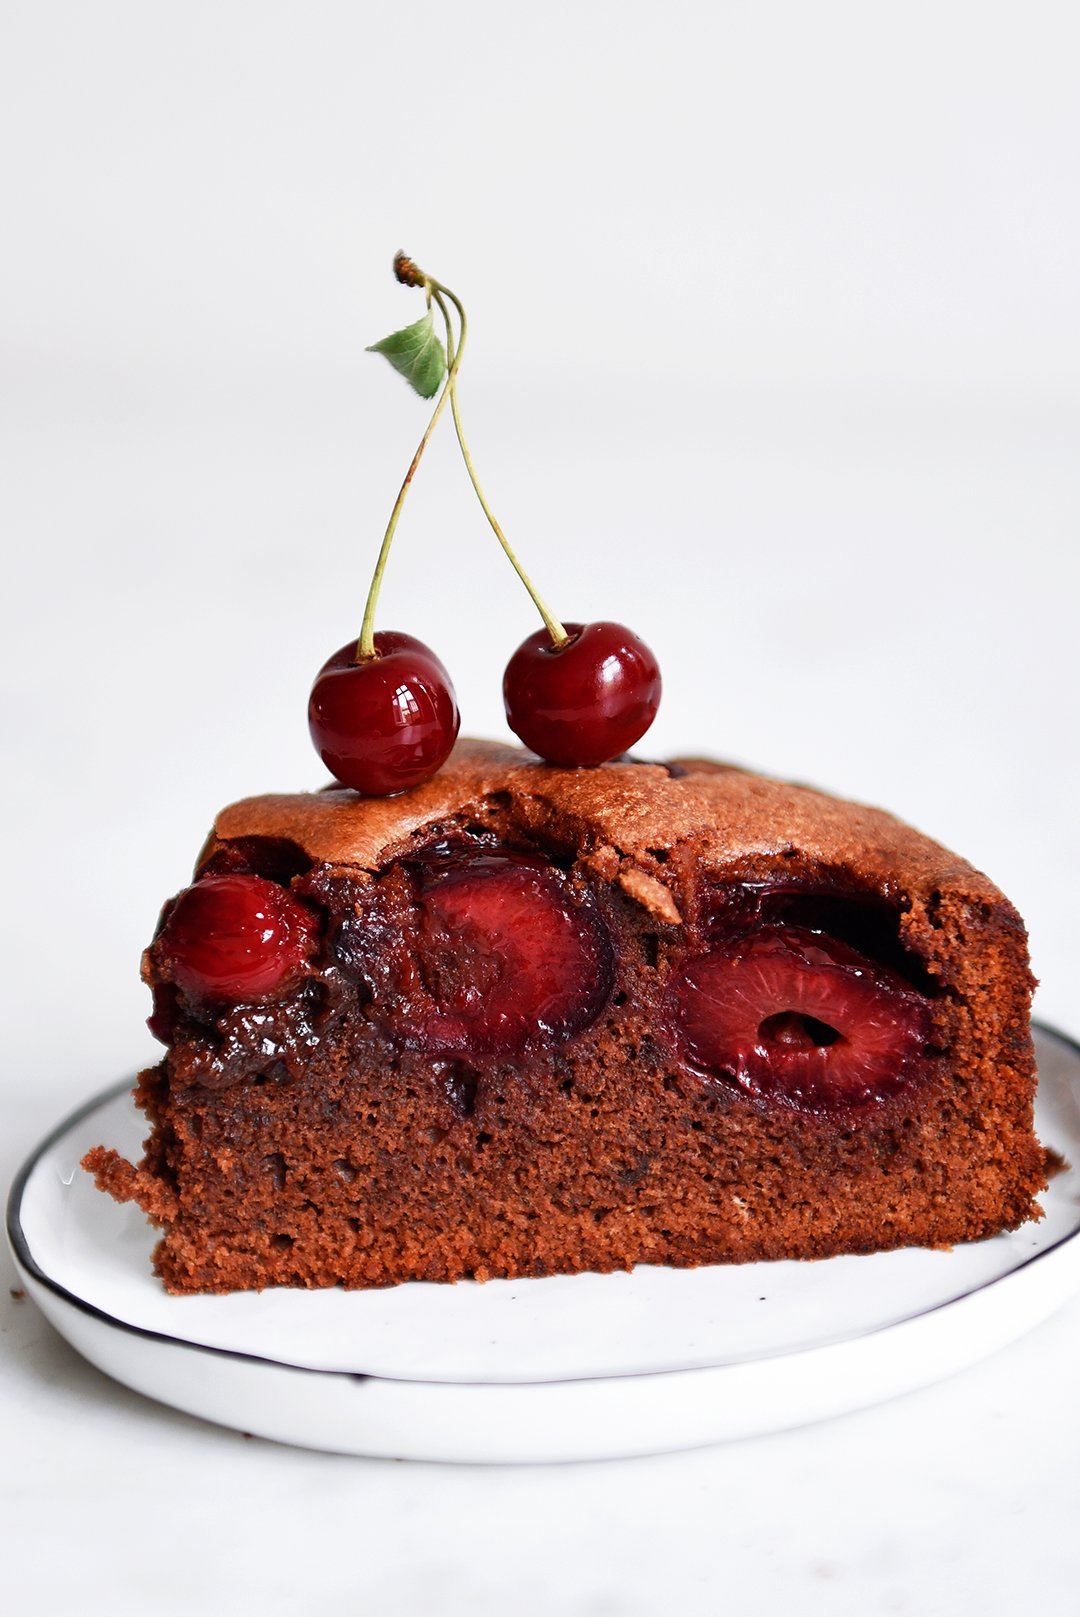
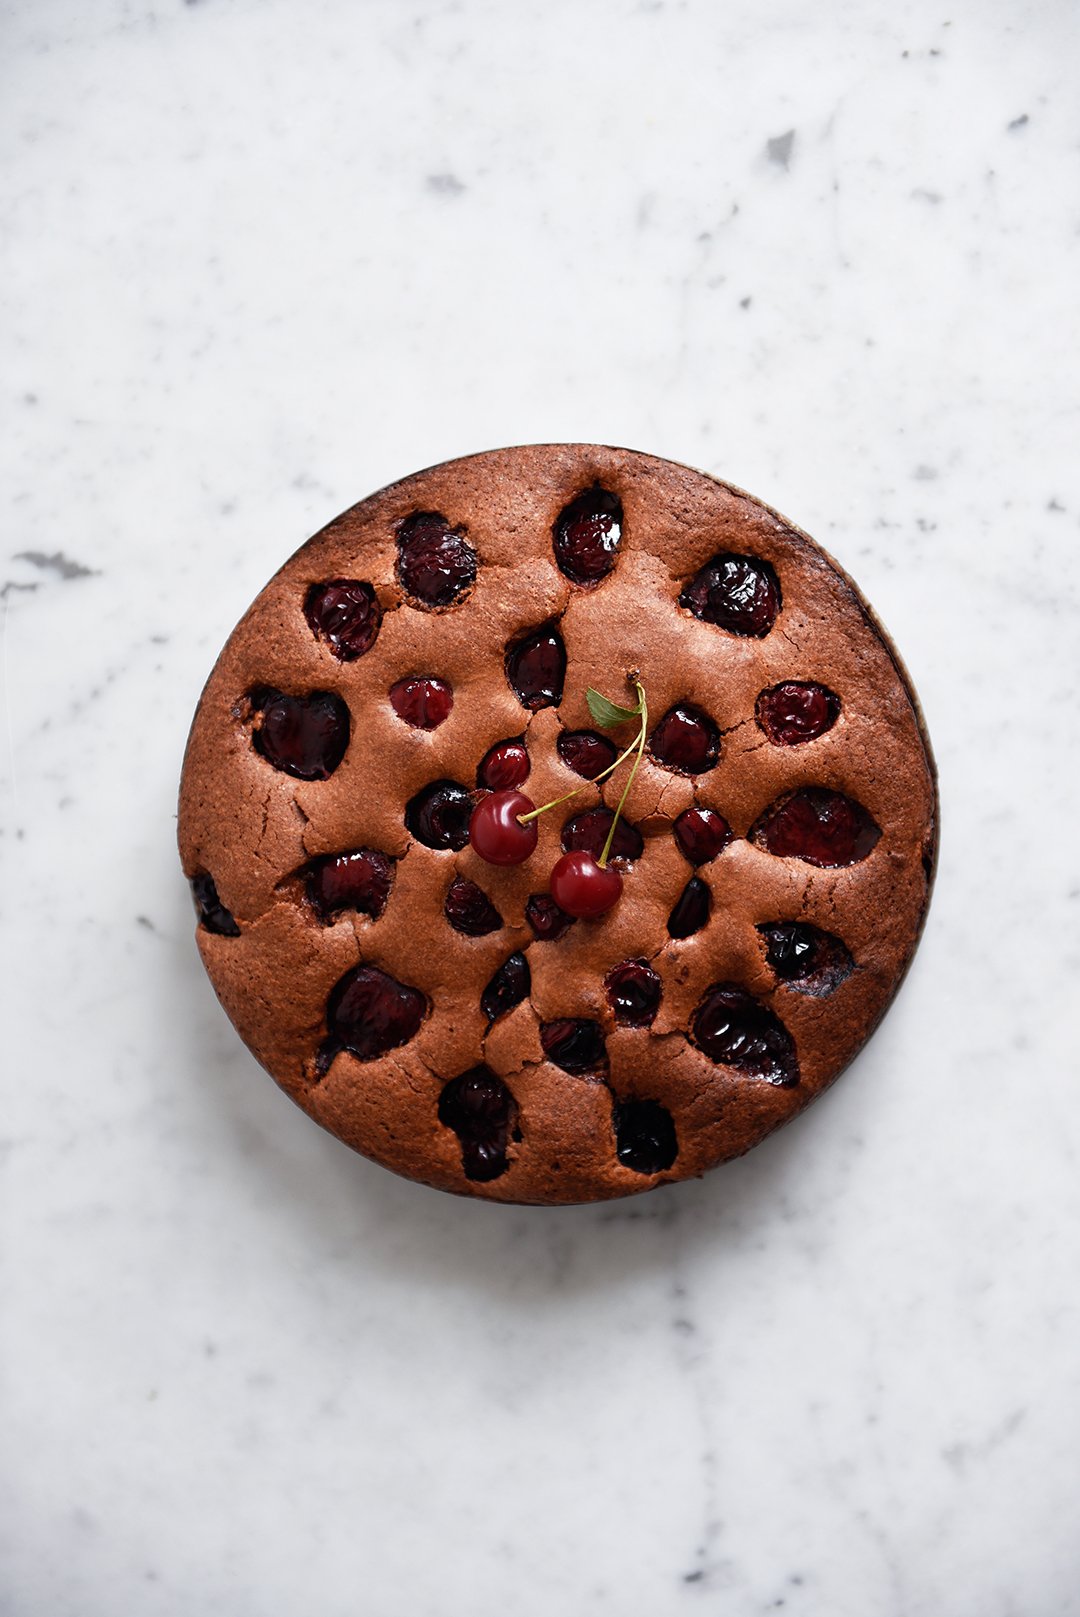

Berlin & 365's Autumn Quiche with Squash, Taleggio & Sage
My editor at Prestel in New York asked me one day where I'd like to launch my new book. Berlin, I said, and Malta, of course, and London, and NYC, and the West coast this time, LA and San Francisco. It's nice to dream and imagine all these places on both sides of the Atlantic, to think of all the people I'd meet and who'd celebrate 365 together with me. I'm good at dreaming but I'm bad at not following a dream. It makes me restless, once my mind is set on something it doesn't want to stop until it gets there. Sometimes my dreams don't work out, sometimes they do - even though everybody around me has given up hope. And sometimes they happen to be even better than I hoped they'd be.
There are many ways to launch a book, but I wanted a feast - in six cities. There are many reasons why a dream works out, luck (always), persistence (tiring for everyone around), thoughtful planning (I studied architecture, I'm good at that), and help and support from others (and I got a lot of that). In the next couple months I'll share some impressions of the six 365 book launch events here on the blog, I'll write about the places and what I love so much about them, and about the people who made all this possible. And to give you a little taste of this book tour, I'll always share one of the recipes that we enjoyed at the events. So I'll start with Berlin, my home, the place where my adventurous journey began, and with the recipe for the Squash and Taleggio Quiche with Crispy Sage (you can find it in the book, recipe no. 287, and below). This quiche became the cover of 365 and quickly gained fans and fame all around the globe.

On the morning of September 23rd I started to feel nervous, it was the publication day of the German 365 and the day on which I'd step out of my comfort zone and talk about the book that I'd been working on for so many days and nights. It feels good when a book is out, you can't change anything anymore and at one point you even stop dreaming about gram-to-cup conversions but it's also the time when people start seeing what you've created, when it's not just you and the book anymore. It's scary.
So I kept myself busy during the day (the best strategy to calm my antsy mind), I went to the hair dresser (thank you Jay for dealing with my anxious self) and then drove straight to the Hotel de Rome, a former bank turned into the hotel of your dreams where 365 would soon see the most marvelous of celebrations. Türkan Arikan, the hotel's Director of Communications and the best event partner an author could ask for, had reserved the stunning roof terrace for our launch - my favourite spot for a summery sundowner - but Berlin's weather was set on drizzle, wind, and grey, no blue skies and golden sunset. We took over Hotel de Rome's imposing Opera Court with our 100 guests instead, nibbled on hearty tastings from 365 prepared by the diligent kitchen crew, and on the bittersweet recipe no. 70 from 365, Tangerine Jam Chocolate Brownies baked by Fine Bagels' fabulous Laurel Kratochvila. A fair feast needs wine and we happily filled our glasses with the wonderful reds, whites, and rosé from Meridiana Wine Estate in Malta (thank you Karl Chetcuti for making Maltese wine that fills my heart and every room on the book tour with so much joy). Florian Domberger baked and shared Berlin's best bread with us, his crunchy, spongy Beutebrot. And I had a very honest, intimate talk about the book with my friend Cynthia Barcomi. This woman manages to fit more into one life than anyone else and her laugh is so charming and infectious that you totally forget that you're nervous and that you're talking about something that existed, not too long ago, only in your head before it became a book. Could I ask for more? No, it was a feast.
Thank YOU so much for all the love and support that you've already shown for 365! If you have a few minutes and you're in the mood, it would be great if you could write a review for the book on Amazon (here are the links for the US, UK, Germany).
You can see all the pictures of the Berlin book launch event here on Facebook. And if you cook or bake recipes from the book and share pictures on Instagram, you can add #365TheCookbook so that they show up in the book's collection. If you feel like diving into the love that this book received so far, you can read about it here.


Squash and Taleggio Quiche with Crispy Sage
from '365 - A Year of Everyday Cooking & Baking' (Prestel, 2019)
Serves 4 to 8
For the filling
1 1/3 pounds (600 g) seeded squash, preferably peeled butternut or Hokkaido with skin, cut into 1-inch (2.5 cm) wedges
1 tbsp olive oil
Flaky sea salt
Finely ground pepper
3 large eggs
3/4 cup (175 g) sour cream (or crème fraîche)
1/2 cup (120 ml) heavy cream
1 tsp fine sea salt
Nutmeg, preferably freshly grated
5 ounces (140 g) mild, sweet cheese that melts well, such as Taleggio, fontina, or Robiola, diced
3 tbsp (45 g) unsalted butter
50 large fresh sage leaves
For the pastry
2 cups (260 g) all-purpose flour
1 tsp fine sea salt
1/2 cup plus 1 tbsp (130 g) unsalted butter, cold
1 large egg
Preheat the oven to 400°F (200°C).
For the filling, spread the squash in a large baking dish, drizzle withthe olive oil, and toss to combine. Season to taste with flaky sea salt andpepper and roast for 15 minutes then flip the squash and continue roasting for10 to 15 minutes or until golden and tender; set aside.
For the pastry, combine the flour and fine sea salt in the bowl of astand mixer fitted with the dough hook attachment. Add the butter and use aknife to cut it into the flour until there are just small pieces left. Quicklyrub the butter into the flour with your fingers until combined. Add the egg andmix with the hook until crumbly. Form the dough into a thick disc, wrap it inplastic wrap, and freeze for 10 minutes.
On a work surface, place the dough between 2 sheets of plastic wrap anduse a rolling pin to roll out into a disc, large enough to line the bottom andsides of a 12-inch (30 cm) quiche dish. Fit the dough into the quiche dish,pushing it into the dish, especially along the edges. Let the dough hang overthe rim a little or trim with a knife. Use a fork to prick the dough all over.Bake for 15 minutes or until golden. If the dough bubbles up, push it down witha fork. Take the quiche dish out of the oven and reduce the heat to 350°F (180°C).
In a medium bowl, whisk together the eggs, sour cream, heavy cream, andfine sea salt and season to taste with pepper and a generous amount of nutmeg.
Arrange the squash in a circle on top of the pre-baked pastry andsprinkle with the cheese. Pour the egg mixture over the squash and bake for 45to 55 minutes or until golden brown and firm. Take the quiche out of the ovenand let it sit at least 10 minutes.
In a large saucepan, heat the butter over medium-high heat, add thesage, and cook, stirring gently, for 20 to 30 seconds or until golden, green,and crispy—mind that the leaves don’t burn. Spread the sage on top of thequiche, sprinkle with a little pepper, and serve warm or cold.


Apricot and Basil Galette
Summer baking is the best baking, you can reduce additional sugar to a minimum and focus on some of nature's greatest gifts: stone fruit and berries. They are so packed with sweetness and flavor that adding too much sugar would feel like insulting their creator. However, sneaking in buttery pastry - no matter if it's a crunchy crumble, fragile short crust tart, or rustic galette - fortifies the produce's qualities and has only one effect: you'll want to extend teatime into dinner and just keep nibbling until the sun sets and the last crumb vanishes.
I went for a galette for this recipe because of its summery, picnic-style look but I sneaked a herb into the topping that gives it a slightly unusual touch. Apricot and basil is a fantastic combo for salads and there's no reason why they shouldn't mingle in a fruity tart topping. It's fresh, it's earthy, sweet, and sour, it tastes like a hot day in Tuscany.
Taking some time off for such a rewarding endeavor is the best therapy for a weary mind and soul. And I needed that. I lost my rhythm in the kitchen a little over the last year and half. I created new recipes every day, felt excited about the results and was pleased about being productive. All for my 2nd book, for 365. However, my natural flow of shopping, of planning our dinners, of meeting my man in the kitchen after work and pouring us a glass of wine before starting to cook, this wonderful ease has been disrupted. So much so that it's difficult sometimes to find my way back to my routine, a routine that became the compass of my days over the years. Always pointing towards my next meal, always pointing towards the kitchen. That is my comfort, my safety, and I'm trying to regain orientation.
What I love so much about cooking, about preparing my own food, is the fact that it's totally in my hands. That I can make myself - and others - so unbelievably happy by only throwing a few ingredients together and indulging in this experience on an emotional, sensory, but also intellectual level. I can't think of anything more satisfying than creating a meal that reflects the seasons, my mood, and the desires of my taste buds. This galette tastes heavenly, there's no doubt, it also let's July's plump produce shine, but it challenged me to be experimental, to rethink combinations of ingredients that seem a bit farfetched in the beginning. To combine fleshy apricots and fragrant basil - which usually shines atop my summery Caprese salad or Pizza Margherita - meant I had to open up for a new idea. And that's a good lesson. Always. Even in the most trivial situations. And by doing this, I'm slowly finding my orientation again. Towards the kitchen.


Apricot and Basil Galette
Makes one 23cm / 9″ galette.
For the pastry
180g / 1 1/3 cups plus 1 tablespoon all purpose flour
1 tablespoon light brown sugar
1/4 teaspoon fine sea salt
125g / 1/2 cup plus 1 tablespoon unsalted butter, cold
2 tablespoons water, cold
1 teaspoon cider vinegar
For the galette
4 large apricots (320g / 11 ounces) , pitted and cut in half,
plus 2 large apricots (160g / 5 1/2 ounces), pitted and cut into small cubes
50g / 1/4 cup light brown sugar, plus 1 teaspoon for the topping
1/2 vanilla bean, split and scraped
2 heaping tablespoons roughly chopped basil leaves
1 large egg, beaten
For the pastry, in the bowl of a stand mixer fitted with the paddle attachment, combine the flour, sugar, and salt. Add the butter and use a knife to cut it into the flour until there are just small pieces left. Quickly rub the butter into the flour with your fingers until combined. Add the water and vinegar and quickly mix with the paddle attachment until combined. Form the dough into a thick disc, wrap it in plastic wrap, and freeze for about 15-20 minutes, or until firm.
For the galette, in a small saucepan, heat the apricot cubes (not the apricot halves), the sugar, and vanilla seeds over high heat and cook, stirring occasionally, for about 5 minutes or until the apricots are soft and golden. Reduce the heat if the fruit starts to turn brown. Stir in the chopped basil, transfer to a medium bowl, and let the compote cool for a few minutes.
On a work surface, place the dough between 2 sheets of plastic wrap and use a rolling pin to roll out into a 30cm / 12″ disc. Remove the top layer of plastic wrap and replace it with a piece of parchment paper. Flip the pastry disc over, transfer to a wooden board, and remove the remaining layer of plastic wrap. Spread the apricot-basil compote on top of the pastry, leaving a 5cm / 2″ rim, and arrange the apricot halves, cut side down, on top of the compote. Fold the edges of the pastry up and over the fruit then gently press to seal the folds. Chill the galette, on the wooden board, in the fridge for about 15 minutes or until the pastry is firm.
Place a baking sheet in the middle of the oven and preheat the oven to 200°C / 400°F (conventional setting).
Brush the pastry with the egg wash and sprinkle with 1 teaspoon of sugar. Pull the parchment paper with the galette onto the hot baking sheet and bake for about 35 minutes or until golden brown. Let the galette cool for about 10 minutes before cutting. Serve warm or cold.


Swirly Peanut Butter Plum Buns and the blissful lesson of taking a break
I started writing a new book eleven months ago. Actually, eleven and a half months, it was Christmas Eve. The moment I decided to dive into this intense adventure again, I couldn't stop writing down one recipe after the other. It felt like the dishes had been inside my head, waiting impatiently to come out. And all this happened during Christmas 2017, my man thought I was crazy. At a time that's supposed to be calm and serene, surrounded by our sparkling Christmas tree and piles of cookies, listening peacefully to angelic carols, I stuck my head into my recipe notebooks and discussed undiscovered flavor combinations with my mother. By New Year's Day, I had an exaggeratedly long recipe list together and felt ready for a new book - and a holiday.
While I wrote my first book, Eat In My Kitchen, I often crossed my limits, I refused to respect them and felt totally squeezed out by the end of it. I didn't want to make the same mistake twice. So I asked for help and found the best kitchen assistant I could have asked for. He made the whole process of cooking and shooting a book far more smooth than I thought was even possible. He also took care of an impeccable playlist filling my kitchen with the most energizing tunes and making me dance around boxes of vegetables and bowls of cooked dishes. But most importantly, he taught me to take a break once in a while. We often went to a tiny coffee shop around the corner for an espresso and a chat to clear our heads. We started working on the book early February and since then I managed - more or less - to stick to this new ritual in my life: allowing myself to take a little break every day.
Sometimes, after an early morning cooking session followed by an extensive shopping tour for meat, fish, and vegetables, we'd get a bit more excessive and head over to a Berlin bakery famous for swirly buns. Whenever I felt tired and empty, a bite of their spongy cinnamon buns put me back on my feet and felt better than the most sumptuous meal in the world. That's the bliss that you can find in food - and in a break - it will always impress me how good it feels.
It's been a while since I cooked or baked for the blog, and for months now I had a flavor combination on my mind that I wanted to turn into a sweet treat and share: peanut butter and plums. We need to hurry, it's getting late, plum season reached its end, but you can still find some very ripe, sugary stone fruits at the markets. I decided to combine the duo with a recipe that Sofie Wochner from Marigold restaurant in Rome shared with me last summer. The Danish pastry chef treated me to the most wonderful, fragrant cinnamon buns in her kitchen, so I took her recipe for the yeast dough and turned it into Swirly Peanut Butter Plum Buns.
I will keep you posted about my new book, but it'll still take a lot of time until it comes out, as a book does when you want it to be a part of what you truly are. To be continued ...


Swirly Peanut Butter Plum Buns
Mind that the dough has to rise in the fridge overnight before you bake the buns.
Makes 10 swirly buns
For the dough
500g / 3 3/4 cups plus 1 tablespoon all purpose flour
75g / 1/3 cup plus 1 tablespoon light brown sugar
1 (7-g / 1/4-ounce) envelope fast-acting yeast
1 teaspoon ground cinnamon
1/2 teaspoon fine sea salt
255ml / 1 cup plus 1 tablespoon whole milk, lukewarm
1/2 beaten large egg (about 25 ml)
60g / 1/4 cup unsalted butter, at room temperature, divided into 6 portions
For the filling
250g / 1 cup creamy peanut butter
200g / 1 cup light brown sugar
300g / 2/3 pound pitted fresh dark plums
For the topping
1 large egg, beaten
1 tablespoon unsalted butter
In the bowl of a stand mixer fitted with the dough hook attachment, combine the flour, sugar, yeast, cinnamon, and salt. Add the lukewarm milk and 1/2 beaten egg and mix on medium speed for 10 minutes or until smooth. Let the dough rest for 15 minutes then continue mixing, adding the butter, 1 portion at a time, incorporating each portion of butter before adding the next one. Continue mixing on medium speed for another 3 minutes or until smooth. Transfer the dough to a clean bowl, cover, and let it rise in the fridge overnight.
Take the bowl out of the fridge and let the dough sit at room temperature for about 1 hour. Line a 24 x 18cm / 10 x 7 inch baking dish with parchment paper.
For the filling, combine the peanut butter and sugar. Cut the plums into small cubes.
Knead the dough for 30 seconds with your hands. Lightly dust a work surface and a rolling pin with flour then transfer the dough to the floured surface and, using the rolling pin, roll it into a 33 x 33cm / 13 x 13 inch square that's roughly 0.5cm / 1/4 inch thick. Spread the peanut butter mixture on top of the dough, leaving a 2cm / 3/4 inch border, then sprinkle the plums over the peanut butter, gently pushing them into the peanut butter. To fold the dough, divide it into 3 rectangles, don't cut the dough, just leave a thin mark on top of the peanut butter. Starting with the long side of one of the rectangles and dusting off excess flour, fold the first third of the dough up and over the middle third of the dough, then fold the other outer third of the dough up and place on top of the 2 layers of dough to end with 3 layers of dough. Using a very sharp knife, cut the layered dough into 10 slices.
Quickly pull and stretch each slice of dough then twist into a long spiral, close in a loose knot, and transfer to the prepared baking dish. It'll be massy, don't worry, you can sprinkle any peanut butter and plums that fall out on top of the buns once they are arranged in the baking dish. Cover the buns with a tea towel and let them rise in a warm place for 1 1/2 to 2 hours or until puffy.
Preheat the oven to 190°C / 375°F.
Brush the buns with the egg wash then bake for 25 minutes, cover the top with aluminum foil, and bake for another 10 minutes or until golden brown and firm. Rub the warm buns with 1 tablespoon of butter and let them cool for at least 20 minutes before serving.


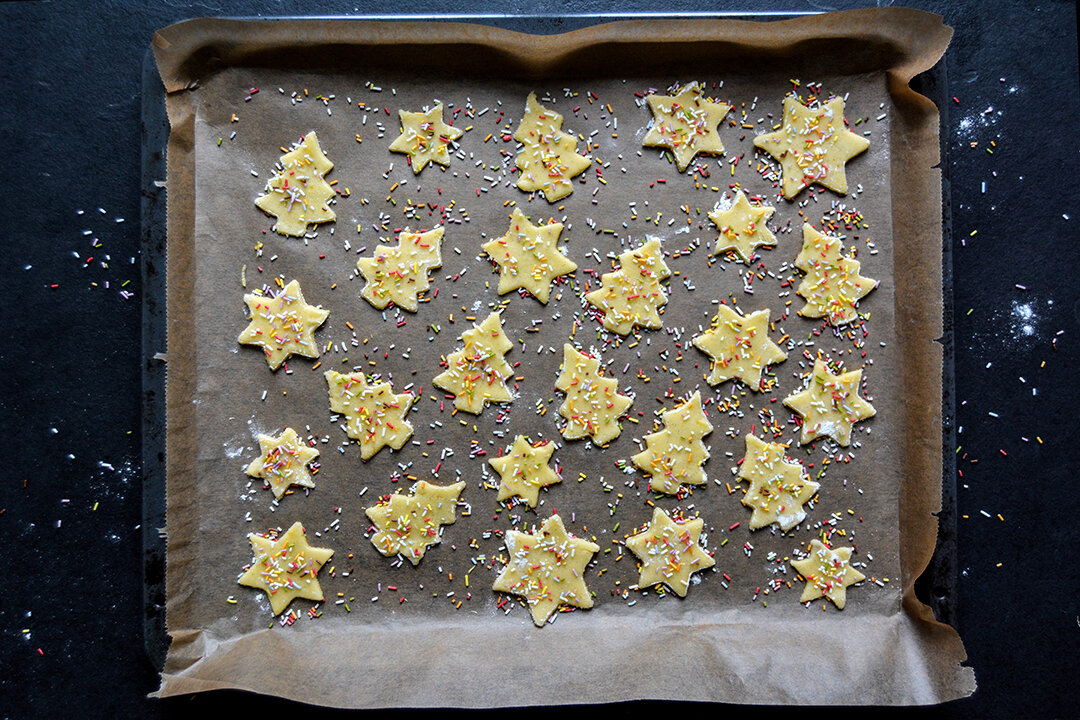
23 Recipes for Cozy Christmas Baking

Berlin, December 2017:
I'm sitting at my dining table, listening to Jingle Bells, wrapping Christmas presents, and waiting for the snow to fall. It's the last weekend before Christmas, the last chance to fill the kitchen with the tempting smell of cinnamon, cloves, and citrus fruits, cardamom, chocolate, and candied nuts, so what am I going to bake? I picked 23 recipes from the last four years of cozy Christmas feasting on Eat In My Kitchen and I love each one of them. Just a look at the pictures and my taste buds get excited. I can remember the woody notes of my Rosemary and Lemon Heidesand Cookies, the citrusy-buttery sweetness of my Mediterranean family's Maltese Lemon Christmas Cookies, the elegance of my mother's classic, her Linzer Cookies, and of course, my annual highlight, the best Vanilla Kipferl in the world. You can find a variation of this famous German cookie in my Eat In My Kitchen book, wonderfully fragrant Cardamom Kipferl. So, happy baking, treat yourself to a cozy weekend with the ones you love and indulge in the pleasures of Christmas baking!
Click on the titles for the recipes:


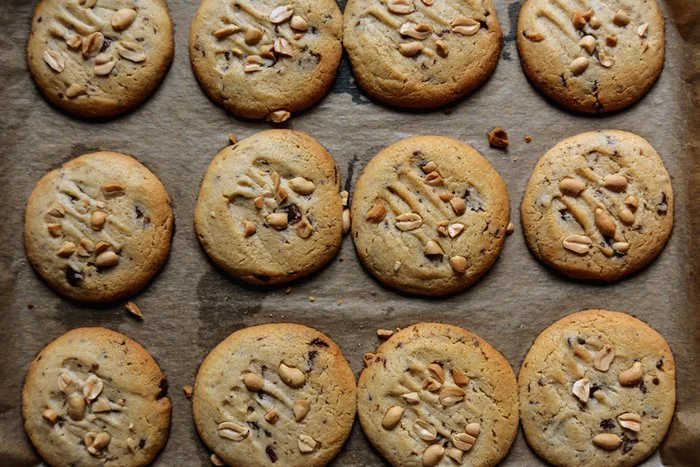


Chocolate, Orange and Cardamom Stollen
My granny Lisa was loved and adored for many of her baked goods. She truly mastered the German Sunday coffee table, filling the house with the sweetest smell of butter, sugar, and eggs every weekend. To please her six children's cravings, and later a growing pack of grandchildren, she sometimes baked seven different cakes in one day. Sponge and fruit cakes, cream tarts and crumbles were often lined up on her kitchen counter and doubtlessly influenced my own baking habits. Her Donauwelle - a marbled cake with cherries and buttercream - will always be my favourite. It's the taste of my childhood - and the beginning of my ever hungry sweet tooth.
Six to eight weeks before Christmas, Lisa used to take orders from friends and family for another one of her celebrated classics: stollen. It's a German staple that you can find at every bakery, in every household as soon as the Christmas lights leave the boxes to twinkle behind wintery windows. The original stollen is quite a dense treat, it's a heavy yeast dough, the texture is crumbly like a fruit bread, but it has richness and depth. Raisins, candied orange and lemon peel infuse the cake for weeks while it sits wrapped in parchment paper in the darkness of the pantry. The top brushed with warm fat and then generously dusted with icing sugar, preventing it from drying out and giving it its snowy white Christmas look.
You can find various interpretations of the basic formula and fill the cake with marzipan, hazelnut or poppy seed paste to add taste and moistness. This is the first stollen recipe I ever created and I wanted it to be an aromatic firework of flavours without distracting from the classic's qualities. I went for bittersweet chocolate chunks, candied orange peel, and a touch of christmassy cardamom and aniseed. I'm more impatient than my granny, so we ate the stollen immediately. There's only one treat that I manage to wait for and that's English Christmas pudding.
Thanks to Kærgården for sponsoring this post, thanks for reminding me of my granny's kitchen and inspiring me to create my first stollen recipe!


Chocolate, Orange and Cardamom Stollen
For the stollen
plain flour 450g / 3 1/2 cups (divided)
granulated sugar 70g / 1/3 cup
ground cardamom 5 teaspoons
aniseed, finely ground in a mortar, 1/4 teaspoon
zest of 1 large orange
fast-acting yeast 2 sachets (7g / 1/4 ounce each)
water, lukewarm, 150ml / 2/3 cup
fine sea salt 1/8 teaspoon
soft butter, unsalted, 250g / 9 ounces
candied orange peel (preferably organic) 100g / 4 ounces
almonds, roughly chopped, 150g / 5 ounces
bittersweet chocolate (50%), roughly chopped, 170g / 6 ounces
For the topping
butter, unsalted, melted 50g / 2 ounces
icing sugar, sifted, about 4-6 tablespoons (to taste)
ground cardamom (optional, to taste)
In the large bowl of a stand mixer, combine 260g /2 cups of the flour, the sugar, cardamom, aniseed, orange zest, and yeast. Add the water and, using the hooks, mix for about 2-3 minutes or until well combined. If the dough is too sticky, add a little more flour. Cover the bowl with a tea towel and let the dough rise in a warm place, or preferably in a 35°C (100°F) warm oven, for 45 minutes or until almost doubled in size.
If the dough has almost doubled in size, add the remaining 190g / 1 1/2 cups of flour, the salt, butter, and orange peel and, using the hooks of the stand mixer, mix for about 3 minutes until smooth. Add the almonds and chocolate and continue mixing until well combined. The dough should be soft and shiny, but not sticky. Take the dough out of the bowl and, using your hands, knead for about 1 minute.
Line a baking sheet with parchment paper.
Transfer the dough to the lined baking sheet and form a short-ish loaf-shape. Flatten the dough a little, flip one long side over until it reaches the middle, then flip over the other long side (see 6th picture), pushing the layers softly together, but don't flatten the loaf, it will expand when it's in the oven! Cover with a tea towel and let rise for about 20 minutes.
Preheat the oven to 175°C / 350°F.
Bake the stollen for about 45-50 minutes or until the loaf is just baked through.
For the topping, brush the top of the warm stollen with the melted butter and dust immediately with icing sugar. If you'd prefer the cardamom to be more present (I recommend to try the stollen first), combine some icing sugar with additional cardamom (to taste) and dust the top of the stollen.
You can serve the stollen immediately, yet I prefer to eat it when it's cool and the chocolate isn't soft anymore. Keep it wrapped in parchment paper and aluminium foil.


Molly Yeh's Chocolate Tahini Cake with Tahini Frosting
Time can feel like a race, it drags you back, you try to keep up, but there's no way to stop. My summer flew by and then there was autumn, as quick as a storm that sweeps all the leaves off the trees, within one night they are all gone.
My last post was on August 27th. Since I started these pages, my Eat In My Kitchen blog, I have never 'abandoned' it for such a long time. It used to feel weird if I didn't come back here every day, like in the first year, or at least every few days like I did in the past 3 years. It was my routine that I loved and hated. Sometimes I did feel pressured, just by myself, and the best thing to escape pressure, at least for me, is another project that sucks me in with such intensity that all my brain cells are too busy to think about anything else. I'm involved in a new project at the moment that I'll only be able to share with you at the beginning of 2018, and this project took me around the world within just a few weeks. I met the most amazing people, I felt hungry and inspired every day, I pushed my borders, which I need to keep my creativity flowing and which I could only do because I had an amazing team around me. So far we went to California, Italy, France, and Japan, and there will be more countries to come. It's quite a journey.
These trips in the past 2 months were one of the reasons why I stayed away from my kitchen, why I didn't go to the farmers market as often, why I didn't experiment, fail and succeed at my cooker, but I discovered new worlds and culinary universes that I can't wait to include in my own cooking - once I'm fully back home and ready to cook.
The second reason I stopped writing, is one that hit me deeper, right into my head, my heart, and my bones. On October 16th, Daphne Caruana Galizia was brutally killed in Malta. She was the most wonderful woman, the bravest I know, she was a mother of three young men, and she was a friend. Daphne fought for freedom and justice, for all of us, she was a well known investigative journalist and blogger. It was late in the evening and I was in Tokyo when I found out, I could only scream and run outside into the dark. Since then, I've been angry, too angry, which never helps anybody. I tried to find words for what happened, but I didn't manage. A few days after I found out, I started writing a post to share here, but it was just anger screamed out into the world. You can say that this is a food blog, and you're right, but this is a food blog written out of my perspective, so whatever influences me as a person will find its way into my kitchen, onto my table, and onto this blog. I can't really say more, my words aren't really back yet, I still feel numbed, but I wanted to put what happened in words, that Daphne Caruana Galizia was killed for saying the honest, painful truth, for being critical, for fighting for our freedom. I will never forget her and my thoughts are with her and her family every day. One of her sons, Matthew Caruana Galizia, continues her work, he just won the Pulitzer prize as a part of a group of investigative journalists who disclosed the Panama Papers first and then the Paradise Papers just recently. We have to support the ones who are brave enough to open their mouth and talk, maybe louder than we'd dare to do, and we have to show that they are not alone and that we are with them.
My mother taught me that life can be beautiful and brutal and that we have to deal with both sides. Sometimes they lay so close to each other that we don't even know how to deal with it. We enjoy the heights to the fullest and then, in the next second, we seem to drown. The place where I often go to when I feel battered by life, is my kitchen, I cook and I bake. And although I've neglected this space so much recently, I have long lists of kitchen projects that I want to dive into during Berlin's long lasting winter.
To cook - and bake - from my friend Molly's Molly On The Range cookbook was on the top of my list, her book came out at the same time as mine, a year ago. Molly and I just met again while I was in California, her compelling, charming way to talk about food and life in general never ceases to amaze me. Molly also knows how to make cakes look so pretty that you wouldn't dare to cut them, like her famous Funfetti Cake or her Gingerbread Farm, a replica of the actual farm where she lives with her husband (you can read her interview for our Meet In Your Kitchen feature in 2015 here). Molly is the kind of person who somehow manages to combine the talents of a perfectionist with the casual laid back attitude of a person who doesn't care about perfectionism at all. Molly's German book was only recently published and when I got the book and spotted the recipe for today's chocolate tahini cake, I was hooked as soon as I read the title.
This was the first cake that I baked in months, and I didn't even notice how much I missed baking until I turned on the oven and thumbed through the pages of Molly's beautiful book. Sometimes, the best thing I can do is to take some time for myself in my kitchen, with eggs, butter, and sugar (and some tahini), and listen to Molly and bake this cake that tastes so unbelievably perfect. It's chocolate, it's tahini, it's sweet, and it's all I needed at the moment to feel ready to face the world again, with all its beauty and its brutality. Thank you, Molly!


Chocolate Tahini Cake with Tahini Frosting
from Molly Yeh's 'Molly On The Range - Recipes and Stories from an Unlikely Life on a Farm'
I only made half of this recipe and decorated the cake with dates and sesame seeds.
Makes one 2-layer 8-inch (20cm) cake or 24 cupcakes
For the cake
1 3/4 cups / 350g sugar
1 3/4 cups / 220g flour
1 cup / 100g unsweetened cocoa powder
1 1/2 teaspoons kosher salt
1 1/2 teaspoons baking powder
1 1/2 teaspoons baking soda
2 eggs
1 cup / 240ml whole milk
1 tablespoon vanilla extract
1/4 cup / 4 tablespoons flavorless oil
1/2 cup / 120g tahini
3/4 cup / 180ml boiling water
For the frosting
1 cup / 240g unsalted butter, softened
1/2 cup / 120g tahini
2 cups / 200g confectioners’ sugar
1/8 teaspoon salt1/4 teaspoon cinnamon
1 1/2 teaspoons vanilla
To make the cake, preheat oven to 350ºF (175°C). Grease and line the bottoms of two 8-inch (20cm) cake pans or line 24 cupcake tins and set aside.
In a large bowl, whisk together the sugar, flour, cocoa powder, salt, baking powder, and baking soda. In a separate, medium bowl, whisk together the eggs, milk, vanilla, oil, and tahini. Add the wet ingredients to the dry ingredients and stir to combine. Whisk in the boiling water.
Pour the batter into the cake or cupcake pans and bake until a toothpick inserted into the center comes out clean. Begin checking for doneness at 28 minutes for cakes and 18 minutes for cupcakes. Let cool in the pans on a rack for 10 minutes and then remove to the rack and cool completely.
To make the frosting, in the bowl of a stand mixer fitted with a paddle attachment, mix together the butter and tahini until creamy. Gradually add the powdered sugar and mix to combine. Mix in the salt, cinnamon, and vanilla.
To assemble, you can either go the traditional route, or crumble up the cake layers with your hands, layer about a 1/3 of them in the bottom of a larger bowl, top it with 1/2 the frosting, another 1/3 of the cake, the remainder of the frosting, and then the remainder of the cake.


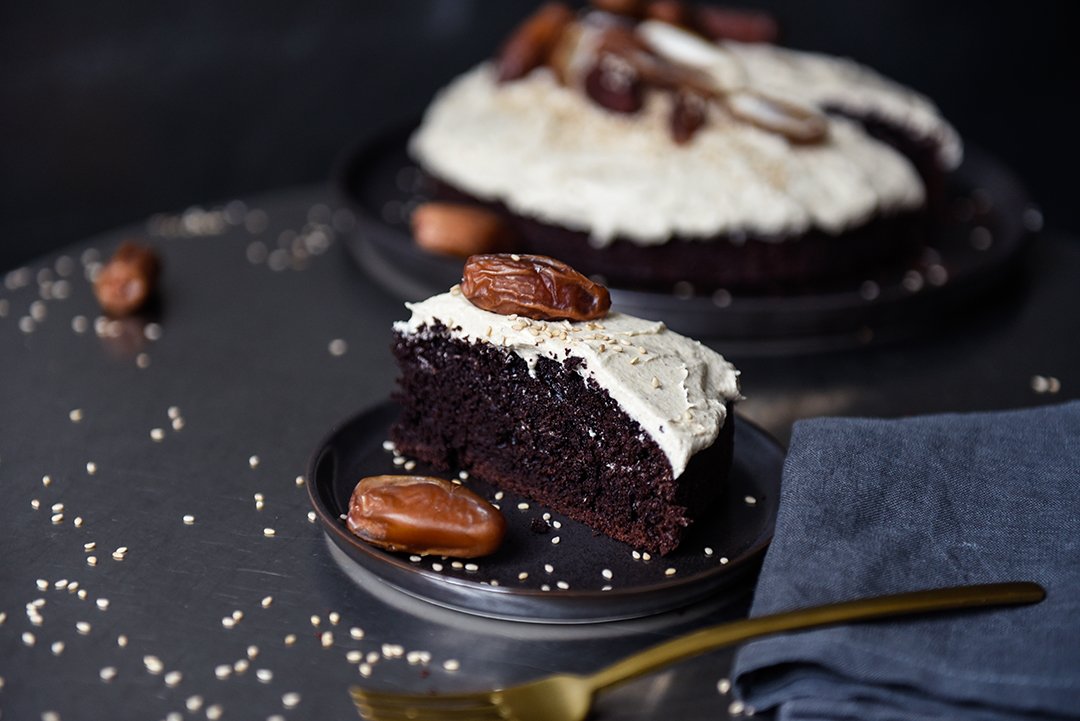


Peach, Chèvre and Rosemary Tart
I allowed myself a few treats during our Mediterranean summer in Malta. I went snorkeling far more often than in the past few years, when my cookbook determined my schedule, I had a few girly shopping moments, and my man and I relaxed at the stunning - and newly renovated - Phoenicia Hotel in Valletta. We enjoyed stunning views from their infinity pool with a glass of crisp Maltese wine close at hand and indulged in lush breakfast buffets and fine French inspired cuisine on their gorgeous terrace overlooking the gardens.
Malta treated us well, the Mediterranean pace and hot climate force me to slow and calm down, something I only truly manage there. Nothing feels as heavy, as worrying or threatening as it might feel anywhere else, everything feels manageable and enjoyable. It's not so much about duties, but about collecting and treasuring the good moments in life. This also reflects in my cooking. If I spent a couple more hours at the beach, we just cooked dinner a bit later, or kept it simple by throwing a fish on the grill and drizzling some fresh lemon juice over it. It's pure, it's good, and it allows me to have more time to chill and chat with a friend, to sit on the rocks a little longer and see the sun disappear into the sea's faded evening-blue.
Another one of my lazy summer recipes is this lovely little sweet and savoury tart: ripe peaches, soft chèvre and Mediterranean rosemary spread on top of (store-bought!) puff pastry. You could also make your own, or use short crust pastry, but my lazy self just went to the supermarket and bought frozen Maltese puff pastry - the best I know.
The tart turned out even better than expected, offer it to your friends who don't have a sweet tooth at teatime, or slice it up for a relaxed late summer dinner in the garden or on the balcony and pop open a bottle of wine. Heaven.
This recipe also works with grapes!
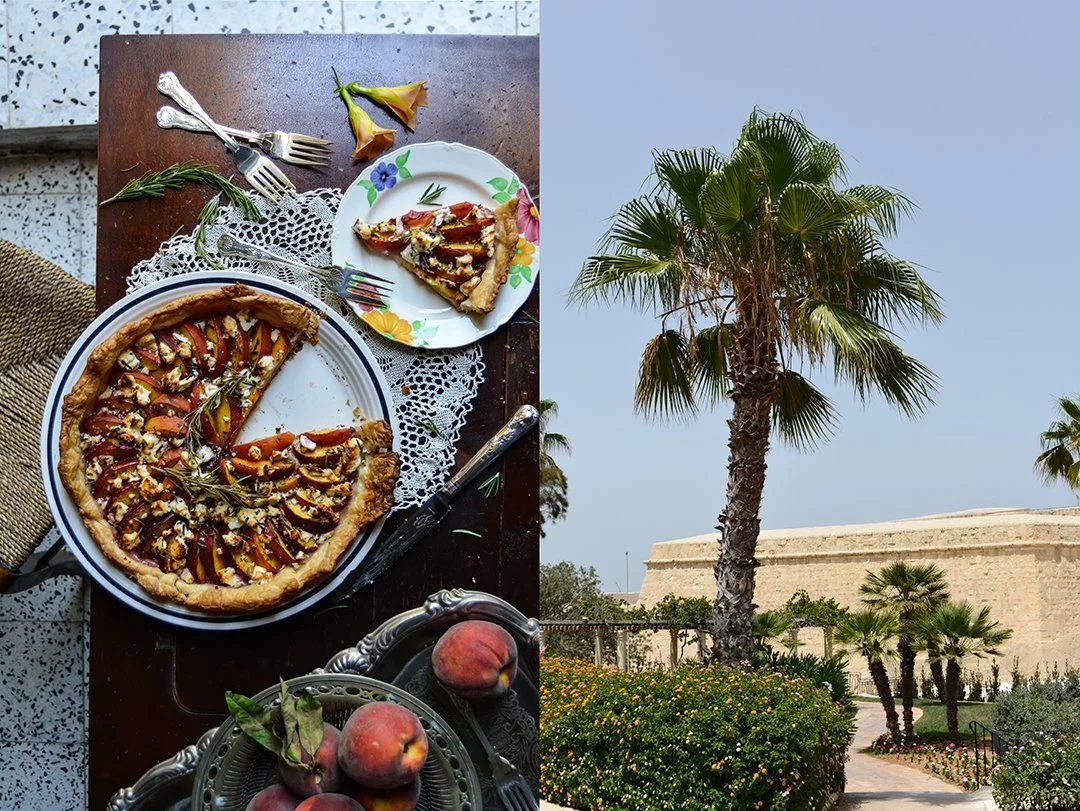

Peach, Chèvre and Rosemary Tart
Makes 1 (28cm / 11″) tart, serves 4-6
frozen puff pastry, defrosted, 320g / 11 ounces (you can also use short crust pastry)
large ripe peaches, cut into wedges, 4-5
mild soft chèvre, crumbled, about 150g / 5 ounces
fresh rosemary, finely chopped, 1 generous tablespoon
liquid honey 2 1/2 tablespoons
Preheat the oven to 200°C / 400°F and butter a 28cm / 11″ tart pan.
Line the tart pan with the puff pastry, pushing the pastry into the pan, and put in the freezer for 5 minutes.
Spread the peaches in a circle on top of the pastry, sprinkle with the chèvre and rosemary, and drizzle with the honey. Bake for about 35 minutes or until the pastry is golden brown and crisp at the edges (mind the heat, I use a gas oven in Malta, which is not as precise as my oven in Berlin).
Let it sit for about 10 minutes before serving and enjoy!


Cherry Chocolate Meringue Pie
Think of Black Forest Torte and meringue pie, take out the heaviness of the whipped cream, and you have a rough idea of the taste of this opulent beauty. My Cherry Chocolate Meringue Pie has all the nice features of the famous southern German coffee table classic, including dark chocolate, Kirsch Schnaps, and sweet summer cherries - it's just lighter. You can also find this recipe in my 365 book.
My friend Jenny was the first baker who introduced me to meringue pie, her formidable lemon meringue pie blew my mind. Although we have similar cakes in Germany, like a sponge cake layered with gooseberries and meringue, it doesn't have the same qualities as a pie. It's richer, a proper German torte. A pie, however, focuses on the fruit filling, there's only a thin buttery short crust base holding all that lusciousness together. The wonderfully fluffy, airy meringue topping adds a very fine sweetness, wrapped in fragile crispiness. It works perfectly with sour rhubarb, a pink spring pie that became a popular recipe on the blog. I could have used the same formula for my plump black cherries, but I wanted a chocolate base. I couldn't get it out of my mind and I'm glad that I didn't, it's the perfect Schwarzwälder Kirsch Pie (the German name for black forest).

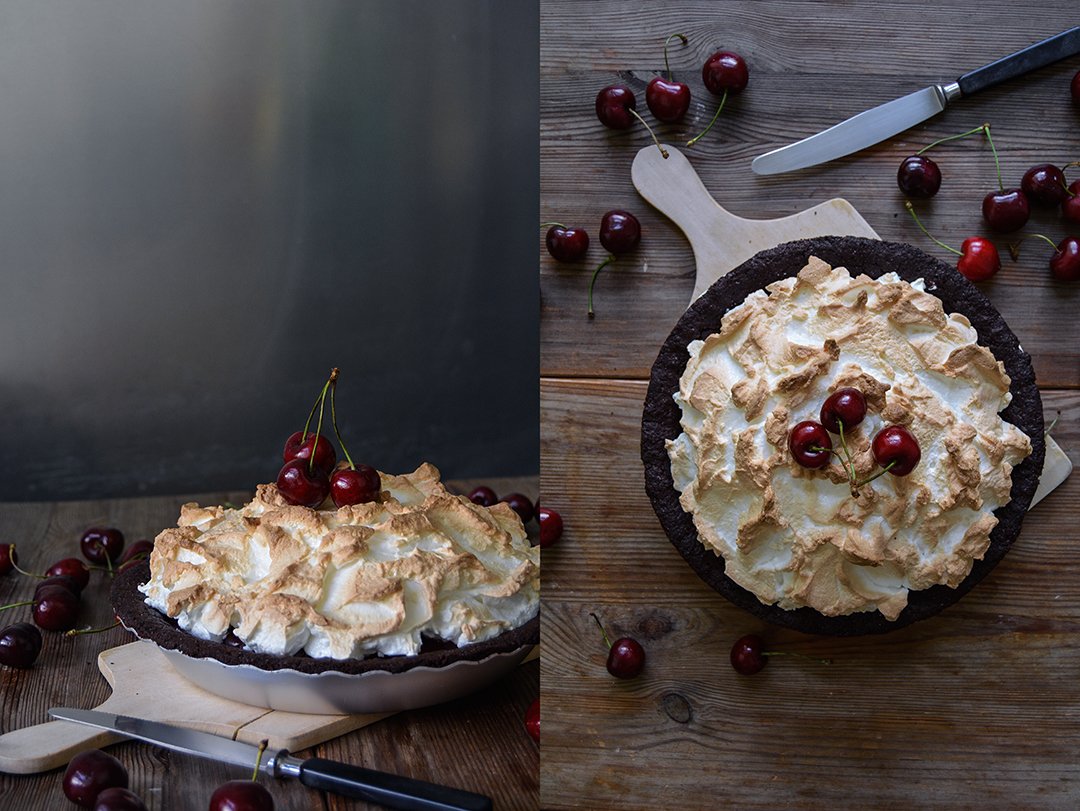
Cherry Chocolate Meringue Pie
You'll need a 23cm / 9″ shallow pie dish for this recipe.
Makes 1 pie
For the cherries
fresh sweet cherries, pitted, about 550g / 1 1/4 pounds (about 4 cups pitted cherries)
granulated sugar 100g / 1/2 cup
ground cinnamon 1 teaspoon
Kirsch schnaps 3 tablespoons
cornstarch 30g / 1/4 cup
For the pastry
plain flour 160g / 1 1/4 cups
Dutch-process or natural unsweetened cocoa powder 50g / 2 ounces
granulated sugar 3 tablespoons
fine sea salt 1/4 teaspoon
unsalted butter 120g / 1/2 cup
cold water 3 tablespoons
For the meringue
fresh organic egg whites 3
a pinch of fine sea salt
granulated sugar 80g / 1/3 cup plus 1 tablespoon
For the cherry filling, in a medium saucepan, heat the cherries, sugar, and cinnamon over medium heat, stirring constantly. When the sugar dissolved, stir in 2 tablespoons of the schnaps, close with a lid, and cook for about 5 minutes or until the cherries soften. Turn the heat down to low. Add 2 tablespoons of the liquid of the cherries to a small bowl and whisk in the cornstarch until smooth, pour back into the saucepan, stirring constantly until well combined. If you'd like the schnaps to be more prominent, add 1 tablespoon of the spirit. Pour the cherries and all the liquid into a wide pan and let them cool completely.
For the pastry, in the large bowl of a stand mixer fitted with the hook attachment, combine the flour, cocoa, sugar, and salt. Add the butter and use a knife to cut it into the flour until there are just small pieces left. Quickly rub the butter into the flour with your fingers until crumbly. Add the water and, using the hooks of the stand mixer, mix until combined. Form the dough into a thick disc, wrap it in plastic wrap, and chill in the freezer for 15 minutes.
Preheat the oven to 210°C / 410°F (conventional setting).
On a table or countertop, place the dough between 2 sheets of plastic wrap and use a rolling pin to roll it into a circle, large enough to line a 23cm / 9″ shallow pie dish. Push the pastry into the dish, trim any excess dough off the rim with a knife, then prick the pastry all over with a fork. Bake for 15 minutes. Let the pastry cool completely before you assemble the pie.
In the large bowl of a stand mixer, whisk the egg white and salt for 1 minute. Adding the sugar gradually, continue mixing for about 1-2 minutes or until stiff.Preheat the oven to 210°C / 410°F (conventional setting).
Pour the cool cherries and all the liquid on top of the pastry. Scrape the stiff egg white on top, shape it to a dome and form little peaks with a knife to create an uneven surface. Bake for 7 minutes or until the top is golden brown and crisp. Let it sit for about 30 minutes before serving, the cherries need to set.
The pie tastes best on the 1st and 2nd day, however, you need to keep it in the fridge, which softens the pastry.


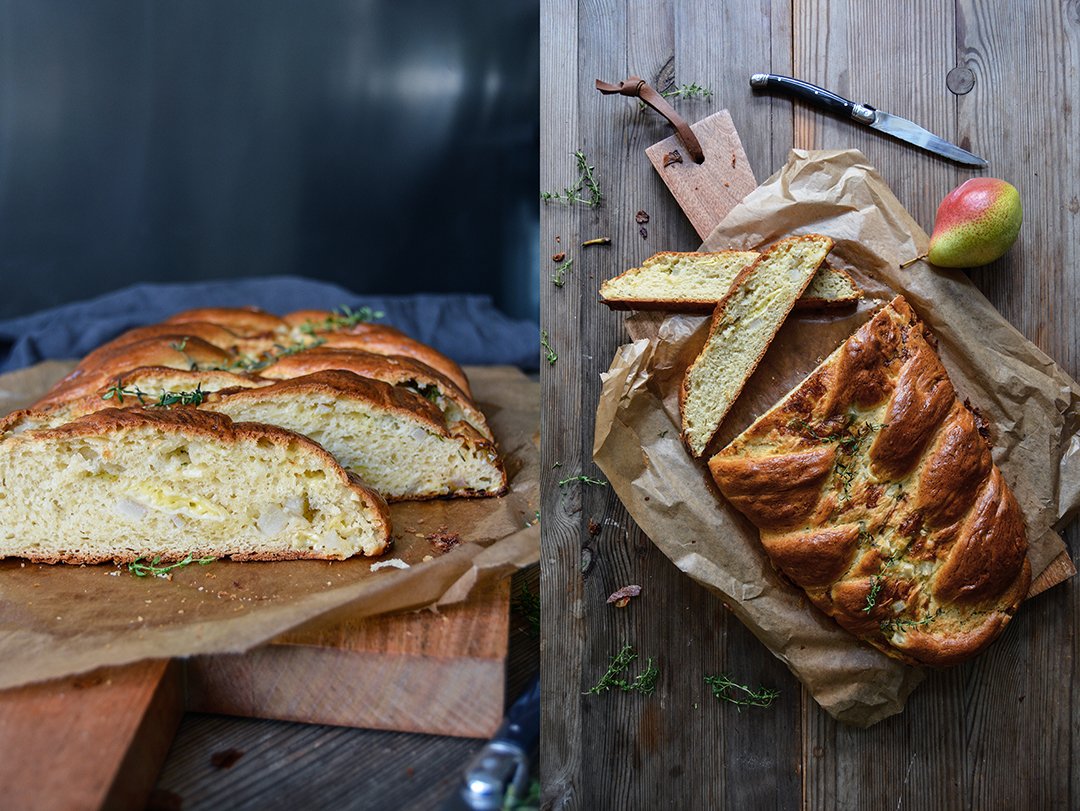
Camembert, Pear and Thyme Challah
A lot of cracking and aching was going on in the oven while I watched my camembert, pear, and thyme challah bake. At one point I got worried that my braided bread was going to explode. It rose and expanded on all sides, it looked more like a challah pancake than the elegant breaded loaf I had in mind. Maybe I filled the single yeast dough strings a bit too generously with ripe - and stinky - cheese and chopped crisp fruit, but I had a feeling that the recipe needed it. So I trusted, which is always the only sensible thing a baker can do when the object of attention doesn't perform as expected.
To my surprise, it worked out in the end and the shape still reminded me of a Hefezopf - the German name for challah. I used my classic plain challah recipe and replaced the sugar with honey. It's common in Germany to use butter and milk for this kind of bread, instead of water and vegetable oil, which you usually find in traditional challah recipes. I like the added richness coming from the dairy products, I find it tastier. Seeing as the fruit and cheese bring in even more juice and moistness, I could have made the dough a bit drier, added more flour to help it keep its shape. But the final texture was so nice, soft and spongy, that I'd rather accept the pancake-look than ending up with a dry Hefezopf.
If you don't feel like camembert, you can also go for any other aromatic cheese that melts well. I already have a raclette challah in mind, next time. And I'm sure that apricots or peaches would also do a pretty good job instead of the pear. So feel free to experiment, but keep in mind, the juicier the fruit, the more it'll soften your dough.
This challah is a perfect picnic, brunch, or Saturday lunch treat, preferably accompanied by fresh fruits, wine, and a selection of cheese and prosciutto. A green salad with juicy tomatoes also goes very well with it.

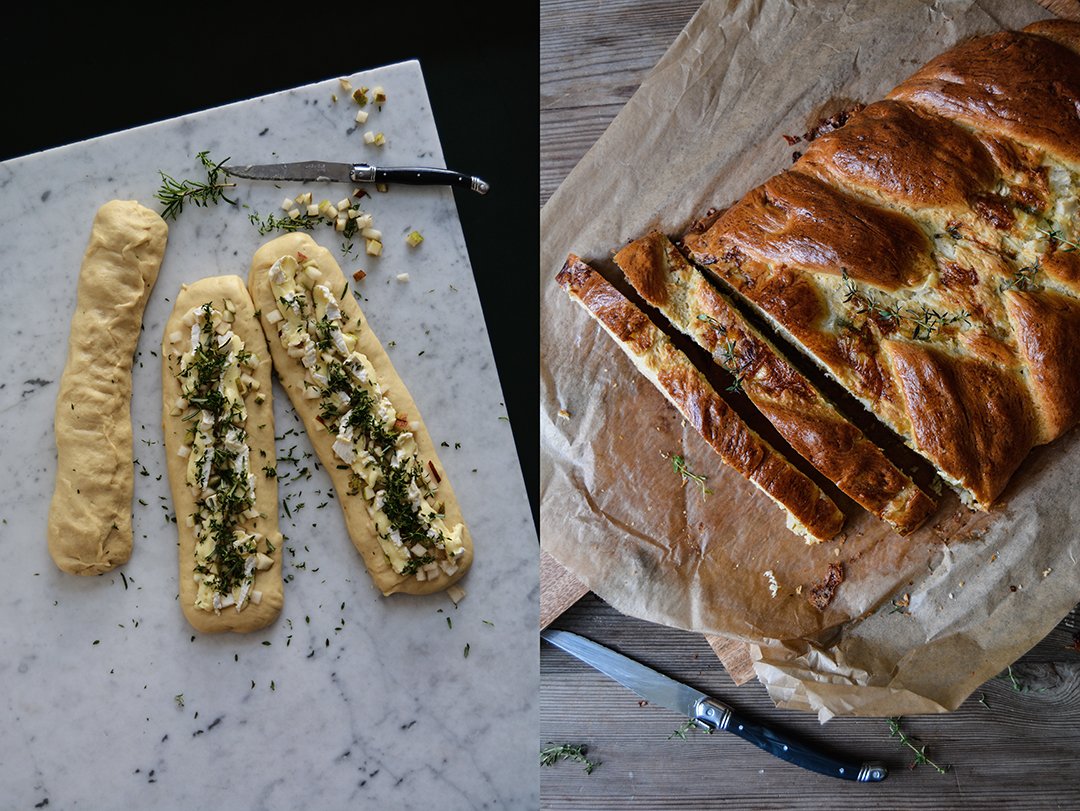
Camembert, Pear and Thyme Challah
When I baked my challah, it was a very hot day. So the butter in the dough literarily melted in my hands and turned braiding into a fiddly task. The single braids stretched quicker than I reacted, I was too slow. If you also happen to go for this recipe on a day with high temperatures, to avoid stress and frustration, try to work quickly when you braid the loaf. Keep the braids a bit shorter to begin with, due to the filling they'll expand in length.
Makes 1 large challah
honey 2 tablespoons
butter, melted, 100g / 1/3 cup plus 2 tablespoons
milk, lukewarm, 150ml / 2/3 cup
organic eggs 2
plain flour 520-550g / 4 cups - 4 cups plus 4 tablespoons
fast-acting yeast 1 sachet (7g / 1/4 ounce)
fine sea salt 1 teaspoon
For the filling
aged camembert, cooled and cut into thin strips (it'll be a mess if it's too soft), 250g / 9 ounces
medium to large firm pear, cored and cut into tiny cubes, 1
fresh thyme and a little rosemary (the needles, chopped), a large handful
For the glaze
organic egg yolk 1
water 1 tablespoon
Stir the honey into the hot melted butter and whisk until combined, let it cool until it's lukewarm. Add the milk and eggs and whisk, the mixture should be lukewarm.
In a large bowl of a stand mixer fitted with the hook attachment, combine the flour, yeast, and salt. Add the milk-butter mixture to the flour mixture and mix for about 5 minutes or until well combined and smooth. If it's too soft and sticky, add a little (!) more flour. Continue kneading and punching with your hands for about 3-5 minutes or until you have a soft and silky ball of dough. Place the dough back in the bowl, cover with a tea towel, and let rise in a warm place, or preferably in a 35°C (100°F) warm oven, for 60-70 minutes or until almost doubled in size. If it's a hot summer day, you can let the dough rise at room temperature (that's what I did this time).
Line a baking sheet with parchment paper.
When the dough is puffy and almost doubled in size, punch it down, take it out of the bowl, and knead for about 30 seconds. Divide into 3 parts and roll them into longish, but not too thin sausage sausage shapes (see picture above). Flatten each piece of dough until it's roughly 7.5 cm / 3" wide. Divide the camembert, pear, and herbs between the 3 pieces of dough and spread, leaving a little rim all around the filling. Fold over each piece of dough, roll it gently, and seal the overlapping side and ends well. The filling should be completely wrapped inside the dough.
To braid the bread, work quickly, as the dough stretches. Lay the ends of the dough rolls on top of each other at one end and braid them tightly. If they become too long and thin, squeeze them together a little. Bend both ends of the bread under the loaf and quickly transfer to the lined baking sheet. Cover with a tea towel and let rise in a warm place for about 40-50 minutes or until fluffy.
Preheat the oven to 190°C / 375°F (conventional setting).
For the glaze, whisk the egg yolk and water and brush the top of the challah. Bake for about 25-30 minutes or until golden brown and spongy. When you knock on the challah's bottom, it should sound hollow. Let it cool for a few minutes before cutting the bread into thick slices.The challah tastes best on the 1st day.