ISCHIA / ISOLA VERDE

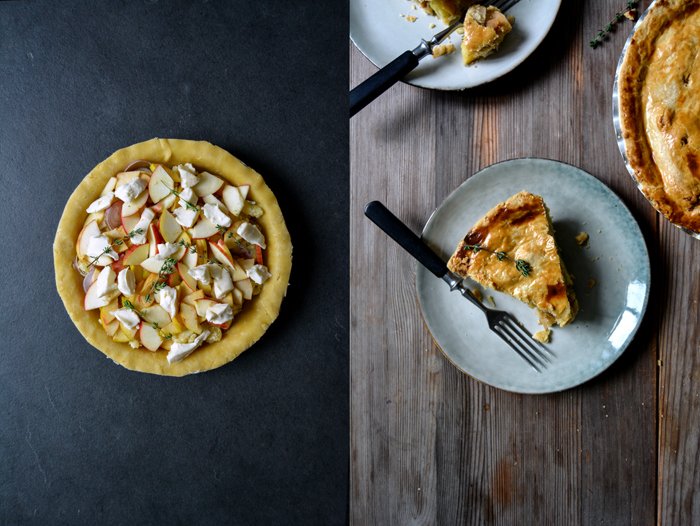
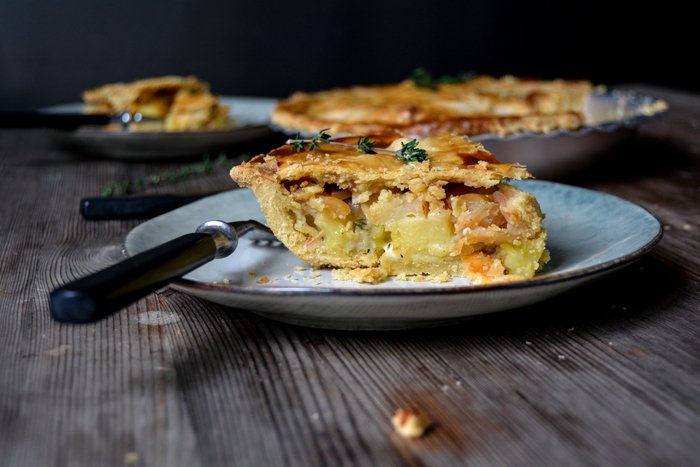
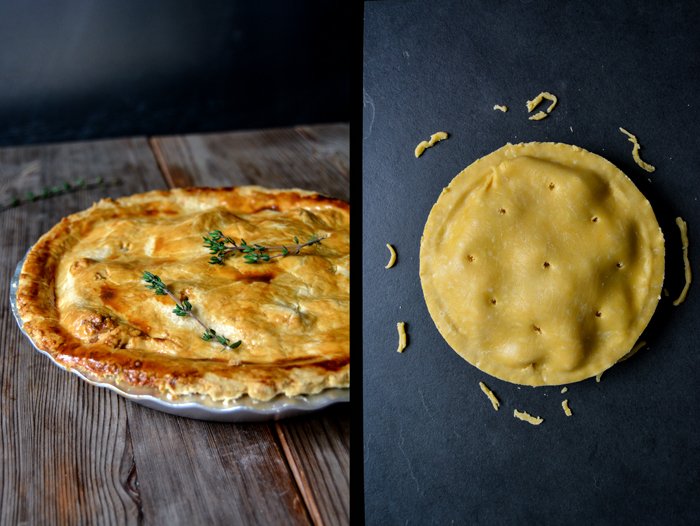
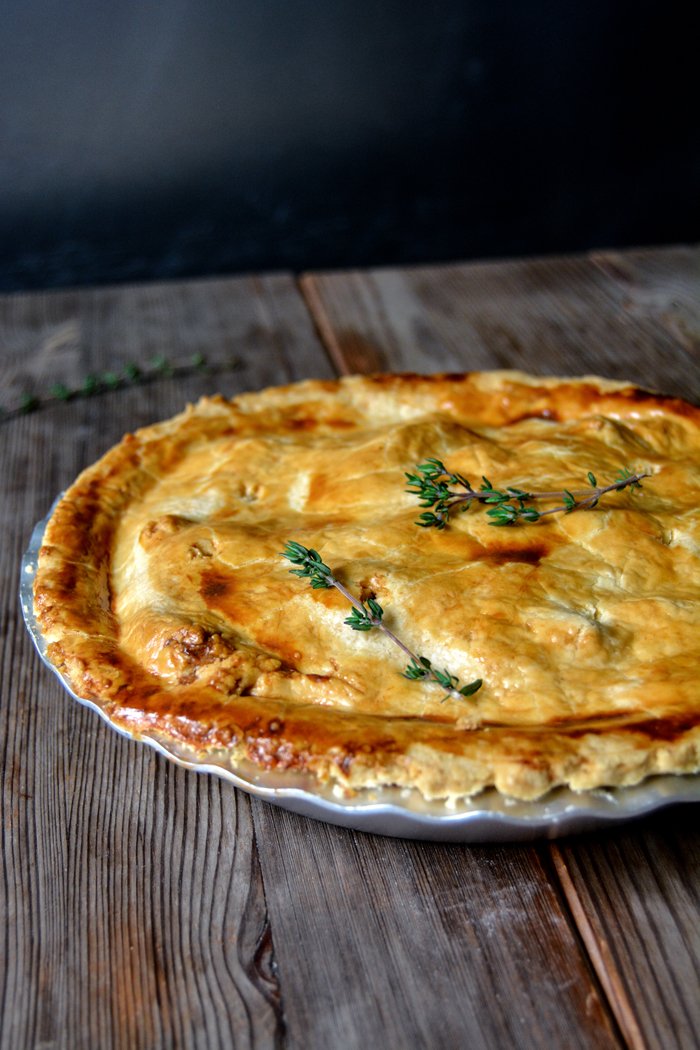
Potato, Apple and Onion Pie with Taleggio

I appreciate a good pie with a buttery crust all year round but there's something particularly satisfying about this hearty dish on a cold autumn's evening. Since the season started, I've already pulled a few of them out of my oven, Nigella Lawson's potato, cheese and spring onion pie is one of my all time favourites. Imagine coming home after a walk through the pouring rain, your bones cold and clothes wet, and then you see - and smell - this golden beauty on the table. Just the idea is so tempting that I could walk straight back into my kitchen and bake another pie.
Nigella's recipe inspired me to think about possible potato fillings wrapped in short crust - with apples and shallots for example. The fruits are at their peak at the moment, crisp, firm and packed with juices, they fill the air in my kitchen with the sweet smell of autumn. I sliced them thinly and layered them with onions to melt into the rich aroma of fresh thyme and milky Taleggio cheese. It was a good pie, especially in combination with German black pudding sausage (Blutwurst) on the side, thickly sliced and cooked in butter. I love this season!


Potato, Apple and Onion Pie with Taleggio
Serves 3-4
For the filling
potatoes, peeled and diced, 350g / 12 1/2 ounces
heavy cream 4 tablespoons
fine sea salt
ground pepper
nutmeg, freshly grated
fresh thyme leaves 2 1/2 teaspoons
medium shallot, thinly sliced, 1
small sour apples, quartered, cored and thinly sliced, 2
Taleggio cheese, chopped, 70g / 2 1/2 ounces
For the pastry
plain flour 300g / 2 1/3 cups
fine sea salt 1 teaspoon
butter, cold, 150g / 5 1/2 ounces
organic egg yolks 2
cold water 2 tablespoons
For the glaze
organic egg yolk 1
milk 1 tablespoon
a pinch of salt
Cook the potatoes in salted water for 10 minutes, drain and let them cool completely.
Mix the cooked potatoes with the cream and season with salt, pepper, nutmeg and thyme to taste.
For the pastry, combine the flour with the salt in a large bowl. Cut the butter into the flour with a knife until there are just small pieces left. Continue with your fingers and quickly rub the butter into the flour. Add the egg yolks and water and continue mixing with the hooks of your mixer until you have a crumbly mixture. Form 2 discs, dividing the dough roughly 2:1, wrap in cling film and put in the freezer for 10 minutes.
Preheat the oven to 400°F (200°C) (conventional oven).
Whisk the egg yolk, milk and salt for the glaze.
Take the dough out of the freezer and roll out both discs between cling film, the bigger piece for the bottom and sides and the smaller one as the lid of the pie. Line a 23cm / 9″ shallow pie dish or a 20 ½cm / 8" loose bottom springform pan with pastry. Spread the potatoes on top of the dough, cover with a layer of onions and a layer of apples and finish it off with the cheese. Close the pie with the smaller pastry lid, gently push the rim with your fingers to seal it. Make a few small holes in the top with a skewer and brush the pastry with the egg glaze. Bake the pie for 15 minutes before you turn the heat down to 350°F (175°C), bake for another 45 minutes or until the pie is golden and the pastry is baked through. Let the pie cool for at least 15 minutes before you cut it into pieces.
Serve on its own or with thick slices of black pudding cooked in a pan in hot butter for just a couple minutes.


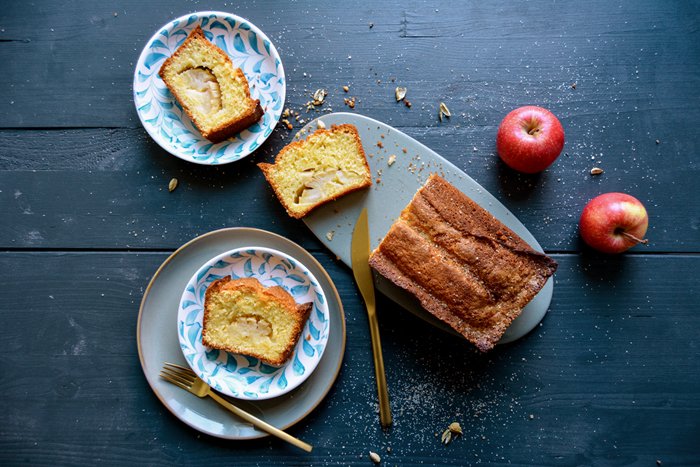
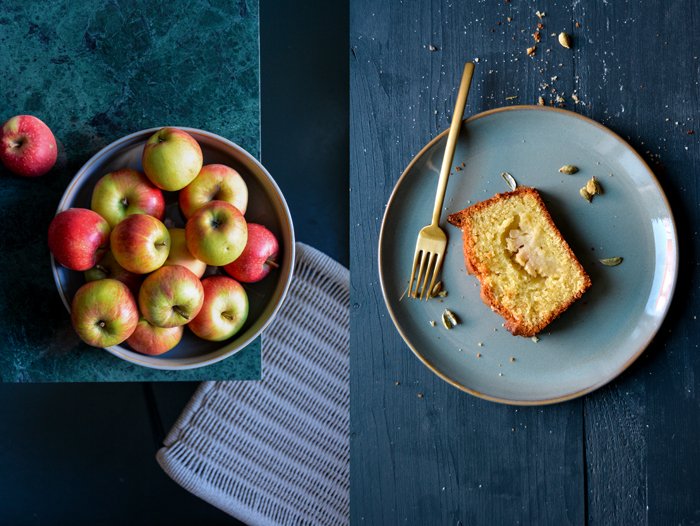
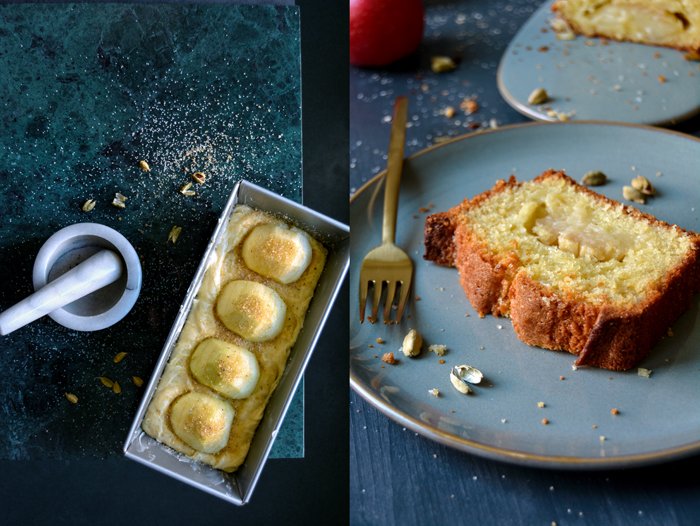
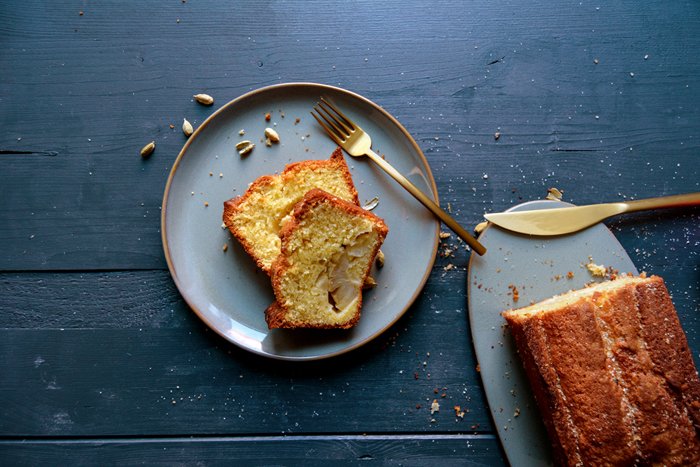
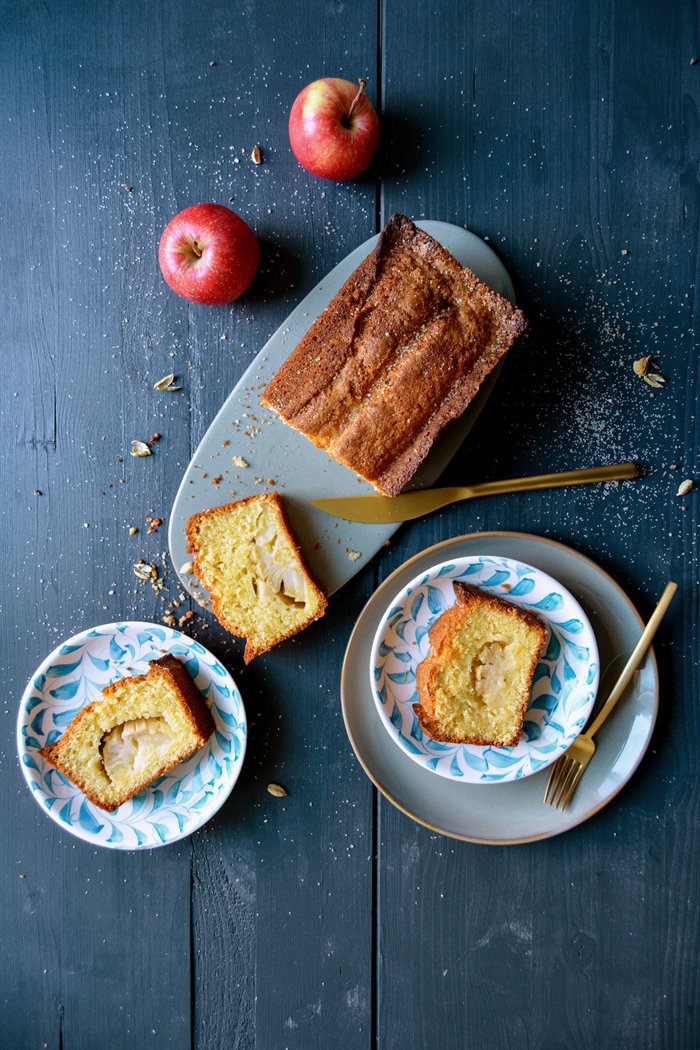
Sunken Cardamom Apple Cake
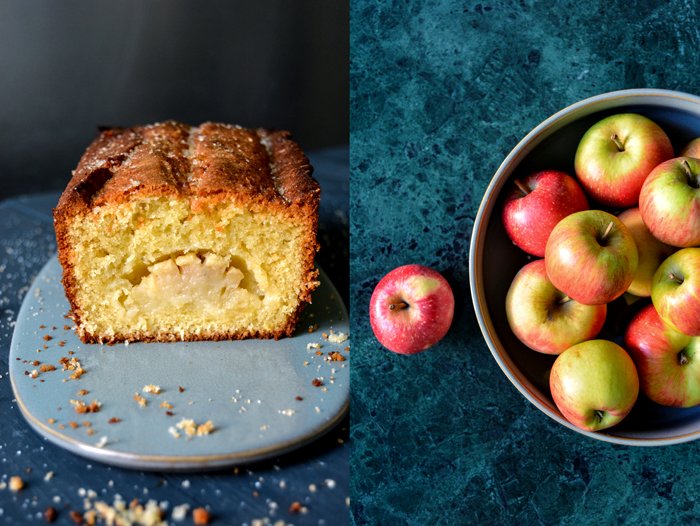
There are many cake recipes that I'll never get tired of experimenting with, but there is one that gives me deep pleasure and guarantees satisfaction no matter what I come up with. A simple apple cake. I appreciate it with crunchy cinnamon crumbles, with blackberries in a pie, elegant and light for breakfast, or rolled into a Tyrolean strudel. And I'm quite sure that I will continue trying out new ideas to melt crisp apples into a spongy cake for as long I can bake. The simplicity of this treat, its fruity sweetness, impresses me over and over again and makes it the perfect choice when my hungry but impatient mind calls for a quick teatime sweet.
Today's apple cake started off with another delicious but more time consuming coffee table treat - Swedish cardamom Bullar (yeast snails) packed with cardamom seeds crushed in a mortar. A friend of mine baked them for me and reminded me that spices ground with pestle and mortar are always far more tasty and rich than any pre-ground products from the supermarket. Most of the time I use whole seeds for my savory dishes but I tend to forget about them when it comes to sweets. So, as soon as the cardamom pods were back on my mind and out of my spice box, I knew that I wanted to combine their confident flavour with sour apples. I had a vision of a pretty little loaf cake, fair and spongy, with halves of apples beautifully arranged on top. A thin layer of Demerara sugar mixed with cardamom sprinkled over the fruits was suppose to add the strong note of the spice to the whole composition and give it a sugary crunchy finish. The preparation only took a few minutes and everything looked nice and neat as I put it into the hot oven, I was quite a happy baker. But after about 20 minutes I passed the oven again, dragged into the kitchen by the unbelievably good smell and my curiosity. I glanced at my cake - and the apples were gone. It seemed like the cake had swallowed them, they sunk in like a volcano, the whole fruits disappeared including the cardamom sugar topping. Although I had a different look in mind, I didn't regret this incident at all. It was rather the opposite, the sunken apples kept all their taste and juices inside the cake, it was fragrant and moist, the sponge infused with the sweet aroma of cardamom.
Sunken Cardamom Apple Cake
Makes a 24 x 10cm / 9 1/2 x 4″ cake
butter, at room temperature, 180g / 6 1/2 ounces
granulated sugar 200g / 1 cup
freshly squeezed orange juice 2 tablespoons
organic eggs 3
plain flour 180g / 1 1/3 cups and 1 tablespoon
baking powder 2 teaspoons
salt 1/8 teaspoon
sour apples, cut in half, peeled, cored and the top carved lengthwise, 2
For the topping
cardamom, the seeds crushed in a mortar, 2 pods, more to taste
Demerara sugar 1 tablespoon
Combine the cardamom and Demerara sugar for the topping and adjust to taste.
Preheat the oven to 175°C / 350°F (convection oven) and butter a 24 x 10cm / 9 1/2 x 4″ loaf pan.
In a large bowl, beat the butter and sugar with an electric mixer until fluffy. Pour in the juice and continue mixing for a minute. Add the eggs, one at a time and mix well in between. Combine the flour, baking powder and salt and add to the bowl, mix quickly until well combined. Scrape the dough into the buttered cake pan and even it out. Lay the apples on top, push them into the dough and sprinkle with the cardamom sugar. Bake for 45-50 minutes or until golden brown. Check with a skewer, it should come out clean. Let the cake cool for a few minutes before you take it out of the pan.


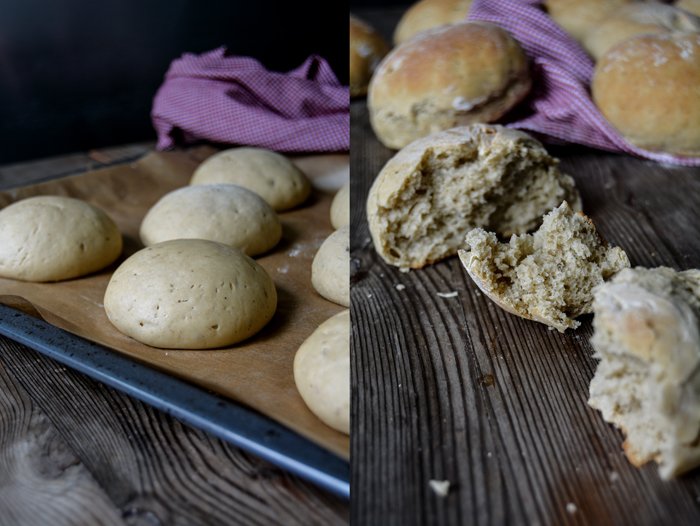
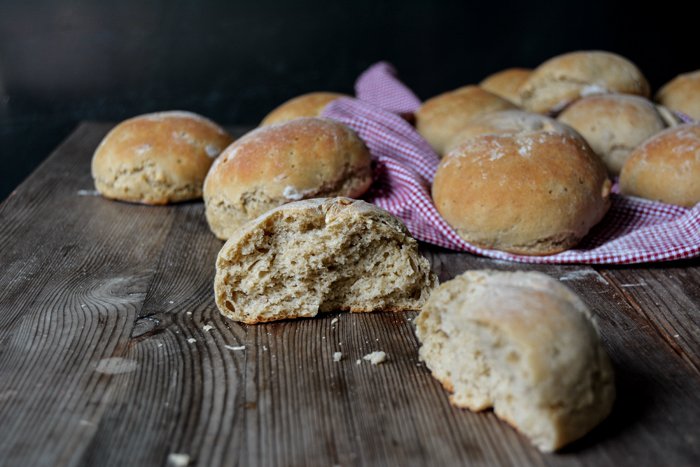
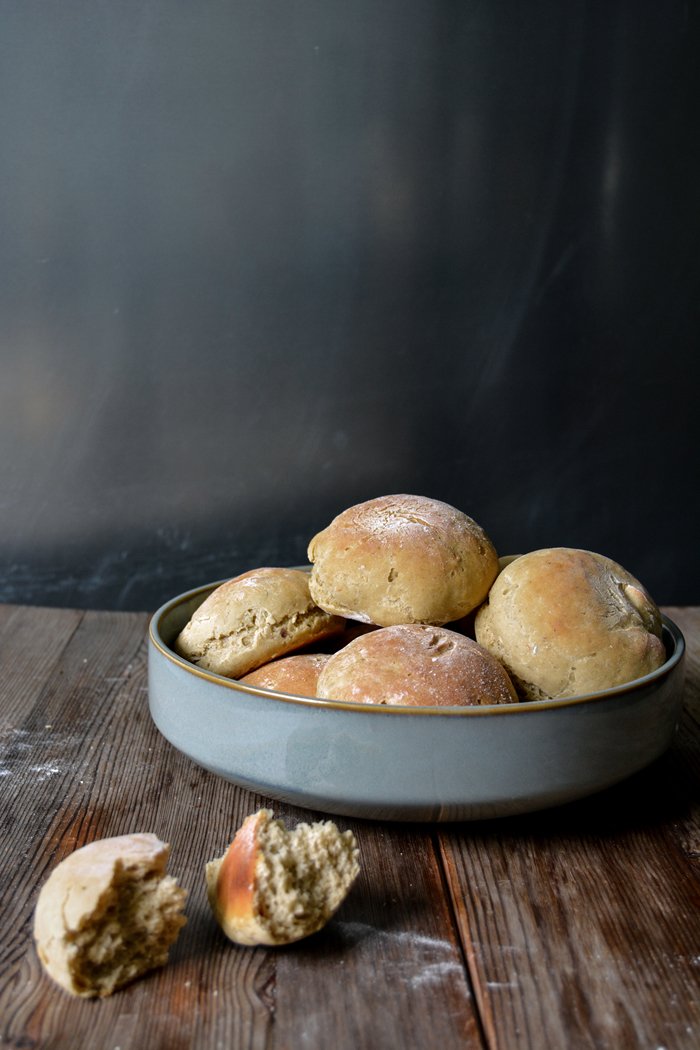
An Autumn Breakfast - Mushroom and Potato Buns with Thyme
As soon as the sweet and earthy smell of my warm autumn buns reached my nose, I felt at peace again and forgave my gnocchi recipe for not performing as expected. A few days ago I mentioned that I had the genius idea to make mushroom gnocchi with chopped porcini and chanterelles stirred into the mixture. However it was a rather frustrating experience, no matter how much flour I added to the soft dough, it was too moist and the texture didn't change at all. It was impossible to form anything resembling gnocchi. After adding a full 1kg-package (2 1/4 pounds) of flour I gave up, it seemed hopeless and I was ready to chuck everything in the bin. Luckily my boyfriend suggested turning the dough into bread - a juicy loaf of potato bread, fluffy, light and juicy - simply satisfying. All of a sudden the recipe made sense, I mixed in a little more flour, some yeast and let it rise for an hour. This gave me enough time to calm down and think about how I'd like to shape my aromatic autumn creation. I went for buns, 24 to be precise, enough to eat mushroom potato buns for the next 2 weeks. It wouldn't have been a big deal, they taste fantastic, but I decided to freeze half the batch for cozy weekend breakfasts. Instead of going to the bakery on Sunday mornings I'll just switch on the oven and fill my kitchen with the aroma of thyme, porcini and chanterelles. 24 buns made of 1600g (3 1/2 pounds) flour can be a bit intimidating for a weekend baker so I scaled down the recipe by half.
The past few weeks have been so busy that I didn't even realize that it's been a month since we got back from our Mediterranean island. I miss it, of course, and I felt so happy when Molly from My Name Is Yeh asked me if I'd like to meet her in Malta. A short trip with friends took her to the archipelago and I would have given a lot to make it possible for us to finally meet after our cross-continental kitchen talk a few months ago. Unfortunately, I didn't manage, the final work on my book has kept me anchored to Berlin and my computer. But she went and enjoyed it so much that she wrote a sweet post about her 3-day trip and her new culinary discovery: Timpana, click here for her travel experiences!
I've kept one special bit of news for the end: Ever since I held Nigella Lawson's Domestic Goddess in my hands for the first time, I've been a great admirer of her work. So when she decided to share my vanilla profiteroles on her Instagram, it was a very, very happy day. Thank you Nigella! And here it is!


Mushroom and Potato Buns with Thyme
Keep in mind that the potato mixture for the dough has to cool in the fridge before mixing it in, you can prepare this step a day in advance.
Makes 12 buns
starchy potatoes, cut into cubes, 450g / 16 ounces
butter 30g / 2 tablespoons
organic egg yolks 2
plain flour, white spelt (type 630) or unbleached wheat, 810g / 6 1/4 cups
dry yeast 1 sachet (7g / 1/4 ounce)
salt 4 teaspoons
ground pepper
nutmeg, preferably freshly grated
fresh thyme leaves 1/2 tablespoon
mixed mushrooms, finely chopped, 100g / 3 1/2 ounces (half porcini, quarter chanterelles and quarter king oyster mushrooms)
Cook the potatoes in salted water until soft, about 15 minutes, drain well in a colander and press through a potato ricer. Mix immediately with the butter and egg yolks and let it cool down to room temperature before you put it in the fridge to cool completely. You can prepare the mixture a day in advance.
Scrape the cool potato mixture into a large bowl.
Combine the flour, yeast, salt and a generous amount of ground black pepper and nutmeg. Add the dry flour mixture, the thyme and mushrooms to the bowl with the potatoes. Mix with the hooks of an electric mixer for about 7-10 minutes until well combined. The dough will be soft and damp, if it's too sticky, add more flour. Cover the bowl with a tea towel and let it rise in a warm oven (35°C / 95°F) for 60 minutes (top/ bottom heat and not fan-assisted!).
Punch the dough down, take it out of the bowl and knead for half a minute. Divide it in 12 portions, dust your hands with flour, put a portion of dough on the palm of your hand and roll with the other hand, holding it like a dome. Turn the dough for about 1o seconds on the palm of your hand until its top is round and firm, this builds up surface tension and prevents the buns from becoming flat. Continue with the remaining dough and lay the buns on a baking sheet lined with baking paper. Cover them with a tea towel and let them rise for about 15 minutes in a warm place.
Set the oven to 220°C / 430°F (top/ bottom heat).
Bake the buns for about 11 minutes or until golden brown, knock on the bottom of a bun, it should sound hollow.

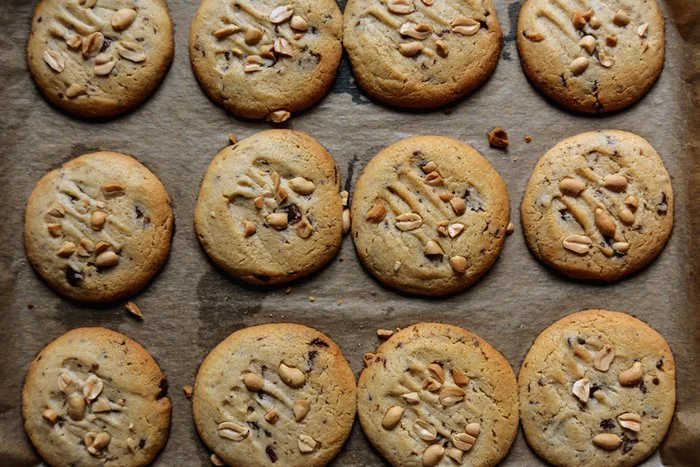
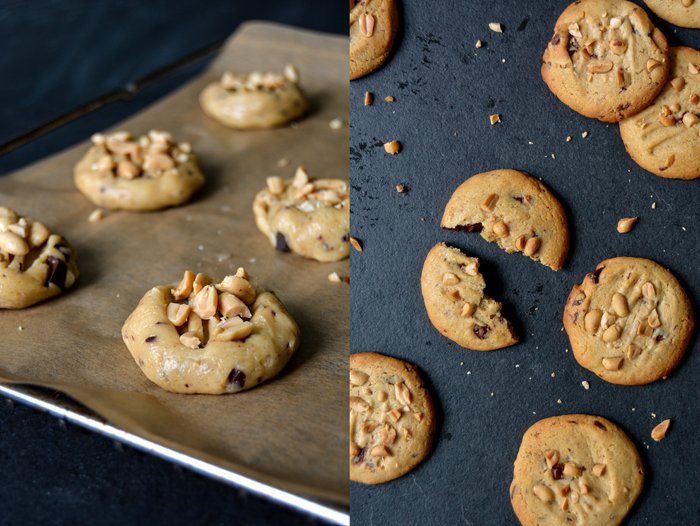
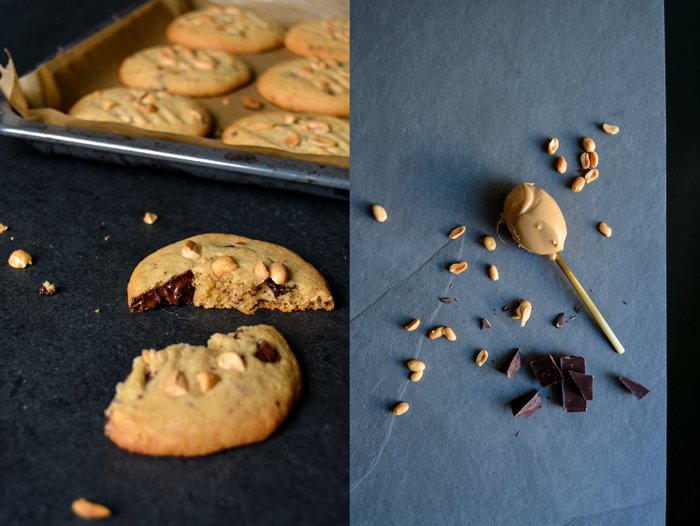
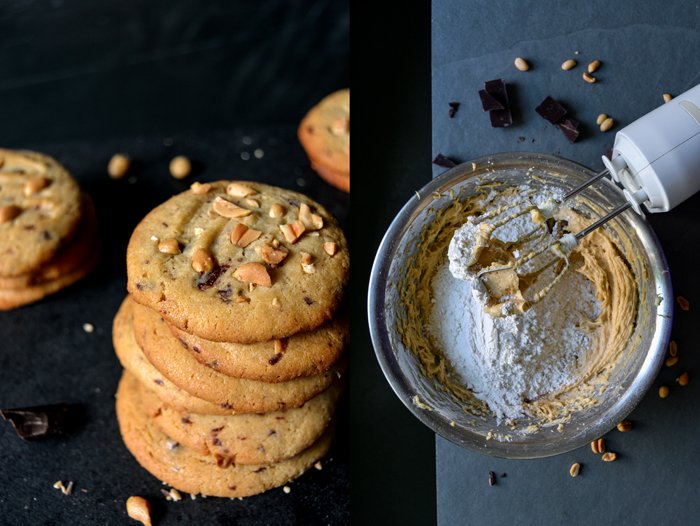
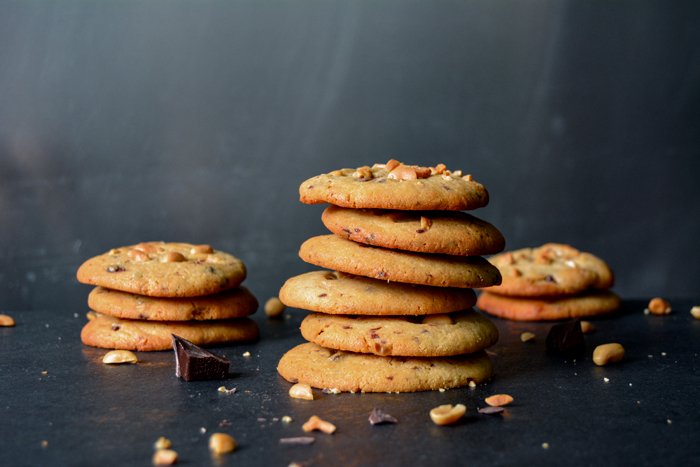
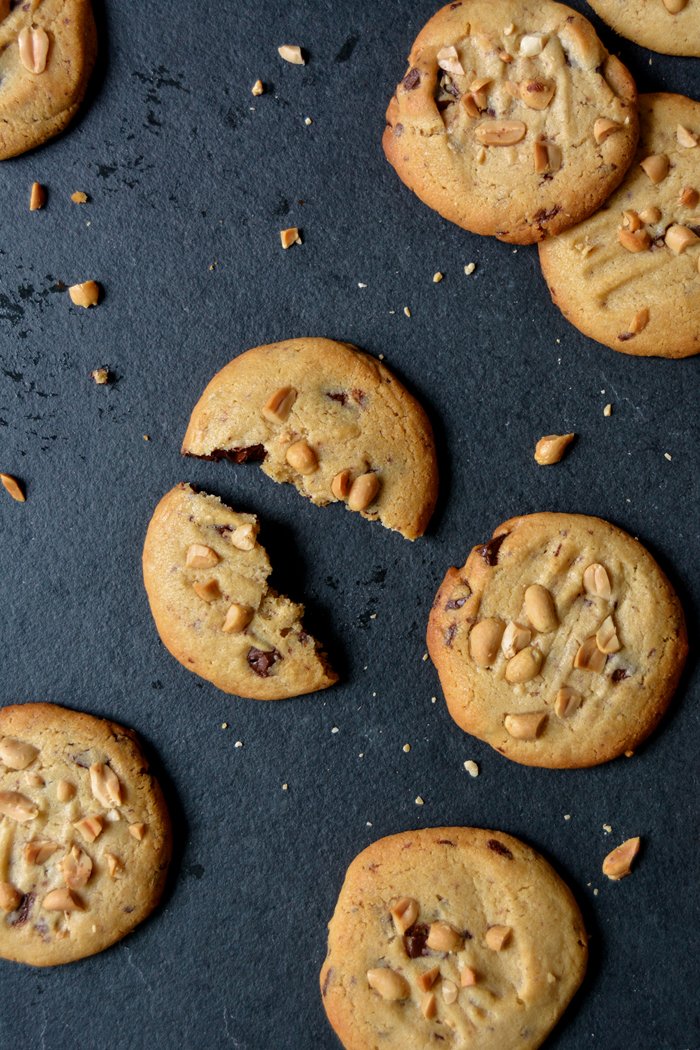
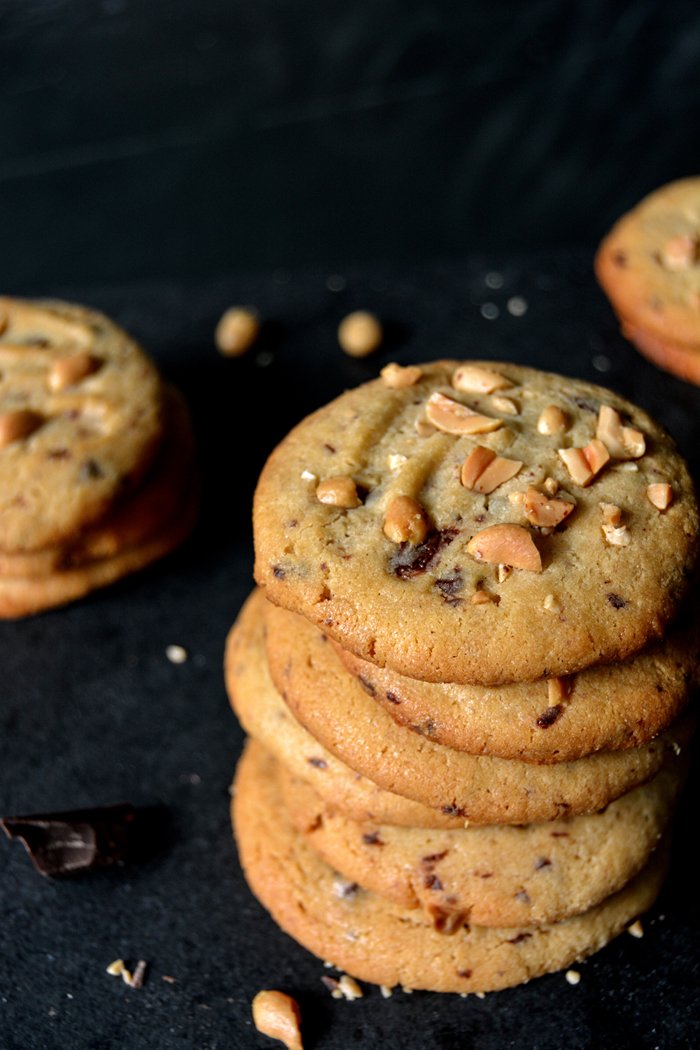
Peanut Butter Chocolate Chunk Cookies
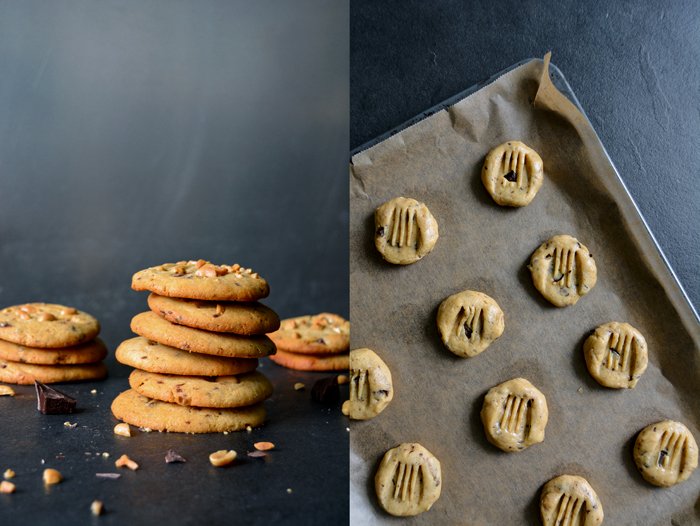
I am impressed! I did not expect Doris' peanut butter cookies could possibly be turned into something even more delicious than the original recipe - once I called these cookies the best ever and for good reason. For years I didn't even feel the need to modify anything of the sweet formula created by our granny in Florida. Her cookies are perfect! But - I felt tempted, I couldn't let go of the idea of rough chunks of bittersweet chocolate melting into the nutty richness of these crunchy bites once it got stuck in my head.
It was a very quick project - another quality of these cookies, they can be done in 20 minutes. I chopped the chocolate first, moved on to unsalted peanuts lightly broken for the topping and waited impatiently in front of my oven to see how my kitchen experiment would turn out. My boyfriend was skeptical - we're talking about an old recipe from his beloved grandmother - but he approved in the end, they were just too good.

Peanut Butter Chocolate Chunk Cookies
Makes about 40 cookies
plain flour 280g / 2 cups and 2 tablespoons
baking soda 2 teaspoons
salt 1/4 teaspoon
butter, at room temperature, 250g / 9 ounces
light brown sugar 280g / 1 1/3 cups
organic eggs 2
peanut butter (smooth not crunchy) 350g / 1 1/3 cups
bittersweet chocolate, chopped into chunks, 160g / 5 1/2 ounces
peanuts (unsalted), roughly chopped, 70g / 2 1/2 ounces
Set the oven to 180°C / 355°F (fan assisted oven) and line a baking sheet with baking paper.
Combine the flour, baking soda and salt.
In a large bowl, beat the butter until fluffy, add the sugar and continue mixing for a minute. Mix in the eggs, one at a time, add the peanut butter and beat until combined. Add the dry ingredients gradually and mix well. Stir in the chopped chocolate and shape the dough into large walnut sized balls. Lay them out spaciously on the lined baking sheet, they will rise! Flatten lightly with a fork, sprinkle with peanuts and push the nuts lightly into the dough. Bake for 10-11 minutes until golden. Leave them to cool on the baking sheet for a couple minutes before you cool them completely on a wire rack.

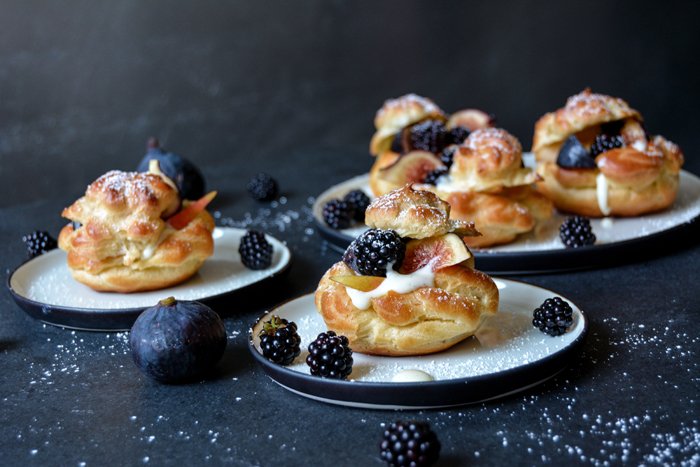
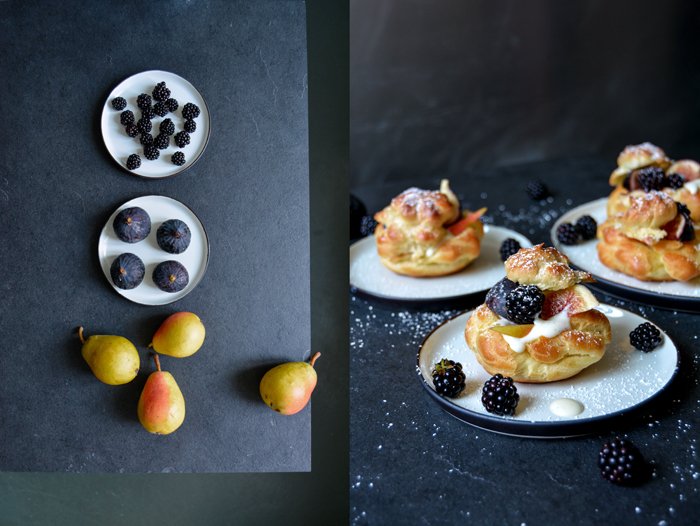
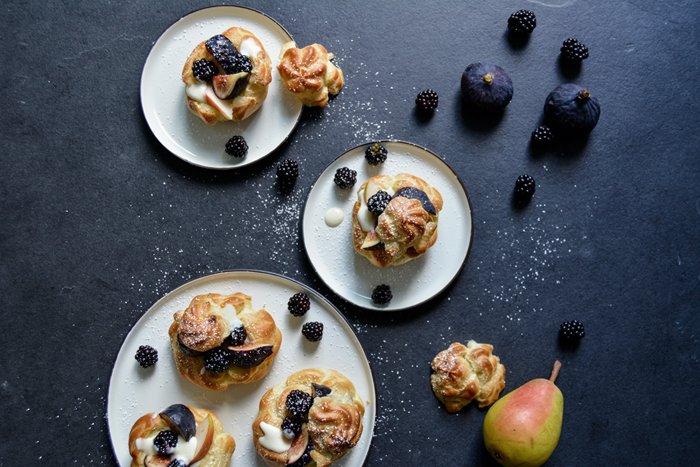
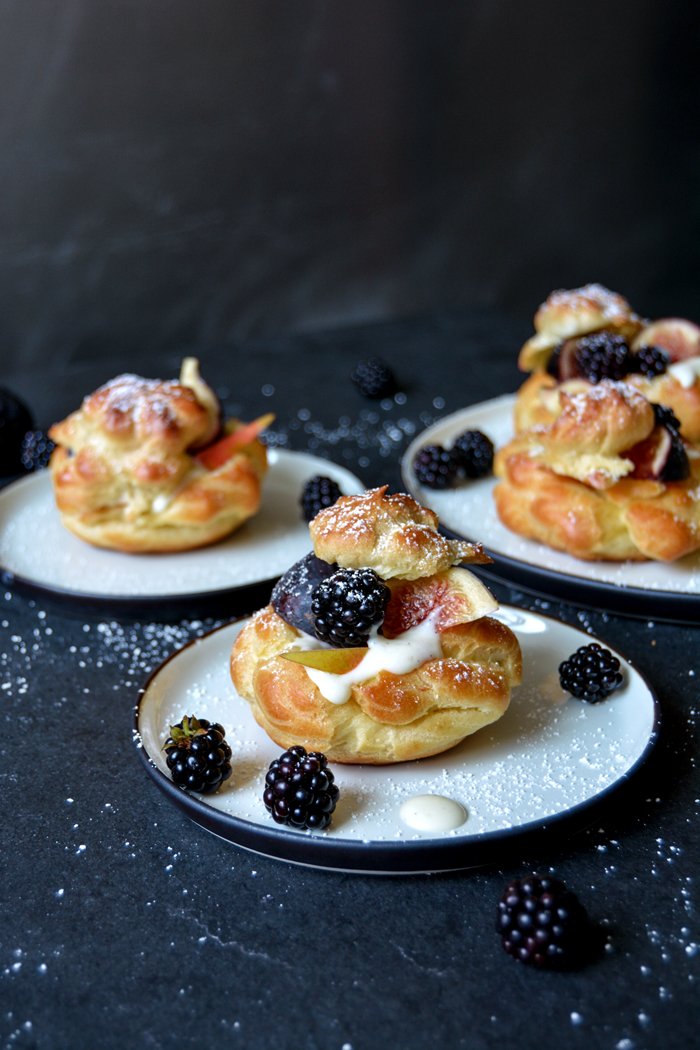
Sunday Profiteroles! Vanilla Cream Puffs with Figs, Pears and Blackberries
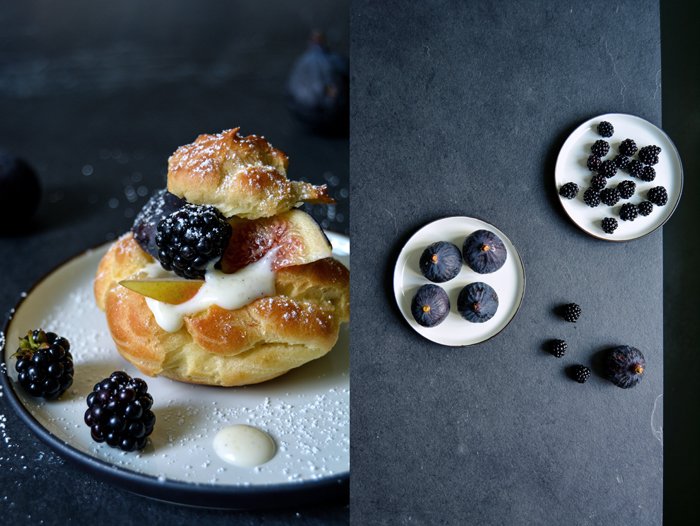
There's something wonderfully old-fashioned about profiteroles - or cream puffs. And they look so voluptuous. Generously filled with vanilla cream, ripe figs, pears, and blackberries they are anything but a simple teatime sweet. This creation calls for a pretty coffee table, delicate porcelain, frilly napkins, and table cloth, my granny Annie would have loved it! She was very much into extravagant Sunday afternoon treats, she used to welcome her guests all dressed up, with lipstick and jewelery. Her Frankfurt Crown Cake - the German Frankfurter Kranz - is a legendary masterpiece, delicious and opulent, it was the star of many coffee tables in my childhood.
Airy choux pastry, golden and crisp, is the secret of a good profiterole. Be it in an elegant oblong éclair or a baroque shaped Windbeutel (meaning cream puff in German), the pastry needs to rise like a ballon but then keep its shape and not deflate. To get there stress-free, there are two rules to obey: the door of the oven should never be opened while the pastry is baking; and, once it's done, the little puff balls have to stay in the oven with the door closed for a few minutes to dry and build up structure. After they cooled off a little they are more robust than they may seem, which is helpful as they have to carry quite a rich filling.

Vanilla Cream Puffs with Figs, Pears and Blackberries
For 12 cream puffs you need
For the vanilla cream
milk 350ml / 1 1/2 cups
large egg yolks 2
granulated sugar 80g / 1/3 cup and 1 tablespoon
a pinch of salt
cornstarch 30g / 1/4 cup
vanilla pod, slit, 1
heavy cream, whipped, 100ml / 1/3 cup and 2 tablespoons
For the choux pastry
butter 80g / 3 ounces
granulated sugar 4 teaspoons
a pinch of salt
milk 90ml / 1 /3 cup and 1 tablespoon
water 90ml 1 /3 cup and 1 tablespoon
all-purpose flour, sieved, 130g / 1 cup
large eggs 3
For the fruit filling
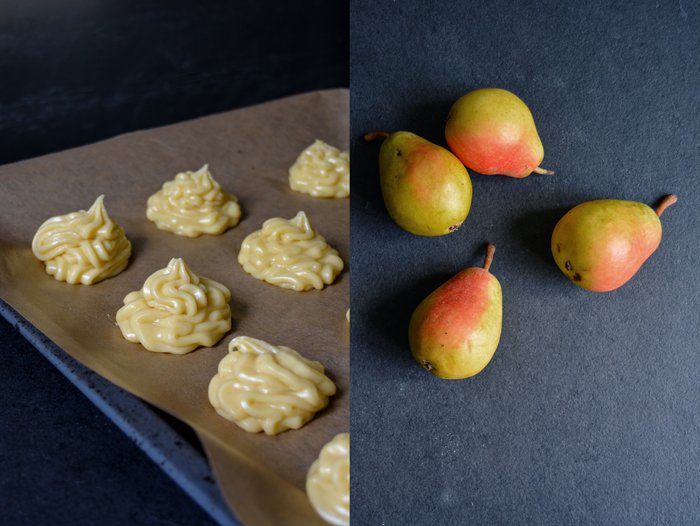
crisp pear, cut into slim wedges, 1
ripe figs, cut into slim wedges, 6
blackberries, a small handful
icing sugar, for the topping (optional)
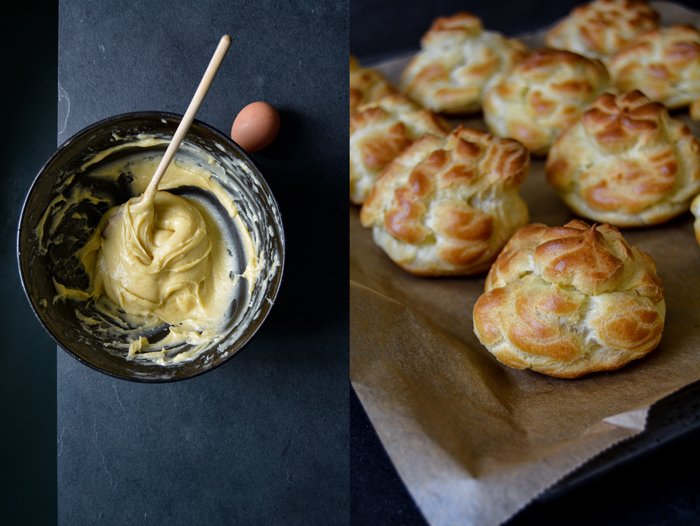
For the vanilla cream, whisk 4 tablespoons of the milk with the egg yolks, sugar, salt and cornstarch until well combined. In a saucepan, bring the remaining milk with the vanilla pod to the boil. Take the vanilla pod out and scrape the seeds out of the bean into the milk. Add the egg-sugar mixture to the hot milk, whisking well. Take the saucepan off the heat immediately and whisk for another minute. If it crumbles, whisk in a little more milk. Let the cream cool and then chill in the fridge for at least 30 minutes. Once it's cool, whip the heavy cream and fold into the vanilla cream gently. Keep the vanilla cream in the fridge until you fill the choux pastry.
Set the oven to 200°C ( 400°F) (top / bottom heat) and line a baking sheet with baking paper.
For the dough, bring the butter, sugar, salt, milk and water gently to the boil. When the butter has melted, stir in the flour vigorously with a wooden spoon, mix until smooth and the dough comes away from the side of the pan. Transfer the dough to a bowl and let it cool for about 10 minutes. Beat the eggs in with a spoon, one at a time, only mix in the next one when the one before is well combined.
Fill the dough in a piping bag with a wide nozzle and pipe the mixture into 12 balls. Bake in the oven for about 19 minutes or until golden brown and crisp, don't open the door while the choux pastry is baking. When it's done, switch off the oven but leave it closed. After 5 minutes open the door slightly, only the stick of a wooden spoon should fit in, and let the pastry dry for another 5 minutes (this way they keep their shape). Take them out of the oven and let them cool on a wire rack completely.
Prepare the cream puffs just before serving: cut off the tip, fill generously with vanilla cream and fruits and close with the lid again. Sprinkle with icing sugar (optional) and enjoy!


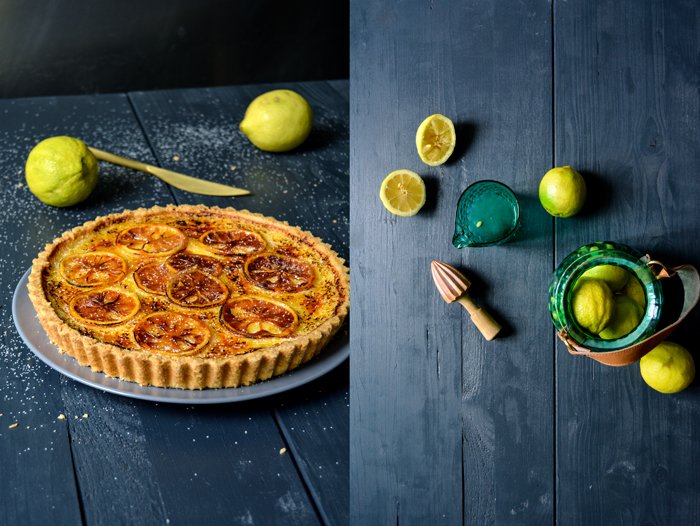
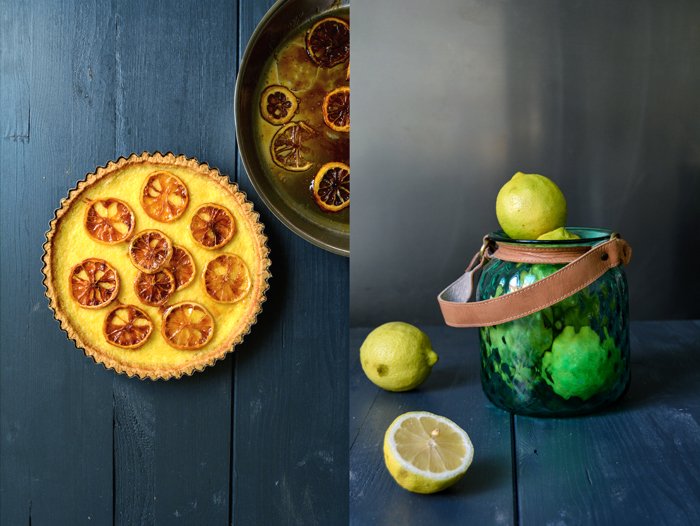
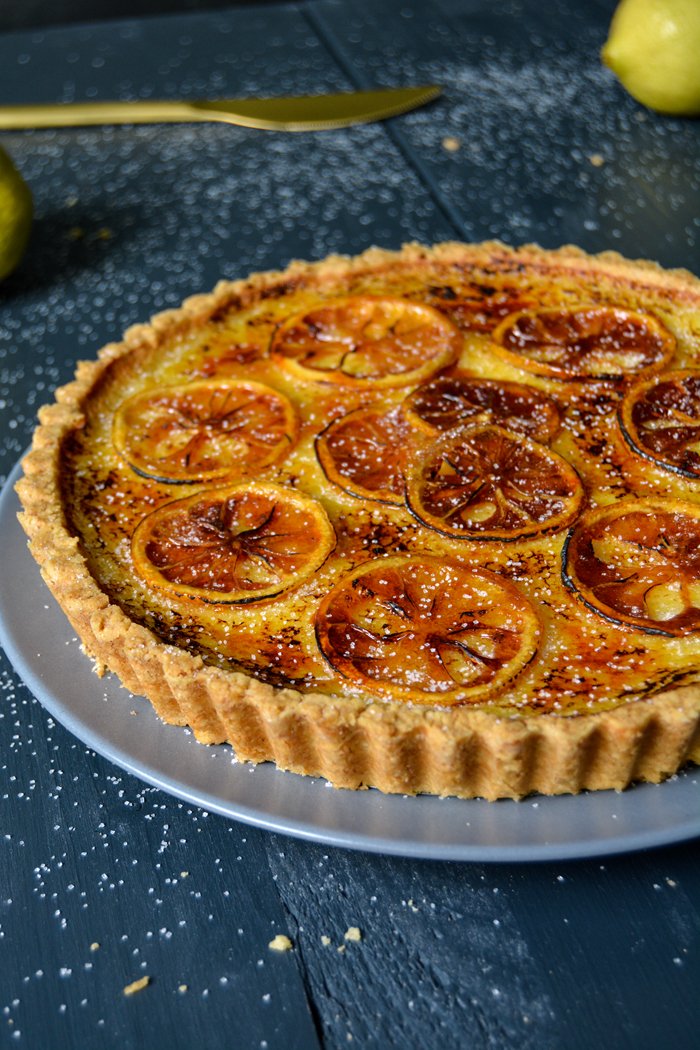
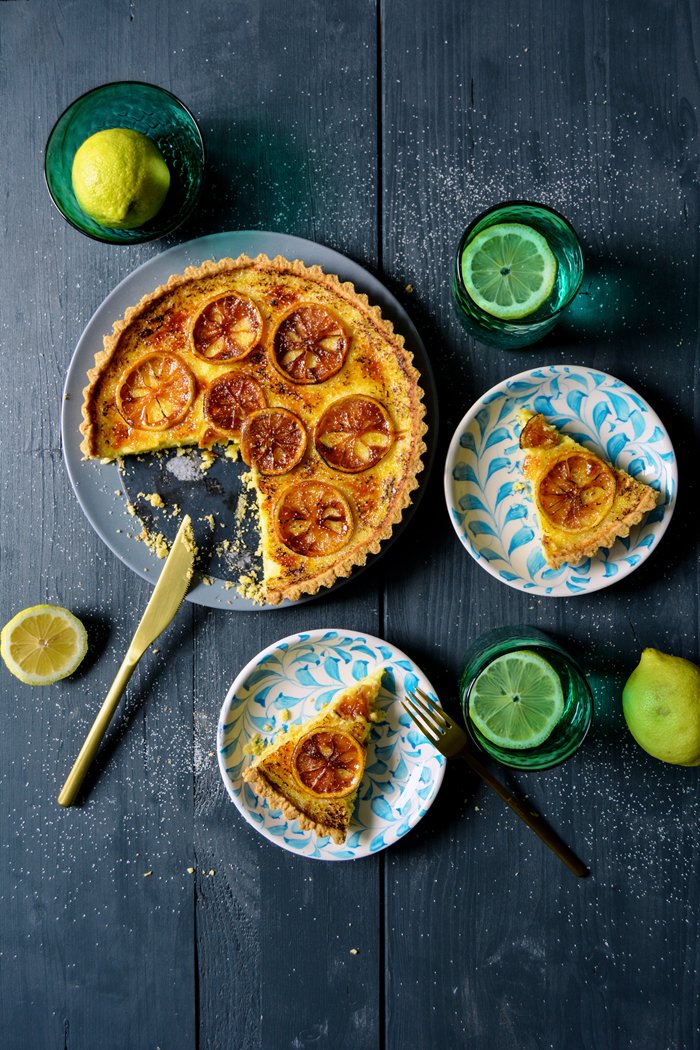
Lemon Crème Brûlée Tart and Malta's Mdina Glass
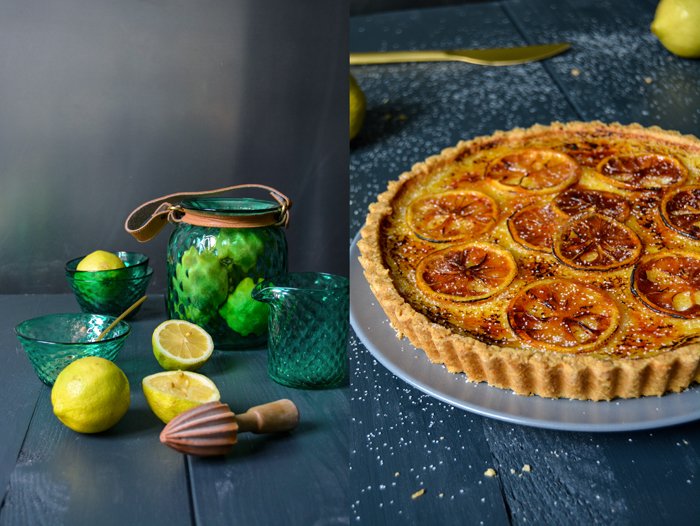
My mother completely falls for design, be it in the form of furniture, porcelain, cutlery or architecture, she and the rest of my family are quite obsessed with pleasing the eye. In her house you find far more than one set of plates, she has them in bulk, in all forms, materials and colours used for different occasions and needs. She can talk about miniature porcelain birds and vase collections with such passion that even I (only sometimes) believe I might need an elegant sparrow on my table. We have a lot in common, but here we're different, I'm a bit more of a minimalist and prefer my home clear and - compared to hers - empty; but our minds meet when it comes to handcrafted products. The art of dedicating a lifetime to a material and shaping it with respect to the highest standards of quality is more than just fascinating, it's admirable.
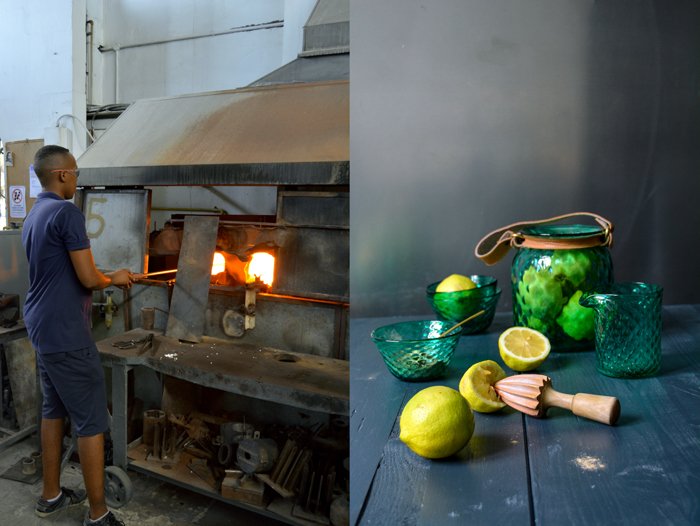
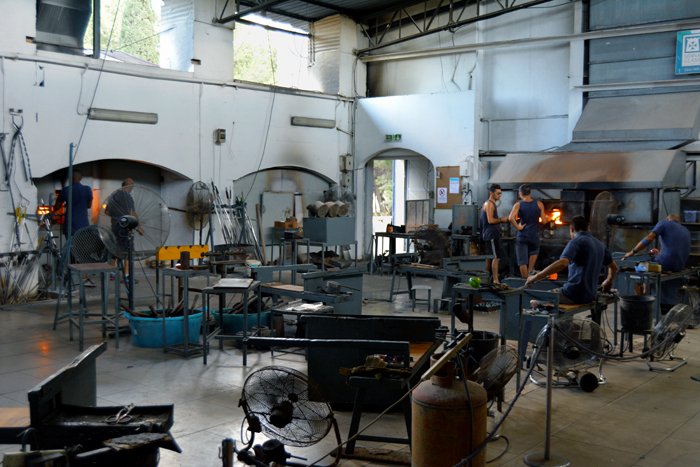
When my mother came to visit us in Malta this summer we obviously had to hop into the little Mdina Glass shop in the country's former capital. The glassware manufacturer offers different design series, as bright and colourful as the land they are made in, we loved it! We also spotted a collection that was new to me, textured glass in vibrant shades of green, blue, yellow and red. It was love at first sight when I saw the turquoise coloured bowls and glasses. So I made a decision, I wanted to go back to visit the company's manufacturing halls. Last week, I had the chance to meet Mark at the Ta' Qali Crafts village close to the city of Mdina and I had an insight into the beautiful art of making glassware.
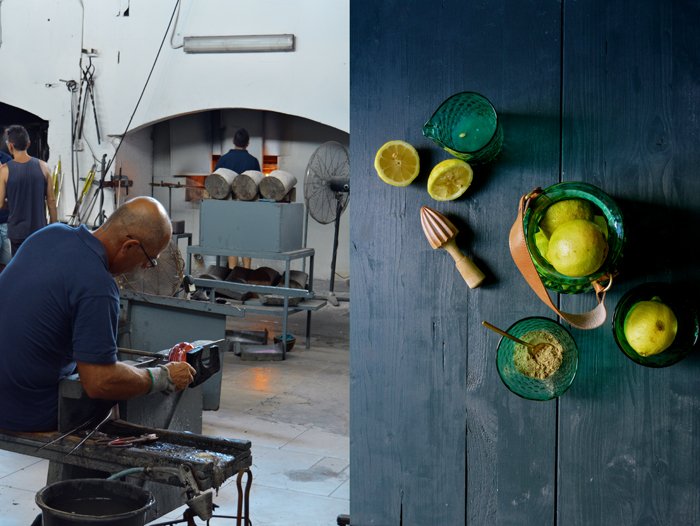
Founded in 1968, Mdina Glass is a relatively young family run business. Although the actual craft seems like quite a male domain - there were only men at the 1400°C (2550°F ) oven - production and product development is in the hands of one of the daughters. It's a story of success built on respect for the artisans who create the fragile products with their hands and mouth. Mdina Glass calls it the freedom of expression that can be found in every single piece - handmade and unique.
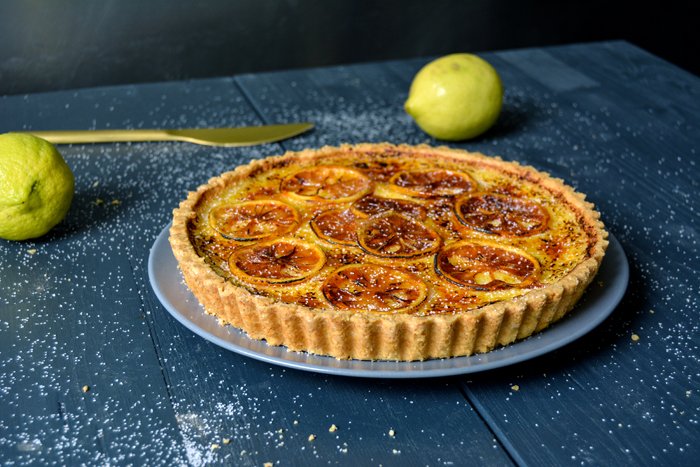
Inspired by such vibrancy, the hot oven's fire and - of course - Malta, the land of the best lemons, I felt like a lemon crème brûlée tart. A smooth but slightly sour filling refined with cardamom and made with lots of citrus juice and zest, eggs and cream sits on a buttery shortcrust. Caramelized lemon slices made it look pretty before my blowtorch turned the sugar sprinkled on top into a thin, blistered crust. Heavenly!
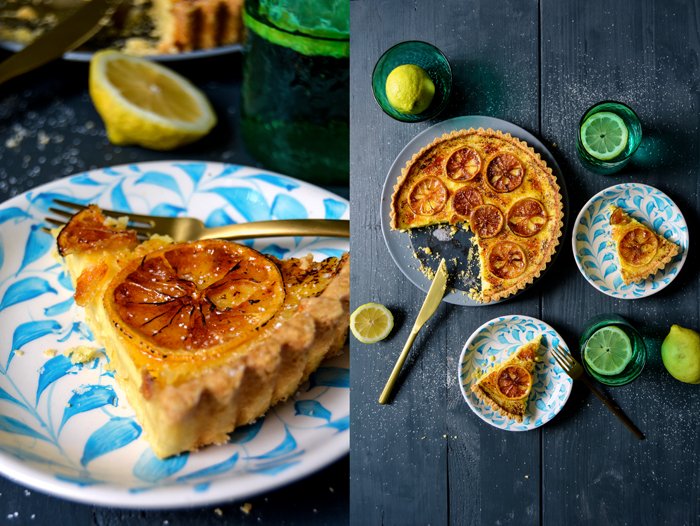
To save time, I didn't prepare a crème brûlée that has to cool for hours, I mixed heavy cream with crème fraîche and eggs and baked the filling right on top of the pastry instead.
Lemon Crème Brûlée Tart
It’s easiest to bake the tart in a loose-bottom tart pan. You will need a blowtorch for the topping.
For a 23cm / 9″ tart pan you need
For the short crust base
plain flour 200g / 1 1/2 cups
granulated sugar 65g / 1/3 cup
a pinch of salt
butter, cold, 110g / 4 ounces
organic egg yolks 2
For the filling
organic eggs 2
organic egg yolks 2
heavy cream 100ml / 1/3 cup and 2 tablespoons
crème fraîche or sour cream 3 tablespoons
granulated sugar 100g / 1/2 cup
a pinch of salt
a pinch of cardamom
freshly squeezed lemon juice 3 tablespoons
lemon zest 2 1/2 tablespoons
For the topping
small organic lemon, very thinly sliced
granulated sugar 4 tablespoons plus a few spoonfuls for the burnt topping
water 4 tablespoons
For the pastry, combine the flour with the sugar and salt. Cut the butter with a knife into the flour until there are just little pieces of butter left. Continue with your fingers and rub the butter into the flour until combined. Add the egg yolks and continue mixing with the hooks of your mixer until you have a crumbly mixture. Form a thick disc, wrap in cling film and put in the freezer for 12 minutes.
Set the oven to 200°C / 390°F (top/ bottom heat).
Roll the dough out between cling film and line the tart pan with the flat pastry. Prick with a fork and bake in the oven for 10 minutes or until golden and crisp. Take the pan out of the oven and set aside.
Turn the oven down to 180°C / 355°F and prepare the filling.
In a large bowl, mix the eggs, egg yolks, heavy cream, crème fraîche, sugar, salt and cardamom with an electric mixer until fluffy. Stir in the lemon juice and zest and continue mixing until well combined. Place the tart pan with the pre-baked pastry back into the oven and pour the lemon filling on top. Bake for about 25 minutes or until just set.
Prepare the caramelized lemon sliced while the tart is in the oven. In a wide pan, bring the sliced lemon, sugar and water to the boil and cook until soft and golden brown. This can take 6-10 minutes depending on the thickness of the lemon and the temperature, mind that it doesn't burn. Pull the pan off the heat and arrange the caramelized fruit on top of the tart. Sprinkle with 1-3 tablespoons of sugar (depending on the desired sweetness) and brown the top gently with a blowtorch.


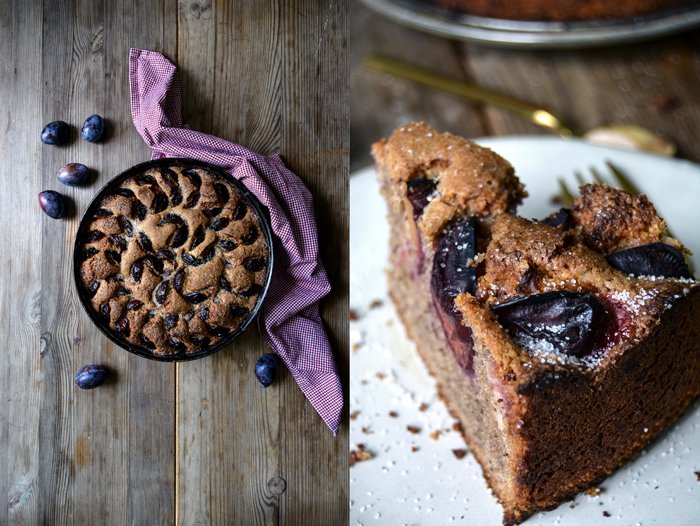
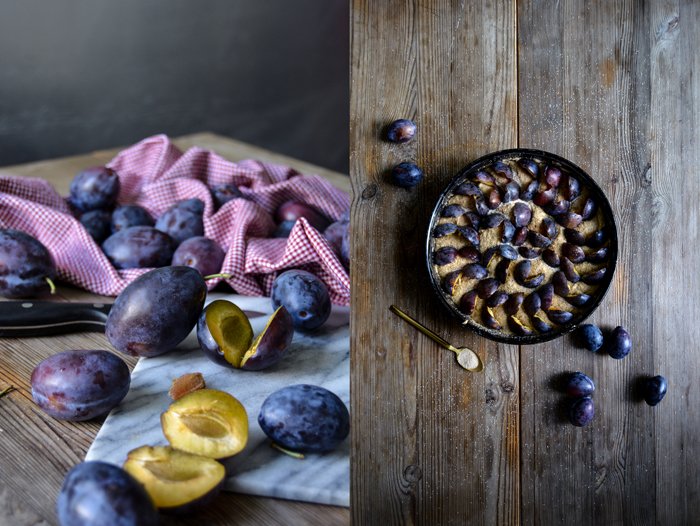
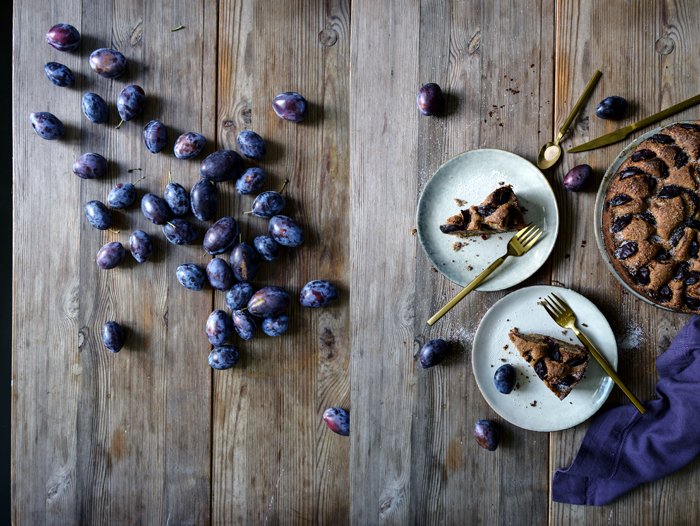
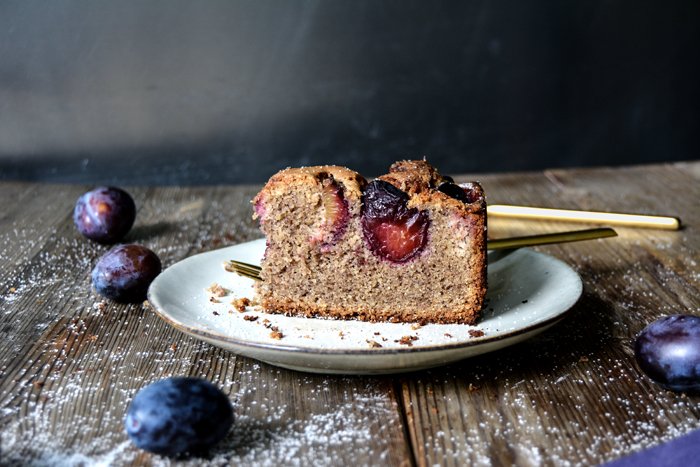
Cinnamony Plum, Buckwheat and Hazelnut Cake
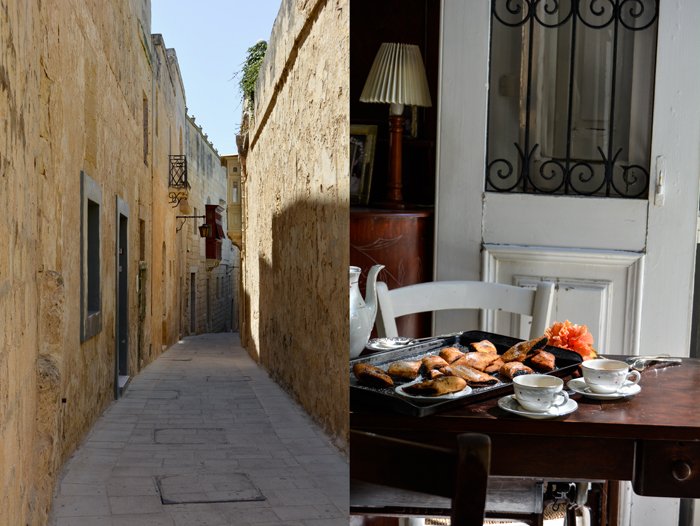
What a week! My boyfriend played at a festival in Malta, in Valletta's Royal Theatre (Pjazza Teatru Rjal), and as I'm his biggest fan I obviously had to go with him. It was supposed to be a little break from my busy schedule but life had a different plan. Our luggage got lost on its way to the Mediterranean, including most of his instruments. So, I didn't get to spend my days at the beach - as I had planned - but on the phone instead, calling airlines and airports to find our stuff. Two days later it arrived - just in time! We picked it up (I have never been so happy to see a suitcase) and drove straight to the beautiful venue at the entrance of Malta's capital. The show was fantastic and we were all happy but the drama didn't end there. On Sunday, my youngest Maltese sister Julia moved to Scotland and the whole family escorted her to the airport to wave goodbye, to laugh and cry. Her mother Jenny, Granny Edith, all the siblings, aunts, uncles and cousins were there. Exhausted but happy to see the young girl safely on her way to the North, we ended up in Floriana, at a large table at one of the gabbanas. Our simple bistro-restaurant was set right at the harbour where all the big cruise ships depart, it was a gorgeous clear night. The moon was bright red and I soon found a huge Maltese pizza in front of me and enough red wine to save me from insanity.
The following few days were filled with exciting visits and news that I will soon share with you. I visited Alex and Benjamin in their old palazzo in Żebbuġ for a new meet in your kitchen feature (coming soon!), we cooked together and enjoyed a scrumptious lunch with great people. They also introduced me to Marina, the inspiring woman runs a little café at the breathtaking Villa Bologna. I went to see her magical place the next day and fell in love. We sat in the park, drank her fantastic ice tea and I was treated to the most delicious apricot clafoutis and two kinds of ice cream: cardamom marmalade and yellow plum. This woman knows how to make her guests feel home! We clicked immediately and have quite a few ideas together for the future ... And here's another gem I dug deeper into this time - Mdina Glass. I visited the traditional glass manufacturing hall and looked right into the 1400°C (2550°F) hot oven where the glass is made - again, more to come soon.
And here's the last exciting news: my brother's first baby was born - and I'm an aunt again! Welcome little girl!
Now, I'm exhausted and ready for a cozy Sunday on the sofa with a large piece of my plum, buckwheat and hazelnut cake. It's an honest cake, nutty and cinnamony, not too sweet and gluten-free, with juicy late summer plums - sweet sofa heaven. Enjoy your weekend!
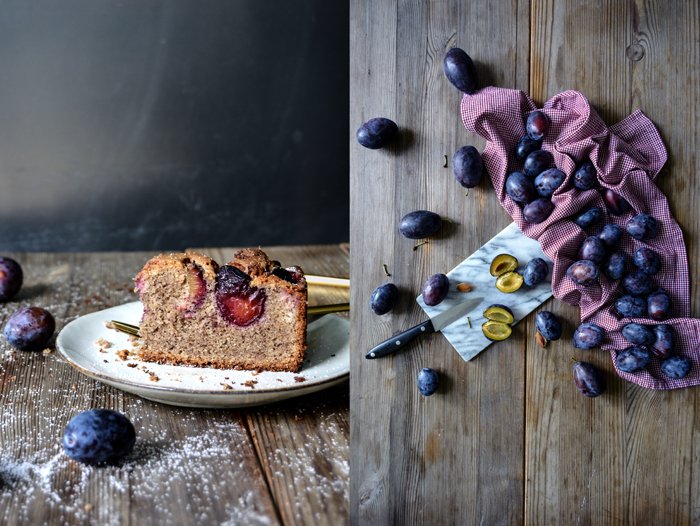
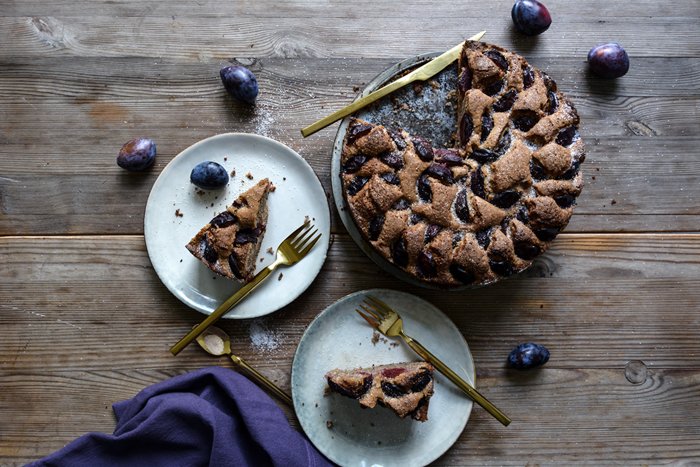
Cinnamony Plum, Buckwheat and Hazelnut Cake
For a 26cm / 10″ springform pan
ground hazelnuts 225g / 8 ounces
buckwheat flour 225g / 8 ounces
cinnamon 2 teaspoons
baking powder 4 1/2 teaspoons
organic eggs, separated, 6
a pinch of salt
butter, at room temperature, 250g / 9 ounces
granulated sugar 200g / 1 cup
plums, pitted, 800g / 1 3/4 pounds
For the topping
granulated sugar 2 tablespoons
cinnamon 1/4 teaspoon
Set the oven to 180°C / 350°F (fan-assisted oven).
Combine the hazelnuts, buckwheat, cinnamon and baking powder.
Beat the egg whites and salt until stiff.
In a large bowl, beat the butter and sugar until fluffy. Add the egg yolks, one at a time and continue mixing for a few minutes until the mixture is thick and creamy. Gently fold the dry mixture and the egg whites with a wooden spoon into the butter and sugar mixture, alternating 1/3 at a time, combine well in between. Scrape the dough into a loose bottom springform pan, even it out and arrange the plums in circles on top, push them into the dough. Sprinkle half the cinnamon sugar over the cake and bake for about 50-55 minutes or until golden brown on top. Check with a skewer, it should come out clean. Sprinkle with the remaining cinnamon sugar and let it cool for a few minutes before you take it out of the spring form pan. Enjoy pure or with vanilla ice cream or whipped cream.


About helping and sharing - and a Provençal Artichoke Quiche
Everybody's life can be a feast and a tragedy at times, it can be calm and peaceful in one second and rocky and rough in the next. In these moments, all of us need a helping hand or someone who listens. I believe, I know, that there's no one out there who wasn't ever in need of help. It starts when we're born, when our mothers are there for us, giving without asking for anything in return. That's love. And all along the way, we meet so many people who are there for us and reach out when in need. Shouldn't we all be willing to do so? Why is it so hard for some to show compassion and be there for the ones in need of help? Why can't we - as those who are much better off and on more stable ground - be there for the ones who are hurt, exiled and persecuted? I believe we should treat others as we would want to be treated. If we refuse to help why should we expect help when we are in a difficult situation?
My grandmother decided to leave East Germany when the wall - die Mauer - was being built, she had to flee with 6 children. They went to West Germany with literally nothing, they left their farm and land behind to escape a regime that she and her husband didn't want their children to grow up in. They were refugees in what was once their own country. But they weren't alone, many people helped them to build up their future, many shared the little they had and my family managed to get back on their feet. 40 years later, East Germany was in need of help, the people of the West gave a share of what they had, out of solidarity, to rebuild a part of the country that had suffered for decades. The people in the East received help. That's compassion. Today, hundred thousands of people are willing to risk their lives and leave their homes to seek help in Europe and other wealthy parts of the world, to escape political systems that are also no longer safe to live in. Wouldn't we all do the same? Didn't we do the same throughout the history of human kind?

Paul from the Einfach-Lecker-Essen blog started the Blogger für Flüchtlinge (Bloggers for Refugees) initiative with a few of his friends to call for support and collect donations for refugee camps, first only in Berlin, and now all over Germany. The movement is growing quickly and more and more stand up every day to give a helping hand to the ones in need. Please spread the word if you write a blog (#BloggerFuerFluechtlinge), you can support the initiative with a donation here.
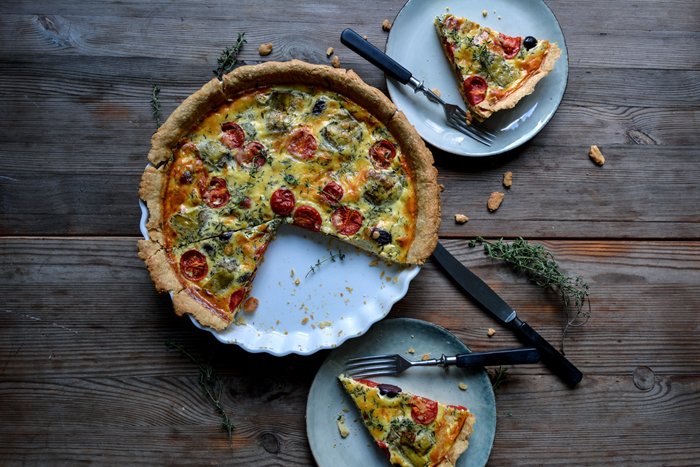
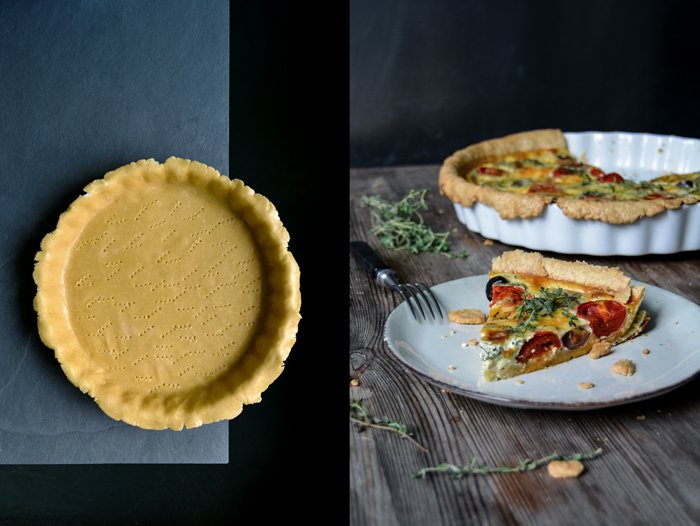
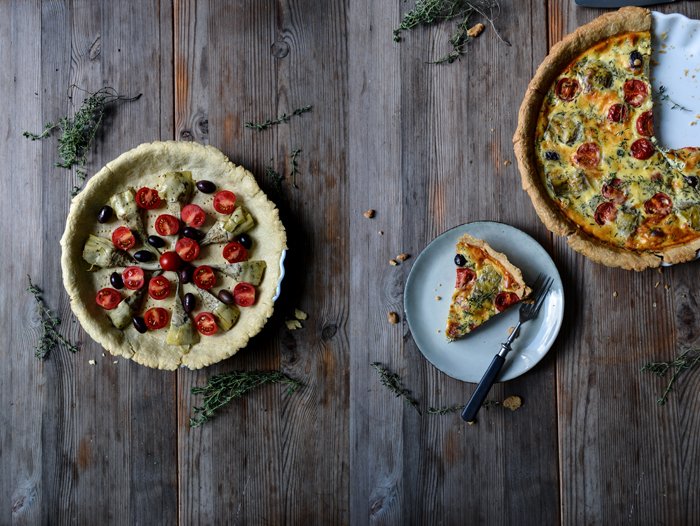
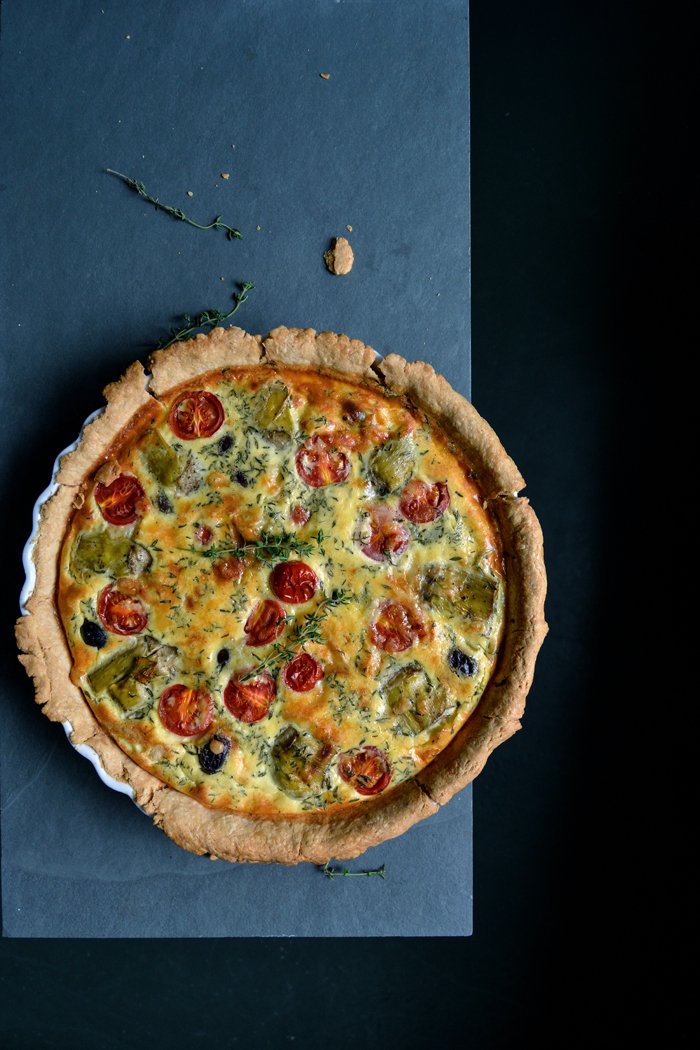
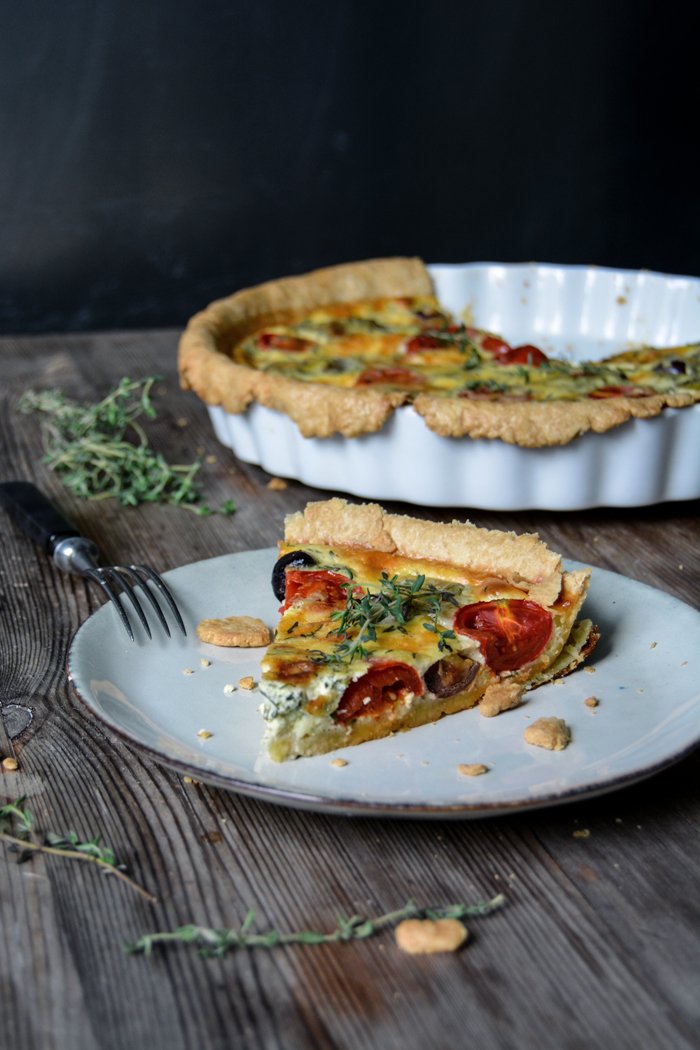
Today's recipe is a dish that is practically made to be shared - a fragrant golden quiche. A quiche is like a friend, it always makes me feel good and at home wherever I am, it's down to earth comfort food. Add some preserved artichoke hearts, tomatoes, olives, thyme and aromatic Gruyère cheese to the filling and you have a late summer Provençal picnic tart. And when we sit there in peace, enjoying the food together with the ones we love, a scene that's so normal for most of us, we shouldn't forget that this is what everybody aspires to. Nothing more and nothing less.
Provençal Artichoke Quiche
For a 30cm / 12″ tart pan or baking dish you need
For the short crust base
plain flour 260g / 2 cups
salt 1 teaspoon
butter, cold 130g / 4 1/2 ounces
organic egg 1
For the filling
organic eggs 4
heavy cream 125ml / 1/2 cup
sour cream 175g / 3/4 cup
fresh thyme leaves 3 tablespoons plus a few sprigs for the topping
salt 1 teaspoon
ground pepper
nutmeg, freshly grated, a generous amount
large preserved artichoke hearts, cut in half (lengthwise), 3
black olives (preferably Kalamata) 10
cherry tomatoes, cut in half, 10
Gruyère cheese (or any other aromatic hard cheese), grated, 2-3 tablespoons
For the pastry, combine the flour and salt in a large bowl. Cut the butter with a knife into the flour until there are just little pieces of butter left. Continue with your fingers and rub the butter into the flour until combined. Add the egg and continue mixing with the hooks of your mixer until you have a crumbly mixture. Form a disc, wrap in cling film and put in the freezer for 12 minutes.
Set the oven to 200°C / 390°F (top/ bottom heat).
Roll out the dough between cling film and line the baking dish with the flat pastry. Prick it with a fork and blind-bake in the hot oven for 15 minutes or until golden.
Take the baking dish out of the oven and set the temperature down to 180°C / 355°F.
Whisk the eggs with the heavy cream, sour cream, thyme, salt, pepper and nutmeg.
Arrange the artichoke hearts, olives and tomatoes on top of the pre-baked pastry base, pour in the egg-cream mixture and sprinkle with cheese. Bake the quiche in the oven for about 55 minutes or until golden brown, the top should be firm. Let it cool for a few minutes and garnish with the thyme sprigs. Serve cold or warm.


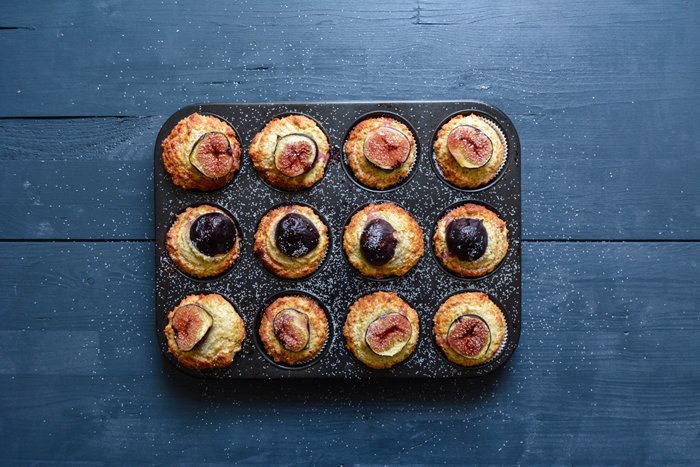
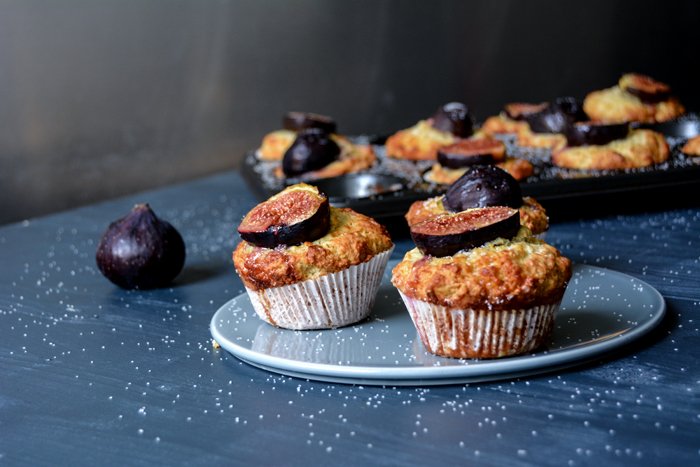
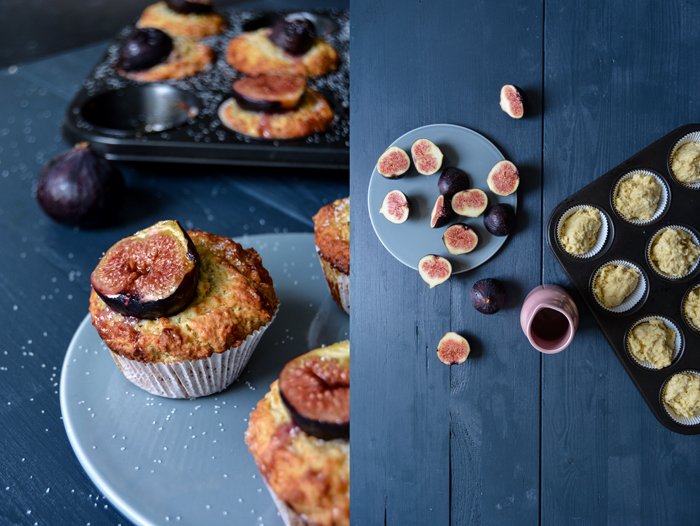
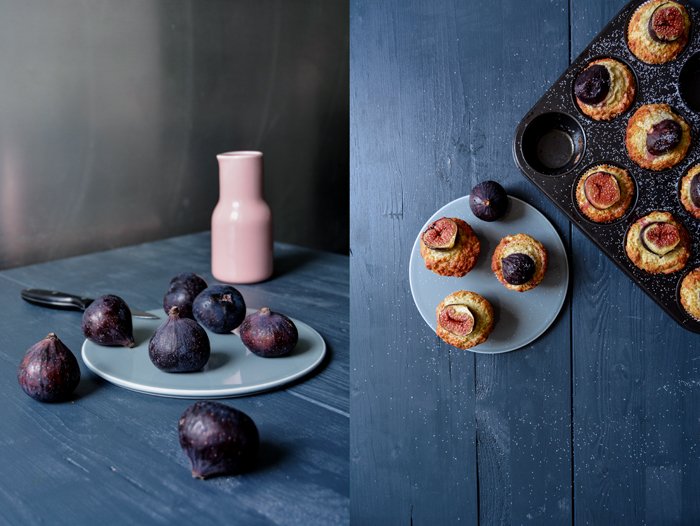
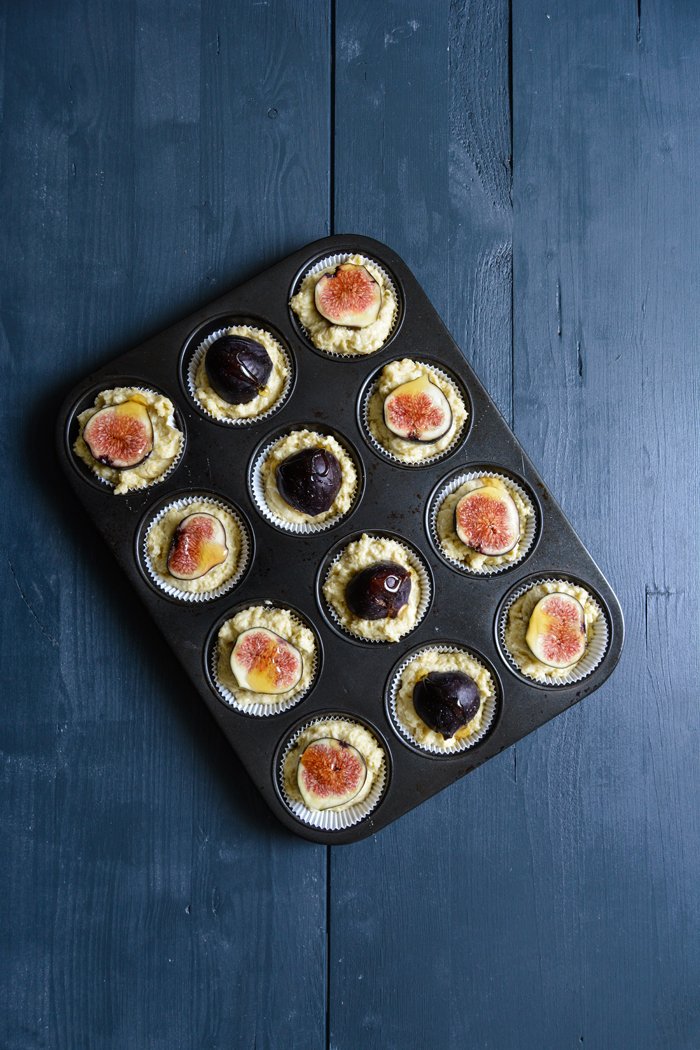
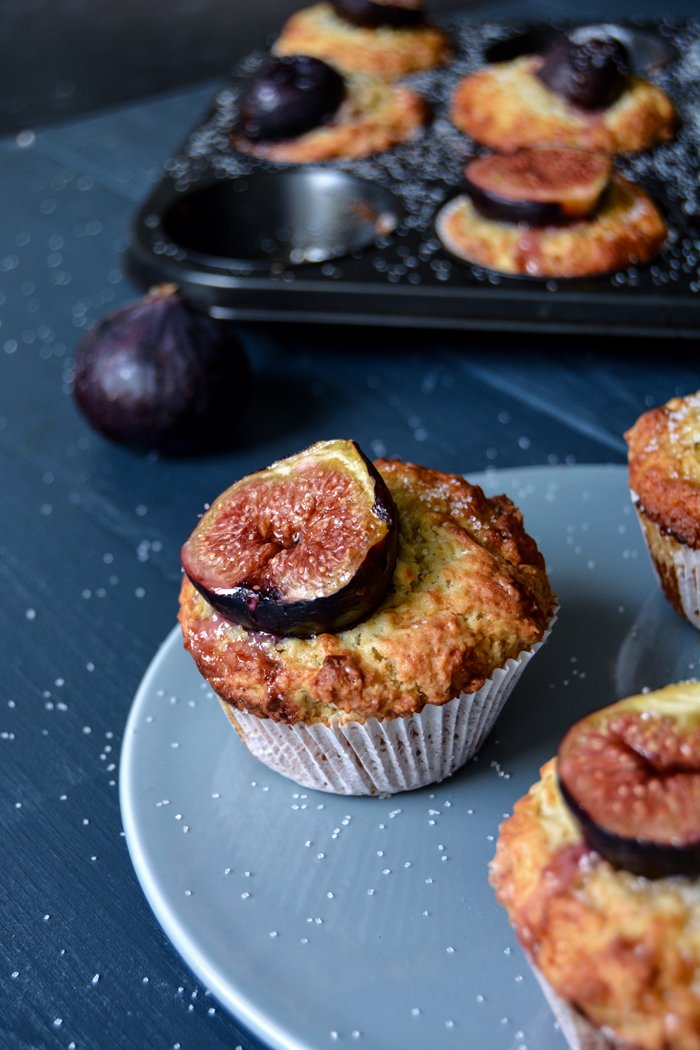
Fig, Ricotta and Olive Oil Muffins

I've been dreaming of these muffins since I went to Malta almost 2 months ago. The idea of figs, soft, ripe and sweet as honey, crowning the top of a pale muffin got stuck in my head. Still in the Mediterranean, I must have bugged almost every farmer on the island (just a slight exaggeration) to find the fruits for my creation, but nature had other plans. It simply wasn't their season yet, I was too early. Luckily we're off to our island next week for a few days, so we can catch up on them and pick them straight from the trees.
At least this was my plan until the beautiful blog Design*Sponge asked me for a recipe for their In The Kitchen With series. While I was still chatting with lovely Kristina to get an idea of what they'd like me to come up with, I had a vision - a luscious baguette sandwich inspired by a picnic in the south of France. I could see whipped chèvre, dark grapes, bacon, honey, thyme - and figs. So here was the second recipe in urgent need of this fruit. I went on a hunt and finally spotted them at my trusted organic market, fresh from Israel, dark as the night, soft skinned and ripe! I bought a huge bunch, enough to lock myself in the kitchen for a whole day, to cook and bake with my delicious finds.
The sandwich came first and it turned out as messy and luscious as I had imagined, you can find the recipe and interview here. My muffins were my second project, equally satisfying - I had quite a successful day in the kitchen. To use my strawberry muffin recipe, with olive oil and ricotta, was part of the plan. I only added a little more sugar to the dough as the fruits lay on top, in the original recipe I stirred in the berries so they sweeten it with their natural juices. It's still not a very cakey muffin, it's more of a warm breakfast treat, to spread some butter on top and melt into the honey glazed figs. Somehow they almost taste like scones - or rather like a luxurious version of it.

Fig, Ricotta and Olive Oil Muffins
Makes 12 muffins
plain flour 320g / 2 1/2 cups
granulated sugar 130g / 2/3 cups
baking powder 3 leveled teaspoons
baking soda 1/2 teaspoon
salt 1/4 teaspoon
organic eggs 2
ricotta 250g / 9 ounces
olive oil 100ml / 1/3 cup and 2 tablespoons
freshly squeezed orange juice 30ml / 2 tablespoons
ripe figs (soft skinned), rinsed (not peeled) and cut in half, 6
liquid honey 3 tablespoons, for the topping
Set your oven to 190°C / 375°F (fan-assisted oven) and put paper baking cups into the 12 molds of the muffin tray.
In a large bowl, combine the flour, sugar, baking powder, baking soda and salt. In a second bowl, mix the eggs, ricotta, olive oil and orange juice until light and fluffy and pour into the bowl with the dry mixture. Stir with a wooden spoon until you have a lumpy dough (with a bit of flour left here and there). Keep in mind, the more you mix it the more it will lose its light texture.
Fill the muffin tray with the dough and push the figs lightly into the batter (I prefer them cut side up). Drizzle a little honey (about 1/4 teaspoon) over each fruit and bake for about 18 minutes or until golden. Sprinkle the muffins with a little more sugar or honey (optionally) and let them cool on a wire rack for a few minutes before you take them out of the tray. Serve warm with butter.

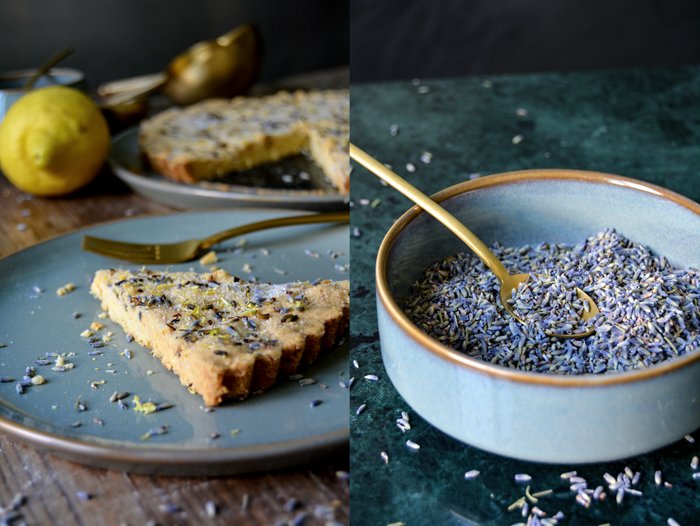
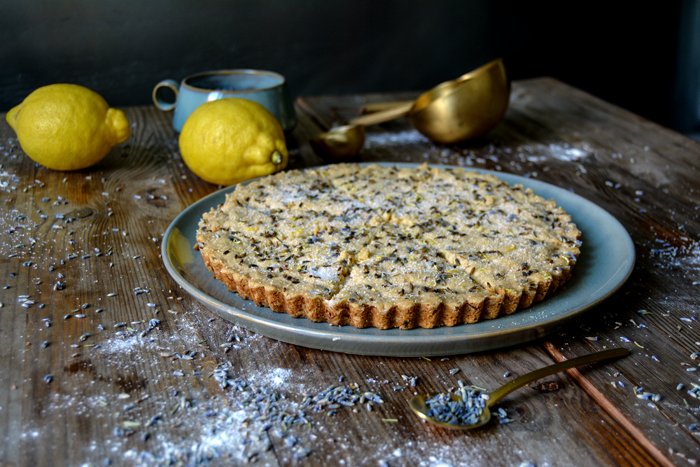
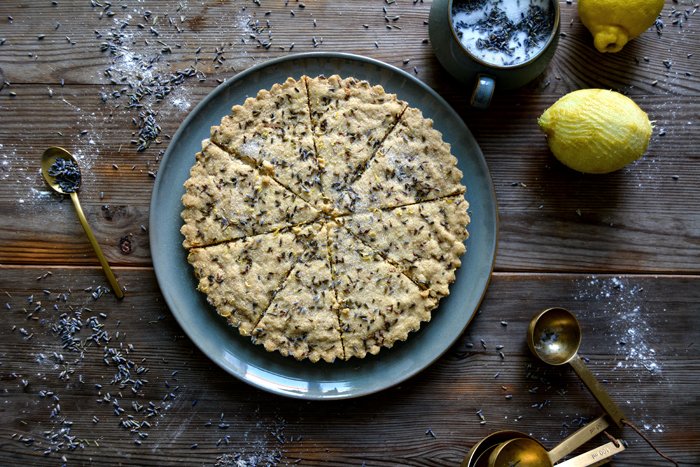
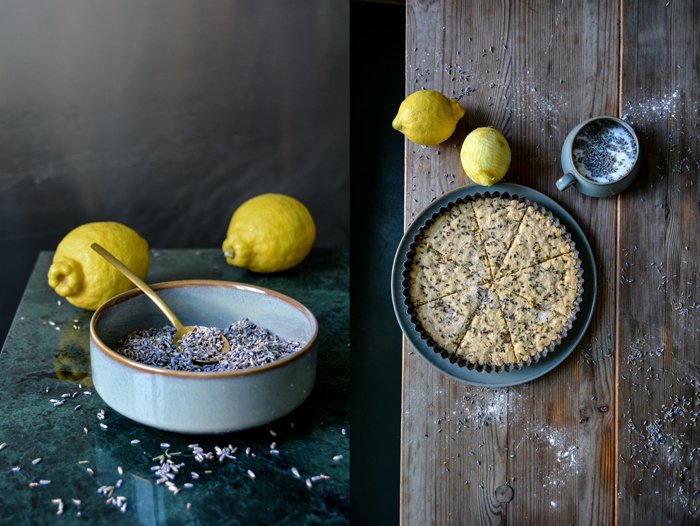
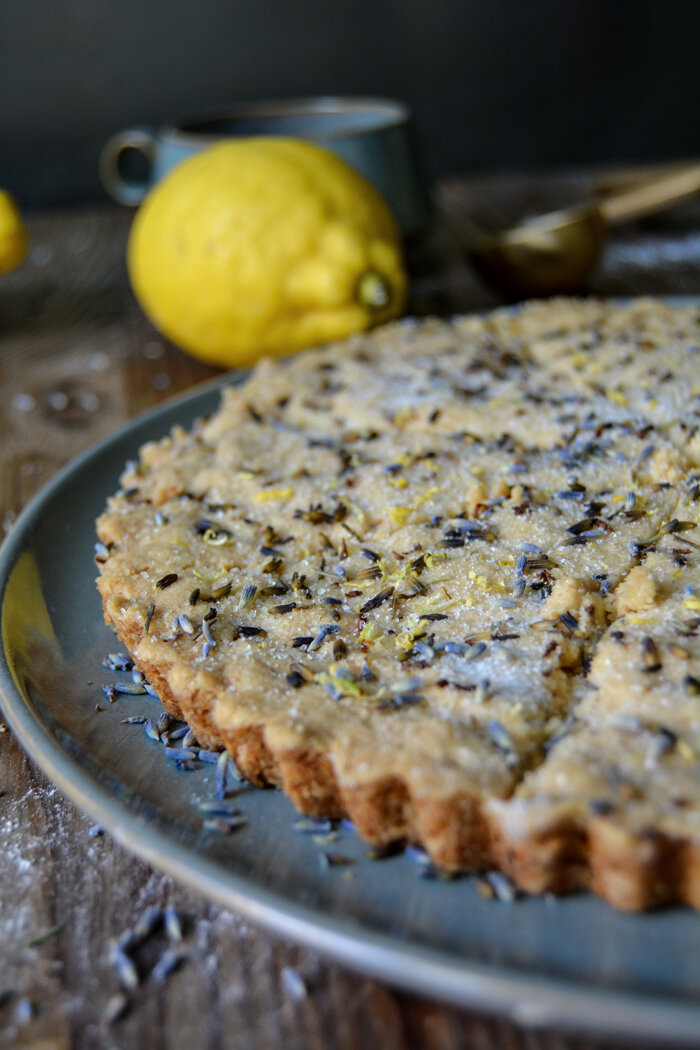
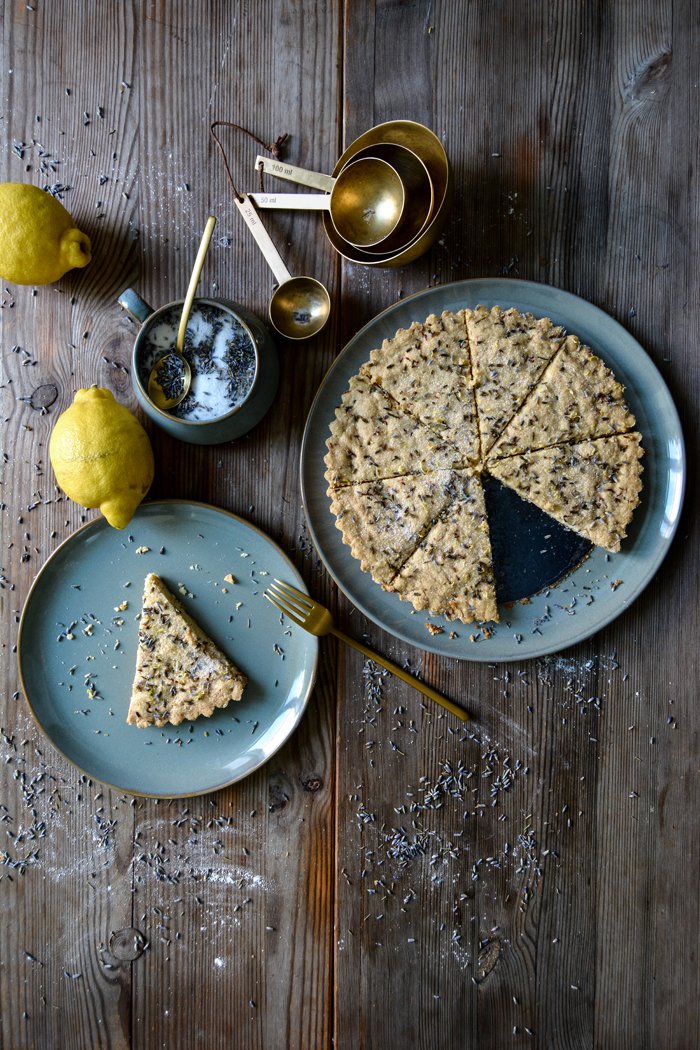
Lavender Lemon Shortbread
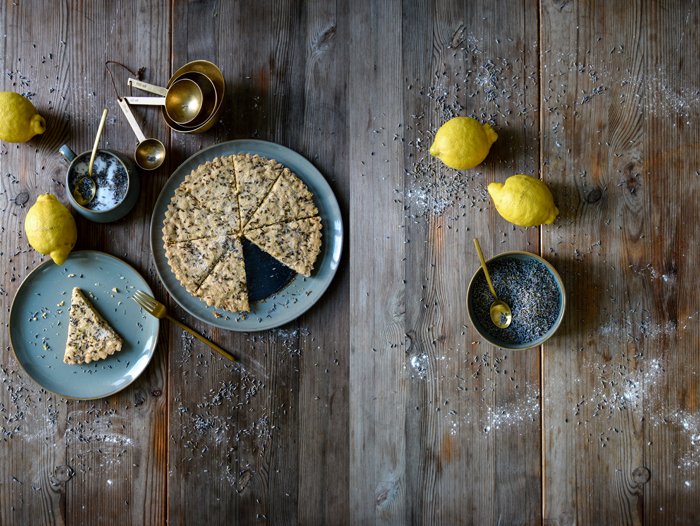
If I had to choose my favourite late summer shortbread for tea time in August I'd have to say it would be lavender lemon. My choice is deeply inspired by the fragrant fields of the Provence covered in mesmerizing purple flowers and the ripe yellow lemons in my Maltese mother's garden. Lavender and citrus fruit both grow lusciously under the Mediterranean's scorching sun, they soak it up and develop aromas of intense depth. I can't think of a more vibrant combination - Malta and the South of France combined in a Scottish treat.
Recently I read about petticoat tails, shortbread in the shape of a large circle cut into segments, the edge decorated in waves by pinching it with fingers or a knife. The name refers to the petticoats popular in the 16th century, the cut of the fabric used to make the skirts had the same shape as the shortbread. I also found out that the pinched edges symbolize the sun. Considering that today's recipe is my late summer variation on this Scottish classic, I decided to go for this shape. I only got a bit worried about the neatly shaped edge, I've never done this before nor seen anyone doing it, so I cheated a little. I used my little French tart pan and ended up with rather small, round rays.
The past few days have been quite excessive on the culinary side. Although we had just waved goodbye to each other when we left Malta, my Maltese sister Emma is here in Berlin to visit us for a few days, a great chance to use her as a guinea pig for some of my cookbooks recipes (she approved!) - and to have an excuse to bake and eat more cake than we should. It's time to celebrate our reunion after all. Our sweet treats of shortbread for tea and peach cake for dinner ended in a proper cake feast as we visited Laura from Tausensuend at Berlin's Bite Club. Salted Caramel Ricotta, spicy chili chocolate and the most amazing sticky sourdough cinnamon snails - life is good when you forget about restrictions!
Lavender Lemon Shortbread
Mind that you prepare the lavender sugar a few days (or even weeks) in advance, you use 10 parts sugar and 1 part organic lavender flowers (L. augustifolia, Hidcote).
Makes a 23cm / 9" shortbread
plain flour 260g / 2 cups
lavender sugar, sieved (leave about 1/4-1/2 teaspoon flowers in the sugar), 80g / 3oz, plus more to sprinkle
zest of 1 large lemon (about 3-4 teaspoons)
a pinch of salt
butter (cold) 160g / 5 1/2oz
Set the oven to 170°C / 340°F (fan-assisted).
In a large bowl, combine the flour, sugar (with a few flowers), zest and salt. Cut the butter with a knife into the flour until there are just little pieces of butter left. Continue with your fingers and rub the butter into the flour until combined. Transfer the crumbly mixture into a 23cm / 9" loose bottom tart pan or directly onto a baking sheet lined with baking paper. Push the dough down evenly into the pan or give it a round shape of the same size and pinch the edge with your thumb. Score the surface with a knife to divide it into 6 segments, cut about half way though the dough. Sprinkle with a little lavender sugar but no flowers, they would burn in the oven. Bake for about 45 minutes or until golden. Take the shortbread out of the oven, sprinkle with lavender flowers (and fresh lemon zest if you like) and let it cool for about 15 minutes before you take it out of the pan.


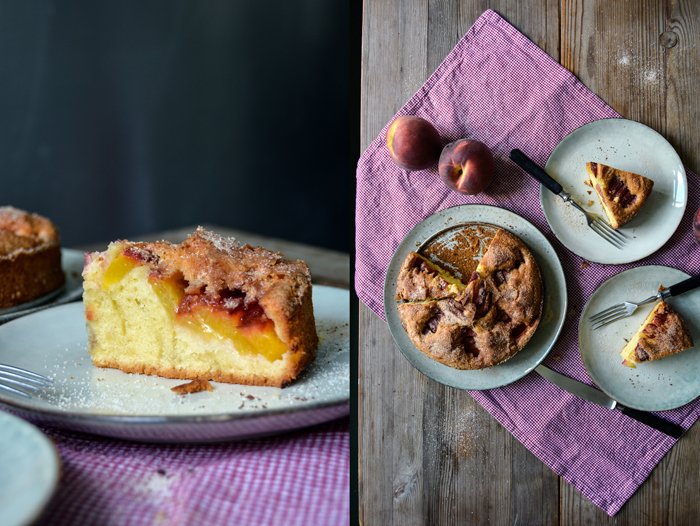
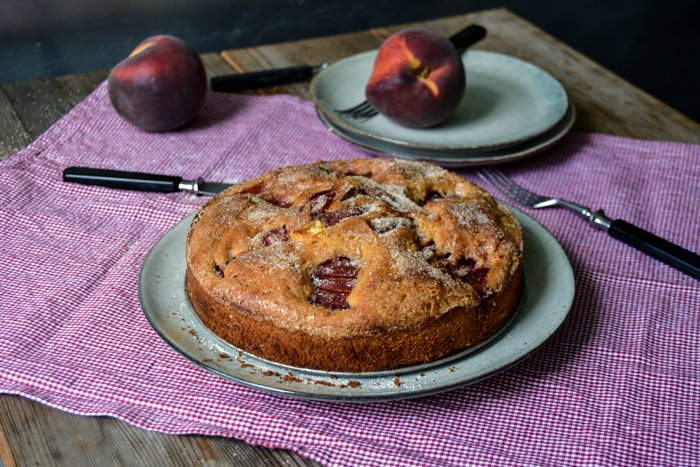
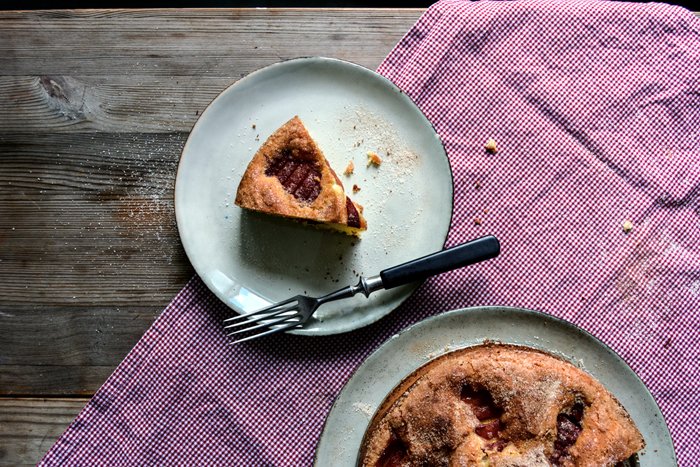
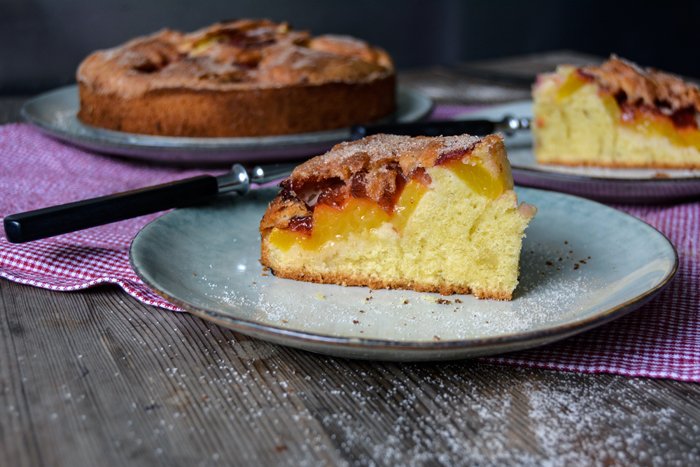
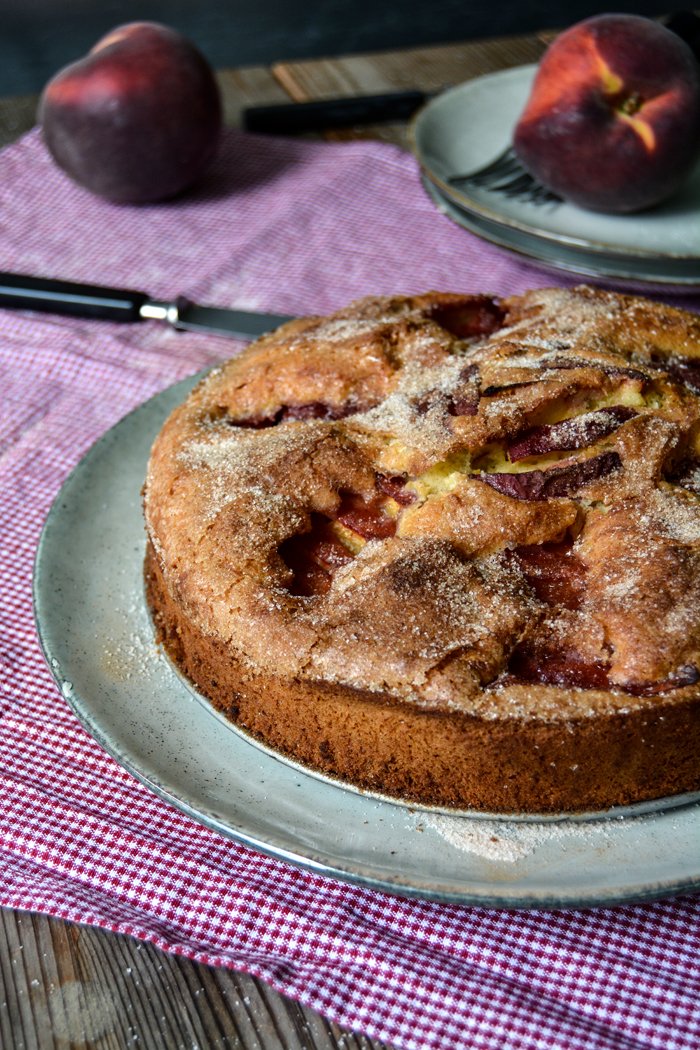
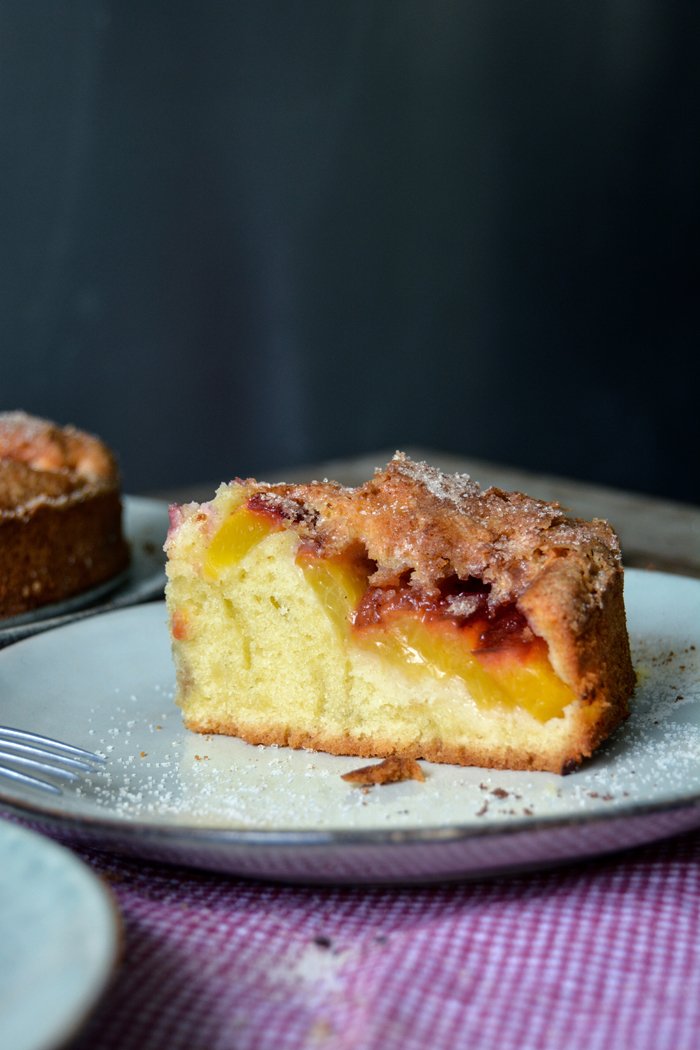
Cinnamon Peach Breakfast Cake with a Crunchy Sugar Crust
We left the island heat to be welcomed by tropical temperatures in the city. After four amazing weeks in Malta we're back in Berlin, and apart from the fact that there isn't the sea in sight, it doesn't actually feel so different. It's hot here, so much so that I decided to take it easy this weekend and leave my work aside and stay in my kitchen most of the time. My culinary life in the Mediterranean focused on seafood and countless wonderful nights in restaurants with friends and family, so now that I'm back, I feel like experimenting again. On the first night I felt too tired to lift a finger or a knife, but the next day I made my beloved fennel orange salad (just without the octopus) and a beetroot carpaccio that was so good that I definitely have to share it with you soon. Yesterday, I revisited my olive oil ice cream with sea salt, I had almost forgotten about it but thanks to Gillie from Yahoo Food, I remembered my luscious frozen treat. She asked me to join their Ice Cream Week on their Instagram next week which I really look forward to. I'm sure it will be full of great inspiration to help cooling off in the next few days!
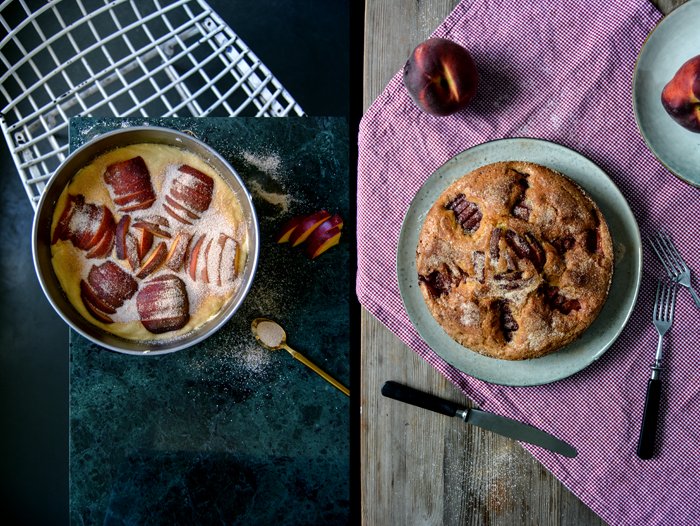
It's been over a year since I turned a generous splash of olive oil into ice cream and I wanted to make sure that the recipe is still as good as I remembered it. There's no doubt about why I was so ecstatic about it, it tasted amazing and felt like velvet. After the cooling sweet a cake was next on my list, a simple breakfast cake with lots of juicy peaches and a crunchy cinnamon sugar crust. The fruits sunk deep into the spongy dough and spread their juices with the first bite. But the sweet crusty topping was the secret star, I sprinkled the cake so generously with cinnamony sugar before I put it in the oven that I was a little worried if I went overboard. But it was so, so good, so I felt no regrets!
This cake is a variation of my Apple Breakfast Cake.

Cinnamon Peach Cake with Sugar Crust
For a 20cm / 8″ loose bottom springform pan you need
granulated sugar 100g / 3 1/2 ounces plus 2 tablespoons for the topping
ground cinnamon 1/2 teaspoon, for the topping
plain flour 130g / 4 1/2 ounces
cornstarch 30g / 1 ounce
baking powder 1 heaping teaspoon
a pinch of salt
butter (at room temperature) 160g / 5 1/2 ounces plus a little butter for the springform pan
organic eggs 3
large peaches, quartered, pitted and sliced, 2
Set the oven to 180°C / 355°F (fan-assisted oven) and butter the springform pan.
Combine 2 tablespoons of sugar and the cinnamon for the topping in a small bowl and set aside.
Combine the flour, cornstarch, baking powder and salt. In a large bowl, beat the butter and sugar until fluffy. Add the eggs, one at a time and continue mixing for a few minutes until the mixture is thick and creamy. Mix in the dry mixture until well combined. Fill the dough into the buttered form and arrange the sliced quarters of the peaches in circles on top. Sprinkle generously with the cinnamon sugar and bake for 40-45 minutes or until golden on top. Check with a skewer, it should come out clean. Let the cake cool for a few minutes before you take it out of the springform pan.


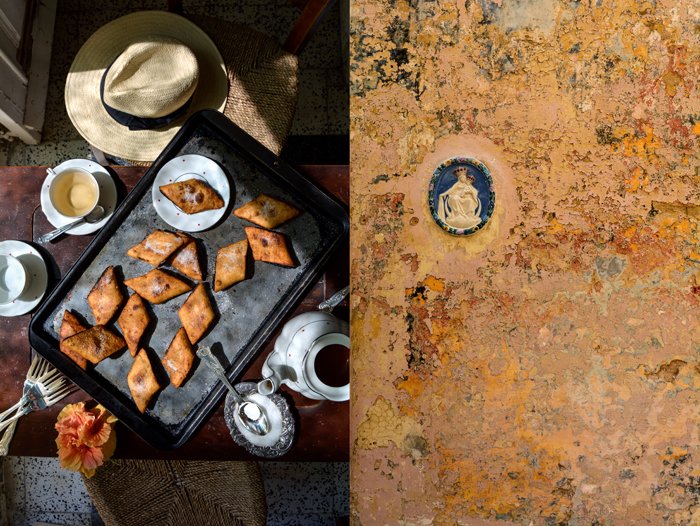
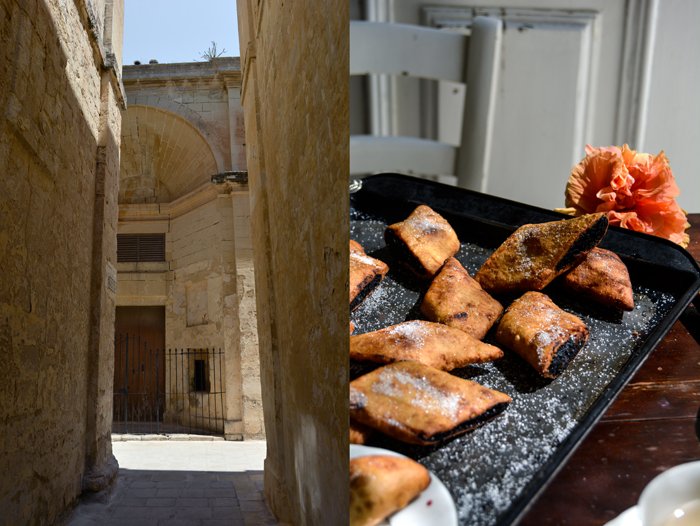
Mqaret - Traditional Maltese Date Pastries
Traditional sweet treats and old fashioned baking crafts give a great insight into an unknown culture. You just have to visit a bakery or confectionery when you get to a new country and you'll immediately have an idea of its mentality. The presentation, the ingredients used by the chef patisseur, the way it's decorated, all these details reveal a lot about a place and its people.
Malta has plenty of culinary culture and so many sweet secrets that I'm still learning about new delicacies every time I visit the islands. It's close to Italy, so you'll find Mediterranean classics like cannoli (Kannoli in Maltese), the frilly cassata siciliana and syrupy ricotta pies. Various rulers of the small archipelago left their traces in the kitchen, the British brought fruit pies and trifles and the Arabic influence is shown in the generous use of citrus fruits and the import of sticky sweet nougat, Qubbajt in Maltese. One of my personal favourites are the wonderfully simple Ottijiet, crunchy eight-shaped sesame cookies made with cloves, vanilla and aniseed. They are perfect for tea time, just as much as Edith's Essijiet with Vermouth. You can easily guess their shape from the name. Another highlight is Malta's aromatic bread pudding that Joanna Bonnici made for me when we met for our meet in your kitchen feature.
The list of these beautifully honest sweets is endless, it's my kind of baking, with lots of spices and citrus, the recipes are not too complicated and quite easy to prepare. Every time I exchange my Berlin kitchen for my Maltese mother Jenny's culinary space, I try to include at least one sweet Maltese dish in my baking activities that leads me to new grounds. Mqaret have been on my mind for quite a while. The little pastries look a bit like giant ravioli, they are diamond shaped, translated to maqrut (singular form) in Maltese. The sweets are generously filled with dates and infused with aniseed, they are a scrumptious remnant of the Arabic takeover starting in 870 AD. They taste so good that they stayed on the island even after the invaders had left. Today, you find them in every village sold at street markets, but unfortunately, often of rather weak quality. My favourite places to enjoy them are Scoglitti and Nenu's bakery in Valletta, or you bake your own at home.
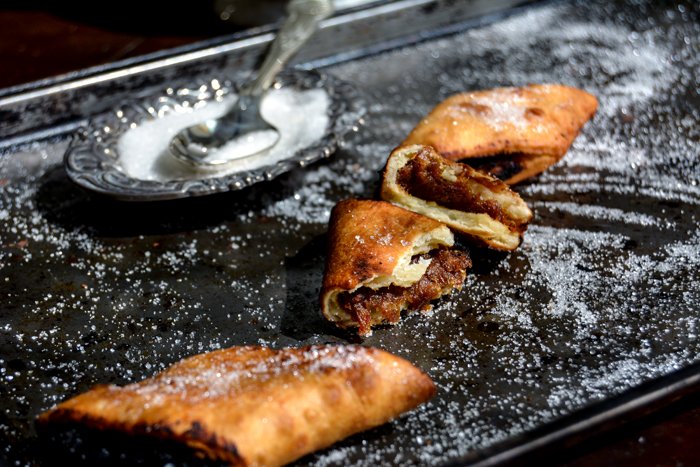
Mqaret are either deep-fried (which I prefer) or baked in the oven, and although I'm not a big fan of cooking in hot oil, in this case, it creates a flakier texture. The traditional recipe uses a short crust pastry made with a little more water than I would normally use, if it's too crumbly you won't be able to fold the dough over the fruit filling. Mqaret are best when they are hot and generously filled, this is at least my humble opinion and it caused long discussions in the family. I used lemon zest but originally it's made with orange and tangerine instead, as the fruits are not in season at the moment I went for their yellow relative which added a flowery fruitiness to the dates. I must admit that I was a bit scared of this project but in the end it turned out to be much easier than expected!

Mqaret - Traditional Maltese Date Pastries
Deep frying in hot oil should never be attempted with children close by, be very careful while cooking the pastries in the oil!
Makes about 14 Mqaret
vegetable oil, for frying, about 1l / 4 1/4 cups
granulated sugar, to sprinkle the cooked mqaret
For the pastry
plain flour 230g / 8oz / 1 3/4 cups
a pinch of salt
butter cold 60g / 2oz
water cold 3-5 tablespoons
freshly squeezed lemon juice 1 tablespoon
anisette spirit 1 tablespoon
Combine the flour and salt. Cut the butter with a knife into the flour until there are just little pieces of butter left. Continue with your fingers and rub the butter into the flour until combined. Add 3 tablespoons of water, the juice and spirit and continue mixing with your hands until you have a crumbly mixture, you should be able to form a ball. If it's too dry, mix in 1-2 tablespoons of a water. Form a ball, wrap in cling film and put in the fridge for about 15 minutes.
For the filling
dried dates, pitted and finely chopped, 250g / 9oz
water, about 4 tablespoons
lemon zest 1 teaspoon (organic fruit) (or 1/2 teaspoon of orange zest and 1 teaspoon of tangerine zest)
a pinch of ground cloves
a pinch of cinnamon
granulated sugar 1 tablespoon
anisette spirit 1 1/2 tablespoons
In a saucepan, bring the dates and water to the boil. Mash the dates with a spoon and leave on low heat for 1 minute. The mixture will be thick and sticky. Take off the heat, add the remaining ingredients and mix well with a spoon, set aside.
For the mqaret
In a large pot, heat the oil.
Divide the dough in 2 parts and roll out each of them between cling film into a 40 x 10cm (16 x 4") rectangle. Spread half the date filling on one half of 1 rectangle (along the longer side) and brush the rim (the long side) with water. Fold the dough over the filling (along the long side) and close the rim well, push it together with your fingers. The short ends stay open. Repeat with the second pastry rectangle, you should end up with 2 long pastry sandwiches filled with dates. Cut each of them with a sharp knife into 6-7 diamond shaped pastries, the cut sides stay open, leaving the date filling exposed.
Use the handle of a wooden spoon to check if the oil is hot enough, bubbles will rise when the temperature is right. Fry the mqaret in the hot oil until golden brown, mind that they don't get too dark. Take them out with a slotted ladle and transfer to kitchen paper to remove excess oil. Sprinkle with sugar and serve immediately. They go very well with vanilla ice cream!


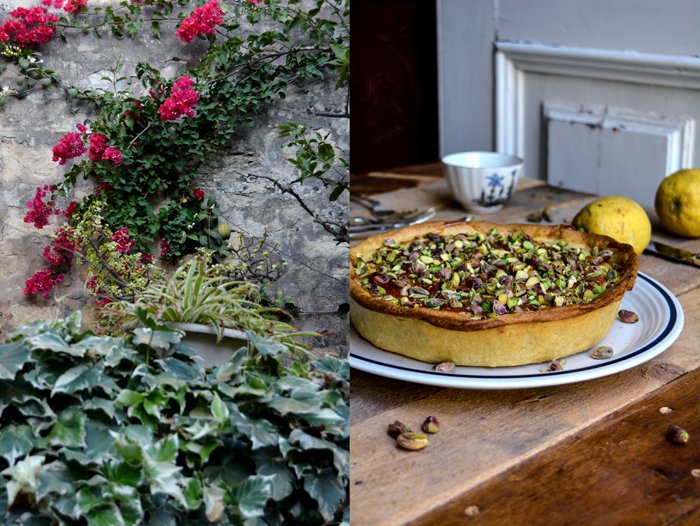
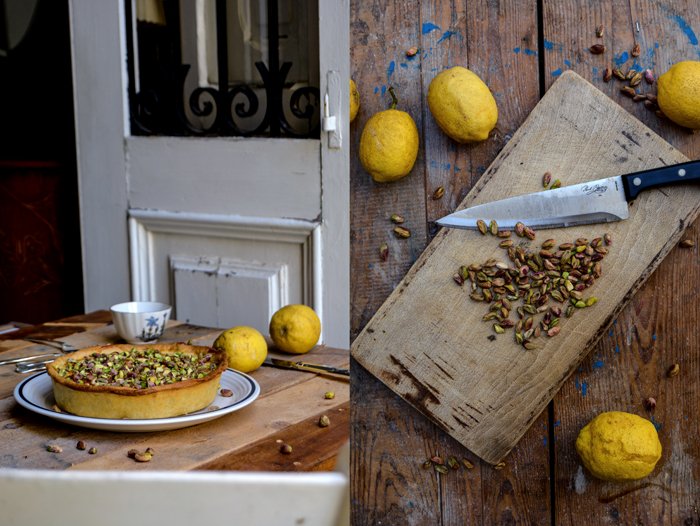
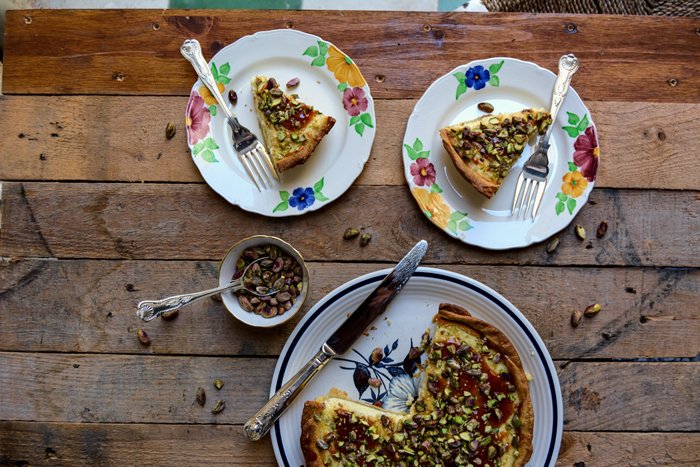
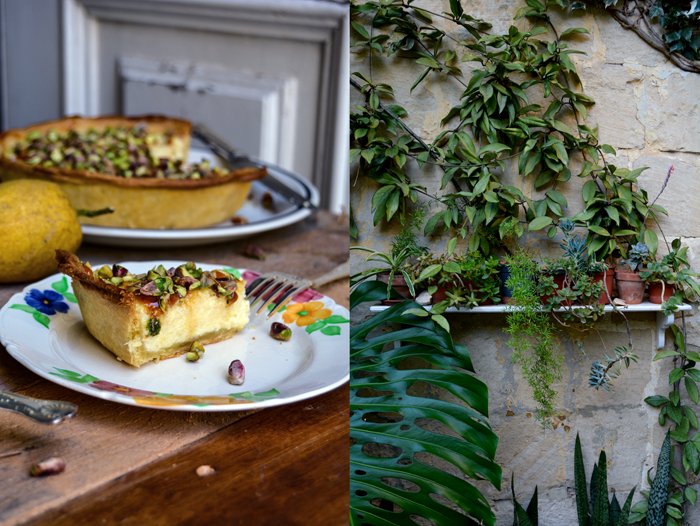
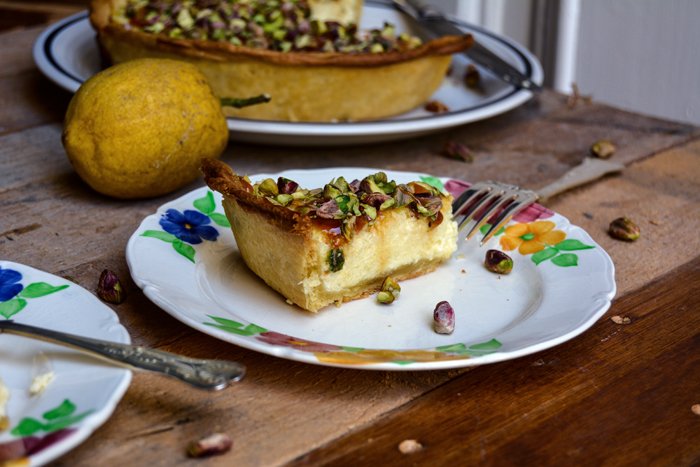
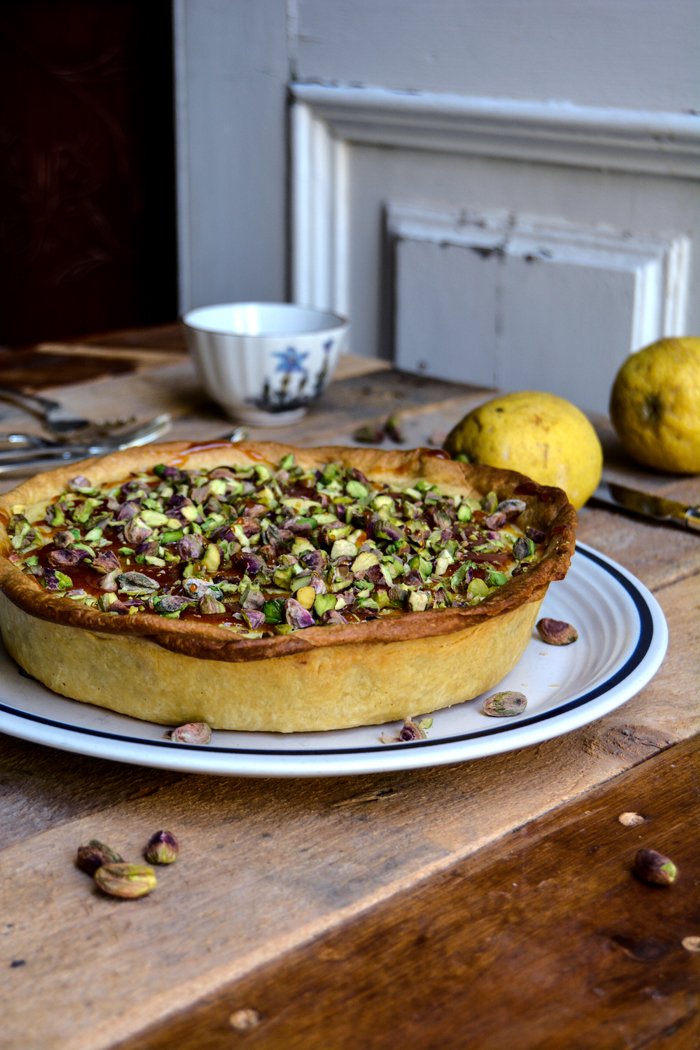
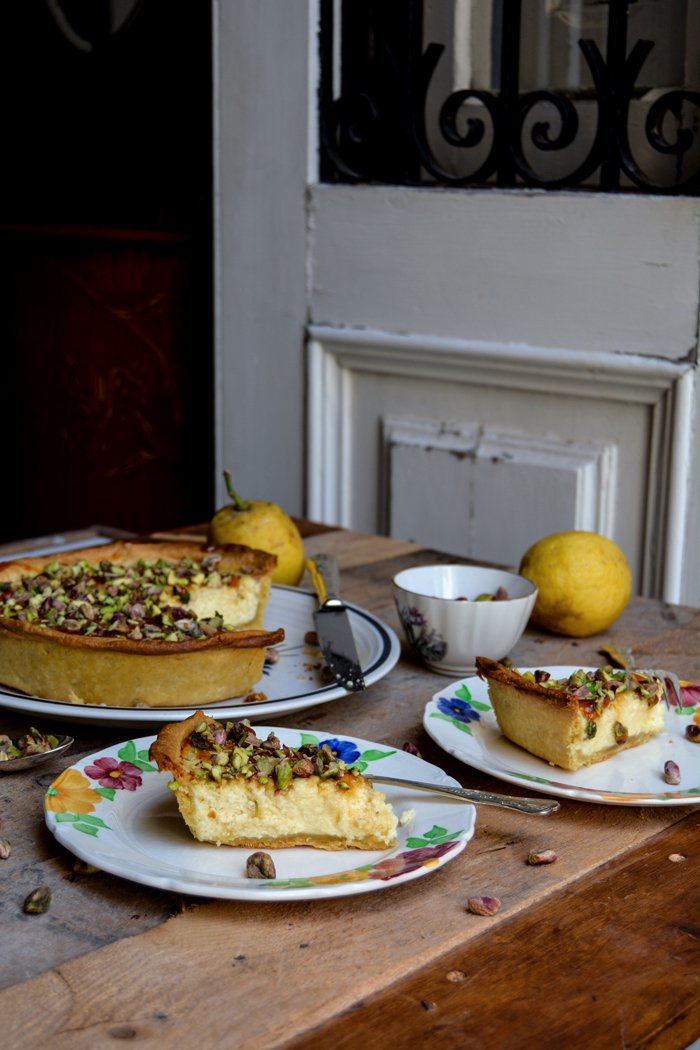
Maltese Ricotta Pie with Lemon Syrup and Pistachios
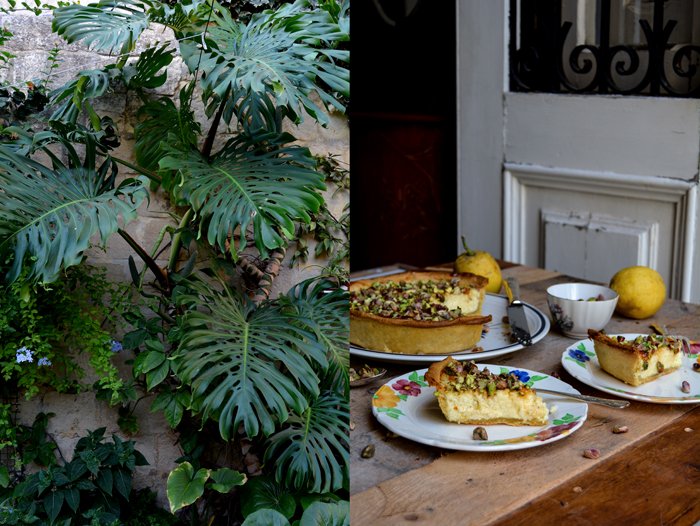
My friend Essa baked a wonderful cake a few years ago that I never managed to get out of my head. It was a Maltese cheesecake made with ricotta and eggs on top of a thin short crust base topped with sticky lemon syrup and chopped pistachios. It was so good, I dreamt of it! We enjoyed it in her Mediterranean garden, the rustic limestone walls covered in fragrant blue plumbago and white stephanotis flowers - the tantalizing smell of the south and a sweet pie on my plate.
Years have past, Essa forgot about the recipe and I, sadly, couldn't find the copy that I had made - until a few days ago. I gave it a go in my Maltese mother's house, in Jenny's kitchen, the same day I made the happy discovery and it came out as amazing as I remembered it. The filling refined with lemon zest is creamy but fluffy, not as dense as a New York cheesecake. The sticky and sour syrup on top and the generous amount of crunchy nuts turn this cake into something so delicious that I soon regretted the size of the pie tin I chose. We ate it all within less than an hour!
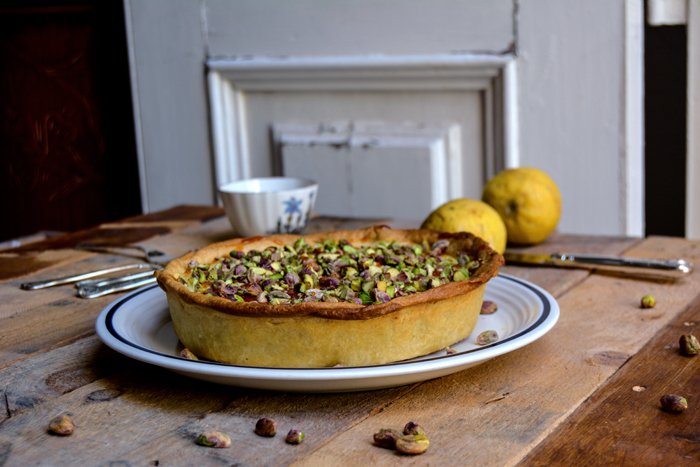
Maltese Ricotta Cake with sticky Lemon Syrup and Pistachios
For a 20cm / 8" pie form you need
short crust dough 250g / 9 ounces (you can use 1/3 of the pastry from my fruit tart recipe, click here)
ricotta 380g / 13 1/2 ounces
lemon zest 1 heaping teaspoon
organic eggs 3
granulated sugar 100g / 1/2 cup
butter, melted, 40g / 2 heaping tablespoons
semolina (fine) 1 heaping tablespoon
pistachios (unsalted), chopped, 40g / 1 1/2 ounces, for the topping
For the lemon syrup
freshly squeezed lemon juice 75ml / 1/3 cup
granulated sugar 50g / 1/4 cup
honey 1 heaping tablespoon
Prepare the dough, form a thick disc, wrap in cling film and put in the freezer for 20 minutes.
Set the oven to 200°C / 390°F (top/ bottom heat).
Roll out the dough between cling film and line your pie form with the flat pastry. Prick with a fork and bake it in the hot oven for 12 minutes. Take it out when it's golden and set aside. Turn the oven down to 190°C / 375°F.
In a large bowl, whisk the ricotta, zest, eggs and sugar. Add the melted butter and semolina and whisk until well combined. Pour the cheese filling on top of the pre-baked pastry and bake for about 30-40 minutes or until just set (I use a gas oven in Malta so the baking time can be different in an electric oven).
For the syrup, bring the lemon juice, sugar and honey in a sauce pan to the boil and cook for about 4-5 minutes on high heat until thick and golden. Whisk once in a while and mind that it bubbles up while cooking, it shouldn't burn!
Drizzle the syrup over the ricotta cake and sprinkle generously with pistachios.


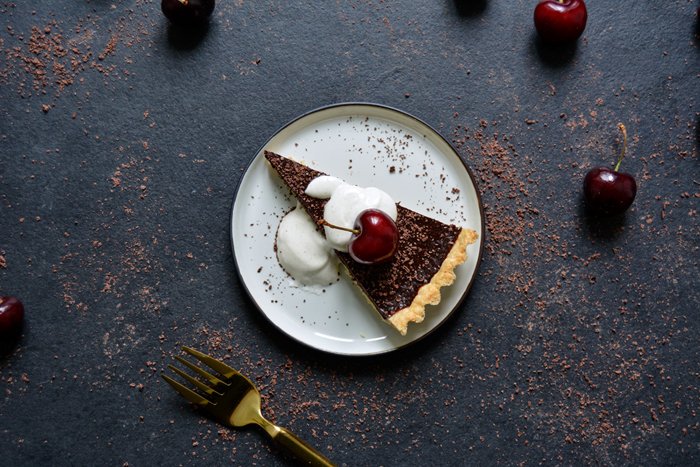
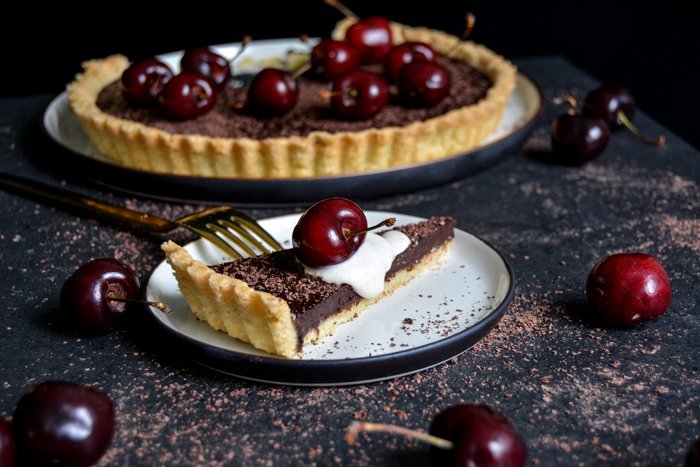
Cherry Chocolate Tart with whipped Cardamom Cream

There are a few combinations in the world of summer foods that are so perfect that I can only sit back and smile. Strawberries with Champagne is one of them or Mozzarella di Bufala with fruity tomatoes. Cherries with bittersweet chocolate is another one of my favourites, it's a heavenly pleasure to taste the sweet juices of this firm fruit merged with the dark depth of cocoa. Cherries are at the peak of their season at the moment and a sumptuous tarte au chocolate has been on the top of my baking list for months, so why not combine the two!
The different flavours and textures in a sweet composition have to be as well balanced as in a savoury dish. In the case of my tart, I wanted the crumbly pastry to stand up strong next to the chocolate which can easily be too overpowering. So I went for a thin layer of the dark filling, roughly the same height as the short crust base. This ratio allows both of them to show off their qualities - buttery crunchy and velvety smooth. Although I'm not a big fan of creamy additions to cakes - be it whipped or ice cream - here, I chose to top the tart which a voluptuous dollop of sweet sour cream mixed with cardamom. The light sourness added a fresh contrast to the heavy darkness and made the rich composition complete. We ended up with the prettiest and most satisfying treat on our coffee table - I couldn't have asked for more.
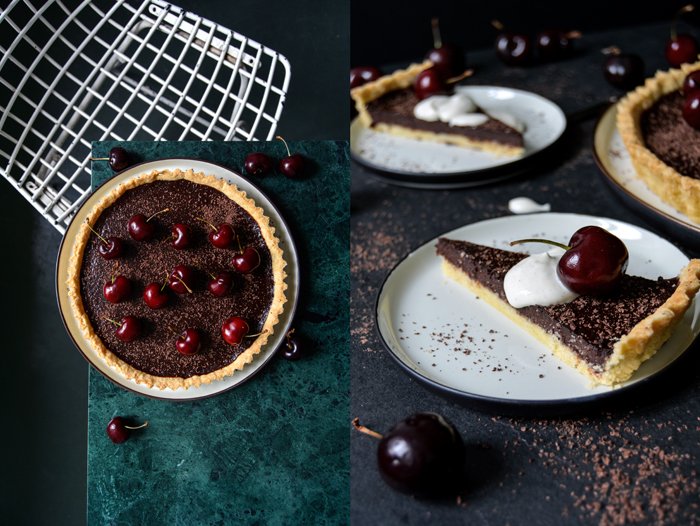
Cherry Chocolate Tart with whipped Cardamom Cream
It's easiest to bake the tart in a loose-bottom tart pan.
For a 23cm / 9″ tart pan you need
sweet cherries 12, for the topping
For the short crust base
plain flour 170g / 6oz / 1 1/3 cups
granulated sugar 50g / 1 3/4oz / 1/4 cup
a pinch of salt
butter, cold, 90g / 3 1/4oz
organic egg yolk 1
water, cold, 1 tablespoon
Combine the flour with the sugar and salt. Cut the butter with a knife into the flour until there are just little pieces of butter left. Continue with your fingers and rub the butter into the flour until combined. Add the egg yolk and water and continue mixing with the hooks of your mixer until you have a crumbly mixture. Form a thick disc, wrap in cling film and put in the freezer for 20 minutes.
Set the oven to 180°C / 355°F (top/ bottom heat).
Roll out the dough between cling film and line your tart pan with the flat pastry. Prick with a fork and bake in the oven for 11 minutes or until golden and crisp. Prepare the chocolate filling while the pastry is in the oven.
For the chocolate filling
heavy cream 80ml / 1/3 cup
milk 40ml / 3 tablespoons
best quality bittersweet chocolate, broken into chunks, 150g / 5oz, plus 1 tablespoon (grated) for the topping
butter 15g / 1 tablespoon
a pinch of salt
granulated sugar 1 tablespoon
organic egg, beaten, 1
Set the oven to 170°C / 340°F (top/ bottom heat) once the short crust base is baked.
In a sauce pan, bring the cream and milk to the boil. Take the pan off the heat and stir in the chocolate, butter, salt and sugar (leave the pan off the heat). Once it's melted, pour into a bowl and whisk in the egg, the mixture should be well combined. Pour the chocolate filling on top of the pre-baked pastry and bake in the oven for about 15 minutes or until set. Take the tart pan out of the oven and let it cool for about 10 minutes before you sprinkle it with the grated chocolate. Decorate with the cherries and prepare the whipped sour cream.
For the whipped cardamom sour cream
sour cream (or crème fraîche) 150g / 5oz
granulated sugar 1 teaspoon
ground cardamom 1/2 teaspoon, to taste
Whisk the sour cream, sugar and cardamom and adjust to taste.


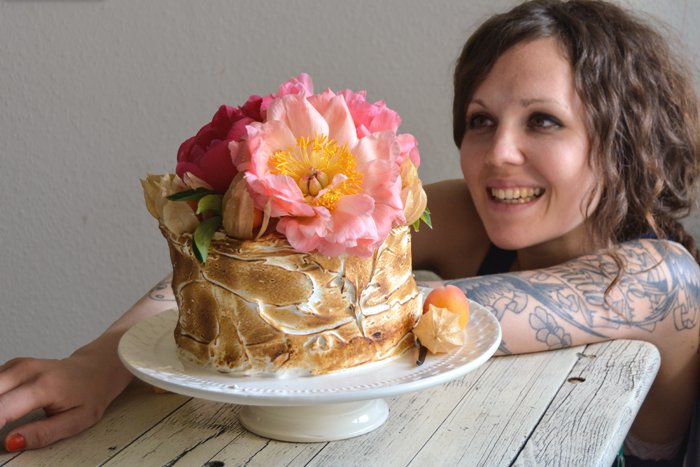
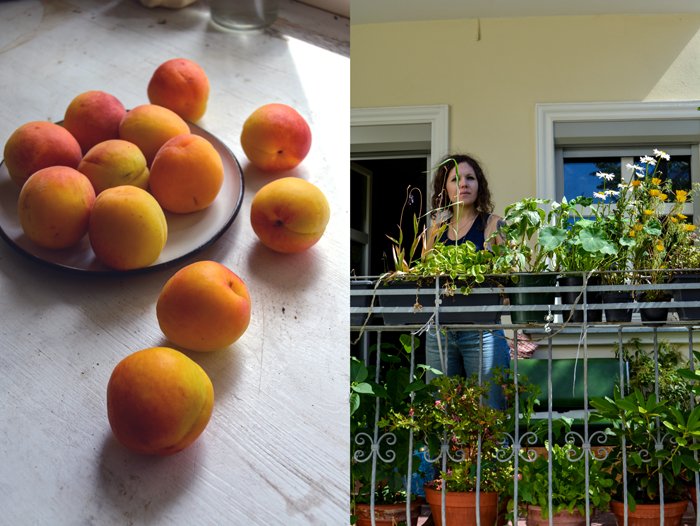
meet in your kitchen | Laura's Apricot, Caramel & Buffalo Ricotta Cake

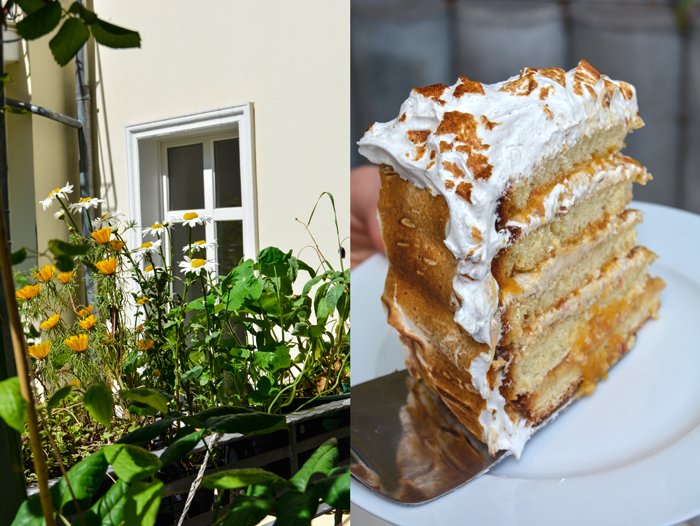
Laura is a modern city hippie, with a big heart for people and sweets. The mother of four lives in the centre of Berlin with her family and created a peaceful oasis in this vibrant city. Her kitchen faces a little veranda and if you walk down a few steps you're right in her fruitful garden. Pots are lined up densely, filled with the most beautiful flowers and vegetables, rucola, peas, herbs and potatoes - it's a green paradise, as calming and gorgeous as the lady of the house.
When I visited Laura's kitchen to chat and bake together, it felt like a Bohemian farm house scene set in summery Provence. The light that falls through the small window in the thick wall is a bit dimmed and adds a Mediterranean flair to the family's home-made kitchen. It's a very personal room and you can feel that this is the creative space of a woman who completely falls for her passion to bake. Her oven and fridge impressed me with their huge dimensions, the walls and shelves are filled with baking tools, pans and ingredients. Laura doesn't need to show off with overly designed furniture, its her personality, her honest kindness and charming smile that makes you want to sit at her kitchen table all day, to watch her work on her amazing cake creations and listen to her family stories.
Growing up in Germany with her parents from Chile and Bolivia this woman is gifted with a rich multicultural background and a great sense for quality. Laura calls her mother and father two hippies, early pioneers of the organic, sustainable and self-sufficient food movement. They introduced her to this now rising trend. Growing your own vegetables in the middle of the city, using old pots, jars and bags to plant the seeds for your own produce became popular all over the world.In Laura's yard, it's a very unspectacular reality, if you want to know what you have on your plates it's best to farm it in your own ground.
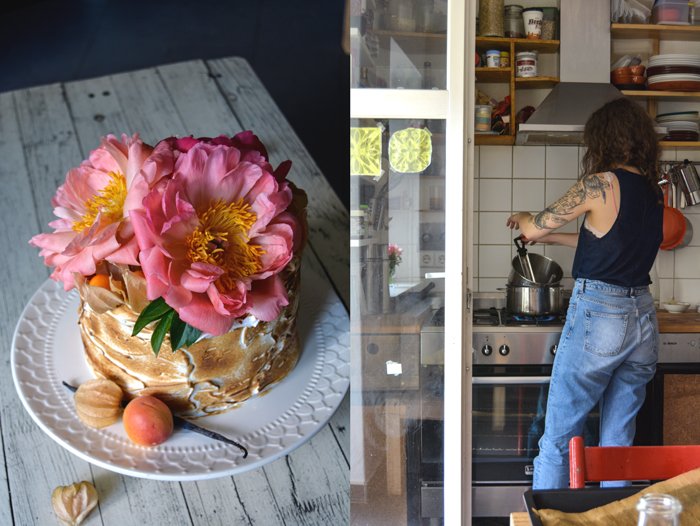
This fascination for food in general, but for baking with the best ingredients in particular, led to a business which is one of Berlin's best kept sweet secrets. Laura started Tausensuend a few years ago to offer her individual and luscious cake creations which are honestly out of this world. She follows her interest in raw vegan cakes (her 'healthy cake line') but she also makes the most decadent layered cakes with creams, meringues, fruits and caramel, spectacularly topped with huge flowers. This is eye candy in its literal sense.

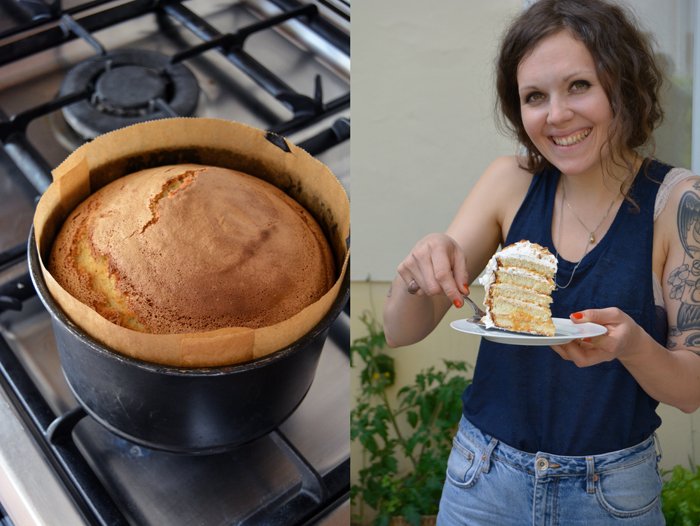
Apricots, Salted Caramel and Buffalo Ricotta Cake with Flambéed Meringue
Set the oven to 190°C / 375°F (top / bottom heat). Grease an 18cm / 7" cake pan (tall) and line it with baking paper. You will need a tall cake ring of the same size to assemble the cake and a candy thermometer and blowtorch for the flambéed meringue frosting.
For the sponge cake
organic eggs, separated, 6
a pinch of salt
superfine sugar 240g / 8 1/2oz
vanilla pods, scraped, 2
plain flour (wheat or white spelt), sieved, 240g / 8 1/2oz
Beat the egg whites with a pinch of salt on high speed for about 5 minutes until very stiff. Add the sugar and continue mixing for 5 minutes until stiff and glossy. Quickly mix in the vanilla. Whisk the egg yolks with a fork and gently fold them into the stiff egg whites. Once it's combined, gently fold in the sieved flour. Scrape the dough into the lined cake pan and bake for 45 minutes. Check after 35 minutes, if the top of the cake turns too dark, cover it with baking paper. When it's done, take the cake out of the pan and let it cool completely.
For the salted caramel
heavy cream 200g / 7oz
superfine sugar 300g / 10 1/2oz
butter (at room temperature), 240g / 8 1/2oz
fine sea salt or rock salt 1 heaping teaspoon
In a sauce pan, warm the cream on low heat (don't bring it to the boil), set the pan aside.
In a large pan, melt the sugar on high heat, watch the pan as the sugar burns quickly. Whisk once in a while and try not to let the sugar forms large lumps. As soon as the colour changes to a light amber, reduce the heat, keep stirring until all the sugar has melted. Add the butter in batches and keep stirring. Carefully pour in the warm cream at the end, mind that it bubbles up and creates steam. Stir in the salt once the caramel is well combined, pour into a jar and set aside.
For the apricot purée
very ripe apricots, pitted, 10-12
a squeeze of lemon juice
lemon zest 1 teaspoon
Purée the fruits, lemon juice and zest in a blender until smooth and set aside.
For the buffalo ricotta cream
fresh buffalo (or sheep) ricotta 250g / 9oz
heavy cream 75ml / 1/3 cup
granulated sugar 75g / 2 1/2oz
vanilla pod, scraped, 1
a pinch of tonka bean (scraped)
Whisk the ingredients until creamy and set aside.
To assemble the cake
Cut the cake into 5 layers and lay 1 slice into the cake ring. Spread thinly with the apricot purée and sprinkle generously with salted caramel. Spread the bottom side of a new cake layer with the ricotta cream and lay on top of the cake in the ring. Continue layering the cake in the same order (cake-apricot-ricotta) until all the layers are used up, finish it off with a cake layer.
Put the assembled cake in the fridge and let it cool for at least 2 hours (overnight would be even better), the cake should soak up all the liquid of the filling.
For the meringue and decoration
For the flambeed meringue
very fresh organic egg whites 6
superfine sugar 300g / 10 1/2oz
a pinch of salt
vanilla pod, scraped, 1
For the decoration
fresh winter or bladder cherries (Physalis) 8
large edible flowers 3
Place a large metal bowl in a large pot with boiling water. Add the egg whites and sugar to the bowl and whisk lightly. Leave the egg whites on the heat until the mixture reaches 60°C / 140°F, check with a candy thermometer. There's no need to whisk while heating the eggs. Take the bowl off the heat once the right temperature is reached, add a generous pinch of salt and beat with an electric mixer until thick and glossy. When it forms stiff peaks, stir in the vanilla.
Carefully take the cake out of the ring and cover it generously with the stiff egg whites. Flambé with a blowtorch until golden and decorate with fresh winter cherries and flowers.
Tausendsuend is one of Berlin's best kept secrets for the most luscious cake creations, when did you start using your fantastic baking skills professionally? What was the impulse that got your business started?
Oh thanks a lot, Meike! Working and playing around and experimenting with food, textures, colours and flavours has always been one of my greatest passions, even when I was a child. But baking, I would say, is my greatest love, and also the thing I always had the strongest connection to, due to the baking skills of my fantastic grandmother. It’s probably the mix of the smelling and tasting of the fresh ingredients and this sculptural way of putting a cake together, making the colours match, arranging the flowers, all the decorating, that interests me. A friend of mine, an artist from Los Angeles, once said, she has a strong feeling that we have the same approach to our work, and that is probably true! I worked as a cook for a couple of years, and then got asked if I wanted to take care of the sweets department in that place because I was somehow famous for my cheesecakes at that time. So I did that and it was a crazy success! Really cool! That was the point, when I started to focus on baking. I started Tausendsuend when I moved to Berlin in 2008, but it was really a long process of defining my own style and making the right connections. Also, I gave birth to 2 children within that time I must admit.
You pay a lot of attention to the quality and origin of each ingredient you use, for your healthy raw cakes as much as for your more traditional layered cream and meringue cakes. Is there a different approach in the creative process for these two kinds of cakes, how do you develop the recipes – healthy and conventional?
I personally love the raw cakes. It’s just great to develop something that satisfies this craving for sweetness and is so good and healthy and nourishing for your body and soul at the same time. I have 4 children and it is the greatest bliss to feed them a raw avocado and lime cake in the morning and make them really happy with it! This is also something that I suggest to parents of children who don’t eat any fruits or vegetables. I’m really lucky not to be one of them, I’m blessed with children who eat almost everything, from seaweed to artichokes to raw avocado lime cake.The 'traditional' cakes are in fact more of a piece of art to me. Of course, I have the same high standards in everything I create, I want all my ingredients to be top quality and I’m pretty sure that these high standards are crucial to the final product. I want my cakes not only to look perfect, but most importantly to taste perfect. And of course, my children get their 5 layered, buttercream covered birthday cakes thickly coated in tons of sprinkles as well. I really don’t think there is something particularly bad about eating sugar, how could I … (laughing)
You were born in Hamburg and grew up in Germany but your father is originally from Chile and your mother from Bolivia. How do your South American and German roots influence your cooking and baking? What did you learn from these different cultures?
My grandmother, originally from Hamburg, lived in Bolivia for over 30 years. I loved her stories about shopping at the farmers markets in La Paz, the enthusiasm you could hear in the way she described the Indian women in their traditional garb. She told me a lot about the Bolivian habits, how the Indians made the Chicha, a traditional schnaps (spirit) that is made by chewing white sweetcorn and spitting it into a bucket to let it ferment. Or the kilo bags of dried Bolivian chili peppers of which she used to make the extremely spicy traditional Aji Sauce. And the Yerbamate of course, a herbal tea that you drink out of hollowed dried pumpkins with a pewter straw. This you do in Chile as well.My father has always been the one who cooked most of the time for us as a family. He made a million empanadas for every occasion, school treats, dinners with friends and so on, one of the national dishes in Chile and Argentina, traditionally filled with beef, onions, raisins, black olives and boiled eggs, that everybody loved, and still does. My children go crazy about them. I think my favourite dish as a child was Pastel de Choclo, a casserole dish made of minced beef and mashed sweetcorn with a sugar crust, so good!! My father is an incredible cook, definitely the person I feel the strongest similarities with in the way I create food. A freestyler and always super curious about discovering new flavours and combinations. I’m very lucky that I have always been surrounded by people who had a very strong interest in food.
Your parents were early pioneers in the organic, sustainable and self-sufficient food movement that is so popular today. How did this affect your relationship with food and your definition of quality of life in general?
My mother was always the one who had the more ecological, political attitude towards how to consume and produce food. She went to shop in small organic grocery shops that were really rare at that time and she had a strong focus on whole foods. She used a lot of millet, quinoa and amaranth in her cooking, things that, at that time, were totally unknown to most people. This curiosity and trying out new and unknown things is something that influenced me extremely. In general my parents were very political and taught us to call things into question. That had a strong influence on all fields of activity in my living and working.
Who is your biggest inspiration in the kitchen?
I find a lot of people inspiring, for very different things. My father is still one of my biggest inspirations, because he is such an artist in juggling with flavours, but there are also a couple of books that I bought in the last years that I find very inspiring, Tartine Bakery for example makes great classic stuff! And the Canadian raw food cookbook author Emily von Euw is so great as well, what an artist!
Which are your favourite Chilean, Peruvian and German dishes?
Oh, that is so difficult to say as I love eating so much and it’s really hard for me to say what dish I like more than the other. As I'm from Hamburg, I have a strong connection to seafood and I still enjoy to go to the Fischmarkt (fish market in Hamburg) on a Sunday morning so much, to grab a sandwich overloaded with the freshest shrimps and rémoulade or some matjes (herring) with tons of fresh onion! I would say I prefer the simple, yet flavourful over the super sophisticated kitchen. My sister, who moved back to Chile after finishing school which is now almost 20 years ago, makes the most incredible ceviche which totally became my favourite Chilean dish. The Bolivians make small super spicy pasties filled with chicken called salteñas that are pretty amazing! But to be honest, there are really only very, very few things that I do not eat.
Where do you find inspiration for new creations?
Absolutely in nature. Strolling through organic farmers markets, smelling fresh fruits. I just visited a friend who moved from Berlin to the Uckermark (an area in the countryside), being in nature, in the countryside fills me with energy and inspires me a lot.
Why do you like to decorate your cakes with giant flowers which became your signature style?
I have a strong love for flowers which I most probably got from my grandmother. She used to live in the suburbs of Hamburg which almost felt like being in the countryside. There was a small farm within walking distance from where she lived and she taught me all the names of the flowers, wild berries and herbs, of all the small insects and butterflies. She also had edible flowers on her terrace and told me how to use them. My first job as a teenager was at a flower shop. If I had not focused on working with food I’d most probably be a florist today.
Do your kids join you in the kitchen? How do you introduce the younger ones to the world of food, how do you spark their interest?
Absolutely. I let my kids join me in the kitchen whenever they want. We do the shopping together, I let them select the vegetables, I let them help me with the cleaning and cutting and they always get a bit of dough when I bake. The older ones (my kids are 4, 6, 10 and 11) even start to cook on their own now with our help. To let the kids take part in the process of buying and creating food and to let them develop their own likes and dislikes and their own taste is the greatest and most successful way to raise their interest in food and eating.
What was the first dish you cooked on your own, what is your first cooking memory?
My very first steps in cooking were with my grandmother. She always took me to the farm, which was close to where she lived. The old farmers couple loved me and let me slip into every little corner. I was allowed to pick berries, to take the eggs out of the henhouse, they even allowed me to be present when the little yeanlings were born. My grandmother made little crocheted shopping bags for my sister and me where we put in all the treasures that we got at the farm. I must have been around 3 when my grandmother first suggested to make scrambled eggs out of my freshly collected eggs. I remember it being a mix of heartache and excitement to break the little eggs into this cute little pan that my grandmother bought for us. I still have that pan.
What are your favourite places to buy and enjoy food in Berlin
I still like the small organic farmers market at Kollwitzplatz on Thursdays right around the corner from where I live. Some say, this market became too touristy within the last years, but still, it provides a great variety of organic locally produced goods. There, I also buy the edible flowers for my cakes from two lovely old ladies who have their own flower garden in Marzahn. Only a few hundred steps from my house I have a fantastic small delicacy store (Le Flâneur) that sells the best cheese I’ve ever tried and a small assortment of really good Champagne (yes, I love Champagne!).Every couple months I ride my bike to the Dong Xuan Center in Lichtenberg, an Asian food market, where you can buy every single Asian ingredient you could ever dream of. I travelled through Asia for a while and this place really reminds me so much of it. It’s a bit like plunging into another small world. You also get an incredibly good pho (Vietnamese noodle soup) there. Frischeparadies is a safe address for fresh, high quality and rather rare products. Even if they don’t have an ingredient in stock, you can always ask, their staff is very helpful and friendly, and they will do their best to try and get what you’ve been searching for. I recently searched for the very rare and hard to get fresh Scandinavian cloudberry, Lindenberg was the only place that could help me to get the fresh berries. And then there is this fantastic organic butcher in Berlin Wilmersdorf (Bachhuber). That place…wow!
You shared your Apricot Salted Butter Caramel Meringue Cake on eat in my kitchen, what do you like about this combination?
Well, it was freestyle mostly. When I did the shopping the day before we met I just could not resist the floral smell of the fresh apricots. Apricots are also just such a winner with salted caramel, don’t you think? And the flambéed meringue is always my ace in the hole, when I really want to impress somebody!
If you could choose one person to cook a meal for you, who and what would it be?
I would love to meet the biodynamic Champagne producer David Léclapart and his daughter Sylvie Gerard Maizieres. She runs a small boutique museum dedicated to Champagne where she organizes Jazz concerts and cooking courses as well, called Pré-en-bulles.
You're going to have ten friends over for a spontaneous dinner, what will be on the table?
I would definitely ask my dear friend Malin from The Bread Exchange for bread. Since we know each other, I bake her cakes for special occasions and she bakes her outstanding sourdough bread for my dinners in return. I would get a variety of good cheeses and butter, fresh artichokes with a light vinaigrette, make a cold or hot soup (I love soup) and a big bowl of fresh salad. And yes, of course, there would be a cake. That’s what everybody expects when being invited to my house.
What was your childhood's culinary favourite and what is it now?
My grandmother's caramelized apple pancakes were a total hit, unbeatable! Right now I would say everything that is produced freshly and with a whole lotta love. At the Bite Club(Berlin street food event) I recently had a pancake made of cabbage, okonomiyaki, wow! That was so good! I love spicy food, I love Asian food, I love fresh veggies, I love a good organic sausage, I love seafood ... the list goes on and on! Oh and I could live off ice-cream for a very long time, my favourite parlour is Rosa Canina.
Do you prefer to cook on your own or together with others?
I love to have people around me, but to be honest, I tend to be a bit bossy in the kitchen, so it’s more the question if others want to cook together with me.
Which meals do you prefer, improvised or planned?
Improvised, definitely!
Which meal would you never cook again?
I can not think of any, actually. Well, I’m not fighting to make empanadas, that is a shit load of work, the dough is made of boiling saltwater, screaming hot fat and flour which you have to stir together with a wooden spoon and then knead it while it’s still really hot. My father is a lot better at it anyways …
Thank you Laura!


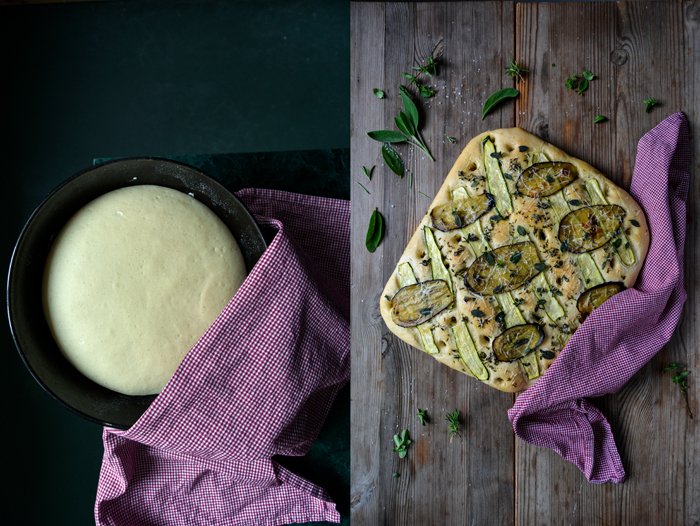
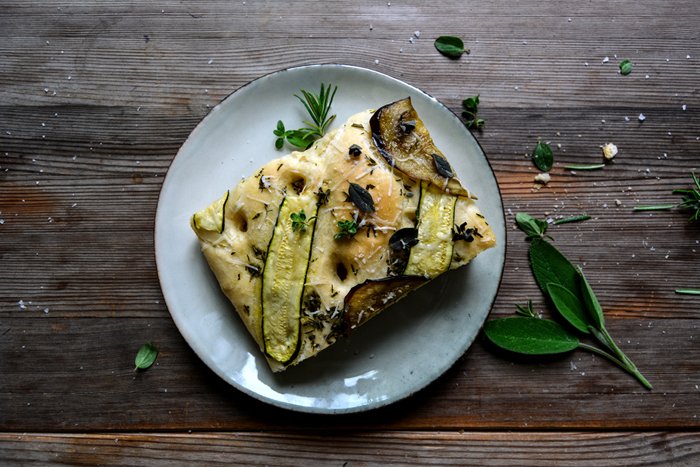
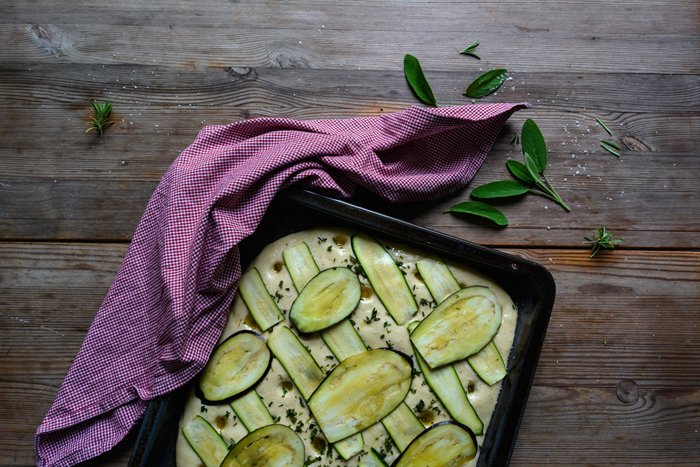
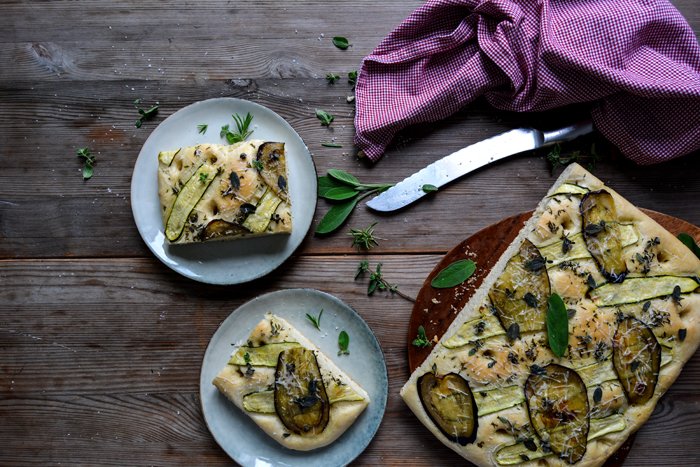
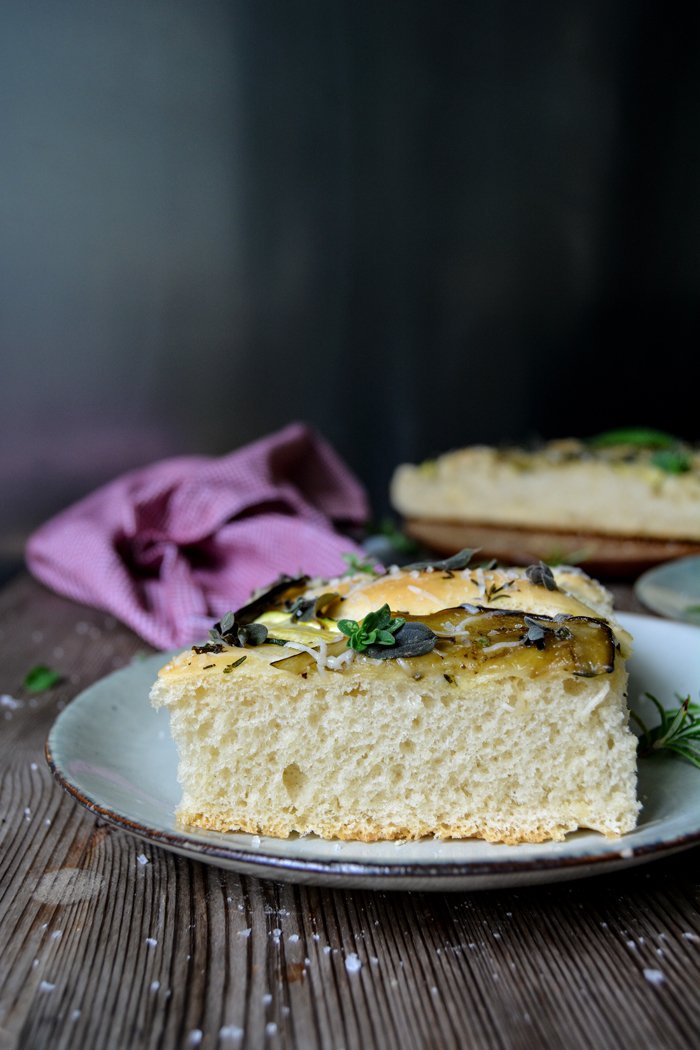
Herb Focaccia with Zucchini, Aubergine and Parmesan
This is one of my most beloved summer scenes: juicy focaccia topped with fragrant herbs on the table next to an aromatic selection of cheese and a chilled bottle of rosé wine waiting to be opened. Sometimes it impresses me how easy it can be to create a little holiday even in my own home. Although I have to admit that warm temperatures and a clear blue evening sky definitely help to put my mind in the right mood, scrumptious food is even more efficient.
I used my reliable focaccia recipe to make the soft Italian bread, it's so oily that my fingers feel deliciously smooth and sticky after each bite. Last year I fell in love with a topping of dark grapes and rosemary, in 2015 I'm falling for an almost pizza-like creation. I picked a selection of rosemary, thyme and sage right from the front row of my window sill garden, chopped them finely and spread the green crumbles over the puffy, risen yeast dough. Thin slices of zucchini and aubergine came next to form a pretty grid pattern and add their summery fruitiness. To finish it off, I sprinkled my golden focaccia with fresh oregano and Parmesan. It's such a teaser, when I opened the door to take out the baking sheet, the warm smell of yeast, herbs and cheese caressed my nose. At this point, I definitely felt like I was somewhere in the south of Italy.
Herb Focaccia with Zucchini, Aubergine and Parmesan
For a 25 x 32cm / 10 x 12 1/2″ focaccia you need
plain flour 500g / 17 1/2oz
dry yeast 1 sachet (7g / 1/4 ounce)
salt 1 teaspoon
sugar 1 heaping teaspoon
water, lukewarm, 260ml / 1 cup and 2 tablespoons
olive oil 120ml / 1/2 cup (half for the dough and half for the topping)
fresh herbs (rosemary, thyme, sage), finely chopped, 2 generous tablespoons
small zucchini, very thinly sliced (best with a vegetable/ mandoline slicer), 1
medium aubergine, very thinly sliced, 1/2
flaky sea salt, for the topping
Parmesan, grated, 3 heaping tablespoons
fresh oregano, the leaves of a small handful of sprigs (about 2 heaping tablespoons)
In a large bowl, combine the flour, yeast, salt and sugar. Add the water and half the olive oil (60ml / 1/4 cup) and mix with the hooks of an electric mixer for a few minutes until smooth and well combined. Continue kneading with your hands for a few minutes until you have an elastic dough ball. Put the dough back into the bowl and cover with a tea towel. Let the dough rise in a 35°C / 95°F warm oven (top / bottom heat, no fan) for 45-60 minutes.
Take the dough out, punch it down and knead for 1 minute. Spread the dough on an oiled baking sheet with your hands until it measures roughly 25 x 32cm / 10 x 12 1/2″. Cover with a tea towel and let it rise for 20 minutes in a warm place.
Set the oven to 220°C / 430°F (top / bottom heat).
Punch about 6 x 7 holes into the surface of the dough, you can use the round bottom of a wooden spoon or your finger. Pour half of the remaining olive oil (30ml / 1/8 cup) over the dough and into the holes. Use the remaining 30ml / 1/8 cup of oil to thinly coat the sliced vegetables on both sides with your hand. Sprinkle the focaccia with the chopped herbs and lay the oiled vegetables in a cross pattern on top (start with the zucchini and continue with the aubergine). Season with sea salt and bake for 20 minutes or until golden and light brown on top. When it's done, sprinkle with Parmesan and oregano and leave in the hot oven for 1 minute.
Enjoy warm or cold at a summery table full of fruits, cheese and wine!


Cakey Red Currant and Oat Cookies
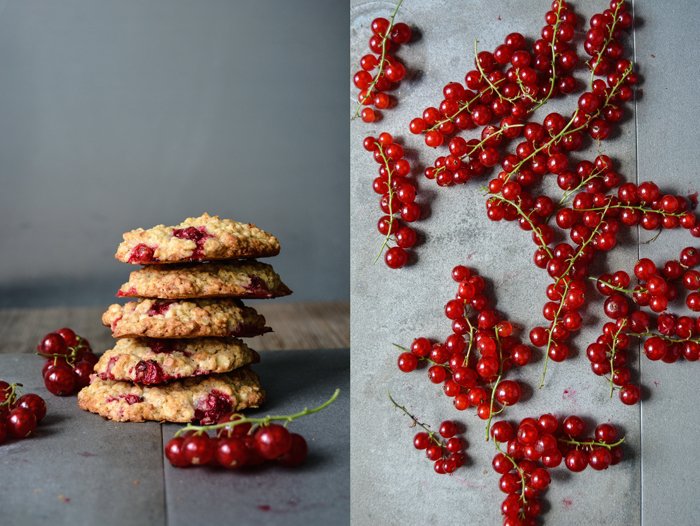
To eat fruits right from a bush or tree is one of the most satisfying culinary experiences I know. A couple years ago, I went for a walk through Buskett Garden nearby Dingli in Malta with my boyfriend and his mother. We strolled along a little stream lined with mulberry bushes, fig and pomegranate trees. At one point we couldn't stop ourselves picking a few of the giant berries and ripe figs bursting in the hot afternoon sun. The honey sweet juices dripped of our fingers and we could only smile, overwhelmed by such peace, it felt like the Garden of Eden.
My granny Lisa's garden used to put me in the same mood, set in the north of Europe it offered a completely different scene. Lined with dark fir trees on one side and the most beautiful cherry tree on the other, where I used to sit on a swing after I picked its sweet fruits right from the branches. One of her neighbors used to grow red currants on little bushes, every year they were gifted with luscious produce. The branches were so packed with berries that the bushes looked bright red at one point in early summer, sprinkled with a few green dots from the leaves. Luckily, the owner planted the bushes so close to my granny's garden that they grew through the fence. He also didn't mind me sitting there in the grass, stuffing my mouth with one handful of these red berries after the other.
In the city, I miss out on this experience which is a pity. I have to buy the fruits by the boxes but the results that come out of my kitchen after I used them for my sweet treats are as satisfying and ease my sorrows. Today's wonderfully cakey red currant and oat cookies did a great job. They feel like little cakes, not crunchy at all, but rather juicy. Their soft texture combined with the nutty oats, mashed banana and sweet and sour fruits made me forget about hand-picked harvests and anything else!
You can also use blueberries for this recipes if you can't find red currants.
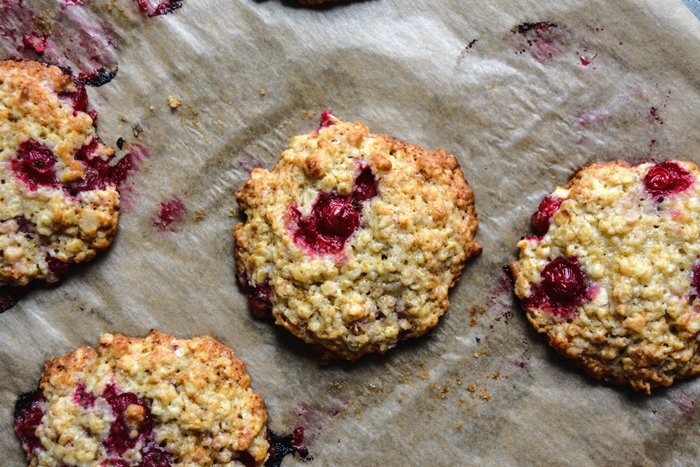
Cakey Red Currant and Oat Cookies
For about 26 cookies you need
plain flour 200g / 7oz / 1 1/2 cups
rolled oats 150g / 1 2/3 cups
salt 1 teaspoon
baking soda 1/2 teaspoon
baking powder 3/4 teaspoon
butter (soft) 170g / 6oz
granulated sugar 200g / 7oz / 1 cup
ripe banana, mashed, 1 (about 100g / 3 1/2oz)
organic egg 1
pinch of vanilla (scraped from the pod)
red currants (or blueberries), ripe but not soft, 200g / 7oz
Set the oven to 180°C / 360°F (fan-assisted oven) and line a baking sheet with parchment paper.
Combine the flour, oats, salt, baking soda and baking powder. In a large bowl, mix the butter and sugar until fluffy with an electric mixer. Add the banana, egg and vanilla and continue mixing until well combined. Stir in the dry mixture with a spoon until you have a lumpy dough (with a bit of flour left here and there). Gently fold in the red currants (leave out a small handful of berries), use 2 tablespoons and don't mix more than 4-5 times. Try not to damage the berries too much, you want their juices to stay inside their skin. For each cookie, drop a tablespoon full of dough on the lined baking sheet, leave enough space in between them as they will expand in the oven. Flatten them softly with a fork (just a little) and gently push the remaining red currants into the dough. Bake in the oven for about 13 minutes or until golden, they will be quite soft. Take them out and let them cool on the tray for a few minutes before you transfer them onto a wire rack. The texture is nicest on the first day as they soften in a cookie box, but the taste was just as good the next day.
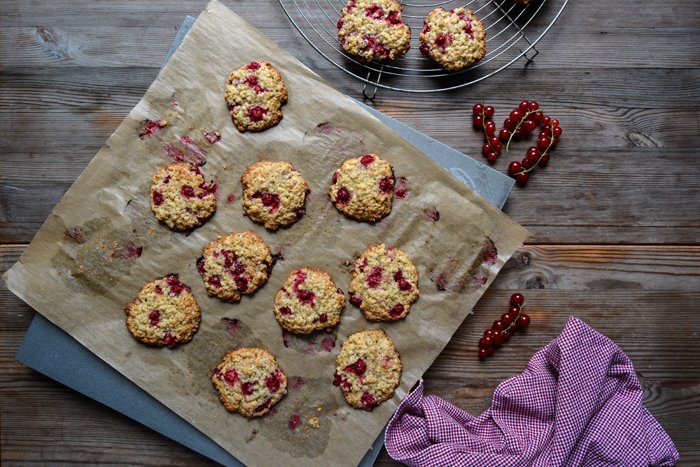
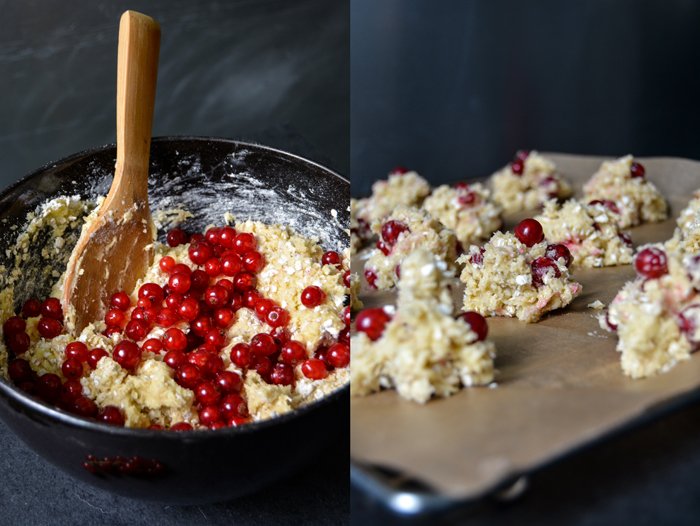


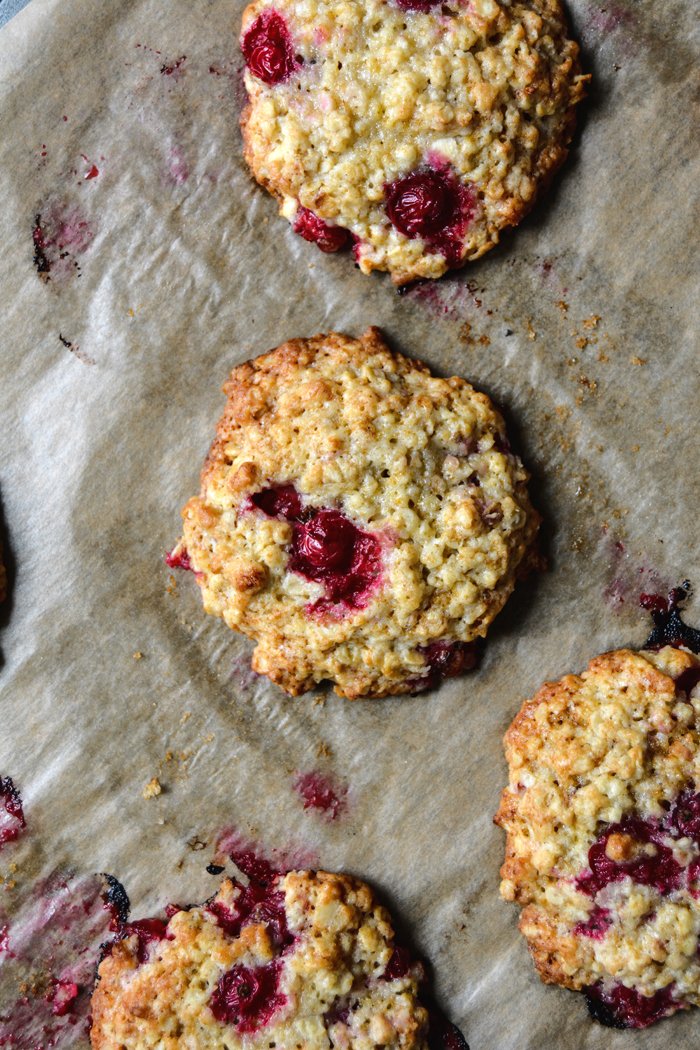
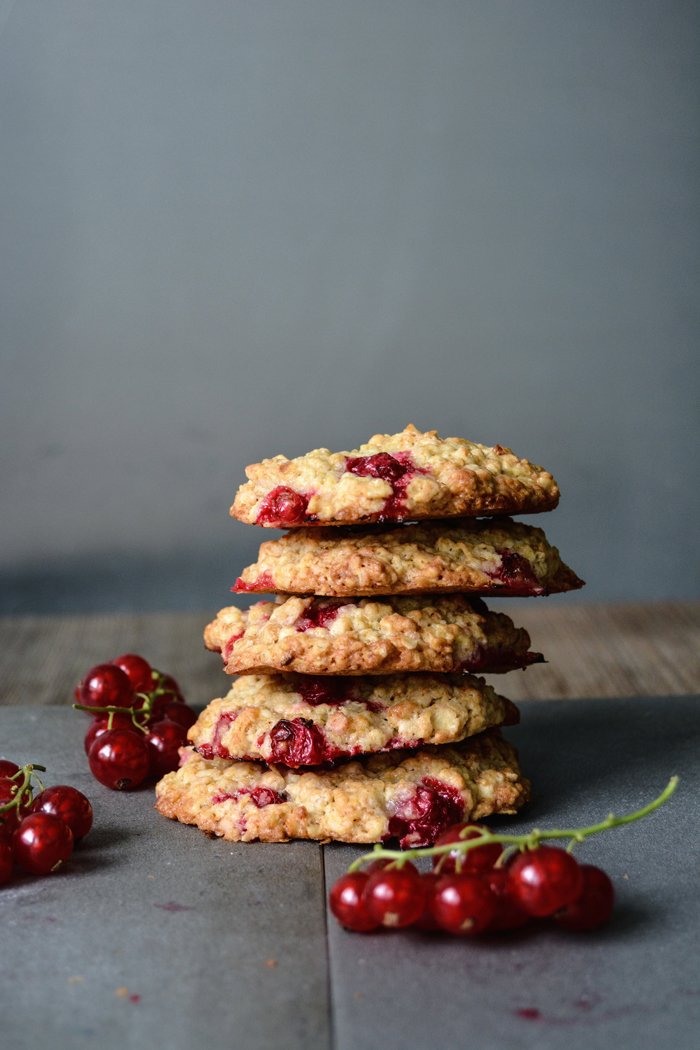

Apricot Cinnamon Crumble Tart - my best cake ever!
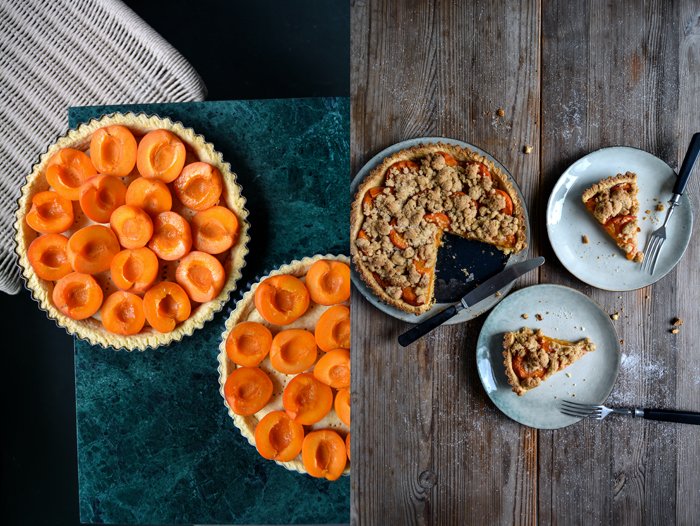
According to a friend, this is the best cake I have ever made. However, although I feel flattered by this compliment, his statement should be handled with care. Overwhelmed by a homemade sweet treat, he tends towards such passionate judgements, it wasn't the first time. But I have to agree, it was an extremely good cake!
Let's start with the base, the buttery short crust was crisp and slightly flaky, exactly how I love it. I also used this pastry for my Raspberry and Blueberry Tart with Bavarian Cream, it's a classic for summer tarts. Fruit was next, apricots cut in half sprinkled with a little sugar to help them release their juices without taking away their natural fresh and sour sweetness. They were still in pieces when I took the tart our of the oven, soft but not mushy like a compote. For the cinnamon crumbles, I used the recipe from my old kitchen friend, my beloved rhubarb (or plum or apple!) crumble cake. The flavour of the spice is strong enough to stand up to the apricots, the crumbles stay beautifully in shape and you can taste that they are made with plenty of butter, they are pure crunchy bliss. Luckily, I made two cakes from the start, I had a strong feeling that this was going to be a luscious feast, but I didn't expect that we would empty the pans so quick, it was insane. Slice after slice we just continued telling each other how delicious this tart is and all of a sudden it was all gone!


Apricot Cinnamon Crumble Tart
One of my tart pans has a loose bottom which helps to cut out slices, it also worked in the other pan, just a few crumbs fell off but it still looked pretty.
For 2 tarts in 23cm / 9″ tart pans you need
apricots, cut in half and pitted, 1kg / 2 1/4 pounds / about 20 fruits
granulated sugar 2 tablespoons
For the short crust base
plain flour 390g / 14oz / 3 cups
granulated sugar 100g / 3 1/2oz / 1/2 cup
salt 1/4 teaspoon
butter, cold, 200g / 7oz
organic egg yolks 3
water 2 tablespoons
Combine the flour with the sugar and salt. Cut the butter with a knife into the flour until there are just little pieces of butter left. Continue with your fingers and rub the butter into the flour until combined. Add the egg yolks and water and continue mixing with the hooks of your mixer until you have a crumbly mixture. Form 2 thick discs, wrap in cling film and put in the freezer for 20 minutes.
Set the oven to 200°C / 390°F (top/ bottom heat).
Roll out the dough between cling film and line your tart pans with the flat pastry. Prick with a fork and blind-bake in the hot oven for 12 minutes. Melt the butter for the crumbles while the tarts are in the oven (see recipe below).
Take the pans out of the oven, arrange the apricots (cut side up) in circles on top of the pastry, sprinkle each tart with 1 tablespoon of sugar and prepare the crumbles immediately.
For the crumbles / The tart
plain flour 200g / 7oz / 1 1/2 cups (you might need more if the crumbles are too sticky)
granulated sugar 130g / 4 1/2oz / 2/3 cup
vanilla, scraped, 1/4 pod
ground cinnamon 2 teaspoons
butter, melted, 125g / 4 1/2oz (you might need more if the crumbles are too fine)
Have some extra flour and butter to melt close at hand so that you can add some immediately if necessary.
Combine the dry ingredients in a bowl. Pour the melted butter on top and mix quickly with the hooks of your mixer, stop as soon as it crumbles. If the crumbles are too moist and sticky add a little more flour (1-2 tablespoons). If they are too fine and don’t form bigger crumbles add more melted butter.
Spread quickly on top of the apricots, if you have bigger lumps of crumbles you may have to separate them with your fingers. Bake in the oven for about 35 minutes or until the pastry base and crumbles are golden brown. The fruits should start to release their juices, they will soften while the tart cools. You can serve the cakes with ice cream or whipped cream for tea time in the garden (or on your balcony) but we didn't even have that - which allowed us to eat more of the tart!


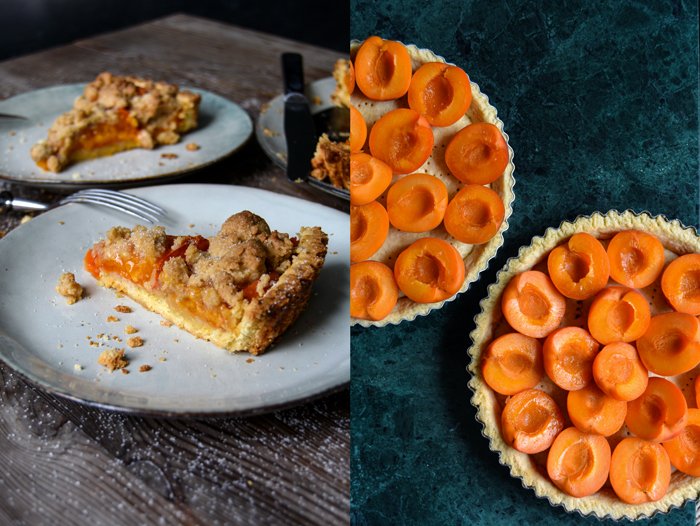
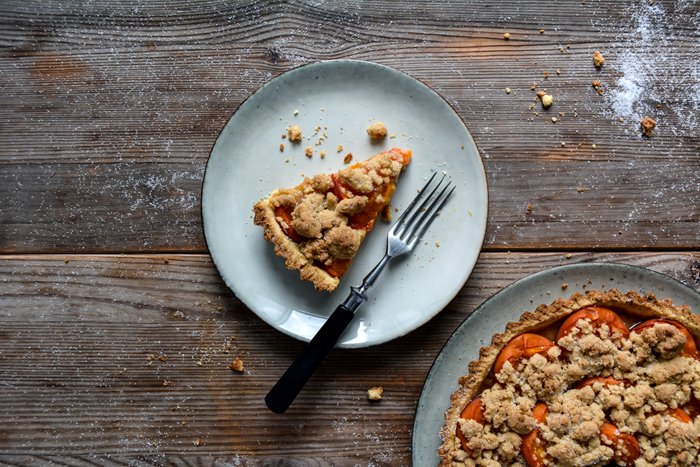
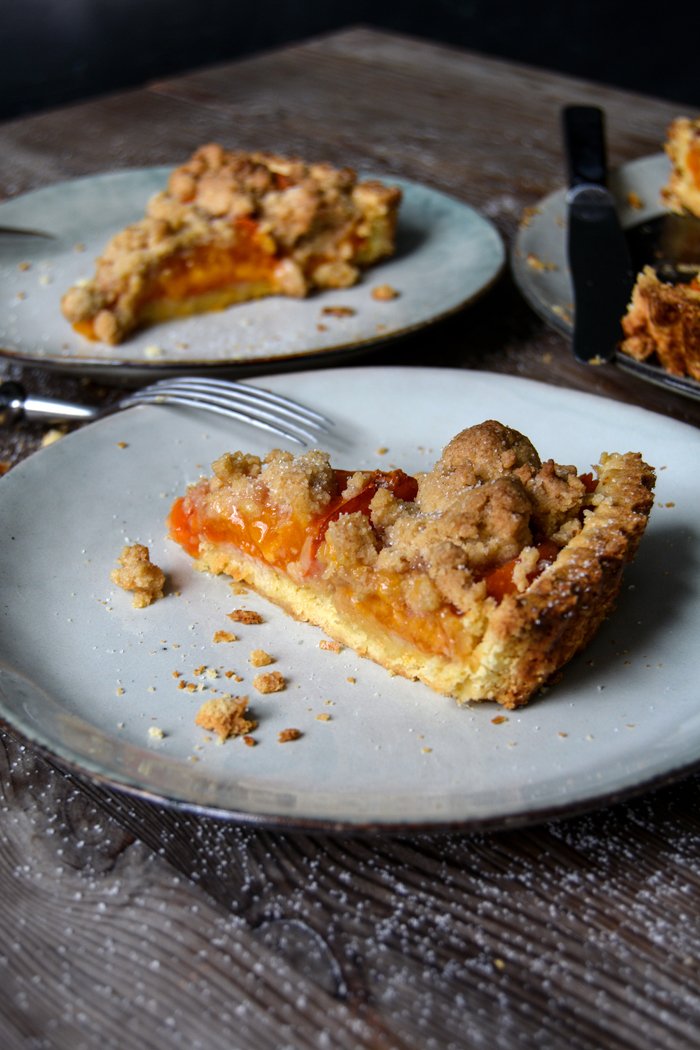

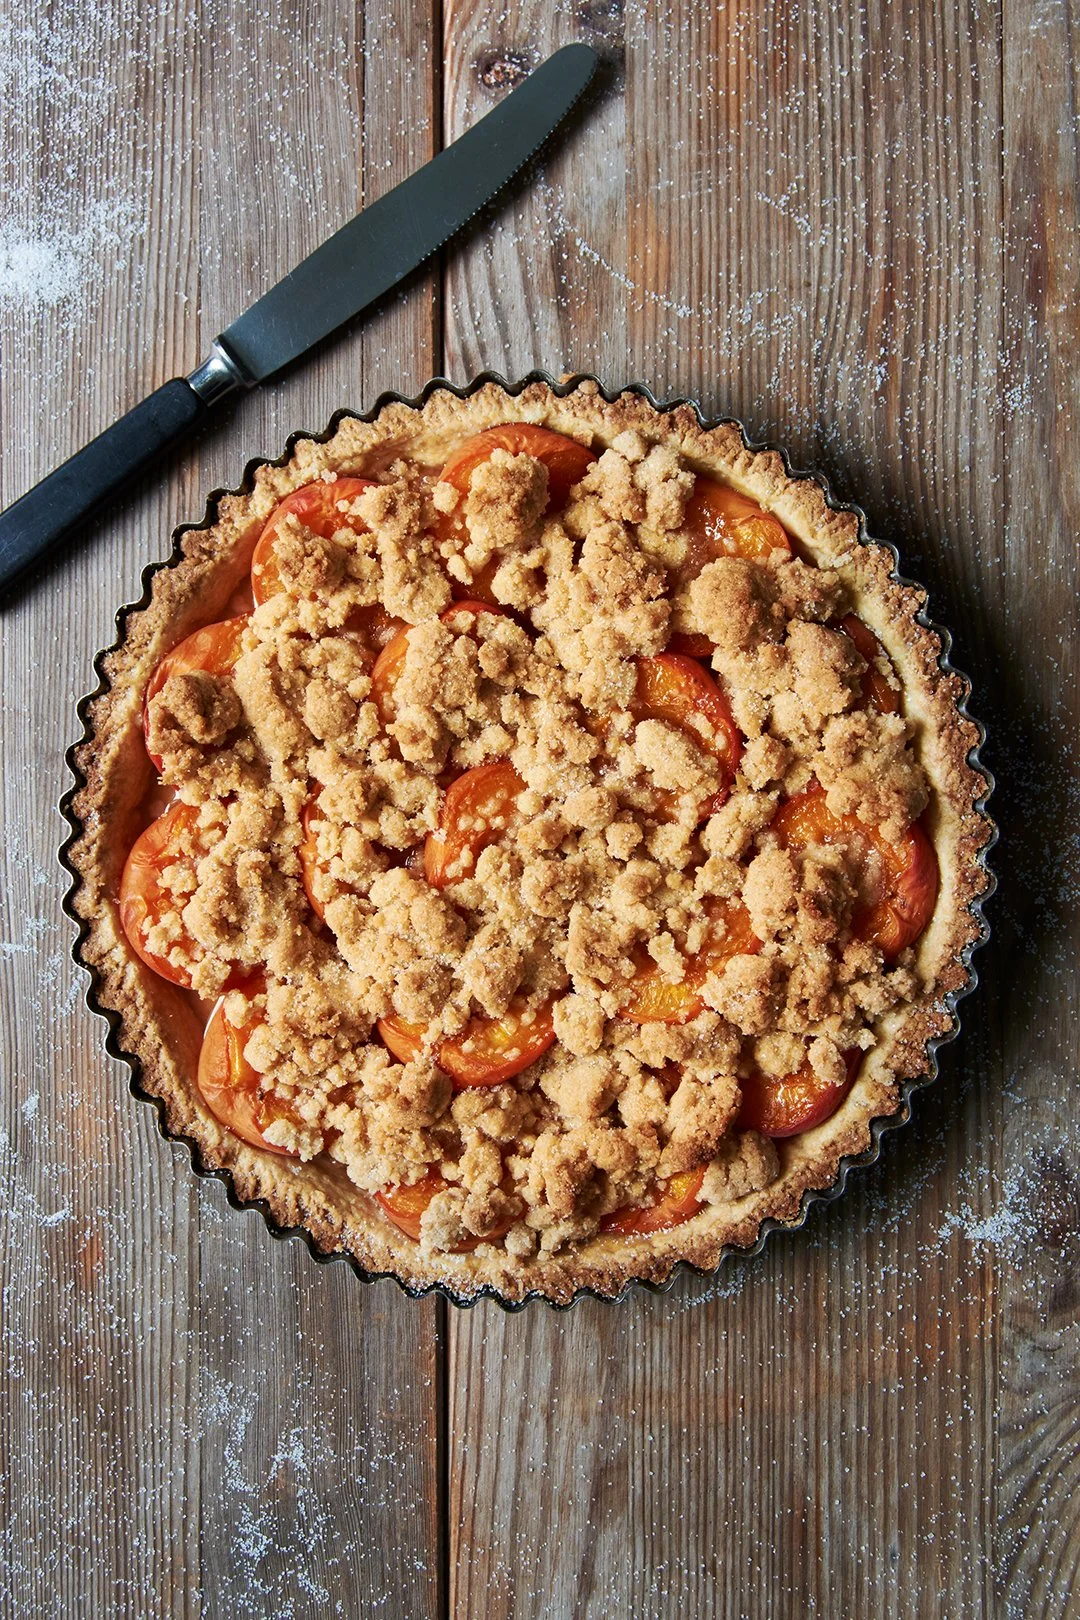
Blackberry Garden Cake with Lemon Mascarpone

My mother's garden is set in the soft green hills of the countryside, it's surrounded by high bushes and trees, spruce, birch and pine. The lush lawn winds around a curved patch of rhododendron that leads to a little pond covered with the most majestic blossoms of water lilies gently laying on top of waxy leaves. This was once the home to a school of glowing goldfish which, sadly, was discovered by a grey heron one summer. It had all started with two fish which I gave my mother as a birthday present many years ago, they must have really liked each other as it wasn't long before their population grew rapidly. We enjoyed them a lot, it was such a perfect picturesque garden scene. I used to sit next to the roses growing at the stone steps at the water looking at the bright red fish swimming through their kingdom. But nature had a different plan.
The beauty of this garden, its peace and vastness, makes it one of my favourite places in the world. To see my mother working in her vegetable garden which is spread out on a higher level, to watch her picking weeds and choosing our dinner, is such a beautiful picture that I will always carry with me. We discuss the meal and she often teaches me the plants' names which I, unfortunately, tend to forget most of the time. And there's one thing that makes a day out there complete to perfection, a simple, scrumptious garden cake! Nothing too extravagant, a pound cake is always best, with some fresh fruits (preferably from my mother's garden) and a luscious frosting, like my blackberry cake with lemon mascarpone. It's simple enough to eat it with your fingers while enjoying your garden on a sunny afternoon, but then there's the creamy icing which gives it a Sunday tea time touch. It combines everything a good cake needs in my eyes, the recipe is based on my apple cinnamon breakfast cake but the dark fresh berries turn it into a proper summer cake.

Blackberry Cake with Lemon Mascarpone
For a 24cm x 10,5cm / 9.5″ x 4″ loaf tin you need
plain flour 130g / 1 cup / 4 1/2oz
cornstarch 30g / 1/4 cup /1oz
baking powder 1 heaping teaspoon
a pinch of salt
butter (at room temperature) 160g / 2/3 cups / 5 1/2oz
granulated sugar 100g / 1/2 cup / 3 1/2oz
organic eggs 3
blackberries 250g / 9oz
For the lemon frosting
mascarpone 230g / 1 cup / 8oz
icing sugar 55g / 1/2 cup / 2oz
heavy cream 90ml / 1/3 cup and 1 tablespoon
lemon zest 3 teaspoons plus 1/2 teaspoon for the topping
lemon juice 3 teaspoons
Set the oven to 180°C / 355°F (fan assisted oven) and butter the loaf tin.
Whisk the ingredients for the frosting and adjust to taste and desired texture. Fill in a bowl and keep in the fridge. This is enough frosting to cover the cake on its top and sides.
Combine the flour, cornstarch, baking powder and salt. Mix the butter and sugar in a large bowl with an electric mixer until fluffy. Add the eggs, one at a time and continue mixing for a few minutes until the mixture is thick and creamy. Mix in the dry mixture until well combined. Pour half the dough into the buttered form and arrange a layer of 7-10 blackberries cut in half on top, if the berries are small you'll need 14-20. Set the remaining berries aside. Pour the remaining dough on top of the berries, spread it out evenly and bake for 40-45 minutes or until golden on top. Check with a skewer, it should come out clean. Let the cake cool for a few minutes before you take it out of the tin and lay it on a wire rack. When it's completely cool, spread the frosting voluptuously over the top (and sides if you like), garnish with a few berries and lemon zest and serve with the remaining fresh blackberries.


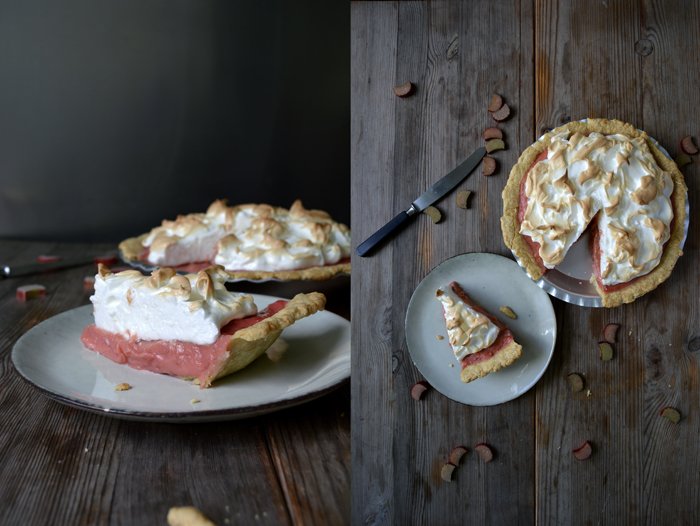
Cinnamony Rhubarb Meringue Pie

This has been my rhubarb week. I bought too many of the flavor-packed stalks for my rhubarb and leek gratin on Monday - their colorful beauty was just too tempting and I ended up grabbing (and buying) as much as I could fit in my hands. So the green and red pile of rhubarb on my marble counter top called for a compote, or even better, a pie!
I felt inspired by lemon meringue pie: an elegant pie made of a crumbly short crust, yet instead of lemon, topped with the fruitiest, cinnamony rhubarb curd you can imagine and finished off with a cloud of sweet meringue. I love lemon pie but learned that rhubarb lifts it onto another level, at least for my taste. It's such a fruity, sour, and slightly sweet and buttery composition.
A short note: The curd in the cool pie will be a bit more set than you see in the pictures, I cut it too early - tempted by my impatient appetite!
You can also find this recipe in my book 365: recipe no. 98!

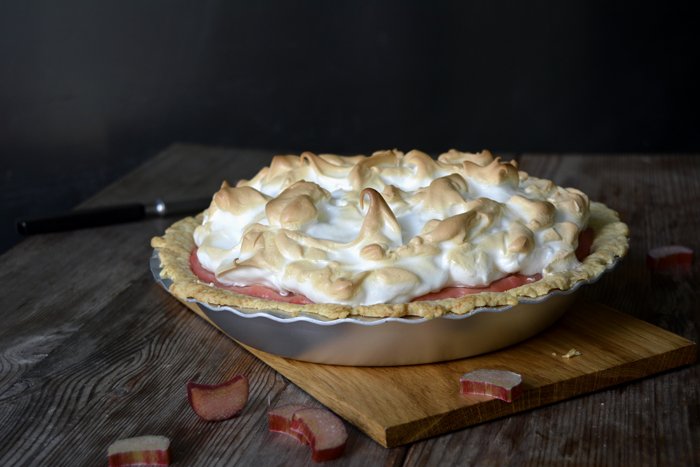
Rhubarb Meringue Pie
For a 23cm / 9" pie (in a shallow pie dish) you need
For the pastry
plain flour 160g / 1 1/4 cups / 5 1/2oz
granulated sugar 1 tablespoon
salt 1/4 teaspoon
butter 90g / 3/4 stick / 3 1/4oz
water (cold) 3 tablespoons
Combine the flour, sugar and salt in a bowl. Cut the butter with a knife into the flour until there are just little pieces of butter left. Continue with your fingers and rub the butter quickly into the flour until combined. Add the water and continue mixing with the hooks of an electric mixer until you have a crumbly mixture. Form a thick disc, wrap in cling film and put in the freezer for 15 minutes.
Set the oven to 200°C / 400°F (top/ bottom heat).
Roll out the dough between cling film and line your pie dish with the flat pastry. Prick it with a fork and blind-bake in the hot oven for 15 minutes or until golden. Let it cool completely.
For the rhubarb curd
First you make a rhubarb compote which you then turn into a curd.
rhubarb, cut into 0.5 cm / 1/4" slices, 680g / 1 1/2 pounds
granulated sugar 150g / 3/4 cup / 5 1/4oz for the compote, plus 2 tablespoons for the curd
ground cinnamon 1/4 teaspoon
water 75ml / 1/3 cup for the curd, plus 1 tablespoon for the compote
butter 1 tablespoon
cornstarch 60g / 1/2 cup
pinch of salt
organic egg yolks, beaten, 3
For the compote, heat the rhubarb, 150g (3/4 cups) of sugar, cinnamon and 1 tablespoon of water in a large pot on medium heat until the sugar dissolves. Turn up the heat to medium-high and cook for 10 minutes (open, without a lid). Take off the heat and stir in the butter.
For the curd, whisk 75ml (1/3 cup) water, the cornstarch, 2 tablespoons of sugar and salt and add to the hot rhubarb. Bring to the boil and cook for 3 minutes on medium-high heat, stir once in a while. Take 1 tablespoon of this mixture and whisk into the beaten egg yolks, pour the egg-compote mixture back into the pot with the rhubarb. Bring to the boil, stir constantly and cook for half a minute. Take the pot off the heat, pour the curd into a bowl and let it cool completely. You could place the bowl on cooling pads to speed up the process.
For the meringue
egg whites 3
granulated sugar 80g / 1/3 cup and 1 tablespoon
a pinch of salt
Beat the egg whites with the salt, adding the sugar gradually while beating, until the white is stiff.
The pie
Set the oven to 200°C / 400°F (top/ bottom heat).
Pour the cool rhubarb curd on top of the pastry and finish it off with the stiff egg whites, you can form little peaks with a knife to create an uneven surface. Bake for 7 minutes or until the top is golden brown and crisp. Let it sit for about 30 minutes before cutting for the curd to set. The pie still tastes great the next day (after keeping it in the fridge) but it won't look as pretty.