ISCHIA / ISOLA VERDE

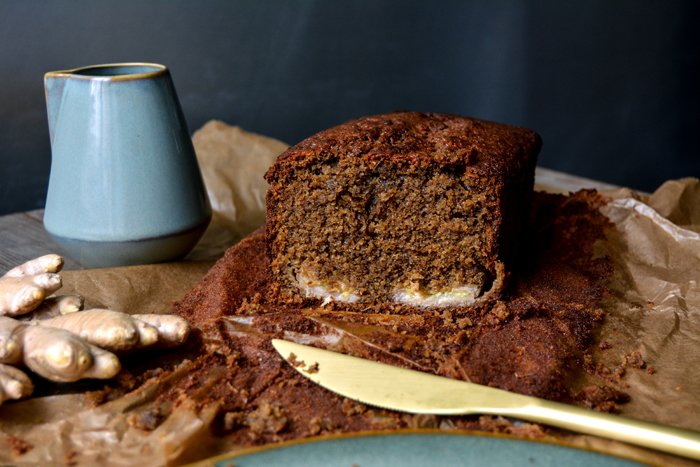
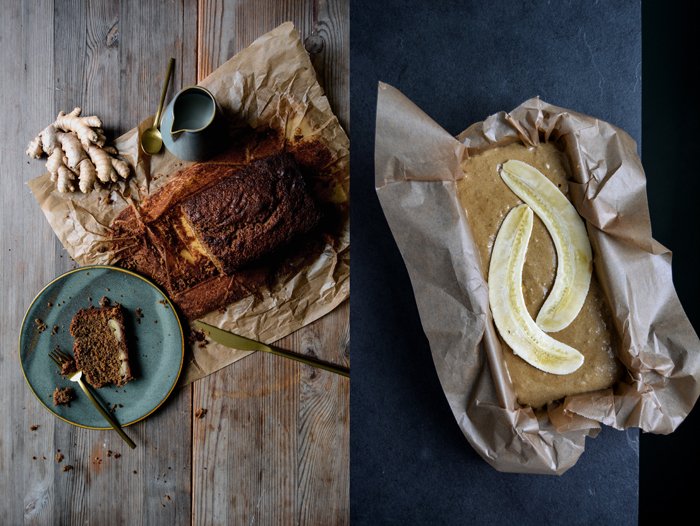
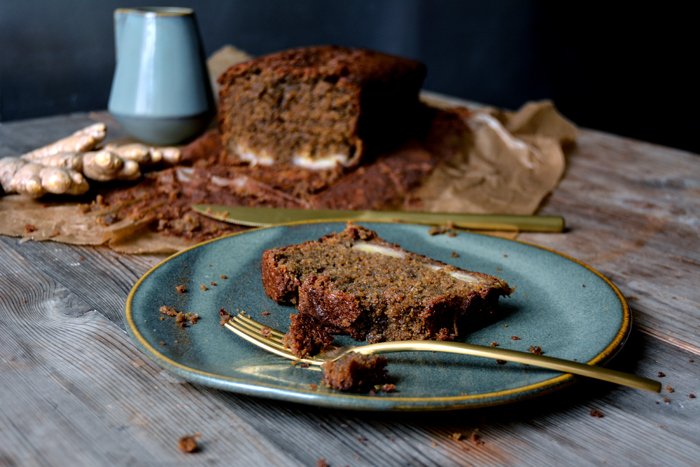
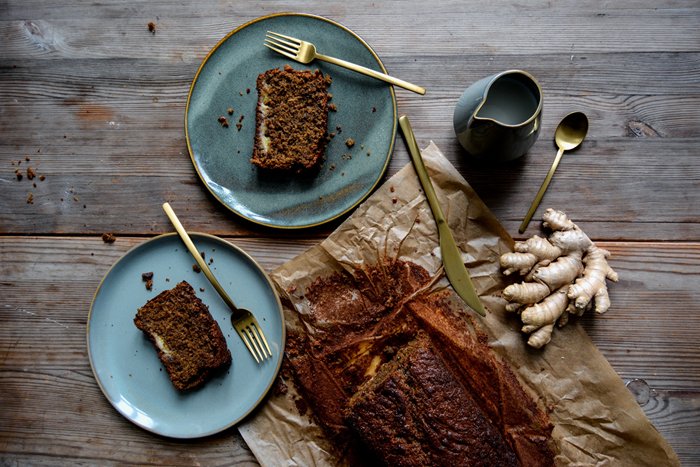
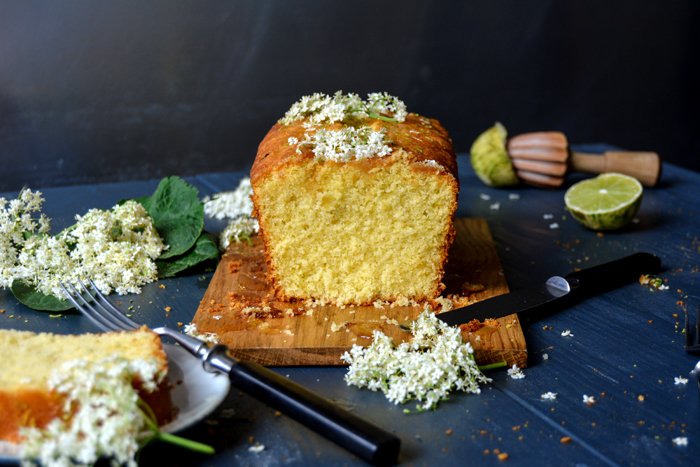
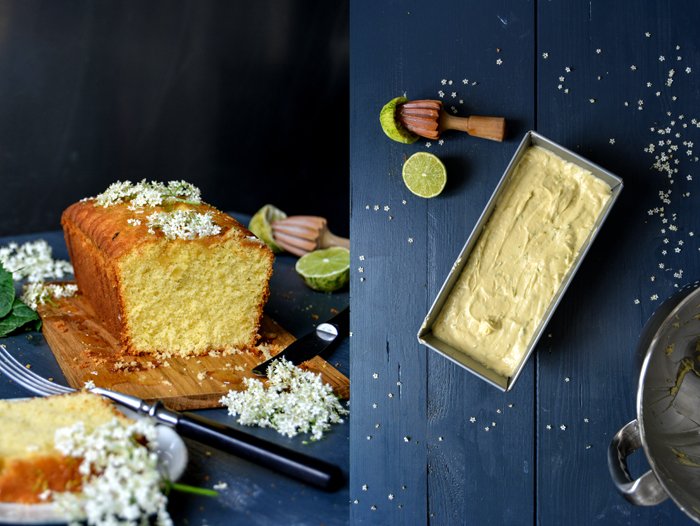
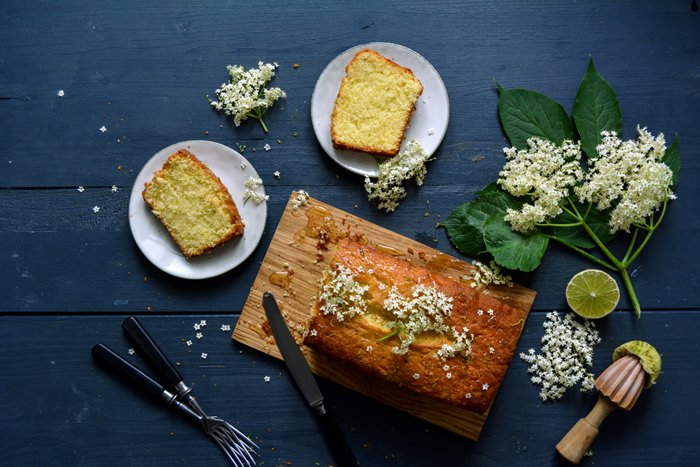
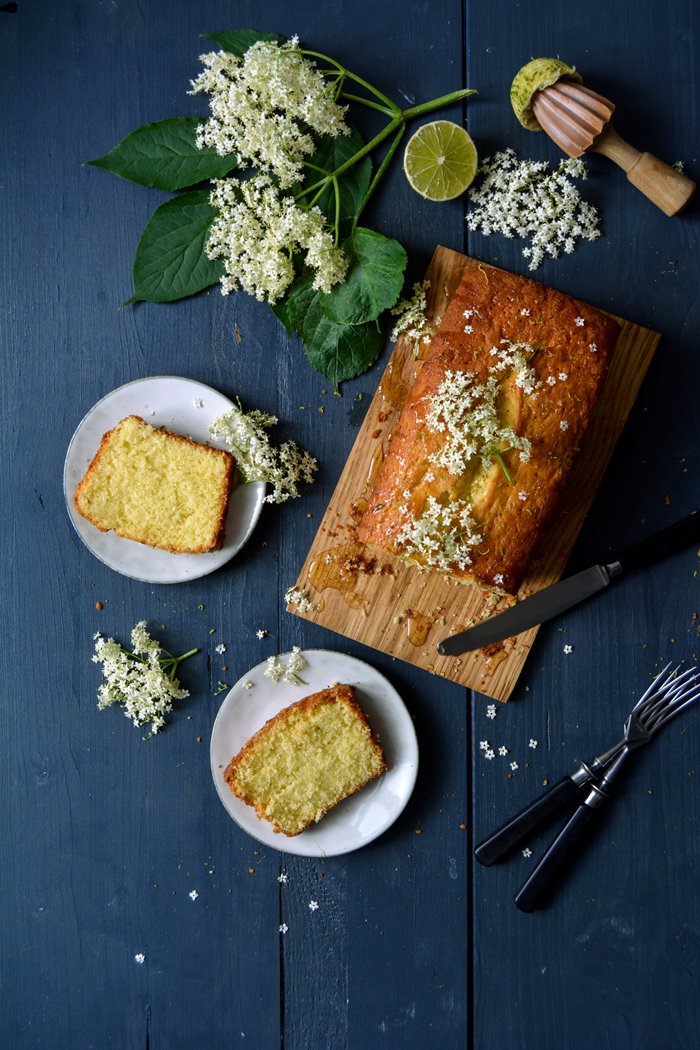
Elderflower Lime Cake

Whenever I ride around the city on my bike at the moment, I feel enwrapped in the sweetest smell of elderflower, black locust (acacia), and chestnut flowers. An invisible cloud meandering through the city. As soon as I open my kitchen window in the morning until I close it at night, I'm mesmerized by this perfume of early summer.
Together with a group of friends, I recently went on a bike tour to the countryside. We chose Beelitz, an area outside Berlin, to spend a day away from noise and distraction. I wrote about this area two years ago, it's a picturesque village surrounded by fields and dense woods and it's famous for Germany's best asparagus (you can see the pictures here). Last time we went a little earlier, in May, the asparagus fields were still covered in foil - white asparagus grows in the dark - but now, in June, the scene looks completely different. What used to grow under ground, pale and slender, turned now into a filigree green plant gently swinging in the breeze. The white asparagus season in Beelitz’ forest is now over.
After our 2-hour bike ride through forest and fields we needed a break and enjoyed asparagus with Hollandaise sauce at a secluded restaurant, called Landgasthof Rieben. We chatted with the owner and learned that you can only grow asparagus on the same field for 7 years, then it also needs a break, for another 7 years. The magic number.
So one of the flowers that smell the most captivating right now, are elderflowers and their season is almost over too. I love to use their sticky syrup for refreshing Hugo cocktails (you find the recipe in the link for the syrup), or to make caramelized onions or chicken taste even sweeter; but using it for baked sweets, is one of the best ways to enjoy elderflower on a Sunday afternoon. I went for a simple lime loaf cake, the warm cake soaked with a wonderfully fragrant syrup made of lime juice and elderflower. Sometimes, these simple cakes are just the best.
Elderflower Lime Cake
Serves 4 to 6
For the cake
plain flour 210 g / 1 1/2 cups plus 2 tablespoons
cornstarch 70 g / 1/2 cup plus 2 tablespoons
baking powder 3 teaspoons
fine sea salt 1/4 teaspoon
butter, at room temperature, 180g / 3/4 cup plus 1 tablespoon
granulated sugar 180g / 3/4 cup plus 2 tablespoons
organic eggs 3
freshly grated lime zest 2 tablespoons
freshly squeezed lime juice 3 tablespoons
buttermilk 90ml / 1/3 cup plus 1 tablespoon
For the syrup
elderflower syrup 100ml / 1/3 cup plus 1 tablespoon
freshly squeezed lime juice 3 tablespoons
For the topping
a few elderflowers (optional)
Preheat the oven to 160°C / 325°F (preferably convection setting). Butter a 23 x 10 cm / 9 x 4-inch loaf pan.
For the cake, in a large bowl, whisk together the flour, cornstarch, baking powder, and salt. In a second large bowl, beat the butter and sugar for a few minutes or until light and fluffy. Add the eggs, 1 at a time, incorporating each egg before adding the next one, and beat for 2 to 3 minutes or until light and creamy. Add the lime zest and juice and beat for 1 minute. With a wooden spoon, fold about 1/3 of the flour mixture gently into the batter, followed by 1/3 of the buttermilk. Repeat with the remaining flour mixture and buttermilk, folding just until combined. Pour the batter into the prepared pan and bake for about 50 minutes (slightly longer if using a conventional oven) or until golden on top. If you insert a skewer in the center of the cake, it should come out clean. Let the cake cool in the pan for a few minutes before turning it out onto a wire rack.
For the syrup, in a small saucepan, bring the elderflower syrup and lime juice to the boil and cook for 1 minute over high heat.
Prick the warm cake all over with a skewer and slowly pour the elderflower-lime syrup over the top. Decorate with elderflowers just before serving.


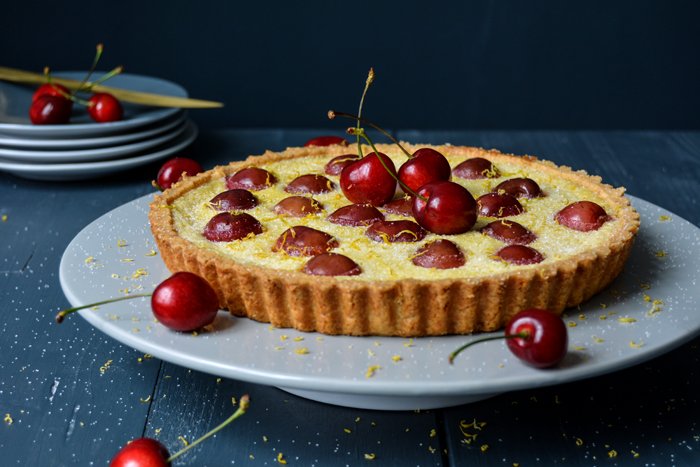
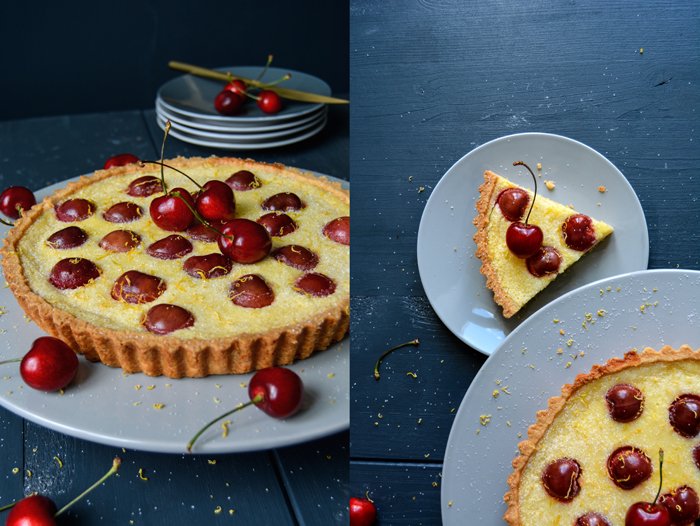
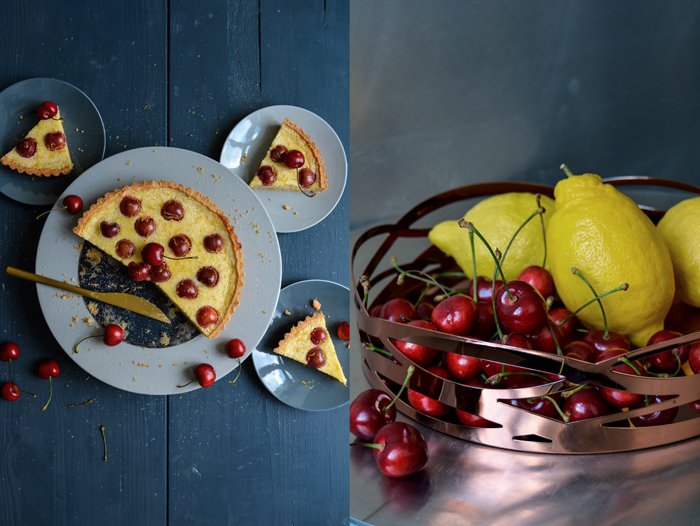
Cherry Lemon Tea Time Tart
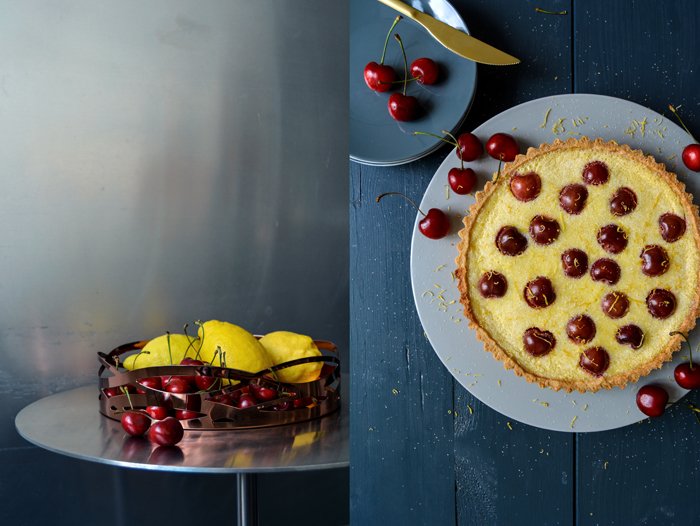
I had a passionate discussion about 'the best cherries' with the owner of a vegetable shop in my neighborhood. He's a very kind, very hard working guy from Turkey who never seems to sleep. No matter what time I pass by his shop, the young man is always busy as a bee. He helped me out many times when I needed a certain fruit or vegetable for a photo shoot that wasn't in season. Calling his buddies from all over, he makes the impossible possible. He managed to bring red currants to my kitchen when everyone else laughed at me when I asked for the little berries weeks before their season. He always finds someone in Spain, Greece, or Turkey to make me happy and my photo shoot work. My private cooking follows the season but unfortunately, editorial schedules don't.
So last week he told me that he has very good cherries at the moment, he praised their glossy beauty and outstanding taste. He went even further and said that they are better than German cherries, which, in all respect, is quite a bold statement. In my eyes, I had the best cherries of my life in my granny Lisa's garden and I don't think that anything in the world is ever going to change that. Her juicy fruits were not only packed with so much flavor, but also with the most precious memories. And this is something I love about summer fruits. Take strawberries, blackberries, red or black currants, or cherries, almost everybody, seems to have childhood memories connected not only to these fruits but also to picking and eating them. This is priceless and in a very beautiful way, saved for a lifetime. For my vegetable man from Turkey, the Turkish cherries will always be the sweetest and juiciest and I understand why this is how he feels, and for me, the crop from Lisa's garden used to beat every cherry in the world, because it was her tree - and I miss it.
When I tried my friend’s cherry at the shop, I had to admit that they were really good. So I bought a huge bag full of them, went straight home, and baked a cherry lemon tart. It's a tea time classic in my kitchen and the sweet and sour filling can easily take a little summer-makeover - the cherries make it a bit sweeter and juicier. Next time I'll make it with red currants, but they'll have to be in season.
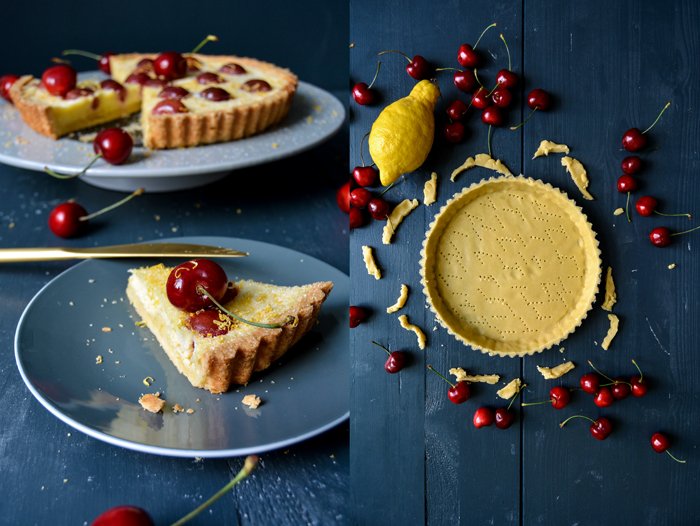
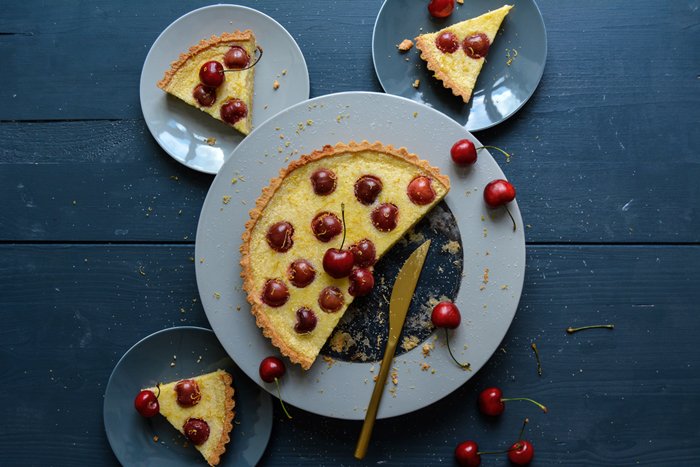
Cherry Lemon Tart
Serves 6-8
For the pastry
flour 200g / 1 1/2 cups
granulated sugar 65g / 1/3 cup
a pinch of salt
butter, cold, 110g / 1/2 cup
organic egg yolks 2
For the lemon filling
organic eggs 2
organic egg yolks 2
heavy cream 100ml / 1/3 cup and 2 tablespoons
crème fraîche or sour cream 3 tablespoons
granulated sugar 100g / 1/2 cup, plus 1-2 teaspoons for the topping
a pinch of salt
ground cardamom 1/4 teaspoon
freshly squeezed lemon juice 3 tablespoons
lemon zest 2 1/2 tablespoons, plus 1-2 teaspoons for the topping
fresh cherries, with their pits, 20 (plus a few cherries for decoration, optional)
For the pastry, combine the flour, sugar, and salt in the bowl of a stand mixer fitted with the dough hook. Add the butter and use a knife to cut it into the flour until there are just small pieces left. Quickly rub the butter into the flour with your fingers until combined. Add the egg yolks, set the mixer to medium speed, and mix until crumbly. Form the dough into a thick disc, wrap it in plastic wrap, and freeze for 12 minutes.
Preheat the oven to 200°C / 400°F (conventional setting).
Roll the dough out between cling film and line a 23cm / 9″ tart pan (preferably loose-bottom) with the pastry. Prick with a fork and bake for about 10-12 minutes or until golden and crisp. Take the pan out of the oven and set aside.
Turn the oven down to 180°C / 350°F.
For the filling, in a large bowl, beat the eggs, egg yolks, heavy cream, crème fraîche, sugar, salt, and cardamom for about 2 minutes until well combined. Stir in the lemon juice and zest and mix well. Pour the lemon filling on top of the pre-baked pastry, spread the cherries in the filling, and carefully transfer the tart pan back to the oven. Sprinkle with a little sugar and bake for about 40 minutes or until set.
Let the tart cool for 10 minutes, then sprinkle with a little lemon zest and decorate with the remaining cherries (optional). Serve warm or cold.


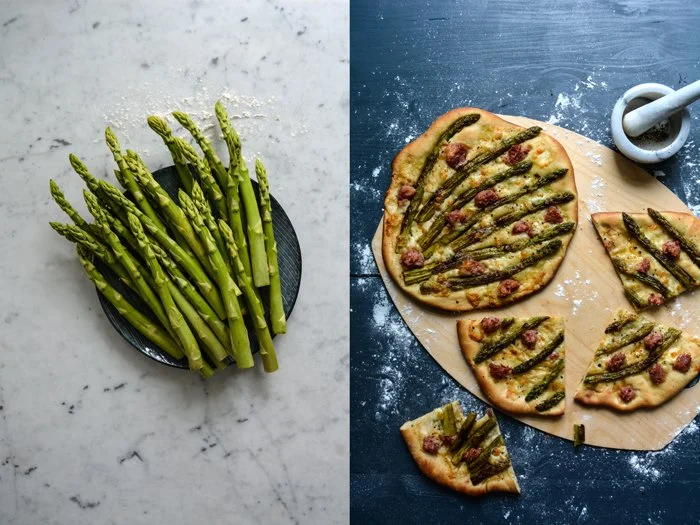
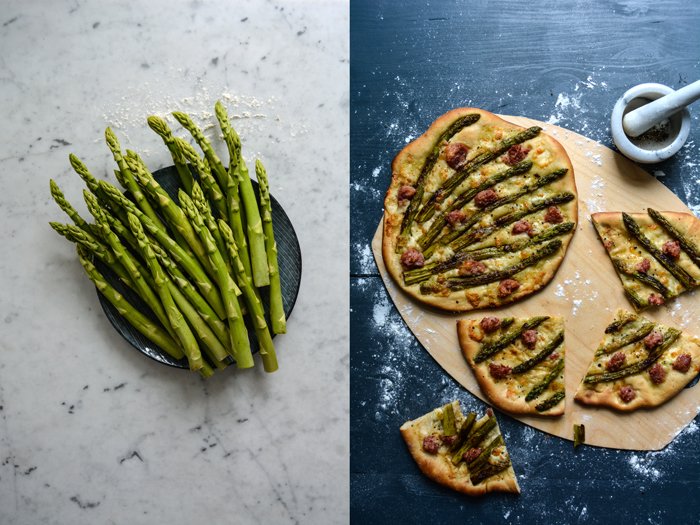
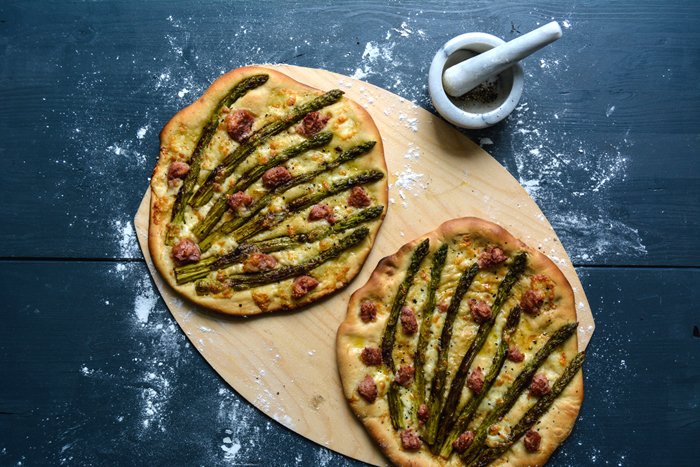
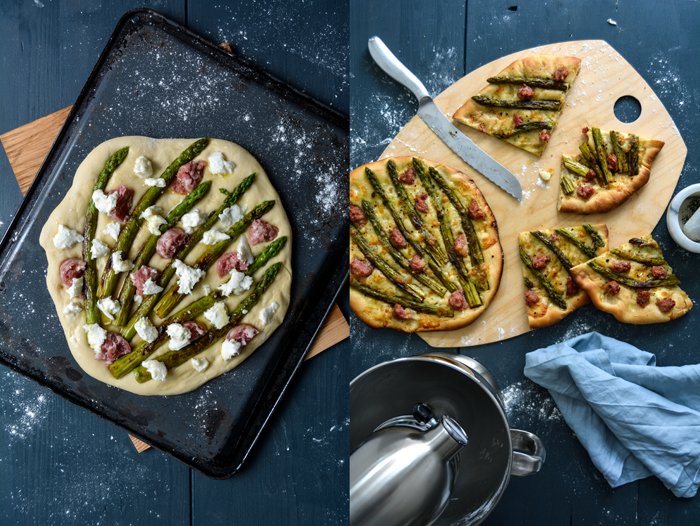
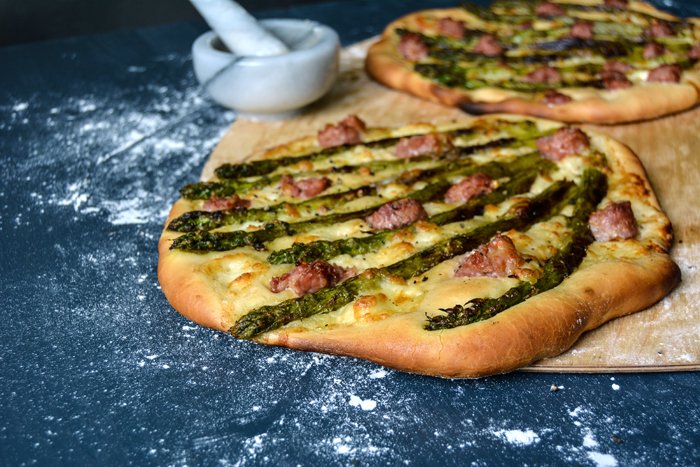
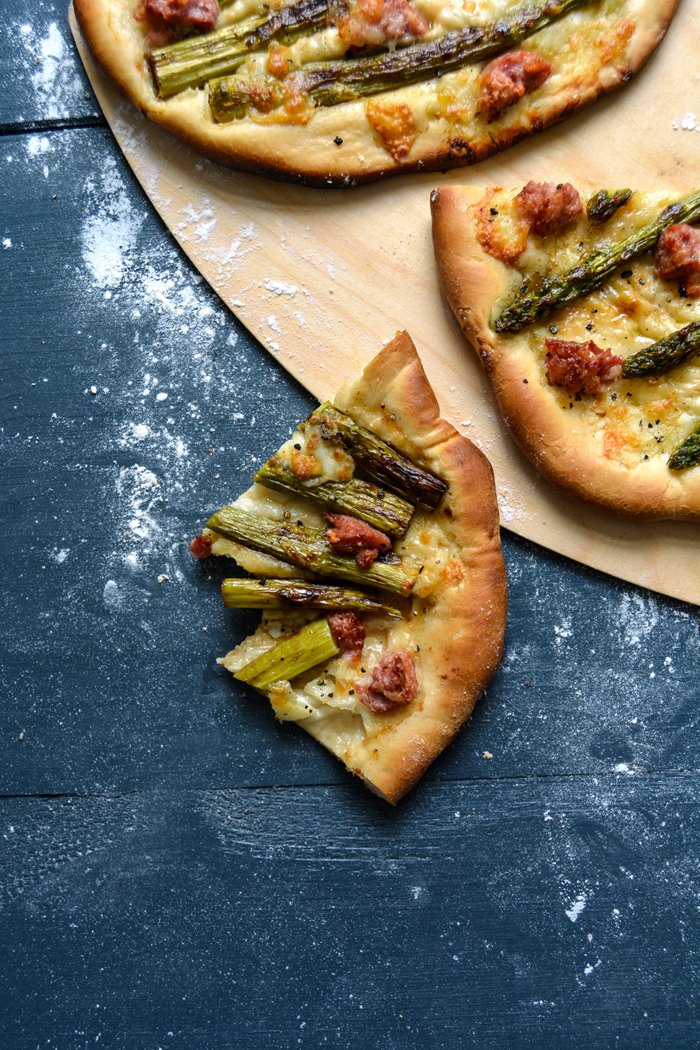
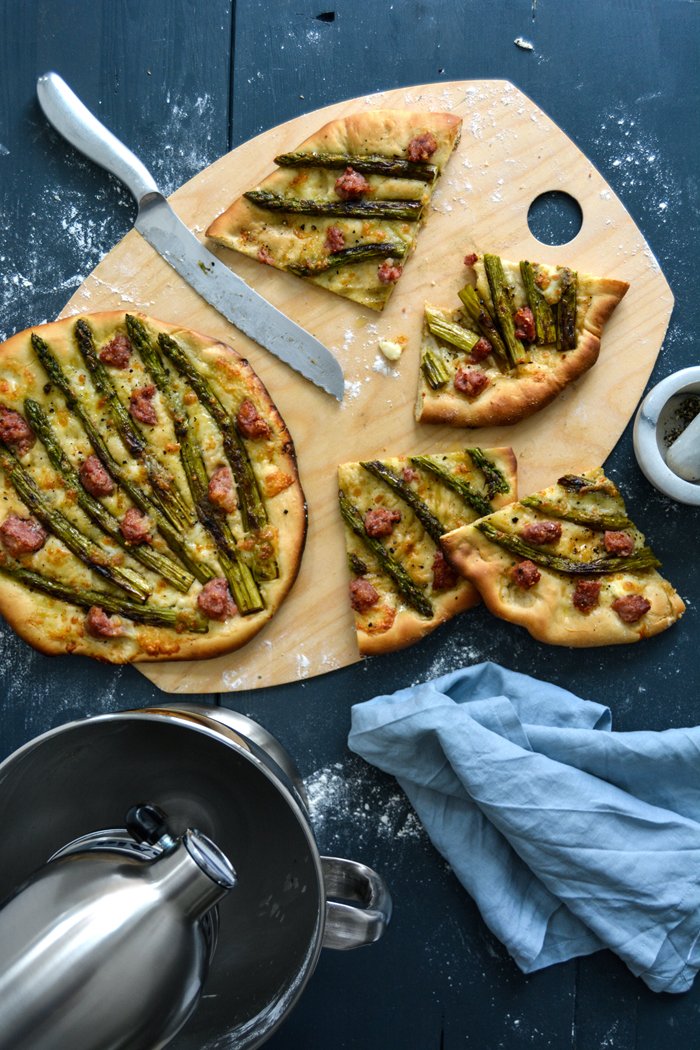
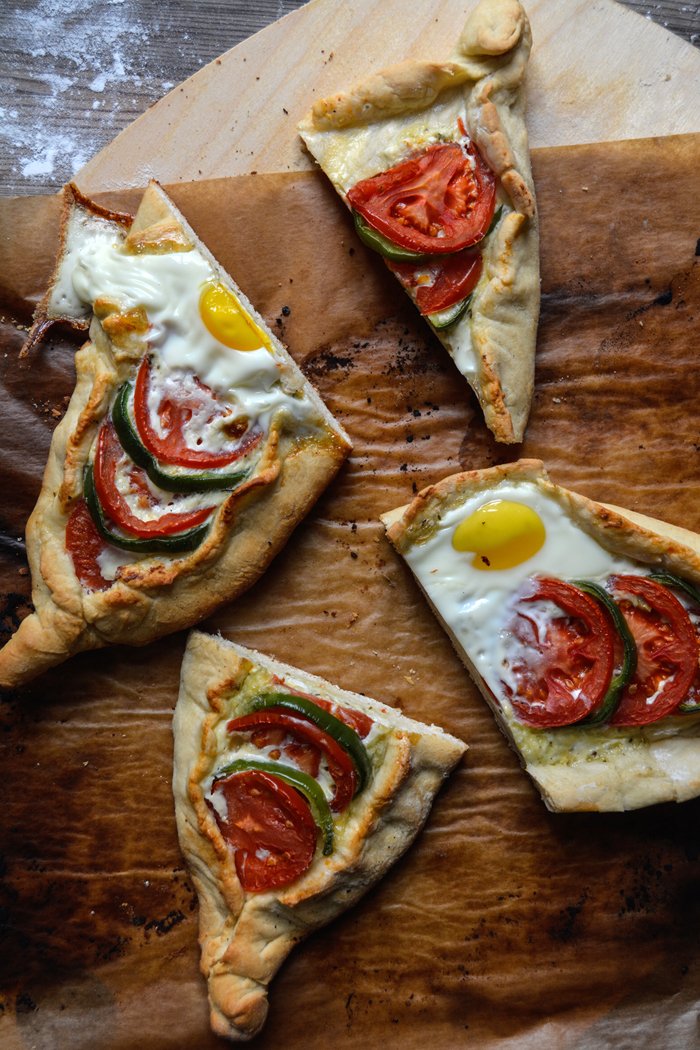
Pizza Bianca with Green Asparagus, Salsiccia, and Mozzarella di Bufala
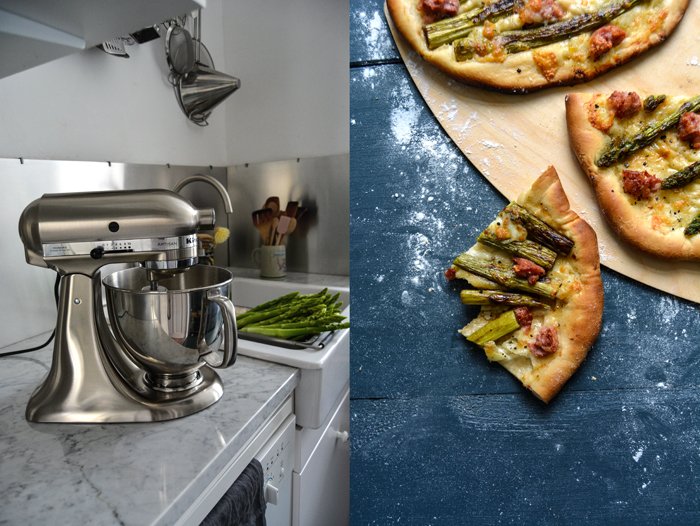
I got my first KitchenAid and I feel like a little girl on Christmas Eve. To call the current mood in my kitchen excitement would be a serious understatement.
After years of seeing - and admiring - these sparkly, polished beauties in the kitchens of my friends and family (my sister has two!), the time had come to get my own. At a certain age, one deserves these special treats. I'm a strong believer that it's good to wait for things in life, it strengthens your character and makes you deeply appreciate what you have. But 20 years of waiting was more than enough, that's how long it took me to finally see this powerful stand mixer on my marble counter tops.
In various phases of my life, I always had my favourite KitchenAid colour. In my young twenties, I loved the creamy white surface, followed by a fascination for the 50s and its soft pastels. Light blue, mint, or pink, I would have taken any of them. Then I got into puristic minimalism and only a black mixer would have made it into my kitchen. In my thirties, I fell for light yellow, but now, all of a sudden, I had to make a decision and decide which colour I would finally get and see for the rest of my life. It wasn't easy and it took a few visits to various appliance shops. In the end, I had to weigh the advantages and disadvantages of cream, yellow, black, copper (which looks really hot), and brushed stainless steel. This process brought back lots of memories of the different eras of my life connected to each colour. After a couple weeks, my decision was made: brushed stainless steel is the winner! When the large package arrived I couldn't wait to see my object of desire on my counter tops - I was almost hysterical, which is excusable in my eyes, it's been 20 years after all. So here it is and it looks amazing. The mixer's metallic surface fits perfectly to my white marble and brushed aluminium wall panels. I'm totally in love and can't stop looking at it.
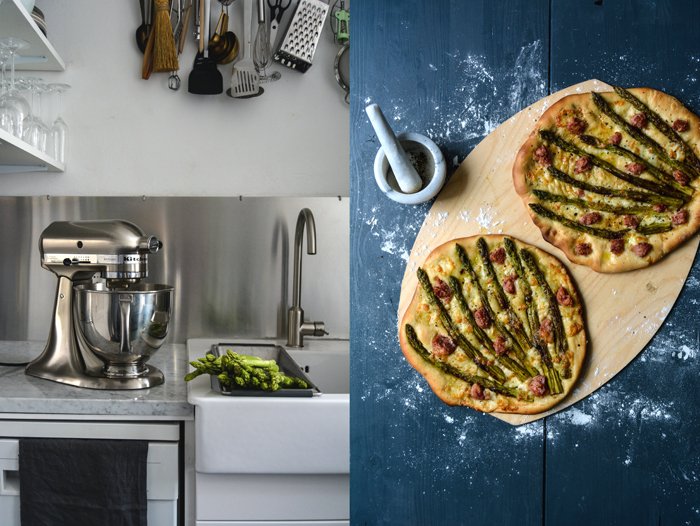
Testing its functionality was the next step, I had never used a KitchenAid before. My unbreakable hand mixer, a gift from my mother when I moved into my first flat two decades ago, has been a loyal partner during all my kitchen adventures. I was a little nervous and decided to start with two easy recipes - Sunday morning pancakes and Sunday evening pizza. This allowed me to get used to the three different attachments. My hand mixer only has two, but my new beauty offers a whisk, a paddle, and a hook - I needed a conference call with my sister to figure out when to use what.
Before I switched on the power, I had to call my boyfriend for this special moment. And this was our maiden voyage: I - rather the mixer - started beating the egg whites with such calm, persistence, and firm perfection that I thought I'd never touch my hand mixer ever again (sorry hand mixer). My next project - pizza dough - gave me the same satisfaction. The yeast dough was well mixed, smooth, and ready to be kneaded with my hands for a few minutes, which I always do to turn it into a soft and silky ball. I thought I'd use the time while the dough was getting mixed in the machine to prepare the toppings, however, I couldn't help but sit next to it with a glass of rosé wine in my hand and watch it work with elated enthusiasm.
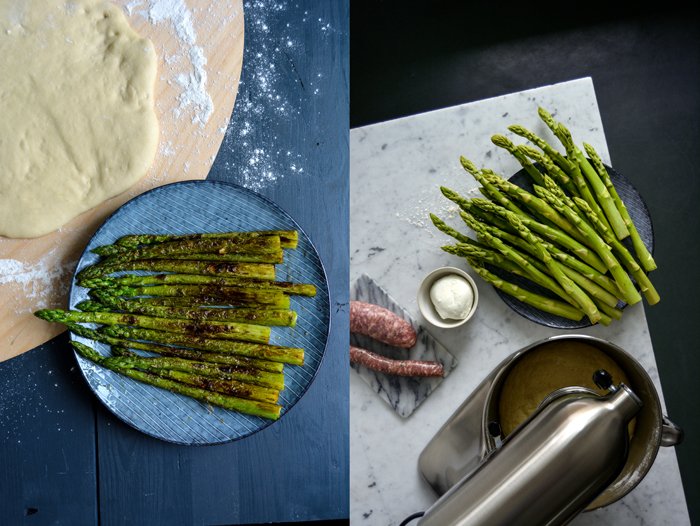
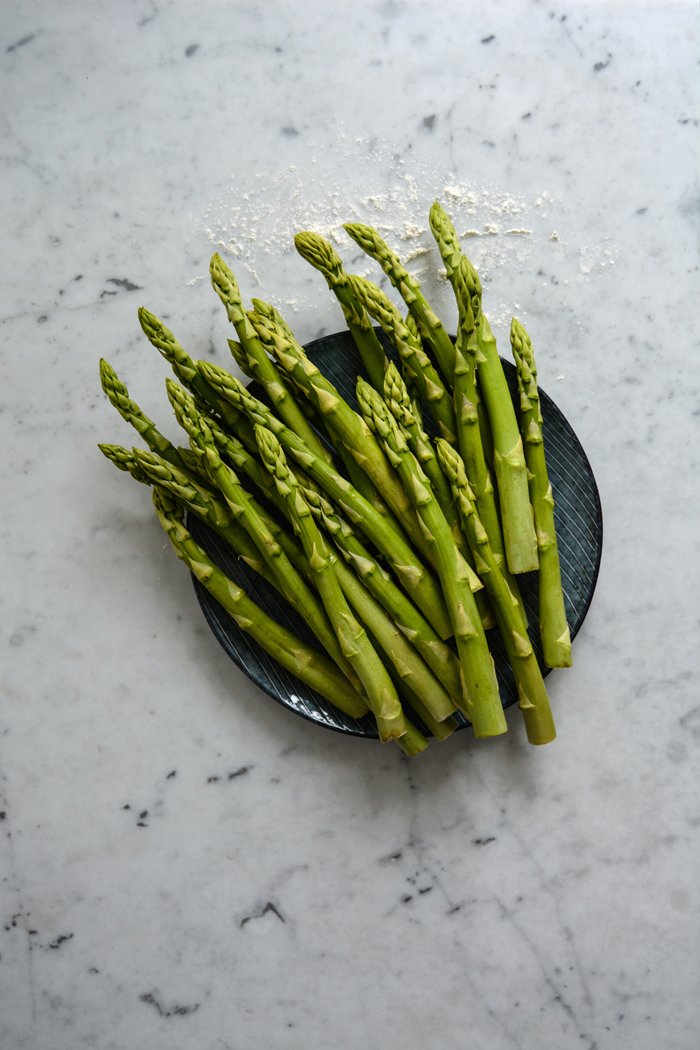
Our first KitchenAid pizza was such a great success that I made another one only three days later, but this time it was an oily pizza bianca topped with green asparagus, Italian salsiccia, and mozzarella di bufala. On our latest Saturday leisure trip, we went to the food market at Markthalle Neun in Kreuzberg in Berlin and enjoyed a luscious piece of very oily pizza bianca at Sironi. The baker, Mr. Sironi, went for a topping of broccoli, sausage, and mozzarella. It was very minimal and very good and a reminder that it's time for a white pizza in my kitchen. I find it lighter and quicker to prepare and it tastes just as good when it's cold, which makes it perfect for summer picnics or easy dinners on the balcony or in the garden. I'm really impressed by the simple combination of greens, mozzarella, and sausage. Asparagus is in season at the moment, but feel free to replace it with broccoli, leek, zucchini or whatever veg comes to your mind. You could also add a little garlic oil, which I don't find necessary. But we're talking about pizza, so everybody should just follow their personal preferences. Enjoy!
Click here for more pizza inspiration.
Thank you KitchenAid for helping me make my little kitchen dream come true!
Pizza Bianca with Green Asparagus, Salsiccia, and Mozzarella di Bufala
I start to prepare the dough 2 hours before I bake the pizza to give it enough time to rise and I bake it on a hot baking sheet, which has a similar effect to a pizza stone.
Makes 2 pizzas
For the dough
plain flour 350g / 2 2/3 cups
fast-acting yeast 1 (7g / 1/4 ounce) envelope
fine sea salt 1 teaspoon
water, lukewarm, 180ml / 3/4 cup
olive oil 6 tablespoons
For the topping
olive oil
green asparagus, trimmed, 14 young stalks
flaky sea salt
black peppercorns, crushed in a mortar
large Italian salsiccia sausage (or any other coarse sausage), skin removed and cut into chunks, 1
mozzarella di bufala, torn into chunks, 125 g / 4 1/5 ounces
For the dough, combine the flour, yeast, and salt in the bowl of a stand mixer fitted with the dough hook. Add the lukewarm water and olive oil and knead on medium-high speed for a few minutes until well combined. If the dough is too sticky, add more flour. Transfer the dough to a table or countertop and continue kneading and punching it down with your hands for about 4 minutes until you have a smooth and elastic ball of dough. Place the dough back in the mixer bowl, cover with a tea towel, and let rise in a warm place, or preferably in a 35°C / 100°F warm oven, for about 60 minutes or until doubled in size.
While the dough is rising, prepare the topping: Heat a generous splash of olive oil in a large, heavy pan and sauté the asparagus, turning occasionally, on medium-high heat for about 7 minutes. Season with flaky sea salt and crushed pepper to taste and set aside.
When the dough has doubled in size, punch it down, take it out of the bowl, and divide into 2 parts. On a well-floured work surface or pizza peel, stretch or roll each piece of dough into a 28cm / 11" disc. Cover with a tea towel and let rise for about 30 minutes or until puffy.
Place a baking sheet (or pizza stone) on the bottom of the oven and preheat the oven to the highest temperature, 260°C / 500°F or higher.
Once the baking sheet is hot, carefully take it out of the oven, flip it over, and place it on a trivet or other heat-safe surface. Arrange 1 of the risen dough discs on the baking sheet and spread half the asparagus, salsiccia, and mozzarella di bufala on top. Push the asparagus gently into the dough. Sprinkle with 1 tablespoon of olive oil, a little flaky sea salt, and crushed pepper and bake on the bottom of the oven for about 10 minutes or until the crust is golden brown and crisp and the mozzarella is golden. Repeat to make the second pizza and serve hot or cold.


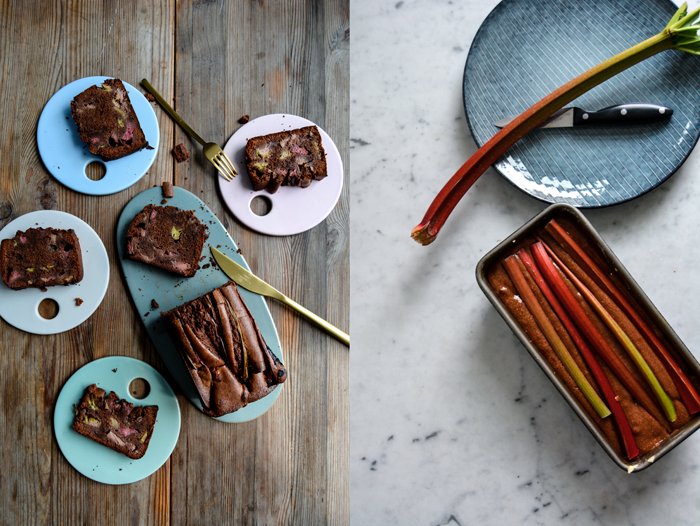
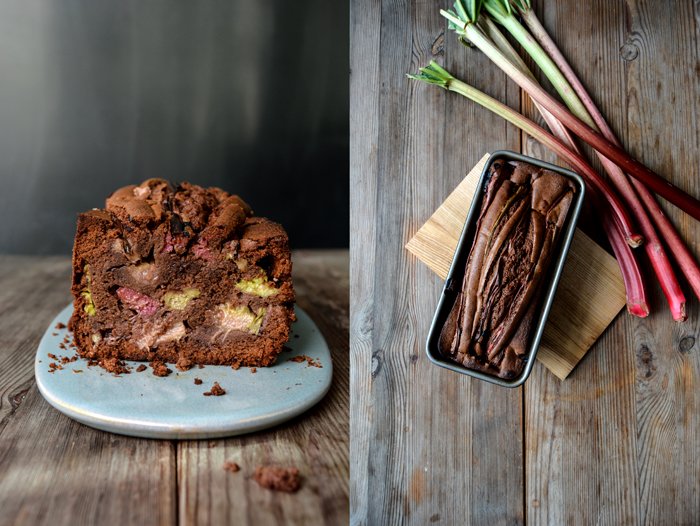
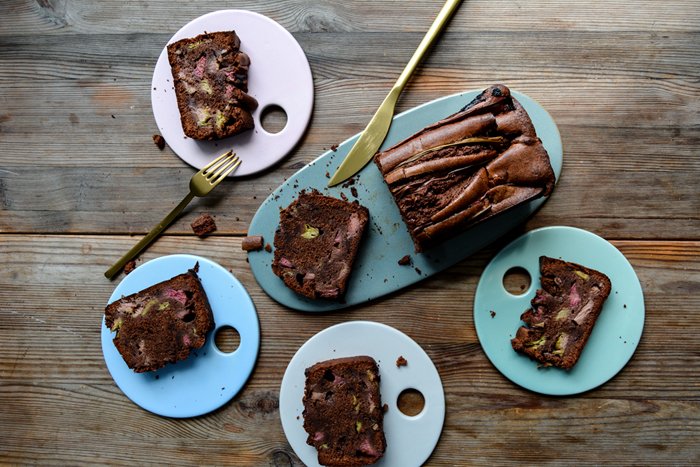
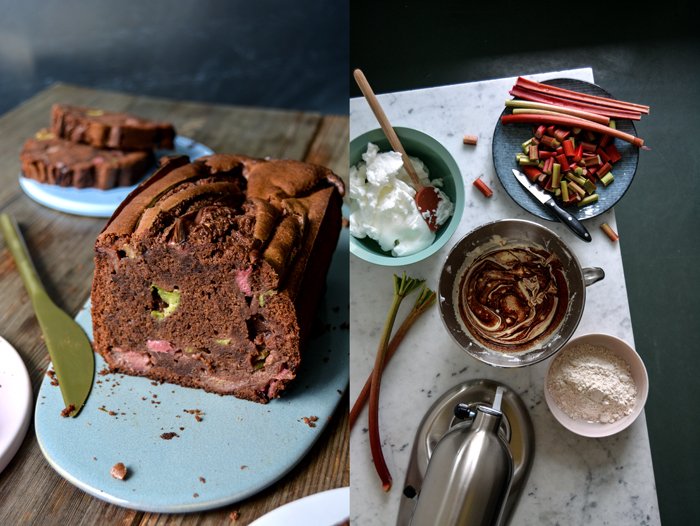
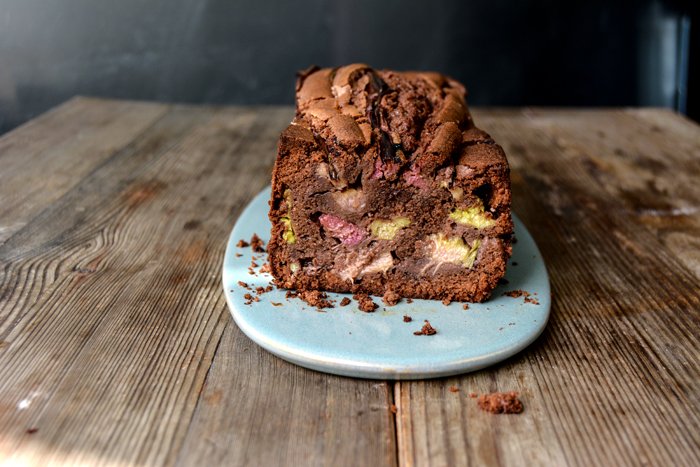
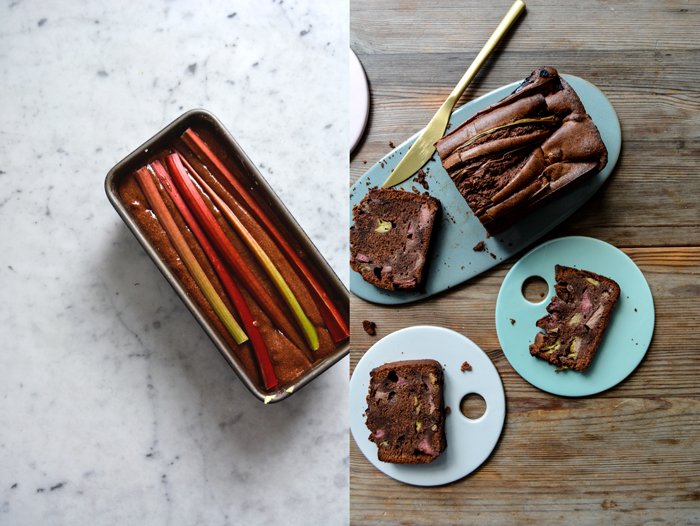
The juiciest Rhubarb Chocolate Cake
The amount of recipes I've been creating by request in the past few months could almost fill another book. My mind had to come up with all sorts of sandwiches, roasts, seafood dishes, salads, and cakes, which to be honest, is one of the most satisfying things I do amongst all the fields that I've worked in since I started my blog. I love to write and take food photos, but there's something very calming and, at the same time, very exciting about creating recipes. Re-thinking culinary traditions, playing with old and new combinations and various ingredients in my head until a whole dish finally comes to the table is my true passion. It's one of the few things that never pressures me, it comes out so easily that I wouldn't dare to call it work.
Working on so many new creations at the same time has one side effect: I have to remind myself to keep it simple - my personal kitchen mantra. I tend to go further and further, adding more and more ingredients, and forgetting that kitchen magic often lies in the little details. A small change can add a completely new quality to a dish, like to my chocolate cake - or the darkest Gâteau au Chocolat. It's a good cake, with chocolaty depth and a moist texture. As in all of my baked treats, I prefer chocolate over cocoa powder, taste and texture is what I'm after when I want to satisfy my chocolate cravings. Back to my cake, there was no need to improve on this formula, it's just right, but I've been wanting to bake a rhubarb cake for days so I just combined the two. I added so much rhubarb to my dark loaf cake that it ended up being the juiciest and fruitiest chocolate cake I ever baked - with a slightly sweet-sour note.
A short note: I let the loaf cool for just a few minutes before I cut it - I was too impatient - but I recommend letting it cool completely, otherwise it's a little too fudgy. So be patient, let it cool, and enjoy! For my Gâteau au Chocolat, I used very dark chocolate (99%), however, for this rhubarb chocolate cake I would go for a lighter one, 55% was my chocolate of choice.
Rhubarb Chocolate Cake
Serves 6
trimmed rhubarb 450g / 1 pound
dark chocolate (about 55%) 150g / 5 ounces
butter 150g / 2/3 cup
organic eggs 4
a pinch of salt
plain flour 130g / 1 cup
ground cinnamon 1 teaspoon
ground cardamom 1/2 teaspoon
granulated sugar 180g / 3/4 cup plus 2 tablespoons
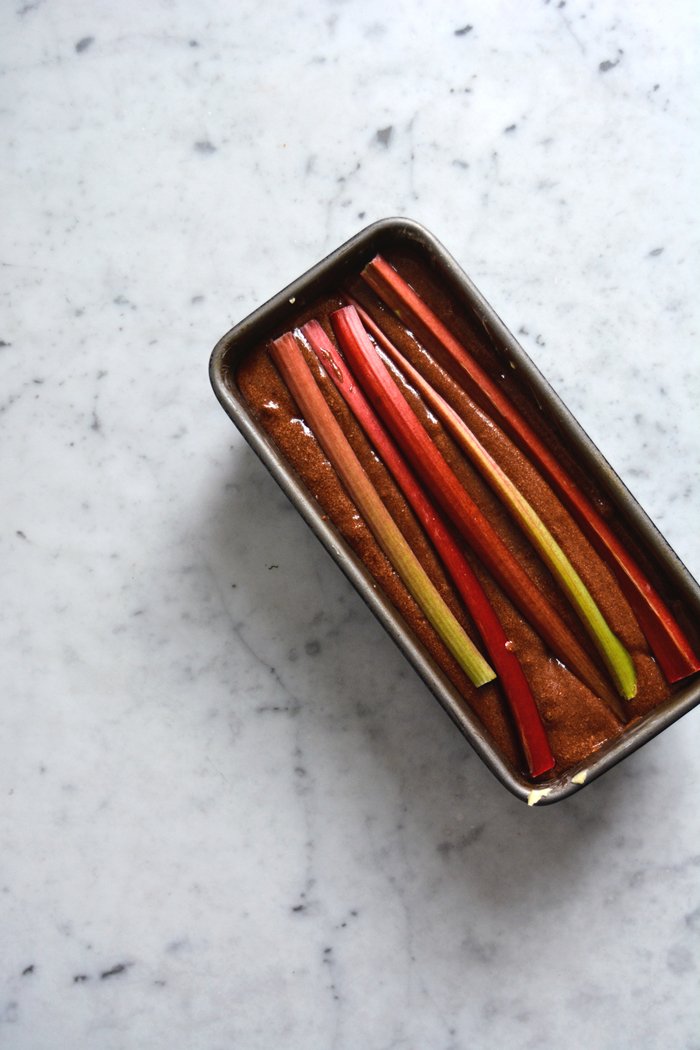
For the top of the cake, cut 5 thin long pieces of rhubarb, about 25cm / 10" long. Cut the remaining rhubarb into 2cm / 3/4" long pieces.
Set the oven to 180°C / 360°F (preferably convection setting) and butter a 11 x 25cm / 4 1/2 x 10" loaf pan.
In a medium saucepan, melt the chocolate and butter over low heat, whisk well, and let cool for a few minutes.
Whisk the egg whites and salt until stiff.
Combine the flour, cinnamon, and cardamom.
Mix the egg yolks and sugar until light yellow and thick, then whisk in the chocolate-butter mixture. Using a wooden spoon, stir in the flour mixture and mix until well combined, then gently fold in the beaten egg whites. Fold in the shorter rhubarb pieces and scrape the batter into the buttered pan. Arrange the long rhubarb pieces on top of the cake and bake for about 75 minutes (slightly longer if using a conventional oven) or until the cake is golden brown and firm on top. If the top of the cake gets too dark, cover it loosely with aluminium foil. Check with a skewer, it should come out almost clean. Let the cake cool completely for a couple hours before you take it out of the pan.


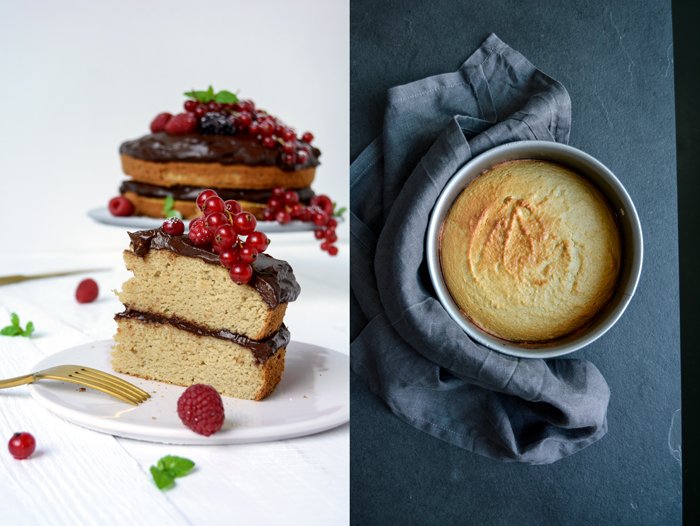
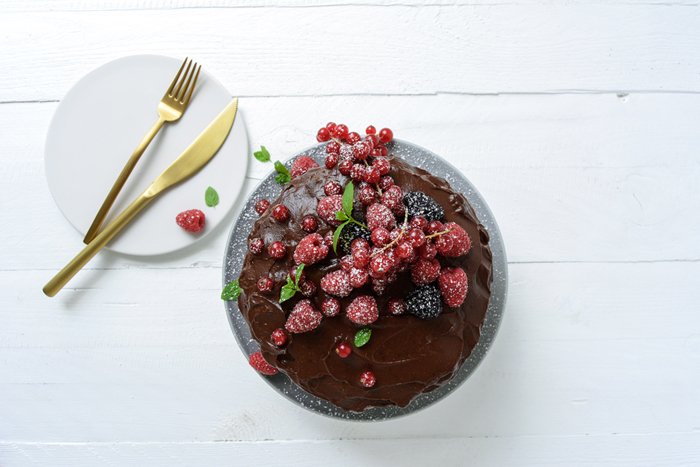
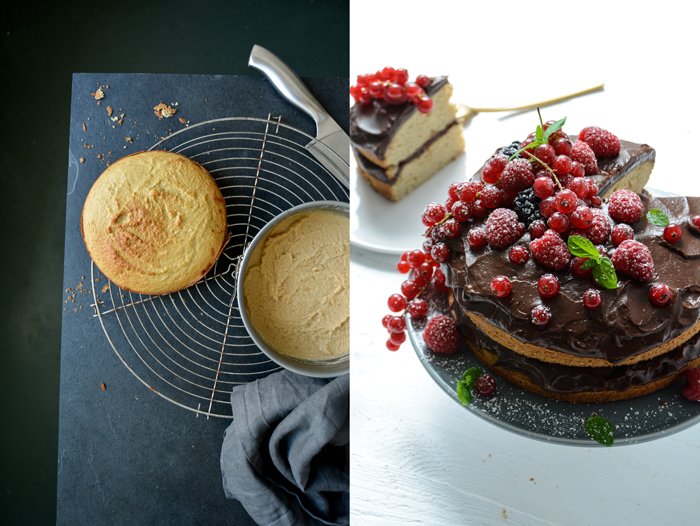
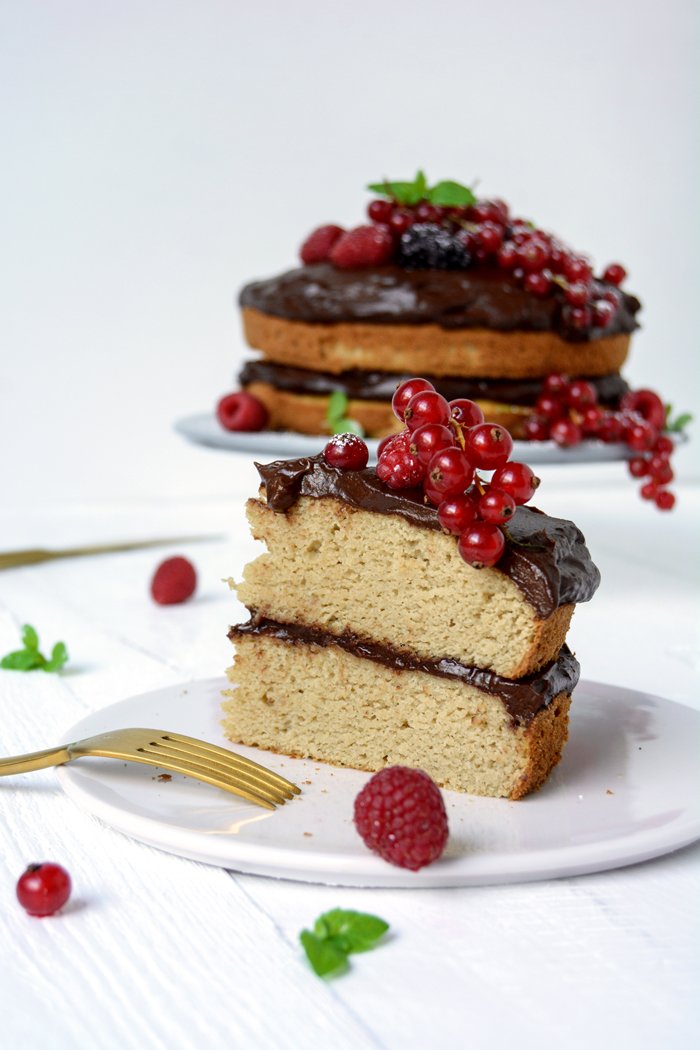
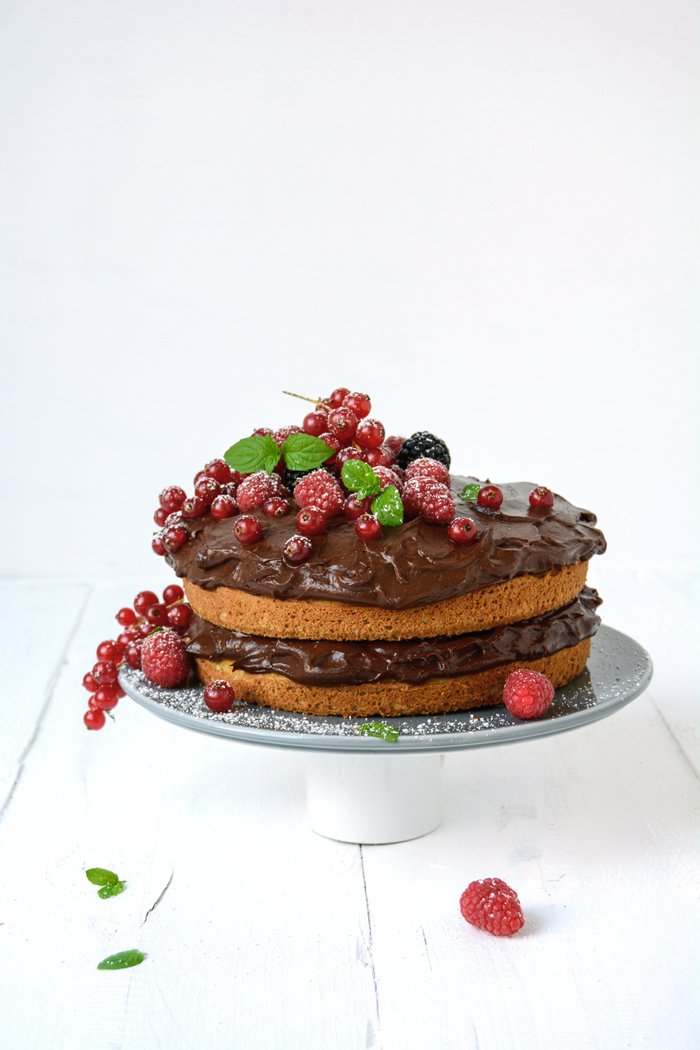
Hemsley + Hemsley's Cannellini Sponge Cake with Chocolate Avocado Frosting
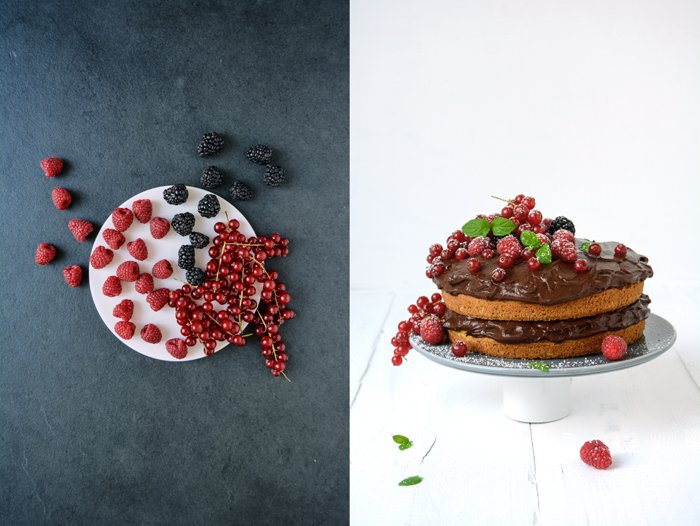
No flour and no butter - the Hemsley sisters did it again! The two gorgeous girls from London impressed me with a recipe that leaves out all the ingredients that I usually pull out of my pantry and fridge when I turn on the oven to bake a sweet treat.
There's a beautiful cake in the sister's new book Good + Simple that surprised and challenged my traditional idea of sweets and baking. When they published their last book I was in a similar situation, I gave their raw avocado lime cheesecake a try and I was more than a bit skeptical in the beginning. However, there was no need for any doubts, the Hemsley's taught me that you can make a cheesecake without cream cheese, using avocados instead. It has the same creamy texture, it tastes great, and it's healthy! But this time, Jasmine and Melissa went a step further, they made a sponge cake with canned cannellini beans and a little coconut flour. To my big surprise, the result looks like a sponge cake, feels like a sponge cake, and tastes like a sponge cake. It was a little like a science project that works out when you least expect it. I could not imagine how canned beans could turn into a spongy cake, layered with chocolate avocado frosting. I got used to the avocados from their last book, but the beans seemed a bit far fetched. I was wrong. It's kitchen magic, I don't know how, but the mashed legumes become a light cake (with the help of a few other ingredients).
I always believe that it's important to have an open mind in the kitchen, to exchange ideas with other great minds that love food just as much but maybe follow another diet, a different approach. Our culinary traditions can only evolve if we try out new recipes, ingredients, and combinations. I'm lucky, my own diet only follows my mood, I don't suffer from any allergies or food intolerance. You'll see a cakey nibble on my plate quite often during the week - and an even bigger piece on the weekend. My health doesn't mind my little sweet treats, but even I changed to white spelt flour (type 630) for all my baking recipes (sweet and savoury) a few years ago. I just prefer its nutritional value. So we all have to find out which kind of food makes us feel good, the body and the mind. The beans were a great reminder for me that there are many ways to enjoy the sweet side of life.
On my last trip to London, I visited Jasmine at the new Hemsley+Hemsley café at Selfridges in London. She and her sister told me about their latest project so enthusiastically when we last met in Berlin that I couldn't wait to see their new "baby". It's the perfect place to enjoy a little shopping break, to snack and feel good. If you happen to be in the capital and you're after the kind of food that gives you energy during a busy day and tastes delicious at the same time, follow the Hemsley's to their new kitchen.

Cannellini Sponge Cake with Chocolate Avocado Frosting
I only made half the recipe and used an 18cm / 7" springform pan. I baked the sponge cake for 25 minutes.
Serves 6-8
For the sponge cake
coconut oil, melted, 125g / 1/2 cup, plus extra for greasing
cannellini beans, drained and rinsed, 3 cans (each 400g / 14 ounces)
medium eggs 9
vanilla extract 1 tablespoon (I used a pinch of fresh vanilla seeds, scraped out of the bean)
maple syrup 220ml / 3/4 cup plus 3 tablespoons
apple cider vinegar or lemon juice 5 teaspoons
coconut flour 90g / 3 1/4 ounces
baking soda 2 1/2 teaspoons
fine sea salt 1/4 teaspoon
fresh mixed berries 150g / 5 ounces, to decorate the cake
For the Chocolate Avocado Frosting
medium, ripe avocados 4
coconut oil, melted 5 tablespoons (about 75g / 2 1/2 ounces)
raw honey 8 tablespoons (to taste)
cocoa powder 10 tablespoons
vanilla extract 1 tablespoon
lemon juice 2 tablespoons
orange extract (not essence) 1/2 teaspoon (I used a little freshly grated orange zest)
a pinch of sea salt
Preheat the oven to 180°C/350°F (convection setting), then line the bases of two 25cm / 10" springform pans with baking parchment and grease the sides with butter or coconut oil. (I baked one cake after the other in the same pan and kept the dough in the fridge while the first one was baking.)
Blend all the ingredients for the frosting together in a food processor until smooth, adding a dash of cold water if needed. Adjusting the flavouring to taste, then transfer to a bowl and set aside in the fridge.
For the cake, add the cannellini beans to the cleaned food processor bowl along with the eggs, vanilla extract, and maple syrup and blend until smooth. Add the remaining cake ingredients, except the berries, and blend to combine.
Divide the cake batter between the prepared cake tins, spreading out evenly and smoothing the surface. Bake in the oven for 35 minutes until well risen and lightly golden on top. Check the cakes after 25 minutes and swap the tins between shelves, if necessary, as they will cook at different rates.
Remove from the oven, transfer to a wire rack and allow to cool completely in the springform pans before turning out.
While the cakes are cooling, gently wash the berries and dry them carefully using kitchen paper or leave to air dry; they must be thoroughly dry before adding to the cake.
Spread half the frosting on one of the cooled sponges, top with the other sponge and spread over the rest of the frosting. Store in the fridge and bring to room temperature to serve. Decorate with the fresh raspberries just before serving. (I sprinkled the berries with icing sugar and added a few mint leaves.)


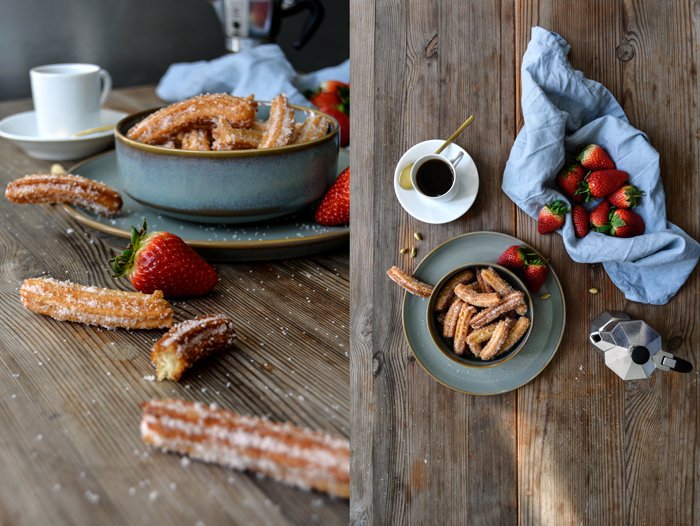
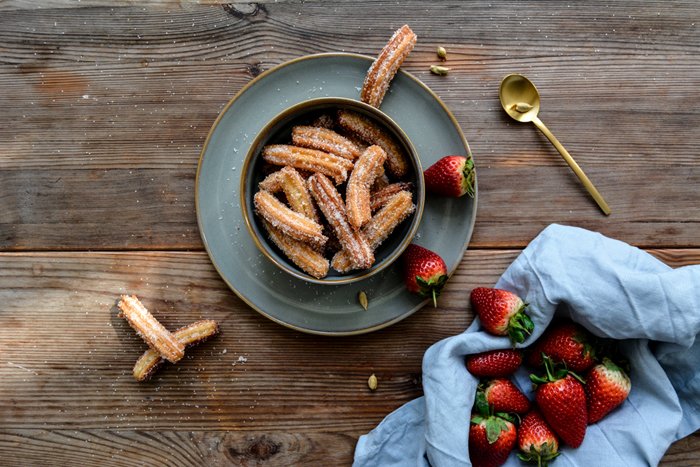
Cardamom Churros on the table and my German book is ready for pre-order!
I almost live in my kitchen, day and night, at least that's how it seems at the moment. Although I'm used to spending a lot of time in this room - and I love it, that's the reason I started this blog - but I barely see anything other than my pots and pans right now. I was asked to develop a bunch of recipes for a project (which I can't talk about yet) and this task ties me to my kitchen again, just like a year ago when I worked on my book. It's so funny that some things tend to repeat annually and you don't really know why. It becomes a theme without a deeper sense to it. So I accept, it's the second year in a row that I spend the month of May developing, cooking, and shooting recipes and producing more food than two people can possibly eat. But luckily, our friends are more than pleased about these circumstances. I cook and bake and they indulge in plates of cakes, roasts, seafood dishes, and salads.
Although I basically do exactly the same as last year, it feels different. It's not my book, these aren't my blank pages that I have to fill. I have to accommodate someone else's vision, which is fine as I have complete freedom with the recipes. But when it comes to taking the photos, I have to match my own ideas with the visual concept that my partner in crime brings to the table. It works surprisingly well but when it comes to the amount of sauce - as banal as it may seem - there are worlds between us. I like it a bit less soggy, however, my creative supervisor prefers more juices on the plate. We compromise and meet in the middle.
The fruits of last year's kitchen work are getting closer and closer to coming to the analogue world - the Eat In My Kitchen book is at the printing press! After I shared the Amazon.com and Amazon.co.uk pre-order links for the English book a few weeks ago, it's time for the big announcement for my German readers: Eat In My Kitchen - Essen, Kochen, Backen und Genießen is ready for pre-order on Amazon.de! It will be published on the 26th September, a few days before the English book (on the 4th October). The cover picture is the same as the English book and we also kept the subtitles quite similar. Apart from the last word, 'to treat' in English (einladen / verwöhnen in German) became 'genießen' (meaning 'to enjoy'), the books are the same and both completely written by myself (I was offered a translator for the German version but that felt a little weird).
My book emerged out of this blog, which is all about cooking, baking, eating, treating, and enjoying the pleasures created in this marvelous space - my kitchen!

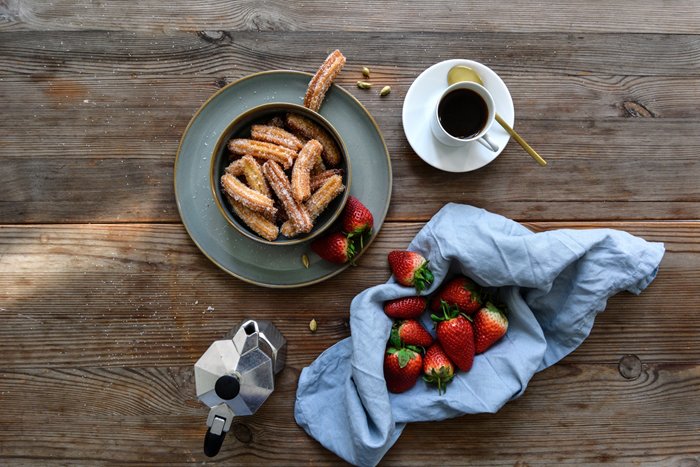
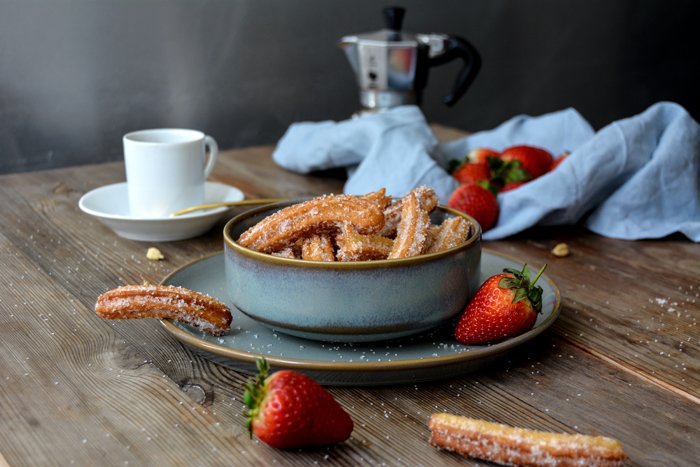
One of the latest creations I passionately enjoyed from my kitchen were churros, the famous Spanish fried pastry snack. It was the first time ever that I made them and I was impressed how easy they are to prepare and how good they taste when they are made at home. Fresh out of the boiling oil, soft inside and golden and crisp on the outside, I tossed and coated them with aromatic cardamom sugar and ate them warm with fresh strawberries. The combination is perfect as it balances the churros' richness with a bit of sour-sweet fruitiness.
I love my kitchen, especially when it produces such deliciousness.

Cardamom Churros
Serves 4
For the topping
granulated sugar 150g / 3/4 cups
ground cardamom 1 1/2- 2 teaspoons
For the churros
sunflower oil, for frying, about 1,3l / 5 1/2 cups
water 350ml / 1 1/2 cups
olive oil 2 tablespoons
granulated sugar 1 tablespoon
fine sea salt 1/4 teaspoon
plain flour 200g / 1 1/2 cups
organic egg 1
For serving
fresh strawberries
For the topping, combine the sugar and cardamom and spread on a deep plate.
In a large, heavy pot or Dutch oven, heat the sunflower oil over medium-high heat.
In a large saucepan, bring the water, olive oil, sugar, and salt to the boil. Take the pot off the heat, add the flour, and, using a wooden spoon, stir vigorously until smooth and the dough comes away from the side of the saucepan. Transfer the dough to a large bowl and let it cool for about 10 minutes. Using a spoon, beat in the egg and mix until well combined.
When the oil is hot – dip in the bottom end of a wooden spoon, little bubbles, should form around it – fill the dough in a pastry bag fitted with a large open-star tip (about 1cm / 3/8"). Carefully squeeze the dough into the hot oil and snip it off when the churro is about 7cm / 2 3/4" long. Fry about 5-8 churros at a time, depending on the size of your pot, and turn them a few times, using 2 large spoons. The churros should be done and golden after about 4-5 minutes. If they turn dark quicker, turn down the heat a little. Take them out with a slotted ladle and transfer them to the plate with the cardamom sugar. Toss and coat them and keep them in a large bowl while you continue frying the remaining dough. Serve warm with fresh strawberries - and preferably with a dark espresso.
Churros taste best on the first day. You can freeze them once they are fried, but they become a little rubbery (my aunt still enjoyed them though).


Blueberry Victoria Sponge Cake, London, and my first book presentation
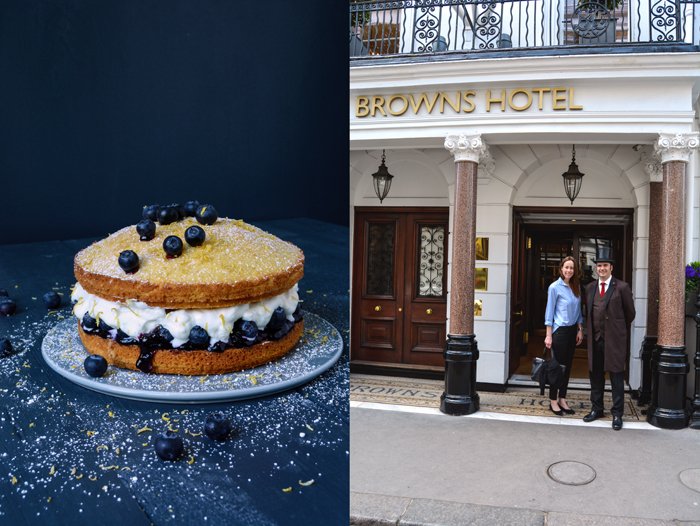
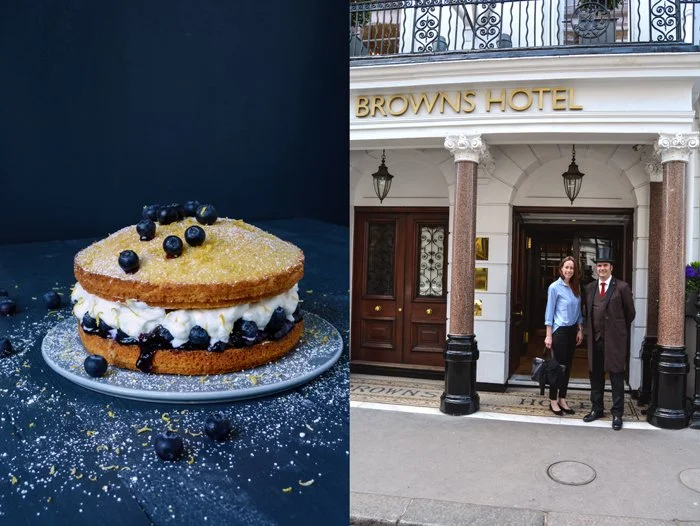
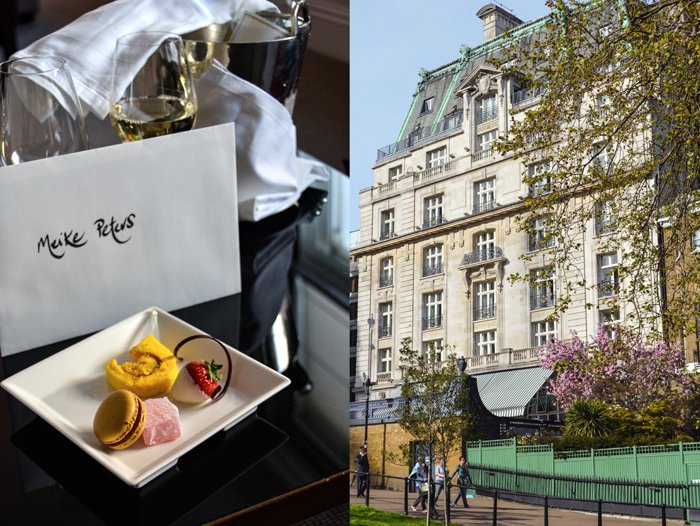
London welcomed me with blue skies and the brightest sunshine - the city looked like a blossoming beauty as I stepped off the train. It was supposed to be a two day work trip but spring temperatures made it feel like a little holiday. Great food and wine and the company of wonderful people almost made me forget why I went to the capital: my publisher's London team invited me to present my Eat In My Kitchen book for the first time at the Photographers' Gallery. To say that I was nervous, is a slight understatement. I drove the people around me crazy in the past few days! We just finished the last edits for my book this week, which means I can't change anything anymore and I'm not yet sure if I like this feeling. Now I have to learn to let go. But the thought of talking about it in front of 30 people straight after closing the last pages of my book to send it to the printing press felt a little overwhelming.
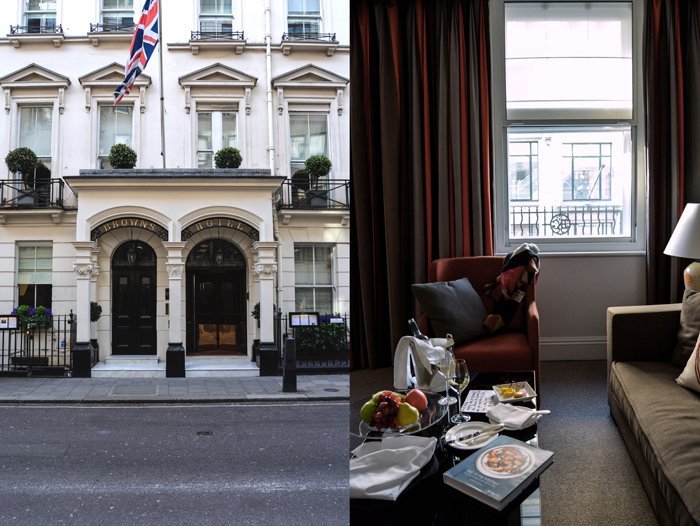
I booked an early flight on Wednesday morning so that I'd have the day to myself. I wanted to have enough time to meet a couple special people. My first stop was the gorgeous Brown's Hotel in Mayfair where I stayed for the night. My last visit to London - and a scrumptious meet in your kitchen tea time feature - made me fall in love with this wonderful hotel. It's the perfect choice when you need a relaxing place to stay during a busy trip. London is like a beehive but Brown's Hotel is the calm oasis you can go back to to rest. Thank you Sophie Grounds for making me feel so good again!

A stroll through the sunny streets of Mayfair took me to busy Oxford Street and the charming building of Selfridges. I came here to visit Melissa Hemsely at the sisters' brand new Hemsely + Hemsley Café located on the third floor of the luxury department store. It's a cozy place that's only been open for a month and it was totally packed. All the tables were taken and I saw lots of happy faces enjoying beautiful dishes from the girl's books, like quinoa roasted vegetables with basil pesto (delicious!), salmon burger with lime slaw, and the sisters' fantastic sweets. We chatted about our books - they just published their second book called Good + Simple - and I also got to try a wonderfully juicy banana cake that's not on the menu yet.
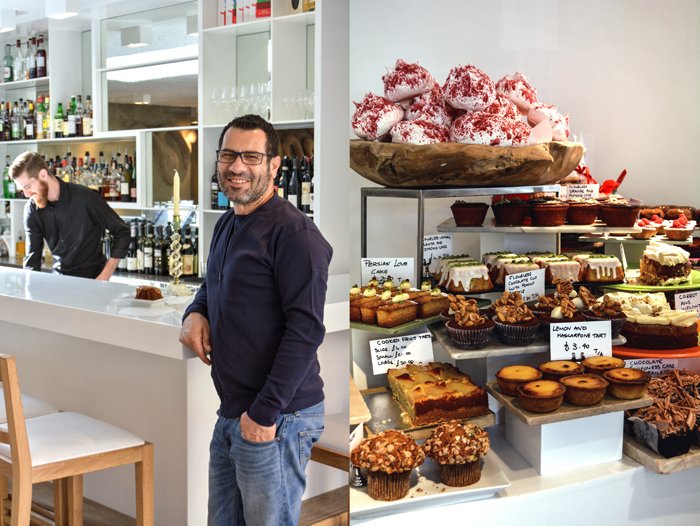
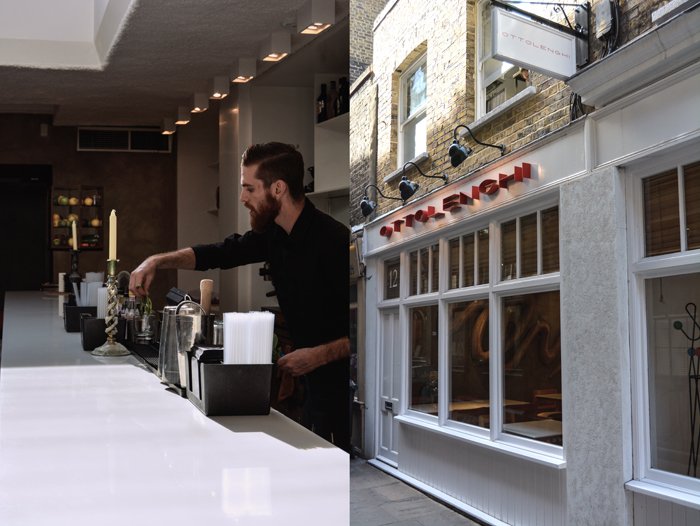
Spitalfields was next, and here I met a man whose work I've admired for quite a while and who I got to know through another one of my meet in your kitchen features: Sami Tamimi. This man is a great inspiration, he's open and charismatic and he talks with a warm, calm voice. Sami seems to smile the whole time, genuinely, and it felt like I've known him for years. He gave me such a flattering quote for my book and I wanted to thank him in person. Sami invited me to the latest addition to the Ottolenghi restaurants, their deli in the heart of Spitalfields that opened just a year ago. The place is bright and airy and the long counter right at the large window front is filled with the most beautiful food you can imagine. No one presents food as tempting, lush and perfect as the Ottolenghi crew. Large bowls filled with colourful salads and vegetables, the freshest meat platters, and piles of colourful meringue, delicate tartlets, and cakes dripping with thick icing turn this room into a food lover's paradise. I was in heaven.
Sami constantly works on new creations and tries the food prepared by his team working in and for the five restaurants, he's an absolute perfectionist. There was a little banana cake on a plate of six that he spotted, it wasn't as straight as the other ones, so it had to go - right into my mouth, I didn't mind. Seeing him in this environment, surrounded by the food he creates with so much passion and perfection, made me understand why he's so successful and why guests from all over the world love the Ottolenghi restaurants so much. The vision that the team behind Ottolenghi once had, has been brought to life completely. There's no compromise and that makes it so good. Before I left, we exchanged spices, and when I stepped out onto the street I felt a little sad to leave.
My dinner plans took me to an old, traditional pub, The Grenadier in Belgravia. It was an early night, I enjoyed my obligatory fish & chips and a glass of wine to the fullest and went to bed early - I had an exciting day ahead.
On the morning of my presentation, I felt like a student going to her exams, but after a few minutes of talking I was fine again - as always in life. The Photographers Gallery was the perfect surrounding and I can only recommend visiting one of their great exhibitions when you're in town. Unfortunately, I didn't have time for the arts but I had a lovely crowd to talk to about my book instead, which felt even better. Thank you everybody at Prestel for inviting me and for making me feel so welcome. It was a pleasure to meet you, Andrew, Emma, Oliver, Lincoln, and Will!
My London days called for a traditional British treat when I was back home in Berlin, ready for a cozy weekend on the sofa: a simple Victoria Sponge cake refined with lemon zest, filled with plump blueberries, jam, and whipped cream. It's an honest, uncomplicated treat that fits perfectly after a week of lots of excitement.


Blueberry Victoria Sponge Cake
You'll need 2 18cm / 7" springform pans for this cake. If you only have one pan (like me), divide the ingredients in half and prepare and bake one cake after the other. For the 3 eggs, beat them lightly and then divide in two equal portions.
For the sponge cake
plain flour 145g / 1 cup plus 2 tablespoons
cornstarch 15g / 2 tablespoons
baking powder 1 teaspoon
a pinch of salt
butter, at room temperature, 160g / 2/3 cup plus 1 tablespoon
granulated sugar 160g / 3/4 cup plus 1 tablespoon
freshly grated lemon zest 2 teaspoons
vanilla bean, scraped, 1/2
organic eggs 3
For the filling
blueberry jam, lightly beaten, about 4 tablespoons
fresh blueberries 120g / 4 ounces, plus a few berries for the topping
heavy cream, whipped, about 120-180ml / 1/2-3/4 cup
icing sugar, for the topping
Preheat the oven to 180°C / 350°F (conventional setting) and butter 2 18cm / 7" springform pans.
For the sponge cake, in a large bowl, combine the flour, cornstarch, baking powder, and salt.
In a large bowl, using in electric mixer, beat the butter, sugar, lemon zest, and vanilla seeds until light and fluffy. Add the eggs, one at a time, mixing well in between. Using a wooden spoon, fold the flour mixture into the butter mixture until well combined.
Divide the batter between the two buttered springform pans and make a slight dip in the middle of each of them (to prevent the cakes from rising too high in the middle). Bake in the oven for 20-25 minutes or until golden and spongy. Check with a skewer, it should come out clean. Take the cakes out of the springform pan and let them cool completely (about 15-20 minutes).
Transfer 1 sponge cake to a plate and cut off the tip if it rose to high, it shouldn't be too pointy but it doesn't need to be completely even either. Brush the top generously with jam and spread the blueberries on top. Spread the whipped cream all over the berries and sandwich with the second sponge cake (you don't have to even this cake out). Dust the cake with a little icing sugar and, if you want to decorate it with blueberries, dip the berries in the jam and stick them on top of the cake.


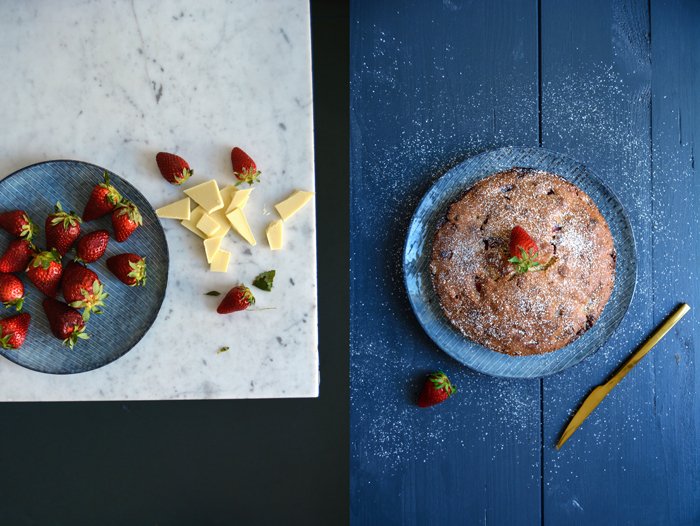
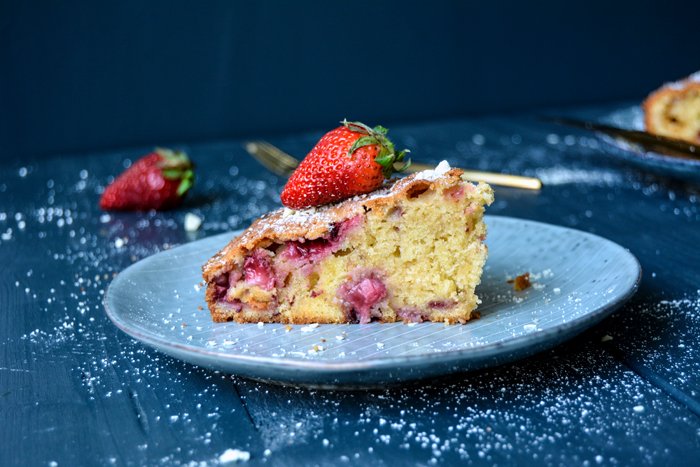
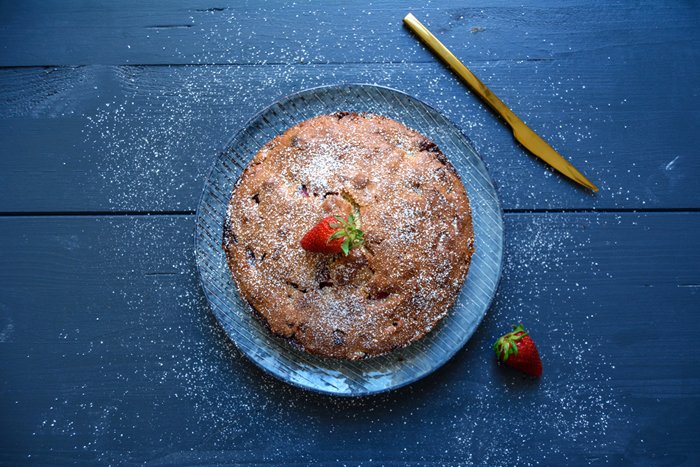
Strawberry White Chocolate Breakfast Cake

This is such a kiddy cake: it's light and fluffy, sweet and juicy, and packed with soft strawberries and creamy white chocolate. And although my childhood days are long over, I love this cake. I would even call it my favorite spring cake (for the time being, until my next discovery). And the fact that it's so easy to prepare - you just have to roll out of bed on a lazy Sunday morning and throw it all together - makes it a perfect weekend breakfast cake.
The combination of the ripe red berries and the milky chocolate works unbelievably well in a cake. I'm familiar with this duo in ice cream and other sweet snacks, but it never struck me as much as in this composition. I was worried that the sweetness could be a little overpowering, but there was no reason to worry, it was still balanced. In fact, this cute little teaser tastes so good that it was gone in less than 24 hours. I wanted to freeze a few pieces - my new habit to eat a little less sweets - but it was hopeless. One piece after the other kept disappearing until the last crumbs were gone and the plate looked almost clean. I think if I could choose between a plate full of cake or a little less on my hips, I'd always go for cake.

Strawberry White Chocolate Breakfast Cake
Makes 1 cake
plain flour 130g / 1 cup, plus 1 tablespoon for the strawberries
cornstarch 30g / 1/4 cup
baking powder 1 heaping teaspoon
fine sea salt 1/8 teaspoon
butter (at room temperature) 160g / 2/3 cup plus scant 1 tablespoon
granulated sugar 100g / 1/2 cup
vanilla bean, scraped, 1/2organic eggs 3
fresh strawberries, cut into cubes, 150g / 5 ounces
white chocolate, chopped, 100g / 3/1/2 ounces
For the topping (optional)
icing sugar or finely grated white chocolate 1 tablespoon
fresh strawberries 3-4
Preheat the oven to 180°C / 350°F (preferably convection setting) and butter a 20cm / 8″ springform pan.
In a large bowl, combine the flour, cornstarch, baking powder, and salt.
In a second large bowl, using an electric mixer, beat the butter, sugar, and vanilla seeds until light and fluffy. Add the eggs, one at a time, and mix well in between. Continue mixing for 2 minutes or until the mixture is thick and creamy. Quickly mix in the flour mixture until combined. Mix the strawberries with 1 tablespoon of flour and add, along with the chopped white chocolate, to the batter. Using a wooden spoon, gently fold in the berries and chocolate until just combined. Scrape the batter into the buttered springform pan, even it out, and bake for 40-45 minutes (slightly longer if using a conventional oven) or until golden on top. Check with a skewer, it should come out clean. Let the cake cool for a few minutes before you take it out of the springform pan.
Sprinkle the cool cake with icing sugar or grated white chocolate and decorate with strawberries.


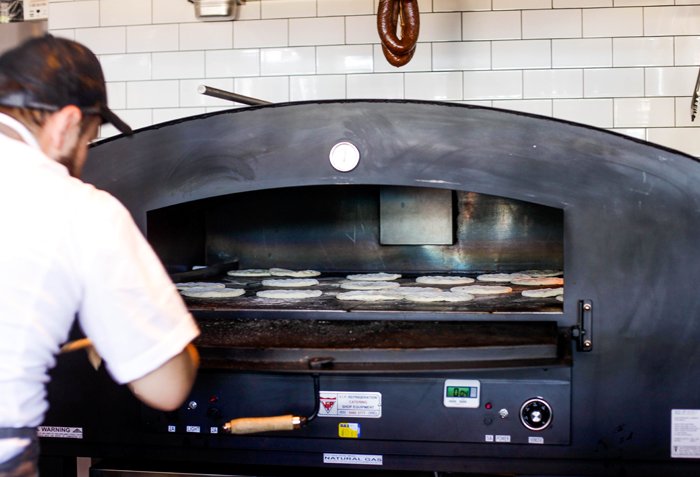
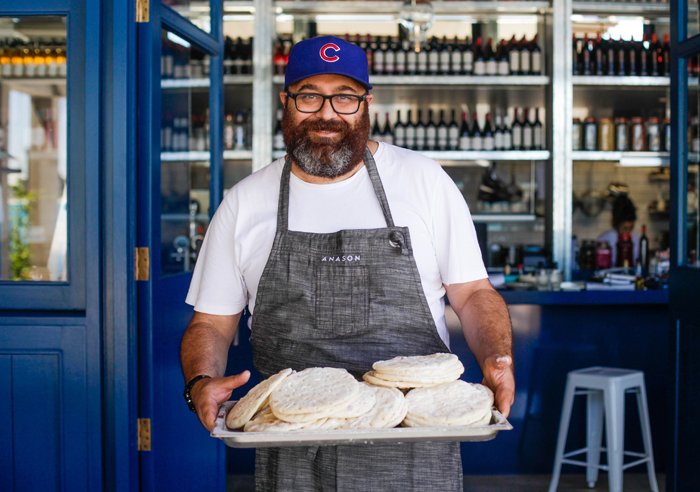
meet in your kitchen | Somer Sivrioglu's 'Anatolia', Sydney, and Cheese and Egg Pizza

Some books make you fall in love with its captivating pages from the moment you lay your hands on it. Anatolia, by Somer Sivrioglu and David Dale, is one of them. This outstandingly beautiful cookbook is rich in pictures, stories, and recipes. It takes you to another world of flavours, ingredients, and unknown combinations and it makes you want to go straight to your kitchen to bring this exciting new discovery right into your home - or at least a bite of it.
The first recipe I tried from this book, was pide, thin Turkish pizza. Somer makes it with an aromatic minced lamb topping, which is divine, however, when I gave it a second go, I sneaked in a dark Provençal olive tapenade, and shared it on eat in my kitchen. Somer liked my version so much that he shared it on Facebook, we started chatting, and here's the result: Our cross-continental Berlin-Sydney meet in your kitchen feature!
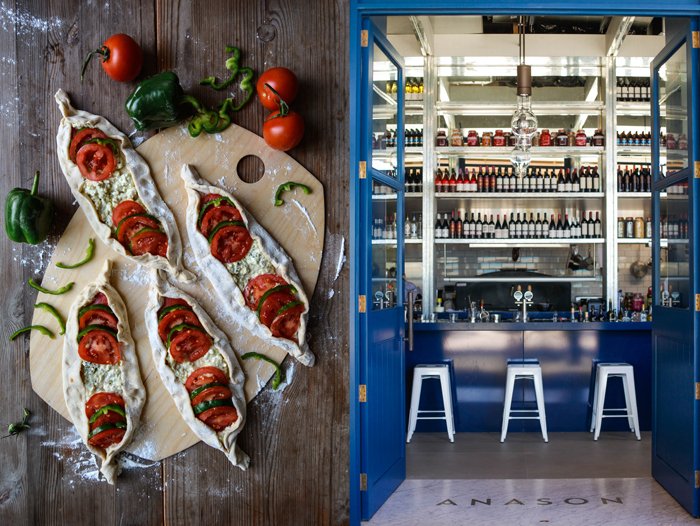
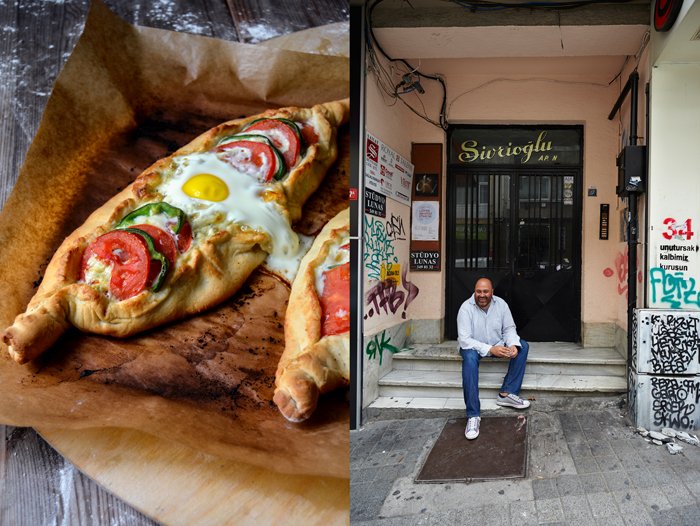
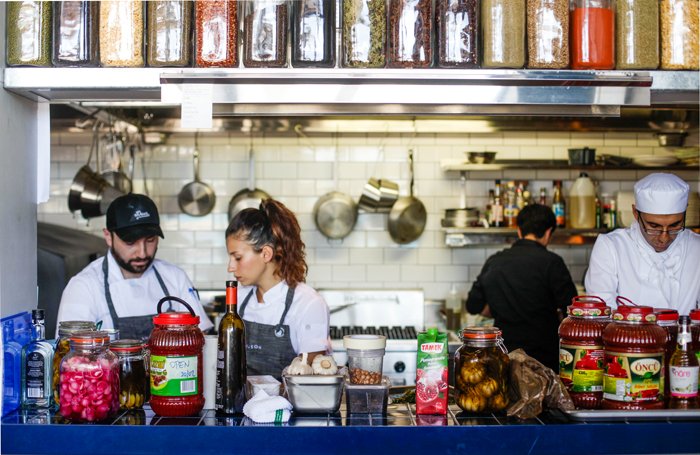
My guest grew up in Turkey, in Istanbul, where he lived with his family until he was 25. But one day, the young man decided to explore life on the other side of the world and moved to Sydney. His dream came true and he started an impressive career in food that led to two fantastic restaurants and an award-winning cookbook. Somer runs the popular Efendy that opened in 2007, featuring contemporary Turkish cuisine in the Balmain district. Anason - his second 'baby' - was next, which only just opened its doors to the public world, but it's already one of Sydney's new culinary hot spots.
This man is busy and I don't know how he managed to write a cookbook on top of his packed schedule as a chef, but he did, and the result takes the globe by storm: Anatolia: Adventures in Turkish Cooking won the prestigious international IACP award (former winners are luminaries such as Thomas Keller, Claudia Roden and Julia Child). I'm sure it will keep its place in the front row of my book shelf for quite a while. Somer is a passionate chef, he loves food, and this shines through in every project that he pulls onto his table. Congratulations!
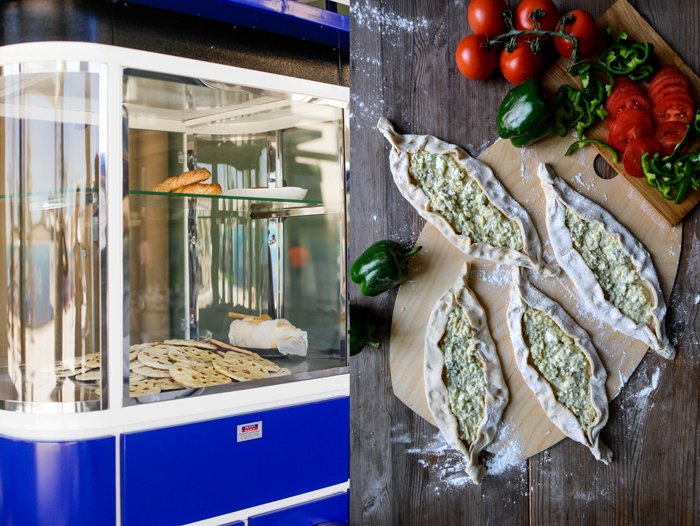
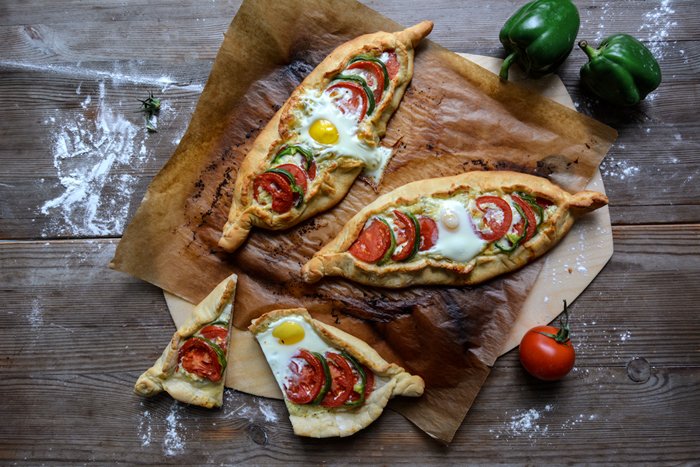
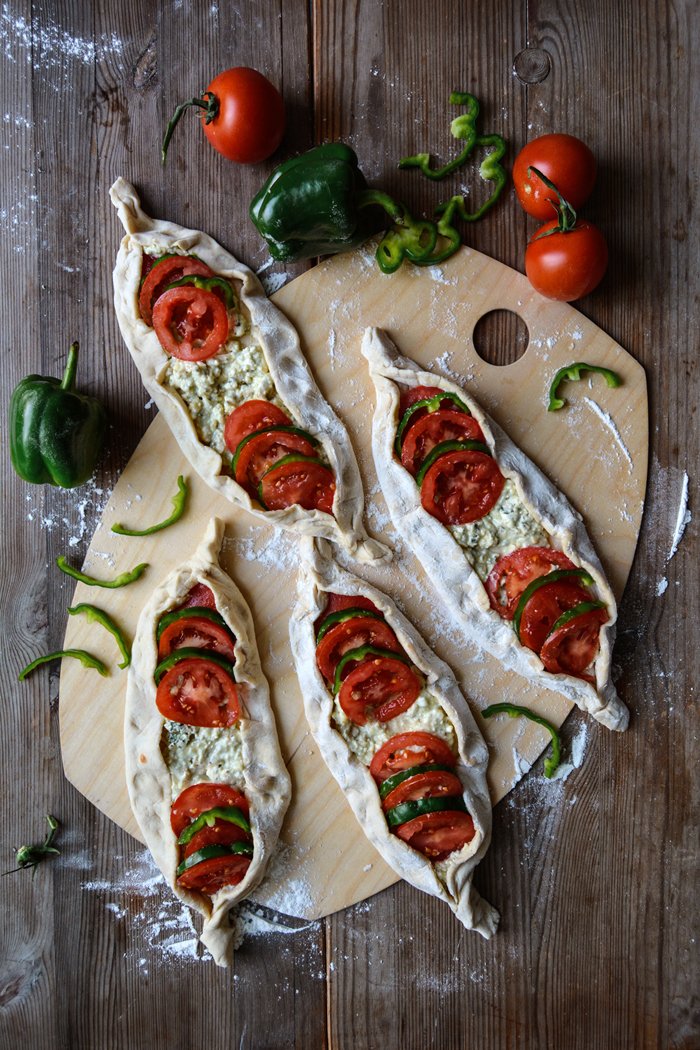
My weak spot for Turkish pizza made me go for another pide recipe from Somer's book, which I share with you today: slim pide filled with an aromatic cheese mixture of 4 different cheeses, green pepper, tomato, and a baked egg. This dish calls for a relaxed dinner on the balcony or in the garden, with a glass of chilled crisp white or rosé wine and a fresh salad on the side. May only the temperatures rise and summer begin!
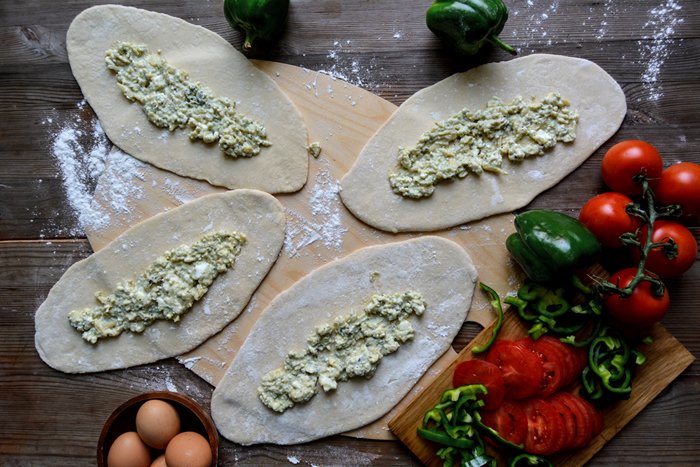
Pide with Four Cheeses
Serves 4
For the dough
dry yeast 1 tablespoon
water, lukewarm, 50 - 100ml / 3 1/2 tablespoons - 1/3 cup plus 1 tablespoon
granulated sugar 1 teaspoon
plain flour 300g / 2 1/3 cups
strong flour 150g / 1 cup plus 2 tablespoons
whole milk, lukewarm, 50ml / 3 1/2 tablespoons
salt 1 teaspoon
For the cheese filling
4 cheese-mixture, grated or crumbled, 100 - 140g / 3 1/2 - 5 ounces (depending on how rich you'd like your pide), such as feta, aged ricotta, blue cheese, and mozzarella or provolone
egg 1
chopped fresh oregano 2 teaspoons (or about 1/2 - 1 teaspoon dried oregano)
For the topping
large tomatoes, thinly sliced, 2
large green pepper, cut in half, cored, seeded, and thinly sliced, 2
eggs 4
vegetable oil 2 tablespoons (I used olive oil)
Dissolve the yeast in 50ml / 3 1/2 tablespoons of the water. Stir in the sugar and set aside for 5 minutes. It should start to form bubbles.
Sift the flours into a large bowl, make a well in the middle, and pour in the yeast mixture and the milk. Knead the dough for 10 minutes, or until it reaches earlobe softness. Add more of the water if necessary (I used all of the water). Cover the bowl with a damp tea towel and let it rest and rise for 30 minutes.
Add the salt to the dough and knead for 3 minutes. Place the dough on a floured work surface and form it into a cylinder, then cut it into 4 equal pieces. Cover and let rest for another 10 minutes.
Meanwhile, preheat the oven to 200°C / 400°F. If you have a pizza stone or tile, place it in the oven. Or leave a baking sheet in the oven so it will preheat.
Combine the crumbled cheeses in a large bowl. Add the egg and fold and mix until combined; stir in the oregano.
On a floured working surface, stretch the pieces of dough into ovals, about 30 x 20cm / 12 x 8" and 5mm / 1/4" thick; or use a rolling pin.
Transfer the 4 pides to 2 pieces of parchment paper. Spoon a strip of the cheese mixture in the middle of each oval, leaving a 5cm / 2" rim all around the edges. Fold over the 2 longer sides so they touch the filling but don't cover it. Join the folded edges at the top and bottom to make a boat shape. Press each into a point and twist to close tightly. Arrange 6 slices of tomato and 4 slices of pepper on each pide and break an egg into the middle. If you don't want the egg to be cooked through, bake the pides without the egg for 7 minutes, then add the egg, and bake for another 7 minutes or until golden brown.
Brush the tops of the dough with oil.
If you're using a baking sheet preheated in the oven, take it out of the oven and pull 1 parchment paper with 2 pides over onto the hot baking sheet; or transfer 2 pides with the parchment paper onto the hot pizza stone or tile in the oven. Bake for about 15 minutes or until golden brown. Enjoy warm.

Growing up in Istanbul, Turkey, in the 1970s and 1980s, during a time of severe political unrest, how would you describe your life as a child and teenager? What are your memories of those days?
I was born and raised in Kadikoy, Istanbul, one of the last multicultural suburbs of Istanbul, where the few of the last descendants of Greek, Armenian and other non-muslim population lived after the rise of nationalist policies drove them out of the city they lived in for many generations. Although the 1970s were chaotic, we felt safe on the streets as the community values were very strong back then, everyone knew and looked after each other.
Why did you leave Turkey in your twenties and move to Sydney?
I came to study for my MBA degree and to live in another country to find my own voice.
What does having your own restaurants – Efendy and Anason – mean to you, is it a dream come true?
My restaurant, Efendy, and the amazing team gave me the chance to represent Turkish food in a country where it was only known as kebaps and Turkish bread before we opened.
Your mother worked as a restaurant consultant, do both of you share a similar philosophy when it comes to food, cooking, and running a restaurant? Does she give you advice and do you listen?
She ran a number of restaurants /meze bars and I learned a lot from working with her, as to sharing the same philosophy fundamentally, yes, but I challenge myself to progress and she is a bit more conservative. I think we are both challenging each other in that aspect. She gives me advice, typically I would ignore, or pretend to ignore, but do it later on anyway (laughing).
Who is your biggest inspiration in the kitchen?
My grandma, Akife, was my childhood influence, as she was one of the first modern females to complete a home economics degree and she took cooking classes as part of it. She was a great example of how to create excellence from scarcity.
How did the Turkish cuisine influence your perspective as a chef? How do you develop new recipes?
Turkish food is all about seasonality, abundance and variety. As a chef, it made me think about using the right produce at the right season and applying various drying, pickling, and preserving techniques to my cooking. I used to create the recipes and get my chefs to cook them at Efendy, but now I ask them to create recipes that means something to them, from their heritage, and I learn and coach them to fine tune them to put in our seasonal menus at Efendy and Anason.
How long did you work on your cookbook Anatolia? Can you describe the creative process of this wonderful book, which you wrote together with David Dale?
Three years from concept to print. As a first time book author, I was lucky enough to work with one of the best food journalists, David Dale, and he coached me thorough the whole process. We have been to Turkey twice together visiting cities all over the country, talking to masters of craft and adapting the recipes to Australian and European readers where they can cook with common ingredients that can be found at any farmers' market.
What is your favourite Turkish and your favourite Australian dish?
Turkish: Kalkan - Black-Sea turbot. Australian: Mud crabs cooked over the BBQ.
What do you miss about Istanbul?
I am lucky enough to go back every year. Eating seasonal fish and drinking raki on the Bosphorus with family and friends is one thing I yearn for and do every time I am back. In fact, I am in Istanbul at the moment.
What was the first dish you cooked on your own, what is your first cooking memory?
I remember helping my grandma buttering the layers of her lamb borek, she had the scariest looking electrical round oven where all the cables and elements were exposed.
What are your favourite places to buy and enjoy food in Sydney?
My favourite shopping spot was at Growers Market at Pyrmont, unfortunately they closed, so currently it’s Eveleigh Markets every Saturday. Favourite cafés: Le Cafeier in Balmain and Edition Coffee pop-up at Barangaroo, both located next to my restaurants and keep me going all day and night.So many restaurants to mention but I love the next-gen Turkish restaurants in Sydney like Pazar Food Collective, Stanbuli and Sefa Kitchen.
If you could choose one person to cook a meal for you, who and what would it be?
I would love my babaanne (paternal grandmother) to cook something from her Albanian heritage, as we lost her when I was very young and never learned that part of my culinary culture.
You're going to have ten friends over for a spontaneous dinner, what will be on the table?
It won’t be on the table but the spring lamb on a spit would be next to the table and complemented with some mezes and seasonal salad accompanied by raki or a few nice bottles of Öküzgözü (Turkish red wine variety).
What was your childhood's culinary favourite and what is it now?
I loved my anneanne’s karniyarik and borek, nowadays, I love having a simple grilled fish or a nice steak on a charcoal BBQ.
Do you prefer to cook on your own or together with others?
Of course cooking with others, I don’t like cooking by myself or eating by myself.
Which meals do you prefer, improvised or planned?
Improvised, as it has an element of surprise and spontaneity.
Which meal would you never cook again?
Bombe Alaska (Baked Alaska). Many years ago, when I was working in banquets at a hotel, I made it for a wedding of 1000 people not knowing how it is made. Lesson learnt.
Thank you Somer!

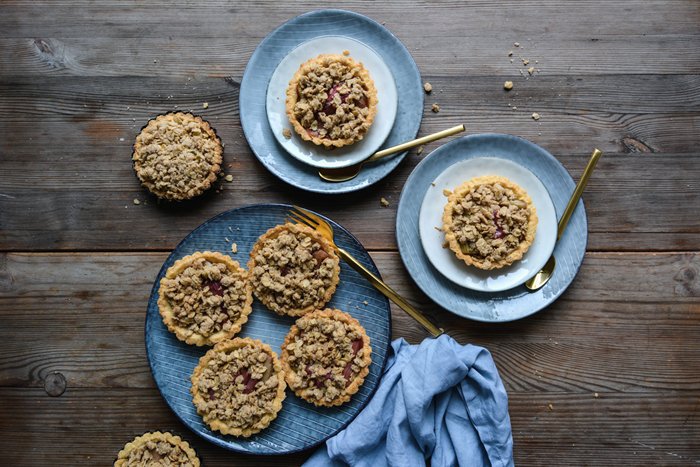
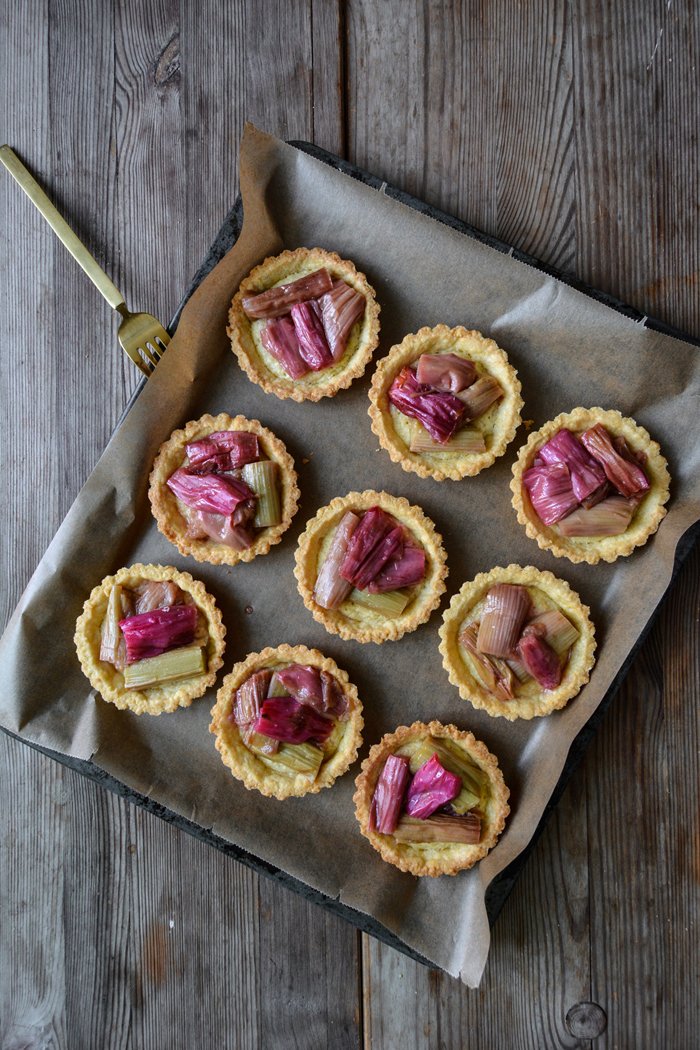
Rhubarb Tartlets with Cinnamon Oat Crumble

The combination of rhubarb and cinnamon crumble is so perfect that I dare to call it one of my favourite baked sweets. It's sweet, fruity-sour, and buttery, what more could I ask for? I could add oats, which I've never done before for some reason, so I gave it a try and the result was extremely pleasing. The first bite through the crunchy aromatic crust and soft fruit gave me the feeling that home-baked sweets are simply the best.
The past few days were a little rough and rocky and I often wished I had two Meikes to sort out all the tasks and problems piled up on my desk. Late night work led to sleep deprivation and a paranoid me, worrying that I wouldn't manage to finish everything in time. I call myself quite disciplined, I can work hard, but luckily, I also know when to pull the brake. It was a bright and sunny afternoon and I started to feel like I could see the light at the end of the tunnel - although not all problems were solved yet - but I decided to close my laptop. Trying not to think too much, I grabbed my bag and jumped on my bike. Cycling through springy Berlin and enjoying the bumpy ride over cobbled roads put a smile on my face as I saw nature's leaves and blossoms taking over the city again. I stopped at a café for a creamy cappuccino that felt like the best coffee I had in a while, and leafed through a cheesy magazine. Life can be perfect and sometimes it's so easy to get there, all you have to do is forget about your duties for a little while and follow whatever your mood calls for.


Rhubarb Tartlets with Cinnamon Oat Crumbles
Makes 10 tartlets
For the filling
trimmed rhubarb, cut into 5cm / 2" pieces, 600g / 1 1/3 pounds
granulated sugar, 100g / 1/2 cup
For the pastry
plain flour 260g / 2 cups
granulated sugar 80g / 1/3 cup plus 1 tablespoon
a pinch of salt
unsalted butter, cold, 160g / 2/3 cup
organic egg yolks 2
For the oat crumble
rolled oats 100g / 3 1/2 ounces / 1 cup plus 1 tablespoon
plain flour 65g / 1/2 cup
granulated sugar 90g / 1/3 cup plus 2 tablespoons
ground cinnamon 1 teaspoon
unsalted butter, melted, 80g / 1/3 cup
Preheat the oven to 200°C / 400°F (preferably convection setting).
For the filling, add the rhubarb and sugar to a large baking dish and toss to combine. Bake for about 25 minutes or until soft but still in shape. Set the rhubarb aside and let it cool completely.
For the pastry, in a large bowl, combine the flour, sugar, and salt. Cut the butter with a knife into the flour until there are just little pieces of butter left. Continue with your fingers and rub the butter into the flour until combined. Add the egg yolks and continue mixing with the dough hooks of an electric mixer until you have a crumbly mixture. Form a thick disc, wrap in cling film, and put in the freezer for 10 minutes.
Butter 10 (10cm / 4") tartlet pans and dust with flour. Line a baking sheet with parchment paper.Divide the dough into 10 equal parts. Roll out the 10 pieces of dough between cling film into 12 cm / 4 1/2" circles. Line the tartlet pans with the pastry, push the dough into the pans, and prick with a fork. Bake for about 12-15 minutes or until golden, bush the dough down with a fork if it bubbles up. Take the tartlet pans out of the oven and let them cool for a few minutes. Using a metal skewer, loosen the pastry shell gently along the rim and turn the tartlets out onto the lined baking sheet.
Turn the oven down to 180°C / 350°F.
For the crumble, combine the oats, flour, sugar, and cinnamon in a medium bowl. Stir in the melted butter and mix until combined and crumbly.
Divide the rhubarb among the tartlet shells, sprinkle with the oat crumble, and bake for about 15 minutes or until golden brown.


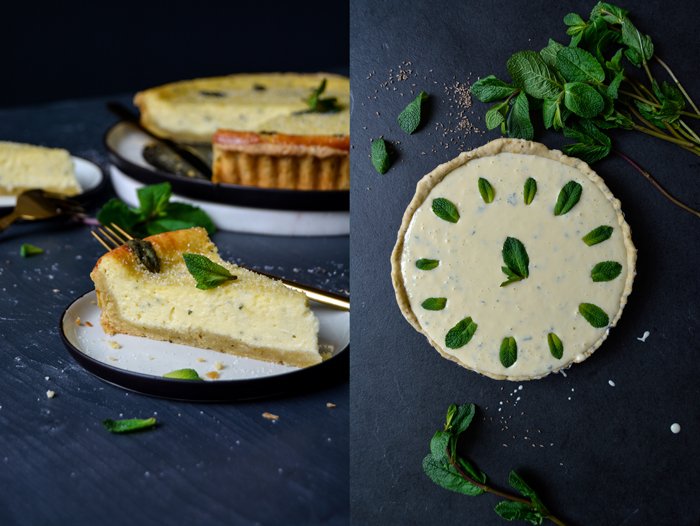
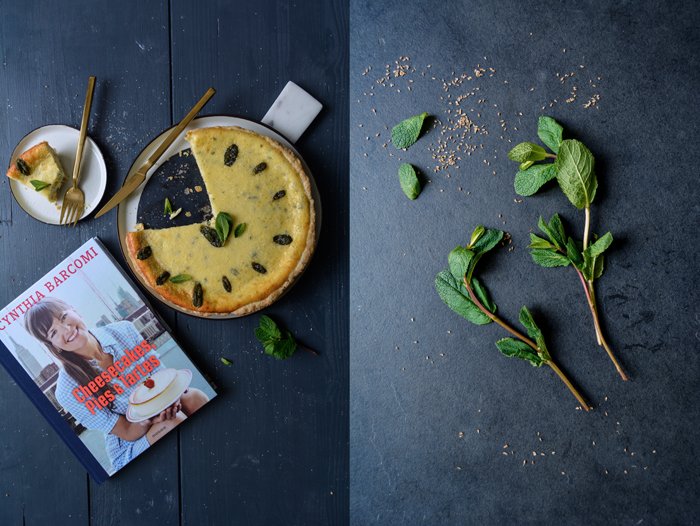
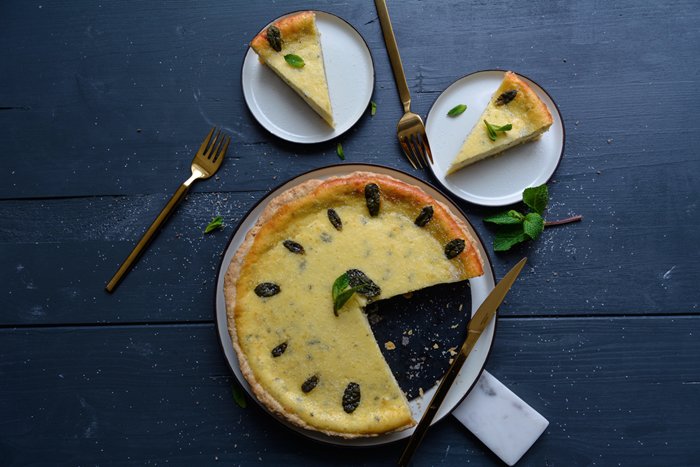
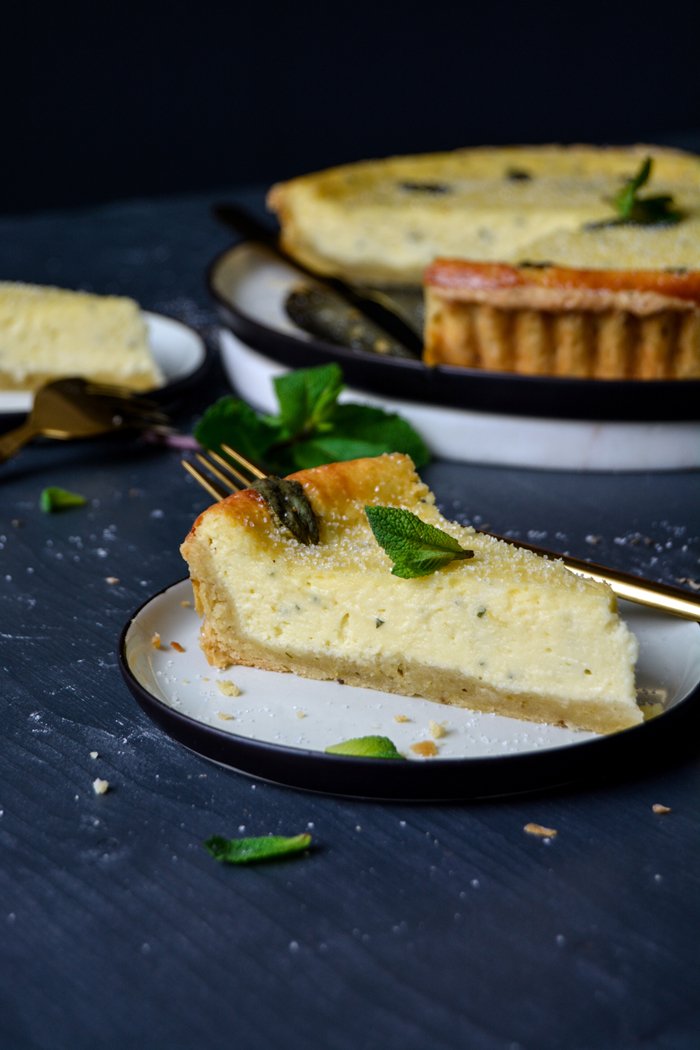
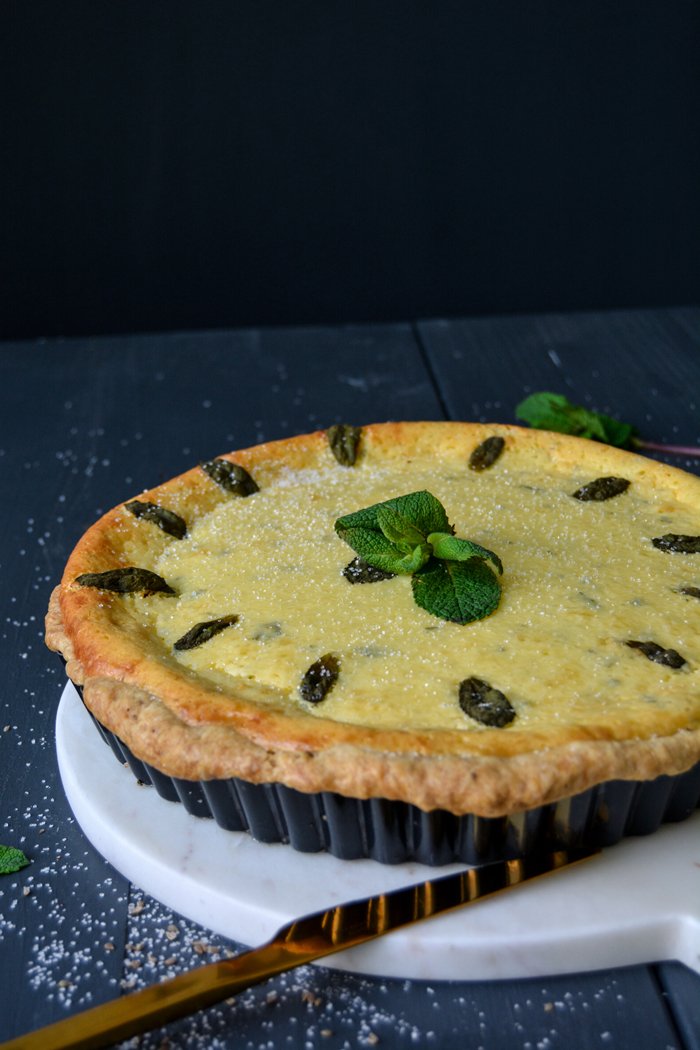
Cynthia Barcomi's Cheesecake with Mint and Aniseed Crust
This recipe comes from a woman who is a great inspiration in the kitchen and for life - and she's also one of the reasons why I live where I live. I used to visit Berlin quite often in my twenties and on one of those trips, I discovered Barcomi's Deli right in the heart of the city's old Eastern part. The moment I walked through the hidden Sophienhöfe for the first time, I fell in love with its peaceful backyards and the tall brick walls covered in vine. When I opened the glass door to Cynthia Barcomi's cozy café, I found my place (update: sadly, the café closed in 2021). Amazing coffee and the best American cakes, muffins, and sandwiches I had ever tasted, I was hooked. So I decided that if I ever moved to this city, it would have to be close to Cynthia's kitchen. And that's what I did.
Cynthia is from New York. In the late 80's, she came to Berlin to live and work here as a professional dancer. Today, she's one of Germany's most successful women in the food business. She started roasting her own coffee beans long before it became a trend, and she introduced the people in her new home city to all the scrumptious treats she grew up with: bagels, New York cheesecake, fruit pies, and luscious sandwiches made with the juiciest potato bread. It became a great success. When you meet Cynthia, you can see right away that she's not the kind of person who would rest if something works out. She's constantly on the move, her enthusiasm is impressive, and she jumps from one project to the next project. She started a flourishing catering business, became a popular TV host, sells her own bakeware collection (she has the most perfect pie dishes!), and she wrote six best selling cookbooks. And all this as a mother of four children - sometimes I wish I had her energy.
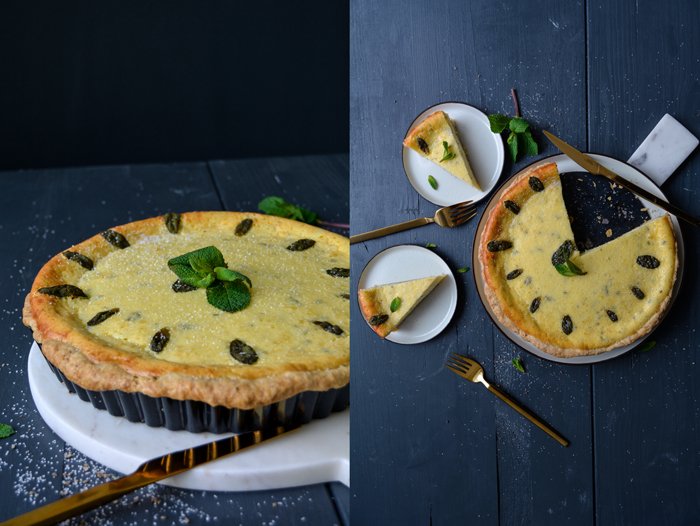
It's only a year ago since Cynthia published her last book Cookies, which includes the best brownie recipe I know: chocolate and peanut butter. They are divine. Her new masterpiece is just as packed with deliciousness and focuses on Cheesecakes, Pies & Tartes (in German). It's a very special book, as Cynthia, for the first time, shared her signature cake, the best New York cheesecake in town. Her fans have been bugging her for years to share it with them, but she declined. So finally, after 20 years, she had mercy on us and opens her new book with this exact recipe. When I decided to write about Cynthia's new creations, I felt so tempted to bake this cake and share the recipe here with you, but I wasn't even sure if I feel quite ready to bake this cake at home in my kitchen. I've ben enjoying it for so long at her café, do I want to know how this piece of magic is actually made? I think for now, I want to leave it this way, I just jump on my bike whenever my appetite calls for it and roll down the hill to her Deli.
But as I thumbed through the pages of her new book, reading about such tempting treats as Blueberry Pocket Pies, Peanut Butter Townie, Sweet Potato Spice Bars with Potato Chip Crust, and Honey Almond Goat Cheese Cheesecake, I got excited. And then I spotted a recipe that made it impossible to read any further: A Spanish Cheesecake or Flaó from Ibiza. The pie is made with ricotta and mascarpone and refined with lemon and mint - this is genius! The filling lies on an aniseed short crust base and it's the most aromatic, fragrant, and light cheesecake I ever had on a plate. Two days ago, I shared the last pieces of it with some friends and there was happy silence at the table. I never even thought of adding mint to a cheesecake and it's actually the best thing that could happen to it. Cynthia learned about this combination from a friend's aunt, Maria, an eccentric art collector from Spain, living in New York. I have to start thinking about what else I could do with the mint plant outside my kitchen window.

When I sipped on my creamy cappuccino at Barcomi's many, many years ago, it would have never crossed my mind that one day, the woman who created all this would become more than an inspiration in my life. Cynthia gave me the best tips for my book when I started working on it. She shared her experiences with me and helped me so much during the whole process in the past year. And then, when I asked her if she'd like to write a quote for my book, she didn't hesitate. I emailed her the pages of the Eat In My Kitchen book, and I have to confess that I felt a bit nervous to share it with her. When I read her words, it brought me to tears:
"Great food like great art speaks the truth. Meike’s recipes and photos are pared down, honest and revealing – I love what she does! She goes right for the sensory jugular leaving you wanting and needing more. Void of superfluous detail, Meike’s all about delicious food – brava!"
Thank you Cynthia!

Cynthia Barcomi's Mint Cheesecake with Aniseed Crust
Serves 6
For the pastry base
plain flour 200g / 1 1/2 cups
granulated sugar 2 teaspoons
aniseed, finely crushed in a mortar, 1 1/2 teaspoons
salt 1/2 teaspoon
freshly grated zest from 1/2 lemon
unsalted butter, cold, cut into cubes, 90g / 1/3 cup plus 1 tablespoon
vegetable shortening, cold, cut into cubes, 30g / 2 tablespoons
egg yolk 1
olive oil 1 tablespoon
For the filling
fresh ricotta 250g / 9 ounces
mascarpone 250g / 9 ounces
granulated sugar 200g / 1 cup
eggs 4
freshly grated zest from 1/2 lemon
fresh mint leaves, finely chopped, 2 tablespoons
For the topping
fresh mint leaves 12
granulated sugar 1 tablespoon
In a large bowl, combine the flour, sugar, aniseed, salt, and lemon zest. Add the butter and vegetable shortening and rub them into the flour mixture with your fingers, or use the dough hooks of an electric mixer and quickly mix until you have a crumbly mixture. Whisk together the egg yolk and olive oil in a measuring cup and add water until the total is 100ml / 1/3 cup plus 1 tablespoon. Add to the dough and mix until just combined; don't knead the dough. Form a thick disc, wrap in cling film, and put in the fridge for 2 hours (or longer).
Preheat the oven to 175°C / 350°F and butter a 23cm / 9" pie or tart dish.
For the filling, in a large bowl, using an electric mixer, whisk together the ricotta, mascarpone, and sugar until creamy. Add the eggs, 1 at a time, and stir in the lemon zest and chopped mint leaves.
Take the pastry out of the fridge and roll our between cling film, large enough to line the bottom and sides of the pie dish. Line the pie dish with the pastry, press it into the dish, and leave about 5mm / 1/4" of dough hanging over the rim.
Pour the filling on top of the pastry and decorate with the 12 mint leaves (arrange them like a clock). Bake for 50 minutes or until golden. (Cynthia suggests that you check the cake after 30 minutes and cover it with aluminium foil if it gets too dark, I skipped this, the colour was fine.) Take the cake out of the oven, sprinkle with the sugar, and let it cool.


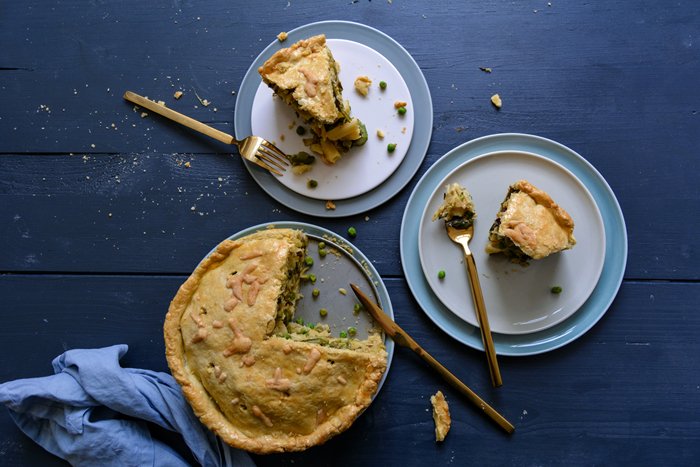
Spring Timpana - Maltese Pasta Pie with Asparagus, Peas, and Leeks

Yesterday's excitement called for lots of carbs - and a glass of wine! It was a day packed with too many emotions to handle. After sharing the cover of my book and the Amazon pre-order links here on the blog, I felt overwhelmed by all the sweet emails and messages I got from all over the world. I needed good, solid, rustic food for dinner to calm me down. I made a dish that is so packed with carbs that it actually feels a little weird, but it's also packed with flavour and comfort, so it makes sense. I baked a springy Maltese pasta pie, also known as Timpana. I introduced you to this Maltese street food classic a few months ago and the response to the recipe was crazy.
Timpana is basically short pasta stuffed into a buttery pastry shell. Usually, it's enriched with Bolognese, which is nice but it can get a little boring if you've eaten it for years, so last time I made it I went for a meat-free Mediterranean filling of zucchini, eggplant, tomato, and basil. It was so good that I thought I'd never need another filling ever again. But then spring came around the corner with all its pretty greens. Wouldn't it be nice to see green asparagus, sweet peas, and leek inside this pie beauty? I didn't have to think about it twice. I went to the grocery store, put all the vegetables in my bicycle's basket, and once home, I turned on the oven.
It's still a little weird for me to look at this combination of penne and shortcrust in a rational way but maybe this dish shouldn't be overanalyzed. It simply feels and tastes good, and after the first bite, my mind and emotions were at ease again: I felt so happy and thankful to have the eat in my kitchen blog and book in my life, both of them connect me with so many people all over the world and bring so many fantastic experiences into my life.


Spring Timpana - Maltese Pasta Pie with Asparagus, Peas, and Leeks
You'll need a 20 1/2cm / 8″ springform pan.
Serves 4-6
For the filling
penne pasta 250g / 9 ounces
green asparagus, trimmed, about 500g / 1 pound
peas, fresh or frozen, 200g / 7 ounces
olive oil
leek, thinly sliced, 200g / 7 ounces
Dijon mustard
3 teaspoons
fine sea salt 1 teaspoon
ground pepper
organic egg 1
Parmesan, freshly grated, 80g / 3 ounces for the filling plus 1 tablespoon for the topping (or 100g / 3 1/2 ounces for the filling if you prefer a richer pie)
For the pastry
plain flour 300g / 2 1/3 cups
fine sea salt 1 teaspoon
butter, cold, 150g / 2/3 cup
organic egg yolks 2
water, cold, 2 tablespoons
For the glaze
organic egg yolk 1
milk 1 tablespoon
a pinch of fine sea salt
For the filling, cook the penne in salted water until al dente, they should have bite. Let the pasta cool completely.
In a large pot, bring salted water to the boil and cook the asparagus for about 3 minutes or until al dente. Reserve 120ml / 1/2 cup of the cooking water. Drain the asparagus and rinse quickly with cold water. Let the asparagus cool completely, then cut into pieces as long as the penne.
In a small saucepan, cook the peas in boiling salted water for 1 minute. Drain and rinse with cold water; set aside.
In a large, heavy pan, heat a splash of olive oil over medium-high heat and cook the leek for about 10 minutes, stirring once in a while, or until golden and soft; let it cool completely.
Preheat the oven to 200°C / 400°F (conventional setting).
For the pastry, combine the flour and salt in a large bowl. Cut the butter with a knife into the flour until there are just little pieces of butter left. Continue with your fingers and rub the butter into the flour until combined. Add the egg yolks and water and continue mixing with the dough hooks of an electric mixer until you have a crumbly mixture. Form 2 discs, dividing the dough roughly 2:1, wrap in cling film, and put in the freezer for 10 minutes.
For the filling, in a large bowl, combine the pasta, the reserved asparagus cooking water, mustard, salt, and a generous amount of ground pepper. Season to taste with salt, pepper, and mustard, then stir in the egg and mix until well combined. To fill the pie, the filling should be completely cool.
For the glaze, in a small bowl, whisk together the egg yolk, milk and salt .
Take the dough out of the freezer and roll out both discs between cling film, the large disc, for the bottom and sides of the springform pan, should be about 32cm / 12 1/2″, and the smaller disc should be big enough to cover the pie.
Line the bottom and sides of the springform pan with the large pastry disc. Spread 1/3 of the pasta mixture on top of the pastry, sprinkle with 1/3 of the Parmesan, 1/3 of the vegetables (asparagus, peas, and leek) and season with salt and pepper to taste. Continue making 2 more layers. Pour any remaining liquid from the pasta mixture over the filling. Close with the pastry lid and gently push the rim with your fingers to seal the pie. Using a toothpick, prick a few holes into the top of the pie. Brush the top with the egg glaze and sprinkle with the remaining 1 tablespoon of cheese.
Bake the pie for 15 minutes, then turn the heat down to 175°C / 350°F and bake for another 50 minutes or until the pie is golden and the pastry is baked through. Let the pie cool for at least 15 minutes before you cut it into pieces.


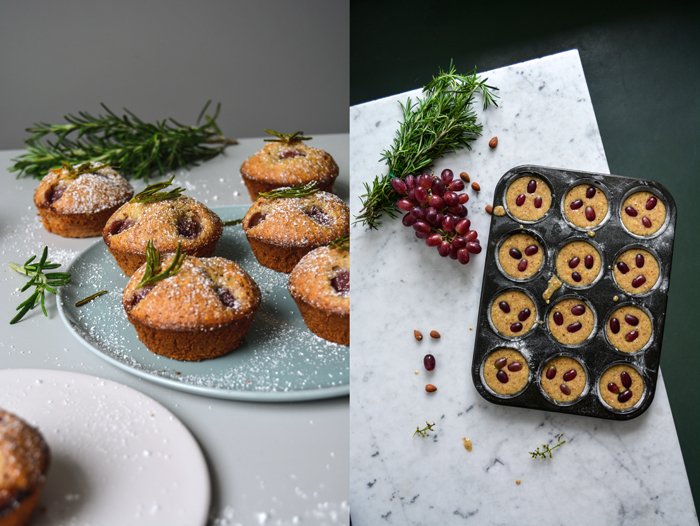
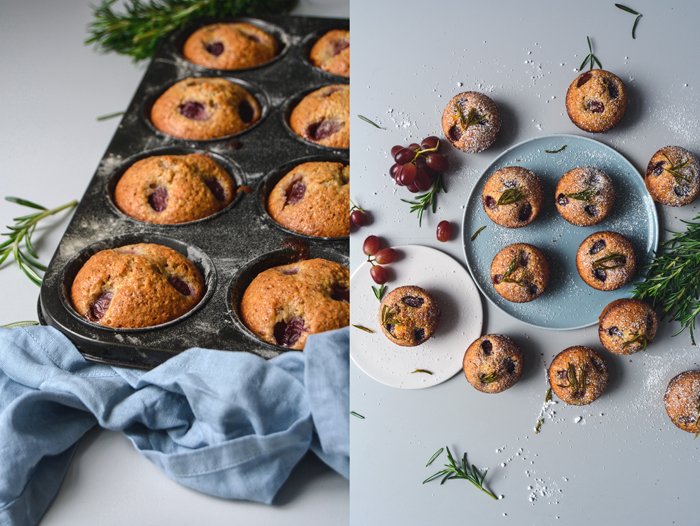
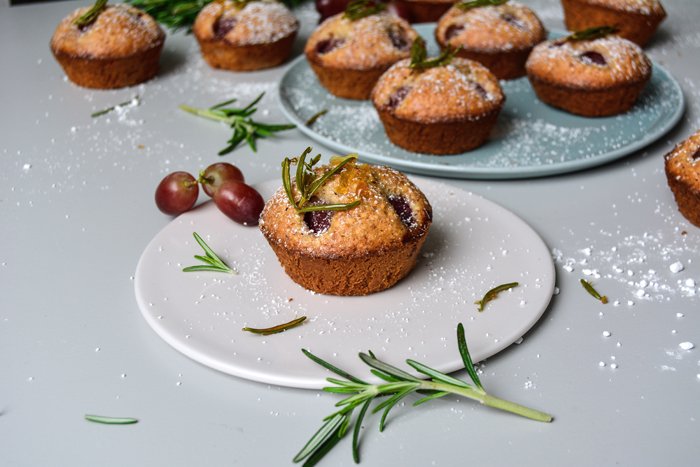
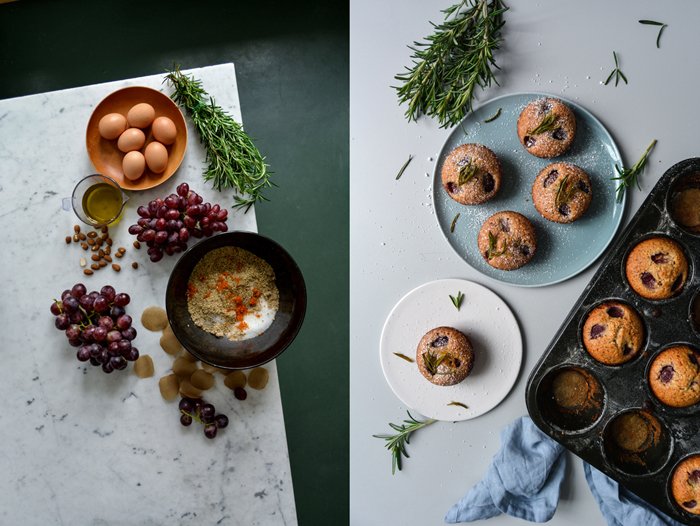
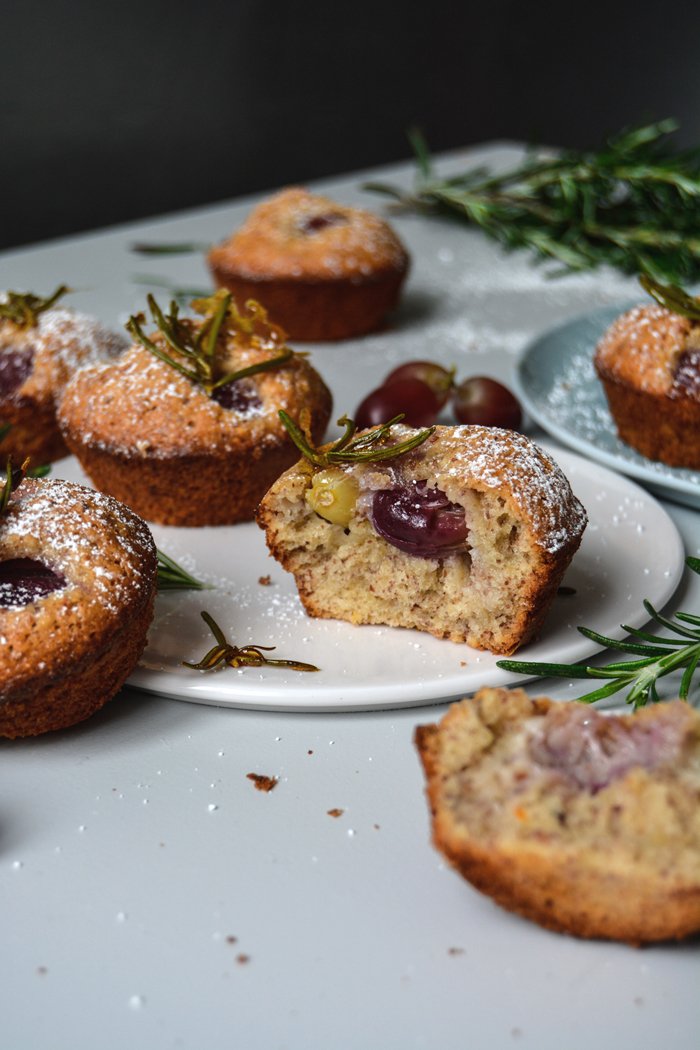
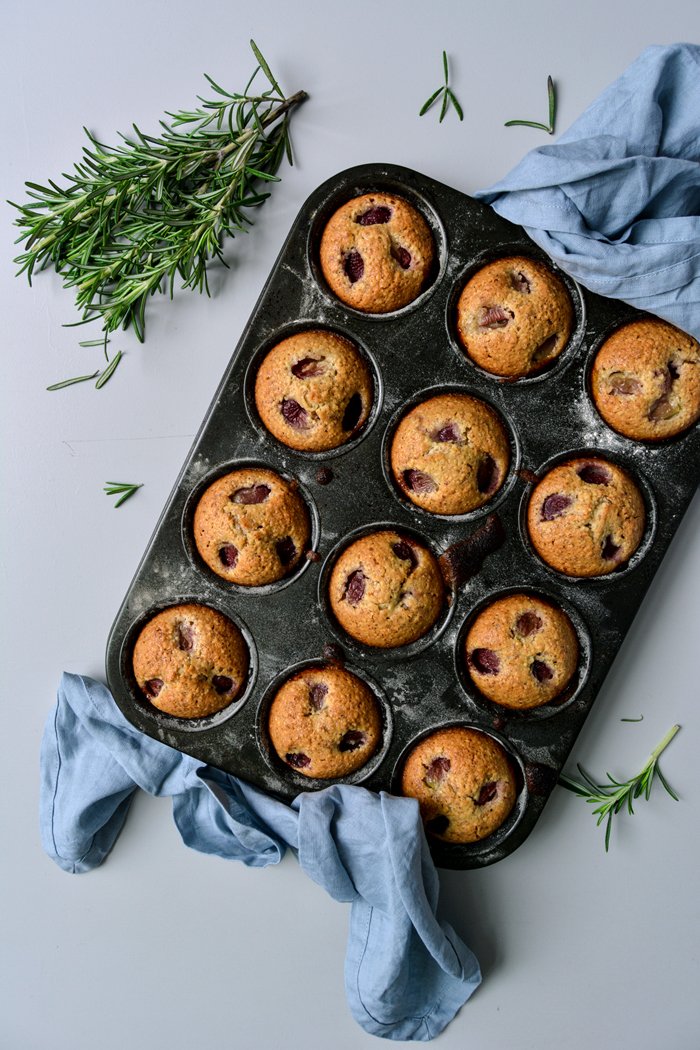
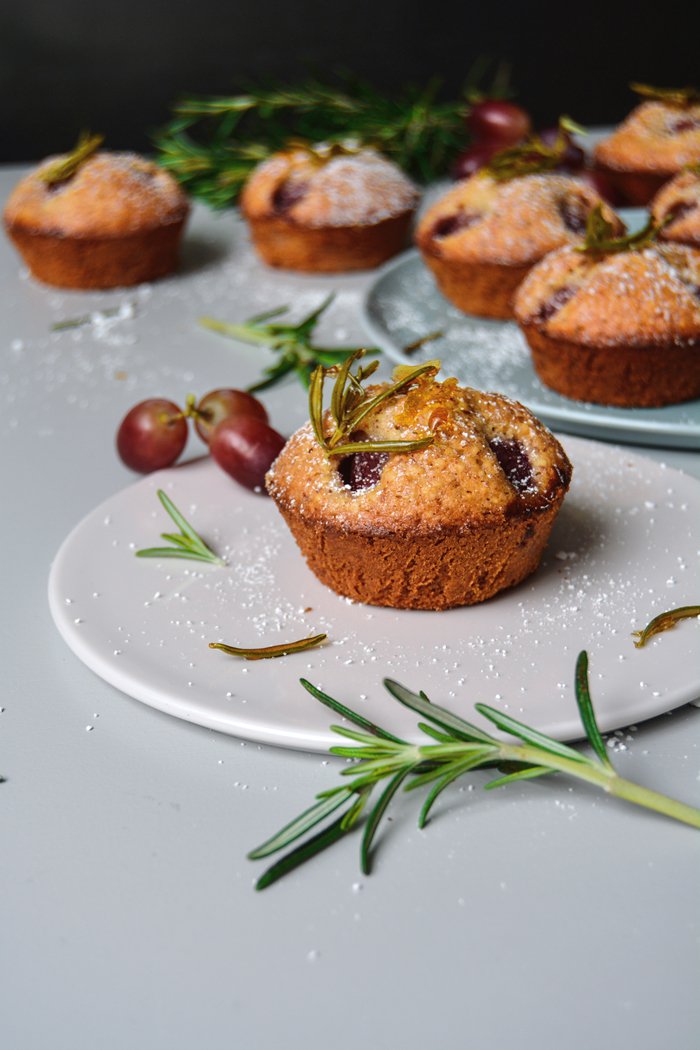
Grape and Olive Oil Friands with Caramelized Rosemary
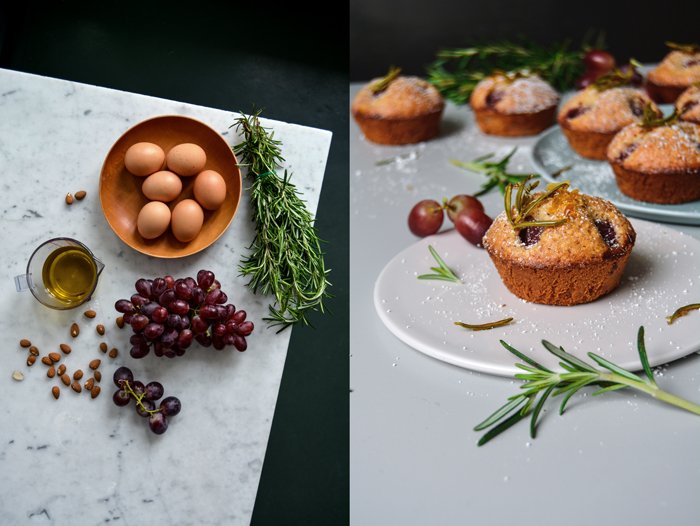
I don't know what drove me to come up with a grape-recipe in April, but it must have had something to do with the fact that I desperately felt like baking with fruits and there was nothing else in sight that sparked my interest. I went to the shop around the corner to find some inspiration, but there were just a few tiny baskets of unripe strawberries, I spotted plump blueberries, which seem to have become available all year round, and some very delicate - and artificial - looking raspberries. I didn't get excited by any of them.
I usually try to follow the (local) seasons, but there was a bag full of South African grapes that seemed to fit perfectly to the bunch of rosemary that I had already picked. So they became the main flavours for my French olive oil friands. If we leave out the fact that it's not the fruit's season in the northern hemisphere where I live, it's a cozy sweet treat that is just right when the weather is too moody to go outside, or there's too much work on the desk, and you're forced to stay inside. A nibble of this aromatic beauty and the world looks much nicer again.
In case you've never heard of friands before - I must admit I was one of them - they are sumptuous small cakes, a patisserie classic. They look similar to muffins but the texture is actually more fine and delicate. They are made with ground almonds and just a little flour, and a generous amount of beaten egg white that helps the batter to rise instead of baking powder or baking soda. Traditionally made with melted butter, I just followed my mood and replaced the dairy product with mild olive oil. It was a good choice, especially in combination with the sweet fruit and fragrant herb.
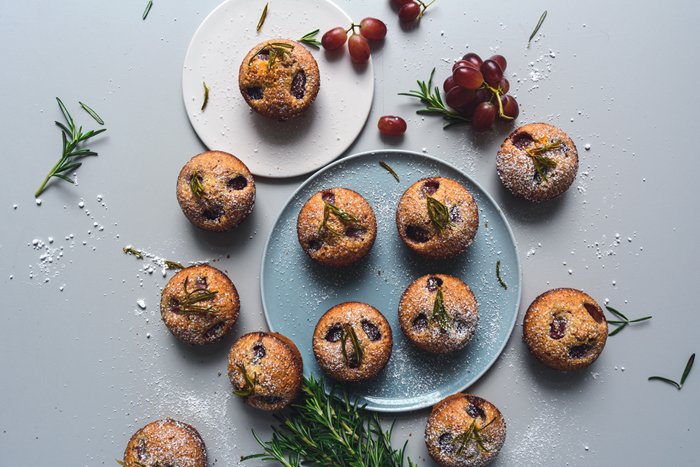
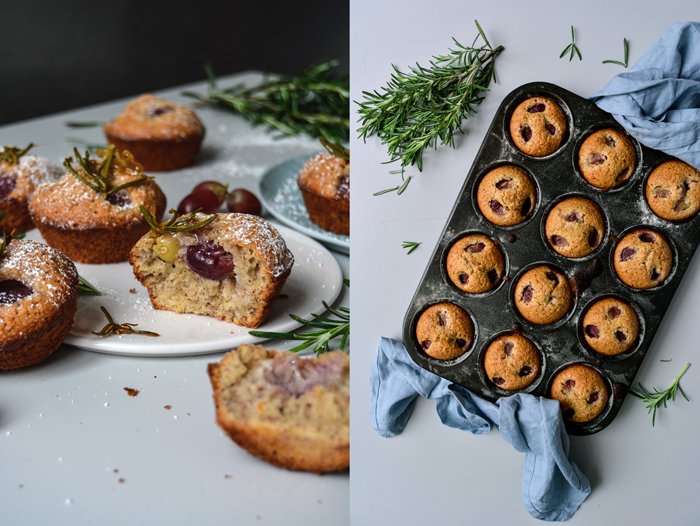
Grape and Olive Oil Friands with Caramelized Rosemary
Makes 12 friands (in a muffin pan)
For the friands
organic egg whites 6
fine sea salt 1/8 teaspoon
granulated sugar 180g / 3/4 cup plus 2 tablespoons
ground almonds (or hazelnuts) 200g / 1 2/3 cups
plain flour 80g / 2/3 cup
freshly grated orange zest 2 teaspoons
mild olive oil 140ml / 2/3 cup
small dark grapes, preferably seedless (or seeds removed), 36 (3 grapes for each friand)
icing sugar, for the topping
For the caramelized rosemary
granulated sugar 3 tablespoons
water 2 tablespoons
the tips of 12 sprigs of rosemary (with about 4-5 needles each)
Preheat the oven to 200°C / 400°F (conventional setting). Grease a 12-cup muffin pan with olive oil, dust with a little flour, and place in the fridge. Cut 12 circles of parchment paper, large enough for the bottom of each muffin cup; set aside.
In a large bowl, using an electric mixer, whisk the egg whites, salt, and 1 tablespoon of the sugar for about 1 minute until it forms soft peaks.
In a second, large bowl, combine the remaining sugar, ground almonds, flour, and orange zest. In alternating batches, fold in the beaten egg whites and the olive oil, about 1/3 at a time. Stir gently until just combined.
Take the muffin pan out of the fridge, lay 1 parchment circle into each muffin cup, and divide the batter between the cups. Place 3 grapes on top of the batter in each muffin cup and bake for about 20 minutes or until golden. Check with a skewer, it should come out clean. Let the friands cool for a few minutes, then, using a small sharp knife, cut along the sides of the muffin cups and lift the friands out of the muffin pan. Remove the parchment paper.
For the caramelized rosemary, place a piece of parchment paper on the counter top. In a small, heavy pan, heat the sugar and water on high heat, without stirring. When the sugar is golden and caramelized, stir in the rosemary until coated in caramel and transfer to the parchment paper. Let it cool for a few minutes before you peel it off the parchment paper.
Dust the friands with icing sugar and garnish with the caramelized rosemary. They taste best on the first day.

Pomegranate Pavlova Tart with Pistachios and Rosewater
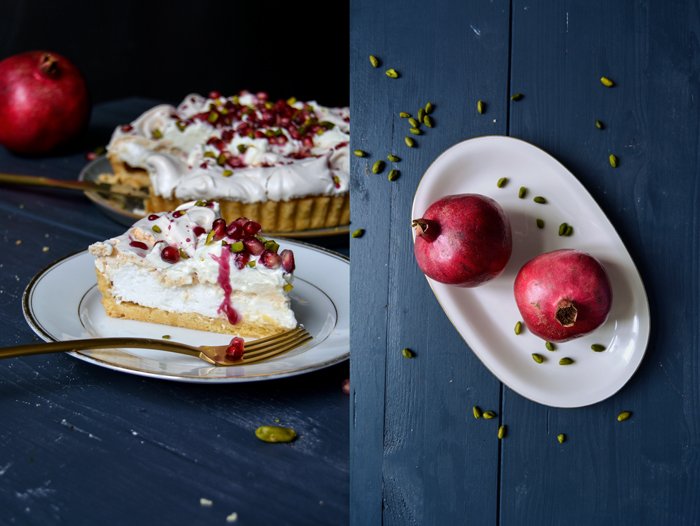
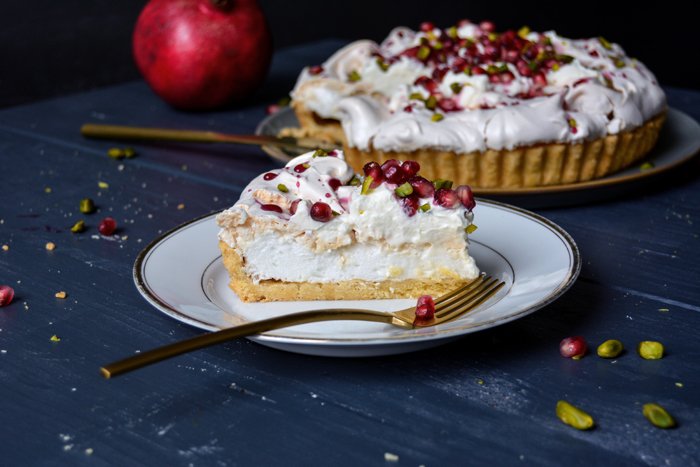
In the past week, I experienced the highs and lows of kitchen life, a fact that a curious baker has to live with when jumping into new recipes. Let's start with the uplifting experience: I baked 3 cakes and 2 were fantastic, which isn't that bad. One of them will stay a secret until I share it with you next week, but the other one was this bomb of a cake. It's a voluptuous beauty, full of flavour, sweetness, crunch, and fluffiness. I call it a pavlova tart - not just a pavlova, which never really managed to rouse my excitement. Baked meringue sandwiched with whipped cream can be nice but it's not enough for me. So I decided to transfer the whole thing onto buttery shortcrust pastry and now it has my attention. This combination is so good that I believe the pastry base should have been an obligatory part of this sweet classic named after the Russian ballerina Anna Pavlova from the start. But never mind, I'm happy with my new discovery. The light meringue is soft in the middle and crunchy on the outside, it's refined with a hint of rosewater just like the rich whipped cream that crowns the whole composition. Sweet-sour pomegranate seeds and their juices turned into a concentrated syrup lay graciously on top, side by side with nutty pistachios. Simply wonderful!
However, my disappointing kitchen experience was an epic fail - ready for the bin. I decided to give puff pastry a try again and I regretted it the moment I pulled the result out of my oven. I spent 2 days reading about the perfect croissant and up until they were in the oven I was quite optimistic that I'd manage to bake light, crisp apricot croissants, made for a Sunday brunch table. But my hope was destroyed as I opened the oven door and witnessed a rather sad result that looked like my flaky sweets got run over by a truck. It took me 2 years to recover from my last puff pastry disaster - I tried to make Maltese pastizzi, it's the flakiest treat, basically the queen of puff pastry - which ended in a buttery, floury soup on a baking sheet. I must say that, this time, it didn't actually look and taste as bad as my last attempt, but it's definitely far from making an appearance on the blog. It's a work in progress I guess.
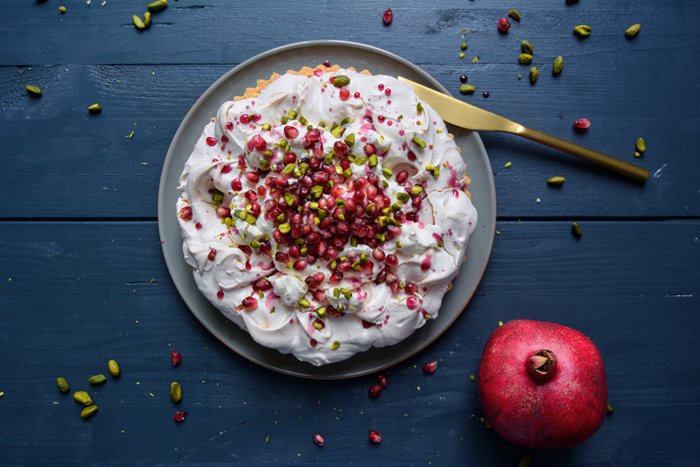
Pomegranate Pavlova Tart with Pistachios and Rosewater
Makes 1 23cm / 9″ tart
For the short crust base
flour 200g / 1 1/2 cups
granulated sugar 65g / 1/3 cup
a pinch of salt
unsalted butter, cold, 110g / 1/3 cup plus 2 tablespoons
organic egg yolks 2
For the meringue
organic egg whites 4
fine sea salt 1/8 teaspoon
granulated sugar 200g / 1 cup
cornstarch, sifted, 1 1/2 teaspoons
cider vinegar 1/2 teaspoon
quality rosewater, preferably organic, 2 teaspoons, plus more to taste
For the topping
heavy cream, whipped, 200ml / 3/4 cup
2 tablespoons granulated sugar
quality rosewater, preferably organic, 1 teaspoon, plus more to taste
seeds from 1/2-1 pomegranate
pomegranate juice 60ml / 1/4 cup
unsalted pistachios, chopped, 1 small handful
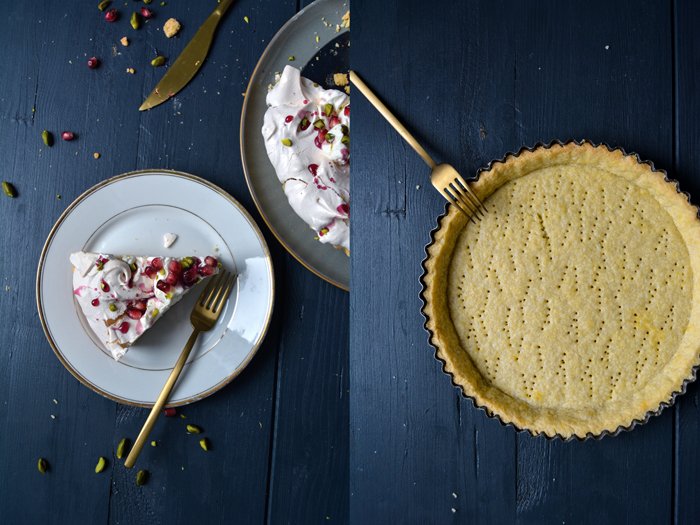
For the pastry, in a large bowl, combine the flour, sugar, and salt. Cut the butter with a knife into the flour until there are just little pieces of butter left. Continue with your fingers and rub the butter into the flour until combined. Add the egg yolks and continue mixing with the hooks of your mixer until you have a crumbly mixture; this takes a few minutes. Form a thick disc, wrap in cling film, and put in the freezer for 12 minutes.
Preheat the oven to 200°C / 400°F (conventional setting).
Roll the dough out between cling film and line a 23cm / 9″ tart pan with the flat pastry. Prick with a fork and bake in the oven for 12 minutes or until golden and crisp. Take the pan out of the oven and let it cool completely.
For the meringue, in a large, clean bowl, using an electric mixer, whisk the egg whites and salt for 1 minute. Continue whisking for 10-12 minutes, adding 1 tablespoon of the sugar at a time. The meringue should be stiff and glossy. Whisk in the cornstarch, vinegar, and 1-2 teaspoons of the rosewater. Add more rosewater to taste.
Turn the oven down to 180°C / 350°F.
Scoop the stiff egg whites onto the pre-baked pastry, spread it lightly but don't push it down. Swirl it a bit for an uneven surface. Bake in the oven for 5 minutes, then turn down the heat to 135°C / 275°F and bake for about 60 minutes or until the meringue is light golden and crisp. Switch off the oven, open the door slightly, and leave the cake in the oven for 15 minutes. Take the cake out of the oven and let it cool completely.
In a medium bowl, using an electric mixer, whip the heavy cream, sugar and 1 teaspoon rosewater. Add more sugar and rosewater to taste; set aside.
In a small saucepan, bring the pomegranate juice and 1 1/2 tablespoons of sugar to the boil. Cook for 1 1/2 minutes or until it starts to thicken.
To assemble the tart, spread the whipped cream in the middle of the meringue, leaving a wide rim, drizzle with the syrup, and sprinkle with pomegranate and pistachios.


Maltese Zeppoli - Fried Cream Puffs with Vanilla Ricotta and Fresh Berries
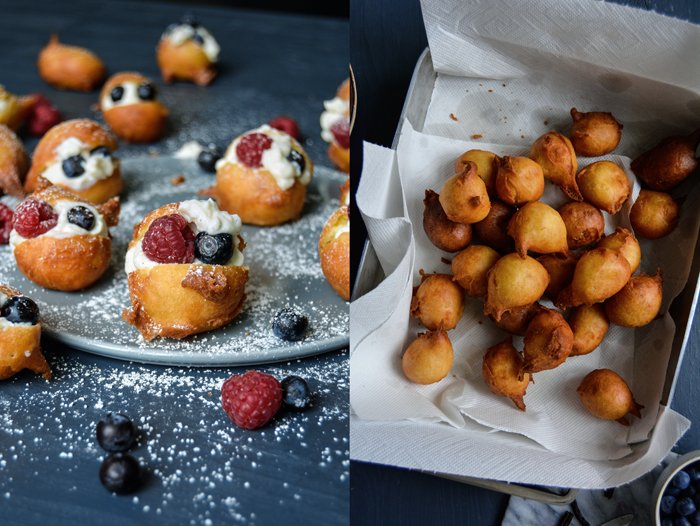
My Maltese family has been telling me about zeppoli - or zeppole in Italian - for many, many years. Countless stories about these puffy, tiny balls of choux pastry, fried to golden perfection, and filled with ricotta, fed my curiosity and made my mouth water. In Malta, the little sweets, also known as sfineġ, are traditionally made on the 19th March to celebrate the feast of St. Joseph. The filling is rich, refined with chocolate and candied peel and fruit, and topped with chopped hazelnuts. In other parts of the Mediterranean, like southern Italy, Sicily, and Sardinia, you can also find them plain, rolled in sugar, dipped in melted chocolate, or topped with vanilla custard. There wasn't the slightest doubt which version I'd go for.
The problem is, when you have an idea of a classic dish without actually ever having tried it, it becomes a dish of its own. In my mind, I always imagined the little puff balls filled with pretty berries. I couldn't really see the chopped chocolate bits but lots of vanilla freshly scraped out of its pod, sweet orange juice, and fragrant Maltese honey stirred into the creamy ricotta. I have an excuse, I've never been to the Maltese archipelago on St. Joseph's special day, so I have never tried a single original zeppoli. Therefore, I just used my imagination and my critical Maltese man, and gave this project a go in my kitchen. I'm not the biggest fan of deep-frying - and some zeppoli recipes even allow you to bake the pastry in the oven - but I didn't want to move away from its origin too much. I made 26 of the crisp balls and to my surprise, they all turned out well, apart from the usual 2 to 3 first trials to find the right temperature setting. It should be relatively low, on medium, so that the inside can cook long enough without burning on the outside - golden and crisp should be the goal. The filling was delicious, fine and aromatic, and a couple raspberries and blueberries on top made it summery fresh. I was more than pleased with the result, and so was my Maltese man, the last zeppoli 'disappeared' after dinner.
There's also a savoury version of this dish, filled with anchovies, however, my imagination fails to give me an idea of how this would taste. I guess I have to go to Malta for this culinary experience. If you're into deep-fried sweets, you can also try my Greek Loukoumades, made with yeast dough.
Have a Happy Easter with your loved ones and enjoy lots of chocolate eggs! xx


Maltese Zeppoli - Fried Cream Puffs with Vanilla Ricotta and Berries
Makes about 26 cream puffs
For the filling
fresh ricotta 250g / 9 ounces
flowery honey, such as orange blossom, 1 tablespoon
freshly squeezed orange juice 1 tablespoon
vanilla pod, scraped, 1/2raspberries, 1 small handful (about 100g / 3 1/2 ounces)
blueberries, 1 small handful (about 100g / 3 1/2 ounces)
For the choux pastry
sunflower oil, about 1 1/2l / 6 cups, to fry the pastry
unsalted butter 120g / 1/2 cup
granulated sugar 50g / 4 tablespoons
fine sea salt 1/8 teaspoon
water 120ml / 1/2 cup
plain flour, sieved, 130g / 1 cup
organic eggs 3
For the topping
icing sugar
For the ricotta filling, in a medium bowl, whisk the ricotta, honey, orange juice, and vanilla seeds until creamy. Season with honey and vanilla to taste. Keep the ricotta in the fridge until you fill the choux pastry.
In a large, heavy pot, heat the sunflower oil on medium-high heat. Line a large baking dish with kitchen paper.
For the pastry, in a large pot, bring the butter, sugar, salt, and water to the boil. Turn the heat down to low, stir in the flour vigorously with a wooden spoon, and mix until smooth and the dough comes away from the side of the pan. Transfer the dough to a bowl and let it cool for about 10 minutes. Beat the eggs in with a spoon, 1 at a time, only mix in the next one when the one before is well combined.
When the oil is hot - dip in the bottom end of a wooden spoon, little bubbles, should form around it - scoop out 1 heaping teaspoon of the dough and carefully scrape it with a second teaspoon into the hot oil. Start with 2 balls of dough to adjust the temperature, you might have to turn the heat down to medium or a little bit lower. The pastry has to cook for 4-6 minutes for the inside to be cooked through. The outside should be golden and not dark brown. If they become dark after 2-3 minutes, turn the heat down. Transfer the cooked zeppoli to the lined baking dish and continue frying the remaining dough. Let them cool completely.
Using a sharp knife, cut a wide slit in the top part of each zeppoli and fill with a spoonful of the vanilla ricotta. Top with 2-3 berries, sprinkle with icing sugar, and serve. Once the zeppoli are filled, they should be enjoyed within the next hour as the ricotta soaks the pastry.


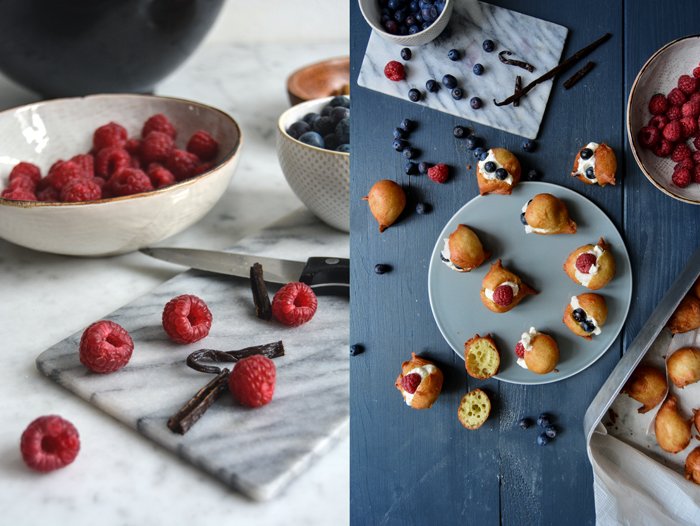
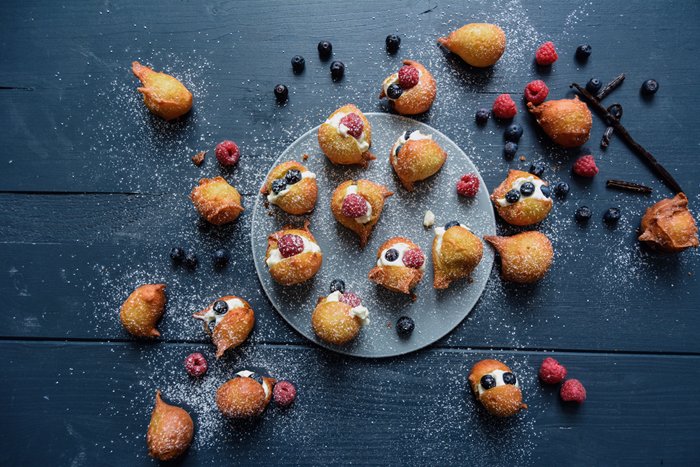


Tsoureki - Greek Braided Easter Bread with Aniseed and Orange Blossom Water

Patience is a tricky thing, I feel it growing with every year I gain, but it still manages to drive me crazy at times. After about one year of working on my cookbook, eat in my kitchen, developing the recipes, cooking, baking and shooting them all by myself, then going through a long process of filling the pages with my little stories connected to each and every dish, I feel a rising impatience to bring this project to an end. Month after month of working closely with my fantastic team in New York, Munich, Berlin, and London, having a daily exchange and constant flow of ideas between me and my editors, photo retoucher, and book designer; all this leaves me hungry. I want to hold the fruit of our work in my hands so badly. My friends constantly make little jokes about me as they only see me with my laptop, glued to my chair at our long wooden dining table, which I turned into my office, or busy in the kitchen. To them, it seems like I, the chair, and the table have become one in the past year.
In German, there is a beautiful word called Vorfreude, which you could translate to the happy excitement you feel connected to a positive event lying in the future. This Vorfreude keeps me going. Sometimes I just feel my heart jump, when I think of the dedication I wrote on one of the first pages of my book for someone who means a lot to me, when I virtually thumb through the pages of my book which is still a file on my computer, or when I first saw the cover design, which I'll share with you soon! And I'm willing to wait for these moments, I'm willing to wait to make this book better and better with every correction, addition, and change we make, and then one day, it will be printed and I'll look at it and remember all the excitement, happiness, and frustration that's woven into every single page of it.
Baking can be a good teacher for life and a master when it comes to patience, especially baking with yeast. It will be Easter Sunday in a week and a sweet braided yeast bread is one of the most delicious and fragrant treats that one can have on the breakfast or coffee table on this special day. But this bread takes its time, you can't really rush - although I still try and succeed by letting the dough rise in the warm oven. It's a little quicker but you still have to be patient.
This year I go for a traditional Greek Easter bread called Tsoureki. It's soft and fluffy, enriched with butter and eggs, and flavoured, often refined with mahlep, a ground spice made of wild cherry seeds, and mastic, sun-dried resin. More modern variations feature vanilla and cardamom but I was after a different flavour combination: aniseed and orange blossom. Years ago, I spent a couple weeks on the Greek island of Naxos and I enjoyed one of the fluffiest yeast buns with aniseed and orange in the shade of an old chapel high up on a hill. This picture in mind, I knew what my Tsoureki would taste like. It smells so beautiful and aromatic like the air in the Mediterranean, anise and orange merged in a scrumptious breakfast bread sprinkled with nutty sesame. I only left it in the oven for a little too long, just a couple minutes, but I have an excuse. Two of my cousins stopped by for an unexpected quick visit, a family chat at the table and the bread was forgotten. At one point I thought "Wow, it smells so good!", so I ran to the oven and pulled out this nicely risen beauty (with a dark bottom).
Here's another sweet braided bread I made and shared 2 years ago.
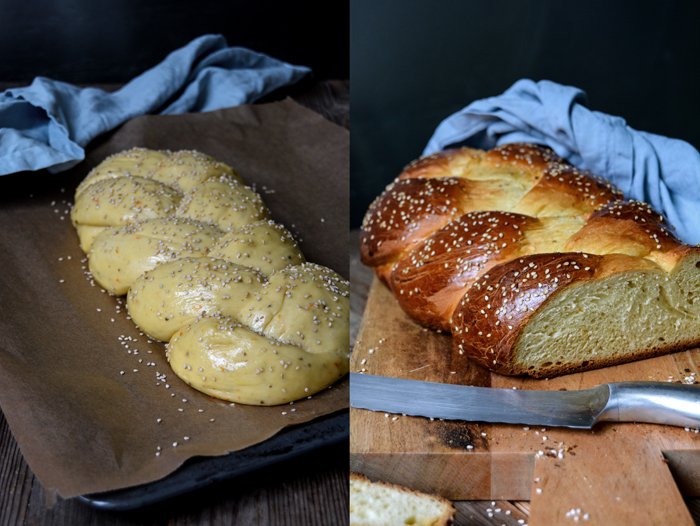
Tsoureki - Greek Easter Bread with Aniseed and Orange Blossom Water
Makes 1 large loaf
plain flour 520g / 4 cups
granulated sugar 100g / 1/2 cup
fast-acting yeast 1 sachet (7g / 1/4 ounce)
fine sea salt 1/2 teaspoon
aniseed, lightly crushed in a mortar, 2 teaspoons
zest of 1 small orange
milk, lukewarm, 150ml / 2/3 cup
unsalted butter, melted, 100g / 1/3 cup plus 2 tablespoons
organic eggs 2
orange blossom water 2 tablespoons
sesame seeds, for the topping, 1-2 tablespoons
For the glaze
organic egg yolk 1
water 1 tablespoon
In a large bowl, combine the flour, sugar, yeast, salt, aniseed, and orange zest. Whisk together the milk, butter, eggs, and orange blossom water - the mixture should be lukewarm - and add to the flour mixture. Using the dough hooks of an electric mixer, knead for about 5 minutes until well combined and smooth. Continue kneading and punching with your hands for about 7 minutes until you have a soft and silky ball of dough. Place the dough back in the bowl, cover with a tea towel, and let rise in a warm place, or preferably in a 100°F (35°C) warm oven, for 100 minutes or until well risen (it won't double in size). Rising at room temperature prolongs the process.
Punch the dough down, take it out of the bowl, and knead for about 30 seconds, then divide into 3 parts and roll them into long sausage shapes. Lay the ends of the rolls on top and braid them tightly. Bend both ends of the bread under the loaf and transfer to a baking sheet lined with parchment paper. Cover with a tea towel and let it rise in a warm place for 50 minutes or until fluffy.
Preheat the oven to 180°C / 350°F (conventional setting).
Whisk the egg yolk and water for the glaze and brush the top of the loaf, sprinkle with sesame. Bake in the oven for 40-50 minutes, cover the loaf with aluminium foil after 15 minutes to prevent it from getting too dark. When the bread is done, it should be golden brown, knock on its bottom, it should sound hollow. Let it cool for a few minutes before cutting it into thick slices, and enjoy with butter.
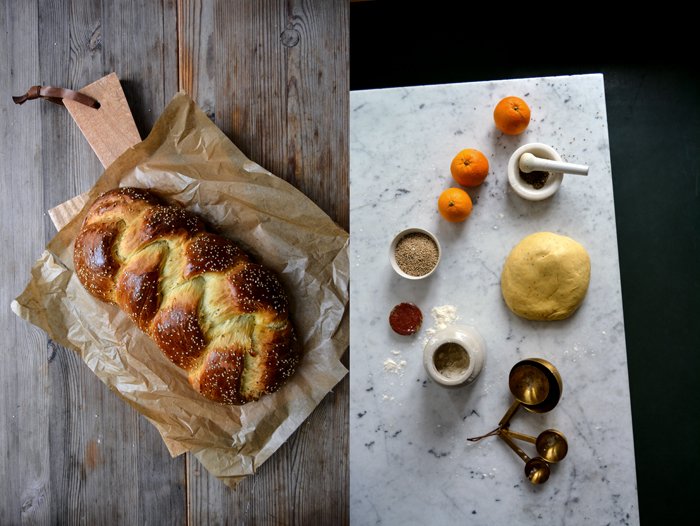


Pumpkin Quiche with Taleggio and Crisp Sage
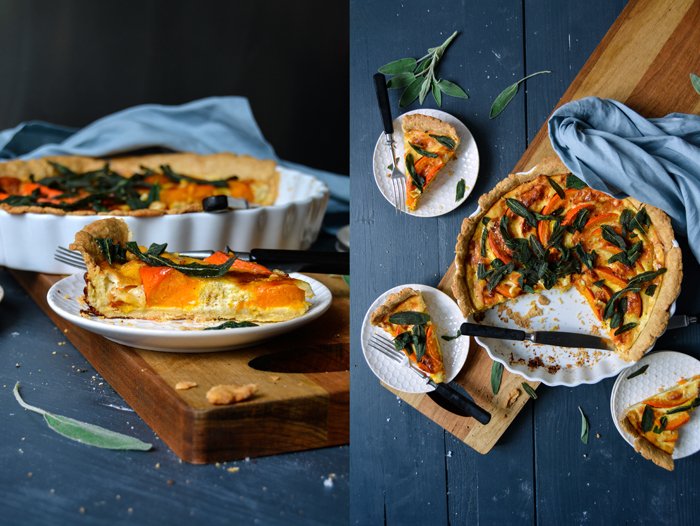
A quiche was one of the first savoury recipes that I made on my own and actually enjoyed. Learning to cook takes time but once you succeed, you get hooked on it. Whenever friends and family asked me to chip in with a dish for a birthday party, I used to make my quiche and felt more than happy about the applause I got for it. In the beginning, I used a more basic filling of leeks, tomatoes, and thyme, but then I got experimental: be it my Italian fennel tart, the combination of artichokes, olives, and Gruyère, spinach and gorgonzola, or green beans and ramps - I love them all. There are boundless possibilities to follow the seasons and your mood. However, its greatest quality is the buttery, flaky, utterly tempting pastry base. It's light and crisp and tastes so good that it wouldn't even need any topping.
One of the best ways to enjoy a quiche, is at a picnic on a lazy summer's day, but the warmer season is still far away, so I choose a filling that fits the cold and moody weather of March and goes well for a Sunday brunch with friends. I go for pumpkin, Taleggio, and crispy sage leaves fried in butter. It's pure comfort food. Usually, I like my quiche recipes warm or cold, I have no preference, but this recipe here is best when it's still warm. The soft cheese spreads its aroma and sinks into the sweet squash and woody-earthy sage. It's happy-making food.
I developed this quiche recipe for the West Elm blog, where you can also find this recipe and the long (!) wooden chopping board, the linen napkin, and stoneware plates. This post was sponsored by West Elm to make my kitchen a little prettier!
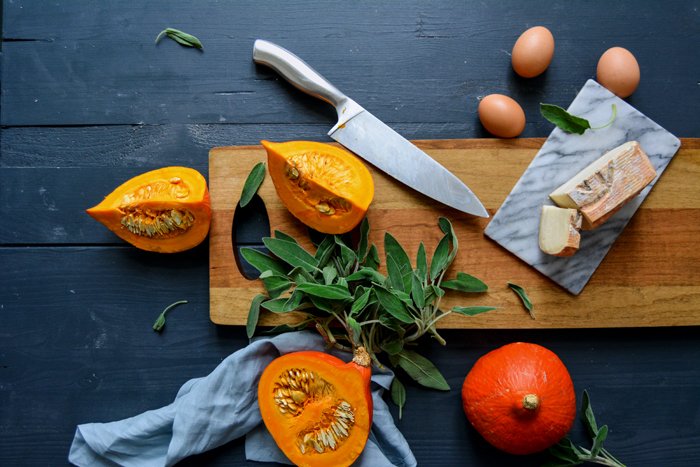
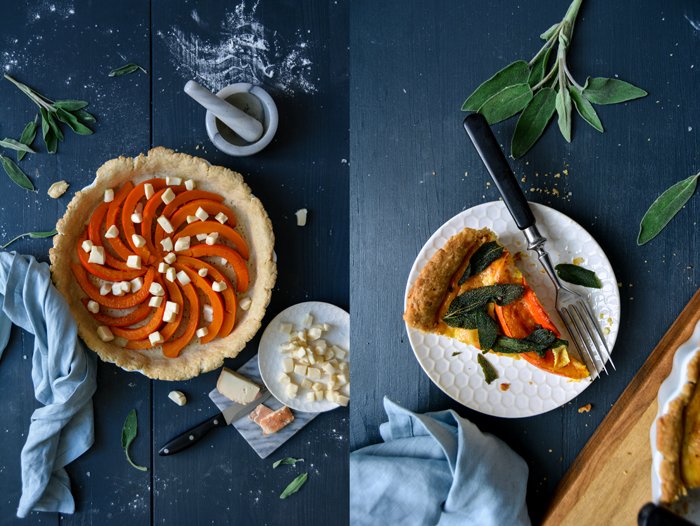
Pumpkin Taleggio Quiche with Crisp Sage
Makes a 30cm / 12″ quiche
For the filling
seeded pumpkin, peeled butternut squash or Hokkaido with skin, 600g / 1 1/3 pounds
olive oil 1 tablespoon
flaky sea salt
ground pepper
organic eggs 3
heavy cream 125ml / 1/2 cup
sour cream 175g / 3/4 cup
fine sea salt 1 teaspoon
nutmeg, preferably freshly grated, a generous amount
Taleggio (or another aromatic semi-soft cheese), diced, 150g / 5 ounces
butter 3 tablespoons
large fresh sage leaves 50
black peppercorns, crushed in a mortar
For the pastry
plain flour 260g / 2 cups
salt 1 teaspoon
butter, cold 130g / 4 1/2 ounces
organic egg 1
Preheat the oven to 200°C / 400°F (conventional setting). Line a large baking dish with parchment paper.
Cut the pumpkin into 5cm / 2" wedges and place them in the lined baking dish. Drizzle with the olive oil, use your hands to toss and coat the squash in the oil. Sprinkle with flaky sea salt and pepper and roast for 15 minutes. Turn the squash wedges over and continue roasting for about 15 minutes or until golden brown and soft when pricked with a fork. Cut the wedges in half lengthwise and set aside.
For the pastry, combine the flour and salt in a large bowl. Add the butter and use a knife to cut it into the flour until there are just small pieces left. Quickly rub the butter into the flour with your fingers until combined. Add the egg and mix with the dough hooks of an electric mixer until crumbly. Form the dough into a thick disc, wrap it in plastic wrap, and freeze for 12 minutes.
Place the dough between 2 sheets of plastic wrap and use a rolling pin to roll out into a disc, large enough to line the bottom and sides of a 30 cm / 12" quiche dish. Fit the dough into the quiche dish, pushing it into the dish, especially along the edges. Let the dough hang over the rim a little or cut it off with a knife. Use a fork to prick the dough all over. Bake for 15 minutes or until golden. If the dough bubbles up, push it down with a fork.
Take the baking dish out of the oven and set the temperature down to 180°C / 350°F.
For the filling, whisk the eggs, heavy cream, sour cream, salt, pepper and nutmeg.
Arrange the pumpkin in a circle on top of the pre-baked pastry and sprinkle with the taleggio. Pour the egg-cream mixture over the squash and bake for about 55 minutes or until golden brown, the top should be firm.
While the quiche is in the oven, cook the sage: Lay a kitchen paper on a large plate. Heat the butter in a large, heavy pan on medium-high heat. When the butter is sizzling, spread the sage in the pan and roast for about 20 seconds or until golden, turning the leaves gently once or twice. Mind that they don't become dark. Take the pan off the heat and immediately transfer the sage leaves to the plate lined with kitchen paper.
When the quiche is done, let it cool for 10-15 minutes, then cover with the sage leaves and sprinkle with crushed pepper, serve warm.


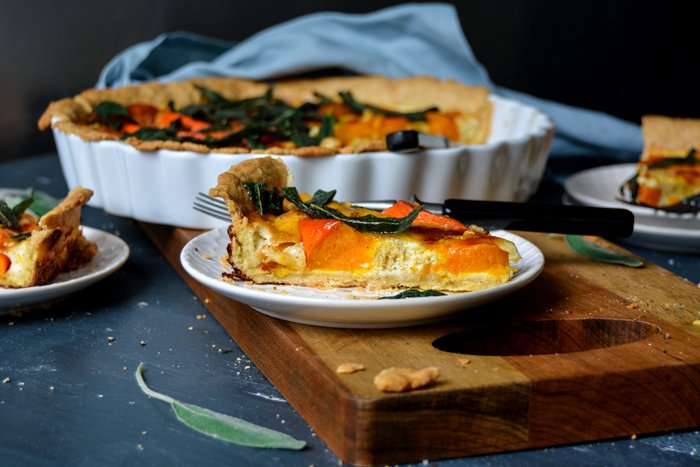
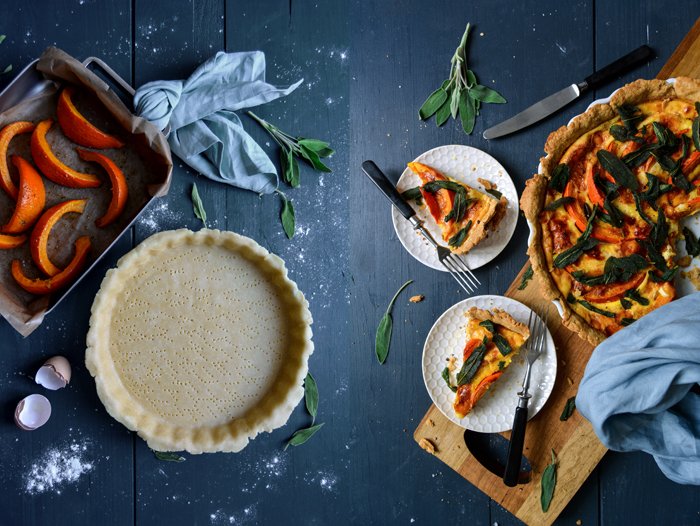
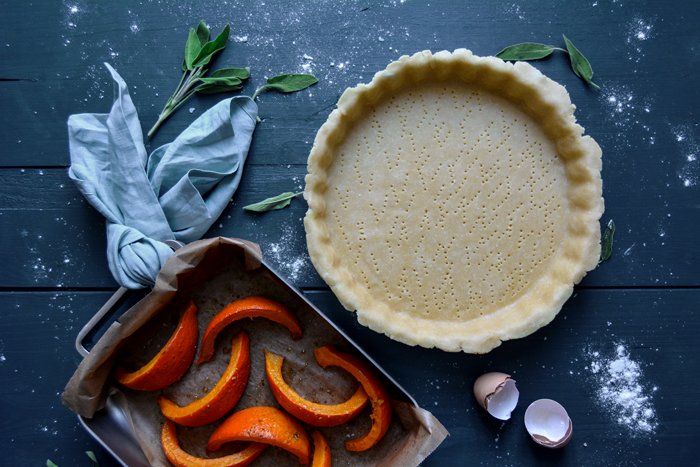
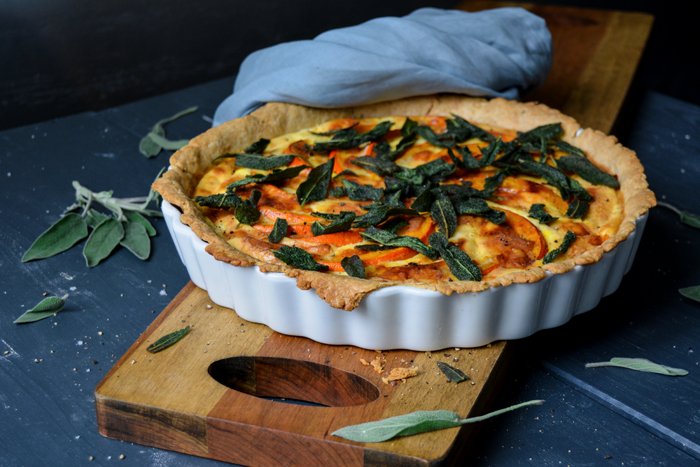
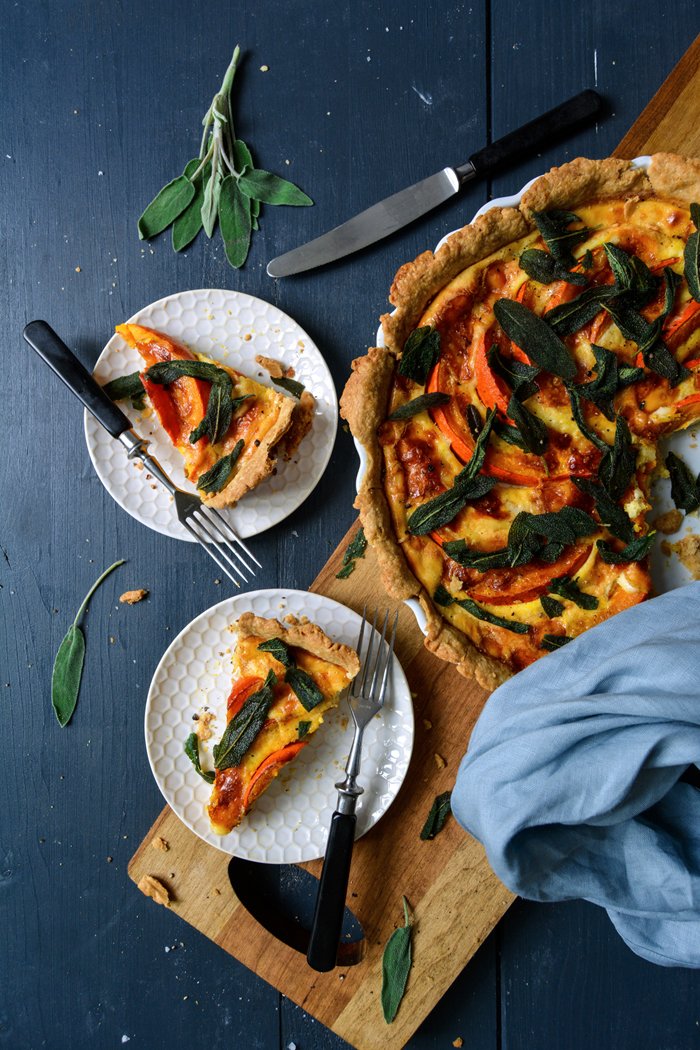
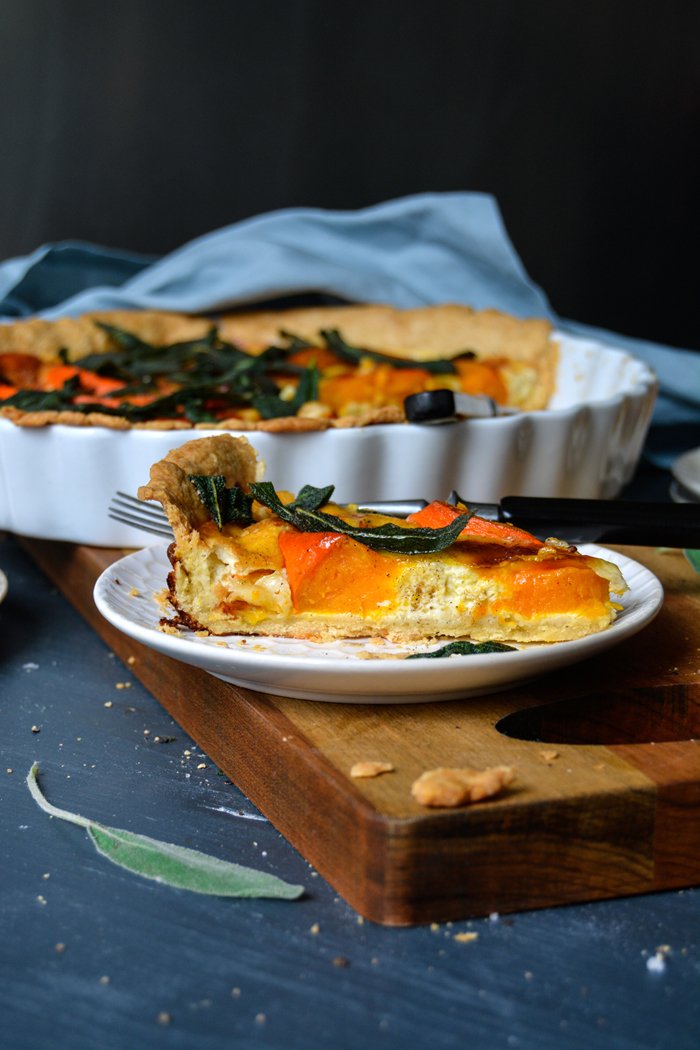

Carrot and Pineapple Muffins with Hazelnuts
The secret ingredient to my favourite carrot cake is puréed pineapple, it makes the batter nice and light and adds subtle fruitiness. Our cake-loving granny Doris from Florida introduced me to her little masterpiece when I visited her in the sunshine state for the first time a few years ago. Although it wasn't the only treat she prepared for us - she's a grandma after all, so she made sure that our plates were never (!) empty - it was the one that struck me the most. I must have eaten the whole cake on my own, it's addictive and I loved it! It's made with sunflower oil instead of butter, which I'm usually not that fond of, but here it doesn't disturb the flavours and makes a very nice and fluffy texture. Refined with my beloved cinnamon, it's a fragrant cake that fits perfectly to a late Sunday breakfast in spring. The temperatures are far from springy here in Berlin so I need a bit of imagination, but never mind, my heart is already set on the next season.
So what works in a cake, also works in a muffin. It's just quicker and easier to prepare and you can even skip the icing of the cake, which turns the whole thing into a richer treat (but if you're up for it, you can find the recipe for my cream cheese icing in the link to the carrot cake). I often use canned pineapple in this recipe, drained and squeezed, I'm after sweetness so if you can't find the freshest, juiciest, and sweetest fruit, go for the can. The amounts of the cake ingredients needed a few adjustments to turn into muffins but the results are actually quite similar: they have the same light texture, beautiful aroma, and I can't stop eating the muffins either.
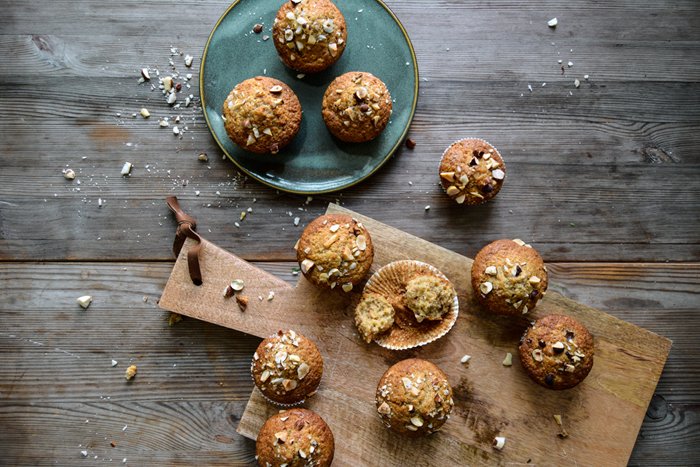
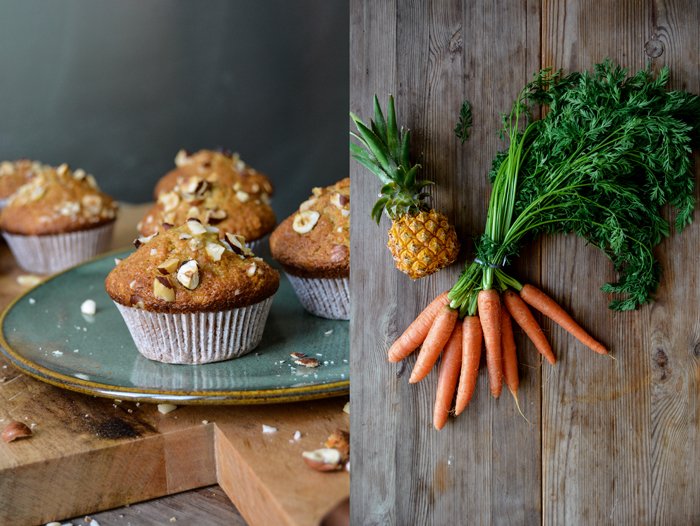
Carrot and Pineapple Muffins with Hazelnuts
Makes 12 muffins
plain flour 260g / 2 cups
granulated sugar 150g / 3/4 cup
baking powder 3 teaspoons
baking soda 1/2 teaspoon
fine sea salt 1/8 teaspoon
ground cinnamon 2 1/2 teaspoons
sunflower oil 120ml / 1/2 cup
pineapple (canned or fresh), drained and lightly squeezed (canned fruit), and puréed, 150g / 5 ounces
organic eggs 3
carrots, grated, 150g / 5 ounces
hazelnuts, chopped, 1 small handful, for the topping
paper baking cups 12
Set the oven to 180°C / 350°F (preferably convection setting) and line the 12 molds of a muffin tray with paper baking cups.
In a large bowl, whisk together the flour, sugar, baking powder, baking soda, salt, and cinnamon.
Whisk together the sunflower oil, puréed pineapple, and eggs.
Pour the pineapple-oil mixture along with the carrots into the bowl with the flour mixture and stir with a wooden spoon until you have a lumpy dough, with a bit of flour left here and there. Keep in mind, the more you mix it, the more it will lose its light texture. Divide the dough between the muffin cups and sprinkle with the chopped hazelnuts. Bake for about 20-22 minutes (slightly longer if using a conventional oven) or until the muffins are firm on top. Let them cool for 1-2 minutes before you take the muffins out of the tray.
You can keep the muffins in an airtight container for up to 2-3 days.
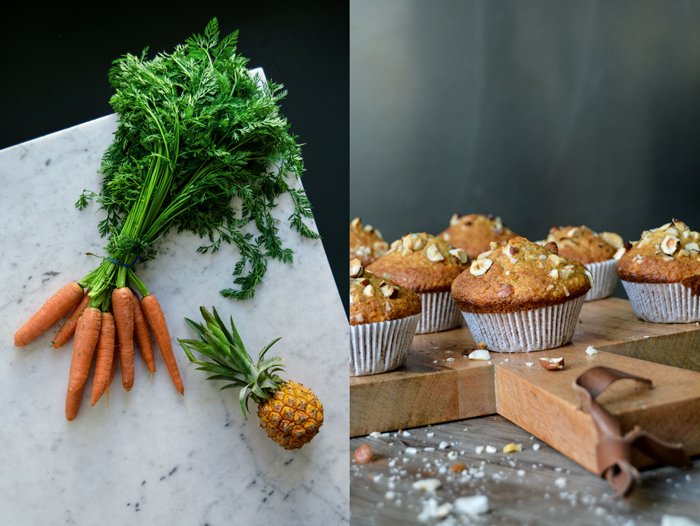
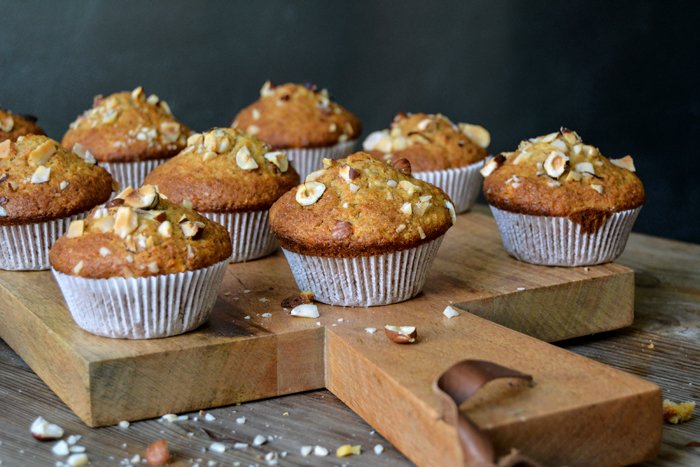
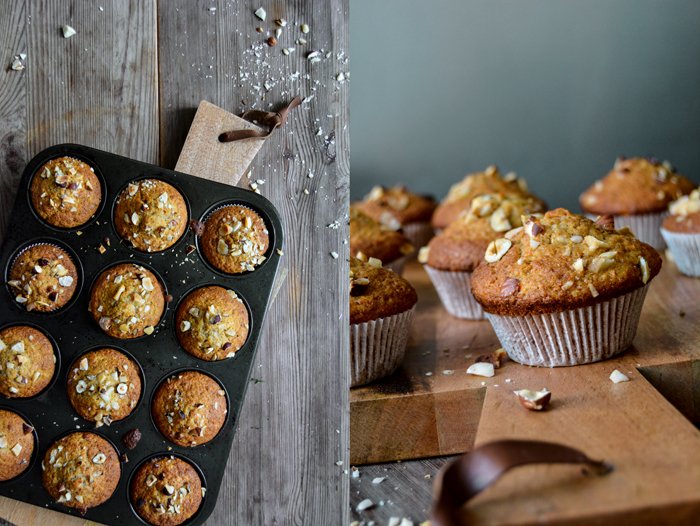

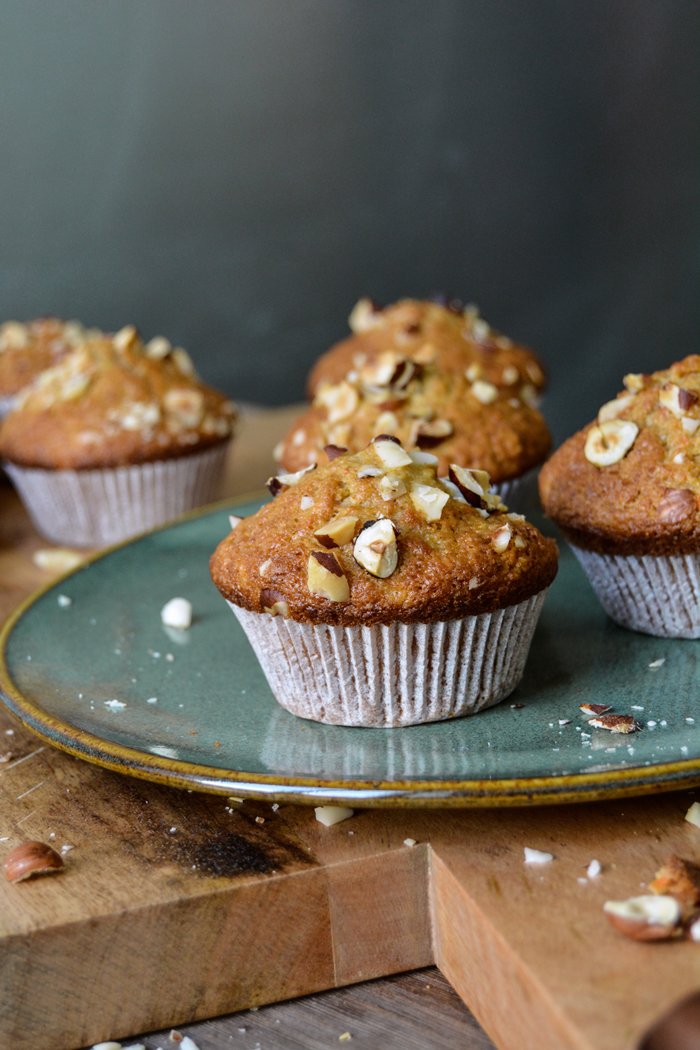

Provençal Pine Nut, Date, and Honey Tart

Berlin, March 2016:
I haven't left the country in a while and I'm starting to feel wanderlust. A few days in an old farmhouse somewhere in the soft hills of Tuscany, lonely walks along the endless beaches of breezy Brittany, or a lazy stroll through one of the ancient villages in the romantic Provençe. I wouldn't mind any of these tempting scenes, just far away, a different place, with different sights and smells, food, and languages to refresh my senses after too many months of being in the city.
Instead, I'm bound to my desk making the last decisions for my book, working on a few new projects, and thinking of recipes that can bring the sweet smell of traveling to my table. I'm quite obsessed with pine trees, I love their distinct, woody smell so much so that I even use a perfume that manages to capture this beautiful aroma of summer, sun, and sand in a little glass bottle. It's the smell of hot dry air mixed with the saltiness of the sea, where slim strips of pine forest become sandy beaches and end up in the gentle waves of the Mediterranean.
So, here's my cure: a Provençal pine nut tart filled with ground almonds, chopped dates, and honey, lying on top of a crisp short crust base. It's so fragrant, warm and sweet, a bit nutty, crunchy and soft, it's all you need when your heart is afar but you're still at home - in cold Berlin.

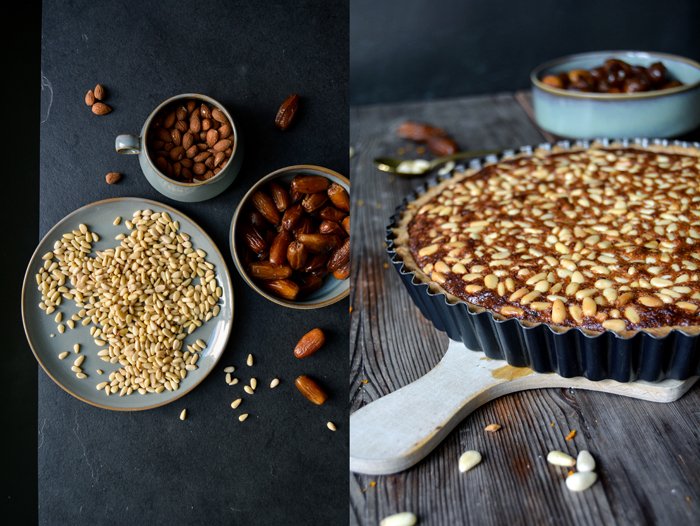
Provençal Pine Nut, Date, and Honey Tart
Makes a 23cm / 9″ tart
For the short crust base
plain flour 200g / 1 1/2 cups
granulated sugar 65g / 1/3 cup
a pinch of salt
butter, cold, 110g / 1/2 cup
organic egg yolks 2
For the filling
butter, at room temperature, 100g / 1/3 cup plus 1 tablespoon
brown sugar 50g / 1/4 cup
honey 50g / 2 1/2 tablespoons
freshly grated orange zest 1 teaspoon
freshly squeezed orange juice 1 tablespoon
organic eggs 2
ground almonds 100g / 3 1/2 ounces
dates, finely chopped, 100g / 3 1/2 ounces
pine nuts 100g / 3 1/2 ounces
For the pastry, combine the flour with the sugar and salt. Cut the butter with a knife into the flour until there are just little pieces of butter left. Continue with your fingers and rub the butter into the flour until combined. Add the egg yolks and continue mixing with the hooks of your mixer until you have a crumbly mixture. Form a thick disc, wrap in cling film, and put in the freezer for 12 minutes.
Set the oven to 200°C / 400°F (conventional setting).
Roll the dough out between cling film and line a 23cm / 9″ tart pan with the flat pastry. Prick with a fork and bake in the oven for 10 minutes until golden and crisp. Take the pan out of the oven and set aside.
For the filling, in a large bowl, using an electric mixer, beat the butter, sugar, honey, orange zest, and orange juice until creamy. Add the eggs, one at a time, mixing well in between until combined. Stir in the almonds and dates and mix until combined. Scrape the filling on top of the baked pastry, even it out, and spread the pine nuts on top. Push the nuts gently into the almond-butter mixture. Bake for 15 minutes, then turn the oven down to 180°C / 350°F, and bake for another 12 minutes or until the top is golden brown and firm. Let the cake cool for 10-15 minutes before you take it out of the pan.

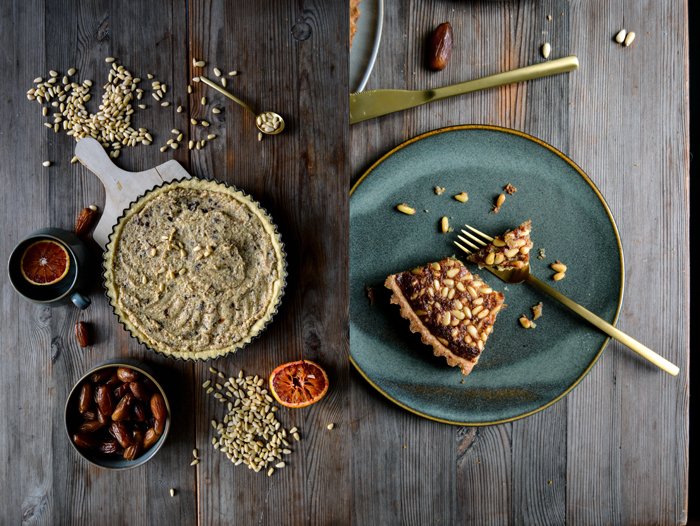
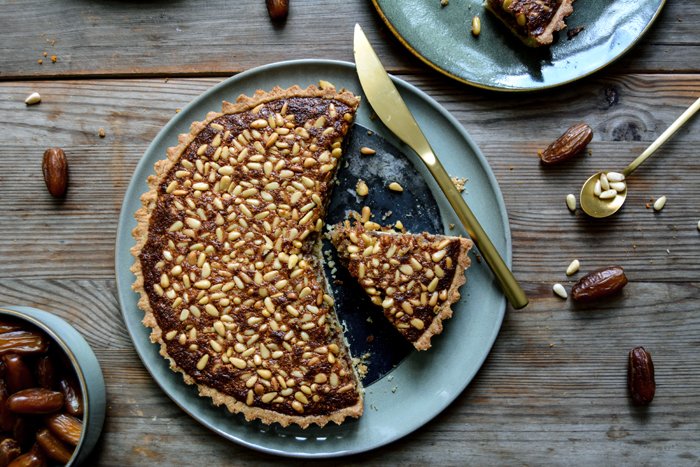

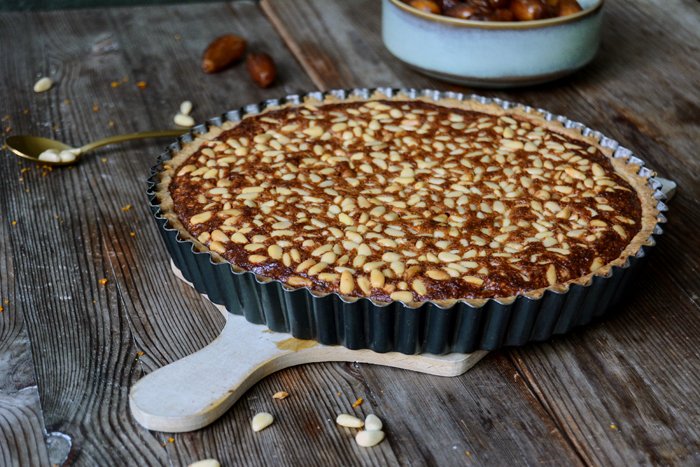
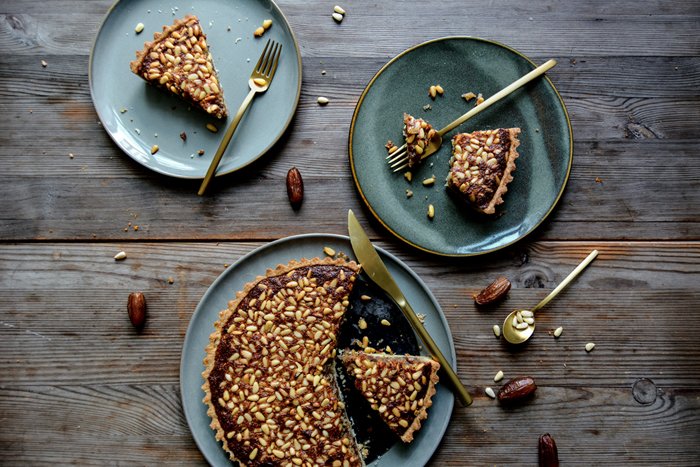
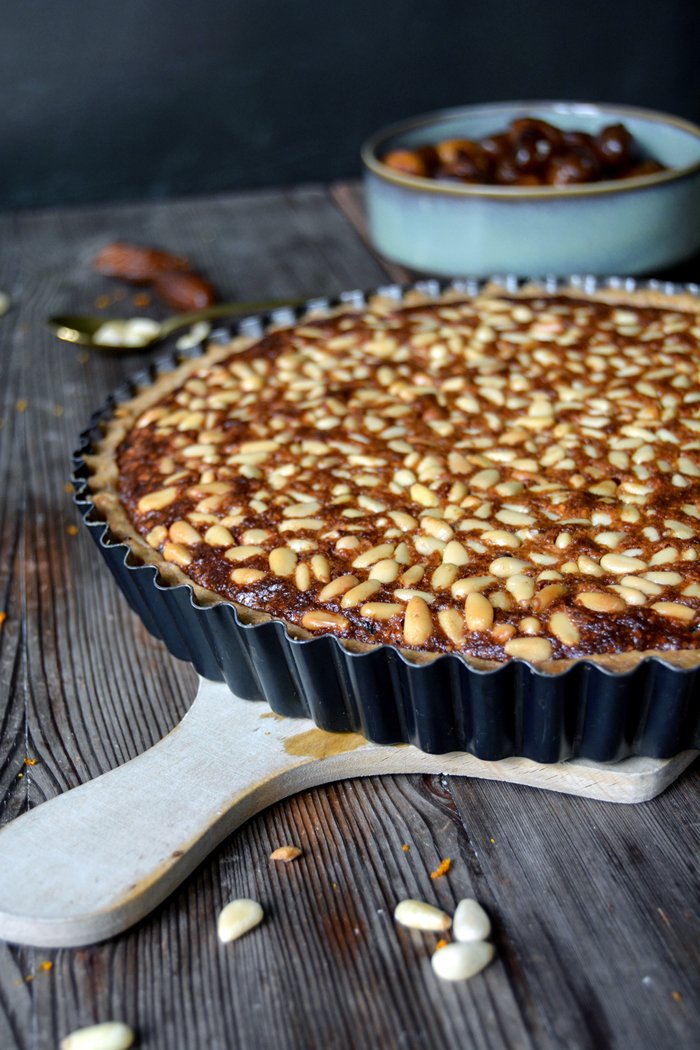
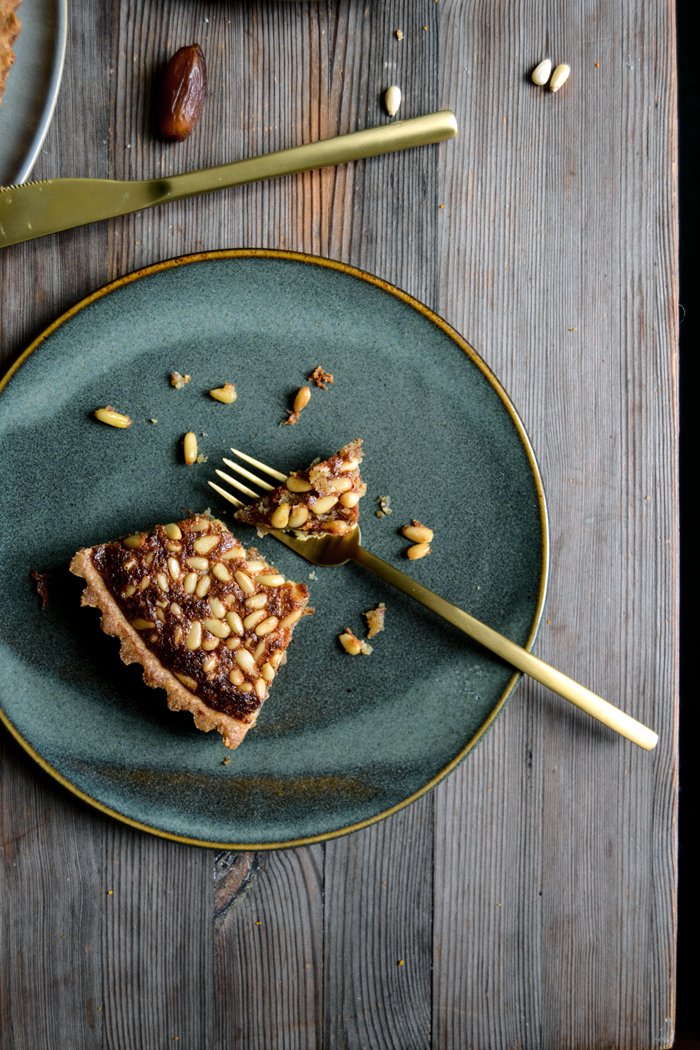


Sticky Banana Ginger Bread
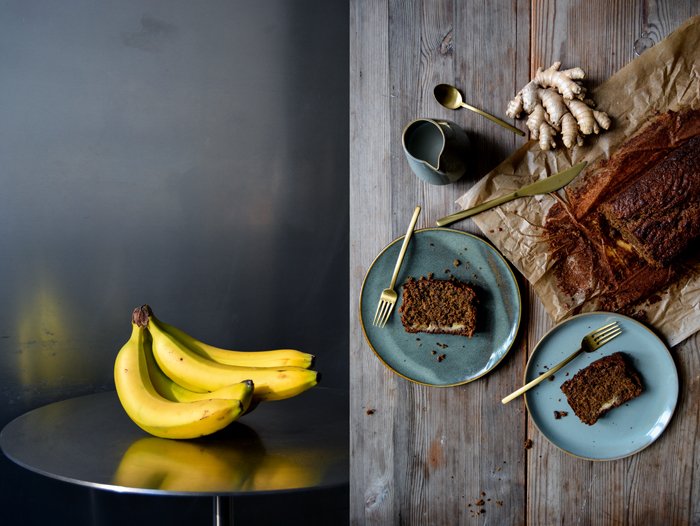
This cake tested my nerves - I needed two attempts to bring it to perfection. The first version tasted divine but was far too soggy and didn't bake through. I didn't mind and still ate half of it. But it didn't help, my pride as a baker made me go back to my kitchen and work on the texture.
Apart from its unsatisfyingly undone center, cake no. 1 had the advantage of the banana halves lying perfectly on top of the baked cake and the batter rising around it - quite dramatic. It was beautiful, but unfortunately, slightly burned as the temperature was too high from the start. Cake no. 2 decided to swallow the fruit and let it sink to the bottom. Not as pretty as the former but it had a scrumptious concentrated banana taste once you got to the sunken fruit.
The cake itself was inspired by Nigella Lawson's wonderful Fresh Gingerbread from her Domestic Goddess book, it's a recipe I truly adore. However there isn't much left of her original recipe, I only aimed for the stickiness, which she mastered to perfection. I added butter, more eggs and spices, and mashed bananas to my ginger bread. And some baking powder for more sponginess. After my disastrous first attempt, I decreased the amount of milk and turned down the heat. It looked completely different but tasted so, so good. The cakey bread (it's actually more of a cake than bread) is infused with the honey-sweet aroma of bananas, lots of freshly grated ginger, and warming cinnamon. It's so good that I forgave the bananas for their disappearing act.
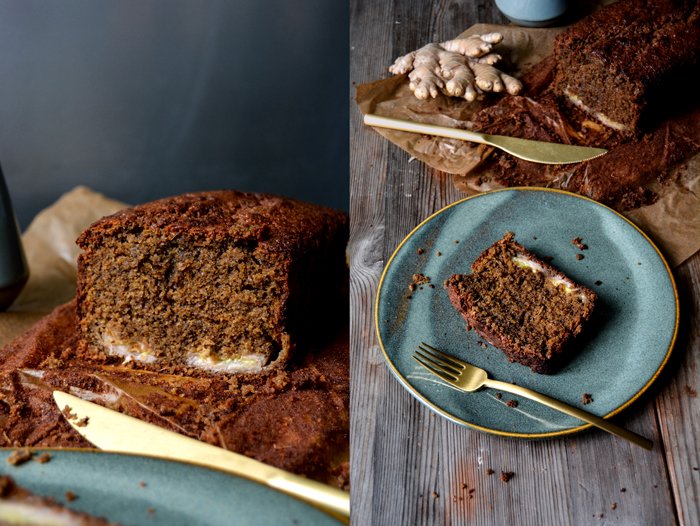
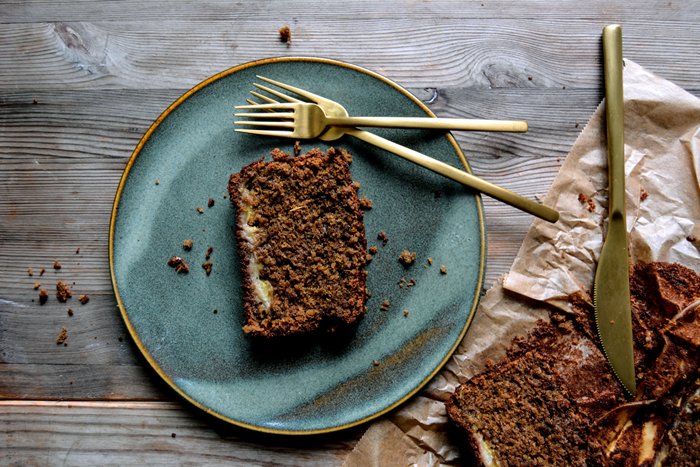
Sticky Banana Ginger Bread
This recipe is also in my 2nd book, 365: A Year of Everyday Cooking & Baking (recipe no. 34).
Update March 16th, 2024 (last picture of this post): Today, I decided to decrease sweetness and go for
180g / 1/2 cup plus 1 tablespoon sugar beet syrup (or dark molasses)
50g / 1/4 cup brown sugar (or granulated sugar)
The other ingredients / measurements didn’t change. I baked it for 60 minutes (so a bit shorter).
Makes 1 loaf
260g / 2 cups plain flour
1 teaspoon baking soda
1 1/2 teaspoons baking powder
1/8 teaspoon fine sea salt
120g / 1/2 cup butter, at room temperature
3 ripe bananas (2 mashed bananas, about 180g / 6 1/2 ounces, and 1 cut in half lengthwise)
200g / 1/2 cup plus 2 tablespoons sugar beet syrup (or dark molasses)
100g / 1/2 cup brown sugar (or granulated sugar)
1 generous tablespoon freshly grated ginger
2 teaspoons ground cinnamon
3 organic eggs
60ml / 1/4 cup whole milk
Preheat the oven to 160°C / 325°F (preferably convection setting). Line a 11 x 26 cm / 4 x 10" loaf pan with parchment paper.
Combine the flour, baking soda, baking powder, and salt.
In a large bowl, using an electric mixer, beat the butter until creamy. Add the mashed bananas, sugar beet syrup, sugar, ginger, and cinnamon and continue mixing until well combined. Add the eggs, one at a time, mixing well in between. In batches, add the milk and the flour mixture, alternating, about 1/3 at a time. Mix until just combined and no more flour is left. Scrape the batter into the prepared pan, lay the banana halves on top (cut side up), and bake for about 65-70 minutes (slightly longer if using a conventional oven) or until golden brown and firm on top. Insert a skewer, it should come out clean when the cake is done. Let the cake cool for at least 15 minutes before you take it out of the pan. Let it cool on a wire rack for another 15 minutes before taking it out of the parchment paper.