
ISCHIA / ISOLA VERDE

Mussels with Spices, Ginger, Lemongrass and Coriander
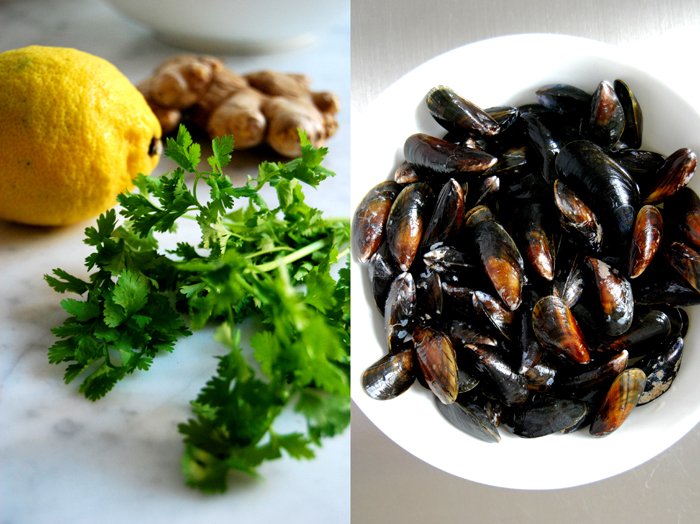
Last summer I enjoyed a sumptuous dinner in a beautiful candle lit garden at an old villa surrounded by fragrant Stephanotis and Plumbago. The setting was just perfect and the food divine as always, cooked by my dear friend Vanessa. She treated us to the freshest seafood, prepared in inspiring variations. We started the dinner with mussels cooked with coriander, turmeric, cayenne and ginger in a wonderful broth made with coconut milk and lemon. I was never too fond of mussels until that night. I used to cook them with celery, carrots and onions in white wine which is nice but the exotic mixture of spices and herbs was something special and unexpected.
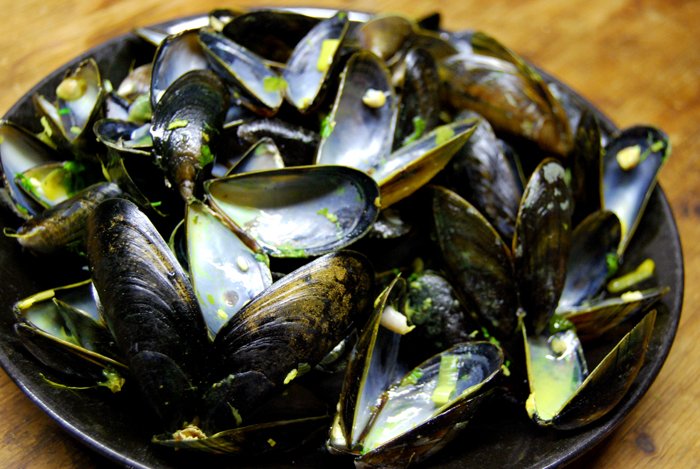
When I bought the mussels for our dinner I knew I would take Vanessa's version and mix it with mine. I used white wine instead of coconut milk but adopted her mix of coriander, turmeric, cayenne and ginger. To this I added some lemongrass, garlic, spring onions and carrots. The velvety broth was a fantastic match for the mussels, very bold while not overpowering the fresh sea taste of the mussels. We finished all the mussels and soaked up every drop of the remaining broth with some Ciabatta bread

Mussels with Spices, Ginger, Lemongrass and Coriander
For 2 hungry people you need
mussels, rinsed, 1 kg / 2 pounds
garlic, crushed, 1 clove
spring onions, cut into slices, 2
carrot, cut into cubes, 1
ginger, grated, thumbnail size
lemongrass, cut into thin slices, a 7cm / 3" piece
coriander seeds, ground, 1 teaspoon
turmeric, ground, 1/3 teaspoon
cayenne pepper, ground, 1/8 teaspoon
salt 1/2 teaspoon
white wine 250ml
lemon juice 1 tablespoon
oil for frying 2 tablespoons
fresh coriander, chopped, a handful
Heat the oil in a large pot and fry the ginger, lemongrass, garlic and vegetables for a couple minutes. Add the ground spices, mix and fry for another minute. Pour the wine and lemon juice into the pot and bring to the boil, season with salt. Add the mussels and mix with the liquid. Close with a lid and turn down the heat to the lowest temperature. Steam for 5 minutes or until the shells open. Take out the mussels which didn't open, you should not eat them! Mix in the coriander leaves and serve on big plates.

Umbrian Torta al Testo with Rucola and Mozzarella

This week's sandwich is my version of Torta al Testo - the Umbrian flatbread - stuffed with rucola and mozzarella together with a dressing of olive oil and balsamico. Originally, this bread is unleavened, just made with flour, salt and water. I add some dry yeast, some use baking soda or sourdough. The name Torta al Testo comes from the fact that, traditionally, it is cooked on a hot disc of clay or metal - al testo - over the open fire, as I don't have that I use a skillet on a normal cooker.
Torta al Testo has everything a good sandwich needs: amazing bread and a tasty filling. What I also like about it, is the way it's cooked. It's fun to see the flat disc of dough rising and cooking in the hot pan within a couple minutes. It's very entertaining! I recently had friends over for dinner and Torta al Testo was the starter. We gathered in the kitchen, crowded as always, I cooked the bread and we all watched it rise. The kitchen was packed with people and food, I cooked one batch of flatbread after the other (I had to make quite a few of them) and the room got more and more smokey from the hot pan. Thankfully no one left, even though you could barely see anymore after I had left one in too long. We were all kind of mesmerized by the rising bread but don't worry, if you watch your bread it will be fine, no need for a fire alarm!

Torta al Testo with Rucola and Mozzarella
For 6 Torta al Testo you need
For the dough
plain flour 250g / 9 ounces plus more for mixing (I use spelt flour type 630 but you can use any other flour)
dry yeast 1 1/2 teaspoons
water, lukewarm, 140ml
salt 1/4 teaspoon
For the filling
mozzarella, cut into cubes, 125g / 4.5 ounces
rucola around 100g / 3.5 ounces
olive oil (6 tablespoons) mixed with balsamic vinegar (3 tablespoons) and seasoned with salt and pepper
Mix all the ingredients for the dough with the hooks of your mixer. Add some more flour if the mixture is too sticky. After 5 minutes continue mixing with your hands for a couple minutes. Put the dough back into the bowl, cover it with a tea towel and let it rise in a warm place or the warm oven (35°C / 95°F, top/ bottom heat, no fan) for 40 minutes.
Divide the dough into 6 pieces. On a well floured working surface, roll each one out into a flat disc. Leave the discs on the floured surface, cover with a tea towel and let them rise for another 20 minutes.
Heat a large skillet on highest temperature (no oil!). Cook the bread on one side for 1 - 1 1/2 minutes, turn and cook on the other side for another minute, at that point it will start to rise rapidly. You might have to cook it for a few seconds more or less - but keep an eye on it so as not to burn it.
Take the bread out of the pan and let it cool for a minute. Cut your flatbread in half and fill with the mozzarella and rucola. Drizzle some dressing on top and close your Torta al Testo.


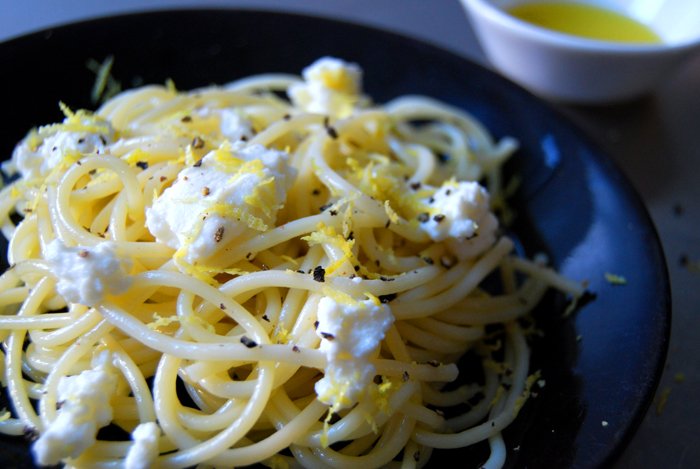
Maltese Pasta with Ricotta and Lemon
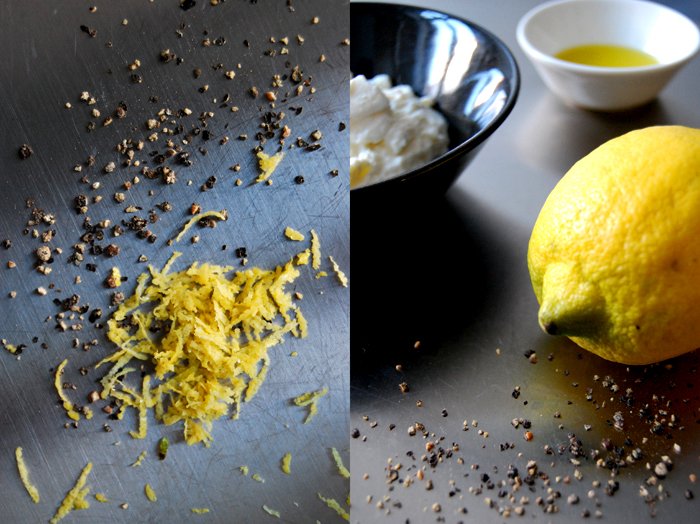
This pasta recipe is there for me at any time of day or night. It started as a middle of the night cooking experiment after being out at a party. My boyfriend and I came home late and hungry, so we sat down in the kitchen over a bowl of pasta with ricotta, lemon zest, basil and crushed pepper. This became a standard post-party hunger salvation.
The inspiration for this combination came from our last trip to Malta. We had just come back from our regular summer stay on this beautiful Mediterranean island where my boyfriend's family is from. Ricotta, lemon, basil and the bold use of roughly crushed pepper are essential ingredients of Maltese cooking as well as fennel seeds, the best tomatoes in the world (together with Maltese potatoes) and lots of herbs. Another treat I always look forward to is Qassata, a savory ricotta filled pastry spiced with crushed pepper and parsley. We make our own when we don't have a Maltese bakery close by (in other words, the rest of the year), I'll write about it soon!
Back to the pasta, I normally throw in a handful of freshly chopped basil but my plant had just given its last leaves so I had to do without.
For 2 people you need
spaghetti 200g / 7 ounces
fresh ricotta 4 heaped tablespoons
zest of 1/2 lemon
basil, chopped, 8-10 leaves
salt and crushed peppercorns
olive oil for the spaghetti
Mix the cooked pasta with a dash of olive oil, season with salt and pepper and divide between the two plates. I prefer to mix the pasta with the ricotta on each plate and not all together, therefore, I add a couple spoons on top of each spaghetti portion and sprinkle with the lemon zest and basil. I always offer some more crushed pepper and salt with it.

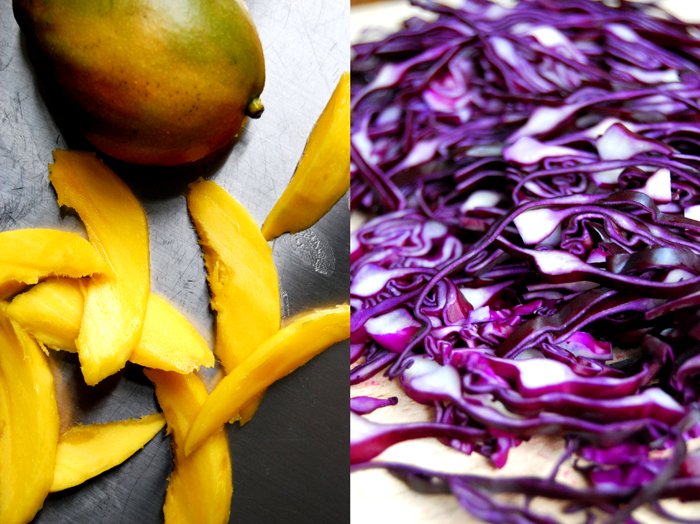
Red Cabbage and Mango Salad

When I had my tea this morning, I stared at a bright red cabbage on my kitchen table for about 5 minutes. I was lost in a daze, still overwhelmed by yesterday's response to the eat in my kitchen feature by ZEIT Magazin. I got so many beautiful messages, thank you all! In case you didn't read it yet, here is the link: http://blog.zeit.de/zeitmagazin/2014/01/05/sonntagsessen-92/
So, back to the red cabbage! My spontaneous decision: I chop the cabbage thinly and mix it with mango slices - I waited patiently for it to ripen, it should be good by now. All this salad needs is a light dressing with olive oil and orange juice and some coriander leaves on top. The light spiciness of the cabbage is great together with the sweet fruitiness of the mango and orange. A vibrant quick and easy Monday lunchtime kick!
Red Cabbage and Mango Salad
For 4 people you need
red cabbage, rinsed, dried and sliced thinly, 400g / 14 ounces
ripe mango, cut into thin slices, 1
orange juice 5 tablespoons
olive oil 3 tablespoons
salt and pepper
coriander leaves, a handful
Mix the olive oil with the orange juice. Season the dressing with salt and pepper and pour over the cabbage. Lay the mango slices and coriander leaves on top - that's it. Tastes great, feels good, prepared in a few minutes - and it looks gorgeous!
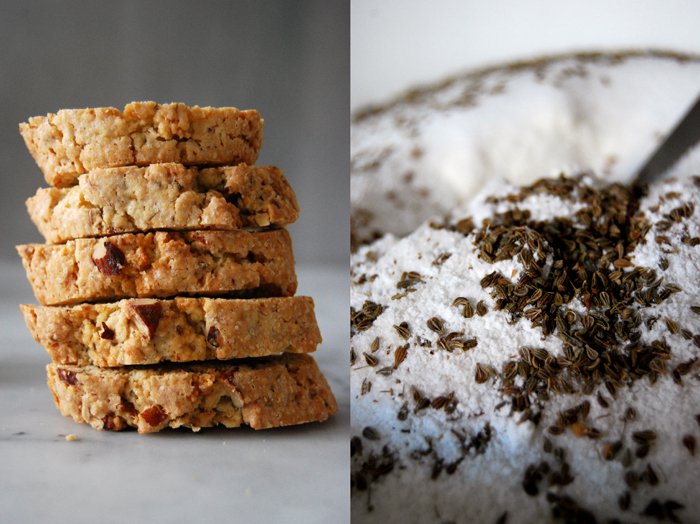
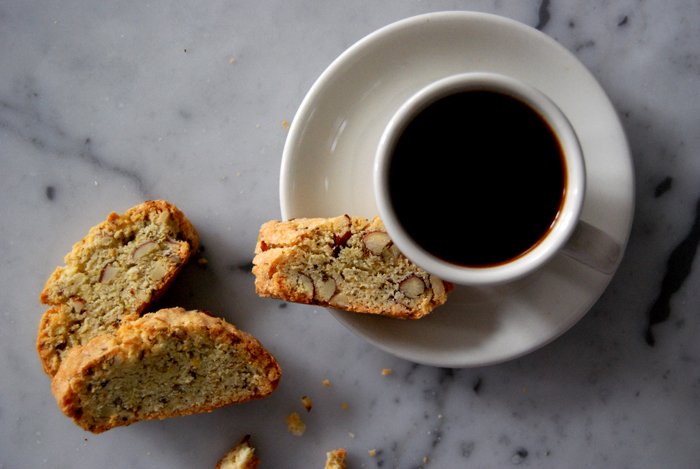
Biscotti with a Shot of Ouzo
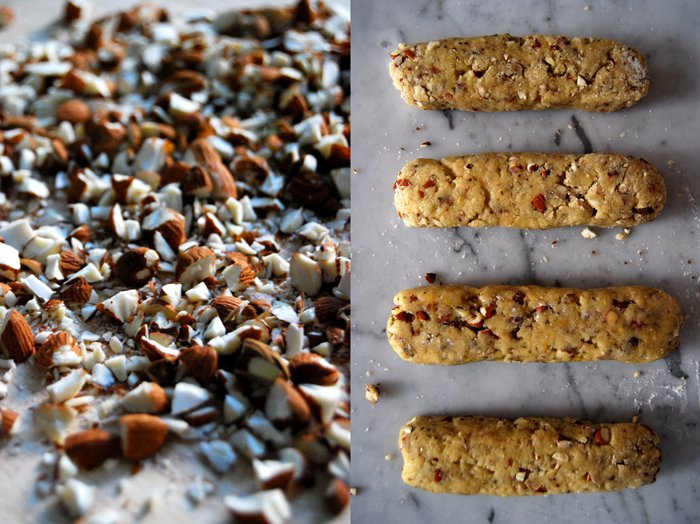
This biscotti proves that cultural exchange leads to enrichment for us all! Originally, biscotti are from Prato in Tuscany. Also known as cantuccini, they are baked twice and filled with almonds. So far, my biscotti stuck to tradition but today I enhance them with a shot of Ouzo, the famous Greek aniseed spirit. The result is a mouth-watering Italian-Greek union! I add some aniseed to the dough and their taste comes through so much stronger thanks to the Ouzo. Together with the almonds and some lemon zest each crunchy bite creates an explosion on your taste buds!
My aunt Ursula told me about the Ouzo-biscotti combination and at first I had my reservations, but that soon changed! I have my biscotti with an espresso at lunch time as a delicious energy booster but they are also a great dessert with ice cream or custard. You could follow the Italian tradition and dip them in Vin Santo - or continue the Greek variation and enjoy them with a shot of chilled Ouzo!

Biscotti with Aniseed, Ouzo, Almonds and Lemon
For 46 biscotti you need
plain flour 400g / 14 ounces
baking powder 2 teaspoons
granulated sugar 250g / 9 ounces
salt 1/4 teaspoon
aniseed, 2 tablespoons
butter, melted, 100g / 3.5 ounces
organic eggs 3
Ouzo (or any other anise flavoured spirit) 3 tablespoons
zest of 1 lemon
almonds, chopped roughly, 100g / 3.5 ounces
Set your oven to 180°C / 355°F and prepare a baking sheet with parchment paper.
Combine the dry ingredients (except the almonds and lemon zest) in a bowl. In a second bowl, mix the butter with the eggs, lemon zest and Ouzo for a couple minutes. Mix the dry mixture into the butter mixture with a spoon. Add the chopped almonds carefully. Divide the dough into four parts and form each into a long bread shape (around 5cm / 2" wide). Place them on your baking sheet and bake for 25 minutes. Take them out and let them cool off for around 20 minutes.
Turn your oven down to 170°C / 340°F.
For the second round, cut each loaf carefully in 1.5cm / 1/2" slices and lay them flat on the baking sheet. Bake for 6 minutes, turn the biscotti over and bake for another 6 minutes. Take the biscotti out when they turn golden and let them cool.


A Gnocchi Treat with Pumpkin and Nuts

I love Hokkaido pumpkin (squash), in fact I always buy too many of them. They look stunning, their curvy shape and bright orange colour - I can't resist! Whenever I see a nice one I have to buy it and end up with far too many pumpkins in my kitchen. I have two on my kitchen table right now - perfect candidates to mix into tonight's Gnocchi dough!
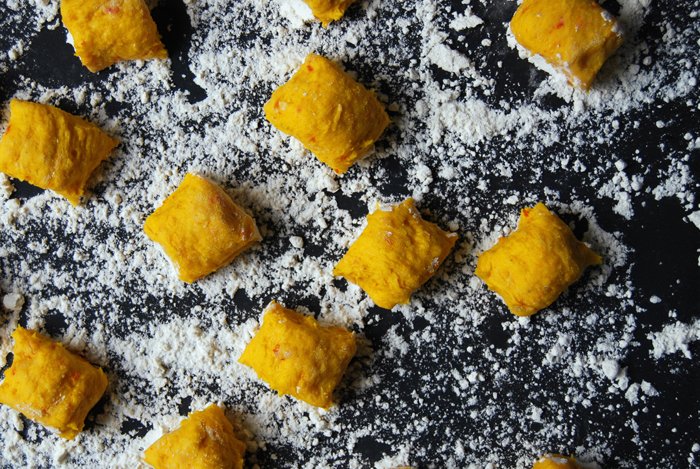
Usually, I make potato Gnocchi with blue cheese sauce or sage butter, but today it's pumpkin Gnocchi with walnut pesto. They are absolutely delicious and easy to prepare. The most important trick is: never mix the flour with the warm pumpkin and potatoes! The mixture must be cold, that way the Gnocchi will keep their shape and have the right, firm texture.
This recipe has been featured on Food52 Halfway To Dinner!
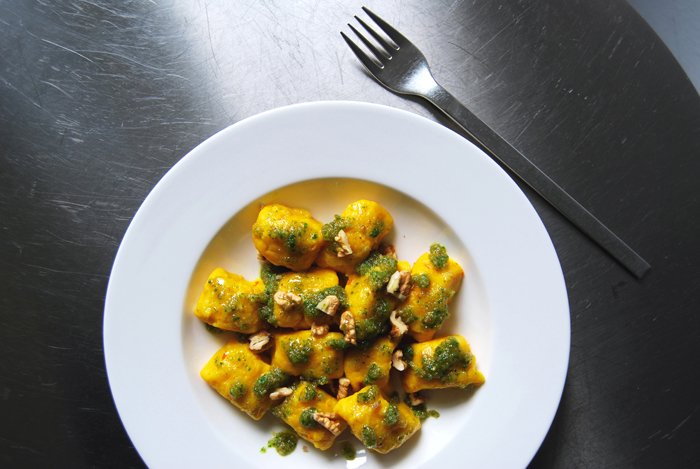
Pumpkin Gnocchi with Walnut Pesto
There are two important rules for Gnocchi making:
1. First, you make the pre-dough with the pumpkin, potatoes, butter and egg yolks which has to cool completely before you mix in the flour, otherwise the Gnocchi will turn out too soft.
2. Mix more flour into your Gnocchi mixture if it's too sticky. If the dough is too soft, the Gnocchi won't stay in shape.
For 4 people you need
For the walnut pesto
walnuts 100g / 3.5 ounces plus more for the topping
parsley, chopped, 3 tablespoons
olive oil 110ml / 1/2 cup, plus more to taste (enough to give the pesto a smooth but thick texture)
salt and pepper
Mix all the ingredients in a blender and season with salt and pepper to a taste. Add more olive oil if the mixture is too thick.
For the Gnocchi
pumpkin (squash), seeds and fibres scooped out, cut into 2.5cm / 1" cubes, 600g / 21 ounces (I like to use Hokkaido pumpkin with skin, or peeled butternut or Musquée de Provence)
potatoes, peeled, cut into 2.5cm / 1" cubes, 200g / 7 ounces
organic egg yolks 2
butter 2 tablespoons
plain flour 280g / 10 ounces
salt 3 teaspoons
nutmeg, grated
pepper
Cook the pumpkin and potatoes in lots of salted water until soft (for about 15 minutes). When they are done, take them out with a slotted ladle and drain them (gently push with a spoon and make sure that no more water comes out). Press the drained potatoes and pumpkin through a potato ricer, take any water out that might come out with pressing.
Mix the warm pumpkin/ potatoes with the butter and egg yolks and put in a cool place (or in the fridge) until the mixture is completely cool.
In a large pot, bring lots of salted water to the boil.
With a spoon, mix the cold potato/ pumpkin mixture with the flour, salt, nutmeg and pepper until combined. If the texture is too sticky and not firm, mix more flour in.
Dust your hands with flour and roll the dough into a sausage shape (about 1cm / 0.5" thick) on a well floured working surface (in batches). Cut off Gnocchi of 2.5cm / 1" length and put them on a well floured baking sheet.
Cook the Gnocchi in the water in batches on medium heat (simmering). When they start to come up and float on the surface take them out with a slotted ladle and drain them. Keep the Gnocchi in a covered ovenproof dish in the warm oven (100°C / 210°F) until the last batch is done.
Serve the Gnocchi sprinkled with the pesto and some crushed walnuts.
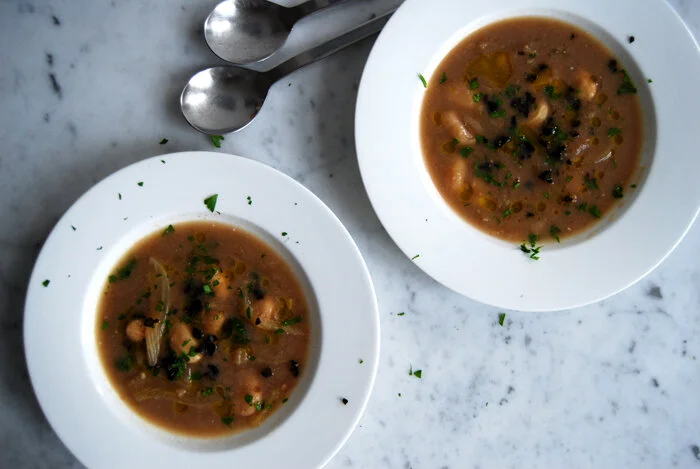
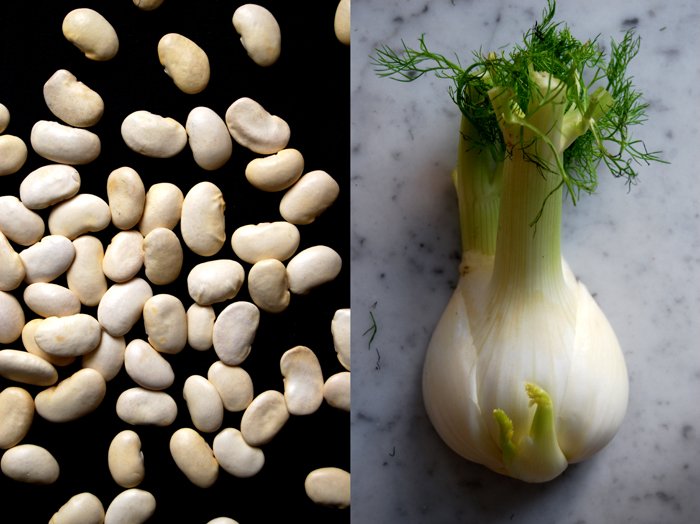
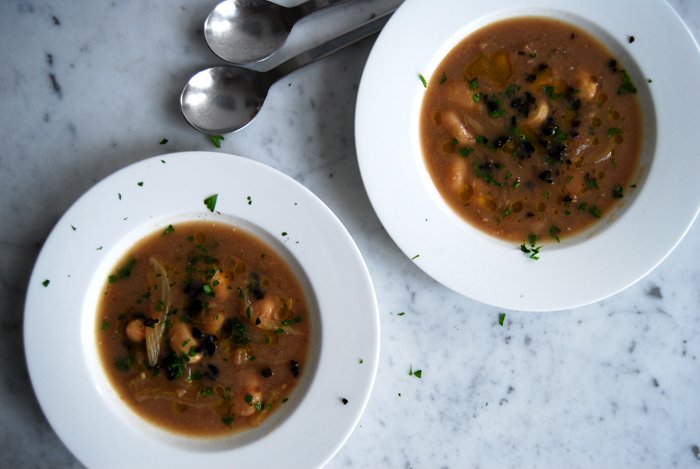
Butter Bean and Fennel Soup
It's time for soup! The colder it gets the more I feel like food that is up-lefting and soul-warming. Something that makes me feel strong and prepares me for the cold, dark months ahead of me. Although I love winter, the snow, even the cold, when you get cosy inside, slow down and relax, it's important to treat yourself to the right food to renew your body and mind.
I'm in the mood for a thick soup, smooth but light - like my Minestrone with big butter beans and fennel with some parsley and black olives sprinkled on top. The texture is velvety and it tastes a bit sweet. Today I add a piece of bacon to it as I feel like something deeper in taste. Usually I cook the vegetarian version, I don't prefer one over the other, both are nice winter treats!
Butter Bean and Fennel Soup
Keep in mind that you have to soak the dried beans in water overnight. I like to cook soups in bigger batches to store some in the freezer - great for busy days. This recipe is for 4 people, sometimes I even double the amount.
dried butter beans or Cannellini beans, soaked in cold water overnight, 250g / 9 ounces
fennel, rinsed, cut in thin slices, 300g / 10.5 ounces
celery stalk, cut in cubes, 1
onion, cut in cubes, 1
broth or water, around 1500 ml
optional: a piece of bacon, 40g / 1.5 ounces
garlic, crushed, 1 clove
bay leaf, 1
salt and pepper
olive oil for frying
parsley, chopped, for the topping, 2 tablespoons
black olives, chopped, for the topping, 4
good olive oil, for the topping
Heat some oil in a large pot. Fry the onion, celery, garlic and bacon (left in one piece) for a few minutes. Add the fennel, take the beans out of the water and put them into the pot as well. Fill with broth, add the bay leaf and close with a lid. Don't season with salt before the beans are done or they won't become soft. Cook for 30 minutes or until the beans are soft. Depending on the bean's texture it may take another 30 minutes. Mine needed 60 minutes today but I must admit that I found them in a dark corner of my shelf.
When the beans are done, take out half of the vegetables (cooked beans and fennel) and put them to the side. Mix the other half of the vegetables together with the liquid in a blender and season with salt and pepper. Put everything back into the pot together with the remaining vegetables. When you arrange the soup in soup bowls sprinkle with olives and parsley and drizzle your best olive oil on top.

Salmon with a Crust of Winter Spices

Salmon is great to combine with strong flavours. Its own taste is so strong and unique but blends in perfectly with all kinds of herbs and spices, even exotic curry mixtures. When I saw this nice salmon steak at the fish counter I had to buy it. I didn't even plan to cook fish but it looked too good to pass by.
At the moment, I use a lot of juniper, bay leaves and cloves, the typical winter spices. I decided to give them a try on the salmon as well - as a rough crust. They are very strong and aromatic spices, a bit sweet and smoky. It was more an experiment of sorts but I was really impressed by the result. We ate it with fresh bread and a salad on the side. Enjoy a glass of white wine with your meal and you will have a small dose of summer in January!

Salmon with a Crust of Bay Leaf, Juniper and Clove
For 2 people you need
salmon steak, around 2cm / 3/4" thick, 1 big or 2 smaller steaks
olive oil
juice of 1/2 a lemon
For the crust
garlic, crushed, 1 clove
bay leaves, ground in a mortar, 2
juniper berries, ground in a mortar, 2
cloves, ground in a mortar, 2
black pepper, ground in a mortar, 6
Set your oven to 200°C / 390°F.
Grind all the ingredients for the crust in a mortar until you have a combined paste. Heat some oil in a non-stick pan (highest temperature). Rinse and dry the fish, season with salt and pepper and fry for 1 minute (on each side). Take the fish off the heat and spread the paste on the top side of the steak. Pour a bit of oil in a baking dish, mix with the lemon juice and place your salmon steak on top. Bake in the oven for 8 minutes, when you can lift the fish from the bones it’s done.
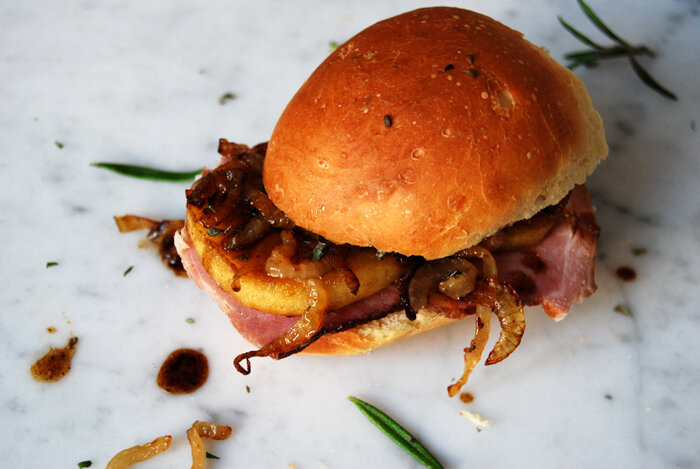
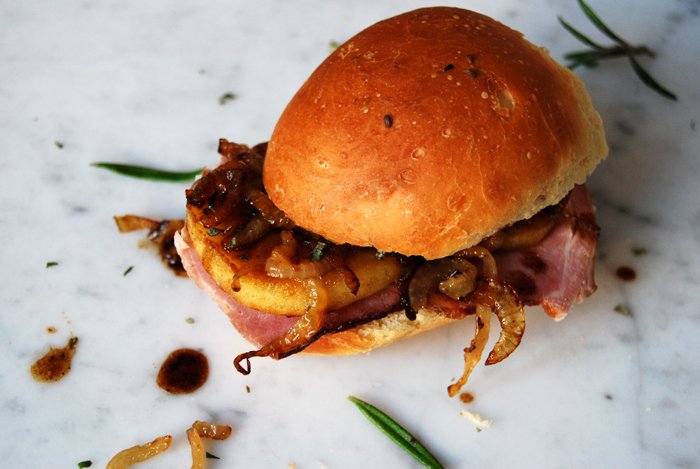
A Greedy New Year's Sandwich
Happy New Year!
The timing couldn't be better: it's eat in my kitchen's Sandwich Wednesday and I really need one. There is no better food after a long night with Champagne and wine than a sandwich. My body wants some real food, hearty and rich! When I lived in Whitby in England a few years ago I used to go to a takeaway called "The Greedy Pig". The food was amazing, fresh and soft buns stuffed with slices of roast pork, apples and gravy. I miss this place!
This week's sandwich is dedicated to "The Greedy Pig". You just need a soft bun or thick slices of white bread (I warm up my mountain buns which were still in the freezer) and stuff it with a few slices of roast pork from the butcher. Fry thin slices of an onion in butter until golden brown. Peel and cut an apple in thick slices. Heat 2 tablespoons of butter in a pan and add a tablespoon of sugar, let it get golden brown. Lay your apple slices in the sugary butter, fry from both sides until golden and deglaze with brandy. Cut your bun in half, put a few slices of roast pork on one side, add the onion and apple with the brandy sirup. Sprinkle with fresh rosemary, close the bun and enjoy your Greedy New Year's Sandwich!

Happy New Year!

I wish you a wonderful 2014 with lots of inspiration, good food and - of course - great moments in your own kitchen!
Meike xx

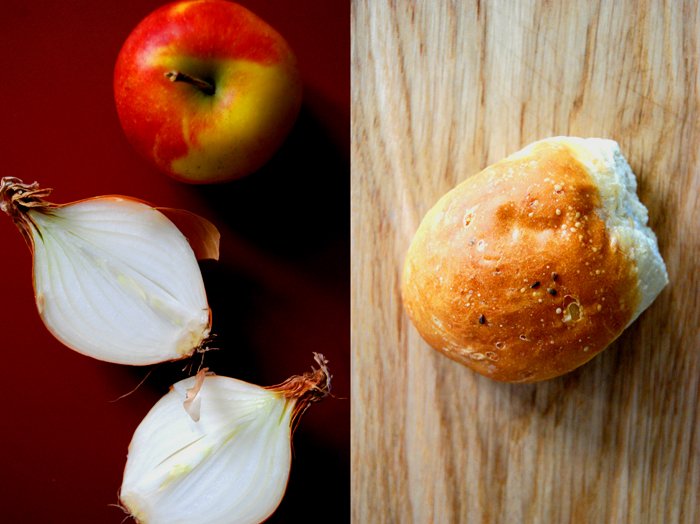
The last spaghetti (in 2013)
The last day of the year always gives me a funny feeling, an emotional mixture of memories, feelings - and excitement for what the future will bring.
I need some pasta to relax.
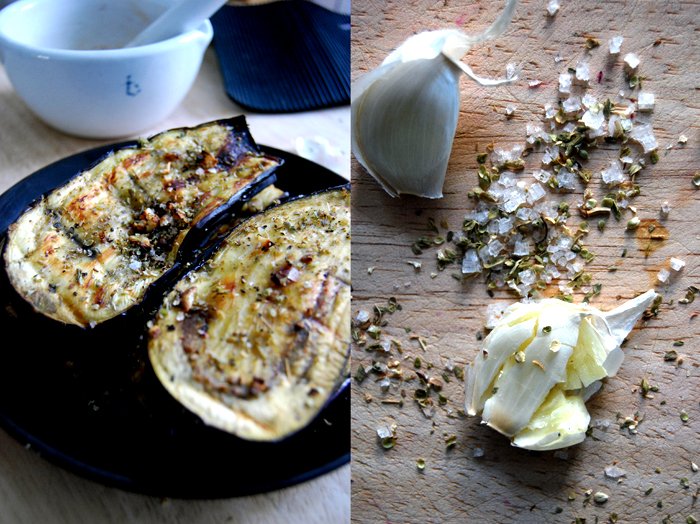
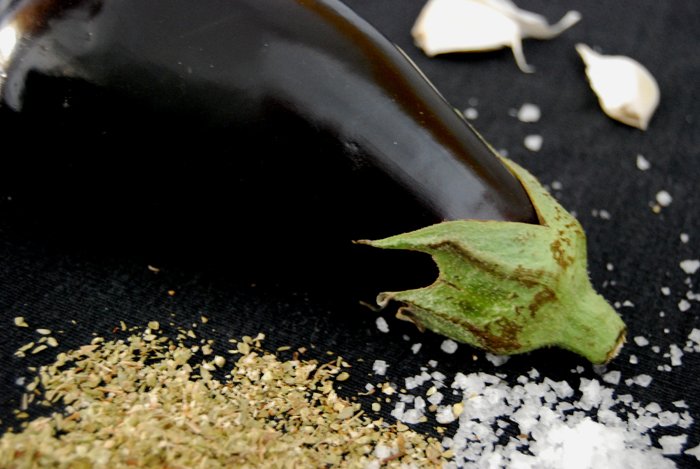
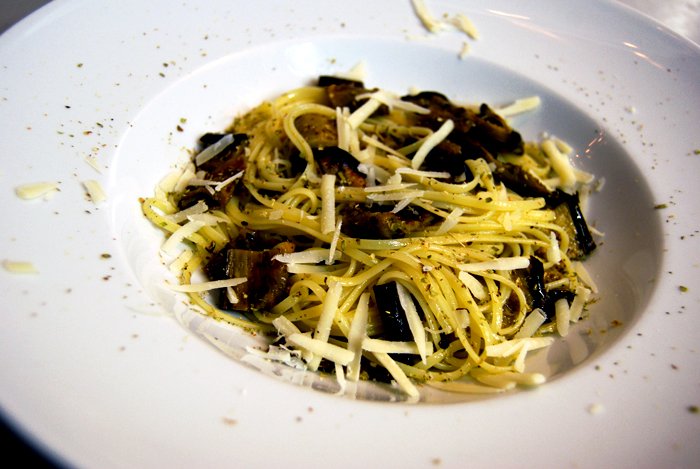
Tonight, we are invited to dinner, we will have cheese fondue. I don't want to eat too much for lunch before this cheese feast but I have some grilled aubergine left from our Sunday pizza. Golden brown and soft, brushed with olive oil and sprinkled with oregano, crushed garlic, salt and pepper - I just cut them in bite sized pieces. I throw some spaghetti in boiling water, when they are done, mix them with the aubergine, a bit of olive oil, some more dried oregano and crushed pepper and sea salt - from Mr. Cini's salt pans in Gozo. You can sprinkle some Parmesan on top if you like. A simple meal to relax in the last hours of 2013!

Fennel Carpaccio with Caper and Lemon
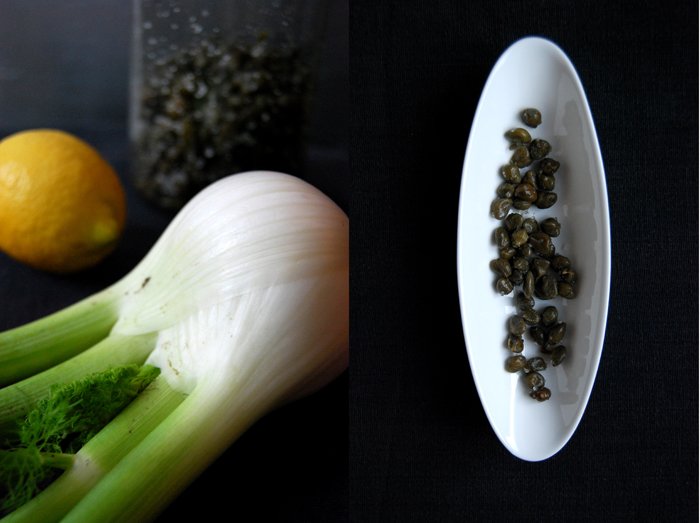
Two days left in 2013 - an easy and comfy lunch is in order to lean and look back on the past months. I feel like a quick carpaccio with fennel, caper and lemon, fresh and light, the right foundation for an honest review of an exciting and inspiring year - and the start of eat in my kitchen!
My mother told me about this vegetarian carpaccio which she enjoyed at a restaurant in Italy, so much that it became part of her - and my - recipe collection. Sometimes she is so excited by her food discoveries that she calls me immediately after she ate to tell me about her find. She knows that I love fennel and caper - a perfect match together with lemon and olive oil. I can get good quality fennel all year round therefore I cook with it quite often. As much as I love this carpaccio as a quick lunch because it's so easy to prepare, it makes a beautiful, light starter as well.
As a starter for 4, cut 1 fennel bulb in very thin slices and arrange them on plates. Add 6-10 capers on each plate, mine are salted so I have to rinse them first. Drizzle some olive oil and fresh lemon juice on top and season with salt and pepper. It only takes a couple minutes.


My Sunday Pizza Tradition

Another tradition of mine - I always bake pizza on Sundays, always. My friends joke about my unwavering dedication (I barely break this tradition) but to me pizza is the ultimate cosy mood food. Nothing beats an evening on my sofa with a nice big piece of pizza in my hands and a good movie. It's the perfect preparation for a smooth transition into a new week. So why change it. The only variation is what's on top which depends on the season, my appetite and spontaneous inspiration. So far, my Sunday tradition has never seemed boring.
For today, my pizza gets a topping with aubergine slices (grilled with garlic and oregano oil), Pecorino slices and one part with ricotta. A very concentrated tomato sauce with lots of oregano and slices of organic Mozzarella go with it, that's all it needs. I make the pizza dough with olive oil which makes it richer and very tasty. A very easy recipe, it takes its time to rise but it's worth it. Nothing beats homemade pizza dough! It makes such a big difference to the taste - and kneading the dough with your own hands is great stress relief!
For years I made my pizza base the same way. First I let it rise in a bowl and then, a second time, on a baking sheet before I put the topping on. This summer I got a great tip from a friend of mine from Switzerland. He told me to put the baking sheet for the pizza on the bottom of the oven while the oven is heating up. As soon as the baking sheet is hot you take it out of the oven and flip it over. You take the well risen pizza dough (which has been rolled out) and place it on the hot baking sheet. The dough will start to rise and bake straight away which makes an amazing crust - like pizza stone. Once the topping is on, bake it in the oven for a few minutes and you will get the crispiest pizza you can imagine!

Pizza with Aubergine and Pecorino
I start to prepare the dough 2 hours before I bake it to give it enough time to rise.
For 1 big pizza (size of 1 baking sheet) you need
For the dough
plain flour 350g / 12.5 ounces plus more for mixing
dry yeast 1 package (for 500g / 1 pound of flour)
water, lukewarm, 190ml
olive oil 3 tablespoons
salt 1 teaspoon
Combine the flour with the yeast and salt, add the olive oil and the lukewarm water, slowly, not all at once (you might not need all of it). Mix with your dough hooks for a few minutes. The dough shouldn't be moist and sticky at all, more on the dry side. Continue kneading and punching with your hands until you have an elastic dough ball, not too hard, not sticky. Put the dough back in the bowl, cover it with a tea towel and let it rise in the warm oven (35°C / 95°F) for 40 minutes. This works really well but make sure that your oven is set to top/ bottom heat and not to fan.
When the dough is well risen, roll it out on a very well floured (this is very important!) working surface. It should be a bit smaller than the size of your baking sheet. Cover with a tea towel and let it rise for another 10-15 minutes
For the tomato sauce
tinned tomatoes 400g / 14 ounces
oregano, dried or fresh, 1 tablespoon plus more for the topping
salt (1 teaspoon) and pepper
Mix the ingredients in a small sauce pan, chop the tomatoes and let everything cook down until very concentrated and thick. If you leave the sauce too liquid it will be soaked up by your pizza base.
For the topping
I prepared the grilled aubergine (eggplant) a day before. You can keep it in the fridge for days and use it for other recipes as well, or enjoy it as antipasti.
aubergine, cut in thick slices, 1
garlic, crushed, 1 clove
olive oil, to brush the aubergine and to drizzle on top of the pizza
salt and pepper
pecorino cheese, cut in thin slices, 100g / 3.5 ounces
mozzarella, cut in cubes, 125g / 4.5 ounces
ricotta, 100g / 3.5 ounces (I sprinkled just 1/4 of the pizza with ricotta)
Brush the aubergine slices with olive oil, sprinkle with oregano and garlic and season with salt and pepper. Grill in the oven until golden brown and soft and cut in long strips.
The pizza
Set your oven to 260°C / 500°F. My oven has a special pizza setting but you can use top / bottom heat as well. Put the baking sheet on the bottom of your oven to heat it.
Take the hot baking sheet out of the oven, flip it over and place it carefully on two stable wooden boards or mats as it will be very hot. Place your risen dough carefully but quickly (best done by two people) on the baking sheet, push it gently into place if necessary. Spread the tomato sauce on top and sprinkle with oregano, continue with the aubergine, Pecorino, mozzarella and ricotta. Put the baking sheet back into the oven, on the bottom again, and bake for a few minutes until the pizza is golden brown, bubbling and crisp!


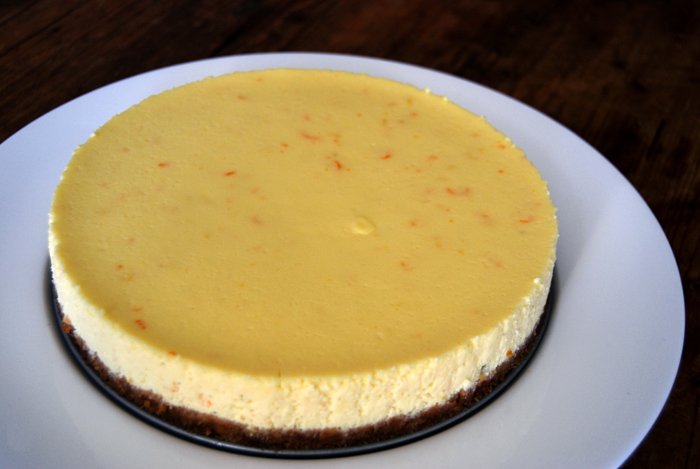
Orange Cheesecake

The first time I had New York cheesecake is quite a while ago - it was love at first sight! When I was fourteen I traveled to New York and Canada with a friend of mine and her family. As soon as I took my first bite I was hooked and during the following three weeks of our holiday I don't believe I left out a single chance to get a piece of cheesecake, every day, at every restaurant we went to. I became a true cheesecake specialist!
Now, when I bake my own, I'm always reminded of that trip and the excitements of being a traveling teenager. Over the years I tried out many cheesecake recipes and developed my own favourite with orange zest and juice and cream cheese mixed with ricotta. It is still as rich and moist as the traditional version, the citrus flavour just adds a fresh, fruity specialness and gives it a lighter feeling.
Orange Cheesecake
For a 20.5cm / 8" springform pan you need
digestive cookies, crushed very finely, 210g / 7.5 ounces
butter, melted, 70g / 2.5 ounces
cream cheese, at room temperature, 450g / 16 ounces
ricotta, at room temperature, 100g / 3.5 ounces
granulated sugar 100g / 3.5 ounces
vanilla sugar 1 teaspoon
organic eggs 3
cornstarch 1 teaspoon
zest of 1 orange
orange juice 1 tablespoon
zest of 1 large lemon
juice of 1 lemon (4 tablespoons)
a pinch of salt
Mix the crushed cookies with the melted butter until crumbly and combined and press into your springform pan. Put in the freezer for 15 minutes.
Set the oven to 165°C / 330°F and put a deep roasting tin in the oven on the lowest position. Boil water in a kettle.
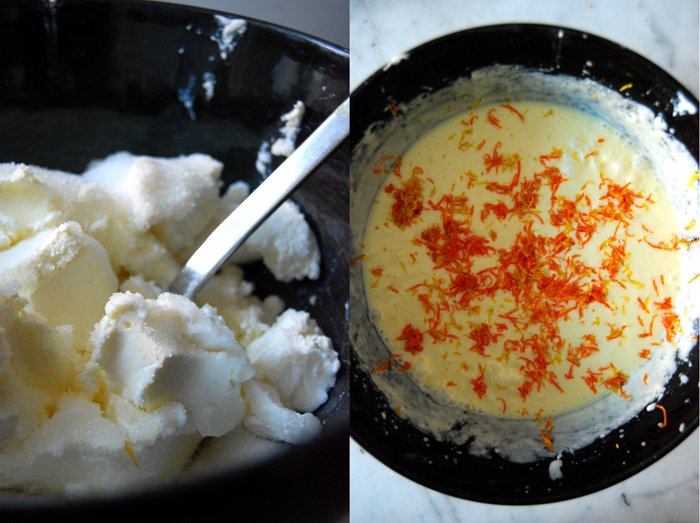
Mix the cream cheese, ricotta, sugar, vanilla sugar, salt and eggs and beat until smooth. Add the cornstarch, lemon and orange zest and juice and continue mixing.
Take the baking pan out of the freezer and wrap in aluminium foil twice so that the bottom and sides are well covered to protect the cheesecake from the water. Pour the cheesecake mixture on top of the hardened crumbs and place carefully into the tin in the oven. Fill the roasting tin with the boiling water from your kettle. The water should come half way up the wrapped springform pan. Bake for 50 minutes, switch off the oven and leave the cake in the oven to cool. After around an hour you can take your cheesecake out and chill in the fridge for a couple hours.

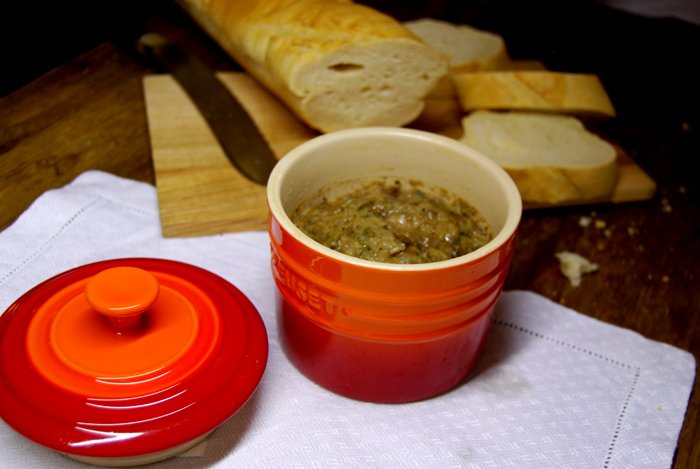
A Feast of Leftovers

It is so satisfying to create meals with leftovers. Although it is exciting to cook a special meal for a special event, the next day when I see the food that is left I get inspired to combine it differently and create something new. When I enjoyed our Christmas duck and the tasty gravy on Christmas Eve I knew I would make a hearty, wintery pasta dish with the leftovers. This has become something of a tradition. Every year in the days after Christmas, when we need a break of our extensive meals, we eat the meat leftovers and gravy mixed with pasta.
I have Delverde's Conchiglioni in the shelf - they look absolutely beautiful, like big shells, and they are perfect to catch the rich gravy and duck. I chop up the duck meat into bite sized pieces and warm it up in the sauce. To offset the richness of the gravy I fry two carrots (cut into thin slices) in some oil and a bit of sugar and add a few thyme leaves. I don't want the carrots to be too soft, it just takes a couple minutes and they still have some bite. When the pasta is ready - al dente - I place the pasta shells on big plates and add the sauce with the meat and the vegetables. You can sprinkle them with crushed pepper if you like it more spicy. It's nothing short of a feast, just lighter and quicker than the first.


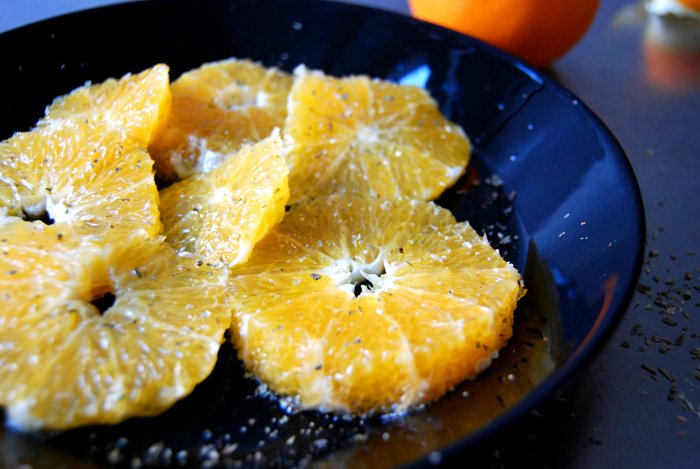
A Sicilian Salad with Oranges, Oregano and Olive Oil
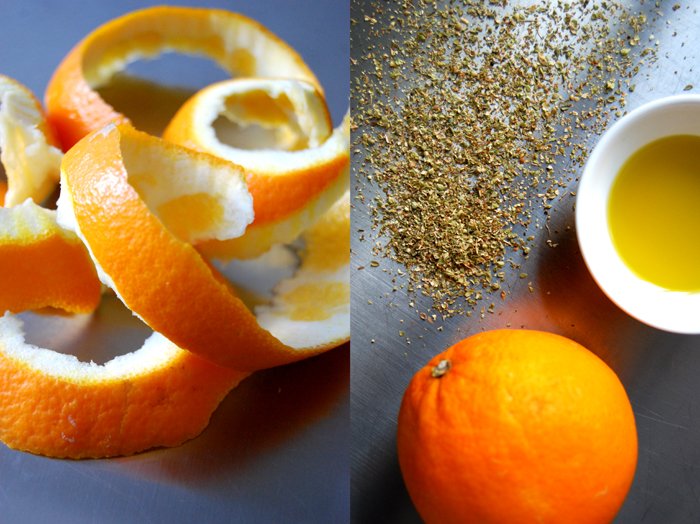
My friends and family live all over the world. On the big festive days of the year, we spend quite a bit of time on Skype to share the special moments. We talk and laugh and - very often - show each other what we cook for our festive meals. Yesterday, my boyfriend's mother Jenny, presented a beautiful piece of ham that she had just pulled out of her oven. It looked so tempting! She also told me about the orange tree in her garden in Malta which is sagging with oranges and held a huge box of oranges for me to see. I knew what I would have for lunch today: my Sicilian salad with oranges, oregano and very good olive oil!
I know this combination sounds a bit extraordinary. It is another one of my Sicilian discoveries which I had for breakfast at a little farm in Noto two years ago. They used the oregano which grew on their farm and it was the best oregano I ever had in my life. It was unbelievably good! I never thought there could be such big differences in the taste of oregano.
This salad makes a perfect snack after the last Christmas days of culinary richness - refreshing, light and comfortable. All you need to do is to peel two oranges (including the softer inner skin) and cut them in thick slices. Drizzle some good olive oil on top and sprinkle with dried or fresh oregano and a bit of salt.

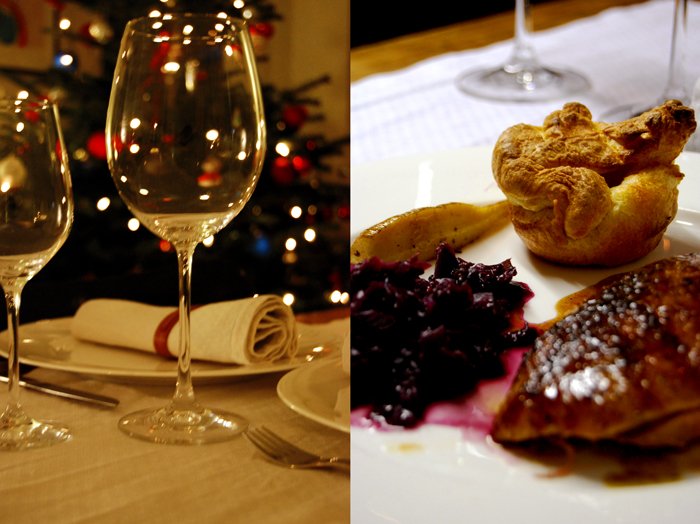
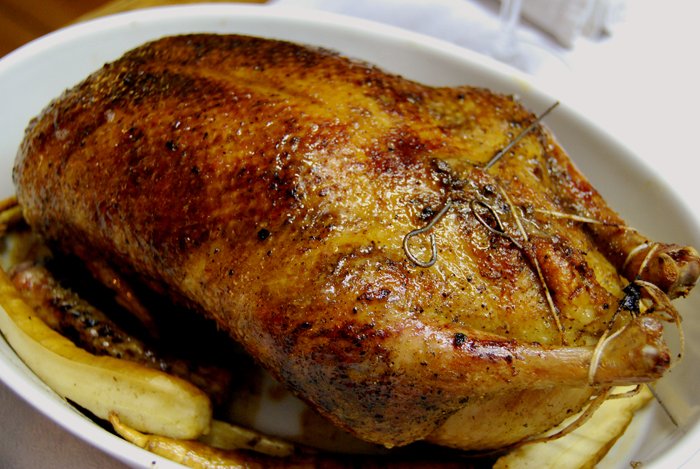
Slow Roast Duck and Yorkshire Pudding - our Christmas Dinner

Christmas is one of the special silent moments of the year, it feels like time stops for a few hours. The streets are empty and we share some precious time with the ones we love. It's a beautiful celebration of love and gratefulness - I wish you all a wonderful and joyful Christmas with the ones who are special to you!
At Christmas time, we share many traditions but each family also creates their own, especially regarding the festive meal. Some of my friends have sumptuous meals and cook for hours, some prefer it simple - like my aunt and uncle - they always celebrate Christmas night with Wiener sausages and potato salad. For me, it has to be duck - together with Yorkshire pudding on the side for the gravy and red cabbage, that's my tradition.
My duck takes its time and cooks very slowly. It stays in the oven for around 4 hours and cooks on very low temperature (85°C / 185°F) which guarantees the juiciest and most tender meat you can imagine. It never fails! I always make a rich filling with apples, mushrooms, minced meat, liver, bacon and lots of herbs. It's more like a terrine than a traditional filling - it could be a meal on its own. I prepare a bit more than I need for the duck and cook it in a little terrine dish in the oven (not as long as the duck, just for an 1 1/2 hours). It is similar to French Paté and I love it cold on bread the next day.

A duck that takes its time
For 4 people you need
whole duck, rinsed, dried, rubbed with salt and pepper, around 2kg / 4 pounds (with neck, liver and kidneys)
olive oil for frying
For the gravy
chicken, duck or goose broth 500ml
rind of 1/4 orange cut in strips
a sprig of fresh thyme
brandy for deglazing
balsamic vinegar
plum chutney or plum butter
salt and pepper
sugar for caramelizing
For the filling
minced beef 80g / 3 ounces
thin slices of white bacon, finely chopped, 2
organic chicken liver, finely chopped, 60g / 2.5 ounces
thin slices of ham, finely chopped, 2
mushrooms, finely chopped, 50g / 2 ounces
tart baking apple, peeled and finely chopped, 1
organic egg 1
dry breadcrumbs, soaked in cream or milk, 1/2 cup
a small onion, finely chopped
clove of garlic, crushed, 1
fresh parsley, chopped, 1 tablespoon
fresh thyme leaves of 1 medium sprig
lemon zest 1/2 teaspoon
bay leaf, ground in a mortar, 1
juniper, ground in a mortar, 1
nutmeg, grated
brandy for deglazing
butter for frying
salt and pepper
Heat some butter in a large pan and fry the bacon, mushrooms, apple, onion, garlic, juniper and bay leaf until golden and deglaze with brandy. Put in a large bowl and mix with all the other ingredients.
The duck and the gravy
Set your oven to 85°C / 185°F. Our oven has a Rotitherm roasting setting which works perfectly for poultry.
Heat a splash of oil in a large pan and fry the duck on all its sides until golden brown. Take the duck out, place on an oven dish and fill with your prepared filling. If you have some filling left put it in a terrine dish and cook in the oven together with the duck (covered with a lid, for 1 1/2 hours). Leave the duck in the oven for around 4 hours. Check with a skewer after 3 1/2 hours to see if the duck is done, when only clear juices come out, the duck is ready. Brush the top of the duck with gravy (see below) and put under the grill for 3-5 minutes until the skin is golden brown.
My gravy isn't thick as I prefer it natural without thickening agents. After you put the duck in the oven, fry the duck's neck, liver and kidneys in the pan you used for the duck and deglaze with brandy. Take the giblets out, pour the broth into the pan and let it simmer down together with the other ingredients for the gravy, until it reached its right concentration and taste. Take out the orange rind and thyme sprig and season with salt, pepper, vinegar and chutney. Caramelize 1-2 tablespoons of sugar until brown and add to your gravy. You can also add some dark chocolate, honey or a tiny bit of orange juice. Play around with it but always use very small amounts of whatever you add and taste in between.
For the red cabbage
Chop a small red cabbage into very thin strips. Rinse the cabbage and fry it - still wet - in some oil or lard in a large pan with a closed lid for 5 minutes (on medium heat). Add 2 glasses of red wine, a chopped apple, some grated ginger, a bay leaf, 6 cloves, 4 juniper berries, 2 tablespoons of honey and season to taste with salt and pepper. Cook for 1 - 1 1/2 hours.
For the Yorkshire pudding
Mix 200ml of milk together with 2 eggs, 200g / 7 ounces of plain flour and 1/2 teaspoon of salt. Fill a bit of oil in little oven dishes (like the ones you use for crème brulée) or in the cups of a muffin pan and place the oven dishes in the hot oven (250°C / 480°F) for a few minutes or until the oil is hot. Pour the batter carefully into the hot oil in the dishes and bake for 12 minutes or until well risen and golden brown. Don't open the oven door before the puddings are done as they will collapse.
Prepare your dinner table with all your festive food. Enjoy with loved ones!

Merry Christmas

I wish you a wonderful Christmas with your families and friends! Enjoy all the special moments of love and good food!
Merry Christmas!
Meike xx

Maltese Lemon Christmas Cookies

I got this recipe from Jenny, my boyfriend's mother, who makes these wonderful lemony cookies every year at Christmas time. She lives in Malta, in the Mediterranean, where everyone has their own citrus trees or knows someone who has enough citrus fruits to give away. Many Maltese recipes are made with lots of lemon juice or zest and I love it. I used to cook and bake more carefully with lemon and lime flavours but I became quite brave with it over the years. It doesn't have to be a shy add-on, it should stand out in many variations.
These flaky cookies are stuffed with lots of lemon zest, they fill the house with such a beautiful, warm and buttery citrus smell. It's absolutely lovely!

Maltese Lemon Christmas Cookies
Makes about 70 cookies
plain flour 160g / 1 1/4 cups
baking soda 1/2 teaspoon
cream of tartar 1/2 teaspoon
fine sea salt 1/8 teaspoon
butter, soft, 120g / 1/2 cup
granulated sugar 100g / 1/2 cup
vanilla pod 1/2, split and scraped
lemon zest, freshly grated, 1 1/2 teaspoons
organic egg 1
sugar sprinkles, for the topping
Combine the flour, baking soda, cream of tartar and salt in a large bowl.
In a second large bowl, cream the butter, sugar, vanilla and lemon zest with an electric mixer until fluffy. Add the egg and continue mixing until well combined. Add the dry flour mixture to the butter mixture and continue mixing with the dough hooks of an electric mixer until combined. Scrape the dough onto a piece of cling film, form a thick disc, wrap and freeze for 30-45 minutes or until the dough is hard.
Preheat the oven to 350°F (180°C) (preferably convection setting). Line 2 (or more) baking sheets with parchment paper.
Once the dough is hard, brake 1/4 off the dough and keep the remaining dough wrapped in cling film in the fridge. Lay a large piece of cling film on the kitchen counter and cover generously with flour, lay the dough on top, dust the dough with flour and cover with a second layer of cling film. Roll the dough out thinly with a rolling pin. The dough is quite buttery, if it sticks to the cling film, dust it with more flour. Dip the cookie cutters in flour and cut out cookies. Carefully transfer them to the lined baking sheets, spread them with a bit of space in between and decorate them generously with sprinkles. Continue with the remaining dough. Bake for 6-7 minutes (slightly longer if using conventional) or until golden. Let the cookies cool completely on a wire rack.
When the cookies are completely cool, store them in an airtight container for up to 1 week.


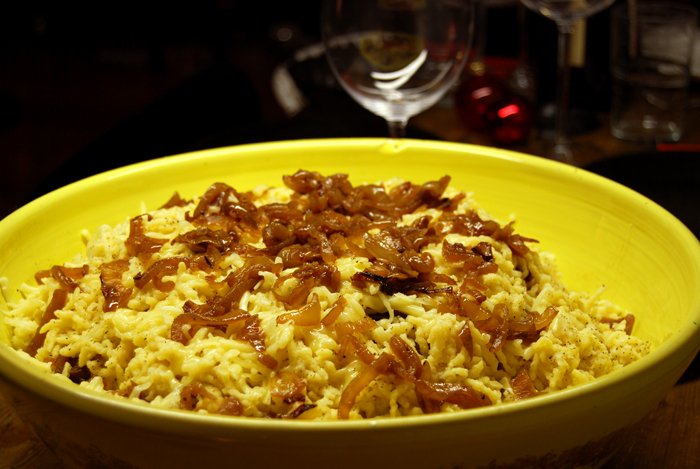
Cheese Spaetzle, a Swabian Feast
This meal is a feast, one of my all time favourite foods! It's luscious, rich and simply stunning. I am talking about Cheese Spätzle - originally from Swabia in the South of Germany. Spätzle are little noodles made of flour, durum wheat semolina and egg. They are thick, with bite. You press the Spätzle dough through a potato ricer into boiling water and then you layer the cooked Spätzle noodles with lots of good mountain cheese and fried onions - just addictive! Whenever our family comes together for a few days Spätzle is one of our dinners.
I make Spätzle with a ricer. Originally they are "cut" into pieces by placing the thick dough on a little chopping board, letting it run into boiling water and cutting pieces off. I must admit that I never tried this. I prefer to stick to my ricer.
Yesterday I had a big dinner for ten at mine and Cheese Spätzle were my first choice. They are so easy to prepare, hearty and perfect for the cold season and - to me - there is nothing more beautiful than placing a big bowl of food in the middle of my long wooden table. It was a true feast, savoured by us all!
Cheese Spätzle
You need a potato ricer with large holes or a special Spätzle ricer.
I served the Cheese Spätzle with a wintery salad with beetroot on the side. As there were 10 of us yesterday I made the Spätzle dough with 27 eggs! Usually I calculate 5 eggs for 2 people.
For 2 people you need
plain flour (I use spelt flout type 630) 130g / 4.5 ounces plus more for mixing
durum wheat semolina 180g / 6.5 ounces plus more for mixing
organic eggs 5
salt 1 teaspoon
onions, medium sized, cut in thin slices, 5
olive oil for frying
aromatic cheese (like Appenzeller or Raclette), grated, 200g / 7 ounces
salt and pepper
Put the flour, semolina and the salt in a big bowl, add the eggs and mix with a wooden spoon until everything is combined. Whip the dough at bit harder until bubbles appear on its surface. Add more semolina if necessary until you have a smooth, thick dough that drips slowly off your spoon. Let the dough rest for 10 minutes.
Fill a large pot with salted water and bring to the boil.
Place an ovenproof dish (big enough for all the Spätzle) in the the oven and set to 100°C / 210°F.
Fry the onions in some oil on medium heat for at least 20 minutes or until soft and golden brown. Grate the cheese.
Fill your Spätzle or potato ricer with some of the Spätzle dough, press into the boiling water and cut off the dripping ends with a long knife. Let the Spätzle cook for 30 seconds, drain and place them in the warm dish from your oven. Season gently with salt and pepper as you will season every Spätzle layer. Sprinkle the top with some of the grated cheese and fried onions. You have to divide the onions and the cheese depending on how many batches of Spätzle you make. Place the bowl with the Spätzle in the warm oven again and continue with the next batch, always seasoning each layer and topping with cheese and onions.
Place the bowl with your Cheese Spätzle on the table - you can offer some freshly crushed pepper and more salt with it.
Enjoy your Spätzle feast!
A small but important note: Clean the cooking ware that was in touch with the Spätzle dough only with cold water. Don't use warm water as it will make the bits of dough as hard as concrete.
