The Most Perfect Cinnamon Fruit Crumble Cake from the Eat In My Kitchen Book
Guest post by Half Baked Harvest / Tieghan Gerard
Who’s up for cake today?
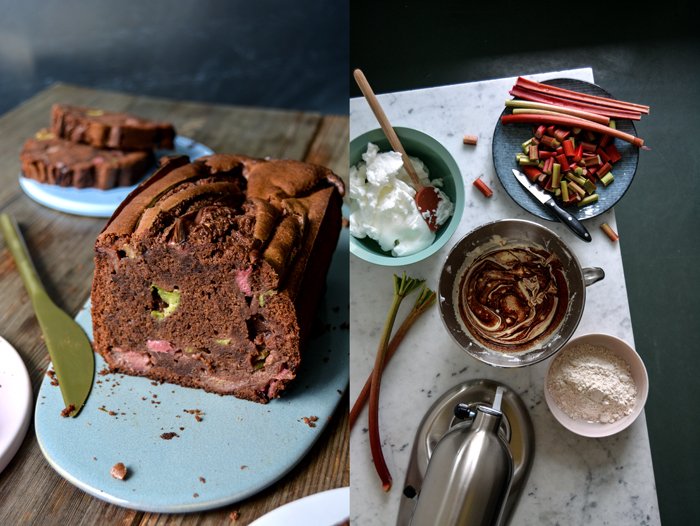
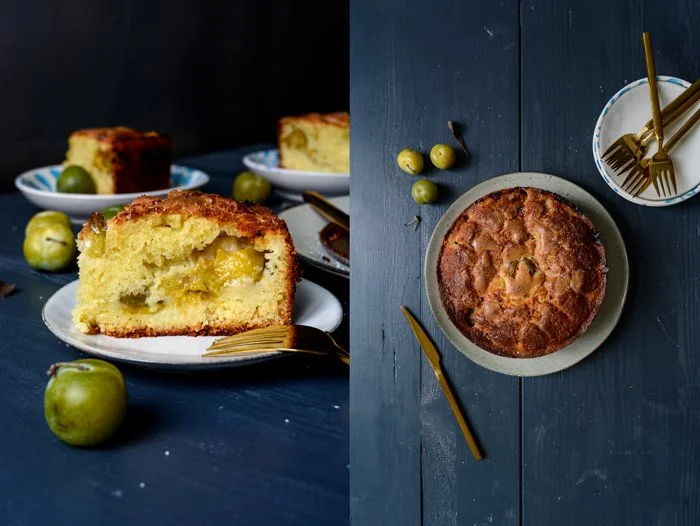
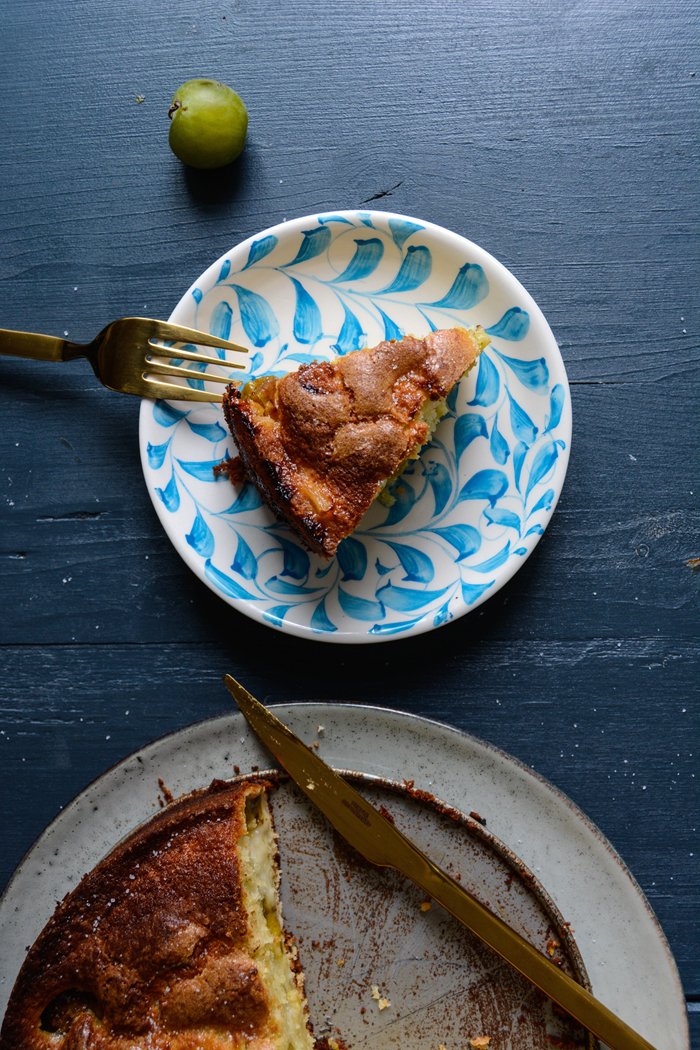
Cool, because I may just have the best cinnamon apple crumble cake in all the land. All you need to decide is whether to eat it for breakfast, lunch or dinner? Because really, when is cake not the most perfect thing ever? Truth… it’s always perfect, any time of day! But especially this cake, it’s loaded with apples, is crazy buttery, and topped with the most cinnamony crumble ever.
I’m not sure if you guys know this or not, but it’s officially fall cookbook season, and well… there are just so many great new cookbooks being released! I’m really excited to share this recipe with you today because it comes from Meike Peters' new cookbook, Eat in My Kitchen.
Ever since embarking on this journey of writing a cookbook, I’ve realized just how much work goes into writing a book. You guys, it’s no joke!! I am currently working through all the edits, and while I am so excited to be getting closer to sharing the book with you all, it’s also crazy scary…and well, my eyes are slightly tired. Basically I am just praying that when the book is released you guys will all love it to pieces! (Tieghan's first cookbook will be published in 2017)
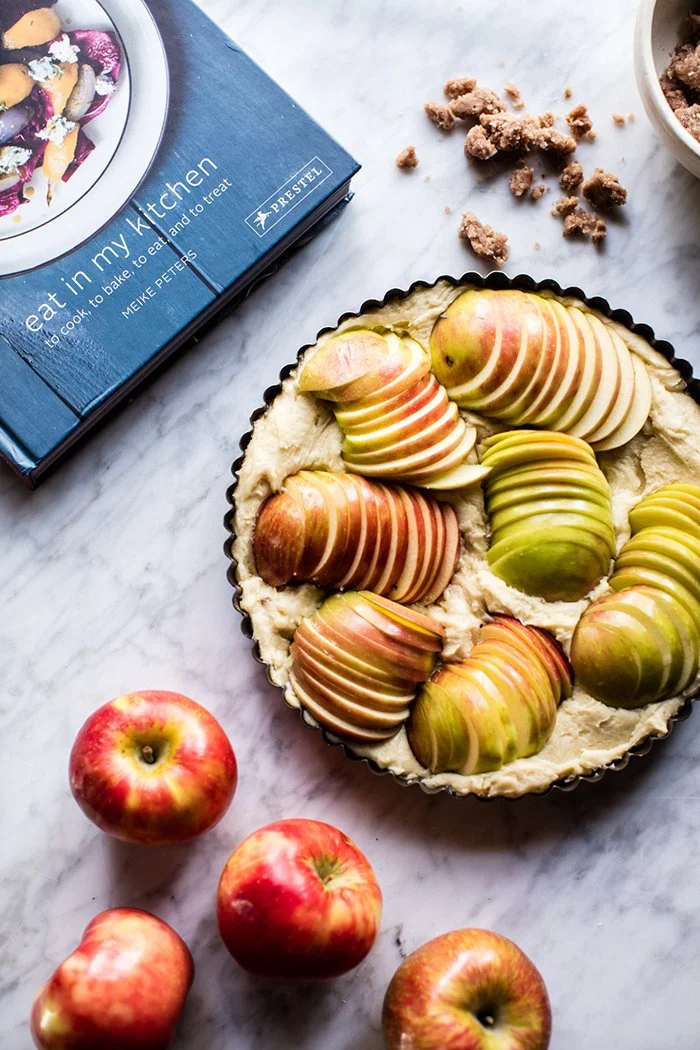
It’s so awesome that I have the opportunity to help others celebrate their cookbook release by sharing a recipe from their book with you guys! It’s fun for me, and such a great way to let you all in on the books I am loving! SO. Today we are talking about Eat in My Kitchen. Oh man, this book is just packed to the brim with recipes I love, so many great ones and so many that I know you will all love. But when I stumbled on this most perfect cinnamon fruit crumble cake, I knew that this was the recipe I needed to make and share with you all.
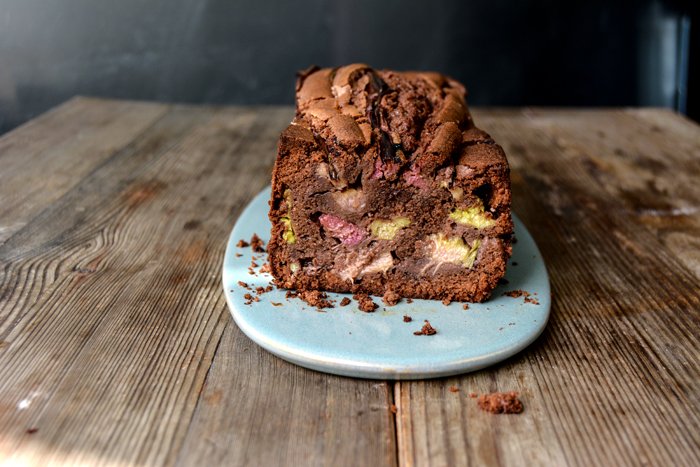
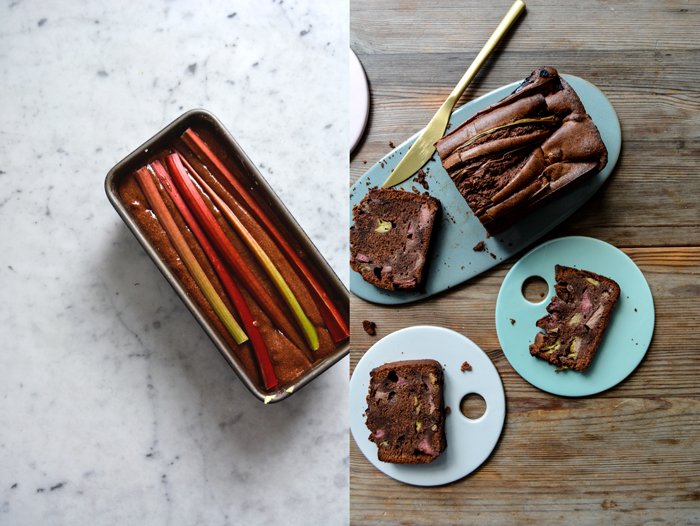
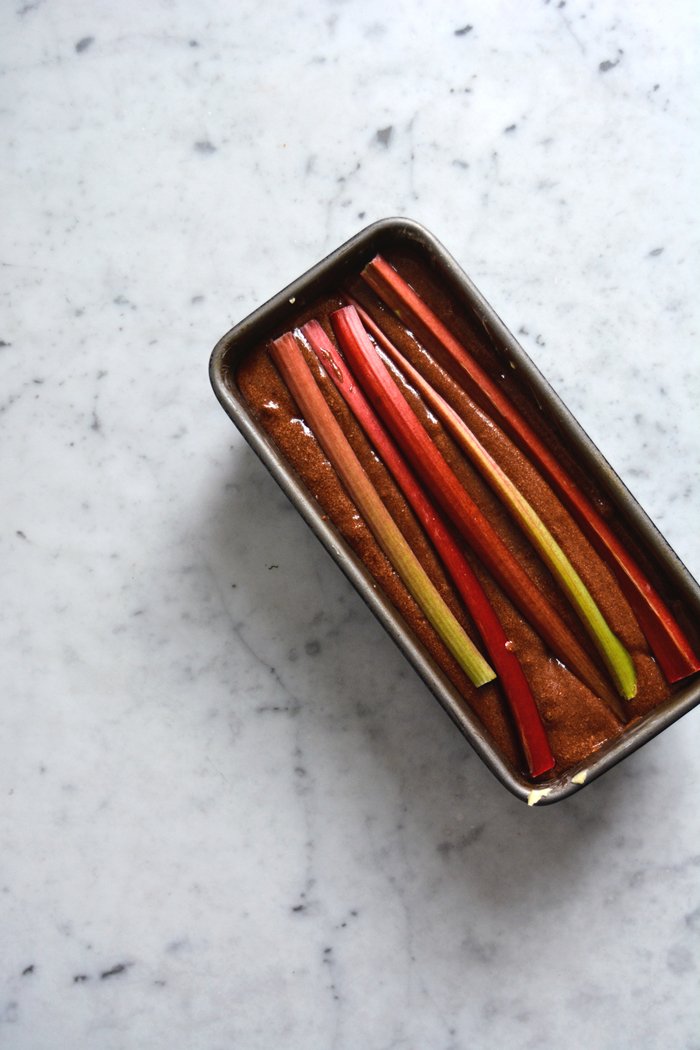
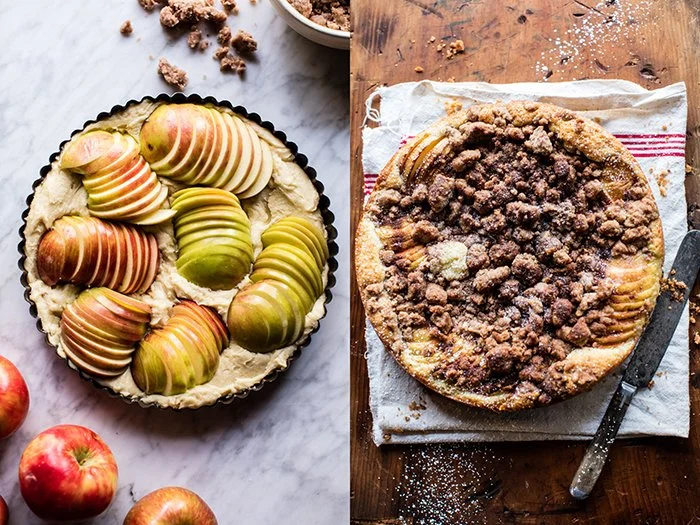
Let me just start off by saying that this cake is all kinds of incredible, AND that Meike made it really adaptable to all of the seasons by suggesting three types of fruit you can use – plums, rhubarb or apples. Seeing as I am obsessed with all things fall, and all things honeycrisp apples, I went with apples as my fruit… so, so, so good! What I love most about this cake is that while some fruit cakes can be on the dry side, this cake is anything but. It’s moist, buttery and almost even doughy in the center if you cook it for just under and hour…which I did…and it was perfection.
This cake is somewhat broken up into three layers. The base cake layer, the apple layer and then the crumble layer. All three layers are delicious, but together they truly make for the most perfect cake, and all of that cinnamon sugar crumble atop of those crisp apples… beyond amazing!
This is the perfect cake to serve warm, dusted lightly with powdered sugar. And yes, I do think this cake is acceptable, not only for dessert, but also as a very special (i.e. something to look forward to) breakfast or mid-day snack.
Bottom line: cake like this is great anytime, and since weekdays are usually in need of a little pick me up, you should totally be making this cake after work… It’s the right thing to do – trust me.
Pictures and introduction from Tieghan Gerard, recipe from the Eat In My Kitchen book. Tieghan lives in the mountains, in Colorado, she's the 22 year old founder of the popular food blog halfbakedharvest.com. Visit her and find lots of inspiration in her huge recipe archive! She's currently working on her own cookbook, The Harvest Table, which will be published in Fall 2017.
Thank you Tieghan for taking over the Eat In My Kitchen blog for a day!


The Most Perfect Cinnamon Fruit Crumble Cake
from the Eat In My Kitchen book, published by Prestel, October 2016
Serves 8 to 12
For the cake base
1/2 cup plus 1 tablespoon (125 g) unsalted butter, at room temperature
2/3 cup (125 g) granulated sugar
1/4 vanilla pod, split and scraped
3 large eggs
2 cups (260 g) all-purpose flour
2 teaspoons baking powder
1/8 teaspoon fine sea salt
Choose one of the fruit fillings
2 1/4 pounds (1 kg) pitted plums, cut in half
or 1 3/4 pounds (800 g) trimmed rhubarb, cut into 1 ½-inch (4 cm) pieces
or 5 large sour apples, peeled, cut in half, and cored, the outside of each apple half scored lengthwise (5 times) Tieghan chose apples for this recipe, unpeeled and thinly sliced
For the crumble
1 1/2 cups (200 g) all-purpose flour, plus more as needed
2/3 cup (125 g) granulated sugar
1/4 vanilla pod, split and scraped
2 teaspoons ground cinnamon
1/2 cup plus 1 tablespoon (125 g) unsalted butter, melted, plus more as needed
For the topping
2 teaspoons granulated sugar
1/8 teaspoon ground cinnamon
Preheat the oven to 350°F (180°C) (preferably convection setting). Butter a 10-inch (25 ½ cm) springform pan.
For the cake base, in a large bowl, use an electric mixer to beat the butter, sugar, and vanilla for a few minutes or until light and fluffy. Add the eggs, 1 at a time, incorporating each egg before adding the next one, and beat for 2 to 3 minutes or until creamy.
In a medium bowl, whisk together the flour, baking powder, and salt. Add to the butter-sugar mixture and mix with an electric mixer for 1 minute or until well combined. Scrape the batter into the buttered springform pan and arrange the fruit of your choice on top. Plums and rhubarb work best arranged vertically; apples should be scored side up. Push the fruit gently into the batter.
For the crumbles, whisk together the flour, sugar, vanilla, and cinnamon in a large bowl. Add the melted butter and use the dough hooks of an electric mixer to mix just until it crumbles. If the crumbles are too moist and sticky, add more flour; if they’re too small and don't form large crumbles, add more melted butter. Immediately spread over the fruit, using your fingers to separate any large crumbles.
For the topping, in a small bowl, whisk together the sugar and cinnamon and sprinkle over the crumbles. Bake for about 50 to 60 minutes (slightly longer if using a conventional oven) or until golden on top. If you insert a skewer in the center, it should come out almost clean. Let the cake cool for at least 15 minutes before taking it out of the pan.


German Apple Pancakes and my Berlin Book Launch Event

The BOOK is out and I've done so many things for the first time in my life in the past three weeks that I'm still a little shellshocked. I've been on TV, which I never ever thought I'd be able to do and to say that I was nervous doesn't even come close to the feelings that shook me up inside (thank you Ben for being such a patient host!). I held more speeches than in my entire life before the book came out. My natural styling and rather casual dress code of jeans and shirt got replaced by pretty dresses, uncomfortable shoes, and more make up. And I changed planes like buses in the past few days. Once (it feels like a long time ago) I was scared of flying, but I've seen so many airports recently, that I think my phobia gave up. Now, I'm back in Berlin, I have a little break to breath deeply and to get some rest before the craziness continues and takes me across the Atlantic, to New York.
In the next few weeks, I'll share some impressions of my book launch events with you. We'll start in Berlin, my home town, and then we'll move on to Malta, London, New York, and Washington.
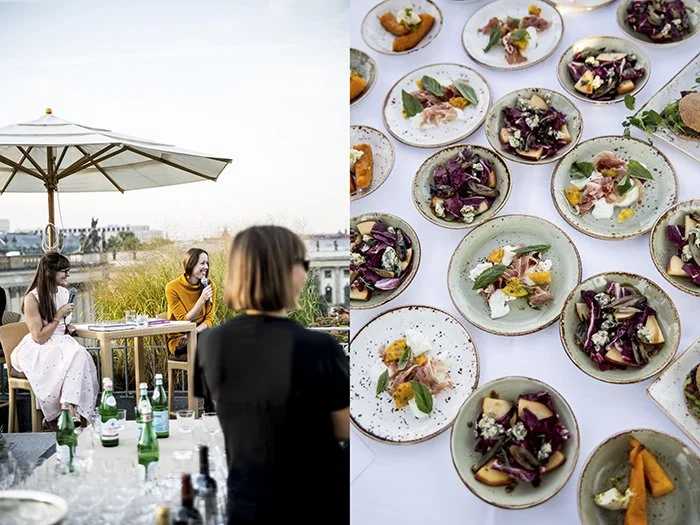
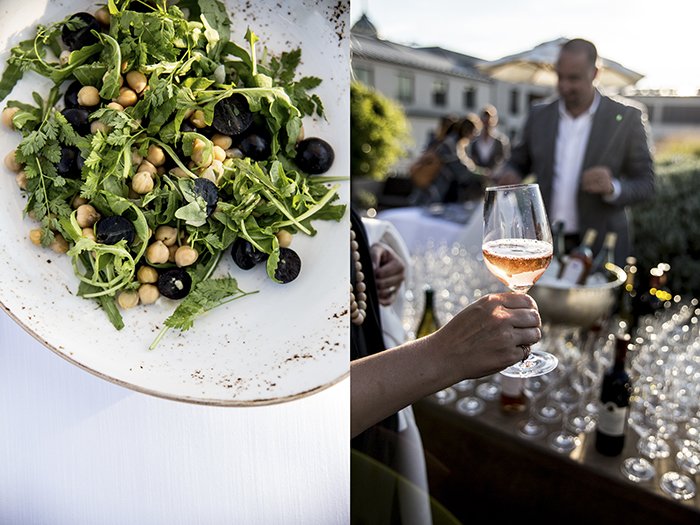
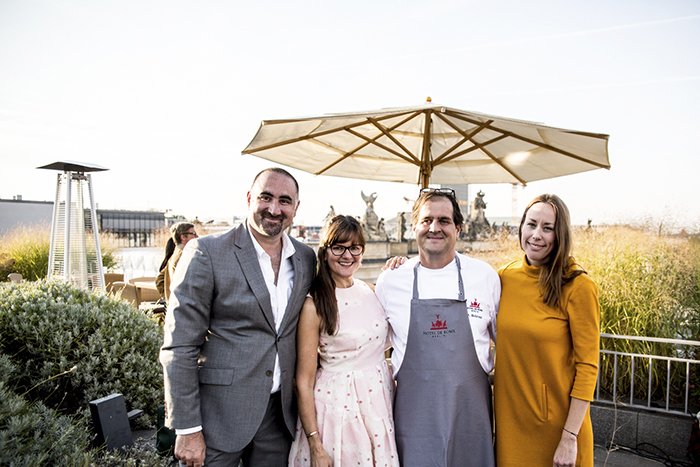
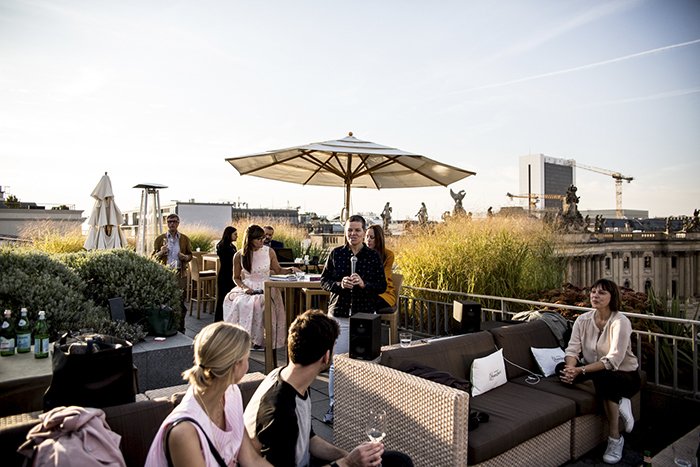
Berlin is my love, I've felt at home in this city since I first opened the door to my apartment almost 12 years ago. One of my favourite spots in this vibrant melting pot is the roof terrace of the stunning Hotel de Rome. It was around a year ago that I decided to have my first book launch event on this terrace. It's a tranquil oasis, it allows you to enjoy the whole city with all its prettiness and construction chaos from afar, but most importantly, you're right under Berlin's clear blue sky. We were lucky, on that early evening on the 26th September, the temperature was mild and the sunset was golden. I couldn't have asked for more.
The day before the event, in the early morning of a quiet Sunday, my family from Berlin and Malta - thank you Ursula, Alexandra, Emma, Julia, and Matt - joined me in my kitchen to help me bake the cakes for my event. I made a wise decision a few months ago, I only took care of the sweets for my event, the Hotel de Rome's fantastic chef, Jörg Behrend, and his team prepared the savoury recipes from my book. They did an amazing job, they actually managed to make me speechless. The food looked like the dishes in my book and tasted like the creations from my own kitchen.

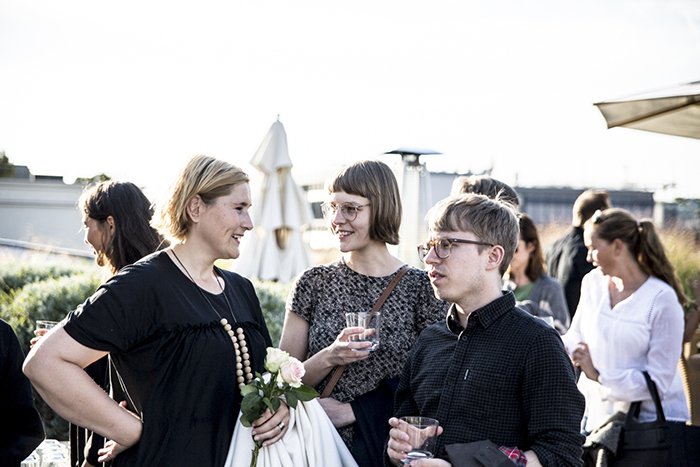
What I've learned during the past three book launches in Berlin, Malta, and London is that you can plan every single detail of an event, but you have to accept that it will be unbearably stressful in the last 20 minutes. During these minutes it may feel like it's never going to work, but then, all of a sudden, in the last minute, everything falls into place. At 6pm sharp, our buffet was set up and Karl Chetcuti was ready to pour the glasses behind the table where he presented five delicious wines from the Meridiana Wine Estate Malta. Cynthia Barcomi - who gave me a heart touching quote for the back of my German book - looked gorgeous in her pink dress and we were both ready (maybe she was a little more ready than me) to have a public talk about my book. My pulse was pumping, wine, food, and the view was enjoyed to the fullest by our guests, and our roof top party got going.
It was the first time that I held a speech about my Eat In My Kitchen book, the first time that I stepped out into the spot light to talk about the process of working on this book. I couldn't have been more thankful for Cynthia guiding me through these exciting minutes, though this new experience, like a sister. My voice and knees were shaking, but my heart was full of joy. The first sip of Meridiana's crisp Astarte white wine after our talk was maybe one of the best sips I ever tasted in my life. I felt relieved.
I want to thank all my guests who came to celebrate with us. I'll never forget the amazing support I keep getting from Türkan, Jörg and the whole Hotel de Rome family, from Karl and Meridiana, from all my family and friends who are there for me no matter how crazy my life is at the moment. Thank you! I want to thank Jules Villbrandt for taking all these beautiful pictures, through your captures I can relive that day again and again. Prestel Publishing, and especially Pia Werner who came from Munich for our celebration, thank you for working on this book together with me.
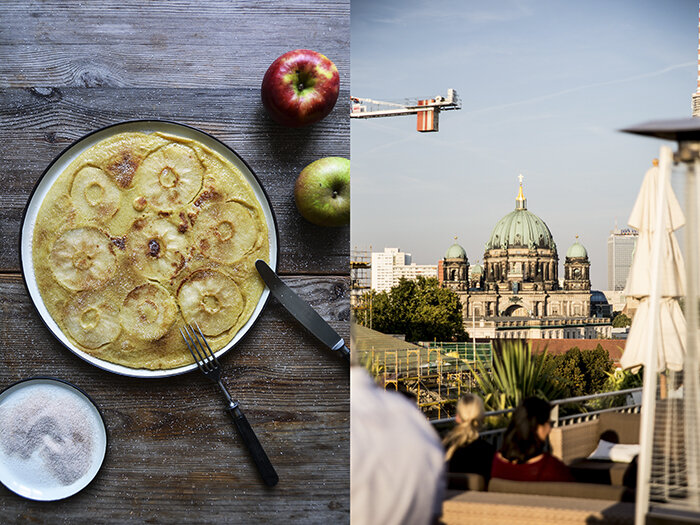
You might have realized that I sneaked in a few pictures from my own kitchen. I can't write on this blog without sharing a recipe with you, it feels strange. So I decided to come up with very, very simple recipes while I'm on the Eat In My Kitchen book tour, recipes that fit into my tight schedule and that also have a connection to each country we celebrate in. Today's recipe is a childhood classic of mine: German apple pancakes. They aren't light or fluffy, these are thick, dense, eggy German pancakes, rich and filling. And - following my family tradition - they have to be topped with sliced sour apples and lots of cinnamon sugar. Enjoy!
You can see all the pictures of the book launch in Berlin taken by Jules Villbrandt here.

German Apple Pancakes
Serves 2
plain flour 130g / 1 cup
ground cinnamon 1/4 teaspoon, plus 1/2 teaspoon for the topping
milk 240ml / 1 cup
organic eggs 3
granulated sugar 2 tablespoons, plus 2 tablespoons for the topping
a pinch of salt
firm sour apples, peeled, cored, and sliced, 1-2
butter, about 3 tablespoons
Sieve together the flour and 1/4 teaspoon of the cinnamon.
In the large bowl of a stand mixer, whisk the milk, eggs, 2 tablespoons of the sugar, and salt for about 1 minutes. Add the flour mixture, gradually, and continue whisking until well combined. There shouldn't be any traces of flour left.
For the topping, combine the remaining sugar and cinnamon.
Heat 1 tablespoon of the butter in a large, heavy or non-stick pan over high temperature. Reduce the heat to medium, pour in half the batter, arrange half the sliced apples on top. Cook for about 2 1/2-3 minutes until golden at the bottom and just set on top, mind that it doesn't get too dark. Flip the pancake onto a large lid, add 1/2 tablespoon of the butter to the pan, and let the pancake slide off the lid into the pan. Cook on the other side for about 2 minutes or until golden. Transfer to a plate and sprinkle with cinnamon sugar to taste. Enjoy immediately, the pancake tastes best when it's warm.
Add 1 tablespoon of the butter to the pan and bake the 2nd pancake in the same way, adding the remaining 1/2 tablespoon of butter before you flip the pancake. Sprinkle with sugar and enjoy.


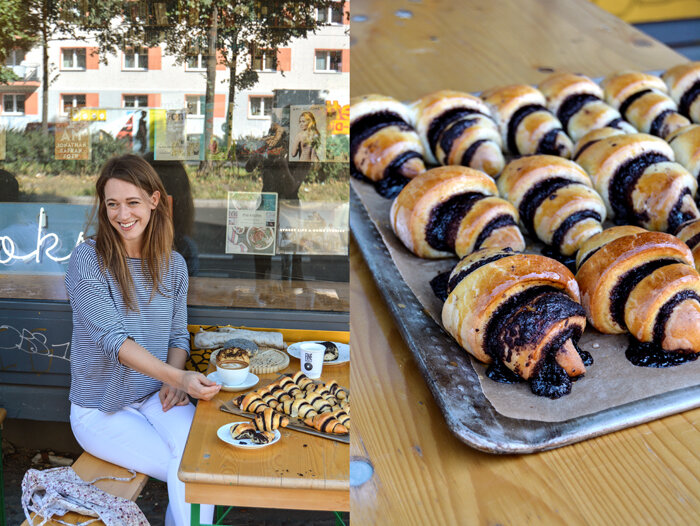
meet in your kitchen| Shakespeare & Sons, Berlin and Laurel's Chocolate Rugelach

"They both slow you down. They’re both transportive. They both smell good. They can both be enjoyed at the same time" - Laurel's words, when I asked her what she likes about the connection of food and books.
I've enjoyed sweet treats made by Laurel's hands for many years, but it took a while for us to meet personally. Together with her business partner Roman, the young woman from Boston runs Berlin's popular Shakespeare & Sons and Fine Bagels - a heavenly place for English books, bagels, cookies, rugelach, and cakes - all in one store! Originally, they started their Berlin business in a cozy space in Prenzlauer Berg that was, conveniently, quite close to where I live. But two years ago they had to move and I lost my dear store. A recent coffee date at their gorgeous new store in Friedrichshain brought back memories and awoke the idea to meet the stranger behind all these amazing sweet goods. It was actually a chocolate rugelach - possibly the best rugelach I ever ate - that made me get in touch with Laurel that same day. Her rugelach is gooey, chocolatey, sweet and juicy, it's so good that you basically have to order one after the other. When we met later, Laurel told me that her dear friend Sanam used to say that every rugelach sticks to your hips for seven years. If something tastes so good, I don't care about my hips, it's worth every pound!
Laurel is a self-taught baker with a weak spot for anything baked and sweet, a trait of her food loving family. Especially the women are quite gifted and know how to impress the hungry crowds at their kitchen tables with homemade cookies, cakes, and breads. Luckily, for generations, this passion has been passed on to the young ones.
Although she calls herself a shy bird who prefers to stay behind the scenes, when I saw her roll out the puffy yeast dough, dishing out stories about Israeli and American rugelach, I didn't believe it at all. Laurel sounds like a pro who must have a cooking show one day. I enjoyed watching her spread the dark chocolate filling lusciously over the orange flavoured dough so much, that I almost forgot how hungry I was. Luckily, it only took 15 minutes and she pulled out the most fragrant warm rolls in front of my camera - and then they went straight into my mouth.
Shakespeare and Sons also have the English Eat In My Kitchen book on their shelves!


Laurel's Chocolate Rugelach
For the dough
7 cups / 910g bread flour
2/3 cup / 130g granulated sugar
4 1/2 teaspoons instant yeast
2 teaspoons salt
1 cup / 225g butter
1 1/3 cups / 315ml milk
1 tablespoon vanilla extract
4 eggs
zest of 1 orange
For the filling
3 cups / 600g of sugar (this can be substituted for demerara or even muscavado for a stronger flavor)
2 1/4 cups / 270g unsweetened cocoa powder
3 tablespoons ground cinnamon
1 3/4 cups / 415g butter
For the egg wash
2 eggs, lightly beaten
In a bowl, whisk together flour, sugar and yeast. When that is mixed in, add salt and whisk again. In a saucepan, melt butter on low heat and then remove from heat. Add milk and whisk. Add vanilla and eggs and whisk. Pour liquid mixture into the flour mixture. If using a mixer, mix until incorporated with the paddle attachment, then switch to a dough hook. Knead with the dough hook for 5 minutes. If mixing by hand, mix well with a wooden spoon and then turn out onto a floured surface and kneed well for about 7 minutes. It's a very stick dough however, so it's best to use a machine. Put the kneaded dough into a well-greased bowl, cover with a wet cloth or plastic wrap, and let rise for about an hour or until your fingerprint in the dough doesn't spring back.
Preheat the oven to 175°C / 350°F. Line 2 baking sheets with parchment paper.
While your dough is rising, make the filling. Mix sugar, cocoa, and cinnamon. Melt butter and pour on while hot. Mix well. Set aside to cool. You can cool it faster in a refrigerator, but be careful not to let it sit in the fridge for too long. It will turn into a solid block.
Turn out your dough onto a floured surface and cut it into 3-5 balls, depending on how large you want your rugelach. There's no need to punch down the risen dough, as the rolling will do that for you. Roll out one of your dough balls into a perfect circle about 1/2cm / 1/4" thick. Spread your filling evenly and thinly across the dough, being careful not to tear the gentle dough. Use a pizza cutter to trim the edges and to divide the dough circle into about 12 triangles, like pizza slices. Now starting from the outside of the circle, roll up your rugelach so they look like little croissants. Place on a baking sheet.
When you've done this for all of your dough, brush your rugelach with an egg wash and bake for about 15 minutes. When you take them out of the oven, drizzle with simple syrup. Oh damn, now you get to eat them.
This recipe also freezes beautifully. I usually bake up as many as I want and put the rest of the unbaked rugelach in the freezer to take out and bake as I need them. (Think about the possibilities here. Seriously. Lazy winter weekend mornings in bed and then...poof...15 minutes later you've got gooey hot rugelach in your kitchen? This is a maximum pleasure recipe so it's a wise move to keep them on hand). Just give them a few minutes to thaw before you throw them in the oven.

How does an ex-physicist decide to start a bagel shop? When did you come up with the idea? Did this idea grow over years or was it a spontaneous decision?
Ha, I don’t know if I’d call myself an ex-physicist. I’d say I got the physics degree and ran. The bagel shop happened out of pure, selfish necessity. I found myself living in the first-class bagel desert of Berlin and, frankly, I was hungry. I tried to assimilate, I swear. Ate broetchens, croissants, muesli...you name it. What can I say? They weren’t doing it for me like a bagel and cream cheese does. I’ve always been a home baker, wasn’t particularly focused on anything else at that point in my life, and it just struck me as something to do. So pretty spontaneous.
At your peak, you baked 350 bagels every day on your own before you put your team together. You offer 25 different bagels at your shop, sweet and savoury. What fascinates you about this popular bun with a hole in the middle?
The bagel is a creature of the diaspora. At this point, it’s as much American as it is Polish-Jewish. It’s spent the last hundred years moving out of the basement-level New York bakeries, getting softer and bigger, and landing on breakfast plates the world over. At the same time, bagels are no longer created with the same reference point or even a nod to their history, and I think it’s important to maintain standards. What I like about a proper bagel is the deliberate chewiness and the impractical hole. The hole serves only to gush cream cheese and soil your clothes. And yet it’s got to be there. More surface area for the flavorful skin. So it’s not an easy food. But it’s such a good food.
Both of us share a passion for rugelach, can you tell us a bit about the difference between American style rugelach and the traditional recipes rooted in Israel?
Ok, so the kind of rugelach I’m familiar with from back home (Boston) are more of a gently flaky cookie made with a cream cheese or sour cream dough and a filling of jam, chopped nuts, raisins, and cinnamon sugar. The dough is a royal pain to work with, but worth it. Meanwhile the rugelach you’d find in Israel are generally from a yeasted dough and reach the level of chocolate-y gooeyness that solicits involuntarily obscene vocals from those eating them. Or maybe that’s just me. This is disloyal to my upbringing, but I’m just going to say it: there is nothing better than an Israeli rugelach. The clouds of bees in the shuk in Jerusalem agree with me.
What makes the Ashkenazi baking tradition so special to you?
A hundred years ago, my great-great grandmother and her sister made their living baking breads and challahs in a village on the outskirts of Warsaw. All the women in my family are wonderful bakers and this is a way of maintaining and honoring a longstanding food tradition. The mandelbread recipe I use in the store goes back at least four generations. I’m not sure how the ancestors would feel about the double-whammy of reverse migration and return to the kind of baking that for them was a tough necessity and for me a cutesy, artisanal hobby-turned profession, but that’s 21st century privilege for you.
What's the hardest part of running your own bakery?
Not eating all the cookie dough.
Are there any Shakespeare and Sons plans for the future, apart from books and bagels?
Right now I’m working with several other people to organize a Jewish food week called Nosh Berlin. It’ll be from March 19-26 2017. There’s never been an event like it here and people are really coming together. To kick it off, we’re partnering with The Breakfast Market at Markthalle Neun to have a Jewish breakfast market with everything from bagels to blintzes to jachnun to Ethiopian dishes, and more. The idea is to get as much wonderful Jewish food together in one place as possible. We’re drawing from local chefs and home-cooks as well as folks from abroad. Then throughout the week there will be events all over the city, from popup dinners to cooking classes to film showings to readings. So everyone should set aside a lot of tummy real estate for that week.
You grew up in Boston, you've lived in Kathmandu and in Prague, and you've called Berlin your adopted home for more than 5 years. What do you like about the capital? What inspires you in this city?
What I like about this city is how easy it is to do your own thing here. It’s a place with very little open judgement about life choices and success seems to be measured differently than where I grew up. And that has provided me and a lot of other people with the room to make slightly unorthodox dreams reality.
What do you like about the connection of food and books?
They both slow you down. They’re both transportive. They both smell good. They can both be enjoyed at the same time.
Can you tell us a little about the history of the house and store where you opened the new Fine Bagels/Shakespeares and Sons shop?
So the building in Friedrichshain where we’re currently located was built in 1962 as a bookstore and apartment building. Since it was in East Germany, it was a state-run bookstore until the fall of the wall, at which point it was privatized. To this day, old Berliners are always popping in to wax nostalgic about their memories of the bookstore from back in the day. If you walk into the store, you’ll noticed a raised portion to your left. It sits on top of a Cold War bunker that was built-in. Meanwhile, all of the built-in bookcases are original. They were covered in terrible particle board from the early ‘90s and when we tore it down, there was the beautiful original wood shelving. It’s a big space so we’re able to accommodate the bakery kitchen, the cafe, and the bookstore. It was a stroke of luck to get it.
You say that many women in your family are passionate home bakers, what did you learn from them? And what about the men in your family?
We’ve got some sort of cruel genetic predisposition to a sweet tooth running down both the paternal and maternal branches of my family. So there was always someone baking sweets. Cookies, cakes, quick-breads. My mother in particular is a home-made obsessive and passed that on. Particularly chocolate chip cookies, kugel, and zucchini bread. One grandmother was always making the most divine Toll House Cookies you’ve ever tasted and the other one was all about blueberry pies and cheesecakes. Would you believe it if I told you my maternal grandmother was an early adopter of the Weight-Watchers program? Shocking.As for the men, well, at least a lot of them are good dish washers. That’s all I’ll say.
If you had to name one dish from where you grew up, back home in Boston, that you miss the most, what would that be?
Honestly, just an onion bagel and cream cheese from Rosenfeld’s in Newton Center. I’m absolutely devoted. They’re the best. And good seafood, of course.
Which are your favourite baking cookbooks and why?
My absolute favorite is Inside the Jewish Bakery. There are no pretty pictures, but it’s the most accurate and comprehensive survey of Jewish-American bakery recipes I’ve ever seen. It’s full of history and storytelling and extraordinarily detailed instructions. And that’s what it should be. The authors, Norman Berg and Stanley Ginsberg, both made their careers in these very bakeries and know better than anyone what they’re talking about. It’s my ultimate reference point.
Where do you find inspiration for new recipes for the Fine Bagels' menu?
Mainly I try to wheedle old family recipes out of the elderly. Other than that, I go home and visit the old-school bakeries and delis around where I grew up. I’m not really trying to do anything so innovative. I’m more interested in preservation.
Who is your biggest inspiration in the kitchen?
Meike, this is entrapment! If I told you it was someone outside of my family, what would the family say? If I told you it was someone within my family, they’d think I was playing favorites. I’ll whisper it in your ear, but you can’t tell the internet. It’s my own neck I’ve gotta think about.
What was the first dish you cooked on your own, what is your first cooking memory?
Chocolate chip cookies with my mother. You hang around hoping to lick out the bowl long enough you inadvertently learn to bake.
What are your favourite places to buy and enjoy food in Berlin?
The fairly new Bread Station on the Maybach Ufer does the best sourdough loaves I’ve ever had. They’ll schmear up a hot broetchen with salted butter and comte for you and it’s heaven. Merle’s Roti and Rum near Yorkstrasse is divine...piles of hot roti, spicy curries, and homemade ginger beer. Heno Heno in Charlottenberg is worth the trip across town. Homey don buri, sour plum onigiri, and herring nigiri appetizers. Lon Men’s Noodle House on Kantstrasse and Agni on Prenzlauer Allee are two other favorites.
If you could choose one person to cook a meal for you, who and what would it be?
Joan Nathan. She’s the queen.
You're going to have ten friends over for a spontaneous dinner, what will be on the table?
A proper Nepali dal bhat tarkari. It’s the most wonderful food in the world. I bothered a lot of people into teaching me to cook while I lived over there and it’s still my favorite thing to make. A shout out of gratitude here to Saraswati Pangeni, Sudeep Timalsina, and Nirajan Tuladhar.
What was your childhood's culinary favourite and what is it now?
Childhood favorite? French toast. Grown up favorite? French toast.
Do you prefer to cook on your own or together with others?
I’m a kitchen misanthrope. Mainly because I’m clumsy. My ideal cooking scenario is having a friend hang out a safe 4 feet away from the cooking. They will gossip to me and drink wine while I make everything. Some days, like yesterday, this is not far off from the reality of my professional kitchen. Can’t say if that’s a good thing or not.
Which meals do you prefer, improvised or planned?
Planned. I live in permanent fear of not making enough food for my guests. This has never happened, but I gotta stay vigilant.
Which meal would you never cook again?
Latkes for 100 people. I smelled like a fry trap that fell into an onion field and my skin broke out in zits like a pubescent boy. Brutal.
Thank you Laurel!


Orange, Chocolate & Buckwheat Muffins
What a week!
The German Eat In My Kitchen book is out and my English book will follow next week, on the 4th October. Just 2 more nights!
The New York Times included the Eat In My Kitchen book in their list of 'The Best Cookbooks of Fall 2016'. NY Times' editor Florence Fabricant wrote a very nice review and also shared one of my recipes from the book. To call me excited would be a complete understatement - I feel insanely happy!
I had my first book launch event in my hometown Berlin, on the gorgeous roof terrace of the stunning Hotel de Rome. It was a golden afternoon, literally, we had blue skies and a slow sunset that wrapped the whole scene in magical light! There were so many wonderful people, fantastic wine from Meridiana Wine Estate in Malta, I offered my first food tastings - and saw many happy faces - and I held my first talk about my book, with dear Cynthia Barcomi. It was an unforgettable event and the best start possible for my book tour (you can see the pictures of the event here). Here's a picture of me at my launch, taken after I gave one of my cookbooks to tennis legend Boris Becker and his wife - the lunching family had to move table due to our event. I still feel a little bad because of that. Lots of nice pictures from the event are waiting on my computer to be shared on the blog, but I guess they'll have to wait a few more weeks, Malta is the next stop on my book tour. More adventures, book talks, and travels to come! To be continued ...
Here's a muffin recipe that I came up with - by request - a few months ago. Although oranges are a typical winter fruit, you can find them on the large fruit plate in my kitchen all year round. I can't live without their fragrant zest, especially in my baking. Pair it with bittersweet chocolate and you end up with one of the best combinations that the sweet world can offer (see last week's recipe from my cookbook). My quick and easy Sunday muffin is gluten free, made with buckwheat flour and ground almonds. It adds a nutty flavour, the texture is a little less dainty compared to plain flour, but the result is wonderful. Give me a cup of cappuccino and a few of these breakfast treats and I'm in heaven, especially when I can move straight to my sofa after a week of so much excitement.


Orange, Chocolate, and Buckwheat Muffins
Makes 12 muffins
buckwheat flour 200 g / 1 1/3 cups
ground hazelnuts or almonds 170 g / 1 1/2 cups
granulated sugar 100 g / 1/2 cup
freshly grated orange zest 3 tablespoons, plus more for topping
baking powder 3 teaspoons
baking soda 1/2 teaspoon
fine sea salt 1/4 teaspoon
freshly squeezed orange juice 120 ml / 1/2 cup
whole milk 120 ml / 1/2 cup
organic eggs 3
unsalted butter, melted and cooled, 125 g / 1/2 cup plus 1 tablespoon
bittersweet chocolate, roughly chopped, 100 g / 3 1/2 ounces
paper muffin pan liners 12
Preheat the oven to 190°C / 375°F (preferably convection setting). Line a 12-cup muffin pan with paper liners.
In a large bowl, whisk together the buckwheat flour, hazelnuts, sugar, orange zest, baking powder, baking soda, and salt.In a medium bowl, whisk together the orange juice, milk, eggs, and butter. Add to the flour-mixture and stir with a wooden spoon just until a lumpy batter forms. Gently fold in the chocolate. Mind that if you mix the batter too much, the muffins will lose their light texture.
Spoon the batter into the muffin cups and bake for about 16 minutes (slightly longer if using a conventional oven) or until golden. Take the muffins out of the pan and let them cool on a wire rack for 2 minutes before serving. Sprinkle the tops with a little orange zest.


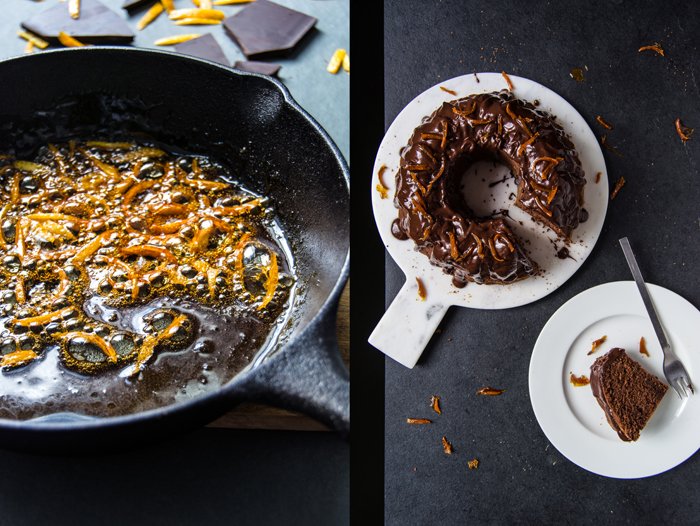
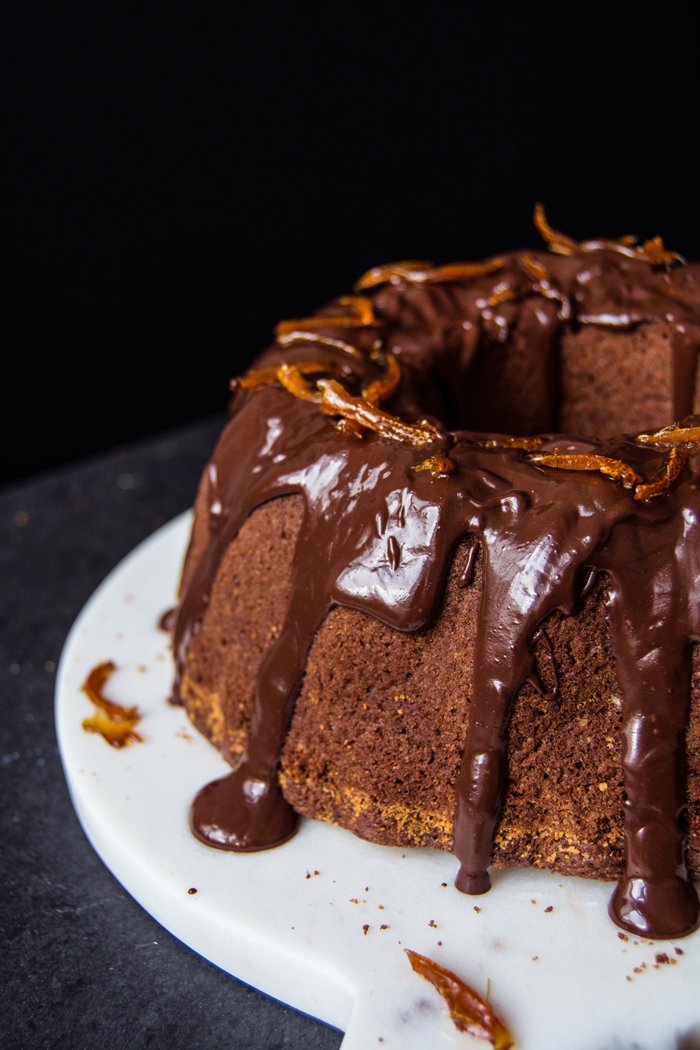
From my cookbook: Chocolate Olive Oil Bundt Cake with Candied Orange Peel
Berlin, 2016:
The first picture of today's post caught the moment I held my Eat In My Kitchen cookbook in my trembling hands for the first time. I had to sit down, or rather, I fell into my beloved old chair in my living room. This chair has seen many emotions, sad and happy, it's been with me all my life and it's the place I want to be when the world around me becomes a little overwhelming.
So this chair had to catch me once again. My knees were wobbly and I didn't know if I should laugh or cry, so I did both. I received a package from my publisher and I knew what it was before I even opened it: two books, my books.
Tomorrow is a very special day, my German book, Eat In My Kitchen -sssen, backen, kochen und genießen, will be published and in a week the English book will follow: Eat In My Kitchen- to cook, to bake, to eat, and to treat, on October 4th. The book is already on Epicurious' list of 'The 25 Most Exciting New Cookbooks for Fall 2016' and my heart is jumping with joy!!
So many people keep asking me how I feel about my big publishing day(s), whether I'm excited, proud, or nervous. To be honest, I can't really say how I feel. Maybe confused and overwhelmed? As much as it felt normal to write this book at one point, to cook and bake the recipes, and to take the pictures, strangely enough it's starting to feel normal to know that it'll be out soon. It may sound weird and maybe I'm wrong, maybe I'll have a nervous breakdown at one point, maybe when I present the book in front of an audience (in the next few weeks, all over Europe and in the US), or when I see it at in bookstores, or when I watch people pulling it off a shelf and buying it. I don't know.
Luckily, I don't have much time to think about it, which is sometimes the best thing that can happen. Eat In my Kitchen feels as intuitive, natural, and close to myself as it can get. The physical book just as much as this blog. I'm in my comfort zone, constantly, which I consider to be the greatest gift. I don't take anything for granted in life, I'm here and I want to learn, grow, and experience everything. I don't know if I'll fail or succeed with this book, but it's also nothing I want to worry about. Every recipe, every story and picture that fill the 256 pages of this book, is totally me, to question or doubt its relevance, would be fatal. That would mean questioning my passion and my beliefs, before this book even sees a shelf in a bookstore.
I can say that I'm unbelievably happy that this book exists. With a big smile on my face, I stand behind all I've created and written in the past year and a half to fill its pages, in both the German and the English book. I went through many lows and I took the highs with great pleasure, I suffered and I cried, I changed some decisions and stood strongly behind others. I've been through my battles, while working on these pages. But now I let go. A month ago I wrote about this transition, this process of letting go of a project. Tomorrow, this process will be complete.
Today sees a premier on the blog, I'm sharing the first recipe from my book with you and, also for the first time, I'll share a recipe in English and in German. I get many requests to write my blog in two languages, and as much as I'd love to do that, I simple don't have enough time. I appreciate the effort of so many of you who aren't that familiar with the English language but still give it a try and follow my recipe instructions in a foreign language. Today, my German readers, you can relax and bake the most delicious, spongy chocolate olive oil Bundt cake, topped with a thick chocolate glaze and sweet and crunchy caramelized orange peel. I love this cake!
Next week, I'll share another recipe from my book with you, on the 4th October, on the day when my English readers can hold the book in their hands for the first time. I'll be in Malta at that point, celebrating the book at my launch at the gorgeous Villa Bologna before my journey takes me to London, New York, and Washington. I'll try my best to keep up with writing about all this here on the blog - and I also intend to start sharing videos on Instagram, so please come over and join my journey in the next few weeks and months.
Today I want to thank my amazing team here in Germany, all the wonderful women and men who made this book possible. Thank you everyone at Prestel in Munich, especially Pia, Julie, and Adeline. Thank you so much Ellen Mey for being my editorial guidance.
So very soon the book will be available in bookstores, and in case you can't find it on the shelves, you can order it at any bookstore in the world, or here:


Chocolate Olive Oil Bundt Cake with Candied Orange Peel
from Eat In My Kitchen - to cook, to bake, to eat, and to treat, published by Prestel
SERVES 8 TO 12
Dry breadcrumbs, for sprinkling the Bundt pan
2 cups (260 g) all-purpose flour
1 cup (200 g) granulated sugar
1 tablespoon baking powder
1 teaspoon baking soda
⅛ teaspoon fine sea salt
5 ounces (140 g) bittersweet chocolate
⅔ cup (155 ml) olive oil5 large eggs
3½ tablespoons (50 ml) whole milk
1 tablespoon freshly grated orange zest
3½ tablespoons (50 ml) freshly squeezed orange juice
FOR THE CHOCOLATE GLAZE
5 ounces (140 g) bittersweet chocolate
1 tablespoon (15 g) unsalted butter
1 to 2 teaspoons sunflower oil
FOR THE CANDIED ORANGE PEEL
¼ cup (50 g) granulated sugar
2 tablespoons water
1 small handful very thin strips of fresh orange peel
Preheat the oven to 350°F / 180°C (preferably convection setting). Butter a 7½-cup (1.75 l) Bundt pan and sprinkle generously with breadcrumbs.
In a large bowl, whisk together the flour, sugar, baking powder, baking soda, and salt.
In a large heat-proof bowl set over a saucepan of barely simmering water, melt the chocolate. Let cool for a few minutes then add the olive oil, eggs, milk, orange zest, and orange juice, and beat with an electric mixer for 2 minutes or until smooth. Add to the flour mixture and quickly mix with an electric mixer for 1 minute or until well combined. Pour the batter into the prepared Bundt pan and bake for about 35 to 40 minutes (slightly longer if using a conventional oven) or until golden brown and firm on top. If you insert a skewer into the cake, it should come out clean. Let cool for a few minutes then shake the Bundt pan a little and turn the cake out onto a plate. Let cool completely. Trim the bottom of the cake to even it out.
For the chocolate glaze, melt the chocolate and butter in a saucepan over low heat. Add 1 to 2 teaspoons of vegetable oil and whisk until smooth. Pour the glaze over the cooled cake, evening it out with a knife or leaving it in voluptuous drops.
For the candied orange peel, in a small saucepan, bring the sugar and water to a boil. When it starts to caramelize add the orange peel. Reduce the heat to medium and cook for 3 to 4 minutes or until the peel is golden and soft—mind that it doesn’t burn. While the caramel is still liquid, quickly transfer the candied peel to a piece of parchment paper. Let cool for 1 minute then peel it off the paper and decorate the cake while the glaze is soft.

German recipe:
Schokoladen-Gugelhupf mit Olivenöl und Kandierter Orangenschale
aus Eat In My Kitchen - essen, backen, kochen und genießen, veröffentlicht bei Prestel
FÜR 8–12 PERSONEN
Semmelbrösel, für die Gugelhupfform
260 g Mehl200 g Zucker
3 TL Backpulver
1 TL Speisenatron1 Prise feines Meersalz
140 g Zartbitterschokolade
150 ml Olivenöl
5 Eier
50 ml Milch
1 EL Orangenabrieb
50 ml frisch gepresster Orangensaft
FÜR DIE SCHOKOLADENGLASUR
140 g Zartbitterschokolade
1 EL Butter
1–2 TL Sonnenblumenöl
FÜR DIE KANDIERTE ORANGENSCHALE
50 g Zucker
2 EL Wasser
1 kleine Handvoll sehr dünne Streifen Orangenschale
Den Ofen auf 180 °C (Umluft) vorheizen. Eine Gugelhupfform (1,8 l) einfetten und großzügig mit Semmelbröseln bestreuen.
In einer großen Schüssel Mehl, Zucker, Backpulver, Speisenatron und Salz vermischen.
Die Schokolade in einer großen Schüssel über einem Wasserbad schmelzen. Ein paar Minuten abkühlen lassen, dann Olivenöl, Eier, Milch, Orangenabrieb und Orangensaft dazugeben und mit einem Handrührer etwa 2 Minuten glatt rühren. Zu der Mehlmischung geben und mit dem Handrührer etwa 1 Minute gut verrühren. Den Teig in die vorbereitete Gugelhupfform gießen und etwa 35–40 Minuten goldbraun backen, die Oberfläche sollte fest sein. Ein Metallstäbchen sollte nach dem Einpieksen in den Kuchen sauber sein. Ein paar Minuten abkühlen lassen, dann die Gugelhupfform ein wenig rütteln und den Kuchen auf eine Platte stürzen. Komplett auskühlen lassen und, falls nötig, den Boden gerade schneiden.
Für die Schokoladenglasur Schokolade und Butter in einem Topf bei niedriger Hitze schmelzen. 1–2 TL Sonnenblumenöl dazugeben und glatt schlagen. Die Glasur über den ausgekühlten Kuchen gießen, mit einem Messer verteilen oder in üppigen Tropfen herunterlaufen lassen.
Für die kandierte Orangenschale Zucker und Wasser in einem kleinen Topf zum Kochen bringen. Wenn es anfängt zu karamellisieren, die Orangenschale dazugeben. Bei mittlerer Hitze etwa 3–4 Minuten köcheln lassen, bis die Schale golden und weich ist – aufpassen, dass sie nicht anbrennt. Während der Karamell noch flüssig ist, die Orangenschale schnell auf einem Stück Backpapier ausbreiten. Ein paar Minuten auskühlen lassen, von dem Papier abziehen und den Kuchen damit dekorieren, solange die Glasur noch weich ist.


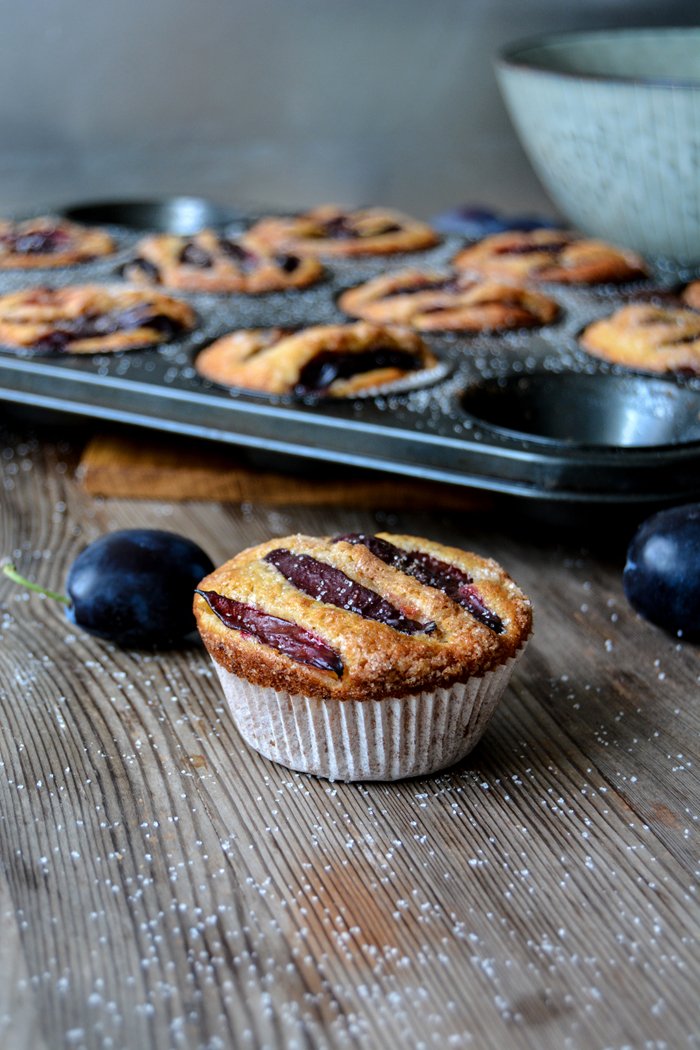
Plum, Cinnamon & Buttermilk Muffins
More plums and more muffins!
On Wednesday, I mentioned my unstoppable appetite for plums. I turned the sweet and sour fruit into a caramelized topping for a rich cheese omelette and made a heavenly ciabatta sandwich. Today I turned them into muffins, fluffy muffins, refined with lots of cinnamon and pretty plums on top. I need my sweet dose of homemade cake at least once a week and there's no better day to indulge in this treat than on a Sunday. And if I don't have much time, I go for muffins. A batch of 12 is just enough for the two of us for breakfast and tea time, and the last nibbles are reserved for dessert.
I like to use German plums for baking, also known as Damson plums, but feel free to use Italian plums or any variety you can find. Apples, pears, or blueberry work just as well, I'd even give some late summer peaches or figs a go.More muffin inspiration:


Plum, Cinnamon & Buttermilk Muffins
Makes 12 muffins
plain flour 200g / 1 1/2 cups
granulated sugar 70g / 1/3 cup, plus 2 tablespoons for the topping
baking powder 2 1/2 teaspoons
baking soda 1/2 teaspoon
a pinch of salt
ground cinnamon 1 1/2 teaspoons, plus 1/2 teaspoon for the topping
buttermilk 190ml / 3/4 cup plus 1 tablespoon
butter, melted and cooled, 90g / 1/3 cup plus 1 tablespoon
organic egg 1
large plums 8, cut into thin wedges
paper baking cups 12
Set the oven to 200°C / 400°F (preferably convection setting) and line the 12 molds of a muffin tray with paper baking cups.
In a large bowl, combine the flour, sugar, baking powder, baking soda, salt, and cinnamon.
For the topping, combine the sugar and cinnamon.
In a large bowl, whisk the buttermilk, melted butter, buttermilk, and egg, then pour into the flour mixture. Using a wooden spoon, stir until you have a lumpy dough, with a bit of flour left here and there. Keep in mind, the more you mix it, the more it will lose its light texture. Divide the dough between the muffin cups and arrange the plum wedges on top. For the topping, sprinkle with the cinnamon sugar and bake for about 15 minutes (slightly longer if using a conventional oven) or until the muffins are golden and firm on top. Let them cool for 1-2 minutes before you take them out of the tray.


meet in your kitchen | Emiko Davies' Grape Focaccia & her life in Tuscany

Our long wooden dining table has seen many luscious lunches and dinners. It has its scars and scratches and I'm sure that a few of them came from an unexpected meal with friends a few months ago. It must have been spring, I was still busy proof reading my book and I was rather stressed. What was supposed to be a one hour snack with a friend from Malta turned into a little Friday feast, with three friends, salads, cheese, and salami, and with a few more bottles of white wine than one should open (and empty) on a Friday afternoon - but who cares, we had a wonderful time. We laughed so much that I managed to relax and forget my duties for a few hours - and it was the start of this meet in your kitchen feature.
One of the friends who sat at my table that day was my dear Heilala. Whenever we meet, we get lost in long conversations. Between nibbles of cheese and sips of wine, she told me about a friend from her school days who just published her first cookbook and had also gone through all the excitement that comes with the adventure of being a book author. Her friend lives in the heart of Tuscany, in Florence, once the breeding ground of breathtaking Renaissance art and architecture. If you've seen it once, you'll never forget its magical beauty. So Heilala told me that her friend lives right there, in this Italian paradise with her Italian husband and their little daughter, she writes a food blog and as I found out later, she's already at work on her second cookbook - she's called Emiko Davies.
I knew Emiko, not personally, but I've been a huge fan of her work for quite a while. Her recipes, her writing, and her photography have depth, every single aspect of her work shows that she's knows what she's talking about. Every picture she shares speaks of the beauty that surrounds her. If you live in a place that's so full of history, culture, and evolving traditions, where the fine arts have flourished for centuries, you can only grow. The former art and history student dug deep into Florence's culinary traditions. Like a scientist, she observed, read, and learned about the original cooking and baking of this part of Tuscany, a region that's so versatile and rich. Florentine, The True Cuisine of Florenceis a declaration of love, of someone who has experienced the city from the outside and has now become a part of it.
The curiosity and persistency of this food loving woman fascinated me - even more so after I found out that we share a beloved friend. We only got in touch last week, but I immediately knew that I wanted to meet Emiko in her kitchen. For know it's just a virtual meeting, but I'm planning to visit her next year, in real life - to be continued.
All pictures in this post are taken by Emiko Davies.


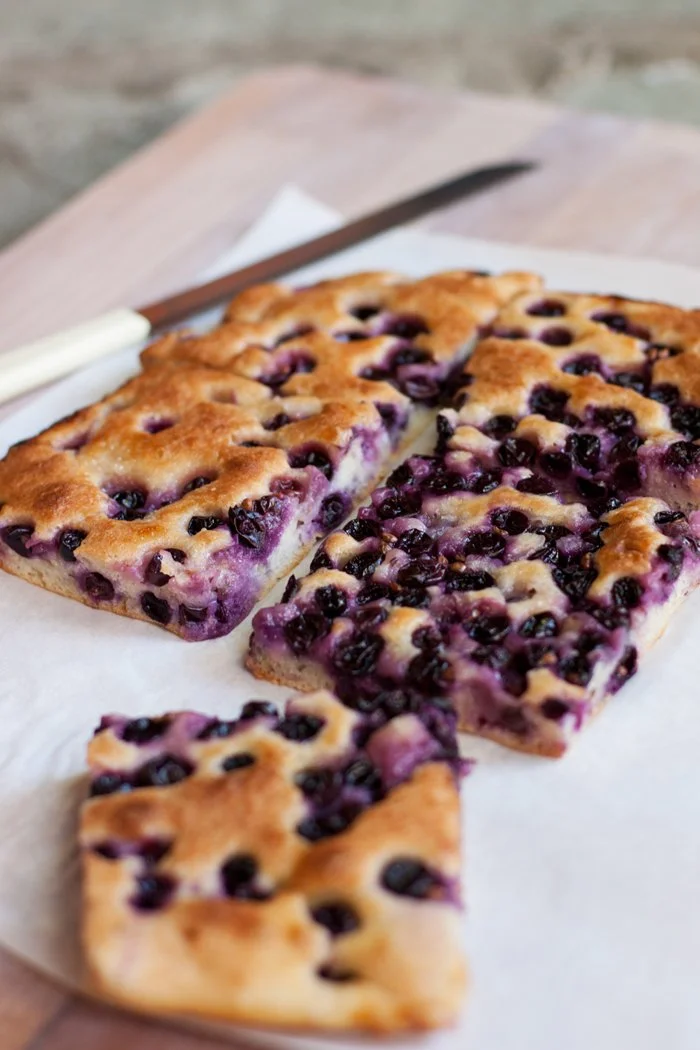
Schiacciata all'uva | Grape focaccia
from 'Florentine: The True Cuisine of Florence' by Emiko Davies, published by Hardie Grant Books
For one or two fleeting months of the year from September to October, the appearance of schiacciata all'uva in Florence's bakery shop windows is a sign that summer is over and the days will begin to get noticeably shorter. This sticky, sweet focaccia-like bread, full of bright, bursting grapes, is a hint that winemakers are working hard at that moment harvesting their grapes and pressing them.
These days, it is usually made with fragrant, berry-like concord grapes (uva fragola) or the more traditional sangiovese or canaiolo wine grapes. These grapes stain the bread purple and lend it its juicy texture and sweet but slightly tart flavour. They are also what give the bread a bit of crunch, as traditionally the seeds are left in and eaten along with the bread. Avoid using red or white seedless table grapes or white grapes for this – they just don’t do it justice in terms of flavour or appearance. If you can’t get concord grapes or it’s the wrong season, try replacing them with blueberries. It’s completely unorthodox, of course, but it’s a very good substitute, giving you a much closer result than using regular table grapes.
Makes 1 large schiacciata, serves 6–8
500 g (1 lb 2 oz) plain (all-purpose) flour, plus extra for dusting
20 g (3/4 oz) fresh yeast, or 7 g (1/4 oz/2 1/2 level teaspoons) active dry yeast
400 ml (131/2 fl oz) lukewarm water
75 ml (21/2 fl oz) extra-virgin olive oil, plus extra for greasing
600 g (1 lb 5 oz) concord grapes (or other black grape)
80 g (23/4 oz) caster (superfine) sugar
1 teaspoon aniseed (optional)
icing (confectioners’) sugar (optional)
Preparing the dough
This can be done the night before you need to bake it, or a couple of hours ahead of time.
Sift the flour into a large bowl and create a well in the centre.
Dissolve the yeast in some (about 1/2 cup or 125 ml) of the lukewarm water.
Add the yeast mixture to the centre of the flour and mix with your hand or a wooden spoon. Add the rest of the water little by little, working the dough well after each addition to allow the flour to absorb all the water.
Add 1 tablespoon of extra-virgin olive oil to the dough and combine.
This is quite a wet, sticky dough. Rather than knead, you may need to work it with a wooden spoon or with well-oiled hands for a few minutes until it is smooth. Cover the bowl of dough well with some plastic wrap and set it in a warm place away from draughts until it doubles in size, about 1 hour. If doing this the night before, leave the dough in the bowl to rise in the fridge overnight.
Assembling the schiacciata
Separate the grapes from the stem, then rinse and pat dry. There’s no need to deseed them if making this the traditional way.
Preheat the oven to 190°C (375°F).
Grease a 20 cm (8 in) x 30 cm (12 in) baking tin or a round pizza tray with olive oil. With well-oiled (or wet) hands, divide the dough into two halves, one slightly larger than the other. Place the larger half onto the greased pan and with your fingers, spread out the dough evenly to cover the pan or so that it is no more than 1.5 cm (1/2 in) thick.
Place about two-thirds of the grapes onto the first dough layer and sprinkle over half of the sugar, followed by about 30 ml (1 fl oz) of olive oil and 1/2 teaspoon of aniseed.
Stretch out the rest of the dough to roughly the size of the pan and cover the grapes with this second layer of dough, stretching to cover the surface. Roll up the edges of the bottom layer of dough from underneath to the top, to seal the edges of the schiacciata. Gently push down on the surface of the dough to create little dimples all over. Cover the top with the rest of the grapes and evenly sprinkle over the remaining aniseed, sugar and olive oil.
Bake for about 30 minutes or until the dough becomes golden and crunchy on top and the grapes are oozing and cooked.
Remove from the heat and allow to cool completely. Cut into squares and enjoy eaten with your hands. If you like, dust with icing (confectioners’) sugar just before serving – although this isn't exactly traditional, it is rather nice.
This is best served and eaten the day of baking, or at the most the next day.
You've lived in many countries and experienced a variety of cultures in your life, your mother is Japanese, your father is Australian, your husband is Italian and you grew up in Beijing. How has your diverse cultural identity influenced your life and cooking?
Moving around a lot and identifying with different cultures, I grew up not feeling like I was particularly attached to just one place. I think this made it very easy (perhaps even necessary – at least that's how I felt about it when I was 20!) for me to pick up a suitcase, buy a plane ticket and move to a new country to learn a new language and discover the new culture. I am also pretty sure this travel and experience partly contributed to me being an adventurous eater – always willing to try anything once. From the beginning, I understood that food is a way to connect with and understand a new culture – if, for Florentines, their number one beloved comfort dish is a warm panino made with the fourth stomach of the cow (it's known as a panino al lampredotto), then you can be sure it's one of the first things I tried – and fell in love with too!
What do you love the most about Florence? Do you find anything difficult to connect with?
There are many sides to Florence and the longer I live here, the more I discover another aspect! When I first moved here, it was so easy to fall head of heels for Florence – especially for someone who studied art and art history as I did! Everywhere you look, the place is touched with the Renaissance and the most important artists in history, it's like one giant museum. That's what drew me in. And it's what drew a lot of expats to Florence, so there is a large expat community with many similar-minded people, who are all here for similar reasons (love, food or art, usually!). I made friends easily here and felt really at home, ironically (as I always feel more at home amongst expats). But having said that, I find it's really difficult to make friends, really good friends, with Florentines. That's been a struggle. I ended up meeting and marrying one, but I have to say, he's quite different from the typical Florentine man!
Was it easy to become a part of the Florentine way of life?
I think yes and no. Living it the historical centre of Florence, visiting the local butcher or fruit vendor or bakery for your shopping, the same bar for coffee every morning, you begin to get to know your neighbourhood and they begin to know you, it becomes your little world. I've met some wonderful people this way, and this feeling of a neighbourhood or quarter is something I love about Florence – something that I hope everyone who still lives in the centre continues to cling on to, as tourism tends to take over in a city like Florence. On another aspect, since having a child, I can see the cultural differences coming out more than ever! My parenting ideals are much more anglo-saxon and more often than not they seem to clash with the 'norm' here!
Your husband is head sommelier at the Four Season's Michelin-starred Il Palagio, do you find it inspiring that both of you work in the fields of the culinary pleasures of life?
Always. We work in two quite different worlds – I write about and cook homely, traditional food, while he has, for the past five years or more, worked solely in fine dining and wine. But at home we always cook together and we have a similar appreciation for good food and good ingredients, cooked properly. He inspires me and helps me in ways he probably doesn't know.
You say that "Italian cuisine doesn't exist, there are many cuisines". Why do you think regional cuisine is so diverse in Italy?
There are many theories, but the simplest answer is history. Italy is actually a very young nation – it was unified in 1861, that's little more than 150 years ago! But the traditions, dialects, dishes and ways of life of each region are ancient. In many cases, even the differences you'll find from town to town are huge. This is what makes Italy such a fascinating place – it's not really one country to discover but so many different places, which means it's almost a new cuisine in every town you visit.
On your blog, you mention an author called Pellegrino Artusi and his cookbook, known in English as Science in the Kitchen and the Art of Eating Well, published in Italy in 1891. Can you tell us a bit about this book and why it fascinates you?
Italy had only been unified for 30 years when this book – documenting 790 “Italian” recipes – was published. It became the sort of cookbook every household acquired and had sitting on the shelf. Artusi himself was from Emilia-Romagna but he spent much of his life in Florence, so many of the dishes are Tuscan, or familiar to Tuscans. But it wasn't meant to be a regional cookbook, it was more like an encyclopaedia of recipes for the “modern” housewife. I love it because it's not only a snapshot into what Italian food was when the country was newly unified, but also because many of the recipes are still made the same way, so it's a fantastic reference for traditional recipes. It's a good read, too, Artusi is witty and at times hilarious in his anecdotes that accompany recipes.
Why do you think that there are many Florentine dishes that didn't change much since medieval times?
Traditions change very slowly in Florence! They have this saying here, la squadra che vince non si cambia, or the don't change a winning team. It's a bit like the phrase, if it ain't broke, don't fix it. Partly there's that at play, it's the proud nature of Florentines to continue to prepare and eat their all-time favourite dishes more or less the way they've been prepared for centuries. There's also the philosophy to cook the local ingredients that have always been available for Florentines, and to use the long-time staples of the cuisine – bread and olive oil being two of the most important! These have been around for a long time and are still what humble, earthy Florentine cuisine is based on.
Can you imagine living in Tuscany for the rest of your life?
For the same reason that I've always found it easy to pick up and move, I can't really imagine being in one place forever! But I've lived in Florence longer than any other single place on the planet, so that's already quite an achievement! Italy is not an easy place to live in, despite the romanticism and beauty. I think that we are lucky to have the option to be able to live in two wonderful countries – Australia and Italy – whenever we want. For now, it's Italy's time.
Florentine, your first cookbook, came out in March this year. At the moment you're working on your next book, Acquacotta, which will be about the cuisine of the southern Maremma area of Tuscany. It will be published exactly a year after the first one. Why did you decide to start working on the new book immediately and what feels different now, after the experience of the first book?
It came about quite quickly because we were living in Porto Ercole, in southern Tuscany for six months last year, well before Florentine came out, and it was just such a beautiful place I knew it had to be shared in the form of a cookbook! So I contacted my publisher and we talked about the pitch for a couple of months and came up with Acquacotta. She was aware that starting to work on it while I was living there would be the best way to bring it to life, so essentially I started working on Acquacotta while I was still finishing Florentine. It's been difficult to juggle between the two and 'switch' from one to the other when Florentine finally came out, but the experience of the first book has helped me feel much more confident about the second one – from the recipe testing to the writing to the photographs, even how the recipes were made and shot. It really helped that I have the exact same wonderful team from Florentine working on this book too, it felt really good and seemed to just make itself, almost!
Your photography is stunning, do you prefer taking the pictures of your dishes yourself?
Thank you! I still feel like I have a long way to go – my background is in analog film photography, and I still feel like I struggle with digital photography, especially the editing part. I'm self-taught for the most part. For my blog, I take all my own photographs, but for the cookbook I took the location photographs, leaving the recipe shots to a wonderful photographer Lauren Bamford. In Australia, a cookbook is really a team effort, with one professional looking after each and every aspect of the book. For the recipe shots, I wanted to make sure the dishes looked completely authentic and real – just like how you'd find them in Florence. So I cooked them myself (with some help from my husband Marco and a home economist) and while I was busy in the kitchen, Deb Kaloper, an absolute magician in food styling, styled the dishes and Lauren Bamford took the photographs. It was a dream to work with them.
How do you develop new recipes for your book and your blog? What inspires you?
What inspires me most is travel and seeing how a place – its landscape, its history – is so strongly connected to the food that is made there and vice versa. It's why I am so interested in regional Italian food. In Florentine I wanted to share how the food in this city belongs entirely to Florence – not just Tuscany. It's not Tuscan food. It's Florentine food. And for Acquacotta, which is still about Tuscany, I wanted to show people how different Tuscan food is when you come to a place like the Maremma – more isolated, less touristy, hidden, and full of beautiful, rugged landscapes, mountains and the sea, which inspire the food. For the blog, I talk about not only dishes that I've found in old cookbooks or tasted in a new place, but also create some travel pieces for people who might be coming to Italy on holiday and want to avoid touristy food and know where to taste the real deal.Who is your biggest inspiration in the kitchen?In every day cooking, it's probably my husband. Everyone who likes to cook for other people knows that the best thing about cooking is making something that you know someone else will love! In developing recipes for the blog and my books, it's usually some old cookbooks that inspire me to try new dishes – aside from Artusi, I also love Ada Boni's 1921 cookbook, Il Talismano della Felicita' (known as The Talisman in English) and Elizabeth David's Italian Food. I've discovered some other older cookbooks recently that I have at my bedside table too, like Patience Gray's Honey from a Weed and Jane Grigson's Vegetable Book.
What was the first dish you cooked on your own, what is your first cooking memory?
I can remember a few mud pies when I was very little, but from memory the first real food I made was scrambled eggs. My grandmother in Sydney taught me how to make them, using real butter and showing me how to take them off the heat when they're still soft and wobbly, just before they look ready so you don't risk overcooking them. I still make it the exact same way.
What are your favourite places to buy and enjoy food in Florence?
My favourite food market is Sant'Ambrogio. It's a local market on the eastern edge of town. It's not huge but it's got everything you'd ever need and more. Plus there's always a nice neighbourhood vibe there, and we have a little ritual of stopping off at the news stand, then going to a pastry shop for coffee and a mid-morning treat. It's the little things. Many of my favourite restaurants are in the same square as the market – Caffe Cibreo is a really pretty spot for coffee or lunch, and the buffet lunch at Teatro del Sale is one of my favourite food experiences in Florence. Pasticceria Nencioni a little down the street is a wonderful, tiny pastry shop and right next to the market, Semel, a little hole in the wall panino shop, makes a fantastic quick lunch – a crunchy roll with maybe some anchovies, fennel and orange (my favourite one) and a small glass of wine.
If you could choose one person to cook a meal for you, who and what would it be?
It'd probably be my mum, I'd ask her to make me my favourite Japanese dishes – cold somen noodle salad and chargrilled baby eggplants if it's summer, miso soup with clams, her sushi and sashimi platters. Whenever I'm home I always request sukiyaki or shabu-shabu (a hot pot dish where each diner cooks their own food in the bubbling pot in the middle of the table) at least once.
You're going to have ten friends over for a spontaneous dinner, what will be on the table?
Food that is unfussy to make (i.e. easy for the cook) and easy to share (i.e. fun and informal for the guests) – a creamy chickpea soup or a steaming pan of freshly tossed vongole and spaghetti, a roast of some sort (a whole roast fish or chicken are my favourites), stuffed with lots of herbs on a bed of roast potatoes and cherry tomatoes so you have the main and side dish in one. Dessert, either an after-dinner stroll to the gelateria or some whipped, coffee-laced ricotta with homemade lady finger biscuits to dip.
What was your childhood's culinary favourite and what is it now?
I loved everything as a child, but in particular I loved Japanese food and Japanese sweets – anything with sweet red bean paste is my weakness! They're still my favourite, most comforting foods, but it's very hard to get good Japanese food in Italy so I wait until I'm visiting my mother to indulge in it.
Do you prefer to cook on your own or together with others?
I like the social aspect of cooking together, when you've got something special planned and there's a lot to do, it's nice to have someone to chat to while you're chopping, or kneading or stirring all day. But when I get the chance to have some time to myself (rare these days, with a three and a half year old around!), I like to be alone in the kitchen, cooking is very therapeutic and relaxing, almost meditative, for me. That's one of the reasons I'm looking forward to the cooler weather, so I have a good excuse for long, slow cooking and baking, my favourite ways to cook.
Which meals do you prefer, improvised or planned?
I do like both, but I think I might be rather good with improvising a meal! One of my best food moments was pulling together a totally improvised meal for my very new boyfriend (so new I probably couldn't even call him that!) from a practically empty fridge. I made him pasta with broccoli and garlic. He took one bite and said “I'm going to marry you.” And he did.
Which meal would you never cook again?
I don't know if there's something I'd never do, but probably things I'd change the next time I tried it. For me, right now, being a mother and writing cookbooks, I have to be a bit picky with what I cook when I have the time to do it, so I tend to lean towards low maintenance, unfussy, simple dishes. Things that are fiddly and require every minute of my attention are things I avoid lately – caramel, for example, is something I may not try for a while!
Thank you Emiko!


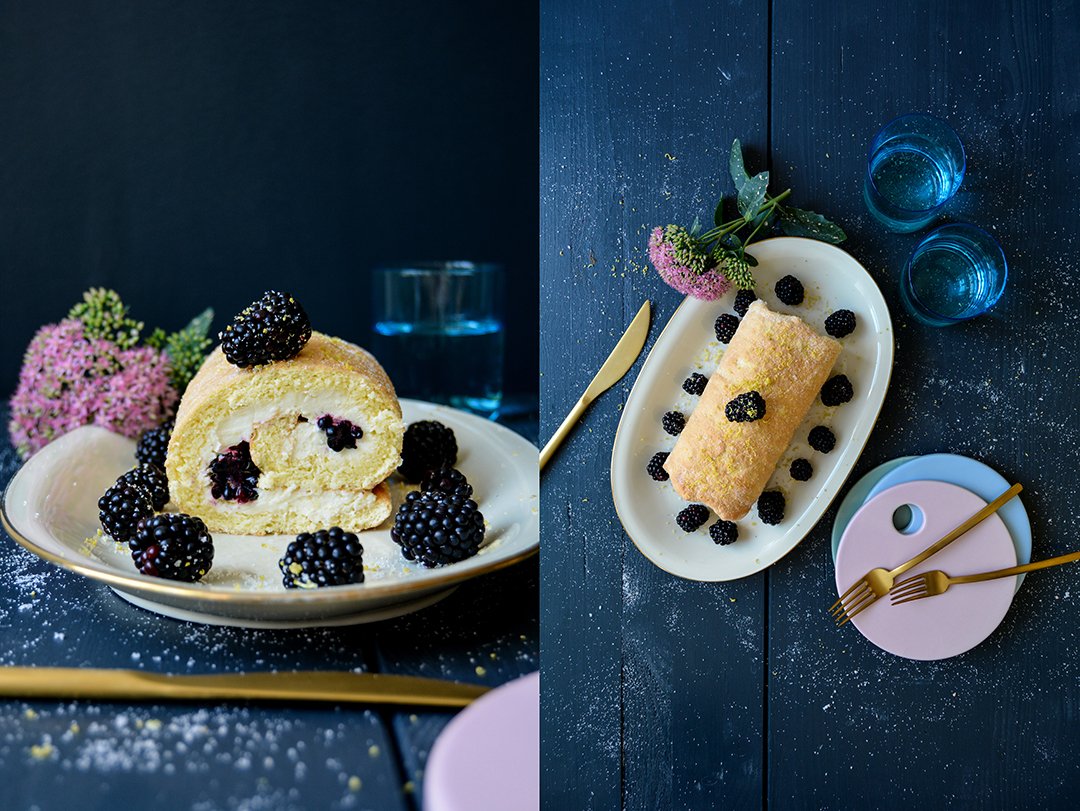
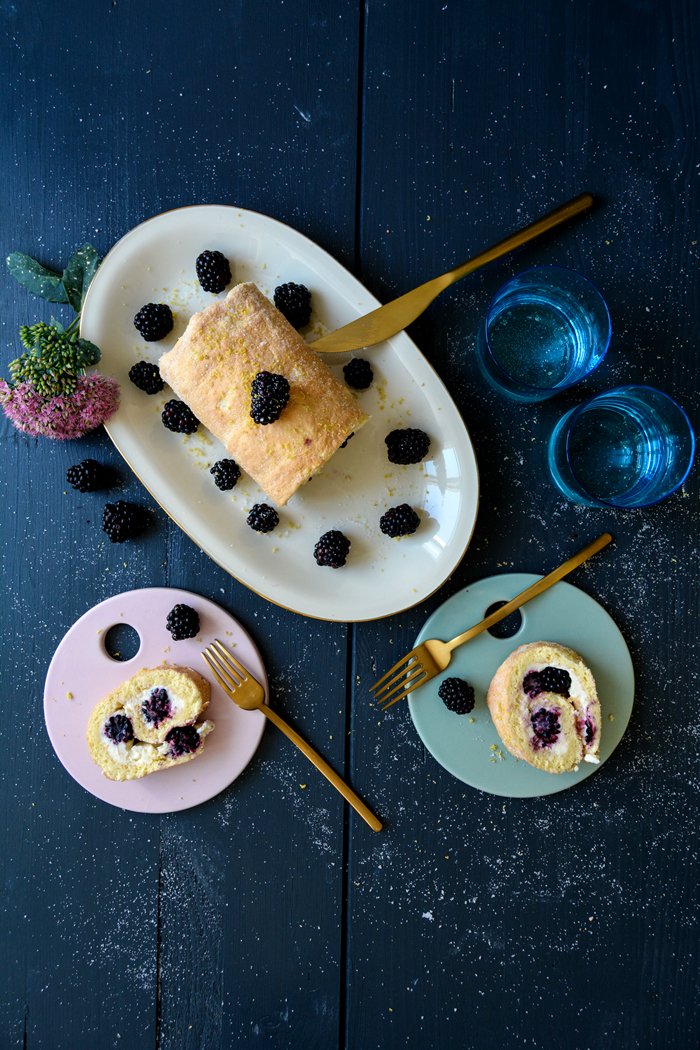
Cheesecake Swiss Roll with Mascarpone and Blackberries

Some days call for lavish teatime treats, especially when it's Sunday and I'm in the mood to spoil myself with some tasty calories. The 7th day of the week should be dedicated to rest and calm, but in my life it's also dedicated to baking. I take advantage of the fact that there are no duties and tasks waiting to be taken care of, so I can give my full attention to a quiet kitchen instead. I'm willing to share my baked treats with my loved ones, it's my kitchen credo after all, which led to my blog and my book's subtitle: To cook, to bake, to eat, and to treat. Cake always tastes better when you share it, but the process of baking it gives me some time just for myself.
So this week I got hooked on the idea of combining a swiss roll with New York cheesecake - without the cookie base obviously. I was after a spongy roll, fluffy but structured, and I know that my beloved swiss roll recipe manages to satisfy this demand with ease. It's been with me for two decades, I trust this roll. My usual filling would be whipped cream, as in my Blueberry Lemon Swiss Roll recipe. But it seemed too light for my current mood, I wanted creamy richness, a denser filling, with cream cheese and mascarpone - and a few plump blackberries - for my cheesecake swiss roll. My body's ready for the next season and it doesn't care that I'll be in Malta again in a few weeks, sitting on the beach in a bikini under the burning sun. I'm set for autumn and my Maltese boyfriend deeply disapproves of my decision - I think every Mediterranean man or woman suffers when summer comes to an end. But for a northern girl, the next season promises coziness and hearty treats, lonely walks in golden forests, and a chilled breeze whistling through the streets.
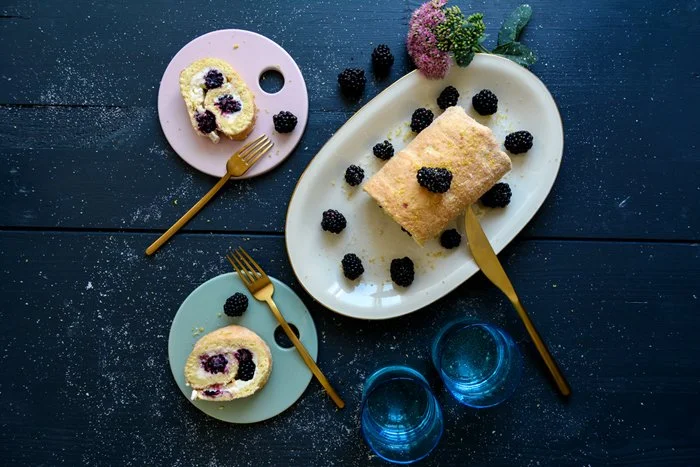
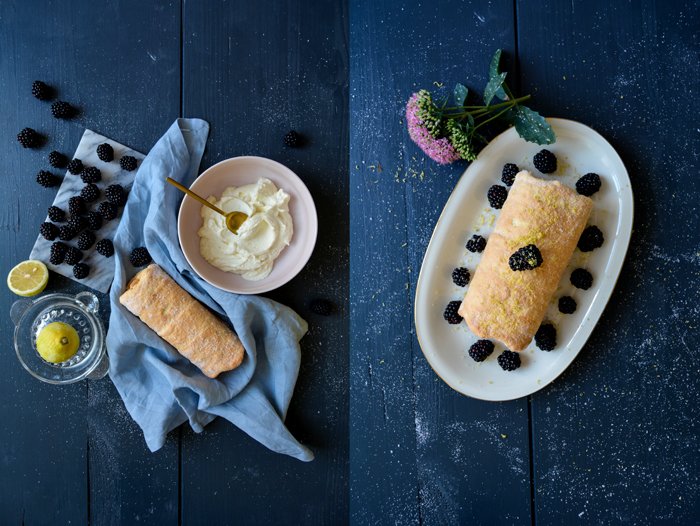
Cheesecake Swiss Roll with Mascarpone and Blackberries
Makes a 15cm / 6″ swiss roll
For the swiss roll
organic eggs, separated, 2
a pinch of salt
granulated sugar 40g/ 1/4 cup, plus 3 tablespoons for sprinkling
plain flour 35g / 1/4 cup
cornstarch 15g / 2 tablespoons
For the filling
mascarpone 110g / 4 ounces
cream cheese 110g / 4 ounces
granulated sugar 2 tablespoons
lemon zest 1 teaspoon, plus 1 teaspoon for sprinkling
freshly squeezed lemon juice 1 tablespoon
blackberries 125g / 4 1/2 ounces
Set the oven to 220°C / 425°F (conventional setting) and line a baking sheet with parchment paper.
In a large bowl, whisk the egg whites with a pinch of salt for a few seconds before adding half the sugar, continue beating until stiff.
In a second large bowl, mix the egg yolks and the remaining sugar with an electric mixer until thick and creamy. Using a wooden spoon, fold the egg white into the egg yolks. Sieve and combine the flour and cornstarch and fold gently into the egg mixture. Spread the dough on the lined baking sheet, covering a rectangle of roughly 15 x 30cm / 6 x 12″ and bake on the middle rack of the oven for about 6 minutes or until golden and spongy.
Sprinkle a kitchen towel with 2 tablespoons of sugar and flip the warm sponge onto the towel. Peel off the parchment paper and carefully roll the sponge with the towel, the roll should be 15cm / 6" long. Leave it rolled up until cool.
For the filling, in a medium bowl, whip the mascarpone, cream cheese, sugar, lemon zest and juice until creamy.
When the sponge is cool, unwind the sponge roll and spread the filling on top, leave a small rim (see picture below). Cover with the blackberries and roll it up tightly. Sprinkle with the remaining 1 tablespoon of sugar and a little lemon zest. Serve immediately or keep in the fridge before serving.


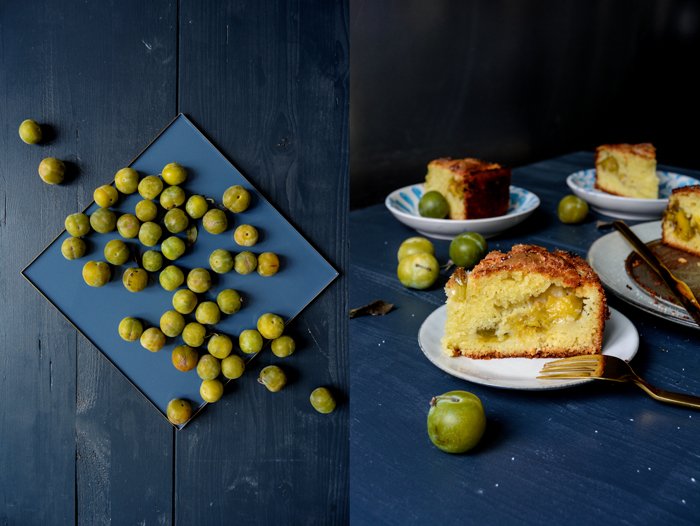
French Yogurt Cake with Greengage Plums for a late summer Sunday
Piles of plums, peaches, and apricots fill my kitchen's countertops. Plates with tiny yellow mirabelles and slightly larger greengage plums make it look and smell like a farmers' market - the fruit flies are having a feast. Every season has its culinary highlights, but late summer is the most lavish time of the year. Figs and berries are at their peak, packed with sweet juices. The whole variety of stone fruits is ready to be picked from the trees, and early apples tease me with their sour quality, which is so perfect for baked treats. Sponge cakes, muffins, tarts, and pies are just waiting to be paired with one of these summer fruits - who needs whipped cream or butter cream frosting? Now is the time to stir some fruit into the dough and enjoy one of the best sweet combinations ever: cake and fruit.
Sunday is my favourite day to bake cake. I start the oven right after breakfast, which tends to end rather late. Not so much because I sleep in, it's more because I enjoy the luxury of not having to rush after a busy week. I take my time, lots of time.
Looking at the long tradition of baking in my life, there are two recipes that I use far more often than others, not only on Sundays. The first one is my fluffy German waffle recipe, it's a family weekend ritual, and the other one is a simple fruit cake. It may sound quite simple but there are a million possible variations of this treat: you can add white chocolate, cornstarch for a lighter texture, or put some crumble on top. Olive oil creates a warm flavour and a juicy texture, great for a cake but also for my fig and ricotta muffins.
Today I went for a classic French yogurt cake, which is usually enjoyed plain. However, my enthusiasm for fruit led to a juicy filling of greengage plums. They were supposed to become a topping, but gravity, in combination with a light sponge dough, had different plans and the fruit sunk. The dairy product is mixed with mild olive oil, no butter, and adds a subtle sour hint. The yellow-green plums make it sweet and fruity (red plums would work here as well), it's just right for my late summer Sunday.


French Yogurt Cake with Greengage Plums
Makes a 20cm / 8" cake
plain flour 230g / 1 3/4 cups
baking powder 2 1/2 teaspoons
fine sea salt 1/4 teaspoon
plain yogurt 155g / 2/3 cup
mild olive oil 155ml / 2/3 cup
organic eggs 3, lightly beaten
granulated sugar 200g / 1 cup, plus 2 teaspoons for the topping
zest of 1 medium lemon
greengage (or red plums), cut on 1 side and pitted, 500g / 18 ounces
Preheat the oven to 180°C / 350°F (preferably convection setting). Butter a 20cm / 8" springform pan.
In a large bowl, whisk together the flour, baking powder, and salt.
Add the yogurt, olive oil, eggs, sugar, and lemon zest and mix with an electric mixer on low speed for about 1 minute, just until there's no trace of flour left and the dough is combined. Pour the batter into the prepared pan and arrange the greengage on top of the batter (vertically, see picture above). Sprinkle with the remaining 2 teaspoons of sugar and bake for about 60 minutes (slightly longer if using a conventional oven) or until golden brown on top. If you insert a skewer in the center of the cake, it should come out almost clean. Let the cake cool in the pan for a few minutes before serving.


Marina's Lemon Marmalade Ice Cream with Caramelized Pistachios
A month has passed and I have to leave my beloved archipelago in the deep blue Mediterranean Sea behind. This is the last recipe from my Maltese summer, but I'll be back soon, in October, to present my 'baby' at one of my book launch events, at the fabulous Villa Bologna in Attard.
It's been a summer full of emotions, with lots of work during the day and family gatherings or evening swims afterwards - the fun began as soon I closed my laptop and put my phone aside. I've been busy organizing the book launches in Europe and the US, I survived my first interviews and photo shoots and I met so many wonderful people who'll be helping me over the next few months. To my surprise, I've been enjoying everything that comes along with being a cookbook author. I love giving interviews (I love talking!) and I've been quite lucky, I've only met very interesting and entertaining people to talk to so far. Photo shoots are still a bit challenging for me, I prefer to stay behind the camera. Usually, I ask my man to accompany me, he manages to make me laugh in the weirdest situations - the result is that we have lots of photos with a big smile on my face. We had a fun shoot with my friend, the great photographer Luke Engerer in Malta. He put me on the roof terrace of his house, the sea in front of me, sparkling in the light of the sinking sun. It was so amazing that I didn't even mind getting naked on the roof to change (I just hope that none of the neighbours had a camera at hand).
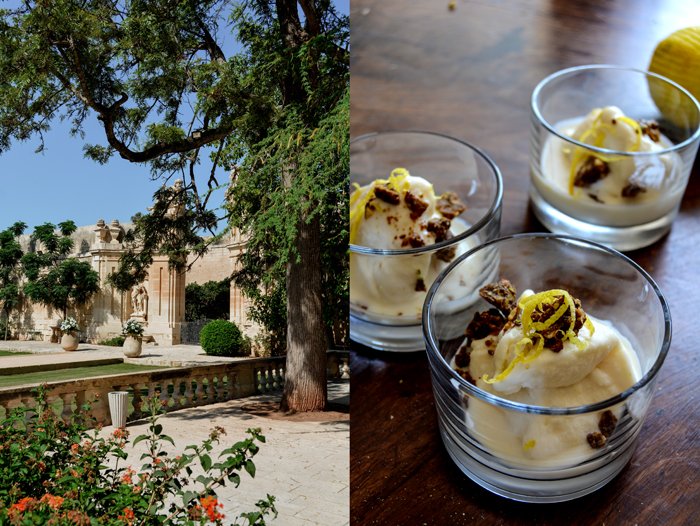
The problem with such a busy schedule is that time flies even quicker. It feels like we just arrived, on that hot night in July and now it's already mid August and I'm sitting at our dining table, back home in Berlin. For some reason, my home city must have misunderstood the season, Berlin welcomed us with autumn weather, I had to pull out the wool pullovers from the far back of my wardrobe. To ease the pain, I keep looking at the hundreds of pictures I took during the past 4 weeks and I remember every single second that I see in the pictures. I can smell the salty air, I can feel the hot wind on my skin, and I can even taste the ice cream that Marina made for us when we met in the kitchen and gardens of Villa Bologna. It was very lemony and it tasted so good - it was also the first recipe Marina ever made for me, back in the summer of 2015. This recipe is genius, it's only made with lemon marmalade, heavy cream, milk, and the juice and zest of a Maltese lemon. We were so impatient, that she took it out of the ice cream machine as soon as the motor stopped. It was an early afternoon and so hot, that the ice cream started to melt as soon as we scooped it into the glasses. Marina topped it with caramelized pistachios and lemon zest and I can't think of a better ice cream for summer - it was divine!
Whenever I have to exchange my Malta life for my Berlin life again, I tend to get a little stressed during our last two days on the islands. There's a lot of packing to do, but this time we had to sort out the transportation of 33 pounds (!) of sea salt from Mr Cini's salt pans in Gozo - and we managed. I also had to put away numerous packages of ottijiet cookies from Busy Bee and there were many fragile shells collected from the bottom of the sea waiting to be brought to Berlin to find a place on our window sills. Although they are already covered in shells, I can't stop collecting more and more of them. When the packing is done, we have a long goodbye ceremony with the family at our granny Edith's house, accompanied by a few tears and food. And when we've waved the last goodbyes and I've finally gone through security at the airport, I usually feel exhausted. I just want to get on the plane and relax, which always works out perfectly, thanks to the country's national airline, Air Malta. I love their cute looking planes, their friendly staff, and the fact that I don't have to worry about the weight of my luggage. Everyone gets 20kg (44 pounds) for free, just like in the good old days of flying.
Thank you Malta for another amazing summer! xx
And my last tip for the islands: I found a new old bakery in Rabat, they work traditionally and their baked goods are to die for!

Lemon Marmalade Ice Cream with Caramelized Pistachios
Makes about 1.5l / 6 cups of ice cream
heavy cream 500ml / 2 cups plus 2 tablespoons
milk 500ml / 2 cups plus 2 tablespoons
lemon marmalade 200ml / 3/4 cup plus 2 tablespoons
juice and zest of 1 lemon
For the topping
granulated sugar 100g / 1/2 cup
pistachios (or almonds), roughly chopped, 50g / 2 ounces
freshly grated lemon zest
For the ice cream, chill all the ingredients and churn in an ice cream machine until creamy. If it's still too soft, keep it in the freezer until completely frozen.
For the topping, add the sugar and pistachios to a frying pan and stir over low heat with a wooden spoon until melted. Quickly transfer the caramelized pistachios to a baking sheet and break into pieces when cool.
Divide the ice cream between bowls and sprinkle with caramelized pistachios and freshly grated lemon zest.


A juicy Grape and Rosemary Tart
This tart combines two of my favourite Mediterranean flavours - grapes and rosemary - and the result is nothing less than heavenly. The fact that the aromatic filling lies on top of buttery crisp puff pastry only exaggerates the temptation.
After failing miserably at making my own puff pastry on a few occasions, I only use this sweet delicacy when I'm in Malta, when I can buy it frozen in exceptionally good quality. If I ever manage to come up with a recipe that's as good as the product that I can buy here from the supermarket, I'll be a very happy baker. You could also use a shortcrust base for this summery tart but I like the elegant look and flaky texture of puff pastry in combination with the syrupy, juicy grapes. The chopped fresh rosemary sprinkled on top of the warm cake as soon as it comes out of the oven adds a woody aroma and gives it an unusual touch - try it, it's fantastic. I used it for a focaccia recipe last year and got hooked on this tasty duo.
I've already baked this tart twice since we arrived in Malta and it immediately gained huge popularity within our family - everybody loves it, kids and grandmother included!


Grape and Rosemary Tart
Makes 1 (28cm / 11") tart, serves 4-6
frozen puff pastry, defrosted, 320g / 11 ounces
dark grapes, preferably seedless, 500g / 18 ounces
granulated sugar 120g / 2/3 cup
freshly squeezed lemon juice 1 tablespoon
roughly chopped fresh rosemary 1 generous tablespoon
Preheat the oven to 200°C / 400°F and butter a 28cm / 11" tart pan.
Line the tart pan with the puff pastry, pushing the pastry into the pan, and put in the freezer for 5 minutes.
In a large bowl, using a large spoon, mix the grapes, sugar, and lemon juice and spread on top of the chilled pastry. Bake for about 40-45 minutes or until the pastry is golden brown and crisp at the edges. The grapes will be juicy, so the bottom of the tart won't be crisp. Sprinkle the tart with the rosemary and let it sit for about 10 minutes before serving.


Italian Meringue with Honey Mascarpone and Figs
Most of the beaches and bays, restaurants and cafés, and markets and shops I visit in Malta are treasured finds of the past. Since I spent my first summer here 9 years ago, I gathered a long list of many places that I need to see at least once every time I come to the islands - I barely have enough time to discover something new. There are many traditions that I set up for myself, like my annual visit to the Sunday morning mass at Valletta's St John's Co-Cathedral, which is held in Latin and accompanied by the most ethereal choir. I went to this magnificent cathedral with my Maltese mama, the rest of the house was still asleep, and afterwards we enjoyed a strong cappuccino at Caffe Cordina. I recommend sitting inside with the locals, next to the bar and order some of their addictive treats. This time I went for spongy rum baba deeply soaked with sticky syrup followed by a buttery ricotta pastizzi - both were divine.
Fontanella Tea Garden in Mdina is another one of my favourite sweet spots. The view is breathtaking, sitting high up on a hill surrounded by ancient bastions, it allows you to see large parts of the island. Their chocolate cake is a classic, dark and juicy and a must whenever I visit Malta's old capital.
But all these sweets are still not enough of a reason to keep the oven back home in Msida switched off. The antique furniture, plates, and cutlery that fill our family's Malta home inspired me to come up with a dessert that suits all the beautiful lace doileys, fragile tea cups and silver tablets with floral patterns. An elegant meringue, lusciously topped with whipped honey mascarpone and Maltese figs was just right - visually and in taste. It's sweet and creamy, light and crunchy, with a juicy hint of fruit. Italian meringues are large and pale, crunchy on the outside and still a little soft inside. I preheated the oven to 160°C / 325°F, turned it off, and left the meringue in overnight, they came out perfect. The mascarpone whipped with a bit of heavy cream and warm honey was a nice contrast to the meringue's crunch.


Italian Meringue with Honey Mascarpone and Figs
For the meringue
large organic egg whites 3
a pinch of salt
granulated sugar 200g / 1 cup
cider vinegar 1/2 teaspoon
For the honey mascarpone
mascarpone, drained, 250g / 9 ounces
heavy cream 2 tablespoons
aromatic honey, like thyme or orange blossom, 2-3 tablespoons
For the topping
ripe figs, quartered, 6
It's best to prepare the meringues a day ahead and leave them in the oven overnight.
Preheat the oven to 160°C / 325°F (conventional setting) and line a baking sheet with parchment paper.
For the meringue, in a large bowl of a stand mixer, whisk the egg whites and salt for 1 minute. Continue whisking for 15 minutes, adding 1 tablespoon of the sugar at a time. The meringue should be stiff and glossy, then whisk in the vinegar. Spoon 6 large mounds onto the lined baking sheet and, using a spoon, swirl the tops a little. Place the baking sheet in the oven, switch off the oven, and bake the meringues overnight (for about 8 - 12 hours), without opening the door. If the meringues are still too soft on the outside, turn on the oven again and bake for a few minutes until crunchy on the outside.
For the honey mascarpone, in a medium bowl whisk the mascarpone and heavy cream until creamy, add more cream if necessary. Warm up the honey in a saucepan over low heat for about 1 minute until liquid and slightly warm, and stir into the mascarpone. Keep in the fridge until serving.
Cut a small top off each meringue, top with the honey mascarpone and figs, and close with the meringue tops. Serve immediately once the meringues are filled.


Black, White, and Red Currant Cookies with White Chocolate

This is my annual currant cookie recipe. It's quite a young tradition, I only started it last year, when I introduced a cakey cookie made with red currants, oats, mashed banana, and a strong hint of vanilla to the blog. It was a sweet hit. But 2016 is the year of colours - black, white, and red currants add vivid flavour and beauty to my new creation. It's still not crunchy, the fresh fruit is just too juicy, but it's less soft and spongy than last year's treat. I left out the banana and replaced it with chopped white chocolate, which brought in a different kind of sweetness, with a slightly milky touch.
The problem with cookies is that I always think I'll make a large batch and keep them in a glass jar to present them in all their prettiness and grab one to go along with my cup of tea or espresso whenever I feel like. However, reality is different. They barely last for two days. It's surprising how quick 24 cookies can vanish with only 2 people in the house - I'm impressed!

Black, White, and Red Currant Cookies with White Chocolate
Makes about 24 cookies
plain flour 130g / 1 cup
rolled oats 90g / 1 cup
salt 1/2 teaspoon
baking powder 1/2 teaspoon
baking soda 1/4 teaspoon
butter, at room temperature, 110g / 1/2 cup
granulated sugar 130g / 2/3 cup
vanilla bean, split and scraped, 1/4
organic egg 1white chocolate, roughly chopped, 100g / 3 1/2 ounces
mixed fresh currants (black, white, and red), preferably frozen for at least 2 hours, 140g / 5 ounces
It's easier to stir the currants into the dough when the fruits have been frozen, it looks prettier and less messy.
Preheat the oven to 180°C / 350°F (preferably convection setting). Line 2 baking sheets with parchment paper.
In a large bowl, combine the flour, oats, salt, baking powder and baking soda.
Add the butter, sugar, and vanilla seeds to the bowl of a stand mixer fitted with the paddle attachment and beat for a few minutes until light and fluffy. Add the egg and beat for about 1 minute or until well combined. Using a wooden spoon, stir in the flour mixture and mix until you have a lumpy dough (with a bit of flour left here and there). Fold in the white chocolate, then quickly, but gently the black, white, and red currants. Try not to damage the berries too much, you want their juices to stay inside their skins.
For each cookie, drop a generous tablespoon of dough onto the lined baking sheets, don't push the dough down and leave enough space between the cookies. Bake, 1 sheet at a time, for about 13 minutes or until golden brown, the cookies will be quite soft. Take them out and let them cool on the tray for a few minutes before you transfer them to a wire rack.
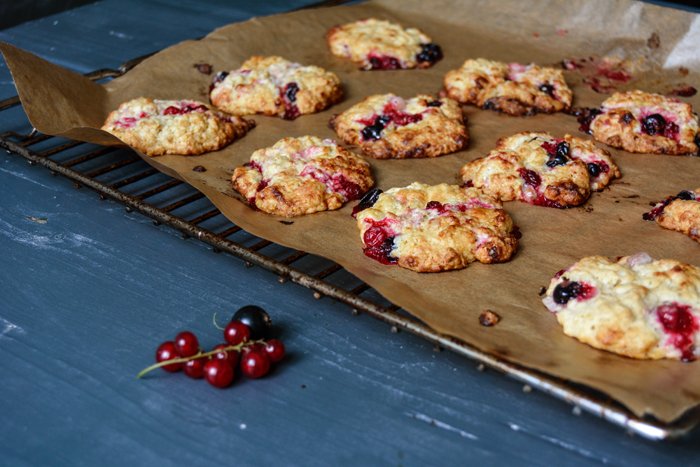


Cherry and Chocolate Marble Bundt Cake
Marble cake is a childhood memory baked in a Bundt pan. It was one of my granny Lisa's fabulous cake classics and it always impressed me with its light texture and the right balance of sweet sponge and bittersweet chocolate. Lisa must have had a weak spot for this duo. There's another masterpiece of hers, the decadent Donauwelle, which is basically the same combination baked flat on a tray, topped with cherries, German buttercream, and chocolate icing. It's a luscious, sweet bomb, perfectly fitting when it's cold and grey outside and you want to keep cosy. But the current mood is far from that, so let's forget about buttercream and all that stuff and think fruity.
You can keep it simple and dust a marble cake with a little icing sugar, but I find that a dark chocolate glaze gives it the necessary crunch and depth to balance out the softness and sweetness. To add a summery feel to it, I stirred some cherries into the batter. You can use fresh or preserved fruits, I go for preserved cherries, as it reminds me of my granny. Lisa used to have the most beautiful cherry tree in her garden, it was huge. The crop was generous, so she used to preserve the fruits and fill the shelves in her pantry. I remember long lines of jars, all filled with cherries ready to be turned into Donauwelle.
The cherries added a hint of pleasant fruitiness to the marble cake, which I liked a lot. I can imagine that apricots or peaches would work just as well, but I've never tried it, that's next on the baking schedule.

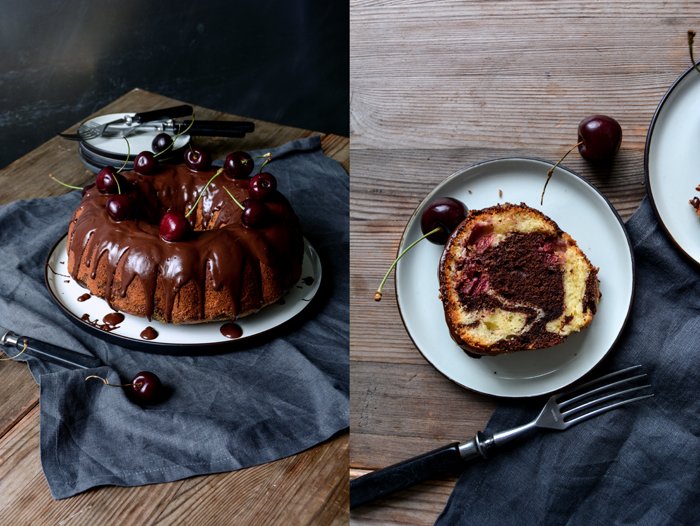
Cherry and Chocolate Marble Cake
Makes 1 Bundt cake
organic eggs, separated, 6
a pinch of salt
granulated sugar 250g / 1 1/4 cups
plain flour, sifted, 300g / 2 1/3 cups
baking powder 3 teaspoons
butter, at room temperature, 200g / 3/4 cup plus 2 tablespoons
vanilla bean, split and scraped, 1/4
whole milk 100ml / 1/3 cup plus 2 tablespoons
cocoa powder 30g /1/4 cup
pitted jarred or fresh cherries 200g / 7 ounces
breadcrumbs, to sprinkle the pan
For the glaze
bittersweet chocolate 200g / 7 ounces
butter 1 tablespoon
fresh cherries 8, for decorating (optional)
Preheat the oven to 180°C / 350°F (preferably convection setting). Butter a 23cm / 9″ Bundt pan and sprinkle with breadcrumbs.
In the large bowl of a stand mixer fitted with the whisk attachment, beat the egg whites, salt, and 1 tablespoon of the sugar until stiff.
In a medium bowl, combine the flour and baking powder.
In the large bowl of a stand mixer fitted with the paddle attachment, beat the butter, the remaining sugar, and vanilla for a few minutes until fluffy. Add the egg yolks, one at a time, and continue mixing until thick, creamy, and light yellow. Add the milk and mix until well combined. Using a wooden spoon, fold the egg whites and the flour mixture into the butter mixture, alternating about 1/3 at a time, combining well in between.
Scrape 1/2 of the batter into the prepared Bundt pan and spread the preserved cherries on top; push them gently into the batter. Stir the cocoa powder into the remaining batter, mix until well combined, and dollop on top of the light batter. Spread the dark batter carefully, then swirl with a small fork through the 2 batters, once is enough, carefully from top to bottom, pulling slowly all the way through the pan. Bake for about 40 minutes (slightly longer if using a conventional oven) or until golden and spongy. Check with a skewer, it should come out clean. Let the cake cool for 2-3 minutes, then shake the pan a little and flip onto a wire rack to cool completely. If the cake won't come out, place the warm Bundt pan into a large bowl filled with cold water. This will help loosening the cake from the pan.
For the chocolate glaze, in a small saucepan, melt the chocolate and butter on low heat, whisk until well combined. Let the chocolate cool for a few minutes, then drizzle over the cake. Decorate with the fresh cherries while the chocolate is still warm.


Yossy Arefi's fantastic Apricot and Berry Rye Galette with Saffron Sugar
Yossy and I share the same passion for one of the best combinations a coffee table has ever seen: juice-dripping fruit and buttery pastry. When I first saw one of Yossy's famous fruit galettes a couple years ago, I immediately fell in love with its honest and rustic look. And as the New York food writer and photographer announced the birth of her first cookbook, Sweeter Off The Vine, a couple months ago, I was hoping that she'd include a recipe for one of her gorgeous open pies. Yossy didn't let me down and she had my full attention when I spotted her Apricot and Berry Galette with Saffron Sugar made with rye pastry. This innocent pie tastes as good as it looks. Theoretically, I could have eaten the whole cake on my own - and I would have loved to! - but we had guests over for dinner and they enjoyed our fruity dessert just as much as I did, so I had to share.
Yossy Arefi is the creator behind the beautiful blog Apt. 2B Baking Co. and she managed to create a second masterpiece (after her blog) with Sweeter Off The Vine. The book is a gorgeous recipe collection from start to finish, following the seasons with colourful creations that celebrate nature's crop at its peak. Rhubarb and berries, stone fruits and melons, figs, apples, and pears, Yossy didn't leave a single craving of mine unanswered. As I thumbed through the pages, I got lost in her honest and pure, and somehow poetic photography. Nothing feels artificial, the whole book is true and manages to speak to the hungry mind without distraction. Her ice creams, tarts, desserts, and pies look like the food you want to eat in your granny's kitchen, but the young woman from New York always manages to sneak in her little additions that make the recipes very modern at the same time. Aromatic spices, like saffron, vanilla and citrus, orange blossom and rose water, or fresh vanilla bean are used in almost all of her recipes. Yossy's family roots are in Iran, and this heritage brought in her great fascination for the wonderful flavours of Middle Eastern cooking and her love for contrasts.


Apricot and Berry Rye Galette with Saffron Sugar
Recipe from Sweeter off the Vine: Fruit Desserts for Every Season by Yossy Arefi, Ten Speed Press.
Makes 1 9" (23cm) galette
For the rye pie crust
2/3 cup (85g) rye flour
2/3 cup (85g) all purpose flour
1/2 teaspoon salt
1/2 cup plus 1 tablespoon (125g) very cold unsalted butter
1/2 tablespoon apple cider vinegar
4 tablespoons (60ml) ice water
For the galette
1/2 vanilla bean
3 tablespoons granulated sugar
pinch saffron threads
2 teaspoons all purpose flour
pinch salt
8 ounces (225g) apricots
1/2 cup (80g) blueberries
1/2 cup (80g) blackberries
1/4 cup (60g) apricot jam (I used blueberry jam)
1 large egg, lightly beaten for egg wash
1 tablespoon turbinado sugar
Whisk the flour and salt together in a large bowl, cut the butter into 1/2-inch (1 1/4cm) cubes, and add the apple cider vinegar to the ice water.
Working quickly, add the butter to the flour and toss to coat. Then use your fingers or the palms of your hands to press each cube of butter into a flat sheet. Keep tossing the butter in the flour as you go to ensure that each butter piece is coated with flour. The idea is to create flat, thin shards of butter that range from about the size of a dime to about the size of a quarter.
If at any time the butter seems warm or soft, briefly refrigerate the bowl.
Sprinkle about 3 tablespoons of the icy cold vinegar-water mixture over the flour mixture. Use a gentle hand or wooden spoon to stir the water into the flour until just combined. If the dough seems dry, add more cold water a couple of teaspoons at a time. You have added enough water when you can pick up a handful of the dough and easily squeeze it together without it falling apart.
Press the dough together, form into a disk, and wrap in plastic wrap. Chill the dough for at least 2 hours before using, but preferably overnight. Keeps for up to three months in the freezer wrapped in a double layer of plastic wrap and a layer of foil. Thaw in the refrigerator before using.
Line a large baking sheet with parchment paper. On a lightly floured surface, roll the dough into a roughly 12-inch (30cm) circle, just under 1/4-inch (1/2cm) thick; it’s okay if it isn’t perfectly round. Transfer the dough to the prepared baking sheet. Store in the fridge while you prepare the filling.
Use the tip of a knife to cut the vanilla bean in half lengthwise and scrape out the seeds. Reserve the pod for another use. Add the granulated sugar to a mortar, add the vanilla seeds and saffron threads, and grind with a pestle until finely ground. The sugar will turn pale yellow and smell wonderful. Stir in the flour and salt.
Gently tear the apricots in half. Place the apricot halves into a large bowl and discard the pits. Add the berries and the saffron-vanilla sugar mixture to the bowl and toss with your hands to combine.
Remove the dough from the fridge and spread the jam on top, leaving a 2-inch (5cm) border around the edges, then top with the fruit. Fold the edges of the pastry over the fruit and press gently to seal the folds. Chill the formed tart until the dough is firm, about 15 minutes.
Position a rack in the center of the oven and preheat to 400ºF (200ºC). When the tart is nice and cold remove it from the fridge and gently brush the dough with the egg wash; sprinkle with the turbinado sugar.
Bake until the fruit juices bubble and the pastry is deep golden brown, 30 to 40 minutes. Let cool slightly before serving. This tart is best served the day it’s made.

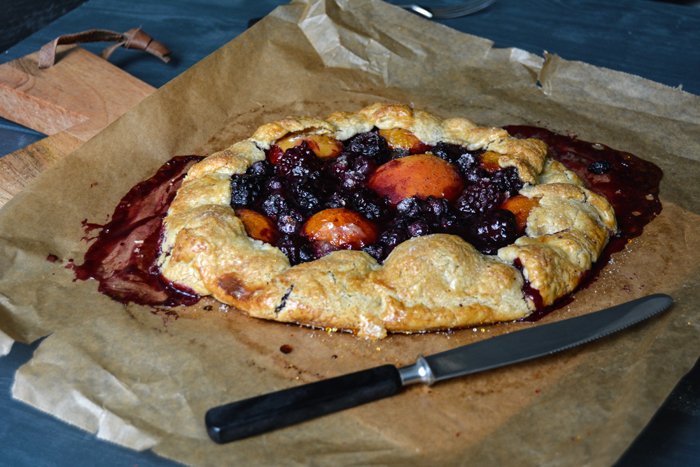

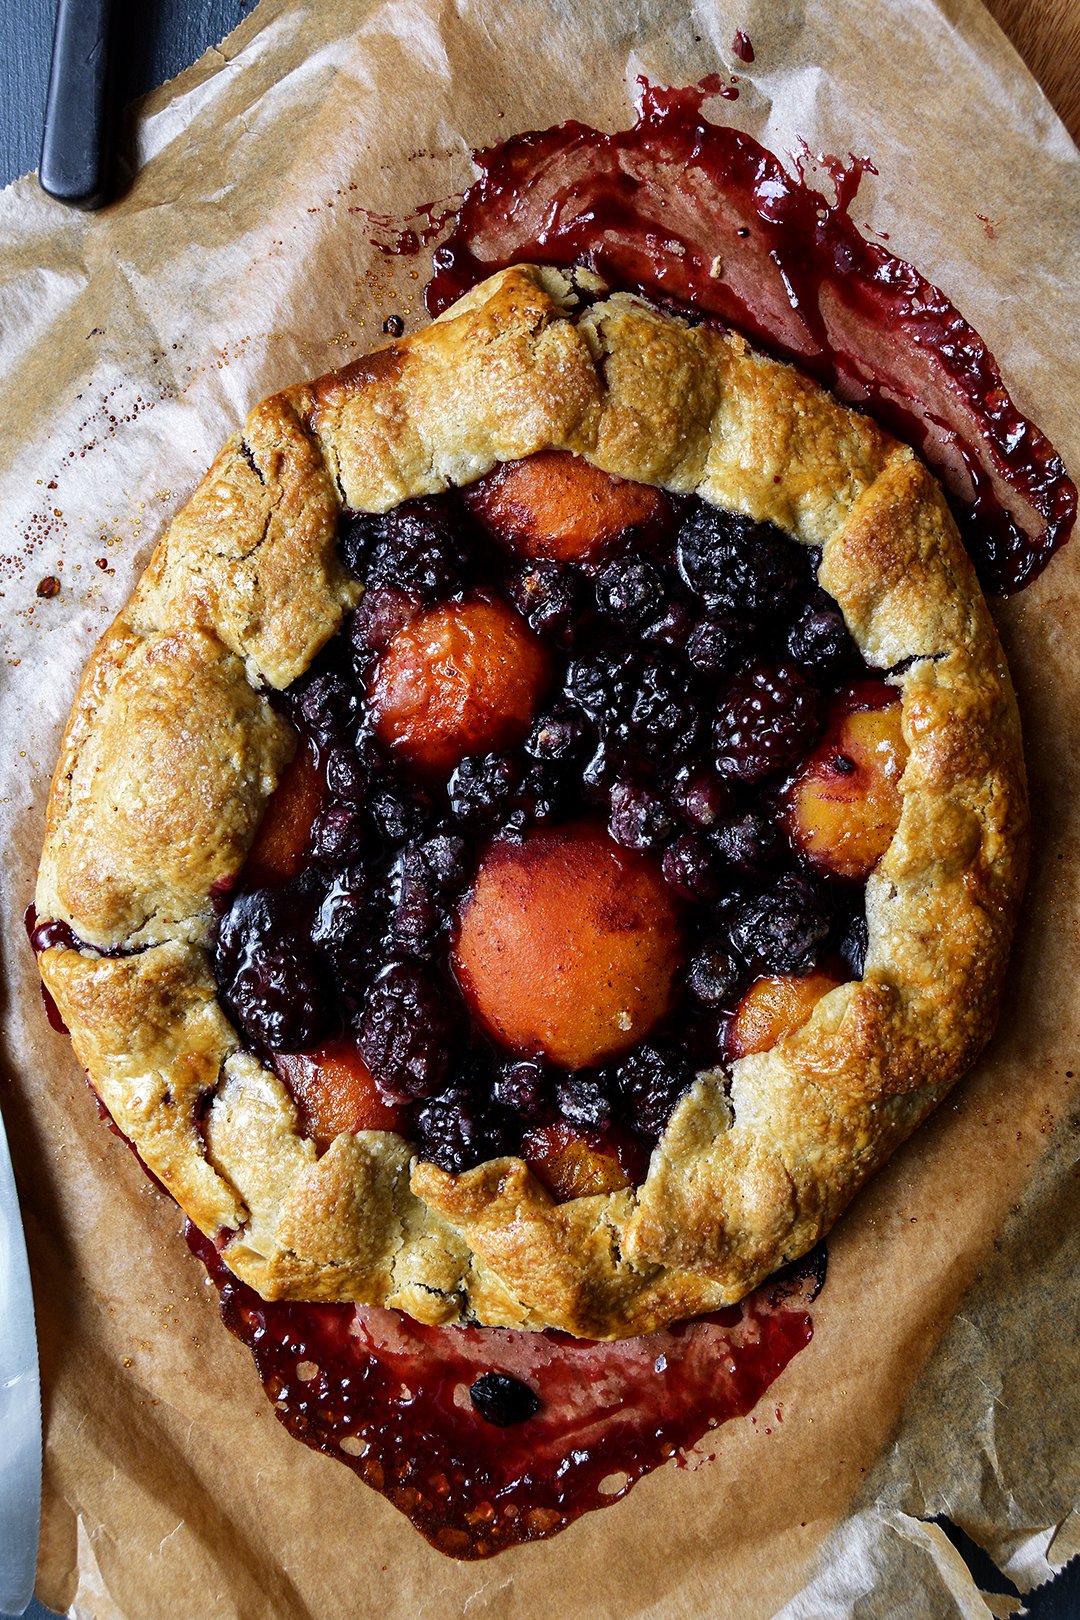

Crunchy Apricot Blueberry Crumble with Vanilla Ice Cream

A few years ago, a friend visited me in Berlin. It was a short visit, we only had a few hours, but we made the most of it and enjoyed an afternoon of baking in my kitchen. The result was nothing less than heavenly: Cristina's addictive Gooseberry Crumble!
Cristina has always been obsessed with baking, so many afternoons I’ve seen her standing in the kitchen, excitedly staring at the oven to see her sweet creations rise and turn into bites of happiness. She always reminded me of myself as a teenager. Those afternoons with my girls, a pound of flour, sugar, and eggs, created some of the best memories of my early teenage years. There's something about the combination of young girls and baking that seems like a match made in heaven. How much we enjoyed trying out new recipes or baking our old classics again and again and again (red wine cake was always high up on our list!). It was an innocent time, before the real troubles of life started.
When I saw the pictures again of Cristina in the meet in your kitchen feature I did with he, how she made this wonderful crunchy crumble in her pretty white dress, I felt reminded of my early baking days - and of her fantastic recipe. As I got over the first wave of nostalgia, I pulled out the baking dish and made a sweet and fruity crumble with apricots and blueberries. I'm sure Cristina would approve of it, especially with a scoop of vanilla ice cream on top.

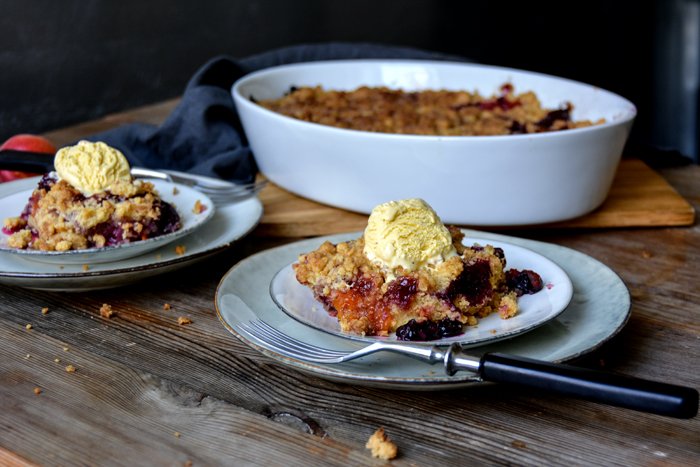
Apricot Blueberry Crumble with Vanilla Ice Cream
Serves 4-6
For the crumble
apricots, pitted and cut in half, 10
blueberries 250g / 9 ounces
plain flour 300g / 2 1/3 cups
Demerara sugar 160g / 3/4 cup plus 1 tablespoon
a pinch of salt
butter, at room temperature, 200g / 3/4 cup plus 1 tablespoon
For the topping
Demerara sugar 2 tablespoons
ground cinnamon 1 teaspoon
For serving
vanilla ice cream
Preheat the oven to 190°C / 375°F (preferably convection setting) and butter a medium baking dish (mine is oval, 19 x 28cm / 7 1/2 x 11").
Spread the apricots and blueberries in the prepared baking dish.
For the topping, combine the sugar and cinnamon.
In a large bowl, combine the flour, sugar, and salt. Add the butter and quickly mix with your fingers until you have a crumbly mixture. Spread the crumbles on top of the fruit and sprinkle with the cinnamon sugar. Bake for about 40 minutes, or until golden brown and crisp. Let it cool for about 10 minutes and serve warm or cold with vanilla ice cream.
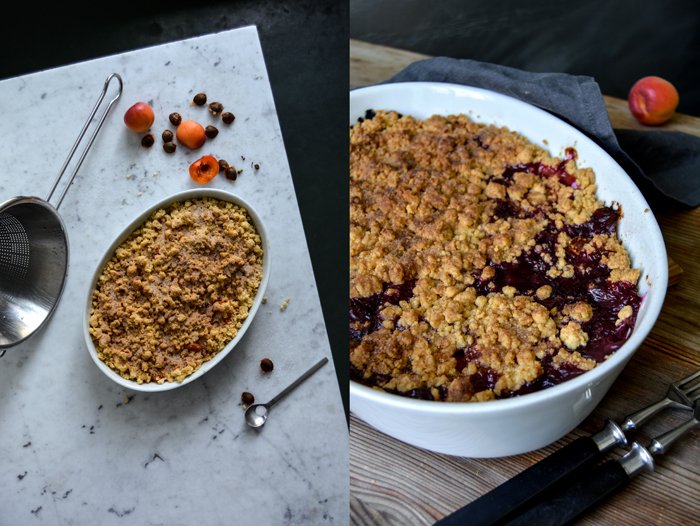
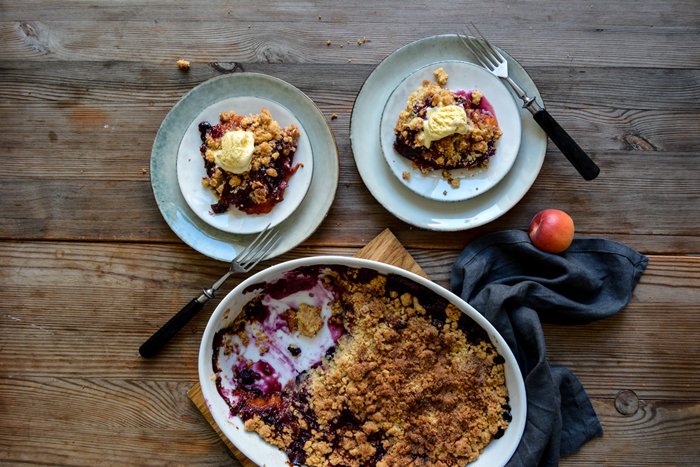
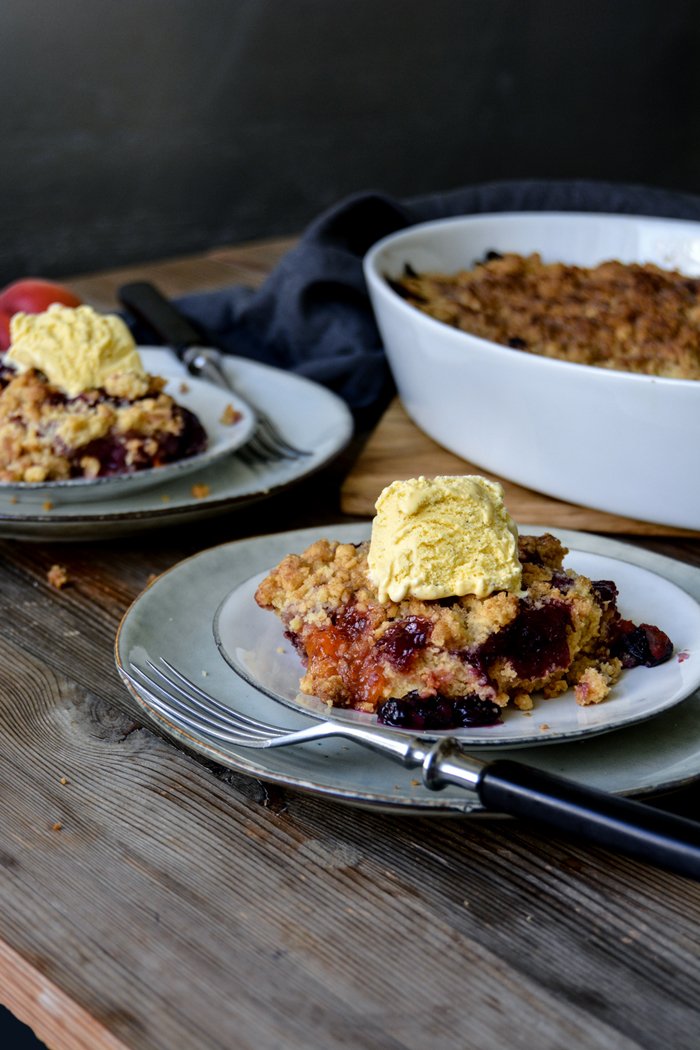

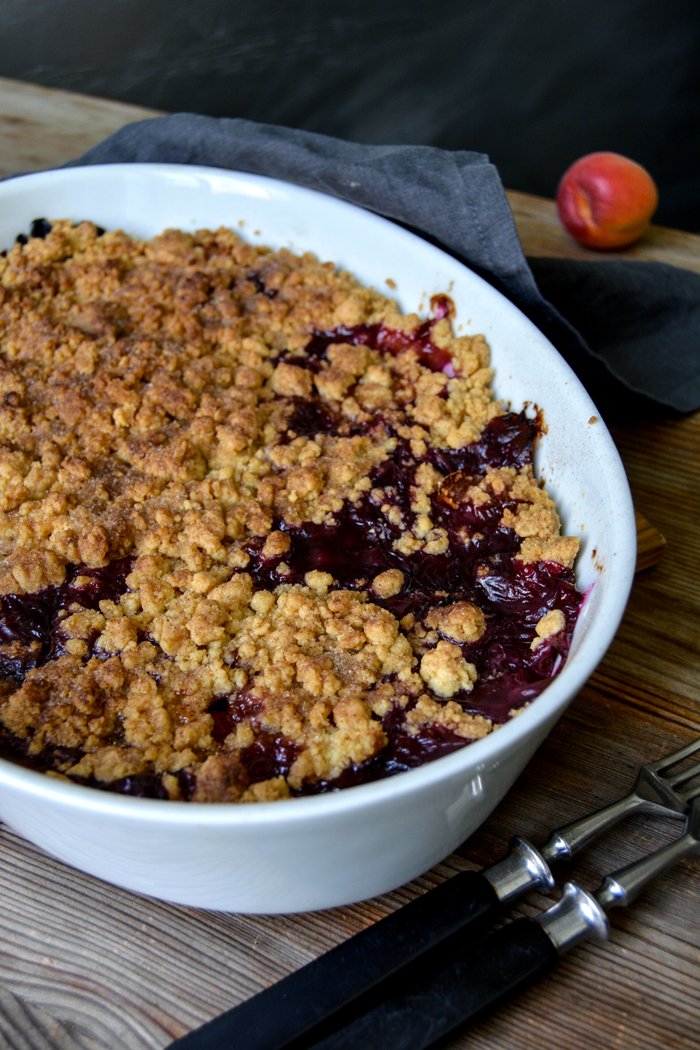

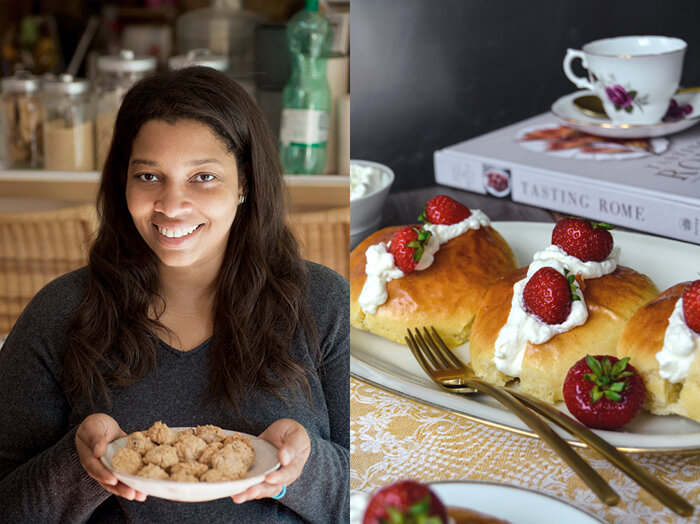
meet in your kitchen | Tasting Rome with Kristina's Maritozzi con La Panna

As soon as the air is filled with flickering heat and the sky over Berlin is painted in the deepest sparkly blue, my mind tends to travel to the South, I'm desperately lost in Mediterranean daydreaming. One of my favourite imaginary destinations - apart from Malta - is Italy. Take me to the soft hills of Tuscany, the Renaissance statues at Florence's Piazza delle Signora, or to the ancient city of Rome and my heart is filled with joy. My schedule doesn't allow me to travel in person, but thanks to two American girls and their gorgeous cookbook Tasting Rome I can travel without having to leave (although I wouldn't mind moving south for a few days).
The first time I was in touch with Kristina Gill, she asked me to come up with a sandwich recipe for her In the Kitchen With column on DesignSponge.com. She was happy with my creation, a lusciously stuffed Mediterranean Baguette, and we stayed in touch. I always assumed that Kristina lives in the US, Design Sponge is an American site. But the girl from Nashville moved to Rome almost two decades ago and dug deep into la dolce vita - into the culture, food, and history of her newly adopted hometown.
Years of walking down Rome's cobblestoned streets, soaking up the loud scenes on the piazzas, and passing by baroque fountains and silent palaces also made her aware of the city's vivid contrasts. To see the past and present meet, old buildings taken over for unconventional use, kitchen traditions being respectfully transformed into contemporary dishes - this lively process fascinated Kristina. When she met her pal, Katie Parla, who's a New Jersey native, the two girls realized that they explore and experience their city in a similar way. Katie, who has a master's degree in Italian gastronomic culture, and Kristina, the photographer and food and drinks editor, both loved documenting Rome's lost recipes and contemporary innovations. So they decided to use their vast insider knowledge to write a cookbook together.
Tasting Rome is a collection of traditional Roman recipes and their modern interpretations. You can find pasta, vegetable, and meat classics side by side with scrumptious pizza variations and sweet Italian treats. I was impressed - and also glad - that the authors didn't skip the city's peasant tradition of using the whole animal, including offal, like sweetbread, liver, or tongue, and the more simple cuts of meat. It's a tradition that corresponds with the great movement of eating sustainably and with respect for our environment.

The two women developed the recipes together and asked the city's great chefs for advice when it came to pizza and cocktails. The colourful pictures in the book that make you want to pack your bags and go straight to the airport - or at least to a Roman restaurant for dinner - were all taken by Kristina. Together, Kristina and Katie manage to share a taste of Rome through their words and delicious dishes.
I chose to share their recipe for Maritozzi con La Panna with you, tender sweet yeast buns filled with whipped cream. Apart from enjoying 4 (!) of these little temptations in one go with great pleasure, I was quite impressed to learn about a very simple technique that they use to roll the buns to give them a tight surface. Usually, I roll yeast buns between my two hands, holding one like a dome and the other one flat, rolling the dough about 20 times. Tasting Rome taught me to use only one hand, rolling the piece of dough and pressing it against a lightly floured kitchen counter until it's a firm ball. It works perfectly!
The beautiful Rome pictures are by Kristina Gill, the food pictures are taken by me.
Update, June 13th, 2020:
Statement by Kristina Gill about the work on Tasting Rome "... my editor forced my voice and views on the book to be subordinate to my co-author's.", click here and here for Kristina's full statement.

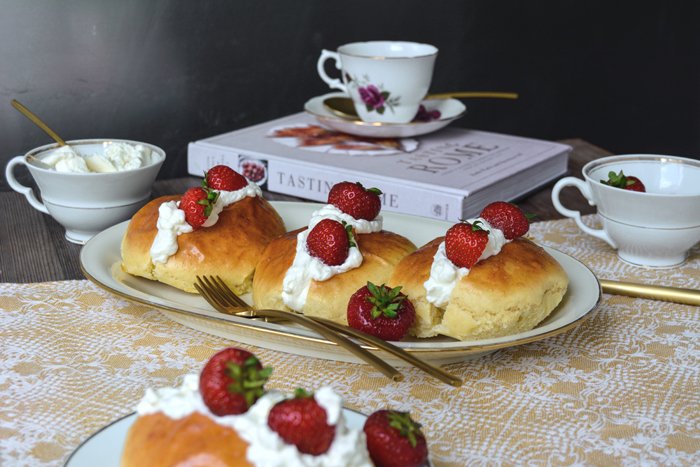
Maritozzi con La Panna - Sweet Buns with Whipped Cream
Makes 12 maritozzi
For the sponge
warm milk (between 40-45°C / 105-115ºF) 120ml / 1/2 cup
active dry yeast 1 1/4 tablespoons (I used fast-acting yeast)
bread flour 130g / 1 cup (I used white spelt flour)
granulated sugar 1 tablespoon
For the dough
unsalted butter, at room temperature, 100g / 7 tablespoons
granulated sugar 100g / 1/2 cup
fine sea salt 1/8 teaspoon
large eggs, at room temperature, 4
bread flour, plus more for dusting, 325 g / 2 1/2 cups (I used white spelt flour. I added 90g / 2/3 cup to the dough)
For the egg wash
large egg 1
whole milk 1 tablespoon
For the filling
heavy cream 480ml / 2 cups
granulated sugar 1 tablespoon
my addition: ripe strawberries
Make the sponge: In a medium bowl, whisk the yeast into the milk, then add the flour and sugar and stir to combine. Cover the mixture with plastic wrap and set aside until it becomes puffy, about 20 minutes.
Make the dough: In the bowl of a stand mixer fitted with the paddle attachment, combine the butter, sugar, salt, and eggs on low speed.
Replace the paddle with the dough hook. Pour in the sponge, mix for a few turns, then add half of the flour. Mix on low until the dough is smooth, about 5 minutes. Add the remaining flour and mix again on low until the dough is smooth, about 2 minutes, scraping down the sides of the bowl as necessary. When the dough was smooth, but still too sticky, I added 90g / 2/3 cup of flour and mixed it for another 2 minutes on '4' on my KitchenAid.
Allow the dough to rest in the bowl for 10 minutes, then run the mixer on low for 10 minutes to stretch the gluten. Meanwhile, line two rimmed baking sheets with parchment paper.
Turn the dough onto a lightly floured surface and divide it into twelve equal-size pieces (each approximately 70g / 2 1/2 ounces). Using one hand, roll each piece into a tight ball, pressing it against the counter to ensure a smooth, tight surface. Next, using both hands, roll each ball into an elongated loaf shape, fatter in the middle and tapered on the ends, about 4 inches long, similar to a small football.
Place the maritozzi on the prepared baking sheets, spacing them (at least) 4cm / 1 1/2" apart. Cover with plastic wrap, then a kitchen towel, and allow to rise in a warm place (20-25°C / 70-80ºF) until doubled in size, about 2 hours.
Preheat the oven to 175°C / 350ºF.
Make the egg wash: Whisk the egg with the milk in a small bowl. Immediately before baking, brush the tops of the maritozzi with the egg wash.
Bake until deep brown, 12 to 15 minutes. Remove from the oven and allow to cool for 5 minutes on the baking sheet before transferring to a wire rack.
While the maritozzi cool, make the filling: Whip the cream and sugar to firm peaks.
Slice each maritozzo open without cutting all the way through. Fill with the whipped cream, dividing it evenly, and serve immediately. Optionally: serve with fresh strawberries.
From Tasting Rome: Fresh Flavors and Forgotten Recipes from an Ancient City. Copyright (c) 2016 by Katie Parla and Kristina Gill. Published by Clarkson Potter/Publishers, an imprint of Penguin Random House LLC.

When and why did you move to Rome?
I moved to Rome in October 1999 for work. I was in the US diplomatic corps.
What fascinates you about Roman culture? Was it easy to adapt, to become a part of it?
Roman culture was a bit different then than now - internet was far less diffuse, and people were still pretty insular. It is hard to break into a ‘friendship’ culture in which bonds are created from childhood and don’t really change. Luckily, one summer several years before I moved here for work, I stayed in an apartment in Rome with other students, and they introduced me to their friends, so when I subsequently studied in Florence and Bologna, their parents made sure I was introduced to families in both cities with children my age. I guess you could say I adapted well because I was adopted! I spent a lot of time with these families - I was never alone on holidays. As time went on, the internet brought more curiosity about other places and people, and provided a way for Romans to cultivate their interests more - people wanted to connect more and that sped up forming relationships, especially around common interests, that their traditional network didn’t provide, so I’ve seen over time that Romans have become much more open to expanding their friendships beyond that childhood crew.
What do you miss about your life in the US?
Where to start? The cheeseburgers, the supermarkets, the variety of food available from different cultures, the variety of food available period, gourmet ice cream, parking, airconditioning, well-heated homes in winter… The ability to realize a dream with your own two hands. There’s a sense of freedom in the US that I don’t feel here - young people are leaving Italy in droves so that they can pursue their dreams. I’m lucky that I am able to be a part of both places.
What is your favourite spot in Rome and why?
My Savoir Bed is my favorite place…sleeps like a dream! But if you mean in the city, there are so many public squares to sit in and soak up thousands of years of history, which I find so mindblowing and relaxing. But lately, I think my favorite place is the MAXXI Museum, designed by Zaha Hadid, where I can check out contemporary art exhibitions. Just a small modern parenthesis in the middle of an otherwise gorgeous ancient landscape.
Can you see yourself living in Rome for the rest of your life?
I would like to move back to the United States to be with my family after so many years of being away and missing everyone. Seems like my cousins’ children were born last year, but are already studying at university!! I’ve missed out on a whole generation!
You wrote your book, Tasting Rome, together with Katie Parla. How long have you known each other and who came up with the idea to write this book together?
I can’t remember how long, however, we met over Twitter, a few years back. I already had the full proposal written when I met Katie, and a couple years after we knew each other, she mentioned that she had written a proposal, a memoir I think, that had been unsuccessful and was a bit down so I said - well, I have one that you might be interested in that we could do together! I sent it to her and asked her if she thought she saw herself in it. We added her name and bio to the proposal, and worked on some refinements with an agent I had already been in contact with. I approached Katie because I thought her knowledge of the history of Roman dishes and food culture would be a valuable addition to the book that would help ground it in fact and set it apart from the typical expat book that is written more from a personal perspective and is often an adaptation of cuisine. I wasn’t wrong!
How did you develop the recipes in your book?
From the proposal and through signing the deal, I was originally going to do all of the recipes and photography in the book, and Katie the features and headnotes, but once we started working on the book and came up with the list of recipes, there were clearly items that I had never eaten, like the offal chapter, and items for which I had no capacity to develop recipes, like the baking chapter and the cocktails chapter. Also, for the classics: Amatriciana, Gricia, Carbonara, and Cacio e Pepe, since Katie spends a lot of time eating out and had written numerous articles on which restaurants’ versions were the best in Rome, we agreed that she was in the best position to identify those recipes. That left roughly half of the book for me to develop, which I did over the course of four and a half months. Sometimes I did eat out to test recipes against my memories, but for the most part, I had clear ideas of how I liked the food I was working on, I knew the elements and knew more or less how to prepare. I had to check technical books for proper frying temperatures as starting points, or baking science (sweets). I did also consult with a friend who is a pastry chef for guidance on the maritozzi because I knew I wanted a rich soft brioche dough for that, and wanted to explore various options. I also talked with a couple of chefs to find out their views on the “proper” way to prepare certain dishes. Interestingly enough, they went over both the tradition and their variations. This gave some latitude and discretion in determining an approach for the book which remained authentic. For the other half, Katie procured recipes from local mixologists, local chefs and restaurant owners, and a good friend of hers who is an amazing baker for the baking chapter. When I look at the book, I think it represents the perfect mix of everything you would encounter in Rome today that defines Rome.
Who is your biggest inspiration in the kitchen?
On a personal level, Lucia, the mother of the family I stayed with when I studied in Florence. She has since passed away. She grew up in a town called Ristonchi a little outside of Florence, with chickens and a garden and the usual rural life. She could make the best food out of any ingredients you gave her. I loved the food made from leftovers the most. Her ribollita was the best on the planet, and her mother’s chicken broth which was liquid gold (and pure fat) made an indelible mark on my palate! She introduced me to Alessandra from Padova, whose mother, Gianna, took the cooking crown (and still wears it). Lucia, Alessandra and I both agreed that Gianna is the best - and between the three of us, we have eaten a lot of Italian cooking. Eating at Gianna’s house was better than any restaurant - and she took ‘orders’ in the morning before each meal so that when lunch or dinner came around, you had anything and everything you wanted. My inspiration from Gianna and Lucia came from their knowledge of how to prepare food, and how to be resourceful, and really how to eat. Gianna’s father was a baker. Food was always a central part of both households and you could tell that each meal was to be savored.
Has food always played an important role in your life? Do you come from a family of foodies?
Not really in the way you would think. I grew up in a household which consumed its fair share of whatever junk food was popular at the time - but which also shopped at the farmer’s market for weekend meals. My grandmother kept her own garden and fruit trees, and three freezers to keep all the produce throughout the year. I used to think she was a magician because this amazing feast appeared on the dinner table from food I hadn’t seen in the refrigerator during the day. It wasn’t until I was older that I learned about the other freezers!!
You took all the pictures in your book, when and how did you discover your passion for photography? What do you love about it?
I started taking pictures to be able to produce the In the Kitchen With column on DesignSponge, in 2008 I think. I think I started to love photography when I started taking more than just food pictures and found that capturing my environment was a way to see all the things I overlooked when I just passed through on my daily routine. It was like discovering a new world.
Do you prefer to capture the atmosphere of a city with your camera or delicious food?
Both. I love to explore a culture through its food, why certain ingredients or cooking techniques play the role they do, how the cuisine of one city differs from another and why. I love to capture the mundane and everyday of a city with my camera.
What was the first dish you cooked on your own, what is your first cooking memory?
I can’t remember! But in high school I think I used to make pizza from ready made pizza dough, and at university, I prepared a meal from an African cookbook, featuring mostly Ethiopian food and my friends and I all liked it a lot!
What are your favourite places to buy and enjoy food in Rome?
My Saturday routine is concentrated in one neighborhood. Before the market I have a pastry (made in house) from Fabrica, a cafe near the market. Then at the Trionfale market I buy fish, produce, and a lot of Asian food staples (lime, rice noodles, bok choy, tamarind paste, palm sugar, ginger, galangal etc). I get cheese and nduja from La Tradizione (which is near Trionfale market). I pick up wine and alcohol from an enoteca named Costantini. I pick up oatmeal (flakes) from the healthful store around the corner from my office. It is a chain called Il Canestro. When I don’t have time for breakfast at home, I stop by Bar Benaco on the way to work because they make all their pastries in house and I can get them while they are still warm. I don’t eat out a lot because I have a bazillion cookbooks and am always excited to try new recipes, but when I do, I eat most often at Cesare al Casaletto because they always find me a table, or takeaway pizza from a place near my house or at pizzeria Tonda.
If you could choose one person to cook a meal for you, who and what would it be?
Bryant Terry, anything he’d like. I would love it all. Unless it had beets in it.
You're going to have ten friends over for a spontaneous dinner, what will be on the table?
I learned about Bo Ssam pork at a meal at Matt Armendariz and Adam C. Pearon’s house. I would prepare Bo Ssam, and a selection of Asian-inspired salads. For dessert, a maple hazelnut cookie by Nigel Slater, and a selection of chocolates and coffee.
What was your childhood's culinary favourite and what is it now?
This is tough because I have no memory of a favorite food… Meatloaf maybe! Now… I have too many favorites, but cheeseburgers are top of my list. And dumplings. Chinese, Korean, Japanese…
Do you prefer to cook on your own or together with others?
I’ve spent a lot of time over the past two years working on the book alone - not just developing the recipes, but also preparing food for the photography. I styled about half of the recipes in the book, and Adam C. Pearson did the other half and the cover. When I was in the studio shooting, I did a lot of food prep as well, and enjoyed the atmosphere and working with Adam and his team of stylists. It’s definitely easier working with others! But sometimes, cooking is therapy and being alone is great.
Which meals do you prefer, improvised or planned?
As long as it’s good, either is fantastic!
Which meal would you never cook again?
I made some dog biscuits for my dog once that were made of like chopped liver and garlic or something. When they started to bake, the smell was SO BAD, I thought I’d have to move out of my apartment. He loved the cookies, but that smell stayed around for a LONG time and it was AWFUL.
Thank you Kristina!

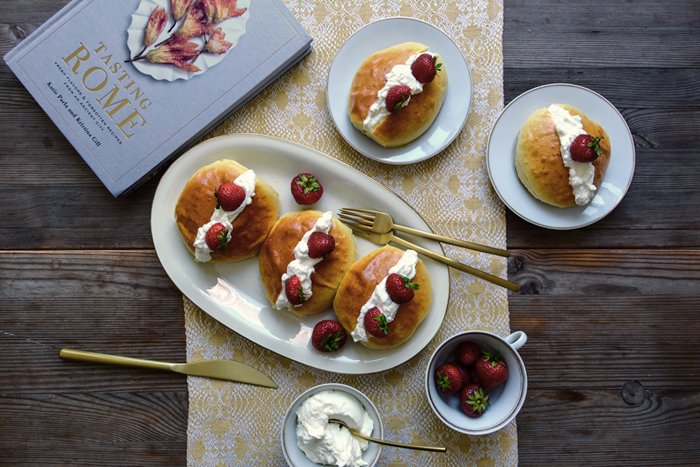


Elderflower Lime Cake

Whenever I ride around the city on my bike at the moment, I feel enwrapped in the sweetest smell of elderflower, black locust (acacia), and chestnut flowers. An invisible cloud meandering through the city. As soon as I open my kitchen window in the morning until I close it at night, I'm mesmerized by this perfume of early summer.
Together with a group of friends, I recently went on a bike tour to the countryside. We chose Beelitz, an area outside Berlin, to spend a day away from noise and distraction. I wrote about this area two years ago, it's a picturesque village surrounded by fields and dense woods and it's famous for Germany's best asparagus (you can see the pictures here). Last time we went a little earlier, in May, the asparagus fields were still covered in foil - white asparagus grows in the dark - but now, in June, the scene looks completely different. What used to grow under ground, pale and slender, turned now into a filigree green plant gently swinging in the breeze. The white asparagus season in Beelitz’ forest is now over.
After our 2-hour bike ride through forest and fields we needed a break and enjoyed asparagus with Hollandaise sauce at a secluded restaurant, called Landgasthof Rieben. We chatted with the owner and learned that you can only grow asparagus on the same field for 7 years, then it also needs a break, for another 7 years. The magic number.
So one of the flowers that smell the most captivating right now, are elderflowers and their season is almost over too. I love to use their sticky syrup for refreshing Hugo cocktails (you find the recipe in the link for the syrup), or to make caramelized onions or chicken taste even sweeter; but using it for baked sweets, is one of the best ways to enjoy elderflower on a Sunday afternoon. I went for a simple lime loaf cake, the warm cake soaked with a wonderfully fragrant syrup made of lime juice and elderflower. Sometimes, these simple cakes are just the best.
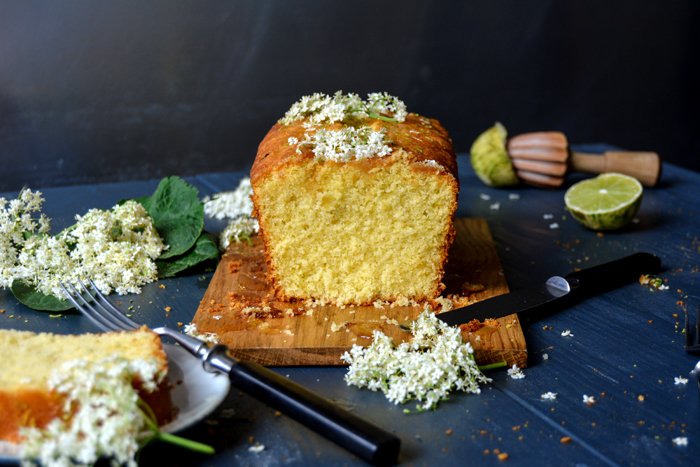
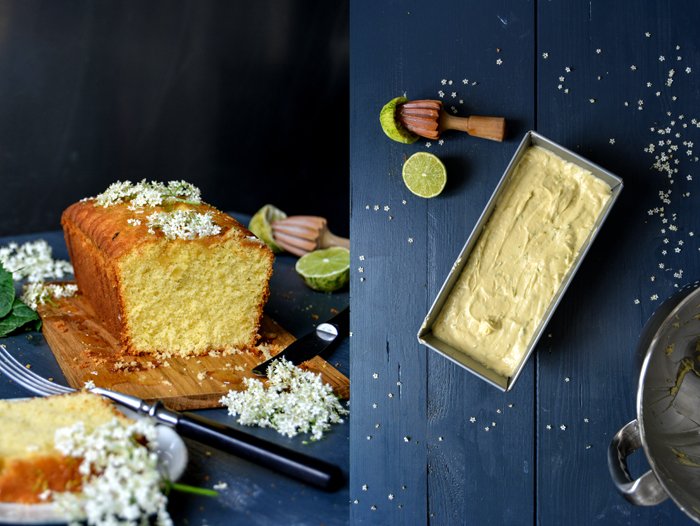
Elderflower Lime Cake
Serves 4 to 6
For the cake
plain flour 210 g / 1 1/2 cups plus 2 tablespoons
cornstarch 70 g / 1/2 cup plus 2 tablespoons
baking powder 3 teaspoons
fine sea salt 1/4 teaspoon
butter, at room temperature, 180g / 3/4 cup plus 1 tablespoon
granulated sugar 180g / 3/4 cup plus 2 tablespoons
organic eggs 3
freshly grated lime zest 2 tablespoons
freshly squeezed lime juice 3 tablespoons
buttermilk 90ml / 1/3 cup plus 1 tablespoon
For the syrup
elderflower syrup 100ml / 1/3 cup plus 1 tablespoon
freshly squeezed lime juice 3 tablespoons
For the topping
a few elderflowers (optional)
Preheat the oven to 160°C / 325°F (preferably convection setting). Butter a 23 x 10 cm / 9 x 4-inch loaf pan.
For the cake, in a large bowl, whisk together the flour, cornstarch, baking powder, and salt. In a second large bowl, beat the butter and sugar for a few minutes or until light and fluffy. Add the eggs, 1 at a time, incorporating each egg before adding the next one, and beat for 2 to 3 minutes or until light and creamy. Add the lime zest and juice and beat for 1 minute. With a wooden spoon, fold about 1/3 of the flour mixture gently into the batter, followed by 1/3 of the buttermilk. Repeat with the remaining flour mixture and buttermilk, folding just until combined. Pour the batter into the prepared pan and bake for about 50 minutes (slightly longer if using a conventional oven) or until golden on top. If you insert a skewer in the center of the cake, it should come out clean. Let the cake cool in the pan for a few minutes before turning it out onto a wire rack.
For the syrup, in a small saucepan, bring the elderflower syrup and lime juice to the boil and cook for 1 minute over high heat.
Prick the warm cake all over with a skewer and slowly pour the elderflower-lime syrup over the top. Decorate with elderflowers just before serving.

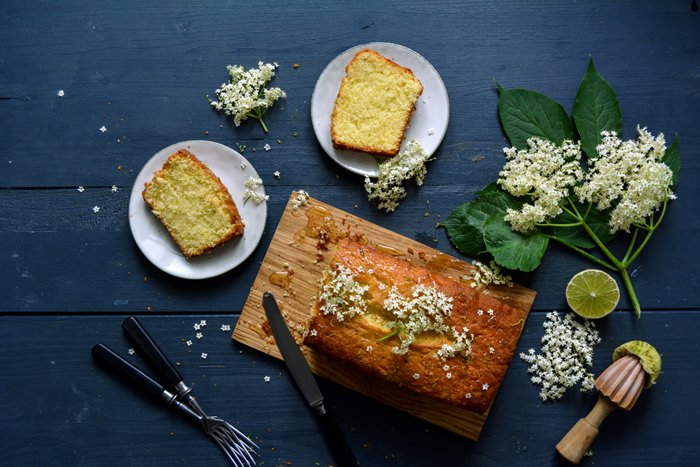

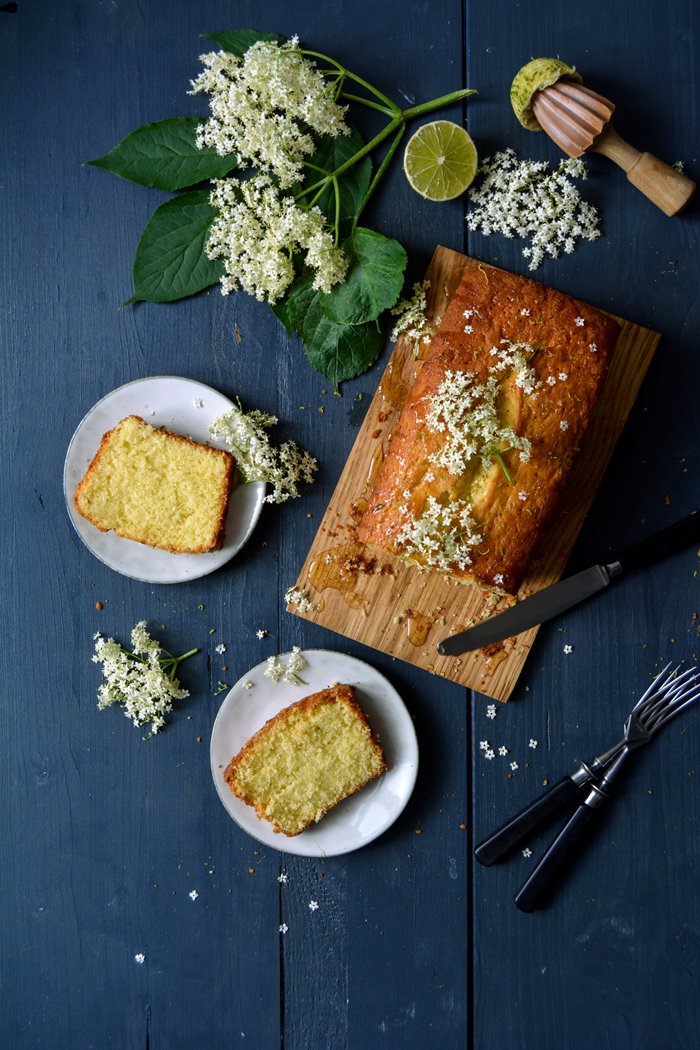

Cherry Lemon Tea Time Tart
I had a passionate discussion about 'the best cherries' with the owner of a vegetable shop in my neighborhood. He's a very kind, very hard working guy from Turkey who never seems to sleep. No matter what time I pass by his shop, the young man is always busy as a bee. He helped me out many times when I needed a certain fruit or vegetable for a photo shoot that wasn't in season. Calling his buddies from all over, he makes the impossible possible. He managed to bring red currants to my kitchen when everyone else laughed at me when I asked for the little berries weeks before their season. He always finds someone in Spain, Greece, or Turkey to make me happy and my photo shoot work. My private cooking follows the season but unfortunately, editorial schedules don't.
So last week he told me that he has very good cherries at the moment, he praised their glossy beauty and outstanding taste. He went even further and said that they are better than German cherries, which, in all respect, is quite a bold statement. In my eyes, I had the best cherries of my life in my granny Lisa's garden and I don't think that anything in the world is ever going to change that. Her juicy fruits were not only packed with so much flavor, but also with the most precious memories. And this is something I love about summer fruits. Take strawberries, blackberries, red or black currants, or cherries, almost everybody, seems to have childhood memories connected not only to these fruits but also to picking and eating them. This is priceless and in a very beautiful way, saved for a lifetime. For my vegetable man from Turkey, the Turkish cherries will always be the sweetest and juiciest and I understand why this is how he feels, and for me, the crop from Lisa's garden used to beat every cherry in the world, because it was her tree - and I miss it.
When I tried my friend’s cherry at the shop, I had to admit that they were really good. So I bought a huge bag full of them, went straight home, and baked a cherry lemon tart. It's a tea time classic in my kitchen and the sweet and sour filling can easily take a little summer-makeover - the cherries make it a bit sweeter and juicier. Next time I'll make it with red currants, but they'll have to be in season.
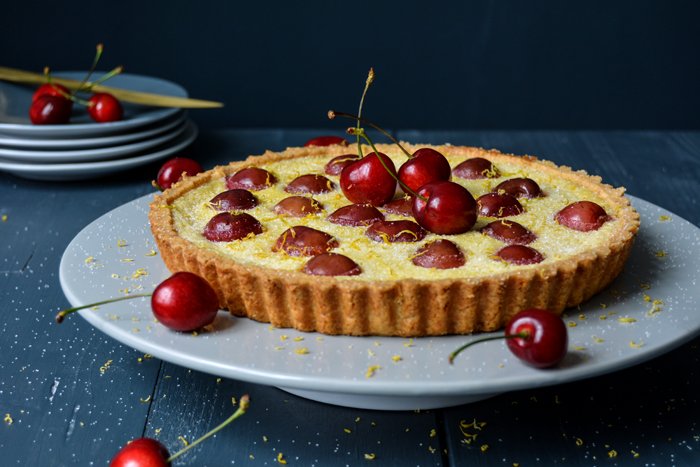
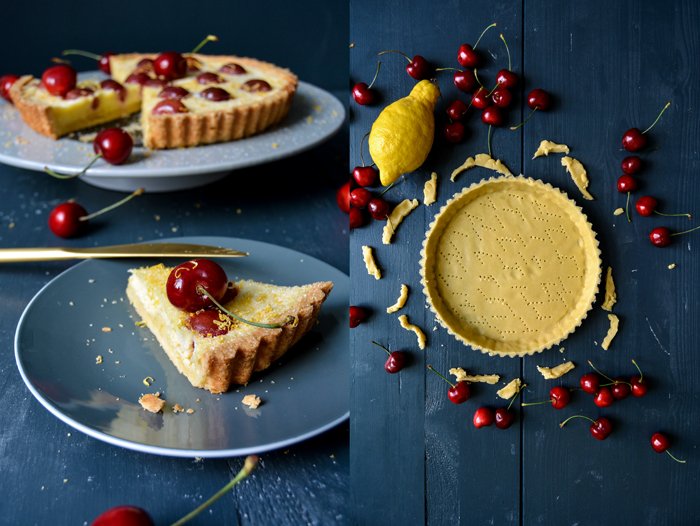
Cherry Lemon Tart
Serves 6-8
For the pastry
flour 200g / 1 1/2 cups
granulated sugar 65g / 1/3 cup
a pinch of salt
butter, cold, 110g / 1/2 cup
organic egg yolks 2
For the lemon filling
organic eggs 2
organic egg yolks 2
heavy cream 100ml / 1/3 cup and 2 tablespoons
crème fraîche or sour cream 3 tablespoons
granulated sugar 100g / 1/2 cup, plus 1-2 teaspoons for the topping
a pinch of salt
ground cardamom 1/4 teaspoon
freshly squeezed lemon juice 3 tablespoons
lemon zest 2 1/2 tablespoons, plus 1-2 teaspoons for the topping
fresh cherries, with their pits, 20 (plus a few cherries for decoration, optional)
For the pastry, combine the flour, sugar, and salt in the bowl of a stand mixer fitted with the dough hook. Add the butter and use a knife to cut it into the flour until there are just small pieces left. Quickly rub the butter into the flour with your fingers until combined. Add the egg yolks, set the mixer to medium speed, and mix until crumbly. Form the dough into a thick disc, wrap it in plastic wrap, and freeze for 12 minutes.
Preheat the oven to 200°C / 400°F (conventional setting).
Roll the dough out between cling film and line a 23cm / 9″ tart pan (preferably loose-bottom) with the pastry. Prick with a fork and bake for about 10-12 minutes or until golden and crisp. Take the pan out of the oven and set aside.
Turn the oven down to 180°C / 350°F.
For the filling, in a large bowl, beat the eggs, egg yolks, heavy cream, crème fraîche, sugar, salt, and cardamom for about 2 minutes until well combined. Stir in the lemon juice and zest and mix well. Pour the lemon filling on top of the pre-baked pastry, spread the cherries in the filling, and carefully transfer the tart pan back to the oven. Sprinkle with a little sugar and bake for about 40 minutes or until set.
Let the tart cool for 10 minutes, then sprinkle with a little lemon zest and decorate with the remaining cherries (optional). Serve warm or cold.
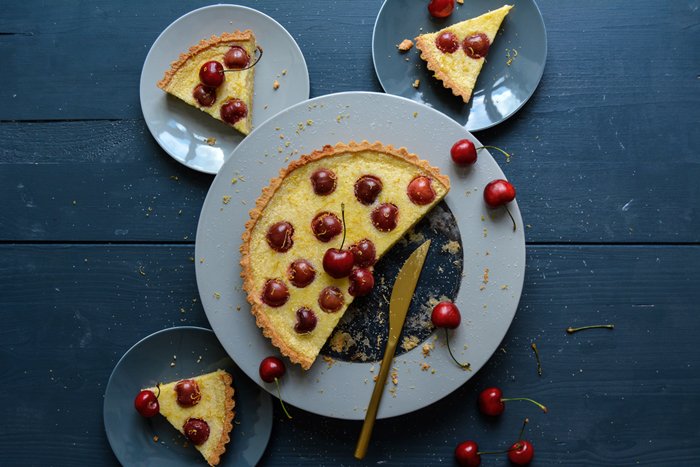
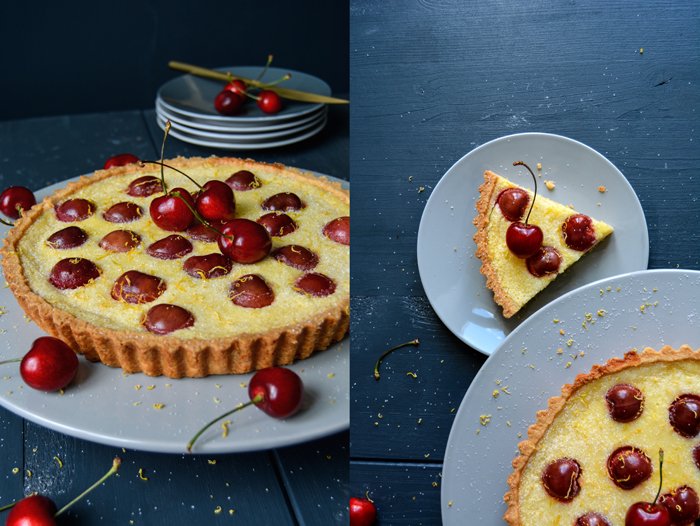


The juiciest Rhubarb Chocolate Cake
The amount of recipes I've been creating by request in the past few months could almost fill another book. My mind had to come up with all sorts of sandwiches, roasts, seafood dishes, salads, and cakes, which to be honest, is one of the most satisfying things I do amongst all the fields that I've worked in since I started my blog. I love to write and take food photos, but there's something very calming and, at the same time, very exciting about creating recipes. Re-thinking culinary traditions, playing with old and new combinations and various ingredients in my head until a whole dish finally comes to the table is my true passion. It's one of the few things that never pressures me, it comes out so easily that I wouldn't dare to call it work.
Working on so many new creations at the same time has one side effect: I have to remind myself to keep it simple - my personal kitchen mantra. I tend to go further and further, adding more and more ingredients, and forgetting that kitchen magic often lies in the little details. A small change can add a completely new quality to a dish, like to my chocolate cake - or the darkest Gâteau au Chocolat. It's a good cake, with chocolaty depth and a moist texture. As in all of my baked treats, I prefer chocolate over cocoa powder, taste and texture is what I'm after when I want to satisfy my chocolate cravings. Back to my cake, there was no need to improve on this formula, it's just right, but I've been wanting to bake a rhubarb cake for days so I just combined the two. I added so much rhubarb to my dark loaf cake that it ended up being the juiciest and fruitiest chocolate cake I ever baked - with a slightly sweet-sour note.
A short note: I let the loaf cool for just a few minutes before I cut it - I was too impatient - but I recommend letting it cool completely, otherwise it's a little too fudgy. So be patient, let it cool, and enjoy! For my Gâteau au Chocolat, I used very dark chocolate (99%), however, for this rhubarb chocolate cake I would go for a lighter one, 55% was my chocolate of choice.
Rhubarb Chocolate Cake
Serves 6
trimmed rhubarb 450g / 1 pound
dark chocolate (about 55%) 150g / 5 ounces
butter 150g / 2/3 cup
organic eggs 4
a pinch of salt
plain flour 130g / 1 cup
ground cinnamon 1 teaspoon
ground cardamom 1/2 teaspoon
granulated sugar 180g / 3/4 cup plus 2 tablespoons
For the top of the cake, cut 5 thin long pieces of rhubarb, about 25cm / 10" long. Cut the remaining rhubarb into 2cm / 3/4" long pieces.
Set the oven to 180°C / 360°F (preferably convection setting) and butter a 11 x 25cm / 4 1/2 x 10" loaf pan.
In a medium saucepan, melt the chocolate and butter over low heat, whisk well, and let cool for a few minutes.
Whisk the egg whites and salt until stiff.
Combine the flour, cinnamon, and cardamom.
Mix the egg yolks and sugar until light yellow and thick, then whisk in the chocolate-butter mixture. Using a wooden spoon, stir in the flour mixture and mix until well combined, then gently fold in the beaten egg whites. Fold in the shorter rhubarb pieces and scrape the batter into the buttered pan. Arrange the long rhubarb pieces on top of the cake and bake for about 75 minutes (slightly longer if using a conventional oven) or until the cake is golden brown and firm on top. If the top of the cake gets too dark, cover it loosely with aluminium foil. Check with a skewer, it should come out almost clean. Let the cake cool completely for a couple hours before you take it out of the pan.