Grilled Raclette with Rosemary Kumquats, Coriander Apple & Star Anise Pear
The light dimmed, tall candles casting flickering shadows on the ceiling, the room filled with the dry heat from the crackling fireplace and the smell of burnt wood and cheese lying in the air like a heavy cloud. When it's time for Raclette at my mother's house in the countryside, it's a celebration of everything that I connect with coziness. Surrounded by family and friends, everybody gathers around the sizzling Raclette grill to watch the magic happen: aromatic cheese melting and dripping, golden bubbles bursting and splashing as they touch the glowing grill, and the rind turning into smokey charred bites.
When you eat Raclette at a snow covered hut in the mountains, you would most likely enjoy it the classic way, with boiled potatoes, raw spring onions, pickled vegetables like gherkins (cornichons) and pearl onions, and lots of crushed or coarsely ground black peppercorns. The cheese needs added acidity, which can come from the pickles but it can also come from fruit.
So here's the fruity way to enjoy the fragrant melted cheese on a crusty baguette: I skip the pickles and go for Raclette with rosemary kumquats, coriander apple, and star anise pear. Kumquats cooked with honey and fresh rosemary turn the tiny citrus fruits into soft and caramelized bites. Pear wedges seared in star anise butter taste like Christmas and apple wedges softened in coriander butter are sweet, aromatic, and slightly sour. That's the colorful trio to complete my rustic Raclette table but you could also add roasted grapes or plums, or juicy persimmons. Whatever fruit you would normally eat with cheese will fit; it can only become better with a little heat, either in the pan on the hob or under the grill. The heat softens the fruit's texture and makes the flavor even more concentrated. I would keep the side dish simple, you can serve the grilled Raclette with a quick green salad.
My mother always uses a very old Swiss made grill that's rather large. It can hold half a wheel of Raclette, melting the surface where the cheese is cut in half, and then you scrape the melted layer right off the wheel onto your plate. It's a lot of fun, but it's heavy, you need a lot of people to eat up half a wheel of cheese, and you can only feed the hungry crowd in batches - around two people every time you scrape the top layer off, then the half-wheel needs to go under the grill again. This is not necessarily a bad thing seeing as we're talking about a meal that's rather rich and filling. A break once in a while doesn't harm the hungry cheese lover, but if I want to throw a cozy Raclette party just for two (or maybe a couple friends), I go for my more practical tabletop grill with single Raclette dishes instead. Then I opt for sliced cheese and grab Le Rustique's Raclette l'Originale. It's aromatic yet not overpowering and melts like butter. When I use sliced cheese I remove the rind, and if you're after that smokey burnt touch you can just leave the Raclette on a little longer until the charred bubbles burst under the grill.
Thanks to Le Rustique for sponsoring this post and reminding me of the coziest celebration of cheese: watching - and eating - bubbling and crackling Raclette.


Grilled Raclette with Rosemary Kumquats, Coriander Apple and Star Anise Pear
You'll need a Raclette grill for this recipe.
Serves 3 to 4
For the fruit
2 tablespoons honey
2 tablespoons fresh rosemary needles (whole needles, not chopped)
12 fresh organic kumquats (or canned kumquats, drained), cut in half lengthwise and seeds removed
4 tablespoons freshly squeezed orange juice
Unsalted butter, to cook the pear and apple
3 star anise
1 large, firm pear, cored and cut into thin wedges
2 teaspoons coriander seeds, crushed with a mortar and pestle
1 large baking apple, cored and cut into thin wedges
For serving
About 500-600g (18-21 ounces) sliced Raclette cheese (for a tabletop grill with single Raclette dishes), rind removed
1-2 crunchy baguettes, sliced
Crushed or coarsely ground black peppercorns
Optional
2 large handfuls mixed small leaf lettuce (young spinach and chard, mâche or corn lettuce)
Olive oil
Balsamic vinegar
Fine sea salt
Finely ground pepper
For the kumquats, in a small, heavy pan, heat the honey over high heat until bubbling. Add the rosemary, kumquats, and orange juice and cook, turning once, for 3-4 minutes or until golden brown and soft - mind that the kumquats don't burn. Set the pan aside and keep warm.
For the pear, in a medium, heavy pan, heat 2 tablespoons of butter and the star anise over medium-high heat until sizzling. Add the pear wedges and sauté, turning once, for about 3-4 minutes or until golden brown and tender. Set the pan aside and keep warm.
For the apple, in a medium, heavy pan, heat 2 tablespoons of butter and the coriander seeds over medium-high heat until sizzling. Add the apple wedges and sauté, turning once, for about 3-4 minutes or until golden brown and tender. Set the pan aside and keep warm.
Melt the cheese, one slice at a time, under the Raclette grill until bubbly then scrape onto a slice of baguette, top with kumquats, apple wedges, or pear wedges and season with crushed black pepper.
You can serve the grilled Raclette with a simple green salad on the side: Divide the mixed lettuce leaves among the plates, drizzle with a little olive oil and balsamic vinegar, and season to taste with salt and pepper.
Enjoy!


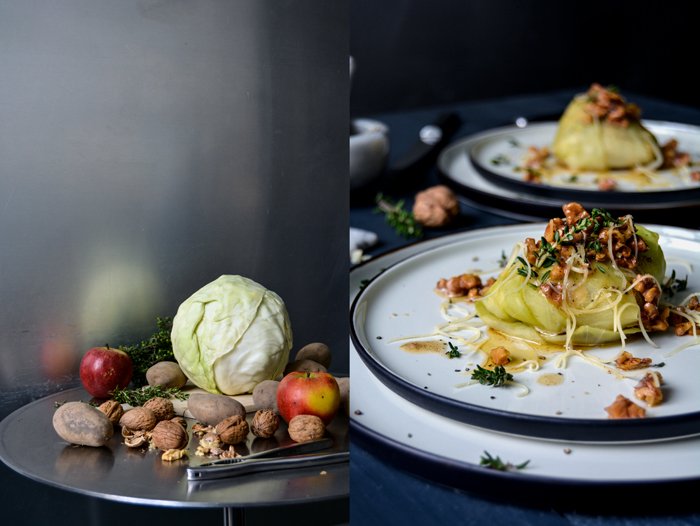
Potato and Apple Stuffed Cabbage Rolls with Walnut Butter and Gruyère

Here we are again: I've reached that critical time of the year - as always in February - when it's still all about cabbage and roots at the market, but I start dreaming of juicy tomatoes and cucumbers, sweet berries and peaches, and seafood dinners at the sea - my mind, impatient and hungry, is already settled in summer.
Luckily, February is quite a short month, then we have March, which at least offers ramps towards its end. In April I can feel the sun getting warmer, the sky becomes brighter, and the produce on my counter tops slowly starts to look more colorful. But for now, I must wait and enjoy what I've got - a beautiful crisp head of cabbage.
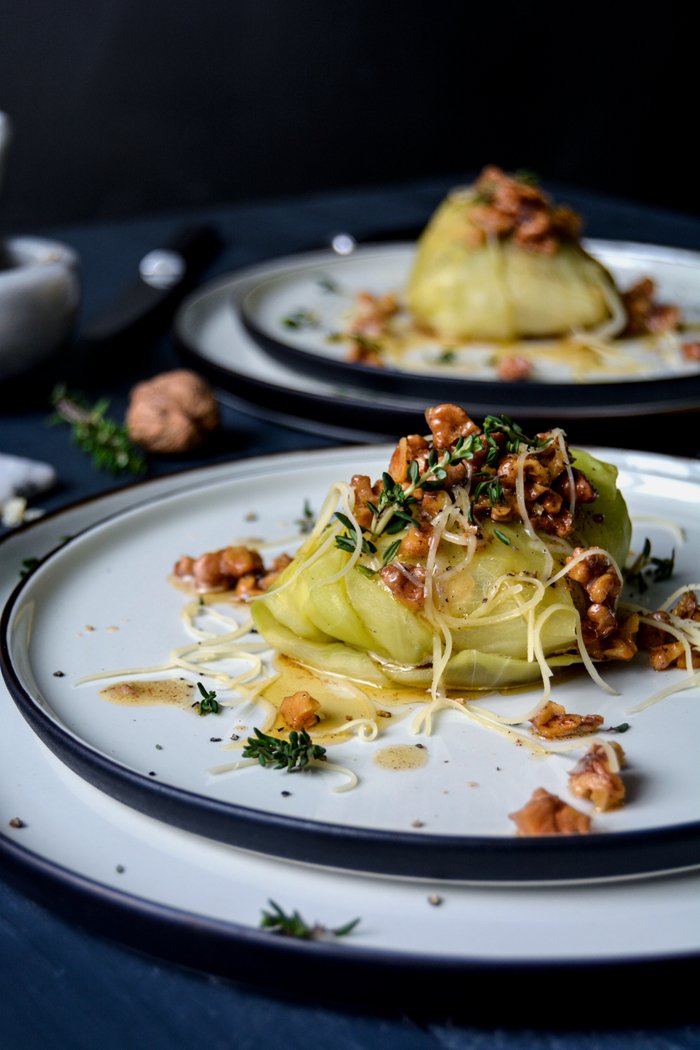
I blanched the large outer cabbage leaves and stuffed them with boiled potatoes, sour apple, fresh thyme, and a few spoonfuls of mascarpone, instead of sour cream, to bind the mixture. My personal highlight was the topping of crunchy walnut butter and freshly grated Gruyère. Any aromatic hard cheese would work here, but there's something about this combination of the roasted nuts and this slightly sweet Swiss cheese that fits perfectly to these little wintery cabbage packages.

Potato and Apple Stuffed Cabbage Rolls with Walnut Butter and Gruyère
For the cabbage rolls
large white or green cabbage leaves 8
peeled potatoes, boiled and chopped, about 250g / 9 ounces
small apple, peeled, cored and chopped, 1
fresh thyme leaves 1 tablespoon
mascarpone (or sour cream or ricotta) 3 tablespoons
organic egg 1
nutmeg, preferably freshly grated
fine sea salt
ground pepper
white wine
For the walnut butter
butter 60g / 1/4 cup
walnuts, roughly chopped, 25g / 1 ounce
For the topping
Gruyère, or any aromatic hard cheese, finely grated, about 2 tablespoons
a few fresh thyme leaves
black peppercorns, crushed in a mortar
For the cabbage leaves, take a large cabbage head and trim the bottom. Carefully peel off 8 large outer leaves. If they tear a little, it's fine. You'll only need 4-5 blanched leaves, blanch the remaining leaves to cover torn patches in the leaves that you use for the rolls.
Preheat the oven to 200°C / 400°F.
In a large pot, bring salted water to the boil and blanch the cabbage leaves for about 4-6 minutes or until tender. Rinse quickly under cold water, drain and cut out the hard stalk (in a slim triangle-shape).
For the filling, in a large bowl, combine the boiled potatoes, apple, and thyme. Whisk together the mascarpone and egg and season with salt, pepper and nutmeg. Add to the potato-apple mixture, stir to combine, and season with salt and pepper to taste.
Lay 4-5 cabbage leaves flat on the kitchen counter and cover torn parts with soft pieces of the remaining leaves. Put a generous tablespoon of the filling in the middle of each cabbage leaf, fold up the sides and roll it up, starting from the side of the stalk. Don't worry if they don't look perfect, mine didn't either. They can all have their individual shape.
Transfer the cabbage rolls to a baking dish and cover the bottom with a splash of white wine and some water. Bake in the oven for about 30-35 minutes or until golden and firm.
While the cabbage rolls are baking in the oven, prepare the walnut butter: In a small saucepan, melt the butter on high heat. When it's sizzling hot, add the walnuts and turn the heat down to medium. Roast for 10-20 seconds or until golden but not dark. Take the saucepan off the heat.
Divide the cabbage rolls between plates and drizzle with a little butter. Sprinkle with the roasted walnuts, fresh thyme, Gruyère, and crushed pepper.


Mince Pies - November Dusk and Apples
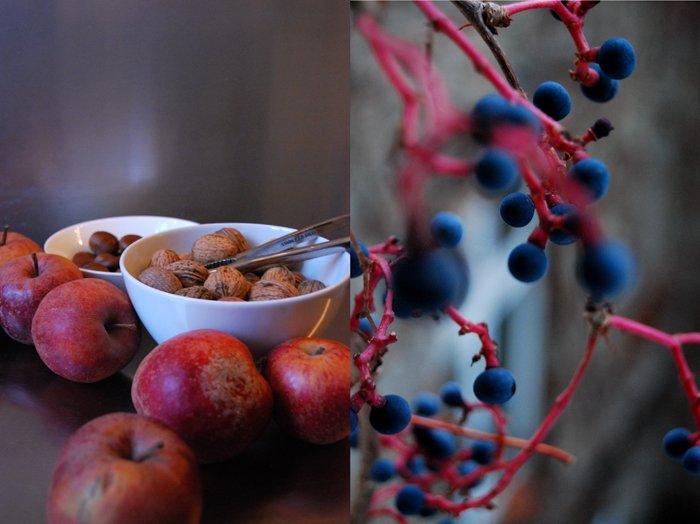
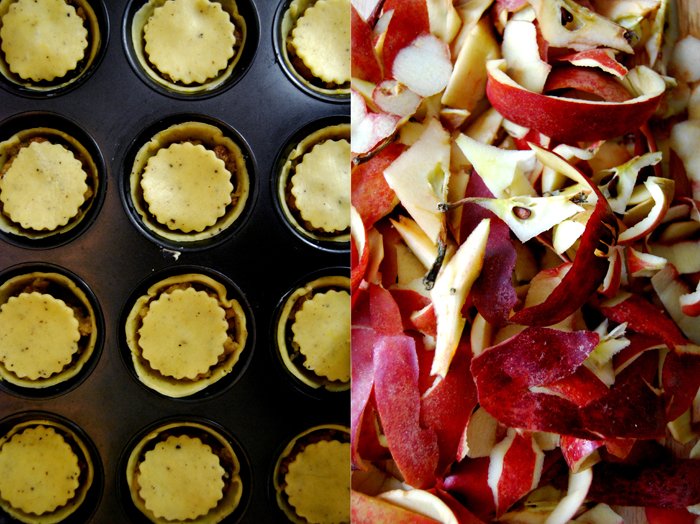
Finally it's getting really cold and crisp outside. And when I see the apples in front of me in this special November afternoon light I feel like making my mince pies. When I lived in Whitby in England I bought tons of them at Botham's, now I make my own.
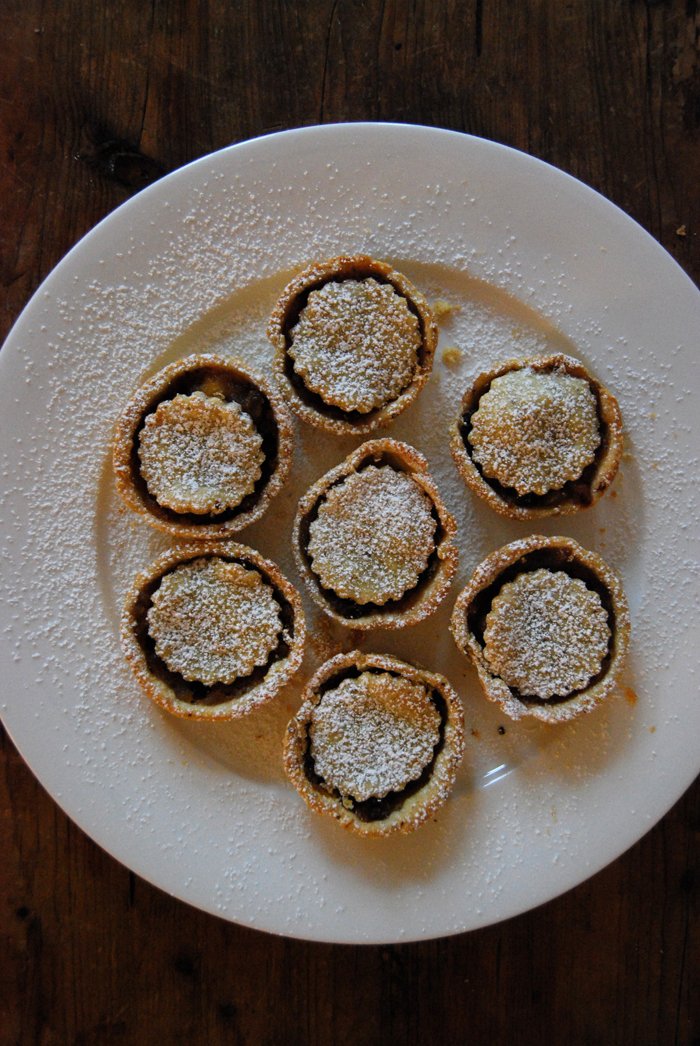
Mince pies are a wonderful combination of buttery short crust - which I love in all variations - and a juicy filling. Mine is a sour-fruity apple filling spiced up with cinnamon, cardamon, mace, allspice, cloves and brandy. I just love them for breakfast, tea time or dessert, I can eat them all the time - especially at Christmas time!Some buy the filling in stores, I like to make my own. It is a bit of work but if you make it in bigger quantities it is worth it.
Mince Pies
The filling for these pies is called mincemeat but don't worry there is no meat involved. It used to be made with meat and some recipes still include beef suet but mine doesn't. The ingredients below are measured to make a few batches of mince pies. If you never tried mince pies before maybe you should start with 1/3 of the filling. If you are a mince pie maniac like me go for the whole amount and keep it in jars in the fridge.
For the mincemeat filling
sour baking apples, peeled, cored and chopped, 1kg / 2 pounds
raisins 350g / 12.5 ounces
currants 100g / 3.5 ounces
candied peel, finely chopped, 40g / 1 ounce
orange, rind, 1
lemon, rind and juice, 1
sugar 200g / 7 ounces
apple cider 250ml
brandy 60ml
vegetable shortening 200g / 7 ounces
cinnamon, ground, 1 heaping teaspoon
cardamom, ground, 1 heaping teaspoon
cloves, ground, 1 heaping teaspoon
mace, ground, 1 teaspoon
mixed spice, ground 1 heaping teaspoon
Warm up a large pan with all the ingredients (except the vegetable shortening) and mix with a spoon until the sugar dissolved. Let simmer on medium heat for 20 minutes and stir once in a while. Take it off when it looks pulpy and stir in the vegetable shortening. Fill into sterilised jars and keep in the fridge.
For the pastry
Enough for 24 muffin sized mince pies (they won't be as high as muffins)
plain flour 300g / 10.5 ounces
vegetable shortening 75g / 2.5 ounces
butter 75g / 2.5 ounces
sugar 1 heaping tablespoon
mixed spice, 2 teaspoons
juice of an orange 5 tablespoons
pinch of salt
Mix the dry ingredients, cut the fats finely with a knife into the flour mixture and rub between your fingers for a few seconds. Add the orange juice and mix with the dough hook of your mixer until it crumbles. Shape two discs, wrap in cling film and put in the freezer for 10 minutes (or in the fridge).
For the Mince Pies
Set the oven to 220°C / 430°F and butter the muffin tray.
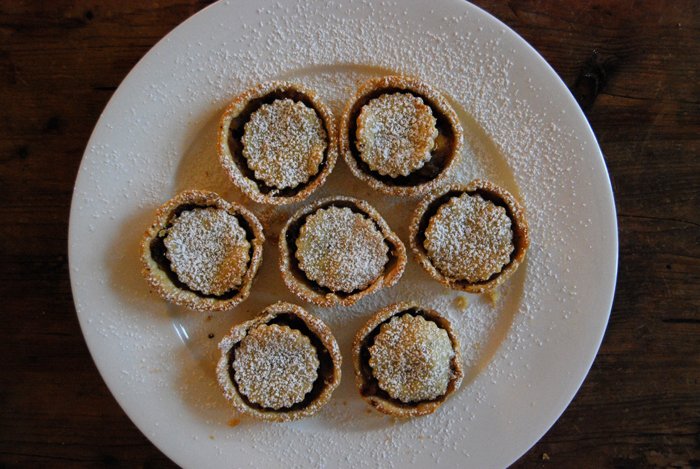
Roll out the pastry between cling film until it is quite thin. Cut out circles a bit bigger than the muffin mold circles and place into the molds. Cut out circles a bit smaller than the molds for the pie's lid. Fill the pies with your mincemeat and put the circled lid on top. Bake for 10 minutes or until golden. Take the mince pies out carefully and let them cool on a rack. Let the muffin tray cool for a few minutes before you continue with the second batch. You can dust the mince pies with icing sugar if you like when the pies have cooled down.