Pumpkin Seed and White Chocolate Babka
Sundays are for sugar rushes
I'll be honest, my oven has been off most of the time in the past few months. There was a humble apple pie, a few quiche variations and the obligatory cookies in December to fill the jars - and to fill my apartment with that buttery smell - but apart from that I've been a lazy baker. Yet to compensate for the lean supply of baked goods from my own kitchen - and still satisfy my voracious sweet desires - I dove into a new old passion: regular visits to my trusted Berlin bakers.
My favorite bakeries in the city offer all I would need to never ever have to turn on my oven again (not to say that would ever happen!). Flaky pastries for the mornings, experimental cookie creations from Cookies & Co for my espresso break, and for the afternoons, there's a café/ bakery I've visited for almost 16 years, SowohlAlsAuch Kaffeehaus. They have a decadent hazelnut mascarpone torte, which often crowns my Sunday coffee table. And then there's Café Boulangerie, with their chocolate covered Bundt cake it is a favorite place to go to when I meet my girls for walks in the neighborhood.
Almost any time I'm up for a longer trip across the city just to nibble on Laurel's bagels, Challah knots and rugelach from Fine Bagels, or have my traditional Pfannkuchen (filled doughnuts without a hole, called Berliner where I come from) at New Years and carnival from KaDeWe.
And for sudden cravings, around the corner from my home is a small bakery particularly talented at yeast baked goods like Puddingbrezel (vanilla custard pretzel), tender brioche buns, sticky poppy seed twists and a relatively new discovery: a glorious pumpkin seed twist. I had never before thought of using squash seeds for sweet baking. For pesto, or crunchy salad toppings, yes, but it never occurred to me that it would make sense to mix it, for example, with white chocolate chunks and use that for a babka filling. So I just did that, loved it and here's (finally!) a new recipe on the blog.
It's a wintery variation of my blueberry lemon cheese babka and my poppy seed babka and it fits particularly well to gloomy Sundays in February, when the heart needs some sweetness to fill the gap until spring. And anyway, Sundays are for sugar rushes - doesn't matter if homemade or from your favorite neighborhood bakery.

Pumpkin Seed and White Chocolate Babka
Mind that the babka has to rise twice, the first time overnight (for about 8 hours) in the fridge.
Makes 1 loaf cake.
For the dough
275g / 2 cups plus 2 tablespoons all-purpose flour
50g / 1/4 cup granulated sugar
1 1/2 teaspoons fast-acting yeast
1/4 teaspoon fine sea salt
60ml / 1/4 cup whole milk, lukewarm
1 large egg
1 large egg yolk
75g / 1/3 cup butter, at room temperature, cut into cubes
sunflower oil, to grease the bowl
For the filling
240ml / 1 cup whole milk
50g / 1/4 cup granulated sugar
1 teaspoon cinnamon
150g / 5 ounces pumpkin seeds, finely ground in a food processor
110g / 4 ounces white chocolate, roughly chopped
For the glaze
45ml / 3 tablespoons water
50g / 1/4 cup granulated sugar
Day 1 – in the evening:
For the dough, in the large bowl of a stand mixer fitted with the dough hook attachment, whisk together the flour, sugar, yeast and salt.
In a medium bowl, whisk together the milk, egg and egg yolk and add together with the butter to the flour mixture. Mix with the hook for about 8 minutes then continue kneading and punching the dough with your hands for a few minutes until you have a soft and silky ball of dough. Transfer the dough to a clean, oiled bowl, cover with plastic wrap and leave it in the fridge overnight, or for about 8-10 hours (don't be alarmed, the dough will only rise a little).
Day 2 – in the morning:
Take the dough out of the fridge and let it sit in the bowl at room temperature for about 1-2 hours (this time I even let it sit for 4 hours and the babka rose beautifully).
For the filling, in a medium saucepan, bring the milk, sugar, cinnamon and ground pumpkin seeds to a boil and cook, whisking constantly, over medium-high heat (bubbling) for 5 minutes or until the mixture is spreadable. Let the filling cool completely (I put the pot in the snow on the balcony, whisking occasionally).
Butter an 23 x 10cm / 9 x 4″ loaf pan and line the bottom with a piece of parchment paper.
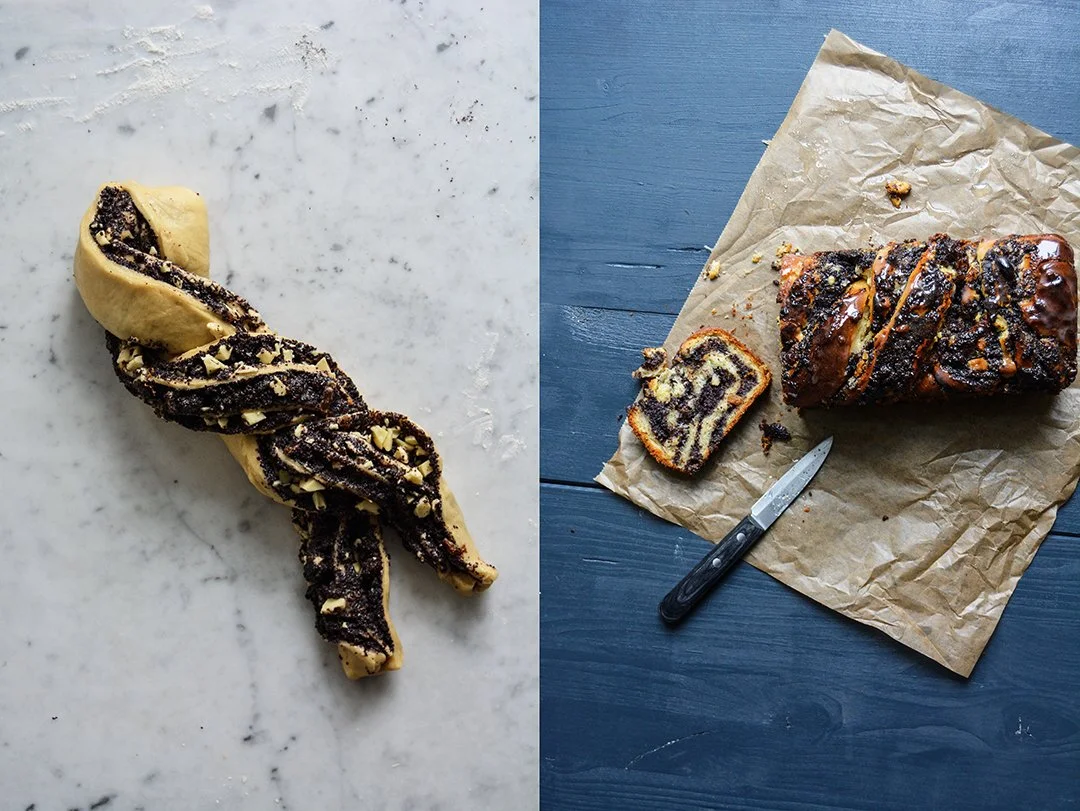
Punch the dough down, take it out of the bowl and knead for 30 seconds. Roll the dough with a rolling pin into a 40 x 28cm / 16 x 11″ rectangle. Spread the pumpkin seed filling on top, leaving a 2cm / 3/4″ border then sprinkle with the white chocolate. Starting from one long side, roll the dough up into a log (8th picture, below). Use your fingers to squeeze the overlapping dough then flip the roll over so that the seam is at the bottom. Using a sharp knife, cut the roll in half lengthwise (3rd picture, top). The cut sides facing up, place both pieces next to each other then quickly lift one half over the other, repeating to form a twist (4th picture, top). Using the blade of a large knife, gently lift the babka and transfer quickly to the prepared pan. Cover with a tea towel and let it rise in a warm place (I kept the bowl on the heater) for about 60-90 minutes or until puffy.
Preheat the oven to 190°C / 375°F (conventional setting).
For the glaze, in a small saucepan, bring the water and sugar to a boil and cook for 2 minutes or until syrupy then take the pan off the heat and set aside.
Bake the babka for 35-40 minutes or until golden brown and spongy, covering the top of the babka with tin foil after 30 minutes if it gets dark. After 35 minutes, check with a skewer, it should come out almost clean. Take the babka out of the oven and immediately brush the top with the syrup. Let it cool for 10-15 minutes then remove from the pan. Enjoy the babka warm or cold.


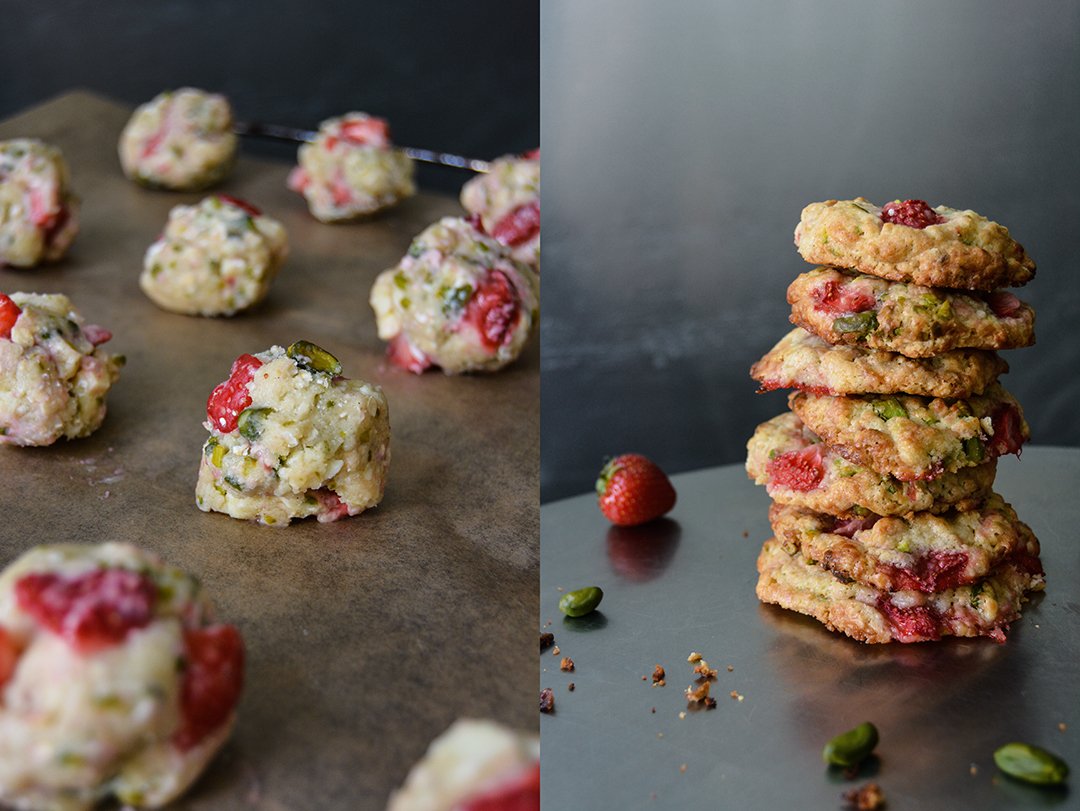
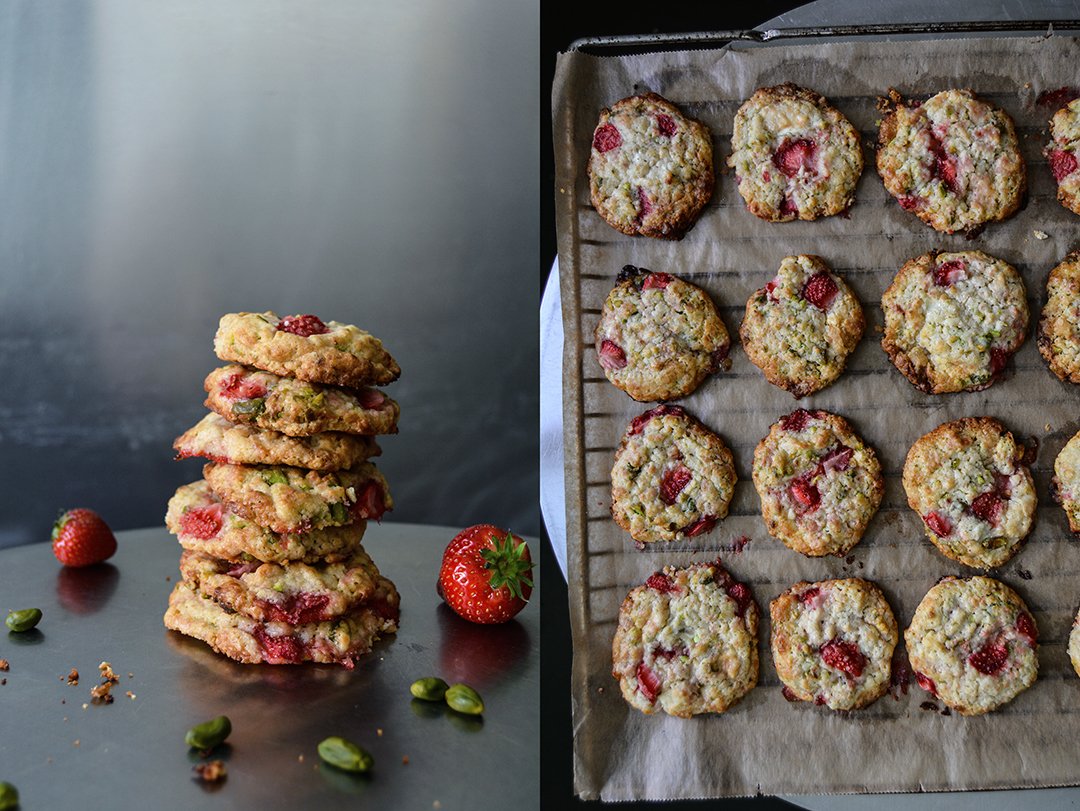
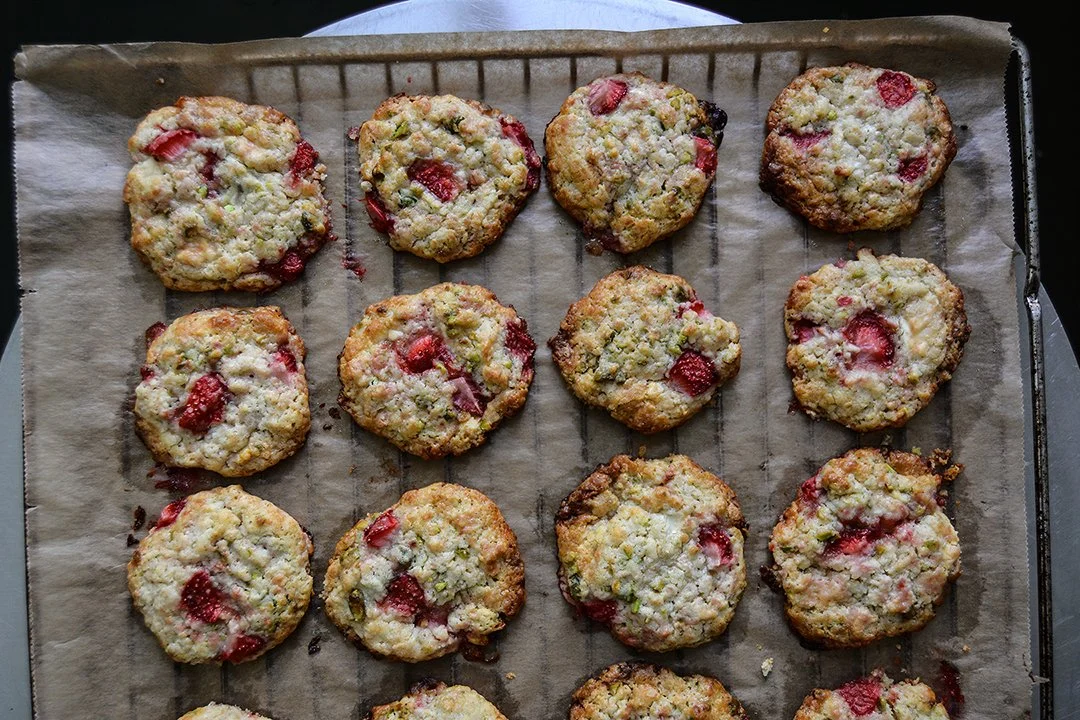
Strawberry Pistachio Cookies with Oats and White Chocolate
This spring feels strange, it doesn't seem to start. Most of the time it's either too cold, too grey, or too wet, I'm more in the mood for cozy stews and hearty pies munched away on the sofa than the springy treats that I usually crave in May.
I'm impatient (not just in the kitchen), I tend to rush to the next season with hungry excitement. I find it hard to wait for the right ingredients to appear at the farmers' market for all the dishes that I already picture in my head. So, I guess I should be thankful for the unpleasant weather, it helps me to stick to the actual season - spring with a wintery touch. Unfortunately, the unusual frosty temperatures at night are a tough burden for the farmers. Their produce suffers, which narrows their harvest dramatically. The white German asparagus that I tasted wasn't as thick and tasty as in the past years, strawberries - by far - aren't as sweet. It reminds me that we're in nature's hands. It's an important reminder, showing us that we live in a fragile system that we easily tend to forget about.
Although I'm not too impressed by the strawberries' taste, they are totally fine in a cookie. Accompanied by nutty pistachios, smooth white chocolate, and a handful of oats, I turned them into the best cookies that my kitchen has seen in a while. They are sweet, soft, and so addictive. Have a bite, close your eyes and you can feel summer.


Strawberry Pistachio Cookies with Oats and White Chocolate
Makes about 20 cookies
plain flour 200g / 1 1/2 cups
rolled oats 50g / 1/2 cup
fine sea salt 1/2 teaspoon
baking powder 1 teaspoon
butter (soft) 130g / 1/2 cup
granulated sugar 150g / 3/4 cup
vanilla pod, scraped, 1/4
organic egg 1
white chocolate, roughly chopped, 100g / 3 1/2 ounces
unsalted shelled pistachios, roughly chopped, a small handful
fresh strawberries, ripe but not soft, cut into small pieces, 100g / 3 1/2 ounces
Set the oven to 175°C / 350°F (preferably convection oven) and line 2 baking sheets with parchment paper.
Take 1 heaped tablespoon off the flour and set aside.
In a medium bowl, combine the remaining flour, oats, salt, and baking powder.
In the bowl of a stand mixer, fitted with the whisk attachment, beat the butter, sugar, vanilla, and egg for a few minutes or until fluffy. Add the egg and continue mixing for about 1 minute until well combined. Using a wooden spoon, stir in the flour mixture until just combined. Fold in the white chocolate and pistachios.
This will make it easier to mix in the strawberries: Sprinkle and mix the strawberries with the heaped tablespoon of flour. Crumble and spread the dough on a baking sheet. Spread the floured strawberries on top of the dough and, using your fingers, gently (!) fold in the berries. Don't worry if it looks loose and messy, mind not to squeeze the berries too much. Scoop out a heaped tablespoon of dough for each cookie and gentle form a ball slightly smaller than a golf ball. Spread the dough balls on a dish that's safe to keep in the freezer, then put the cookies in the freezer for 10-15 minutes or until hard but not frozen. Spread the cookies on the 2 lined baking sheets, mind to leave enough space between the cookies, they will expand in the oven.
Bake, one baking sheet at a time, for about 13-15 minutes or until golden but still slightly soft. After 5 minutes, using a fork, flatten the cookies softly. Let them cool on the baking sheet for a few minutes before you transfer them onto a wire rack.


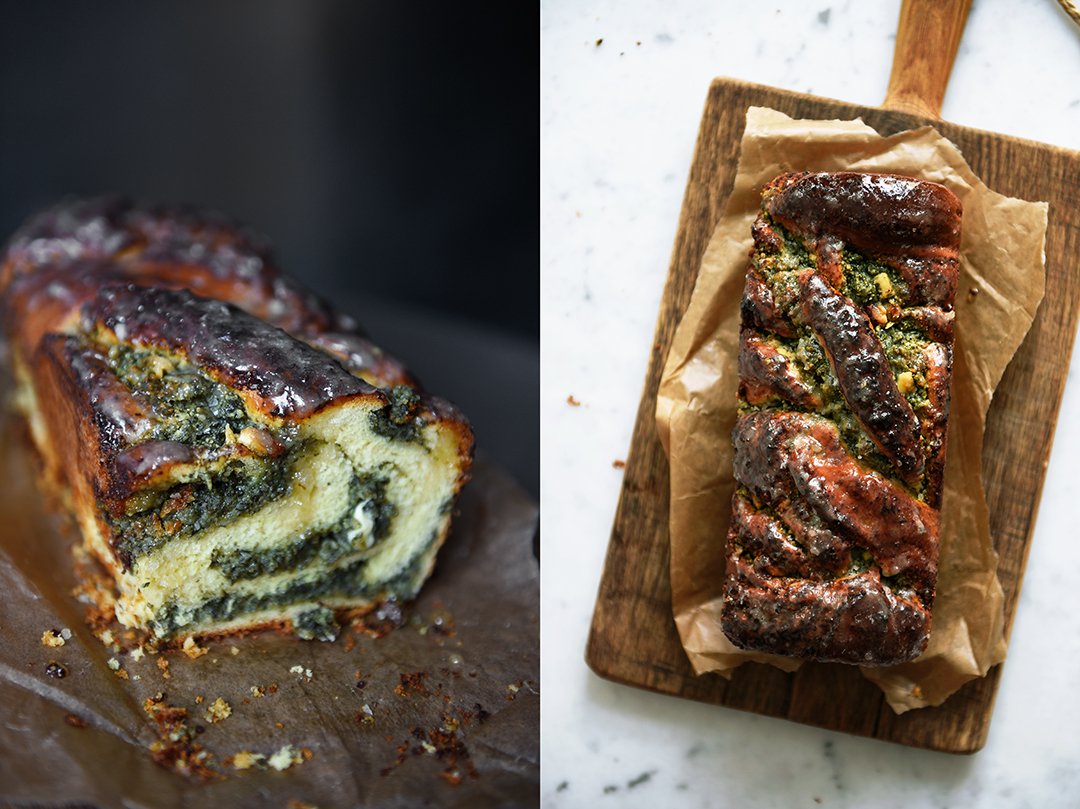
Poppy Seed and White Chocolate Babka
The past week has been crazy and the best way to put my weary mind at ease, is to dig my hands into a ball of yeast dough and knead, and knead, and knead. You can punch and roll it, letting all your energy out until you're exhausted; or you can knead it gently to calm down and feel the pale ball softening slowly between your fingers. Yeast dough is forgiving, it accepts whatever mood you’re in, and it gets better the longer - and harder - you work with it.
The dough for today's babka had to deal with a lot of energy, I must have looked like a boxer training in my kitchen. And it turned out to be the smoothest, silkiest yeast ball my marble counter tops have ever seen. To make babka, you have to be patient, the dough has to rise overnight in the fridge before it transforms into a braided beauty. But then, if you time it well and start early on the second day, you can enjoy the most fragrant cake on your Sunday breakfast or brunch table. And if you don't feel like hassling and hurrying, just take your time and bake it for teatime.
I already shared a babka recipe here on Eat In My Kitchen, last year's Blueberry Lemon Cheese Babka was a hit, not only on my table. This time I wanted to use poppy seeds for the filling to resemble the famous German Mohnstrudel. It used to be one of my childhood's favourites, preferably generously filled with the dark, black seeds. For my filling, I stirred in a handful of raisins, which is also very common in Germany, they make it a bit fruity. But we're not done yet, I have another addition: chopped white chocolate; divine! It's subtle, you can barely taste the little milky bites, but it makes the filling juicier, fudgy in some parts, which is a great contrast to the fluffy cake. For the shiny finish, I used a sticky sugar glaze and I didn't even wait for it to dry, the first slice of a warm yeast cake is always the best.
Update: Here’s the recipe for my Pumpkin Seed and White Chocolate Babka!

Poppy Seed and White Chocolate Babka
Mind that the babka has to rise twice, the first time overnight (for about 8 hours) in the fridge.
Makes 1 babka
For the dough
plain flour 275g / 2 cups plus 1 tablespoon, plus more if it's too sticky
granulated sugar 50g / 1/4 cup
fast-acting yeast 1 1/2 teaspoons
fine sea salt 1/4 teaspoon
milk, lukewarm, 60ml / 1/4 cup
organic egg 1
organic egg yolk 1
butter, at room temperature, cut into cubes, 75g / 1/3 cup
oil, to grease the bowl
For the filling
milk 210ml / 3/4 cup plus 2 tablespoons
granulated sugar 50g / 1/4 cup
ground cinnamon 1 teaspoon
orange zest 1 teaspoon
poppy seeds, cracked, 125g / 1 1/4 cup
raisins, soaked in warm water for 5 minutes and squeezed gently, 40g / 1/3 cup
white chocolate, chopped, 100g / 4 ounces
For the glaze
water 60ml / 1/4 cup
granulated sugar 100g / 1/2 cup
Day 1 - in the evening:
For the dough, in a large bowl, combine the flour, sugar, yeast, and salt.
Whisk the milk, egg, and egg yolk and add along with the butter to the flour mixture. Knead for about 10 minutes, starting with the dough hooks of a stand mixer and continue kneading and punching with your hands for a few minutes until you have a soft and silky ball of dough. If the dough is too sticky, add a little more flour, but mind that it stays soft. Transfer to a clean, oiled bowl, cover with cling film and put in the fridge overnight.
Day 2 - in the morning:
Take the dough out of the fridge and let at sit at room temperature for about 1-2 hours.
For the filling, in a medium saucepan, bring the milk, sugar, cinnamon, and orange zest to the boil. Take the pan off the heat, stir in the poppy seeds, and let it soak for 5 minutes. Stir in the soaked raisins and let it cool.
Butter an 11 x 24cm / 4 x 9″ loaf pan and line the bottom with a piece of parchment paper.
Punch the dough down, take it out of the bowl, and knead for about 30 seconds. On a floured counter top, roll out the dough with a rolling pin into a 28 x 40cm / 11 x 16″ rectangle. Spread the filling over the dough, leaving a 2cm / 3/4″ rim, and sprinkle with the white chocolate. Starting from one long side, roll up the dough tightly into a log. Pull and press to seal the end onto the roll and place the seam at the bottom. Using a sharp long knife, cut the roll in half lengthwise (see 5th picture). The cut sides facing up, press together two ends and lay one half of the log over the other, continue until you end up with a twisted plait (2nd picture). Push the end together. Tuck the ends underneath the babka and, using the large blade of a knife, lift the loaf and transfer quickly to the prepared pan. Cover with a tea towel and let it rise in a warm place (I keep it on the heater) for about 60-90 minutes or until puffy.
Preheat the oven to 190°C / 375°F (conventional oven). For the glaze, in a small saucepan, bring the water and sugar to the boil and let it cook for 2 minutes, take the pan off the heat and set aside.
Bake the babka in the oven for 30-35 minutes or until golden brown. Check with a skewer, it should come out clean. Mind that depending on where you push it in, there will be melted chocolate on the skewer. Take the pan out of the oven and brush the top immediately with the syrup (use all the syrup). Let the cake cool for about 10-15 minutes before you remove it from the pan. Enjoy slightly warm or cold.


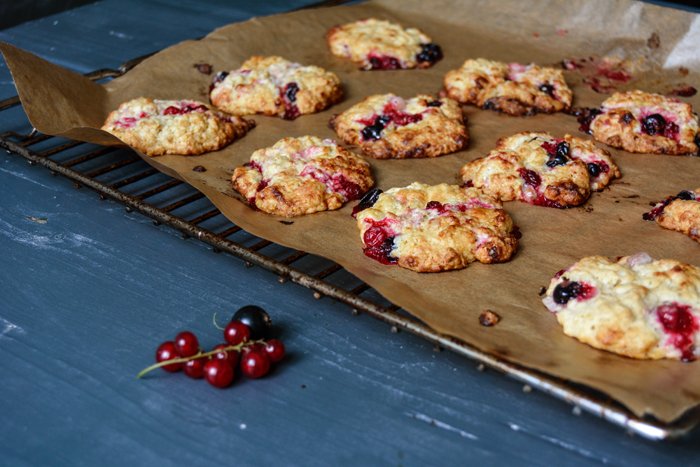
Black, White, and Red Currant Cookies with White Chocolate

This is my annual currant cookie recipe. It's quite a young tradition, I only started it last year, when I introduced a cakey cookie made with red currants, oats, mashed banana, and a strong hint of vanilla to the blog. It was a sweet hit. But 2016 is the year of colours - black, white, and red currants add vivid flavour and beauty to my new creation. It's still not crunchy, the fresh fruit is just too juicy, but it's less soft and spongy than last year's treat. I left out the banana and replaced it with chopped white chocolate, which brought in a different kind of sweetness, with a slightly milky touch.
The problem with cookies is that I always think I'll make a large batch and keep them in a glass jar to present them in all their prettiness and grab one to go along with my cup of tea or espresso whenever I feel like. However, reality is different. They barely last for two days. It's surprising how quick 24 cookies can vanish with only 2 people in the house - I'm impressed!

Black, White, and Red Currant Cookies with White Chocolate
Makes about 24 cookies
plain flour 130g / 1 cup
rolled oats 90g / 1 cup
salt 1/2 teaspoon
baking powder 1/2 teaspoon
baking soda 1/4 teaspoon
butter, at room temperature, 110g / 1/2 cup
granulated sugar 130g / 2/3 cup
vanilla bean, split and scraped, 1/4
organic egg 1white chocolate, roughly chopped, 100g / 3 1/2 ounces
mixed fresh currants (black, white, and red), preferably frozen for at least 2 hours, 140g / 5 ounces
It's easier to stir the currants into the dough when the fruits have been frozen, it looks prettier and less messy.
Preheat the oven to 180°C / 350°F (preferably convection setting). Line 2 baking sheets with parchment paper.
In a large bowl, combine the flour, oats, salt, baking powder and baking soda.
Add the butter, sugar, and vanilla seeds to the bowl of a stand mixer fitted with the paddle attachment and beat for a few minutes until light and fluffy. Add the egg and beat for about 1 minute or until well combined. Using a wooden spoon, stir in the flour mixture and mix until you have a lumpy dough (with a bit of flour left here and there). Fold in the white chocolate, then quickly, but gently the black, white, and red currants. Try not to damage the berries too much, you want their juices to stay inside their skins.
For each cookie, drop a generous tablespoon of dough onto the lined baking sheets, don't push the dough down and leave enough space between the cookies. Bake, 1 sheet at a time, for about 13 minutes or until golden brown, the cookies will be quite soft. Take them out and let them cool on the tray for a few minutes before you transfer them to a wire rack.


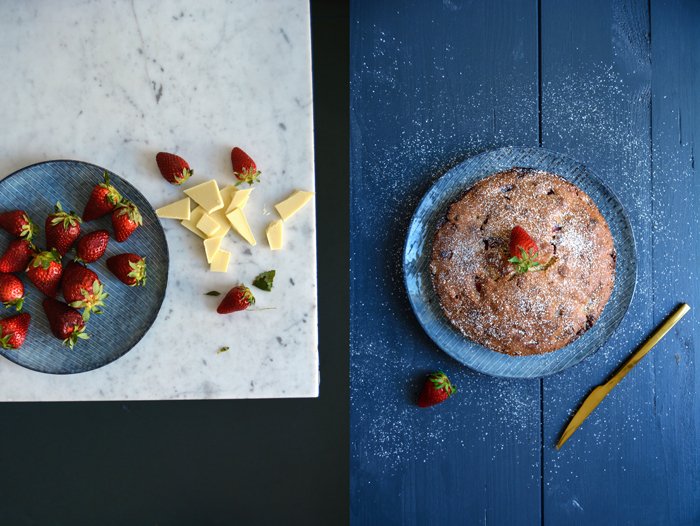
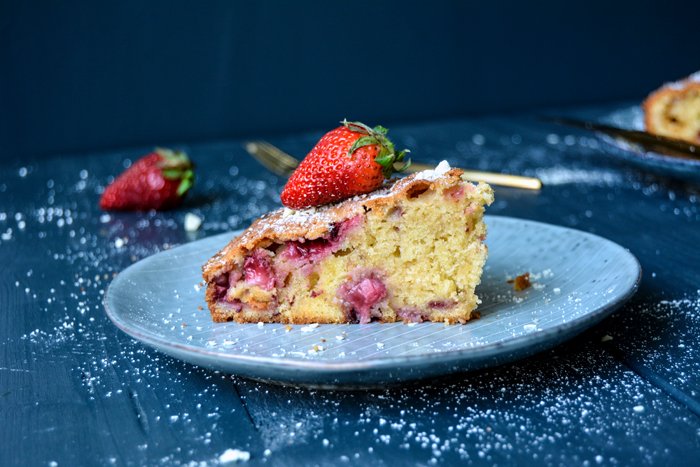
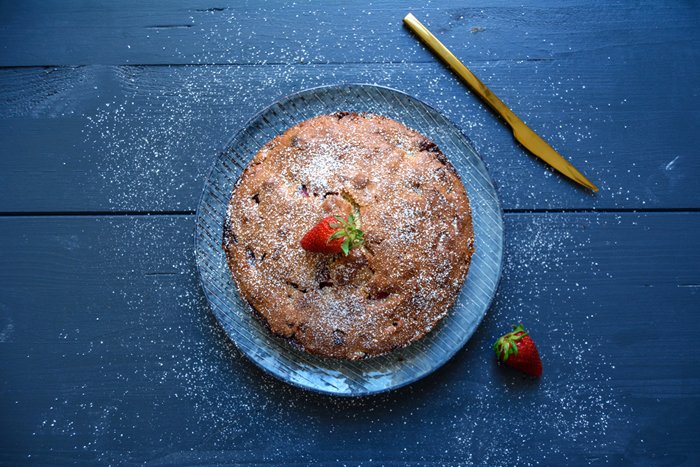
Strawberry White Chocolate Breakfast Cake

This is such a kiddy cake: it's light and fluffy, sweet and juicy, and packed with soft strawberries and creamy white chocolate. And although my childhood days are long over, I love this cake. I would even call it my favorite spring cake (for the time being, until my next discovery). And the fact that it's so easy to prepare - you just have to roll out of bed on a lazy Sunday morning and throw it all together - makes it a perfect weekend breakfast cake.
The combination of the ripe red berries and the milky chocolate works unbelievably well in a cake. I'm familiar with this duo in ice cream and other sweet snacks, but it never struck me as much as in this composition. I was worried that the sweetness could be a little overpowering, but there was no reason to worry, it was still balanced. In fact, this cute little teaser tastes so good that it was gone in less than 24 hours. I wanted to freeze a few pieces - my new habit to eat a little less sweets - but it was hopeless. One piece after the other kept disappearing until the last crumbs were gone and the plate looked almost clean. I think if I could choose between a plate full of cake or a little less on my hips, I'd always go for cake.

Strawberry White Chocolate Breakfast Cake
Makes 1 cake
plain flour 130g / 1 cup, plus 1 tablespoon for the strawberries
cornstarch 30g / 1/4 cup
baking powder 1 heaping teaspoon
fine sea salt 1/8 teaspoon
butter (at room temperature) 160g / 2/3 cup plus scant 1 tablespoon
granulated sugar 100g / 1/2 cup
vanilla bean, scraped, 1/2organic eggs 3
fresh strawberries, cut into cubes, 150g / 5 ounces
white chocolate, chopped, 100g / 3/1/2 ounces
For the topping (optional)
icing sugar or finely grated white chocolate 1 tablespoon
fresh strawberries 3-4
Preheat the oven to 180°C / 350°F (preferably convection setting) and butter a 20cm / 8″ springform pan.
In a large bowl, combine the flour, cornstarch, baking powder, and salt.
In a second large bowl, using an electric mixer, beat the butter, sugar, and vanilla seeds until light and fluffy. Add the eggs, one at a time, and mix well in between. Continue mixing for 2 minutes or until the mixture is thick and creamy. Quickly mix in the flour mixture until combined. Mix the strawberries with 1 tablespoon of flour and add, along with the chopped white chocolate, to the batter. Using a wooden spoon, gently fold in the berries and chocolate until just combined. Scrape the batter into the buttered springform pan, even it out, and bake for 40-45 minutes (slightly longer if using a conventional oven) or until golden on top. Check with a skewer, it should come out clean. Let the cake cool for a few minutes before you take it out of the springform pan.
Sprinkle the cool cake with icing sugar or grated white chocolate and decorate with strawberries.


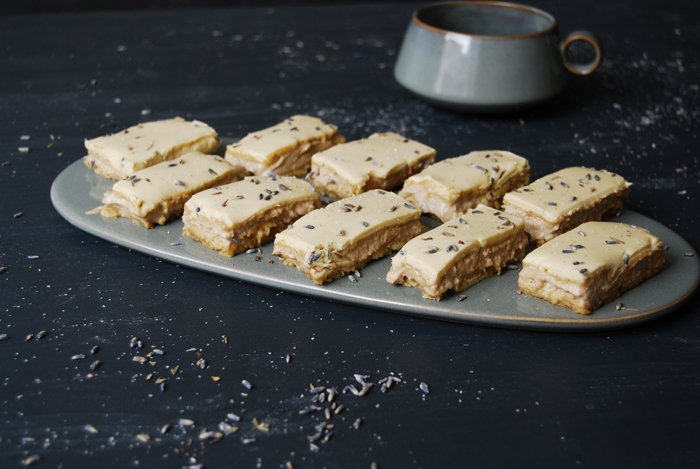
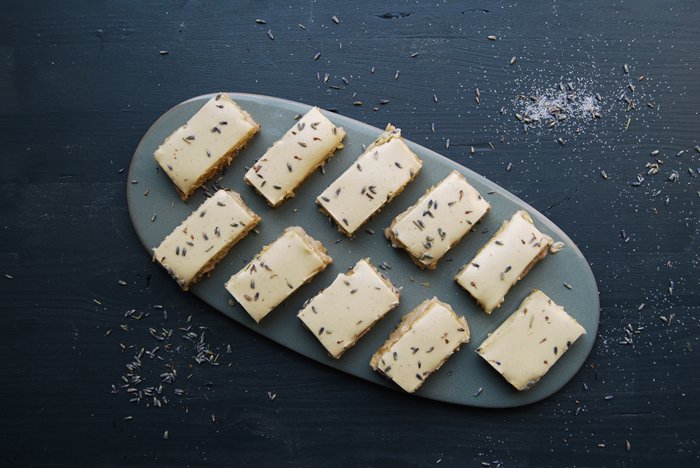
Frances Bissell's Lavender & White Chocolate Caramel Cake

This is advanced lavender baking! When I shared my Lavender Gâteau Breton recipe with you a couple weeks ago, I mentioned Frances Bissell's fantastic baking book, The Floral Baker. The renowned British cookbook author inspired me to give the aromatic blue flowers a try in my kitchen and to add them to my own baking. I started off with the preparation of a jar full of lavender sugar about a month ago, the floral sweetness needs some time to develop its exhilarating qualities. For my buttery French cake, the Gâteau Breton, I sieved the sugar and used the florets just for the topping. I wanted to take it easy at first, to get used to this new flavour and to avoid straining my taste buds without even getting started properly.
So now I felt ready to take the next step, the advanced level of floral baking. I got in touch with Stephen from Serif Books to see if I could share one of the floral master's recipes on eat in my kitchen. We got along very well and I found out that Frances lives in England and Gozo and also includes traditional Maltese recipes in her cooking. I really hope to meet her there one day for a meet in your kitchen feature on the blog!
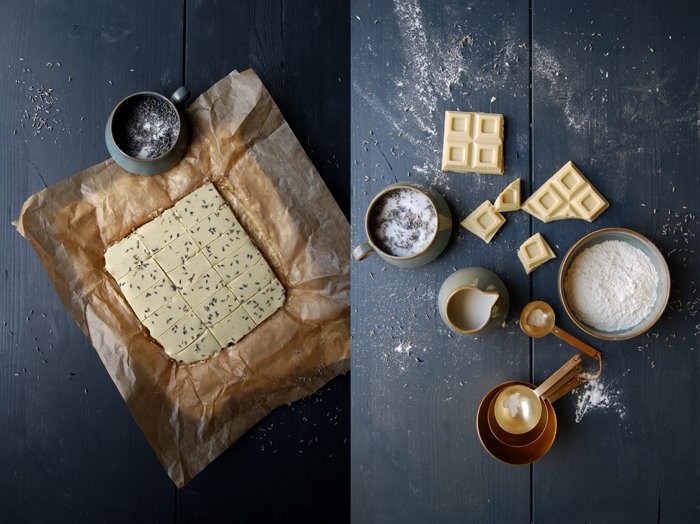
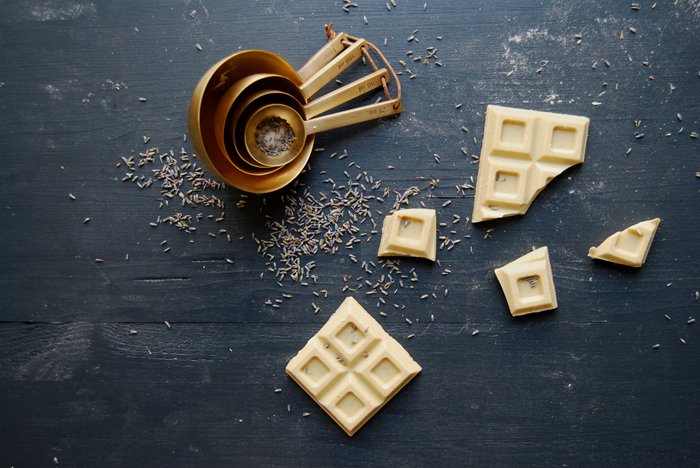
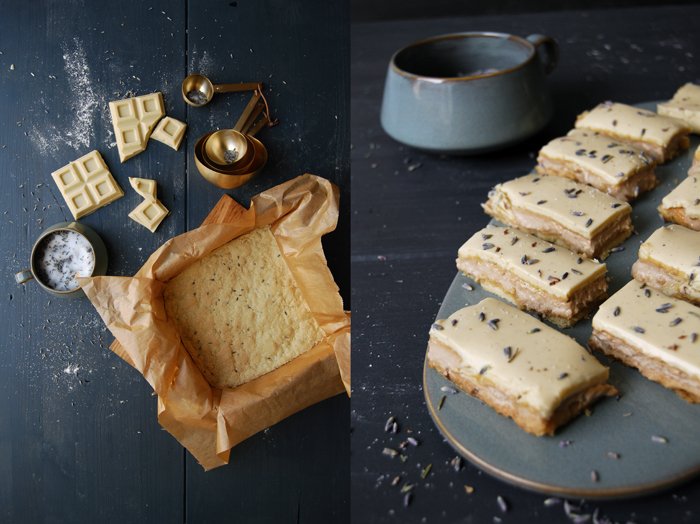
After reading her book I felt quite torn between a few recipes but in the end I went for Frances' Lavender and White Chocolate Caramel Cake. It sounded so decadent and rich that I had to give it a try. The creation is based on her mother's recipe for toffee cake and it has been in her family since the early 1960s. It's like Millionaire's shortbread, just with white chocolate. It starts off with a thin shortcrust base infused with the beautiful aroma of lavender, topped with toffee cream and a final layer of crunchy white chocolate. The creation looks a bit old fashioned which I love, it's the right treat for high tea with the ladies, when you bring out the nice porcelain and get dressed up. I didn't use my bone China at my table but another gem I found recently, the beautiful plates and bowls (and my beloved new measuring spoons!) by Ferm Living in Denmark. It's a clean, grey stoneware collection inspired by Bauhaus classics. My friend Anne, the photographer I mentioned last Sunday, told me about their stunning designs, she knows that I'm always on the lookout for nice tableware. Luckily, we have a similar taste, which is quite minimal, and we're both picky, so I found the perfect design scout for me!
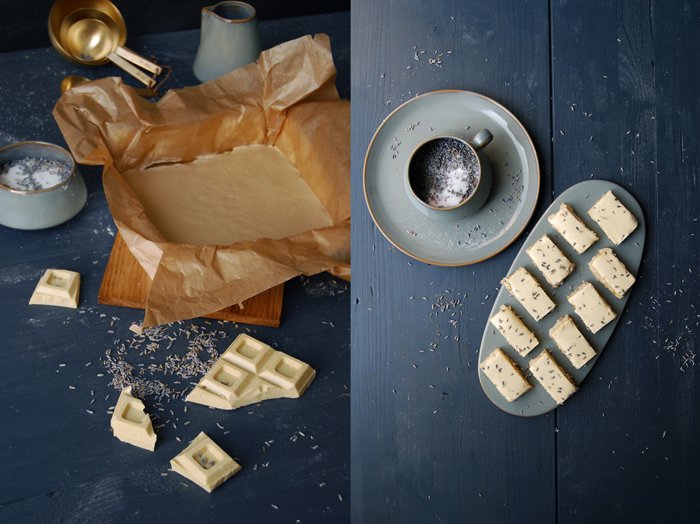
Lavender & White Chocolate Caramel Cake
Recipe by Frances Bissell
Mind that you prepare the lavender sugar a few days (or even weeks) in advance, 10 parts sugar and 1 part organic lavender flowers (L. augustifolia, Hidcote).
For a 20cm / 8" cake tin, about 4cm / 1 1/2" deep, you need
For the shortbread
plain flour 115g / 4oz
lavender sugar 25g / 1oz (I used mainly the sugar and 1 teaspoon of the flowers)
butter, cold, 50g / 2oz
For the topping
Golden Syrup 2 tablespoons
condensed milk 395g / 14oz
quality white chocolate 200g / 7oz
a drop of culinary lavender essence (I left this out and sprinkled the cake with lavender flowers instead)
Set the oven to 190°C / 375°F (fan assisted oven) and lightly butter the cake tin (or line the tin with parchment paper).
For the shortbread, mix the flour, lavender sugar and butter with the hooks of your mixer. Press the dough into the tin and bake for 12-15 minutes. Remove the tin from the oven and leave the shortbread in it.
For the toffee, pour the Golden Syrup and the condensed milk into a saucepan, stir together over moderate heat until well-mixed, then boil precisely 7 minutes, stirring all the time.
Spread the mixture over the shortbread and allow it to cool. Melt the chocolate in a bowl over hot water, mix in the essence if you would like to use it and spread over the cooled toffee, marking into small triangles, squares or fingers, as appropriate, before the chocolate has set. Sprinkle with lavender flowers. Cut when cold.


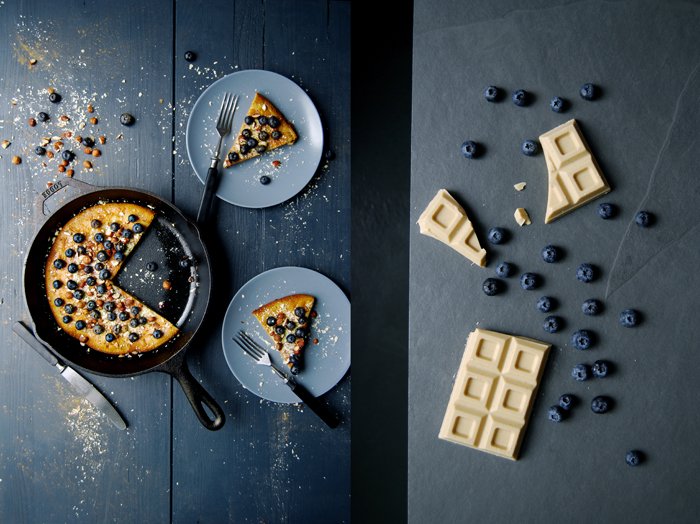
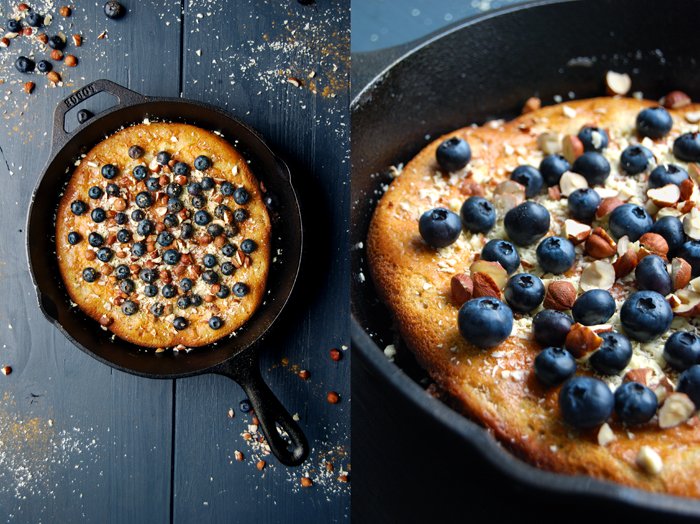
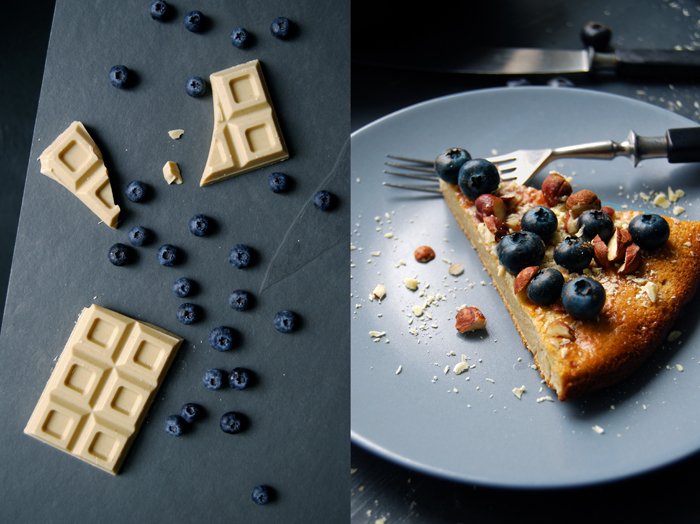
Buckwheat Dutch Baby with White Chocolate, Blueberries and Hazelnuts
I ate my first Dutch Baby in Marta Greber's kitchen, the cook and baker behind the beautiful blog What Should I Eat For Breakfast Today?. We met last October for one of my meet in your kitchen features, I was curious about this woman who is known to be so passionate about the first meal of the day. When Marta told me that she'd like to make a Dutch Baby for me I had to ask her for further information, unfortunately I had no idea what to expect on my plate.
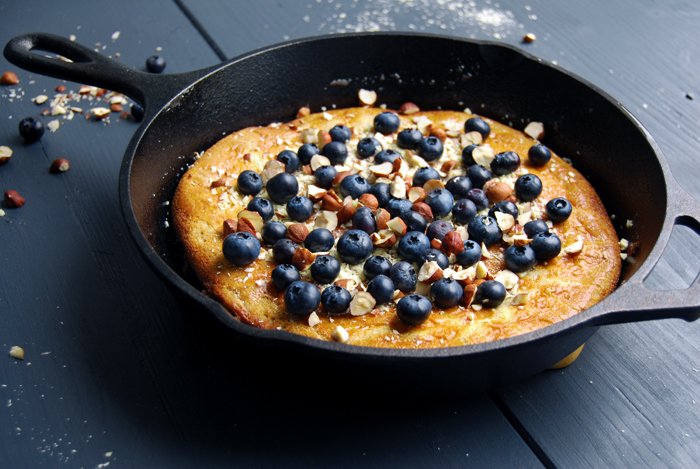
To clear the picture for everyone else who feels as clueless as I did then: a Dutch Baby is a pancake baked in the oven in a heavy cast iron skillet. It rises a bit like a soufflé with a buttery crust on the outside. It's a very simple yet very delicious way to start the day! Marta mastered this dish to perfection, you can find her recipe here in the kitchen feature with her. I didn't want to change her basic formula too much. There are variations on this dish with a thiner result but I particularly liked the richness she created. Her recipe uses more flour than the ones that end up with a paper thin bottom, her Dutch Baby is a proper breakfast and not an airy dessert. I wanted to keep that but there is always room to evolve a recipe, to change it in order to give it a new direction. My new direction is called buckwheat!
Inspired by my hazelnut cake made with this tasty flour which found its way onto the blog only a few weeks before I met Marta, I have been wanting to combine these two creations for months: a hearty buckwheat Dutch Baby refined with cinnamon to underline its nutty flavour. The right cast iron skillet was missing in my kitchen which isn't obligatory for this recipe but I've been longing for this heavy pan from Tennessee for years and I didn't want to start this project without this exact kitchen tool (I know, I sound a bit like a child). Thanks to our family, to lovely Ana and Chris in Florida, my cooking equipment has a few new additions: not only one skillet but three plus a casserole dish, it felt like Christmas when the box arrived. My first Dutch Baby is dedicated to these two wonderful people on the other side of the Atlantic, thank you so much for this kitchen gift!
When I finally got started, it took three attempts to learn that you can't expect the same results from buckwheat batter compared to the ones made with lighter wheat or white spelt, it's just not as airy. Buckwheat is simply too heavy to let the pancake rise and bubble like a perfect soufflé, as long as you're not after after a crêpe-thin Dutch Baby which I wasn't. I wanted Marta's thick German pancake texture combined with the buckwheat's distinct taste. So, using only buckwheat was out of the question, it's impossible. For my first batch I used more or less Marta's recipe replacing half the flour with buckwheat. It created a pancake with a certain density that I wanted to lighten up a little. The second batch made with 1/3 less buckwheat flour tasted perfect but I still wanted a different texture and look. The third and final recipe is made with an additional egg and the same amount of the two different flours, and this time I was finally happy. Don't expect a feather-light soufflé but a cosy, nutty, cinnamony warm breakfast treat, slightly cakey, with sweet and creamy white chocolate melted on top. The addition of chopped hazelnuts and fresh blueberries made this comforting morning treat complete!
So where does the name come from? It's another one of these sweet fairy tales. The dish is derived from the German pancake, the word Dutch is a corruption of the word Deutsch, meaning German. A restaurant owner called Victor Manca is supposed to be the person who made the first Dutch Baby in the early 1900 in Seattle, Washington. At least he owned the trade mark. Legend has it that one of his daughters chose the name, referring to the German-American immigrants, the Pennsylvania-Dutch.
Buckwheat Dutch Baby with White Chocolate, Blueberries and Hazelnuts
For a 25cm / 10" cast iron skillet or heavy baking dish you need
butter 80g / 2 3/4 ounces, to bake the pancake
plain flour 60g / 2 ounces
buckwheat flour 60g / 2 ounces
granulated sugar 2 tablespoons
salt 1/2 teaspoon
ground cinnamon 1 teaspoon
organic eggs 3
milk 125ml / 4 1/2 ounces
quality white chocolate, grated, 60g / 2 ounces, for the topping
blueberries 125g / 4 1/2 ounces, for the topping
hazelnuts, chopped, 20g / 3/4 ounce, for the topping
Set the oven to 230°C / 450°F (top/ bottom heat).
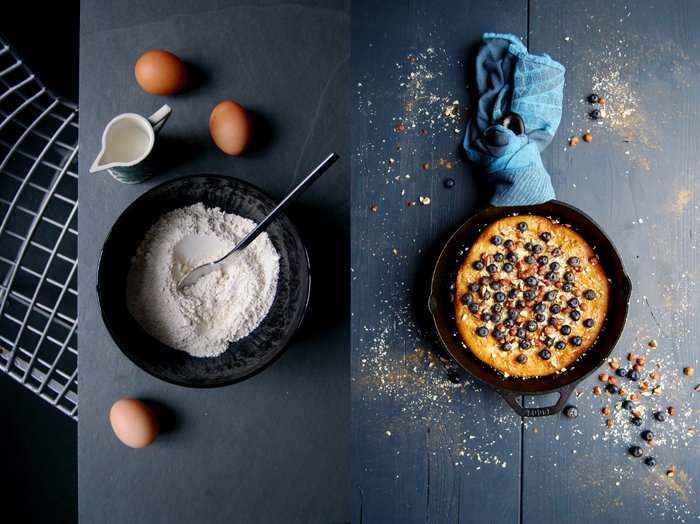
Place the skillet or baking dish with the butter in the oven. Let the butter melt and sizzle slightly (it should be hot but not brown). Combine the flour, buckwheat, sugar, salt and cinnamon in a bowl, add the milk and eggs and whisk for about a minute until combined. When the butter is melted, gently pour the dough into the middle of the pan and bake in the oven for about 10-12 minutes or until golden.
When the Dutch Baby is done, take the pan out of the oven and carefully pour out the excess butter. Sprinkle the surface with the chocolate immediately. Lay the blueberries and hazelnuts on top and enjoy warm!


Marilena's Milk Pan di Campobasso, a traditional Dolci del Molise
I have wonderful news, eat in my kitchen is in the final of the Kitchn's "Best Daily Read Cooking Blog" together with nine other blogs! Thank you for your support and help to come so far!
It would be great if you could vote (one last time, I promise) for the final vote of the "Best Daily Read Cooking Blog" here.
A few weeks ago a very sweet lady, Marilena, got in touch with me. It was the day I wrote about Mussel with Ginger, Lemon Grass and Coriander and we got to talking about seafood recipes, cakes and olive oil. At one point she asked me if I would like to try one of her cake recipes, the Milk Pan di Campobasso.
Marilena lives in Italy in the Molise region (in the Campobasso province) which is north-east of Napoli. She loves to bake, beautifully decorated cakes for weddings and special events and she produces her own olive oil, Marilena has 300 olive trees! She already sent me some of her wonderful extra virgin olive oil which is divine, a few drops on fresh bread and some salt, delicious!
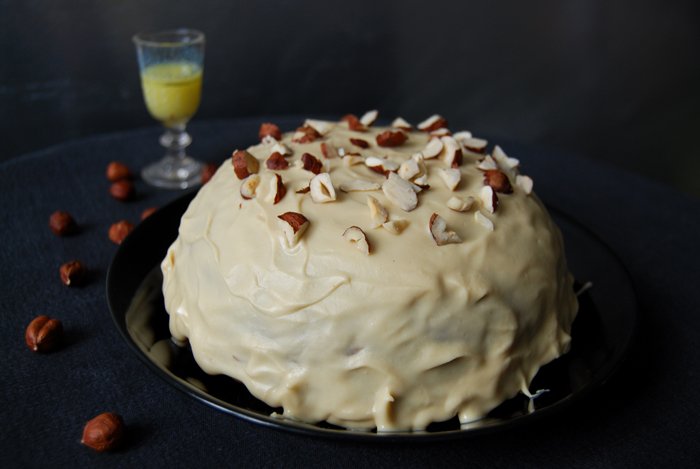
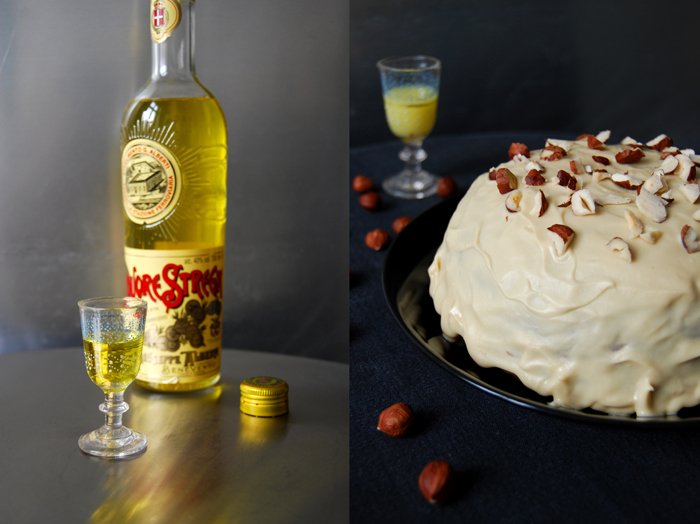
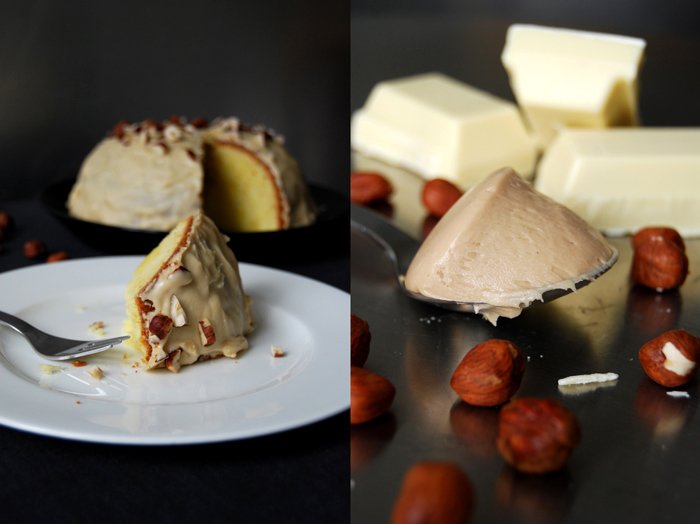
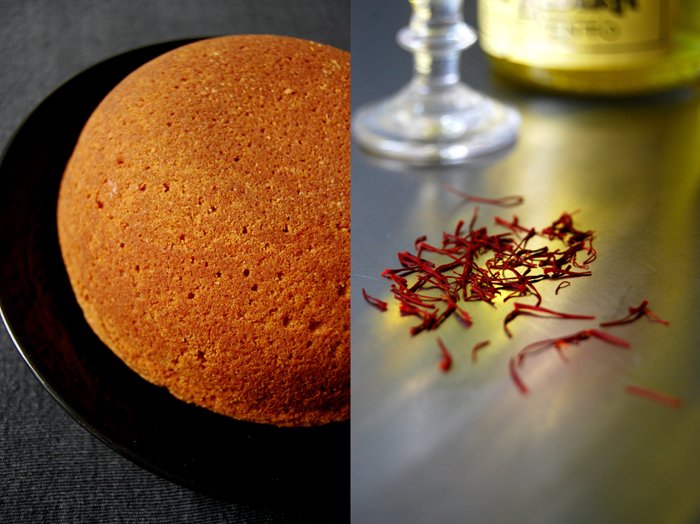
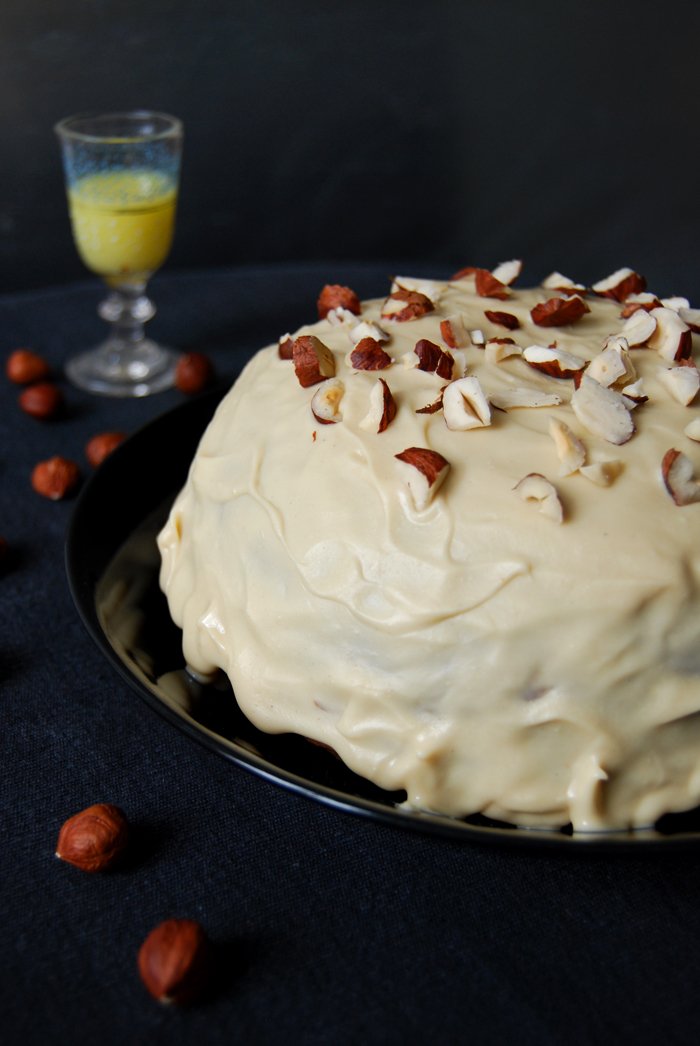
So finally I baked her cake, Marilena's Milk Pan di Campobasso. I was excited, it's a special recipe, a traditional Dolci del Molise and it required a few preparations. First I had to get a special liqueur, the Italian Strega (meaning "witch") which is a herbal liqueur produced since 1860, bright yellow made with saffron, mint and fennel. I ordered it and when it arrived I prepared the "liqueur milk". A mixture made of milk, Strega liqueur, sugar, saffron, vanilla and lemon peel which has to sit overnight, it gives the Milk Pan its typical taste and yellow colour. The cake is baked in a dome cake tin, it's very juicy, a bit moist but still light. It is covered with a glaze of nocciola cream, a hazelnut spread, mixed with white chocolate and sprinkled with hazelnuts. It's hard to describe the taste, it's the taste of Italy, wonderfully sweet and aromatic, with a slight hint of saffron which is a great match to the hazelnuts. I love it, thank you Marilena!
Milk Pan di Campobasso
For this cake you need a 1 liter dome cake tin (mine is ceramic, you can also use a metal one).
For the liqueur milk
I made more liqueur milk than I needed for the cake as I want to use it for other dessert recipes as well. You will need around 50ml (one espresso cup) of this mixture for the cake.
milk 50ml
granulated sugar 50g / 2 ounces
Strega liqueur 50ml (you can also use another herbal liqueur with fennel and saffron)
a tiny pinch of saffron
the seeds of 1cm / 1/2" vanilla bean
a long strip of lemon peel
Mix all the ingredients in a bowl, cover and let them infuse overnight.
For the hazelnut chocolate icing and topping
white chocolate 150g / 5 ounces
nocciola cream (hazelnut spread) 2 big tablespoons
sunflower oil 2 tablespoons plus more for mixing
hazelnuts, chopped, 3 tablespoons, or more if you like for the topping
In a sauce pan, melt the chocolate on low temperature and stir in the hazelnut spread and oil. It should be smooth and liquid, if it's not liquid enough you will have to add a little more oil.
For the cake
butter, soft, 150g / 5.5 ounces
granulated sugar 150g / 5.5 ounces
organic eggs 3
pinch of salt
plain flour 80g / 3 ounces
potato starch 80g / 3 ounces
baking powder 1/2 teaspoon
liqueur milk, 1 espresso cup (around 50ml)
Set the oven to 180°C / 355°F ( (fan-assisted oven), butter the dome cake tin and sprinkle with breadcrumbs.
Beat the egg whites with a pinch of salt till stiff. Combine the flour, potato starch and baking powder. In a large bowl, beat the butter and sugar till fluffy, add the egg yolks, one at a time. Stir in the dry ingredients and the liqueur milk and continue mixing until well combined. Gently fold in the egg whites.
Scrape the dough carefully into the prepared tin and bake until golden. Check with a skewer, it should come out clean. Marilena told me to check it after 30 minutes, mine needed 55 minutes. The baking time depends on the shape, size and material of your tin.
Let the cake cool (I put the tin in cold water which makes it easier to take the cake out), carefully flip it over on a big plate and ice it with the hazelnut chocolate icing. Sprinkle with hazelnuts and enjoy its beauty (and taste)!


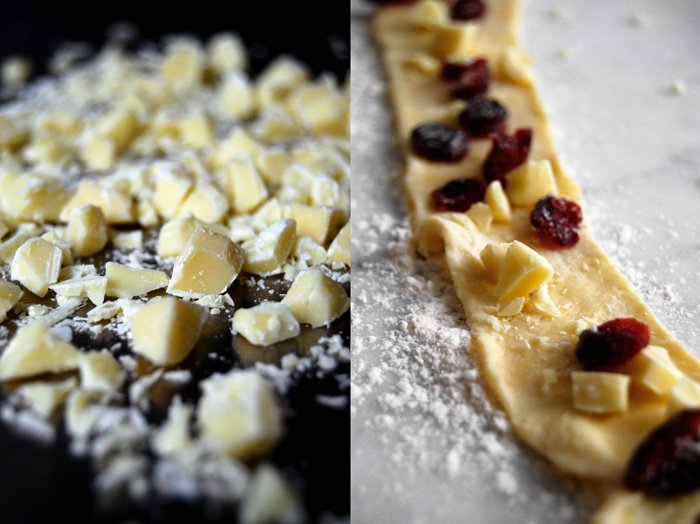
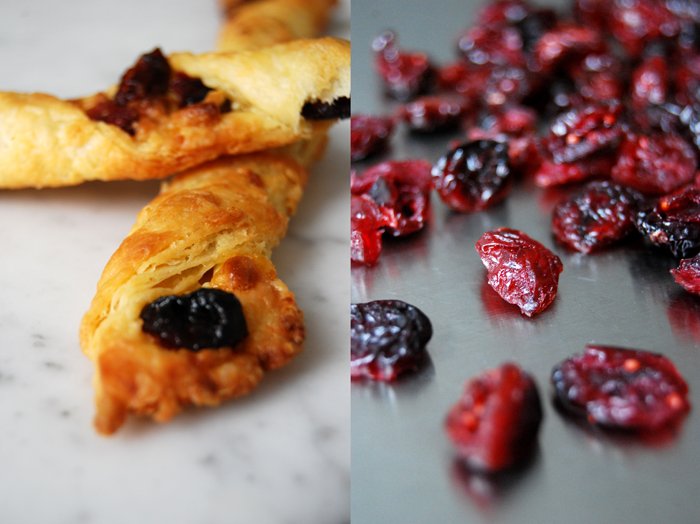
Flaky White Chocolate and Cranberry Twists
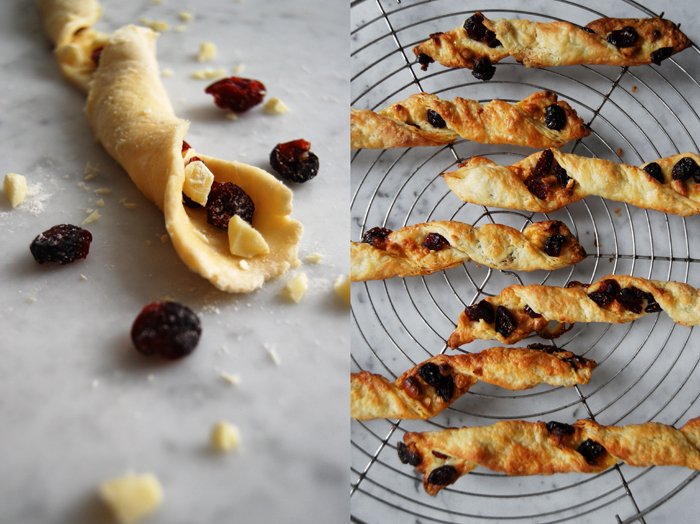
I've been wanting to bake something with white chocolate and cranberries since December but this idea never reached my oven - too much to bake, too little time. I was drawn to this combination last winter when I mixed them into my crunchy cookie recipe. The chocolate and the berries gave them a nice sweetness, milky and fruity. I enjoyed them so much that I decided to share them with our family and friends in Malta, so I sent them a big parcel stuffed with these cookies at Christmas time. The box was emptied within moments as we witnessed on Skype.
This weekend I felt like this duo again but didn't want to bake cookies. Croissants are more what I had in mind, just without the hassle of making two different doughs for the perfect puff pastry. I thought of my buttery flaky Rugelach, this dough is made to be wrapped around a sweet filling but I wanted something bigger, not just a mouthful - a handful! This is a Sunday morning pastry which you hold in your buttery fingers while you sip your coffee. I went for a long and twisted shape, quick to prepare, easy to eat, no hassle on a Sunday - Good morning everybody!
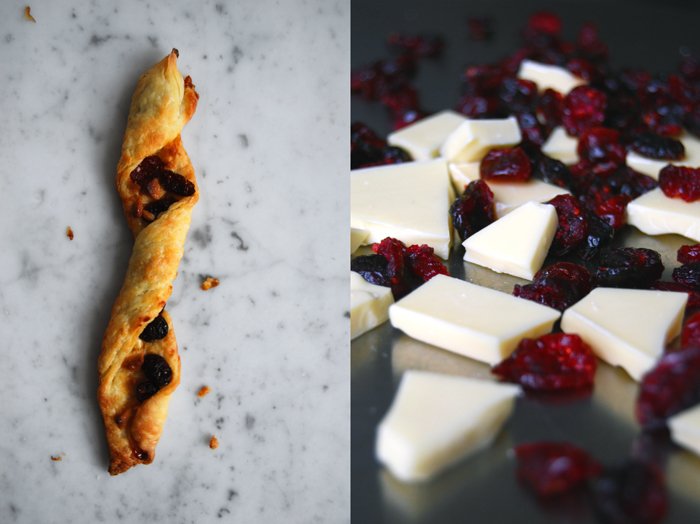
White Chocolate and Cranberry Twists
For 16 twists you need
plain flour 150g / 5 ounces
icing sugar, 1 heaped tablespoon
butter, cold, 125g / 4.5 ounces
cream cheese, at room temperature, 120g / 4.5 ounces
a pinch of salt
white chocolate, chopped, 70g / 2.5 ounces for the filling
dried cranberries 70g / 2.5 ounces for the filling
For the filling, mix the chocolate and cranberries.
Combine the dry ingredients. Cut the butter with a knife into the flour mixture until there are just little pieces of butter left. Mix with your dough hooks for a few seconds. Add the cream cheese and work it into the mixture with a spoon or the mixer until you have a crumbly mixture. Form 2 discs and put them in the freezer for 30 minutes. The dough should be very cold but not too hard, still rollable.
Preheat the oven to 185°C / 365°F and prepare a baking sheet with parchment paper.
Take out one disc, leave the second one in the fridge while you're preparing the first batch. Roll out the disc between floured cling film as the dough becomes very sticky at room temperature. Give it a rectangular shape, the width will be the length of your twists. Cut off a 4.5cm / 2" strip and pull it off the foil (don't worry if it's sticky, it's an elastic dough, you can also use a knife to lift it). Lay the pastry strip flat on your working surface, sprinkle with the filling, pushing it a little into the dough. Carefully, twist the pastry, starting on one side twisting it up to the middle and then continue from the other side. This way you don't loose too much of the filling. Place the twist on the baking sheet and continue with the rest of the dough. Bake the pastry for 12 minutes or until puffy and golden brown. It’s best to check them after 10 minutes to be sure that they don’t get too dark. Let them cool on a wire rack for a few minutes.