Meet In Your Kitchen | Domberger Brot-Werk's Secret to German Bread

This post is part of my Meet in My Kitchen podcast: How did we get to where we are in life & what does food have to do with it
“Food is kind of everything. It’s a source of conflicts, of love. It connects, it’s sharing, it differentiates. It’s absolutely underrated in Germany.” - Florian Domberger
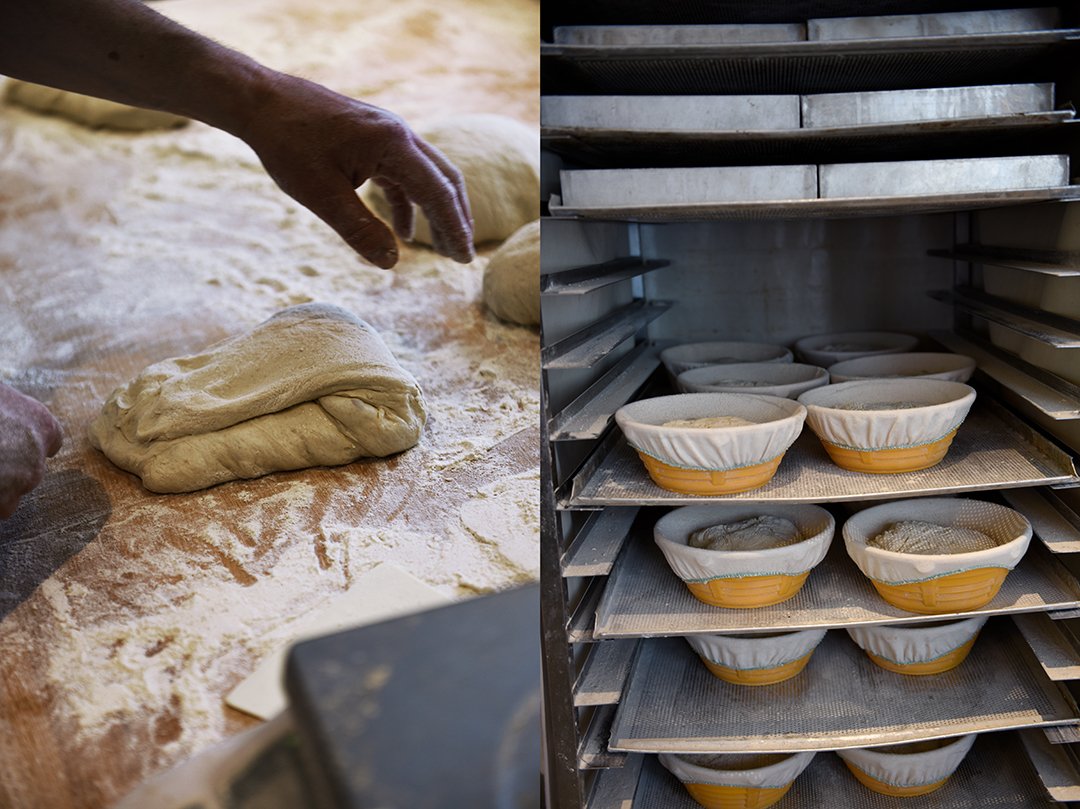
The first time I visited Florian Domberger's bakery, Domberger Brot-Werk, in Berlin's Moabit neighborhood I tried (almost) everything I saw on the wooden shelves: pretzels, croissants, fragrant loaves of crusty German rye and spice bread and traditional buns, such as Vinschgerl, Schrippen, Seelen, and Schusterjungs. All made with sourdough, all made with love. I was hooked. So I sat outside on a bench in front of the bakery in the golden late morning sunlight, all that baked deliciousness spread out in front of me, and every bite reminded me of how bread used to taste in my childhood.
Florian and his team master more than just savory traditional German baking, their sweets are also a generous gift to your palate and hips. His Butterkuchen (a yeasted sheet cake topped with lots of butter and sugar) and his Zimtschnecken (cinnamon rolls) are both the best I ever had in my life. So what is the secret behind this bakery? Florian says it's just "flour, water, salt, time - and love!", and I agree, he and his bakers truly understand the core of what their craft is about.

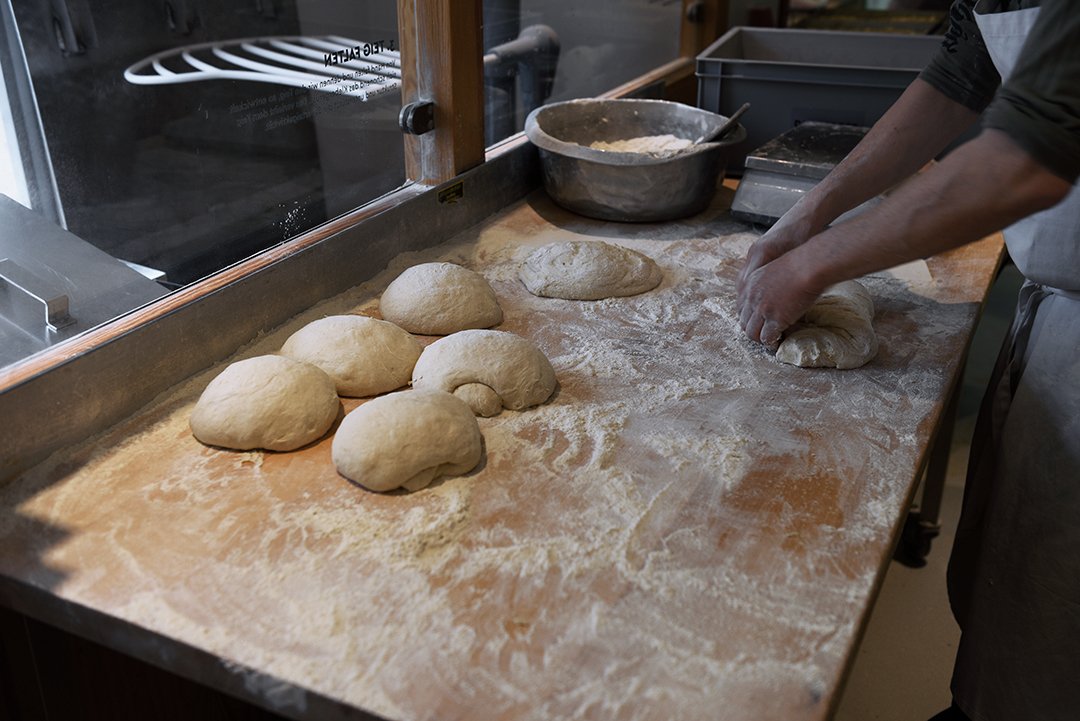
The craft of a baker demands a lot of fascination - and love - for the ingredients, for the flour, the process, the desire to approach perfection and improve each move every day. A baker needs the humble understanding of the importance of time, working and watching your dough slowly and attentively, you can't rush sourdough bread. And that's the tricky point where commercial bakeries lost the craft and with this loss they turned the taste of good bread into a faded memory. Commercial yeast and ready-made bread mixes replaced the elaborate simplicity of "flour, water, salt, and time" and paved the way for an industrialization that is conflicting when it comes to food that achieves its taste and quality from a slow process. An undertaking that could only fail and threaten the tradition and variety that once Germany became famous for.
Twenty years ago, driving through my home country, I could stop at almost any bakery in any town, village, and city. Those were still individual bakeries who had their family name written outside on the shop's sign and inseparably connected to their name was the responsibility, and the pride, to only deliver quality to their customers. And that's where Florian decided to go back to. He put his name on the sign. After a successful international career in shipping and logistics, after leaving his family's business and telling his father he's not going to follow in his footsteps, he learned the craft of the baker with the goal to open his own bakery. Five years ago, his wife, Vanessa, and their two daughters followed their husband and father to Berlin and together they built up one of Berlin's most acclaimed bakeries.
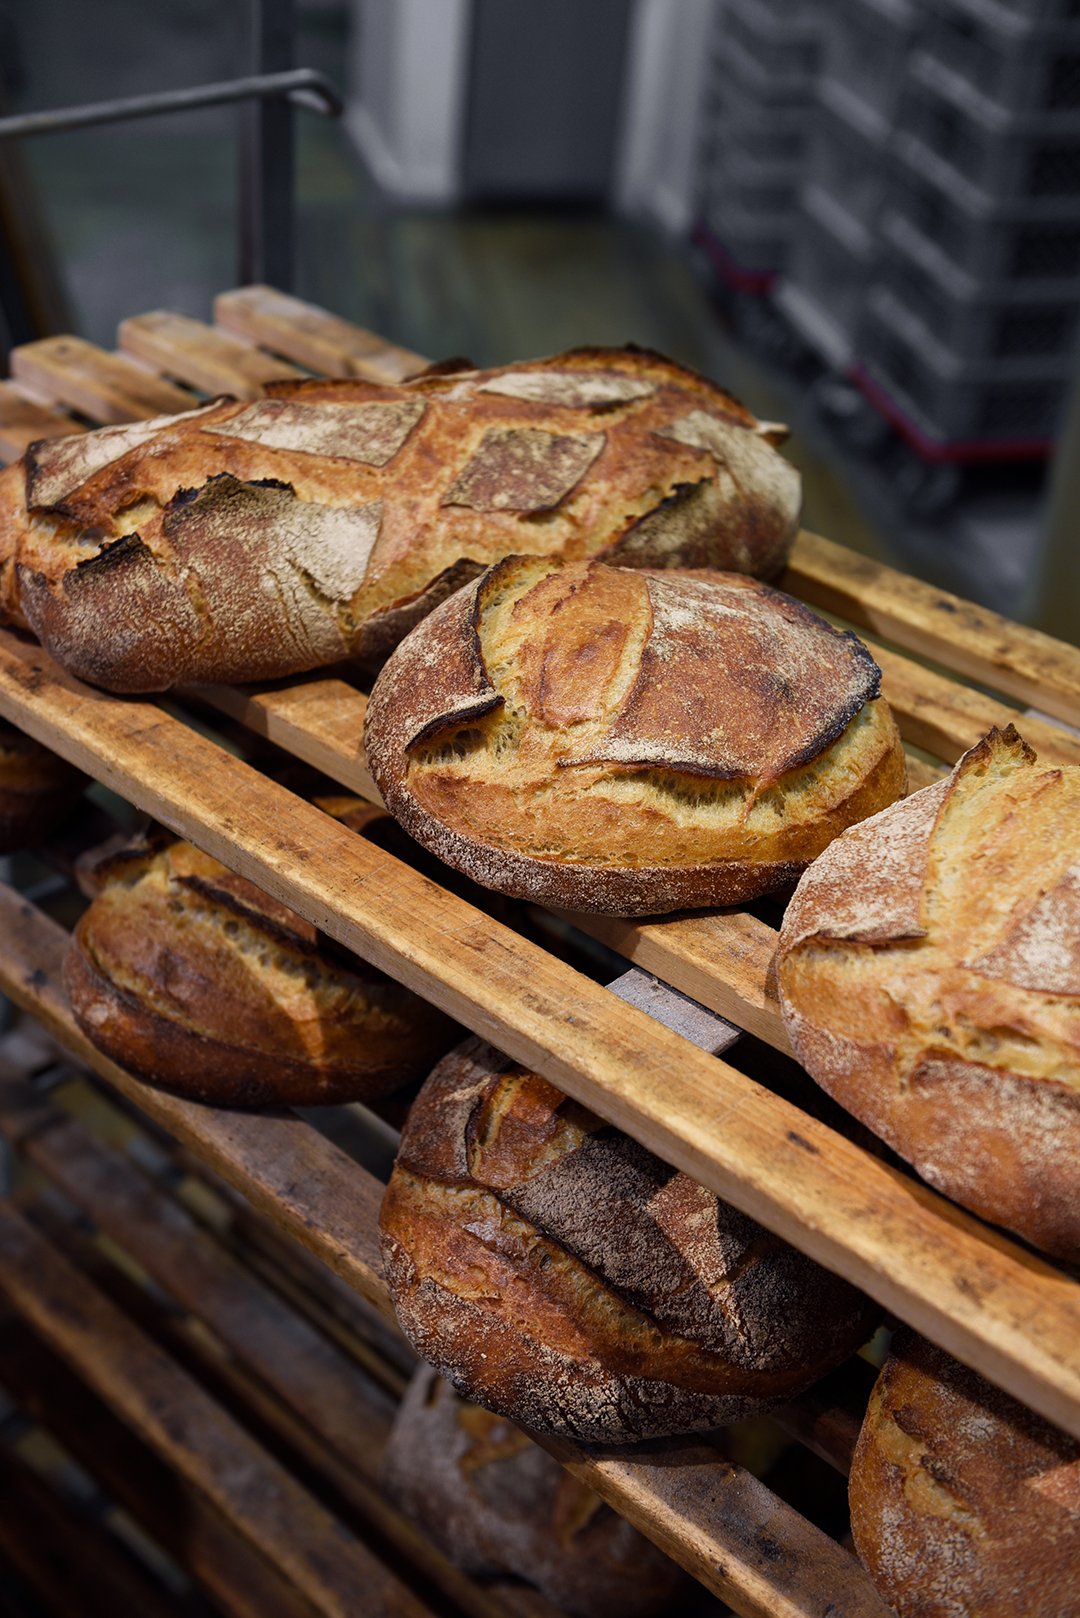
One of Florian's most popular breads - and the recipe that he shared with me (see below) - is his Beutebrot. A white sourdough bread made with wheat and a little spelt flour, with a firm crust and an open almost moist crumb (the double-picture at the bottom of this post showing the loaf cut in half is the bread that I baked in my kitchen, which worked out perfectly). If you happen to have an active sourdough starter in your kitchen you can enjoy Florian's Beutebrot in less than 24 hours and feel the sweet satisfaction of a real bread baker.
The podcast episode with Florian Domberger is in German. You can listen to the Meet in My Kitchen podcast on all common podcast platforms; there are English and German episodes. You can find all the blog posts about these podcast episodes including my guests' recipes here on the blog under Meet in Your Kitchen.
Listen to the podcast episode with Florian on:
Spotify / Apple / Deezer / Google / Amazon / Podimo
On Instagram you can follow the podcast @meetinmykitchenpodcast!
Beutebrot / Wheat and Spelt Sourdough Bread
by Florian Domberger / Brot-Werk
You will need a cast iron cocotte (Dutch oven) with a lid to bake the bread and a very sharp razor blade (bread lame / scoring knife) to score the loaves before baking - and of course, you will need an active sourdough starter.
Makes 2 loaves of sourdough bread
900g / 7 cups unbleached wheat flour (type 550)
100g / ¾ cup whole spelt flour
750ml / 3 cups plus 2 tablespoons lukewarm water
100g / 3 ½ ounces active sourdough starter *
25g / 5 teaspoons fine sea salt
* Your sourdough starter is active when you refresh it and it doubles its volume within roughly 4-5 hours. For this recipe, use the refreshed sourdough starter as soon as it has risen to its peak, before deflating. To test the activity of your starter, you can add a spoonful of it to a glass of water: it should float, it should not sink, then it's ready to be added to the dough. On my Instagram you see how I grew a sourdough starter from scratch, it's in the Highlight Story 'Sourdough', click here.
This is my bread baking schedule: On Day 1, I refresh my sourdough starter in the late morning/ around noon, I start mixing the dough at around 5 pm then, after folding and shaping the dough, I leave it in the fridge overnight and remove it from the fridge the next day at around 8:30am. On Day 2 at around 10am, I preheat the oven and bake one loaf after the other in a round cast iron cocotte (Dutch oven) with a lid.At the bakery, Florian shapes the loaves on Day 2, however I find that my schedule works easier for a home baker.
Day 1
In a medium bowl, combine the wheat flour and the spelt flour. In a large bowl, whisk together the water and sourdough starter. Add the flour mixture and, using your hands, mix for about 3 minutes until well combined; it will be a little sticky. Cover with a kitchen towel and let it rest at room temperature for about 40 minutes.
Sprinkle the salt on top of the dough and, using your fingers, push and rub the salt into the dough. Fold the dough on top of itself a few times then cover with a kitchen towel and let it rest at room temperature (about 21°C / 70°F in my kitchen) for 30 minutes.
Now the bulk fermentation starts, which will take about 3-4 hours: Every 30 minutes, wet your hands with a little water and , grabbing underneath the dough on one side, lift the dough and fold it on top of itself then turn the bowl by 90° and repeat folding the dough the same way on top of itself; turn the bowl by 90° and repeat folding the dough two more times so that the dough has been folded on top of itself from all 4 sides. Cover the bowl, let the dough rest at room temperature for 30 minutes then repeat folding the dough the same way (each time from all 4 sides) every 30 minutes. After 3-4 hours the dough will feel softer and smoother, more cohesive and less stretchy, and it will have risen by roughly 30%. This process will fasten when the room temperature is higher and take longer when the room is colder.
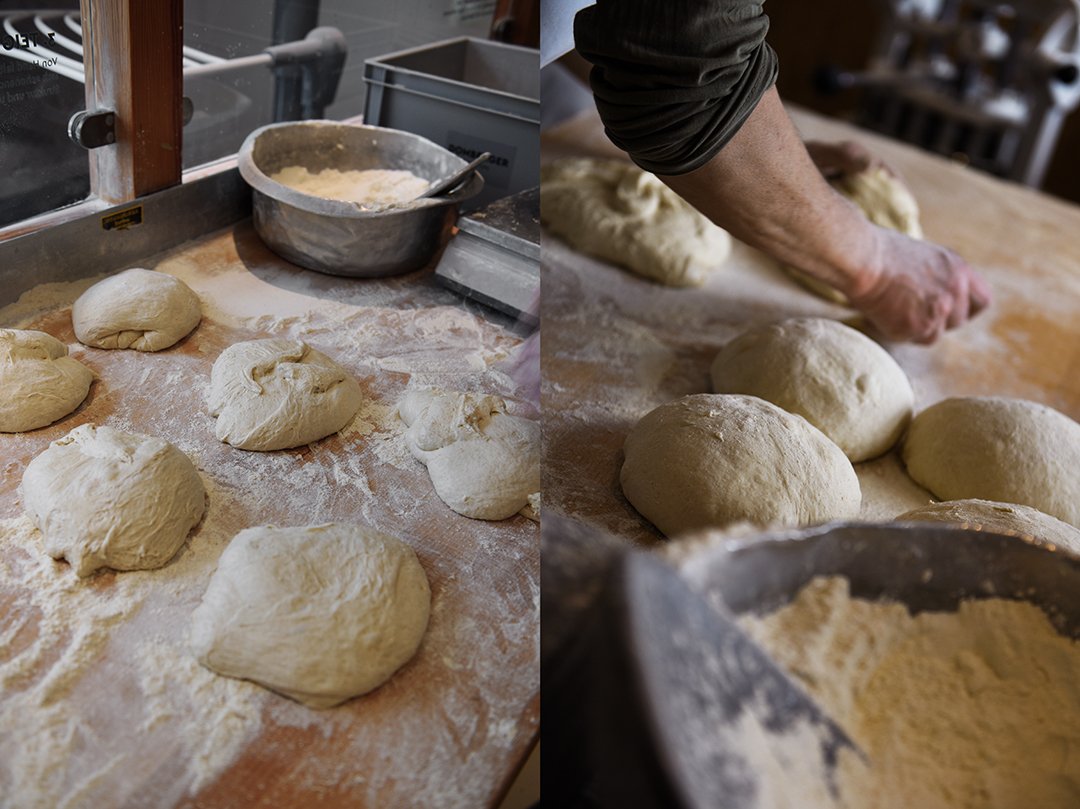
After the bulk fermentation, gently pour or scrape the dough out of the bowl and onto a work surface, dust the dough's top with a little flour then flip the dough and gently cut the dough into 2 pieces. Take one piece of dough, fold it onto itself so that the top and the bottom surface is dusted with flour. Using a bench knife or your hands, gently pull and turn the dough, giving it a round shape and building surface tension (you can find tutorials about shaping sourdough loaves online). The top should be round, smooth, and very taut. Shape the second piece of dough the same way then let both pieces rest for about 10 minutes.
Line 2 bread baskets or bowls (about 20cm / 8" diameter) with kitchen towels and dust the towels with flour. For the final shaping, dust one piece of dough with a little flour and, using a bench knife, flip the dough. Gently stretch and pull the side of the dough that's lying closest to you a little up and fold it over the middle of the dough. Pull the right side of the dough up and fold it to the left generously over the middle of the dough then pull the left side up and fold it to the right generously over the middle of the dough. Now pull the side furthest away from you up and fold the dough onto itself towards you then lay your hands, shaped like a dome, on top of the dough and pull and rotate the dough, while the seams stay at the bottom, towards you. This builds surface tension and creates a taut, round top. Using a bench knife, lift the dough then transfer and flip it into the prepared basket; the seam should be at the top and the round surface at the bottom. Repeat the same way with the second piece of dough. Wrap both baskets with the loaves in large freezer or rubbish bags and transfer to the refrigerator. Leave the dough to rise in the fridge overnight (for about 11-12 hours).
Day 2
After 11-12 hours, remove both baskets from the fridge, leaving them in the bags at room temperature. After 2 hours, place a cocotte (Dutch oven) closed with its lid on the bottom rack of the oven and preheat the oven to the highest setting (at least 250°C / 475°F) for about 30 minutes. The cocotte should be very hot. Remove one basket from the bag. Line a large wooden board with parchment paper, place it on top of the basket, and flip the basket so that the loaf lies on the parchment paper. Quickly score the top of the loaf with the razor blade (you can find tutorials about scoring sourdough loaves and different scoring patterns online) then immediately, and very carefully (!), remove the hot cocotte from the oven, placing it onto a trivet. Be cautious and mind that the cocotte is very hot and can cause severe injuries! Immediately remove the lid from the cocotte then transfer the loaf (on the parchment paper) to the hot cocotte and quickly but carefully place the loaf (on the parchment paper) in the cocotte. Close with the lid, place the cocotte on the rack in the oven then reduce the heat to 230°C / 450°F and bake for 20 minutes. Remove the lid and bake open for another 20-25 minutes until golden brown. Transfer the bread to a cooling rack. Let the bread cool for at least 20-30 minutes before you cut it.
To bake the second loaf, raise the oven temperature to the highest setting again (at least 250°C / 475°F), place the cocotte closed with its lid in the oven, and heat for 10-15 minutes. Then repeat the steps described above but mind to reduce the heat to 230°C / 450°F when you transfer the scored second loaf into the oven (a step I often forget).
The bread tastes best in the first 3 days. It also freezes well, you just defrost the frozen loaf, sprinkle the defrosted (or partly defrosted) loaf generously with water then bake it at 200°C / 400°F for about 10-20 minutes.