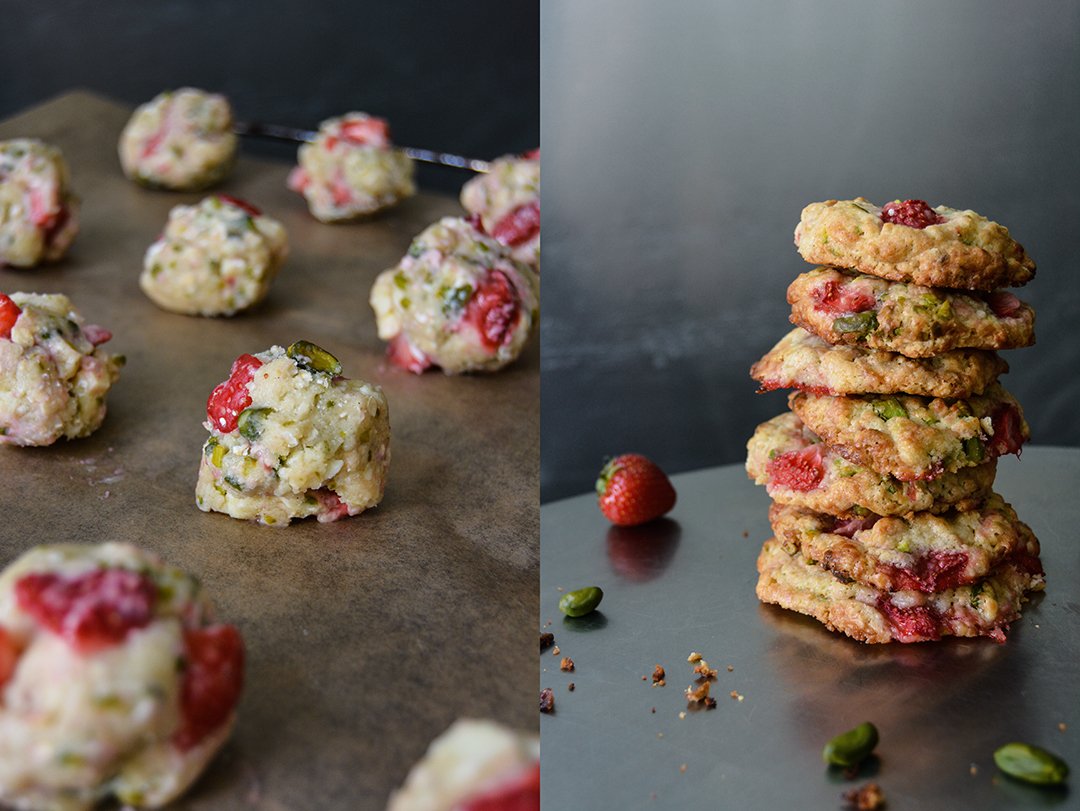
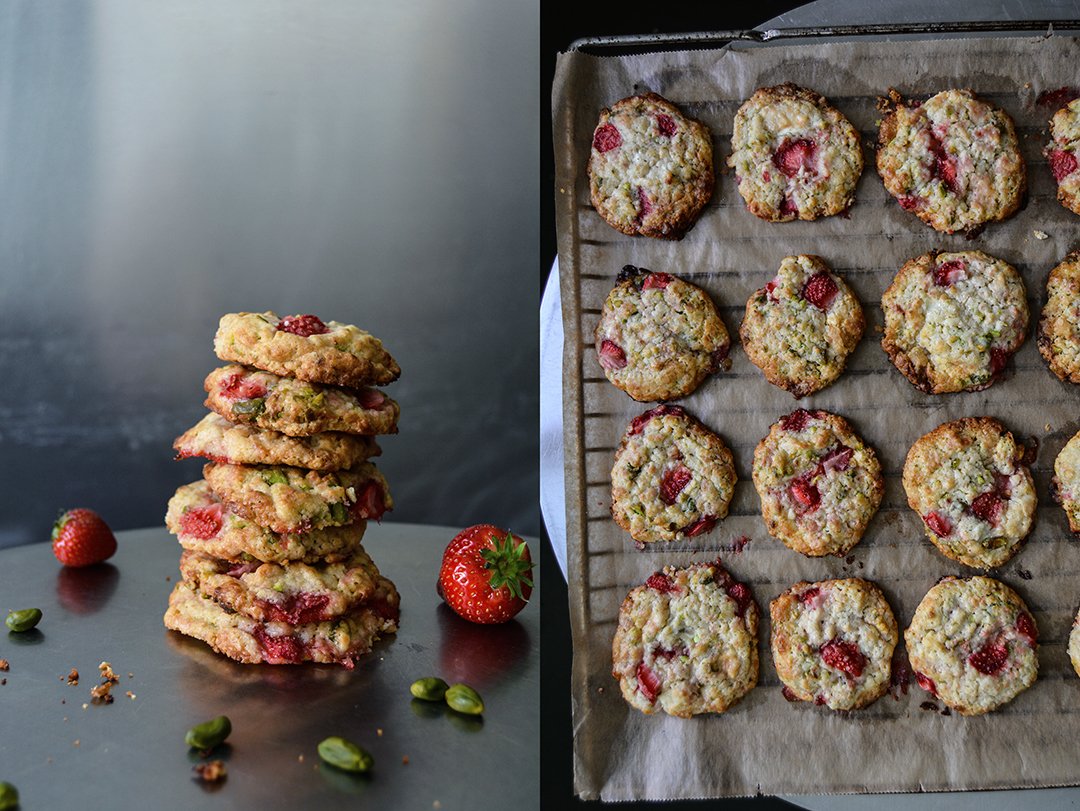
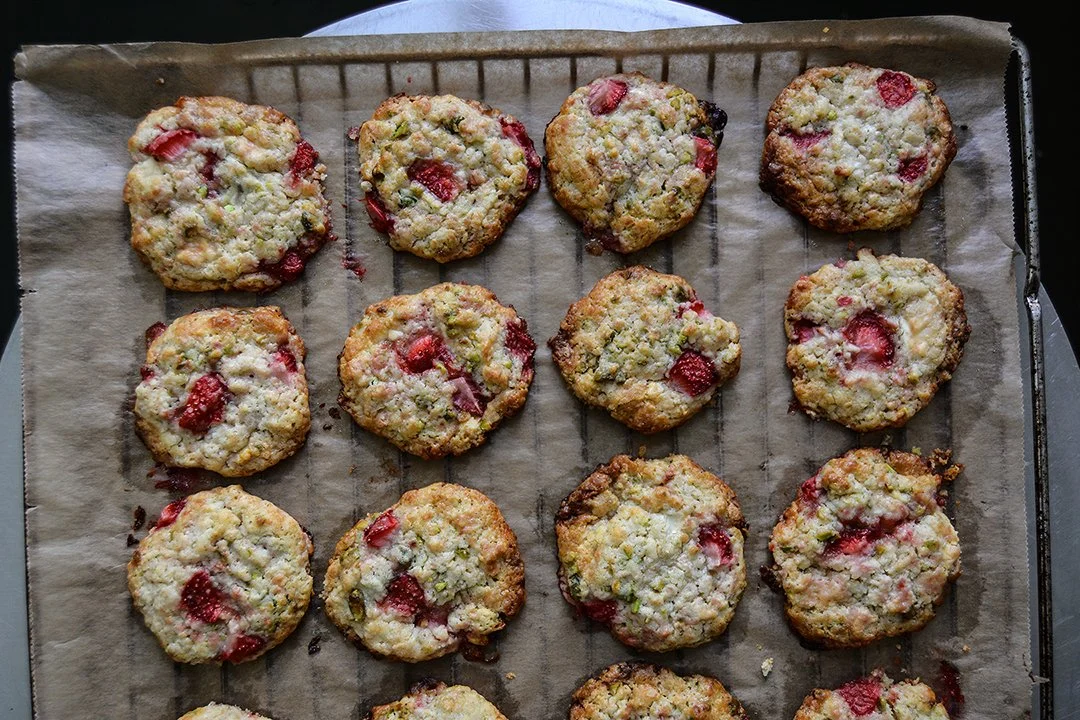
Strawberry Pistachio Cookies with Oats and White Chocolate
This spring feels strange, it doesn't seem to start. Most of the time it's either too cold, too grey, or too wet, I'm more in the mood for cozy stews and hearty pies munched away on the sofa than the springy treats that I usually crave in May.
I'm impatient (not just in the kitchen), I tend to rush to the next season with hungry excitement. I find it hard to wait for the right ingredients to appear at the farmers' market for all the dishes that I already picture in my head. So, I guess I should be thankful for the unpleasant weather, it helps me to stick to the actual season - spring with a wintery touch. Unfortunately, the unusual frosty temperatures at night are a tough burden for the farmers. Their produce suffers, which narrows their harvest dramatically. The white German asparagus that I tasted wasn't as thick and tasty as in the past years, strawberries - by far - aren't as sweet. It reminds me that we're in nature's hands. It's an important reminder, showing us that we live in a fragile system that we easily tend to forget about.
Although I'm not too impressed by the strawberries' taste, they are totally fine in a cookie. Accompanied by nutty pistachios, smooth white chocolate, and a handful of oats, I turned them into the best cookies that my kitchen has seen in a while. They are sweet, soft, and so addictive. Have a bite, close your eyes and you can feel summer.


Strawberry Pistachio Cookies with Oats and White Chocolate
Makes about 20 cookies
plain flour 200g / 1 1/2 cups
rolled oats 50g / 1/2 cup
fine sea salt 1/2 teaspoon
baking powder 1 teaspoon
butter (soft) 130g / 1/2 cup
granulated sugar 150g / 3/4 cup
vanilla pod, scraped, 1/4
organic egg 1
white chocolate, roughly chopped, 100g / 3 1/2 ounces
unsalted shelled pistachios, roughly chopped, a small handful
fresh strawberries, ripe but not soft, cut into small pieces, 100g / 3 1/2 ounces
Set the oven to 175°C / 350°F (preferably convection oven) and line 2 baking sheets with parchment paper.
Take 1 heaped tablespoon off the flour and set aside.
In a medium bowl, combine the remaining flour, oats, salt, and baking powder.
In the bowl of a stand mixer, fitted with the whisk attachment, beat the butter, sugar, vanilla, and egg for a few minutes or until fluffy. Add the egg and continue mixing for about 1 minute until well combined. Using a wooden spoon, stir in the flour mixture until just combined. Fold in the white chocolate and pistachios.
This will make it easier to mix in the strawberries: Sprinkle and mix the strawberries with the heaped tablespoon of flour. Crumble and spread the dough on a baking sheet. Spread the floured strawberries on top of the dough and, using your fingers, gently (!) fold in the berries. Don't worry if it looks loose and messy, mind not to squeeze the berries too much. Scoop out a heaped tablespoon of dough for each cookie and gentle form a ball slightly smaller than a golf ball. Spread the dough balls on a dish that's safe to keep in the freezer, then put the cookies in the freezer for 10-15 minutes or until hard but not frozen. Spread the cookies on the 2 lined baking sheets, mind to leave enough space between the cookies, they will expand in the oven.
Bake, one baking sheet at a time, for about 13-15 minutes or until golden but still slightly soft. After 5 minutes, using a fork, flatten the cookies softly. Let them cool on the baking sheet for a few minutes before you transfer them onto a wire rack.


Meet In Your Kitchen | Deb Perelman - Smitten Kitchen's Berry Ricotta Galette

Last week I went to New York and I had three wishes on my mind:
1. I wanted to win the James Beard Award (I had strong doubts that that would happen).
2. I wanted to eat oysters at The John Dory.
3. I was hoping that Deb Perelman would open the doors to her famous Smitten Kitchen for a Meet In Your Kitchen feature.
And what can I say, I was a lucky girl. I won the award, I had a fantastic pre-award oyster treat just for myself (if you like oysters, book a table at April's restaurant next time you visit NYC!) - and I met and baked together with Deb!
Smitten Kitchen was the only blog I knew about when I started Eat In My Kitchen in November 2013. I discovered many more in the past three years, but not many managed to keep my attention with such persistence as Deb's. She knows how to entertain, impress, and inspire me with calm ease. Her love for food jumps out of all of her recipes, out of every picture she takes and every line she writes. She's a perfectionist, but she knows how to hide it. She's a charmer.

Deb's blog is a staple in the blog world. She started in 2003 writing about her life in general and focussing on recipes since 2006. When you ask yourself how a single person can build up such a successful food platform on her own and keep it running like a smooth motor, you just have to meet her and you'll know why. Deb is full of life and energy, at the same time down to earth and humble. She's not interested in the blunt surface, in superficial attention, she wants to explore a recipe in depth and present it in all its glory. And here lies her secret: all her recipes make sense, from a cook (or baker) and an eater's point of you. She calls herself a fussy eater, picky like her children, she doesn't mind baking the same cake 14 times until it's just right. This leads to a habit of excessive note taking whenever she's at the cooker. To learn, to improve, and to develop the right formula that she and her readers can totally trust. This trust is what a food blog is built on. Mrs. Perelman takes this task quite easily as she loves what she does, she only cooks the food that she craves herself and that she's curious about. She's like a passionate scientist, working late at night, while everyone else is already in bed, and she's still there, solving culinary problems.
Her journey into and in the kitchen was influenced by her work at a bakery as a teenage girl, by her family with roots in Germany and Russia, Jewish baking, and American cooking. Her mother's cookbook by Julia Child added some French extravagance to the palate and sparked her interest. When you read Deb's blog, you can see that she has a weak spot for comfort food. She might be a fussy eater but she's not into fussy cooking.
After hundreds of recipes developed by herself and shared online, it was time, in 2012, to turn this treasure into a physical publication. When Deb's first cookbook - The Smitten Kitchen Cookbook: Recipes and Wisdom from an Obsessive Home Cook - entered the book shops, it happened anything but quietly. It was a success that screamed for a follow up book. A second child (the cutest baby girl!) and obsessive recipe tasting caused a few delays in the schedule, however, Deb's confident that it's going to happen this year. Her new book will come out soon, including more global influences than in the predecessor's recipes. It's a collection that represents how we cook and eat today. Different cultures from all over the world inspired Deb to experiment with ingredients that are relatively new to our kitchens. The frame, however, is Deb, her style, and her love for American comfort cooking.
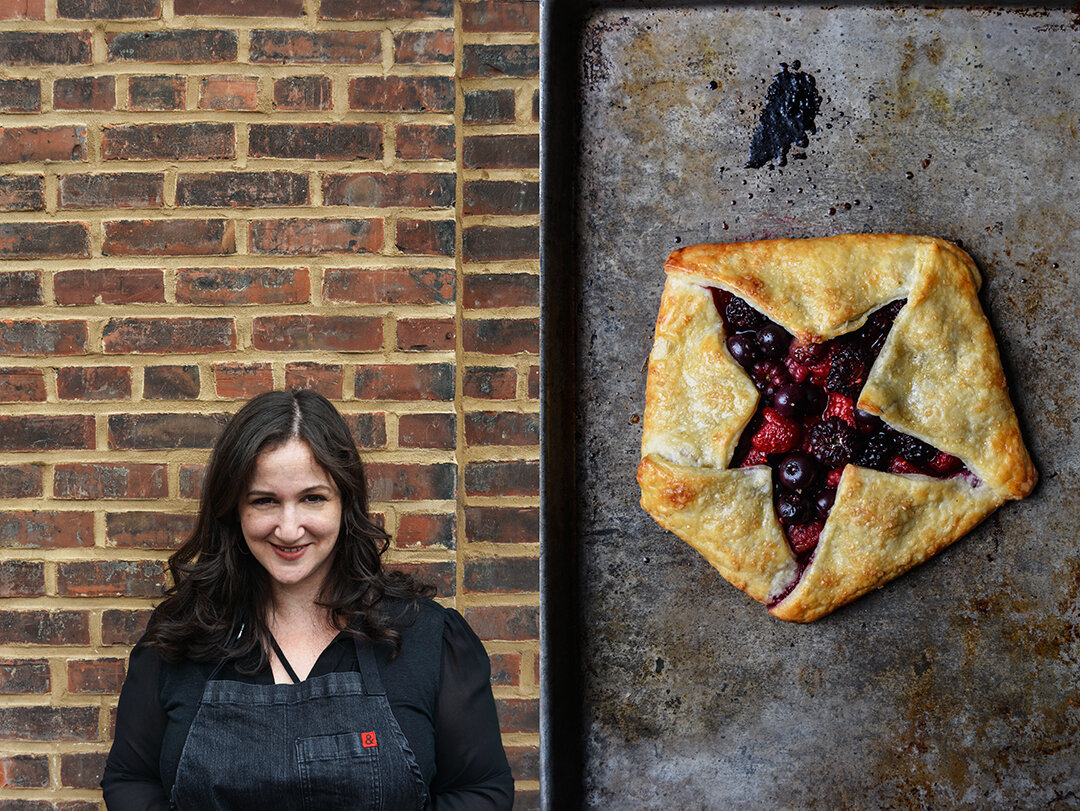
We baked the most wonderful berry ricotta galette together, it tasted divine, and the fact that Deb baked it for me made it taste even better.

Berry Ricotta Galette
Recipe by Deb Perelman / Smitten Kitchen
Deb also made a couple small galettes (as you can see in the picture above), but if you aim for the star-shape it's easier to make one large galette. The smaller ones opened in the oven.
Leakage is almost inevitable when making galettes but you shouldn’t sweat it because I’m convinced that it’s more distressing for the baker (who knows exactly how much jammy deliciousness has been lost) than anyone eating a wedge (it will taste like nothing is missing at all).
Here’s the PDF template I made to help you form a star shape, if desired. As should be abundantly evident, I’m no graphic designer, but it will hopefully give you a start.
Makes one 7.5 to 8-inch (19-20cm) galette
For the pastry
1 1/4 cups (160 grams) all-purpose flour
1/2 teaspoon table salt
1 1/2 teaspoons granulated sugar
Zest of half a lemon
8 tablespoons (4 ounces or 113 grams) cold unsalted butter, cut into pieces
1/4 cup (60g) ricotta, yogurt or sour cream
3 to 4 tablespoons cold water
For the filling
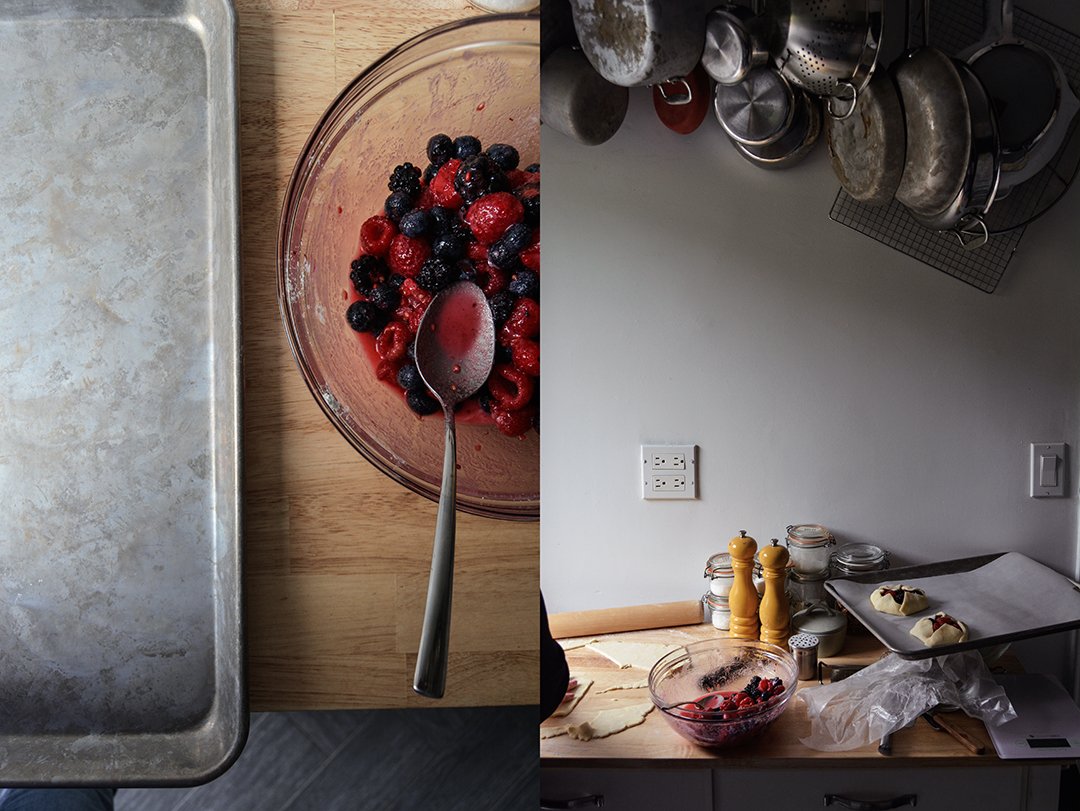
2 cups raspberries, blackberries, and blueberries
3 to 4 tablespoons granulated sugar (use the lower amount if your fruit is especially sweet)
2 tablespoons cornstarch
Juice of half a lemon
Pinch of salt
For the glaze
1 egg yolk beaten with 1 teaspoon water
1 heaped teaspoon turbinado or coarse sugar for sprinkling
For the dough, whisk the flour, salt, sugar and zest together in the bottom of a large bowl. Work the butter into the flour with your fingertips or a pastry blender until mixture resembles a coarse meal and the largest bits of butter are the size of tiny peas. Stir ricotta and 3 tablespoons water together in a small dish and pour into butter-flour mixture. Stir together with a flexible spatula as best as you can, then use your hands to knead the mixture into a rough, craggy ball. Wrap in plastic and flatten into a disc. Chill in the fridge for 1 hour or up to 48 hours, or you can quick-firm this in the freezer for 15 minutes.
Preheat the oven to 400°F (200°C).
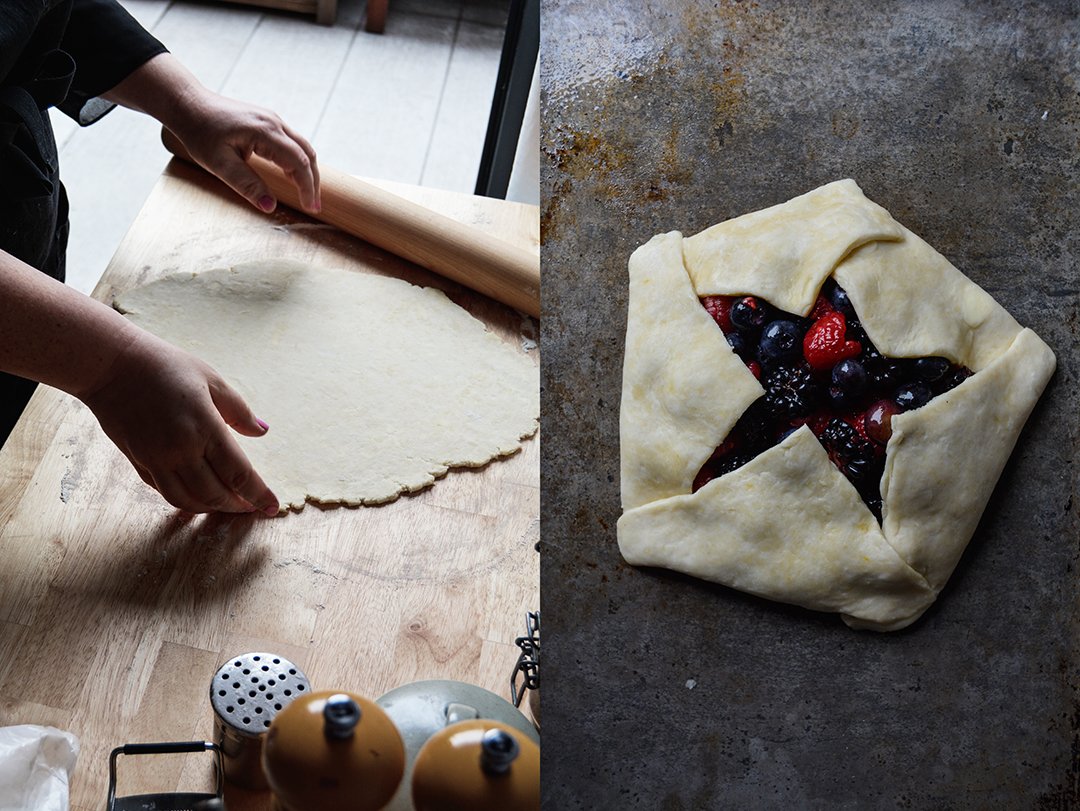
On a floured counter, roll the dough out into a large round-ish shape, about 14 to 15 inches (36-38cm) across. If you’d like to form your galette into a star, as shown, use the red dashed outline of the PDF template mentioned above. It will print smaller on an 8.5×11-inch (DIN A4) piece of paper than you need, but you can use it as a rough guide to cut as large of a pentagon shape as your dough will allow.
Transfer round or pentagon-shaped dough to a parchment-lined baking sheet; I like to fold my dough gently, without creasing, in quarters then unfold it onto the baking pan. If you’re making a star, cut a 1-inch (2.5cm) notch in the center of each side, angling it toward the center, as shown in the blue dashed lines of the template.
Stir together all of the filling ingredients and spread them in the center of the dough, leaving a 2-inch (5cm) border. If you’re making a round galette, fold the border over the filling, pleating the edge to make it fit. If you’re making a star shape, fold each of the 5 corners into the center, along the green dotted lines of the template. Pinch the outer corners closed, to seal in the filling and the shape (see 6th and 10th picture).
Whisk egg yolk and water together and brush over exposed crust. Sprinkle with coarse sugar.
Bake for 30 minutes, or golden all over. Remove from the oven and let stand for 5 minutes, then slide the galette onto a serving plate. Cut into wedges and serve hot, warm or at room temperature, preferably with vanilla ice cream.

The ever-growing number of Smitten Kitchen's followers has now trusted you for over a decade. What's your secret?
I have no idea how I got so lucky with this. When I got started food blogging in 2006, there was no such thing as turning it into a career so it wasn't even in the remotest corner of my mind. All I wanted to do was create a collection of recipes I considered perfect so once I got a dish the way I liked it, I didn't have to reinvent the wheel every time I was hungry for it. I still feel exactly this way. Having an audience makes it way more fun, but I often wonder if I'd still be doing this in a vacuum because I will always want to cook new things and get them right.
You call yourself a perfectionist, do you feel the drive to perfection just in the kitchen or also in other fields of life? Does the perfect recipe really exist, when do you know you have to stop?
I think near-perfect recipes exist. I don't think every recipe is going to work with every set of ingredients, in every kitchen, at every altitude, at all times but I think when the recipe is very strong, it withstands these variations well. If I think a small thing will throw a recipe immeasurably off though, I won't publish it because I've found in 10+ years of comments that if something can go wrong with a recipe, it sooner than later will for someone.As you've seen my fridge and freezer (since cleaned, but only under duress), I think you know my perfectionism does not extend everywhere in my life. But I do want things the way I want them and I hear from my parents I have been this way from the beginning (sorry guys).
Which of your recipes do you love the most? Which one does your husband and two kids love the most?
We all love the Leite's Consummate Chocolate Chip Cookie, especially now that I've updated them in a way that I can make them more often (I like to stash them in the freezer, bake whenever we remember). And not to be too much of a tease but because this is something I've been working endlessly on for the last couple years, there's a grandma-style chicken noodle soup and a crumb cake in my next cookbook that everyone is nuts for. They never go to waste.
Where do you find inspiration for new recipes?
Oddly, never inside the kitchen. The kitchen is where I test out ideas and pay close attention to what happens, but it's not where new ideas come to me. They come to me when I'm on a train or in a car going somewhere far enough that my mind wanders off, or at a restaurant when I like the flavor intersection of ingredients and want to apply it to something else at home.
How do your family's roots in Germany and Russia influence your cooking and your personal culinary journey?
From my husband's Russian family (he was born there but doesn't remember it), an appreciate of garlic, pickles, sour cream, dill, wafer-y cakes, syrniki (cottage cheese pancakes), as well as the value of a freezer full of pelmeni, vareniki (filled dumplings), and at least one bottle of vodka. From my mom's German side, spaetzle, schnitzel, bretzel, Bienenstich (popular German cake), and every type of almond paste/marzipan confection you can dream up.
What do you enjoy about writing a cookbook and what do you hate about this project? Do you prefer working on your blog or on a book?
I love both for different reasons; the blog is my favorite place to be, to try out ideas, chat with people in the comments, field questions and more. The speed of output and feedback is faster, it lends itself well to cooking whims and streaks; it makes me very happy. Books are less balanced. You spend years (5 years, even!) working through recipes and ideas behind the scenes with an additional layer of design -- I don't know how your book experience was, but I seem to always go 20 rounds with the cover, 45 rounds with the title, 10 rounds with page layouts, and am making recipe swaps until the day I'm cut off, like being at a bar at 2am -- all to yield one (hopefully) wonderful thing that you hope people will want to take home and read and cook from but you have no idea and so, perhaps, the stress is also much greater. But so are the rewards (or is it relief?) should people be as excited about it as you were. I loved getting to book tour last time, and hope to do more this fall.
You have a large cookbook selection in your apartment, what makes a good cookbook in your eyes?
So many things. While I love, like anyone with eyes, looking at beautiful pictures, it's never made a just-okay cookbook a great one. What I love even more is feeling like I'm stepping into a story, a world, with recipes. I love a funny anecdote about how a recipe came to be or a small tidbit I wouldn't have known about a dish. I want the recipes to be airtight, even though I know how hard this is, but to me this is the baseline of a cookbook. And I'm always hoping to see something I hadn't seen before; to feel the creativity bursting from the page.
Do you enjoy being cooked for? On a special night, do you prefer to eat at home or dive into New York's vibrant food scene?
I love being cooked for! I love going out; we used to do it so freely before kids and I do miss it, it's just more complicated with noisy people with early bedtimes. I get so inspired going somewhere teeming with fresh ideas, and it makes me want to come home and cook immediately, so eating out fuels eating in.
Who is your biggest inspiration in the kitchen?
I've always enjoyed Julia Child's tenacity, Marion Cunningham's defense of home cooking against drudgery, and Gabrielle Hamilton's unapologetic embrace of her food vision.
When it comes to school events or a friend's party, do you get requests to bring a dish or are people shy to ask Deb from Smitten Kitchen to bring a birthday cake or sandwiches?
Absolutely not.
What was the first dish you cooked on your own, what is your first cooking memory?
Brownies, I think. Not very different from My Favorite Brownies on my site, but I'd forgotten to add the flour. They were a little burnt at the edges and very mushy in the middle and yes, we still ate them. They weren't even bad, but I never heard the end of it.
What are your favourite places to buy and enjoy food in New York?
Union Square Greenmarket for vegetables and fruit and everything; Murray's or Saxelby for cheese, Kalustyan's for spices and around-the-world ingredients, Buon Italia in Chelsea Market, mostly to load up on the Setaro pasta, Faicco's for spiral sausages for grilling weather, which are always a huge hit, can I go on and on? I could go on and on.
If you could choose one person to cook a meal for you, who and what would it be?
I think my kids should wake up early to make me pancakes this weekend for a change. (I am joking, of course. They are 1 and 7 and our apartment would be in ashes.)
You're going to have ten friends over for a spontaneous dinner, what will be on the table?
Spaghetti with clams or mussels and fries or assemble-your-own steak salads with a side of roasted potatoes.
Do you prefer to cook on your own or together with others?
Solo if I'm working on a new recipe or one I haven't ironed out yet, because I want to be able to pay attention and take notes and make tweaks. If I'm throwing together the above meal for 10 friends, they better be hanging out in the kitchen and drinking wine with me.
Which meals do you prefer, improvised or planned?
Improvised; I like the challenge.
Which meal would you never cook again?
Anything where I've ended up cooking things individually over a stove for many people; I have bad memories of making Fake Shack Burgers for 10 people (so much hamburger grease from head to toe when I was done) as well as an early brunch party where I made French toast for everyone as they trickled in.
Thank you Deb!


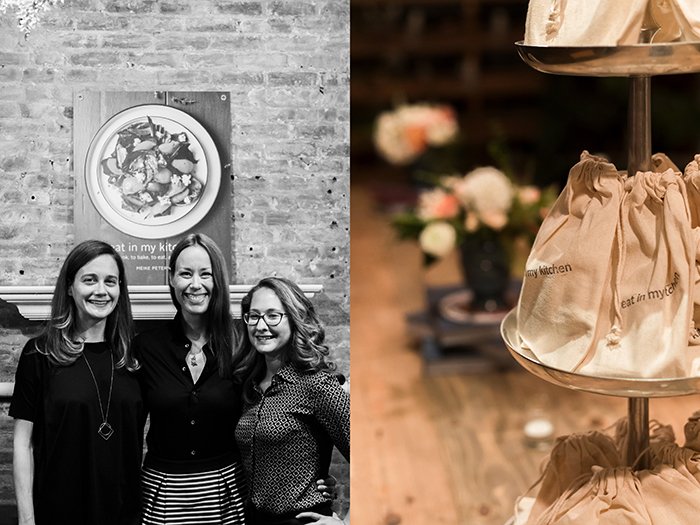
Rhubarb Corn Galette with Saffron & we won the James Beard Award!

Last Tuesday we won the James Beard Award. I flew to New York thinking that I had no chance of winning - Ina Garten was nominated in the same category as me: General Cooking. I was sure that this was not going to happen.
And now I’m sitting here at JFK airport, writing these words while waiting for my flight back to Berlin. Trying to think clearly, but I can’t. I wish there were words to describe how I feel, or at least give you a vague idea of what this means to me - but I can’t. It’s almost impossible to talk about a feeling that still shakes me up every time the memories come back and makes my heart fall as if I’m jumping of a cliff. It’s not just in my mind. I feel physically overwhelmed. Just like I did when I went on stage to fall around our host Andrew Zimmern’s neck, to kiss and squeeze him, and to receive the James Beard Foundation medal from his hands (watch my speech here).
When I say we won and not I won, you need to understand that this book, Eat In My Kitchen, would not exist without a bunch of people who gave me all the help, love, support, and inspiration I needed whenever I thought I wouldn’t manage. These people believed in me before I believed in myself, they were the ones who convinced me to trust and follow my instincts:
My editor Holly La Due who guided me through the past two years since we first spoke about a cookbook - and she held my hand in these endless painful seconds before my name was announced at the awards ceremony by legendary Andrew Zimmern; my mother who passed her love for food and wine on to me, the seed out of which Eat In My Kitchen grows every day; everybody at Prestel Publishing and our external experts Lauren Salkeld, Jan Derevjanik, and Ron Longe, who gave everything to make this book look as it looks and stand where it stands. And my family and friends all over the world, your belief in me makes me grow every day. Thank you for trusting me, and for waiting for me patiently.
When your work is recognized and awarded by one of the most critical juries in the food world, a jury who’s not interested in numbers or celebrity status, but in the quality of recipes, it can easily feel intimidating. But that rainy night at New York's Chelsea Piers was not intimidating at all, it was magical. I was in a room together with so many talented people who all love what I love so much - food - and I experienced the warmest welcome to this family (a word that winner Dori Greenspan used). There's a lot of respect, a humble appreciation of the work of the others. Ronni Lundy, Dori Greenspan, Andrew Zimern, Pierre Koffmann, Naomi Duguid, Judith Jones, Keith Pandolfi, Francis Lam and many more (here's the full list of winners), we were awarded for our work, and everybody who came to this event came to celebrate us, but also a passion that we share and that connects us, no matter what part of the world we come from. I want to thank the James Beard Foundation and all the inspiring people who I met that night, a night that I'll never forget in my whole life.
Knowing that I wouldn’t be able to cook or bake anything to share with you when I came back, I made a galette (twice actually because it’s so good) just a few days before I left. It’s a spring treat and it's quite a spectacular one. A crunchy short crust base made of corn flour and spelt flour (you can also use wheat), topped with sour rhubarb and the most fragrant saffron sugar. Cookbook author Yossy Arefi introduced me to this golden spice sugar and inspired me to use it for various sweet pies. Last summer I wrote about her berry galette and I will never forget how the addition of saffron to fruit and buttery crust hit me. It's a true celebration cake.
And now I want to thank you for always pushing me to try out new things in my kitchen, to keep cooking, baking, and writing about what we all love so much: Food!
Photos of the James Beard Award Ceremony by Kent Miller Studios, c/o the James Beard Foundation.


Rhubarb Corn Galette with Saffron Sugar
Update: This recipe is also in my 2nd book, 365: A Year of Everyday Cooking & Baking, Prestel Publishing, 2019
Mind that it's best to prepare the dough for the galette the day before you bake it to give it enough time to chill in the fridge.
Makes one 23cm / 9" galette.
For the pastry
very fine corn flour / corn meal (not corn starch) 90g / 1/2 cup
plain flour (or white spelt flour) 90g / 2/3 cup
granulated sugar 1 tablespoon
fine sea salt 1/4 teaspoon
unsalted butter, cold, 125g / 1/2 cup plus 1 tablespoon
water, cold, 2 tablespoons
cider vinegar 1 teaspoon
For the galette
granulated sugar 75g / 1/3 cup and 1 tablespoon, plus 1 teaspoon for the topping
vanilla bean, scraped, 1/2
saffron threads about 1/8 - 1/4 teaspoon
plain flour (or white spelt flour) 1 tablespoon
fine sea salt 1/8 teaspoon
trimmed rhubarb 280g / 10 ounces
freshly squeezed lemon juice 1 tablespoon
organic egg, beaten, 1
For the pastry, in the large bowl of a stand mixer fitted with the hook attachment, combine the corn flour, flour, sugar, and salt. Add the butter and use a knife to cut it into the flour until there are just small pieces left. Quickly rub the butter into the flour with your fingers until combined. Add the water and vinegar and, using the hooks of the stand mixer, mix until combined. Form the dough into a thick disc, wrap it in plastic wrap, and chill in the fridge overnight (or for a few hours) until hard, or freeze for about 20-30 minutes.
On a table or countertop, place the dough between 2 sheets of plastic wrap and use a rolling pin to roll it out into a 30cm / 12" circle. Pull off the top layer of plastic wrap and replace with a piece of parchment paper. Flip the pastry circle over, transfer to a wooden board, and pull off the remaining layer of plastic wrap. Store the pastry (on top of the wooden board) in the fridge while preparing the topping.
Using a mortar and pestle, grind the sugar, vanilla seeds, and saffron until the saffron is fine and the mixture is well combined. Stir in the flour and salt and set aside.
Cut the rhubarb into 10cm / 4" long pieces and quarter each piece lengthwise. In a large baking dish, using your hands, toss the rhubarb, saffron-sugar, and lemon juice.
Take the pastry out of the fridge and arrange the rhubarb, overlapping, in a circle on top of the dough, leave a 5cm / 2" rim all the way around the fruit (see 10th picture). Sprinkle with any remaining saffron-sugar. Fold the edges of the pastry over the ends of the rhubarb, press to seal the folds. Chill the galette in the fridge for about 10-15 minutes or until the pastry is firm.
Preheat the oven to 200°C / 400°F (conventional setting). Place a baking sheet in the middle of the oven while preheating.
Brush the pastry with the egg wash and sprinkle with 1 teaspoon of sugar. Take the hot baking sheet out of the oven and pull the galette with the parchment paper onto the baking sheet. Bake for about 30 minutes or until golden brown. Let the galette cool for about 10 minutes before cutting. Serve warm or cold.


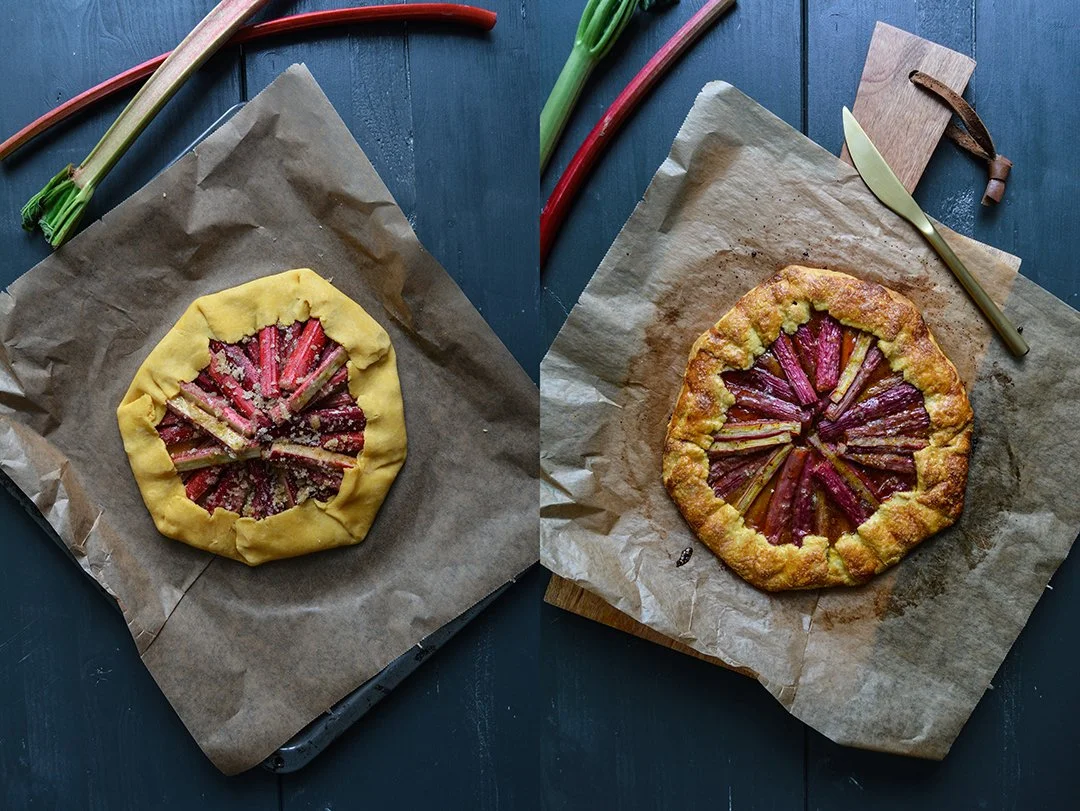


Nominee - Winner:


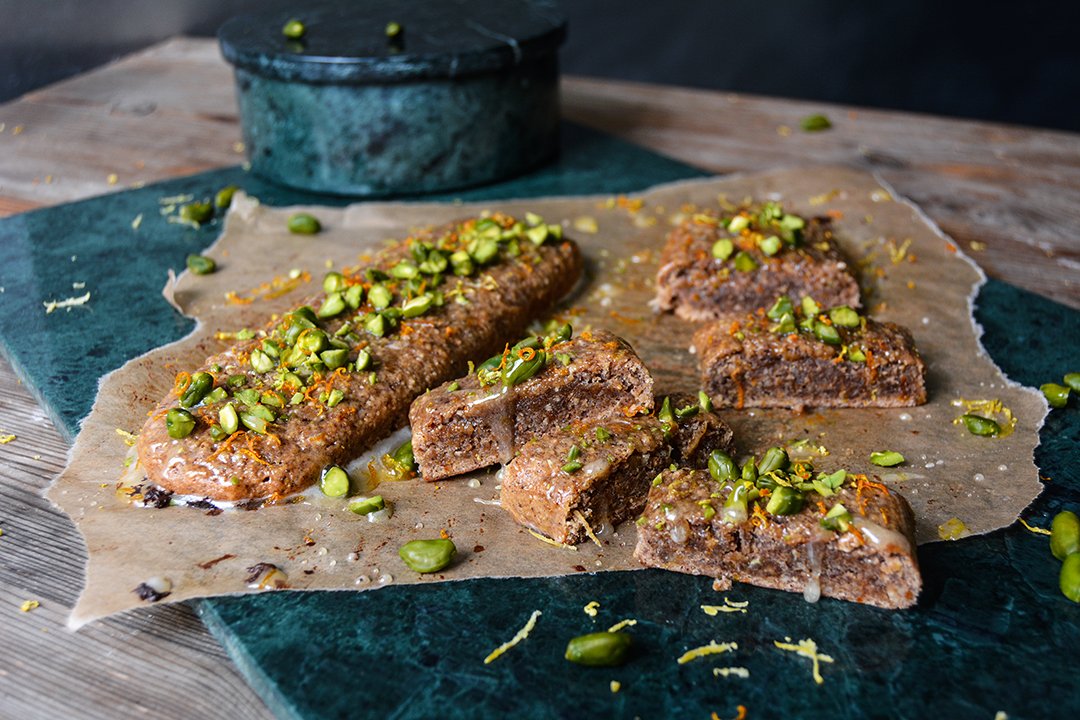
Kwareżimal - Maltese Easter Sweets without Eggs and Butter
No eggs and no butter, but lots of spice and flavour and a soft and chewy texture. Maltese Kwareżimal are an almost guilt-free pleasure that tastes so good, that I ask myself why I didn't bake them earlier.
This ancient treat dates back to the medieval times, when the Knights in the Mediterranean traditionally baked Kwareżimal during Lent. The little dark brown loaves are made without dairy products, just ground almonds (or hazelnuts in my recipe), spices, and honey create a beautifully fragrant cakey sweet. Sugar was allowed, as it was seen as a spice in those days. It's not a healthy bar after all.
The name derives from the Latin word quaresima, the 40 days of the Lenten season. Although you can find Kwareżimal in some confectionaries on the Maltese islands throughout the whole year, my favourite bakery for sweet treats, Busy Bee, only pulls them out of the oven as Easter is nearing. The problem was that I have never been to Malta around this time, so I had no idea how good Kwareżimal tastes. I knew that I wanted to try them at Busy Bee first and thanks to Jessica and Luke this day has finally come. Our friends visited us a couple weeks ago and gave me - besides many other goods - this plain looking miniature cake as a present. It only took me 12 years to have my first bite of Kwareżimal and it was pure enjoyment. I didn't share a piece with anyone.
So I finally knew what I was aiming for, I felt ready to give it a go. My Kwareżimal are made with ground hazelnuts, as my Maltese man doesn't like almonds, but feel free to use whatever nut you prefer. I mixed in some white spelt flour (plain flour woks just as well) to lighten up the texture. But don't worry, it's still as soft and chewy as it should be thanks to the juice of half an orange.
The texture is divine, almost moist, it reminds a bit of rough marzipan. And it tastes so rich, nutty, and citrusy, with strong tones of rather Christmassy spices, such as cinnamon, cloves, citrus zest, and flowery orange blossom water. I went for a crunchy pistachio topping, bedded on sticky honey running down the sites of my little Kwareżimal. You can also chop almonds or hazelnuts. When you buy this sweet from a shop, you get a single bar, not more than 12cm / 5" long, that was my measure. To serve, I cut it in thick slices - it's a bit like a cookie with a chewy feel.

Kwareżimal
Makes 2 small bars (serves 2-4)
finely ground hazelnuts (or almonds) 120g / 1 cup plus 2 tablespoons
plain flour (I used white spelt flour / type 630) 100g / 3/4 cup
granulated sugar 100g / 1/2 cup
cocoa powder 1 teaspoon
baking powder 1/8 teaspoon
fine sea salt 1/8 teaspoon
ground cinnamon 1 teaspoon
freshly grated nutmeg 1/4 teaspoon
cloves, finely ground in a mortar, 1/2 teaspoon
vanilla bean, scraped, 1/4
freshly grated orange zest 2 generous teaspoons
freshly grated lemon zest 2 generous teaspoonsf
reshly squeezed orange juice 60ml / 1/4 cup
honey 1 tablespoon
high quality orange blossom water (preferably organic) 2 tablespoons
candied orange peel, finely chopped, 1 tablespoon
For the topping
honey 2 tablespoons
freshly squeezed orange juice 1 teaspoon
shelled unsalted pistachios, roughly chopped, a small handful
freshly grated orange zest 1/2 - 1 teaspoon
Preheat the oven to 180°C / 350°F (preferably convection setting) and line a baking sheet with parchment paper.
In a large bowl, whisk together the ground hazelnuts, flour, sugar, cocoa powder, baking powder, salt, cinnamon, nutmeg, cloves, vanilla seeds, orange zest, and lemon zest.
In a small saucepan, heat the orange juice and honey over low heat and whisk until the honey has melted. Take off the heat and whisk in the orange blossom water. Let it cool for a couple minutes, then stir into the dry mixture. Add the candied orange peel and stir until well combined. The dough will be soft, but you should be able to form a bar; if it's too soft, add a little more ground hazelnuts.
Wet your hands lightly, divide the dough in half, and form 2 bars, about 5cm / 2" wide and 2cm / 3/4" tall. Mind that they aren't too flat or they will dry out in the oven. Bake for about 15 minutes, the top of the loaves should still be soft and just slightly baked.
While the Kwareżimal are baking, prepare the topping: in a small saucepan, heat the honey and orange juice over medium heat and whisk until combined. Take the pan off the heat.
Brush the warm Kwareżimal with the warm honey and sprinkle with the pistachios and a little orange zest. To serve, cut into thick slices. Wrapped in cling film, it stays fresh for days.


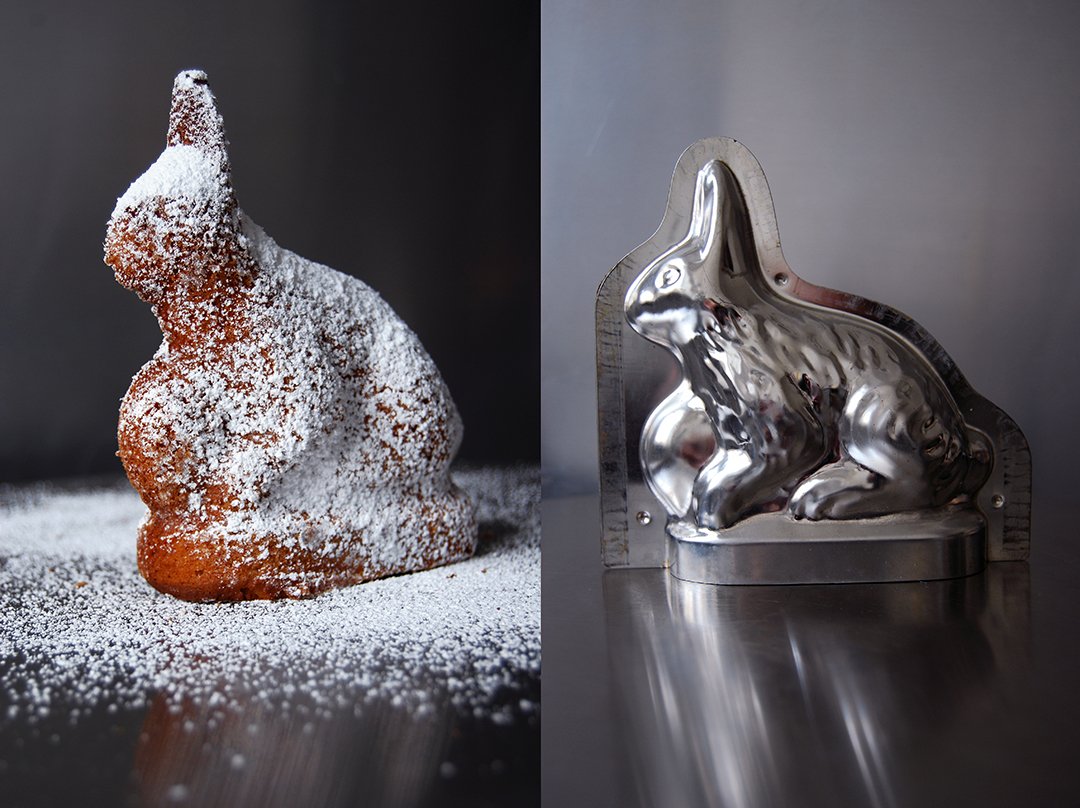
16 Recipes for your Easter Brunch Table

Hunting Easter eggs in the woods was one of my childhood's spring highlights. The sweet smell of blossoms and sunlight in the air, the trees' leaves presenting their most fragile green, and - in a lucky year - I could even replace boots and jacket for shirt and jeans while searching for golden wrapped chocolate eggs and bunnies. I always loved the sprouting energy that comes with the change of season, when winter's shades of grey and brown give way to vibrant colours. Easter is a changing point in the year, there's the promise of summer in the air.
Is there a better way to celebrate this day than gathering your loved ones around the table and treating them to a luscious brunch? Here's some inspiration (click the titles for the recipes) - and there will be two new Easter recipes coming up this Sunday and next Wednesday!
Happy Easter!
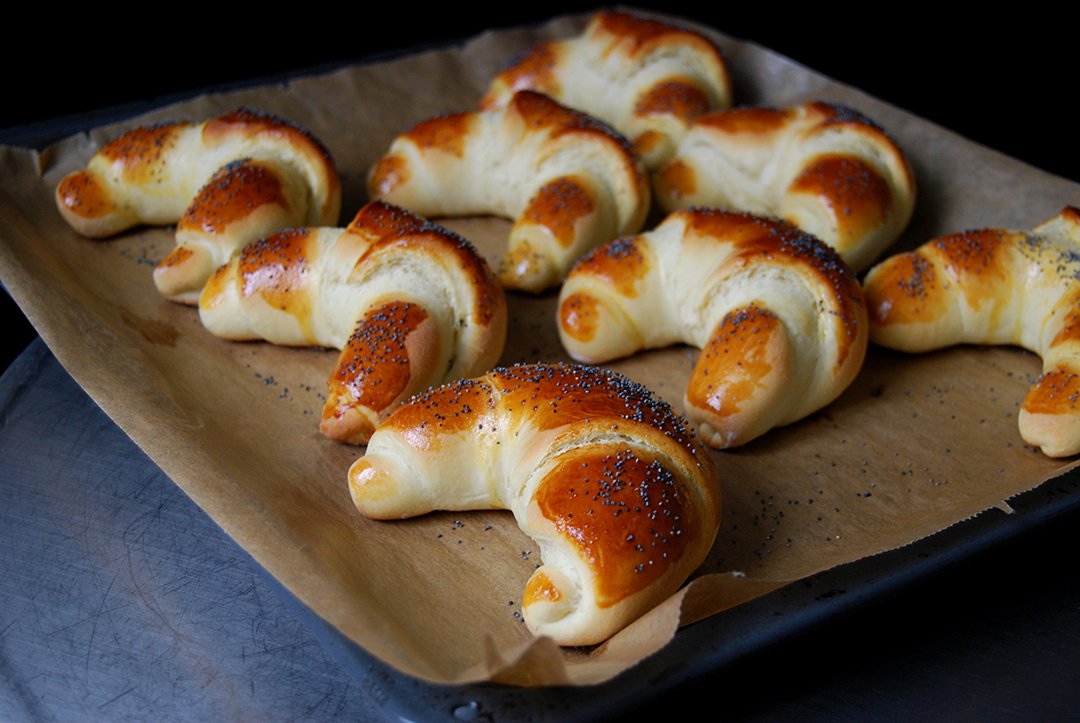
Tsoureki – Greek Easter Bread with Aniseed and Orange Blossom Water


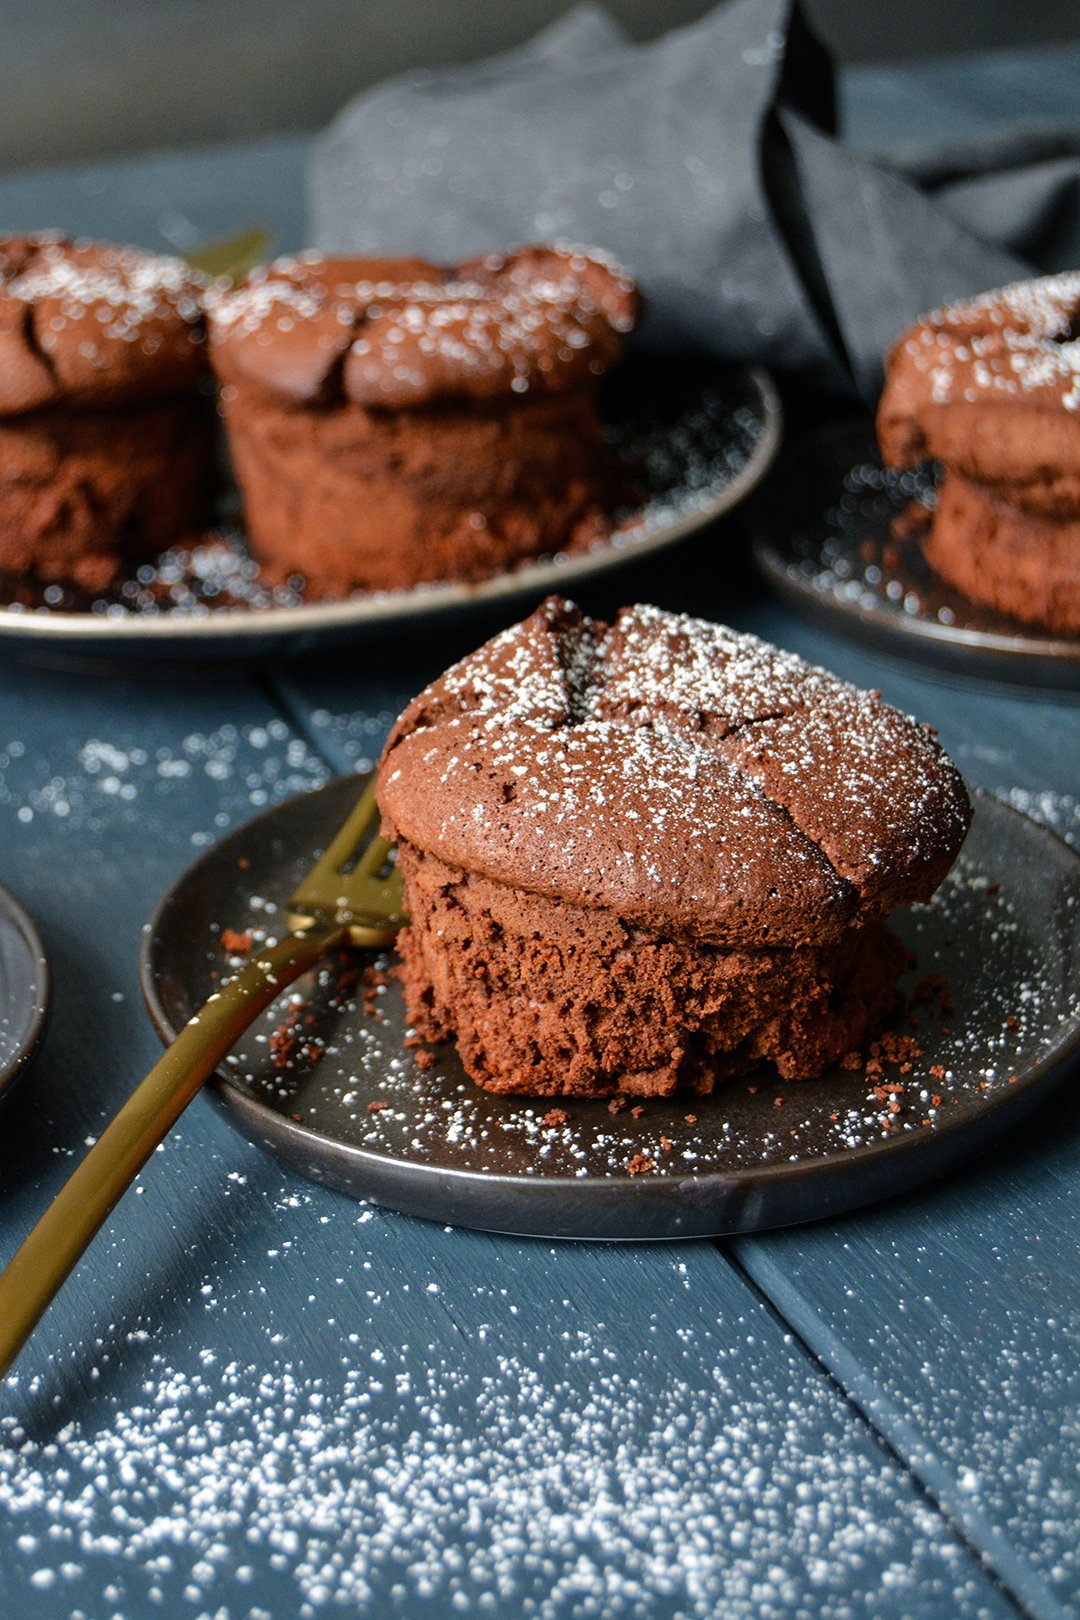
Chocolate Baby Cakes with Peanut Butter and Banana
Bittersweet chocolate and peanut butter is a divine duo that I often come back to. When juicy stone fruits and berries aren't in season yet and it's time for my beloved citrus to say goodbye, I gladly experiment with the little nuts and a bar of dark chocolate. It's one of those treats that, despite its rather filling qualities, still manages to make me grab for another piece. It's heavy, you know it, but it's too good to stop.
My little baby cakes are no exception in that respect, they make a perfect dessert after a light dinner that still leaves some space in your tummy (I wouldn't serve them after a cheese spaetzle feast). But you can also see them as a chocolaty addition to your Sunday teatime table. Keep in mind, these cakes are rich. I'm not a big fan of cocoa powder in baking, I want real chocolate in my cake batter. If you're a chocolate lover, you know what I'm talking about. There's a certain depth that you can't achieve with cocoa powder. I always use the same chocolate for my baking, it has 55% cocoa, it's well balanced - semisweet, but still smooth, and it literally melts in your mouth. I like to call it a grown up treat, bittersweet and rich.
To give the chocolate-peanut combo a new touch, I mixed the nutty butter with half a pureed ripe banana, and this lifts the whole experience onto another level. I see a great future for this trio in my kitchen! This time I went for a sweet, nutty, and rich filling wrapped in a chocolate cake that is still partly molten. Depending on your preference, you can bake the cakes even shorter to leave them a bit more liquid. I found a thin layer of hot chocolate batter laying on top of the soft peanut-banana center just right.
If you'd like to dive more into chocolate and peanut, you can also try these recipes:


Chocolate Baby Cakes with Peanut Butter and Banana
Serves 6
butter, soft, 60g / 1/4 cup
granulated sugar 65g / 1/3 cup
vanilla pod, scraped, 1/2
fine sea salt 1/8 teaspoon
organic eggs 4
plain flour 45g / 1/3 cup
bittersweet chocolate (I use 55%), melted and cooled, 280g / 10 ounces
peanut butter, creamy, 80g / 3 ounces
ripe banana 40g / 1 1/2 ounces (about 1/2 banana)
Preheat the oven to 200°C / 400°F (fan assisted oven). Butter 6 6-ounce ramekins. Cut out 6 circles of parchment paper, large enough to fit the bottom of the ramekins. Then cut out 6 strips of parchment paper, long and tall enough to fit the sides of the ramekins. Line the ramekins with the pieces of parchment paper.
In the large bowl of a stand mixer fitted with a whisk attachment, beat the butter, sugar, vanilla seeds, and salt for a few minutes until creamy. Add the eggs, one at a time, mixing well in between. Add the flour and mix for about 1 minute or until well combined; then add the melted chocolate, mixing well until smooth and well combined.
In a food processor or blender, mix the peanut butter and banana until smooth. Divide into 6 portions and roll into balls.
Divide about 2/3 of the chocolate batter between the 6 ramekins. Lay 1 peanut butter-banana ball on top of the chocolate batter in each ramekin, pushing it down a little (see 1st picture). Top with the remaining chocolate batter and even out the surface. Bake for 14-16 minutes or until the tops start to become spongy, they should still be a little soft and partly liquid. You can also bake them shorter, if you prefer the chocolate center to be more liquid. Enjoy warm or cold.


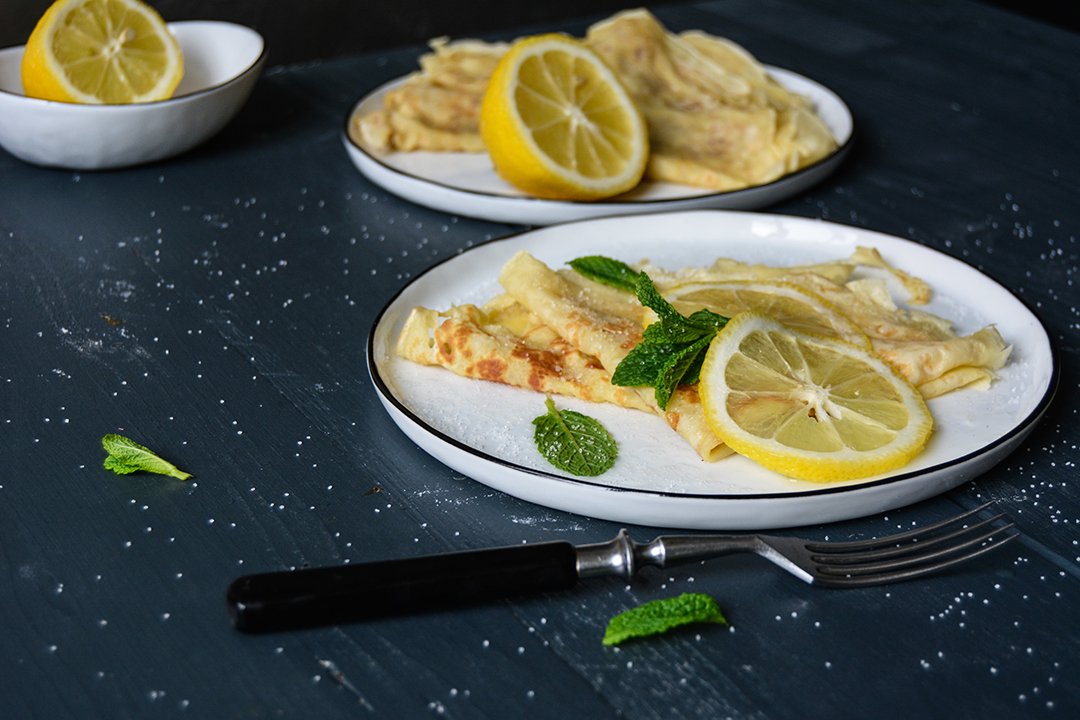
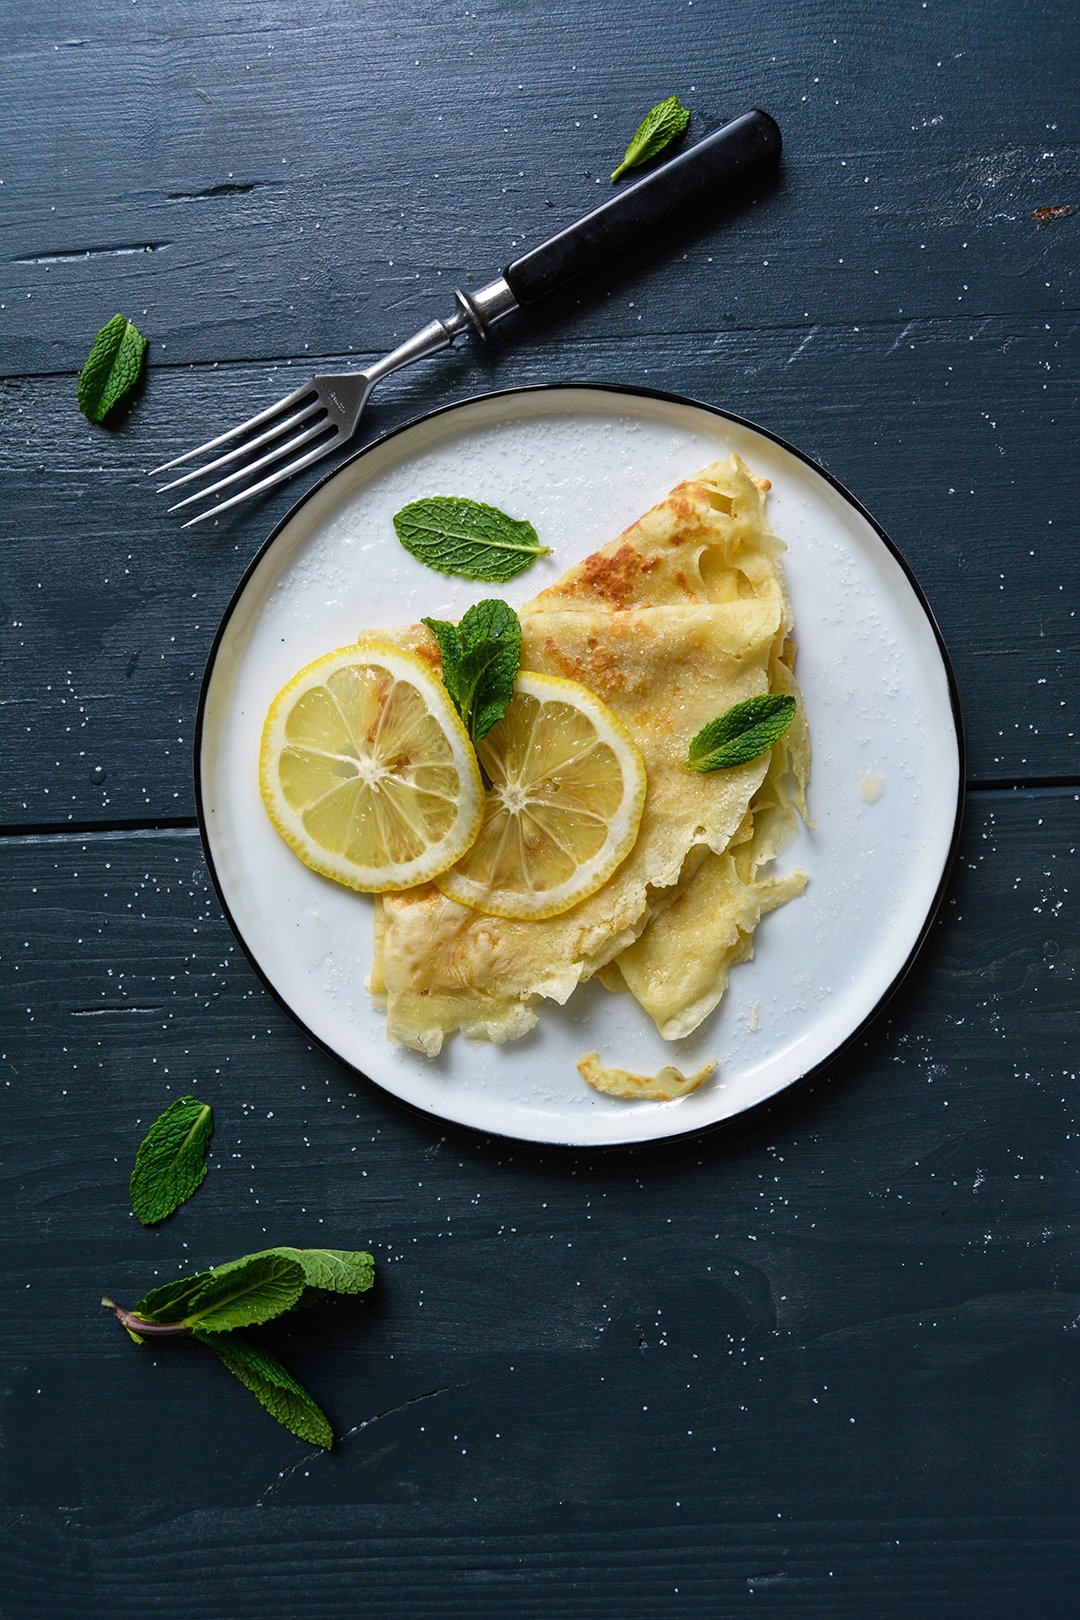
Crêpes au Citron
Rough seas, endless beaches, and food that kept me happy from morning till midnight. I went to France and it was a feast.
I got spoiled with a spontaneous trip to Normandy together with my mother, to the picturesque seaside village of Le Touquet. Five nights, five days and luckily, I didn't have much time to make plans beforehand - or to build up expectations. This kept me relaxed and the activities very basic: I went from my bed to the opulent breakfast table, then straight to the beach for long walks, a quick snack on the 'high street' before teatime or an aperitif at our hotel's beautiful old-fashioned bar; at 7pm I was dressed pretty and ready for the French way of dining - luscious feasting that makes you forget about everything around you and lets you sleep like a baby. Those were my days in Normandy.
We couldn't have organized our arrival at the majestic Le Westminster any better. We were hungry and stepped out of the car just in time for lunch. The hotel's bistro offered a French classic, Steak Tartare, and a fantastic dish of potatoes, cut thinly and cooked like risotto, with smoked eel and truffles. A glass of Sancerre and our French immediately came out more fluently. It was the beginning of a culinary trip that couldn't have satisfied my taste buds any better: the freshest oysters, lobster, large rock crab, prawns, and sea snails, Breton Cotriade (fish soup with potatoes) topped with half a lobster (preferable enjoyed at Perard on Rue de Metz), Moules Frites, oeufs a la neige (floating island), and wonderful salads, all very simple combinations with only a few ingredients, but the results were superb.
During our first walk through the village I spotted a fantastic pâtisserie. My instinct is very reliable when it comes to sweets, I can 'smell' where I can find the best éclair au café, croissants, little tartes Tropéziennes, brioche and baguette. The bakery's staff saw me daily. The farmers' market on Saturday is a weekly celebration in the village, fruits and vegetables, salamis and patés, the most fragrant (and pungent) cheeses, the fishermen's catch from the night, honey and jam, all laid out in front of us. We were like kids in a candy store and bought bags full of delicacies, which we then stored in the car for a couple days to take back home with us. It was quite cold outside so it didn't harm the food. However, the cheese infused the car with such a distinct aroma that I'm sure we'll enjoy it for months.
As much as I love a glass of Champagne and a plate full of Atlantic oysters sprinkled with mignonette (chopped shallots in vinegar), the simple pleasures are sometimes the best in life. Le Touquet has an excellent Crêperie, Aux Mignardises Saint Jean, where you can watch the masters of crêpe cook such delicious creations as crêpe au caramel or au citron (both tested and approved). The simple yet so genius addition of a good squeeze of lemon juice really hit me. It was totally new to me, how could I have missed it? You just have to cook a thin crêpe, sprinkle it with a little sugar, and drizzle it with the sour juices of the citrus fruit. First I started with a few drops, but then I learned that you should be generous, the more lemon, the better! Back home, I already made it twice and here's the recipe for you. If you feel like a quick, but scrumptious breakfast or lunch, or if you'd like to impress your guests at your next dinner party, flip some crêpes in the pan and buy a bunch of lemons.
Another treat, a savoury buckwheat galette, was just as good and included ham, cheese, and an egg. It was actually so good that I might also share this recipe with you in the near future.
And if you're not into citrus, try one of these recipes:


Crêpes au Citron
Makes about 15-20 crêpes
plain flour, sifted, 260g / 2 cups
granulated sugar 50g / 1/4 cup, plus more to sprinkle the crêpes
fine sea salt 1/8 teaspoon
organic eggs 4
milk 1/2l / 2 cups and 2 tablespoons
butter, to cook the crêpes
fresh lemons, cut in half, about 2-3
fresh mint leaves, a small handful (optional)
In a large bowl of a stand mixer fitted with a whisk, mix the flour, sugar, salt, eggs, and milk until smooth; let the batter sit for about 10 minutes (at room temperature) to 1 hour (in the fridge).
In a large, heavy or non-stick pan, melt half a teaspoon of butter on medium-high heat. Pour in a ladle of the dough, holding the pan in your hand and turning it so that the dough spreads evenly and very thinly. The crêpes won’t need more than 30-60 seconds on each side once the heat is set right. When the crêpe is slightly golden on both sides, sprinkle with a little (!) sugar, fold twice so that it forms a triangle, and transfer to a large plate. Cover with a large plate or lid. Continue with the remaining batter until you have about 15-20 crêpes. You should always melt 1/2 -1 teaspoon of butter in the pan before you cook the next crêpe.
Serve the crêpes warm, sprinkled with additional sugar to taste, drizzled with freshly squeezed lemon juice (to taste), and decorate with a few mint leaves. Bon appétit!


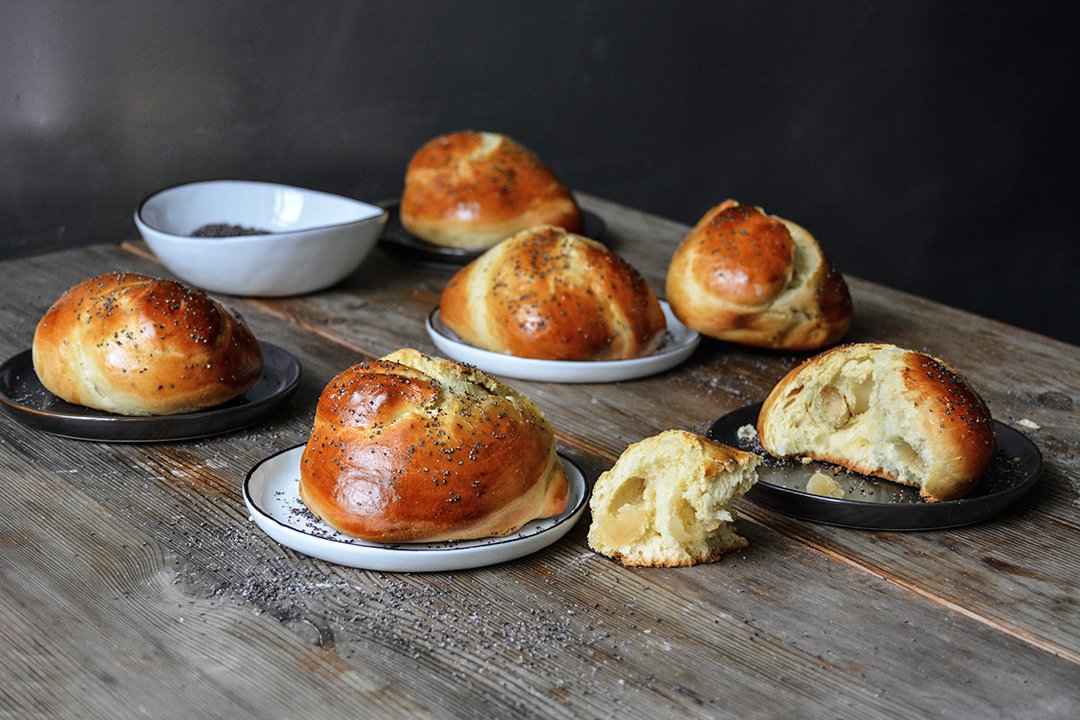
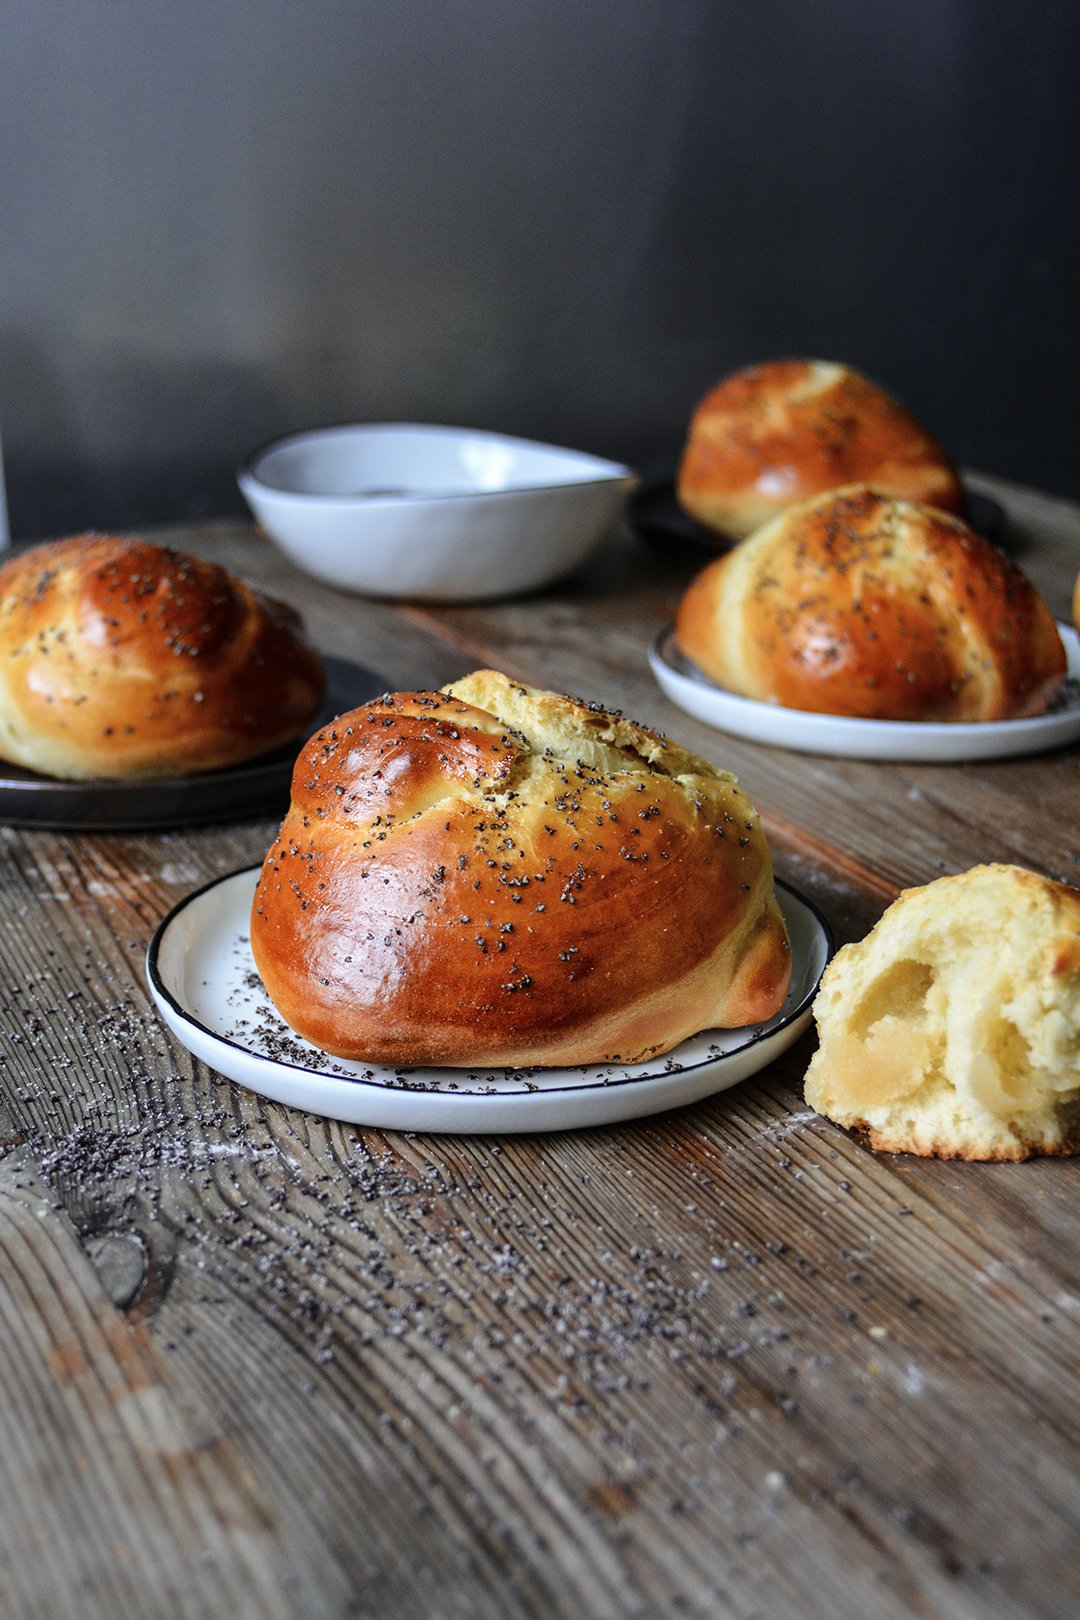
Laurel Kratochvila's Marzipan-Ribboned Challah Knots
I don't even remember how it started. It must have been a few years ago when my man and I welcomed a new tradition: coffee dates. Whenever we find time to take an hour off work, we squeeze in a dark Italian espresso or a creamy cappuccino, happily enjoyed in one of the countless cafés in our area. And on Saturdays - overly excited by the luxury of having plenty of free time - we often stretch it into a lunch-teatime-aperitif date. Just the two of us, chatting about whatever's on our mind, no plans or duties, just lingering until we decide to move on.
On one of these dates, we went to the new Shakespeare and Sons / Fine Bagels. The book shop and bakery used to be close to where we live, but the two owners, Roman and Laurel, had to transfer their cafe and literature business to a new location. That was the first time I tried Laurel's absolutely outstanding chocolate rugelach, which blew my mind and made me want (or rather have to) meet the woman behind this treat.
When we met, our chat led to a Meet In Your Kitchen feature (including my beloved rugelach recipe), but most importantly, I found a woman who's a great inspiration. Laurel loves food, she's obsessed with baking, she's gifted with an unbelievable amount of energy, and when you talk to her, you can see her beautiful soul. She's honest, critical, and crazy enough to overcome her fears and jump into the next adventure. Nosh Berlin is her new baby, a Jewish food week, starting March 17th. It'll be a week packed with talks, feasts, and Jewish food. I already booked my tickets for two events, Molly Yeh is coming on the 22nd and I didn't dare to miss The Gefilte Ball on Thursday. You can find the program of all the events below or on the Nosh Berlin website.
When I met Laurel for a coffee a couple weeks ago to hear everything about her exciting events, I nibbled on my obligatory rugelach and she chose a new creation, her current obsession: a marzipan-ribboned challah knot. She looked so happy whenever she took a bite of her yeast bun that I thought, I need this recipe. Laurel is a nice person who loves to share, I didn't even need to beg her. And here it is, fluffy yeast buns, not too sweet, generously filled with marzipan, and so good, that I ate five of them in a day and a half. Laurel only uses egg yolks, melted butter, and water in this recipe. She uses bread flour, however I replaced it with white spelt flour that comes to use in all of my baking recipes. I had to add a little more flour and I think that a bit more wouldn't have harmed the texture, but helped the knots to keep their shape a bit better and avoided cracks on the surface. As you can see in the pictures, my knots turned into roundish buns in the oven. I didn't mind, challah knot or bun, I love Laurel's latest creation.

Nosh Food Festival
- Friday, March 17th - Kiddush: North African Jewish dinner by Yuval Belhans and Mayaan Meir
- Sunday, March 19th - The Nosh Market at Markthalle Neun Oma and Bella: Movie and a Nosh at Babylon Berlin
- Monday, March 20th - The JCC Krakow presents Jewish Polish Food History. Talk and a tasting
- Tuesday, March 21st - What Jew Wanna Eat? Amy Kritzer, visiting chef from Austin, Texas, presents creative Passover cooking.
- Wednesday, March 22nd - Molly Yeh and Luisa Weiss: Cookbooks, Blogs, and Jewish Baking
- Thursday, March 23rd - Nosh Berlin and Shtetl Neukölln present The Gefilte Ball. Talk and demo with Jeffrey Yoskowitz of The Gefilte Manifesto followed by a klezmer ball.
- Friday, March 24th: Night of Shabbat Supper Clubs
There will also be a couple talks on various Jewish food topics at the Fraenkelufer Synagogue and a showing of Cafe Nagler with a presentation on pre-war Jewish cafe and restaurant life. Additionally, there are Jewish cookery classes all week at Goldhahn and Sampson in Charlottenburg.

Marzipan-Ribboned Challah Knots
If you decide to double the recipe, use only 9 egg yolks, which is Laurel's original recipe.
Makes 7 challah knots
organic egg yolks 5, plus 1 egg white, beaten, for the glaze
butter, melted and cooled, 40g / 3 tablespoons
water 175ml /3/4 cup
bread flour (or white spelt or unbleached wheat flour), 410-480g (3 cups plus 2 tablespoons - 3 2/3 cups), plus more if the dough is too sticky
granulated sugar 100g / 1/2 cup
fast-acting yeast 1 1/4 teaspoons
fine sea salt 1 teaspoon
marzipan, cut into 7 pieces, 150g / 5 ounces
poppy seeds 1 tablespoon, for the topping
In a medium bowl, whisk the egg yolks and butter. Add water and whisk until well combined.
In the large bowl of a stand mixer, whisk together the flour (410g / 3 cups plus 2 tablespoons), sugar, yeast, and salt. Add the liquid mixture and, using the paddle attachment, mix for about 1 minute until combined. Replace the paddle attachment with the dough hook and knead for about 10 minutes. I use setting ‘4’ on my KitchenAid. Add more flour if the dough is too sticky, but mind that it should stay soft. If you prepare the dough by hand, keep kneading an extra few minutes. Transfer to a clean, oiled bowl, cover with a kitchen towel and let rise in a warm place, or preferably in a 35°C / 100°F warm oven (conventional setting), for about 60-70 minutes or until spongy. When you poke the dough, the indentation of your finger shouldn't spring back.
Punch the dough down and then turn out onto a floured work surface. Give it a quick knead to form it back into a ball and then cut 7 equal pieces. Cover with a tea towel and let rest for about 15 minutes.
Line a baking sheet with parchment paper.
Once rested, roll the dough into logs (about 25cm / 10" long) and then gently press flat. Lay a strip of marzipan lengthwise down the middle of the flattened log (using my hands, I first rolled each piece of marzipan into a long log) and then fold the log lengthwise in half, so you have a marzipan-filled log (see first picture). To fold the log into a knot, make an overlapping circle and then wrap the upper end under and then up through the middle (see first picture).
Preheat the oven to 175°C / 350°F (convection setting).
Once all 7 knots are folded, transfer to the lined baking sheet and brush with the beaten egg white. Laurel puts a little simple syrup in the egg glaze to add some extra sweetness, I left mine plain. Let them rise for about 30 minutes or until puffy. Glaze the challah knots with egg whash a second time then sprinkle with poppy seeds.
Bake for about 20 minutes or until the challah knots are golden brown and shiny.


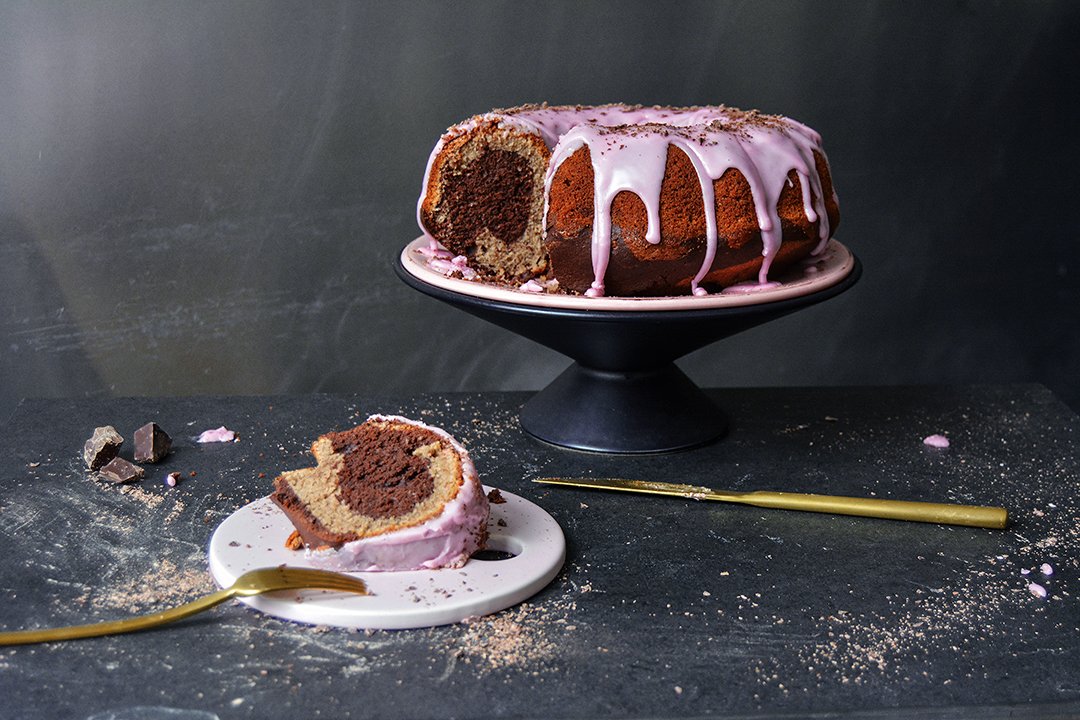
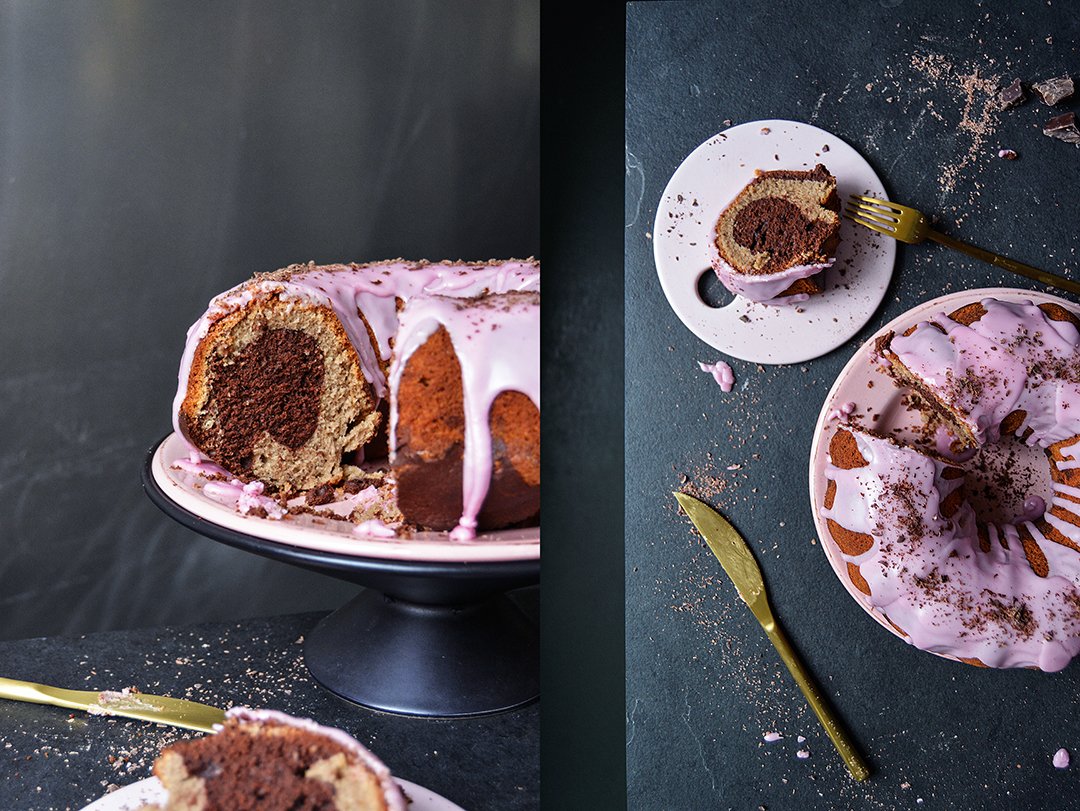
Marbled Red Wine and Chocolate Cake
Let's start this beautiful Sunday with some happy news:
The Eat In My Kitchen book is one of Food52's '15 Piglet Community Picks 2017'! Thank you so much for your book love and support! And if I may ask you for a little more support, it would be fantastic if you could write a review of my book on Amazon, it can be a quick one, but it would help me a lot. Here are the links:
So, back to my kitchen: I've always had a sweet tooth, but I'm a bit of a piggy at the moment. There isn't a single day without cake on the table. Be it baked by myself, or a luscious piece of New York Cheesecake or hazelnut mascarpone torte from my favorite cafés around the corner; or those ultra soft and spongy yeast rolls and buns from a bakery - also just around the corner - that I only discovered a few months ago. I need my sugar no matter what my responsible mind tries to convince me of. Maybe I should have a day or two without it, I don't care. I'm the happiest person in the world when I'm snuggled into my beloved Butterfly Chair - that's currently covered in sheep fur for seasonal reasons - with a cup of Earl Gray tea on my lap and a large piece of cake close at hand.
Last week I had even more reason to bake, two birthdays in the calendar called for a sweet feast. I made the Poppy Seed and White Chocolate Babka that I shared with you last Sunday, peanut butter meringues (the recipe still needs some tweaking, but it'll come up soon), and a marvelous marbled red wine and chocolate cake. It's a marriage between my long loved Red Wine Cake and my classic Chocolate Marble Bundt Cake - I couldn't be more satisfied with the result. It's a little less sweet than my original pink wine creation due to the bittersweet chocolate batter swirled in and it's just perfect. Imagine a large bite of this fluffy cake covered in sticky red wine glaze melting in your mouth. Heaven.
Marbled Red Wine and Chocolate Cake
Makes 1 Bundt cake
dry breadcrumbs, for sprinkling the pan
organic eggs, separated, 6
fine sea salt 1/8 teaspoon
plain flour 300g / 2 1/3 cups
baking powder 3 teaspoons
ground cinnamon 2 teaspoons
unsweetened cocoa powder 2 teaspoons, plus 30g / 1/3 cup for the chocolate batter
butter, at room temperature, 210g / 3/4 cup plus 2 tablespoons
granulated sugar 250g / 1 1/4 cup, plus 1 heaping tablespoon for the chocolate batter
red wine 120ml /1/2 cup
For the icing
icing sugar 220g / 2 1/4 cups
red wine 4-5 tablespoons
bittersweet chocolate, grated, 1 tablespoon
Preheat the oven to 180°C / 350°F (preferably convection setting). Butter a 23cm / 9″ Bundt pan and sprinkle lightly with breadcrumbs.
Whisk the egg white and salt until stiff, set aside.
In a large bowl, combine the flour, baking powder, cinnamon, and 2 teaspoons of the cocoa powder.
In the large bowl of a stand mixer, fitted with the paddle attachment, beat the butter and 250g / 1 1/4 cup of the sugar for a few minutes until fluffy. Add the egg yolks, one at a time, and continue mixing until thick and creamy. Add the red wine and mix until well combined. Using a wooden spoon, fold the egg white and the flour mixture into the butter mixture, alternating about 1/3 at a time, combining well in between.
Scrape half the batter into the prepared Bundt pan. Stir the remaining cocoa powder (30g / 1/3 cup) and sugar (1 heaping tablespoon) into the remaining batter, mix until well combined. Dollop the chocolate batter on top of the lighter batter and spread carefully. Using a small fork, swirl through the 2 batters, carefully from top to bottom, pulling slowly once all the way through the pan. Bake for about 40 minutes (slightly longer if using a conventional oven) or until golden and spongy. Check with a skewer, it should come out clean. Let the cake cool for 2-3 minutes, then shake the pan a little and flip the cake onto a plate to cool completely. If the cake won’t come out, place the warm Bundt pan into a large bowl filled with cold water. This will help loosening the cake from the pan.
For the icing, in a medium bowl, whisk the icing sugar with 4 tablespoons of red wine until smooth. Add more wine if the mixture is too thick. Drizzle the icing over the cake and sprinkle with chocolate while the icing is still soft. Enjoy!


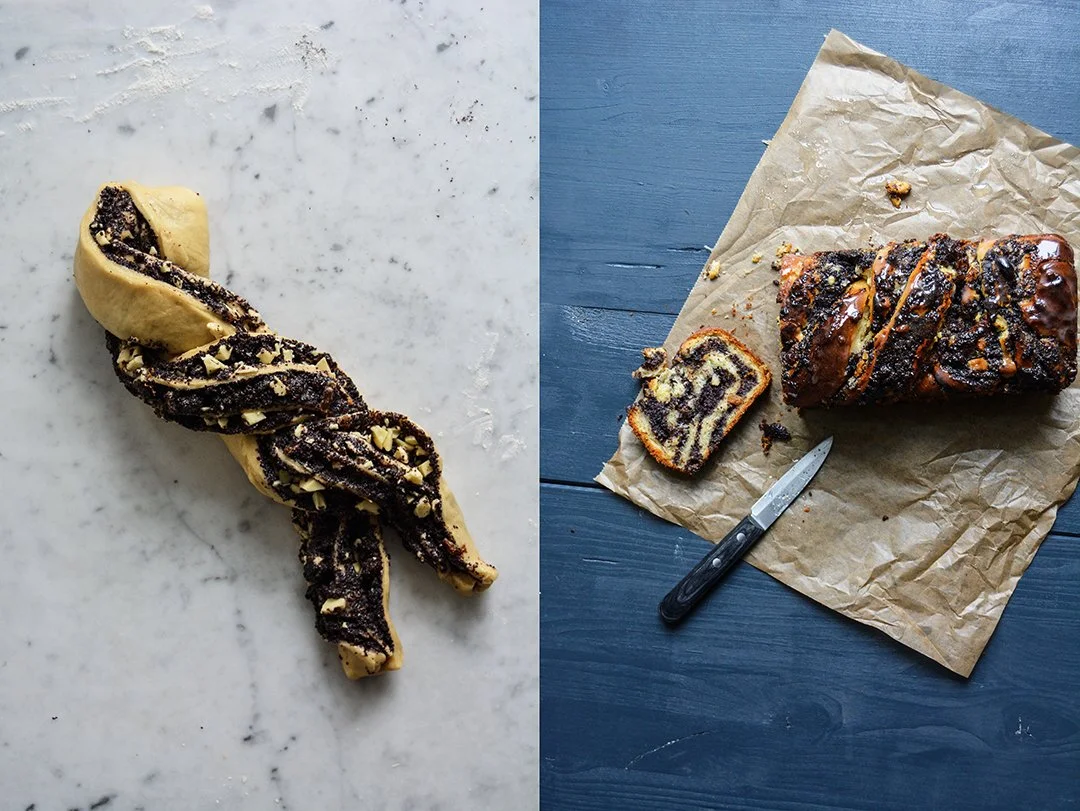
Poppy Seed and White Chocolate Babka
The past week has been crazy and the best way to put my weary mind at ease, is to dig my hands into a ball of yeast dough and knead, and knead, and knead. You can punch and roll it, letting all your energy out until you're exhausted; or you can knead it gently to calm down and feel the pale ball softening slowly between your fingers. Yeast dough is forgiving, it accepts whatever mood you’re in, and it gets better the longer - and harder - you work with it.
The dough for today's babka had to deal with a lot of energy, I must have looked like a boxer training in my kitchen. And it turned out to be the smoothest, silkiest yeast ball my marble counter tops have ever seen. To make babka, you have to be patient, the dough has to rise overnight in the fridge before it transforms into a braided beauty. But then, if you time it well and start early on the second day, you can enjoy the most fragrant cake on your Sunday breakfast or brunch table. And if you don't feel like hassling and hurrying, just take your time and bake it for teatime.
I already shared a babka recipe here on Eat In My Kitchen, last year's Blueberry Lemon Cheese Babka was a hit, not only on my table. This time I wanted to use poppy seeds for the filling to resemble the famous German Mohnstrudel. It used to be one of my childhood's favourites, preferably generously filled with the dark, black seeds. For my filling, I stirred in a handful of raisins, which is also very common in Germany, they make it a bit fruity. But we're not done yet, I have another addition: chopped white chocolate; divine! It's subtle, you can barely taste the little milky bites, but it makes the filling juicier, fudgy in some parts, which is a great contrast to the fluffy cake. For the shiny finish, I used a sticky sugar glaze and I didn't even wait for it to dry, the first slice of a warm yeast cake is always the best.
Update: Here’s the recipe for my Pumpkin Seed and White Chocolate Babka!

Poppy Seed and White Chocolate Babka
Mind that the babka has to rise twice, the first time overnight (for about 8 hours) in the fridge.
Makes 1 babka
For the dough
plain flour 275g / 2 cups plus 1 tablespoon, plus more if it's too sticky
granulated sugar 50g / 1/4 cup
fast-acting yeast 1 1/2 teaspoons
fine sea salt 1/4 teaspoon
milk, lukewarm, 60ml / 1/4 cup
organic egg 1
organic egg yolk 1
butter, at room temperature, cut into cubes, 75g / 1/3 cup
oil, to grease the bowl
For the filling
milk 210ml / 3/4 cup plus 2 tablespoons
granulated sugar 50g / 1/4 cup
ground cinnamon 1 teaspoon
orange zest 1 teaspoon
poppy seeds, cracked, 125g / 1 1/4 cup
raisins, soaked in warm water for 5 minutes and squeezed gently, 40g / 1/3 cup
white chocolate, chopped, 100g / 4 ounces
For the glaze
water 60ml / 1/4 cup
granulated sugar 100g / 1/2 cup
Day 1 - in the evening:
For the dough, in a large bowl, combine the flour, sugar, yeast, and salt.
Whisk the milk, egg, and egg yolk and add along with the butter to the flour mixture. Knead for about 10 minutes, starting with the dough hooks of a stand mixer and continue kneading and punching with your hands for a few minutes until you have a soft and silky ball of dough. If the dough is too sticky, add a little more flour, but mind that it stays soft. Transfer to a clean, oiled bowl, cover with cling film and put in the fridge overnight.
Day 2 - in the morning:
Take the dough out of the fridge and let at sit at room temperature for about 1-2 hours.
For the filling, in a medium saucepan, bring the milk, sugar, cinnamon, and orange zest to the boil. Take the pan off the heat, stir in the poppy seeds, and let it soak for 5 minutes. Stir in the soaked raisins and let it cool.
Butter an 11 x 24cm / 4 x 9″ loaf pan and line the bottom with a piece of parchment paper.
Punch the dough down, take it out of the bowl, and knead for about 30 seconds. On a floured counter top, roll out the dough with a rolling pin into a 28 x 40cm / 11 x 16″ rectangle. Spread the filling over the dough, leaving a 2cm / 3/4″ rim, and sprinkle with the white chocolate. Starting from one long side, roll up the dough tightly into a log. Pull and press to seal the end onto the roll and place the seam at the bottom. Using a sharp long knife, cut the roll in half lengthwise (see 5th picture). The cut sides facing up, press together two ends and lay one half of the log over the other, continue until you end up with a twisted plait (2nd picture). Push the end together. Tuck the ends underneath the babka and, using the large blade of a knife, lift the loaf and transfer quickly to the prepared pan. Cover with a tea towel and let it rise in a warm place (I keep it on the heater) for about 60-90 minutes or until puffy.
Preheat the oven to 190°C / 375°F (conventional oven). For the glaze, in a small saucepan, bring the water and sugar to the boil and let it cook for 2 minutes, take the pan off the heat and set aside.
Bake the babka in the oven for 30-35 minutes or until golden brown. Check with a skewer, it should come out clean. Mind that depending on where you push it in, there will be melted chocolate on the skewer. Take the pan out of the oven and brush the top immediately with the syrup (use all the syrup). Let the cake cool for about 10-15 minutes before you remove it from the pan. Enjoy slightly warm or cold.


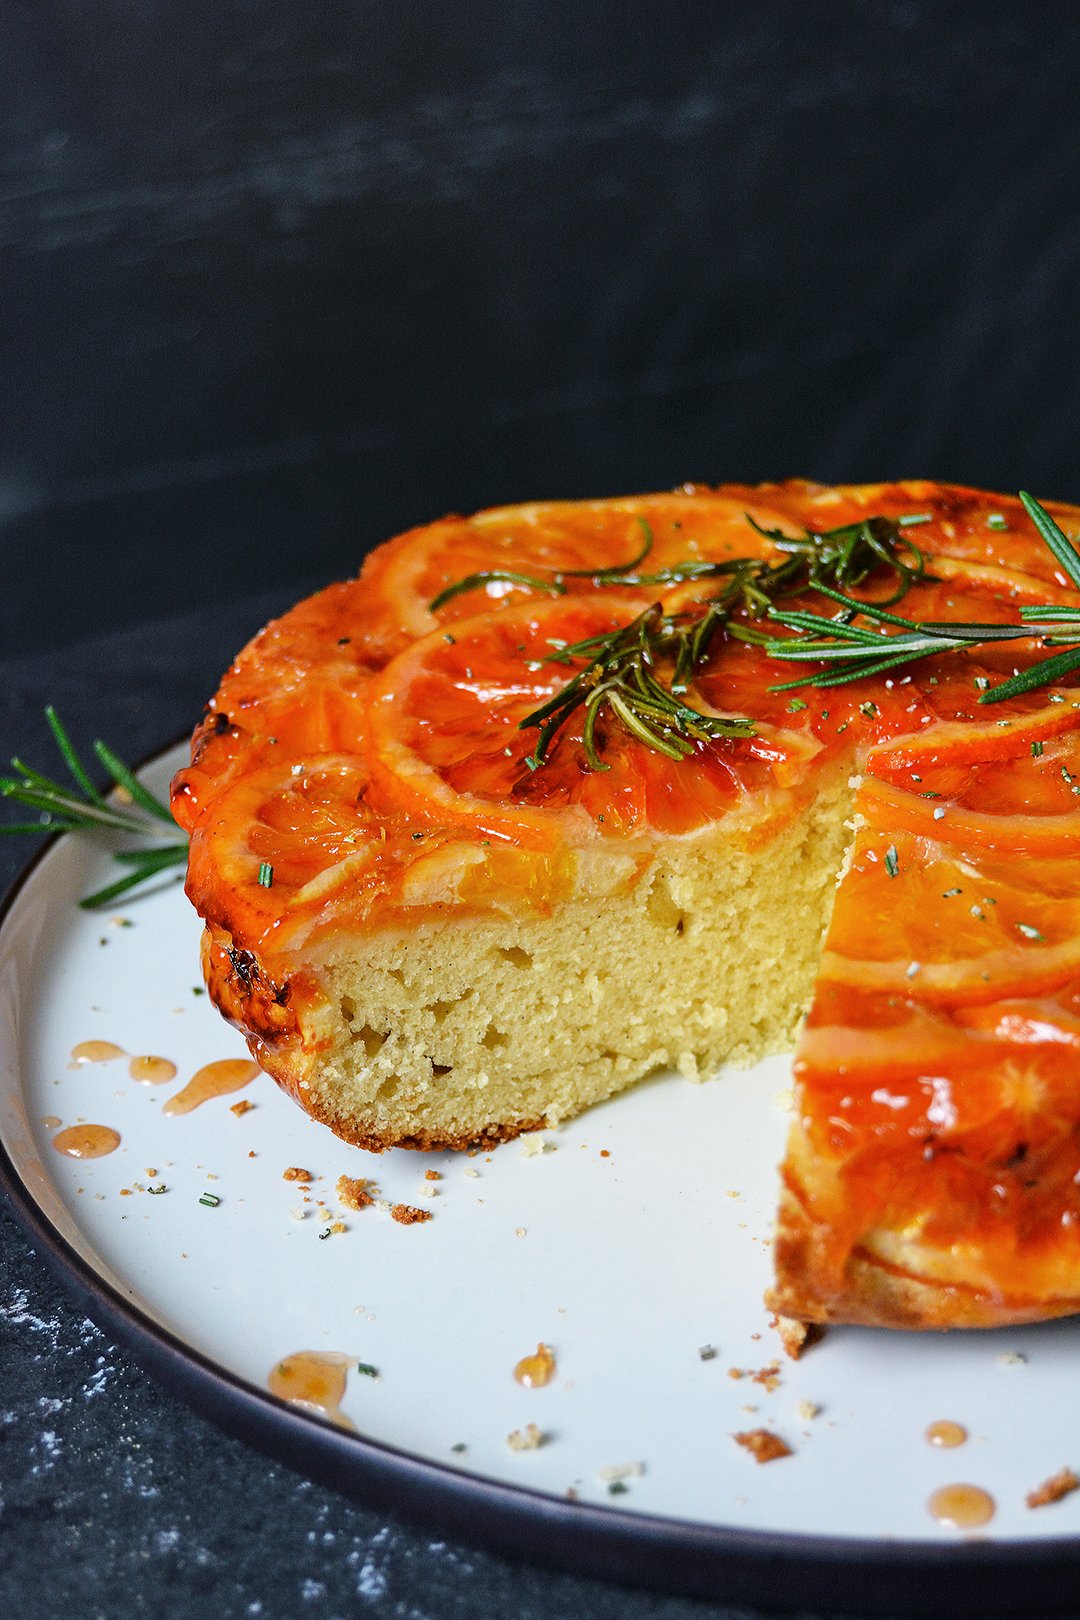
Blood Orange and Rosemary Upside Down Cake
I already had my post written for today's bright orange Sunday cake, but then, yesterday's news from the US hit me. It felt so wrong to just write about a recipe, my mood, my day; why should I write about me and my food, when on the other side of the Atlantic, a single man throws everything away that our so called civilized world claims to stand for. How can we, or the president of the United States, ban citizens from certain countries (Iraq, Iran, Yemen, Libya, Somalia, Sudan, Syria) from putting their feet onto American ground?
I'm German, my country's history shows what happens when we tolerate and support the insane actions of a single man. Didn't we learn anything? Is it still possible for us to allow a man to run a country who doesn't show the slightest feeling of compassion? Didn't we, in the western world, hypocrites, arrogantly accuse other countries of exactly that?
Before I was sad, now I'm concerned.
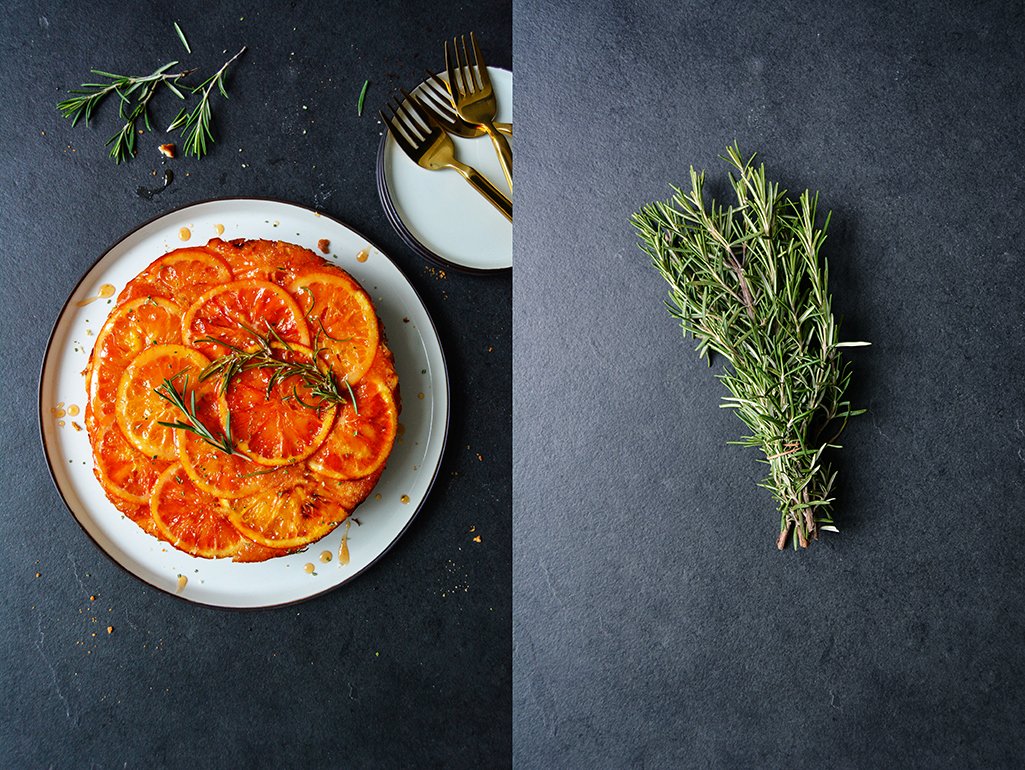
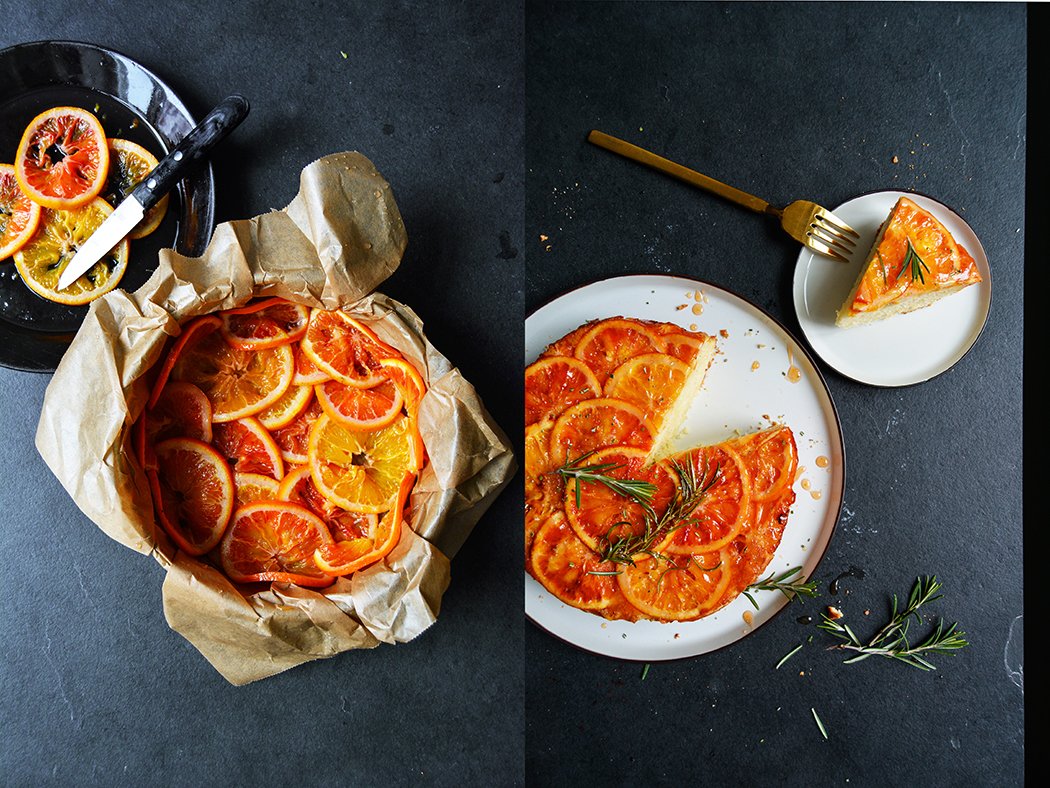
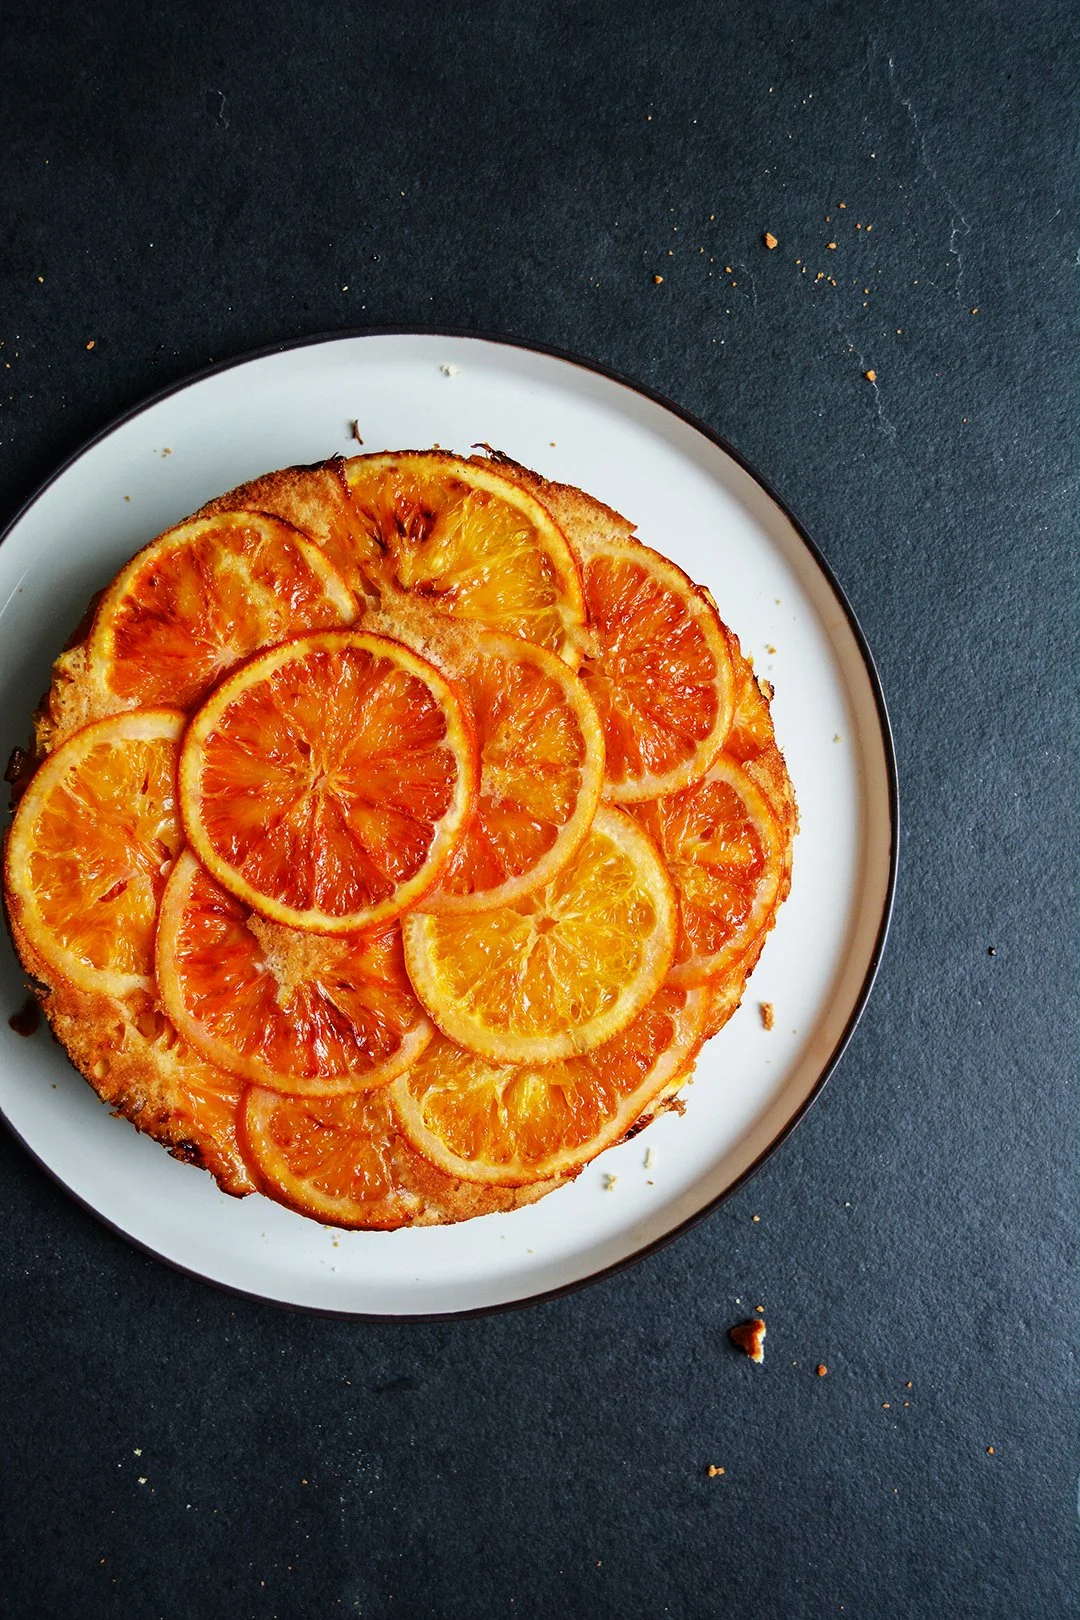
And yes, I baked a cake. It's an upside down cake - for an upside down world - made with Sicilian blood oranges. It looks like a glowing Mediterranean sunset, peaceful. Some prefer to cut off the citrus fruits' peel, I leave mine on for a tangy touch. I first sliced and then cooked three fruits in sugar water with a sprig of fresh rosemary to infuse the pulp. About half an hour later they were soft, ready to become the fruity base of a light and fluffy upside down cake, thanks to beaten egg white folded into the batter. The citrus is very present, which I like, the herbal note is subtle. If you prefer you can use less fruits, but I recommend creating a thick juicy layer of orange slices. They keep the cake wonderfully moist and fruity, also on the second day.

Blood Orange and Rosemary Upside Down Cake
Makes 1 (20 1/2cm / 8") cake
For the oranges
water 120ml / 1/2 cup
granulated sugar 100g / 1/2 cup
organic blood oranges, rinsed, scrubbed, and the ends cut off, 3
medium sprig of rosemary 1, plus a few needles finely chopped (optional)
For the dough
plain flour 200g / 1 1/2 cups
baking powder 2 teaspoons
butter, at room temperature, 80g / 1/3 cup
granulated sugar 150g / 3/4 cup
organic eggs, separated, 2
vanilla pod, split and scraped, 1/2
milk 100ml / 1/3 cup plus 1 tablespoon
fine sea salt 1/8 teaspoon
Preheat the oven to 180°C / 350°F. Butter and line a 20 1/2cm / 8"springform pan.
For the oranges, in a large saucepan, bring the water and sugar to a boil over medium high heat. Stir and let the sugar dissolve. Cut the oranges into thin slices. Reduce the heat to medium, layer the orange slices in the sugar water, and simmer gently for about 25-30 minutes or until soft, but still in shape. Using a slotted ladle, transfer the orange slices to a large plate and let them cool for a few minutes. Add the rosemary to the pot with the orange syrup and set aside.
For the dough, in a medium bowl, combine the flour and baking powder. In a large bowl of a stand mixer, beat the butter and sugar until light and fluffy. Add the egg yolks and vanilla seeds and continue mixing for about 1 minute or until well combined. Quickly beat in the flour mixture in 3 batches, alternating with the milk. Beat the egg white and salt until soft peaks form and fold into the dough.
Arrange the orange slices on the bottom and sides of the prepared pan, fold some of the slices into the corners (see 2nd picture). Scrape the dough on top of the fruits, even it out and bake for about 35-40 minutes or until golden brown and spongy. Check with a skewer, it should come out clean. Let the cake cool for a few minutes before you flip it over, gently remove the parchment paper.
Bring the rosemary orange syrup to a boil over high heat and let it cook for about 2 minutes, let it cool for a couple minutes. Brush the top of the cake with the syrup and arrange the rosemary sprig on top. Sprinkle with a little additional chopped rosemary and enjoy!


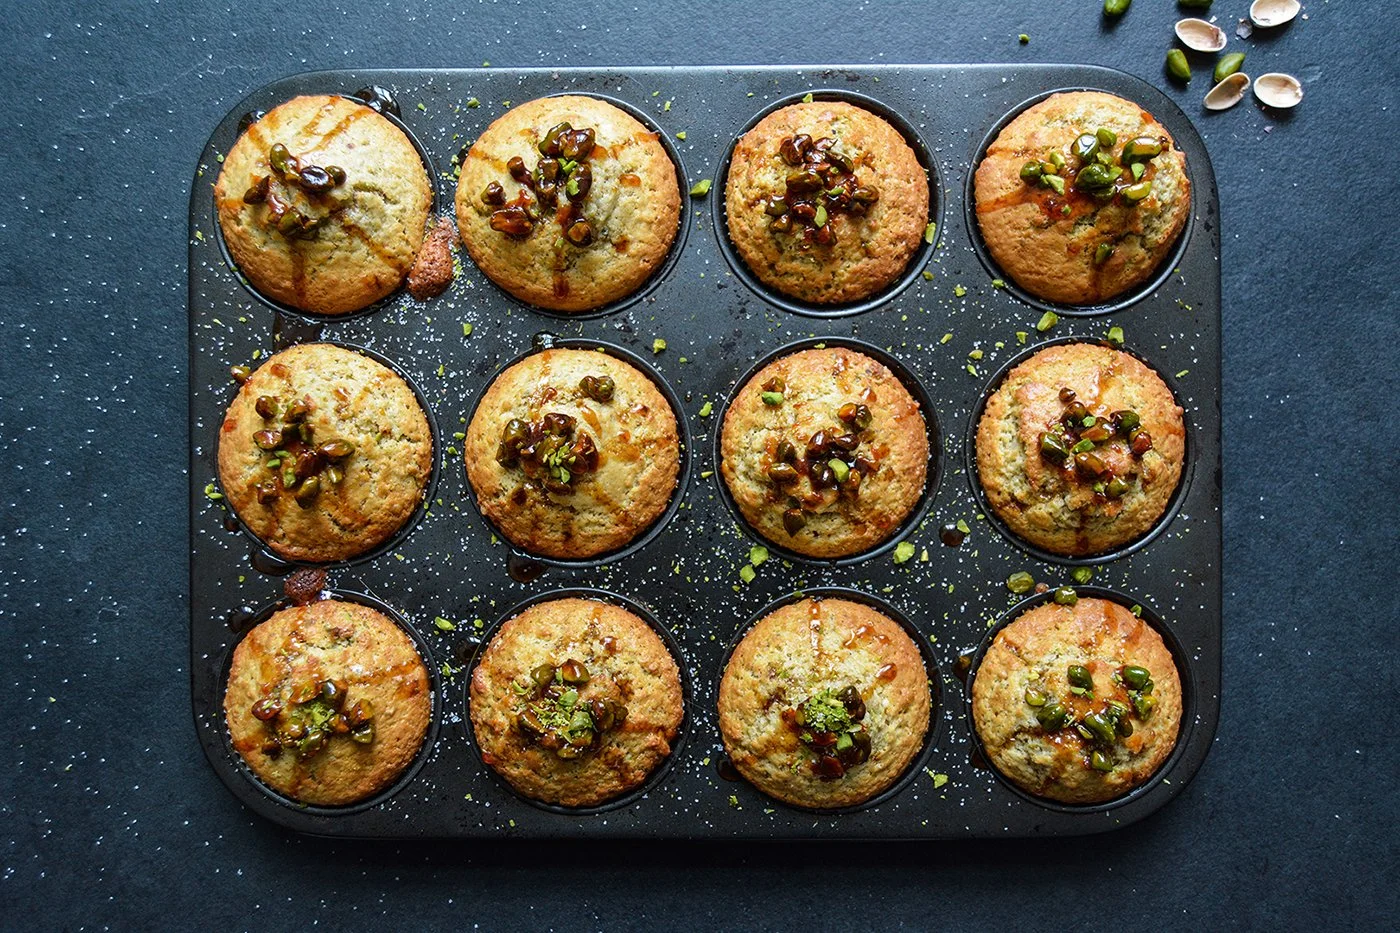
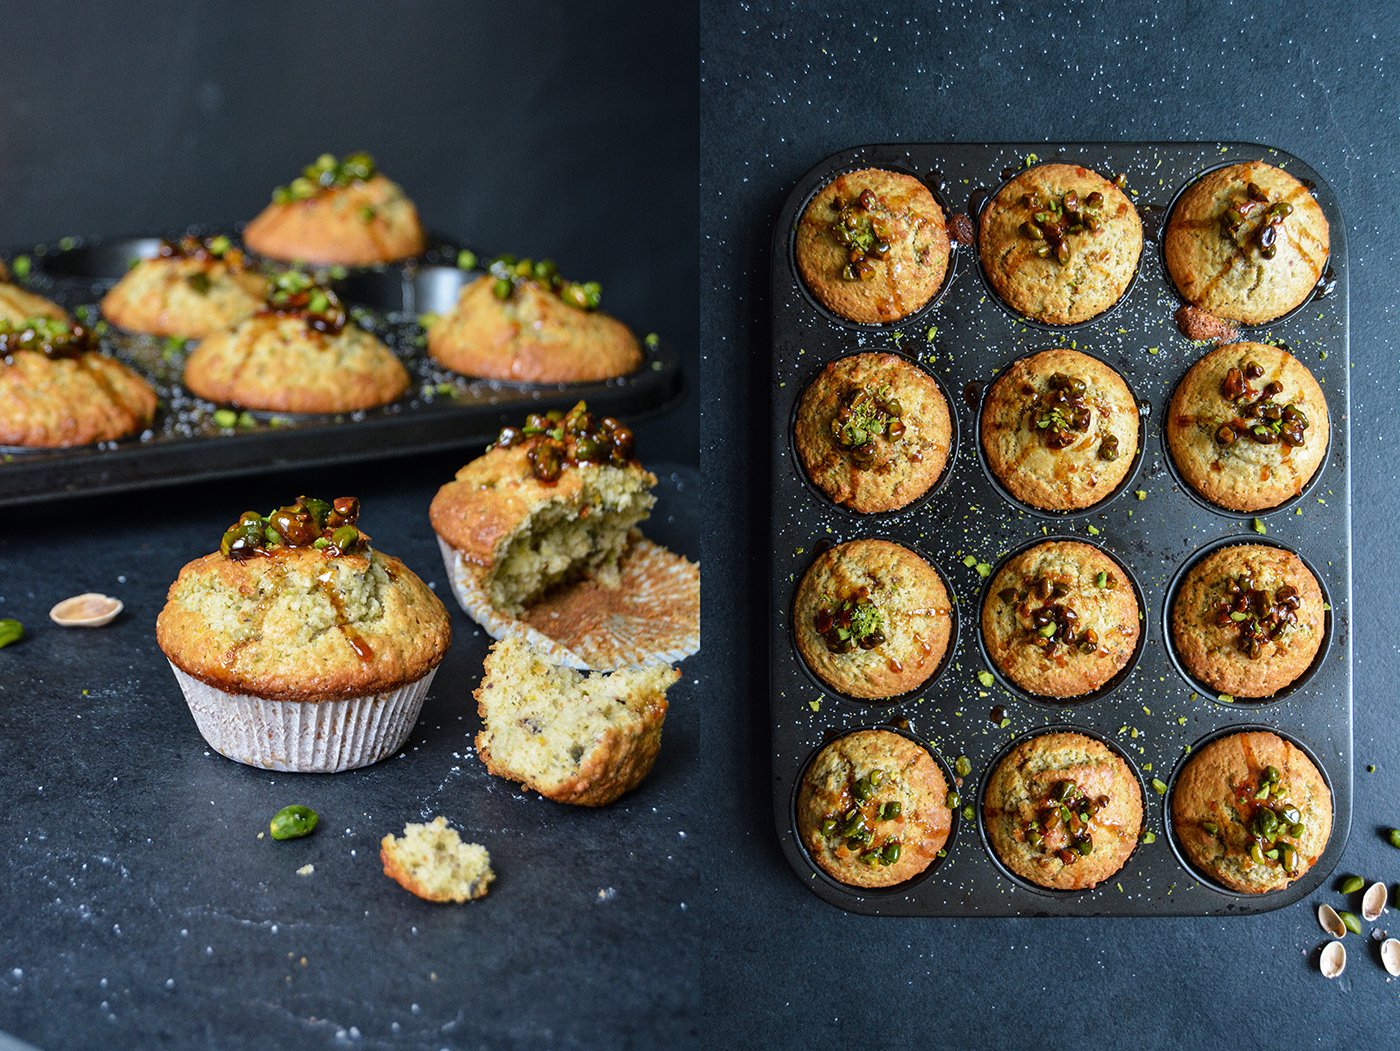
Pistachio Orange Blossom Muffins with Caramelized Pistachios
Pistachios have been on my mind since I tried the most divine breakfast spread during my stay at the stunning Villa Athena in Agrigento in Sicily. Velvety smooth and creamy, slightly sweet and nutty, I'm not surprised that this traditional Sicilian Crema di Pistacchi is so popular in Italy. The texture is similar to the more common chocolate hazelnut spread, but it tastes a million times better, and it's bright green. I love it and I can't wait to start working on my own recipe.
However, there are much quicker ways to satisfy my current pistachio longings, for example, with fluffy pistachio orange blossom muffins topped with caramelized pistachios. I replaced a quarter of the flour with finely ground pistachios and stirred in a few roughly chopped nuts to add some crunch. Oranges team up very well with the green nuts, so I used a generous splash of orange blossom water and freshly grated zest to refine my little green muffins with a citrusy note. While you caramelize the nuts for the topping, you could also make a little more dark caramel to drizzle over the muffins' golden tops. Bittersweet and sticky, it fits really well, but that's up to you.
Yesterday was a great day, as we felt the united power of women. When I saw the pictures of the women's marches all over the world, hundred thousands of women raising their voice and showing their strength, I felt, all of a sudden, the cold fading that gathered in my heart in the past few months. #womensmarch

Pistachio Orange Blossom Muffins
Makes 12 muffins
shelled salted pistachios 120g / 1 cup
plain flour 320g / 2 1/2 cups
granulated sugar 150g / 3/4 cup
baking powder 3 teaspoons
baking soda 1/2 teaspoon
fine sea salt 1/8 teaspoon
butter, melted and cooled, 120g / 1/2 cup
freshly grated orange zest 1 teaspoon
vanilla pod, split and scraped, 1/4
whole milk 210ml / 3/4 cup plus 2 tablespoons
organic eggs 2
quality orange blossom water, preferably organic, 3 tablespoons
paper muffin pan liners 12
For the caramelized pistachios
shelled salted pistachios, a handful
granulated sugar 2 tablespoons
water 2 tablespoons
honey 1 teaspoon
Preheat the oven to 200°C / 400°F (preferably convection setting). Line a 12-cup muffin pan with paper liners.
In batches, rub the pistachios between your hands until most of the salt is scrubbed off. (Alternatively, use unsalted pistachios, in that case add 1/4 teaspoon of salt to the dough instead of 1/8 teaspoon.)
For the muffins, in a food processor or blender, grind 2/3 (80g / 3 ounces) of the pistachios until very fine. Chop the remaining pistachios roughly.
In a large bowl, whisk together the flour, ground pistachios, sugar, baking powder, baking soda, and salt.
Add the orange zest and vanilla seeds to the butter, whisk, and let it sit for a few minutes to infuse the butter.In a medium bowl, whisk together the butter, milk, eggs, and orange blossom water. Add to the flour-mixture and stir with a wooden spoon just until a lumpy batter forms. Gently fold in the remaining chopped pistachios. Mind that if you mix the batter too much, the muffins will lose their light texture.
Spoon the batter into the muffin cups and bake for about 14 minutes (slightly longer if using a conventional oven) or until golden.
For the caramelized pistachios, rub the pistachios as mentioned above to remove most of the salt and chop roughly. In a small, heavy saucepan, bring the sugar, water, and honey to the boil and, without stirring, let it cook until golden and caramelized. Add the pistachios, stir quickly and top each muffin with a teaspoon of the caramelized nuts. Work quickly, as the caramel becomes hard. If it's too sticky, transfer the pan back onto a low heat to melt the caramel.


Tahini Date Cake with Whipped Cream

Welcome 2017! May you bring peace, love, and patience to our lives.
On one of the last days of 2016, we gathered a group of friends from Florence, Israel, and London around our long wooden dining table. To keep it cozy, I cooked Swabian Käsespätzle, the famous homemade egg noodles layered with lots and lots of cheese and soft, golden brown onions. This meal is so rich and comforting, it's perfect for a cold winter's night. I don't know a single person who doesn't find it addictive. Although it's a classic Southern German dish, I've heard quite a few Italians claiming that Italy is its true place of origin. However, my guests from Florence tried it for the first time and they were enraptured.
My guest from Israel inspired me to bake a cake with one of his home country's most popular products: tahini. I made a fruit cake, similar to an English teatime loaf, but I replaced the butter with tahini and olive oil. To say that it was good would be a total understatement. Light, with a soft hint of tahini, it was delicious, especially in combination with the chopped dates that I stirred into the dough and the sesame seeds sprinkled on top. I served this rustic looking beauty with lightly sweetened tahini whipped cream, we were all smitten.


Tahini Date Cake
Makes 1 cake
plain flour 260g / 2 cups
baking powder 1 tablespoon
freshly grated orange zest 1 tablespoon
ground cinnamon 1 teaspoon
fine sea salt 1/8 teaspoon
tahini, mixed well, 75ml / 1/3 cup
mild olive oil 75ml / 1/3 cup
whole milk 90ml / 1/3 cup plus 1 tablespoon
granulated sugar 200g / 1 cup
large organic eggs 4
pitted dates, roughly chopped, 100g / 3 1/2 ounces, plus a few chopped dates for serving
white sesame seeds 1 tablespoon, plus more for serving
For the tahini whipped cream
(the tahini whipped cream serves 4, you'll have to double the amount for the whole cake)
heavy cream 200ml / 3/4 cup plus 2 tablespoons
granulated sugar, to taste
tahini, mixed well, about 1 tablespoon
Preheat the oven to 180°C / 350°F (preferably convection setting) and butter a 20cm / 8″ springform pan.
In a large bowl, combine the flour, baking powder, orange zest, cinnamon, and salt.
In the bowl of a stand mixer, whisk together the tahini, olive oil, milk, sugar, and eggs for about 1 minute until well combined (I mix it on '4' on my KitchenAid). Stir in the flour mixture and continue mixing until no traces of flour are left. Stir in the dates and pour the dough into the prepared springform pan. Sprinkle with the sesame seeds and bake for about 45 minutes or until golden and spongy. Check with a skewer, it should come out almost clean. Let the cake cool for a few minutes and take it out of the pan.
Whip the cream with a little sugar until stiff, adjust sweetness to taste. Add the tahini and whip for a few seconds until well combined. To serve the cake, cut it into large pieces, add a generous dollop of the tahini whipped cream, and sprinkle with chopped dates and additional sesame seeds.
Wrapped in cling film, this cake stays moist for a couple days.


21 recipes for Christmas Cookies
There are few things as relaxing as baking Christmas cookies during the busy days of December. Mixing and kneading pounds of dough while the air in the kitchen is soaked in fragrant sweetness is the best anti-stress remedy. Cinnamon, cloves, citrus fruits, and cardamom, chocolate, almonds and hazelnuts, you don't need many ingredients to give a cookie an extra christmassy touch.
We still have 10 days to go - for the German Christmas on the 24th December, and 11 days for the English and Maltese Christmas. So we have enough time to throw a few more trays of delicious cookies in the oven, to fill the jars, and make our hips happy. Here's some more inspiration from the last three years of Christmas cookie feasting on Eat In My Kitchen. Happy baking!
Click on the titles for the recipes:


Christmas Chocolate Panettone (let’s see it as a giant cookie)


Crème Brûlée Tangerine Cheesecake in a Jar for Christmas
Eat In My Kitchen turned 3! So much has happened around me in the past few weeks that I forgot my blog's birthday on the 23rd November.
I usually create a recipe for this special day - at least in the past 2 years - but now we're all so busy contemplating lunch and dinner menus for December's upcoming festivities, that I decided to skip the birthday bash and move straight on to Christmas. I came up with a dessert that's delicious, gorgeous, and practical in equal measure, a crème brûlée cheesecake in a jar. Its shiny golden prettiness is the perfect finish for a festive table. You can easily bake the cake a day in advance and keep it in the fridge. Sprinkled with sugar, it only needs a few seconds under the hot flame of a blow torch before you and your guests can indulge in the sweeter things in life.
My cheesecake base is made with oat cookies (you can find a recipe for oat cookies in my book on page 234), the filling is a mixture of rich mascarpone and cream cheese refined with tangerine, cinnamon, and vanilla. You could also bake one big cake in a 20cm / 8" springform pan, but it's so much more fun to present these beautiful little jars to your friends and family.
Before you jump to the recipe, I'd like to ask you for two favours:
Food52's cookbook competition, the famous Piglet Tournament, is now open. You can nominate your favourite cookbook and I'd be jumping with joy if you consider giving your vote to the Eat In My Kitchen book. 2016 has brought many wonderful cookbooks to the shelves, but luckily you can vote for more than one book. You can find the form to nominate here, the deadline is the 30th December.
And here's my second question:It would be fantastic if you could also drop a review for my book on Amazon, here are the links:
Thank you so much! Happy 3rd Advent!! xx

Crème Brûlée Tangerine Cheesecake
You'll need 10-12 maison glass jars or ramekins for this recipe.
Serves 10-12
For the base
oat cookies 210g / 7 1/2 ounces
unsalted butter, melted and cooled, 60 / 1/4 cup
For the filling
cream cheese, at room temperature 300g /11 ounces
mascarpone, at room temperature 250g / 9 ounces
granulated sugar 100g / 1/2 cup
vanilla pod, split and scraped, 1/2
large organic eggs 3
cornstarch 1 heaping teaspoon
freshly grated tangerine zest 1 tablespoon
freshly squeezed tangerine juice 3 tablespoons
ground cinnamon 1/4 teaspoon
fine sea salt 1/8 teaspoon
For the topping
granulated sugar
tangerine zest (optional)
For the base, crush the cookies in a food processor or blender until finely ground. Transfer to a large bowl, add the melted butter, and stir until well combined. Divide the cookie mixture between the glass jars or ramekins, using the bottom of a shot glass to press it firmly and evenly into the jars, especially along the edges. Freeze for 20 minutes.
Place a deep roasting pan, large enough to fit the glass jars comfortably, on the lowest rack of the oven. Preheat the oven to 160°C / 325°F. Fill a kettle with water and bring to the boil.
For the filling, in a large bowl, use an electric mixer to beat the cream cheese, mascarpone, sugar, vanilla seeds, eggs, cornstarch, tangerine zest, tangerine juice, cinnamon, and salt until well combined.
Pour the cheesecake batter on top of the chilled cookie base and transfer the jars to the roasting pan in the oven. Slowly pour the boiling water into the roasting pan until it comes about one third to half way up the sides of the jars. Bake for about 20 minutes or until the filling is just set but still slightly wobbly in the center. Turn off the oven, leave the oven door slightly open, and let the cheesecake cool for about 5 minutes, then take the cheesecake out of the oven and let cool to room temperature. Once cool, the cheesecake can be refrigerated for 2 to 3 days. Or, you can finish the crème brûlée topping right away for serving. (Don't refrigerate the cheesecake when it's still warm, or the base will turn soggy.)
For the topping, sprinkle a generous amount of sugar on top of the cheesecakes, about 1 teaspoon for each jar. Using a blow torch, burn the sugar until golden brown. Let it cool for a couple minutes until the burnt sugar is hard, sprinkle with tangerine zest, and serve immediately.


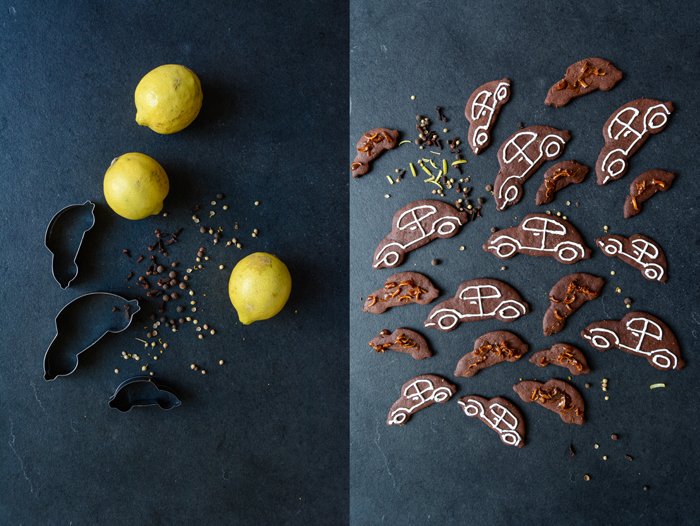
Chocolate Spice Christmas Cookies with Candied Lemon Peel
I used to have a huge spice box in my kitchen that didn't look very pretty and also wasn't particularly practical. For whatever reason, I decided in my early kitchen years to store all my spice filled glass jars and tiny metal tins in this box and that's where I kept them for two decades. This beaten and buckled box still exists, I just use it for potatoes at the moment (even a box has to stay flexible in life). I used to arrange my spices in two layers of jars, so when I needed juniper berries from the bottom, I would always have to empty the whole thing. Rather impractical.
Around two years ago, I renovated my kitchen, I changed the sink and cupboards on one side of the room. When everything was set up, I had a skype call with my Maltese mama Jenny to proudly present my work to her. Not that she's particularly experienced in kitchen renovation, it's rather the opposite, she still works in her gorgeous sea-blue kitchen gem from the 60s. I don't remember why, but we started discussing the spice-situation in my kitchen. There's a slim cupboard with two sliding drawers next to my sink, so when we had our video chat, we both looked at this drawer and decided that it should become my spice cupboard. I arranged everything that same day and since then I'm more than happy to have such a luxurious overview of my spice collection.
The spices I use the most, right at the front when you open the door, are Maltese fennel and coriander seeds, the whole range of peppercorns in black, green, white, and pink, cinnamon, and cardamom. Jars of cumin, cloves, aniseed, allspice, juniper berries, and mustard seeds are right behind. Then there's the hot section, with cayenne and urfa chilli, plus sumac and a few spice mixtures. I love this cupboard, it's a bit chaotic, and it's still a colourful collection of various jars and containers, but it smells beautiful.
Although I generally prefer a certain order in my kitchen, there are zones and tools in this room that seem to follow their own rules. Cookie cutters, for example, tend to end up in places where I don't even know how they got there. I bought a large metal ring at one point to get my growing collection under control. Every year I buy a couple new ones to add to the classics, to stars, angels, and Santa. I tend to have annual favourites. Squirrel, sausage dog, and deer were popular for a long time, which might speak for my love of cute animals. My collection of three beetles is relatively new, maybe I need a car? Who knows. But apart from giving my cookies a cute look, a cutter should be practical. For example, I barely use the deer anymore because the cookies tend to lose their antlers in the oven, so it looks rather sad. My beetles however are very cooperative, roundish, no narrow parts, and they are even big enough to get a proper royal icing decoration.
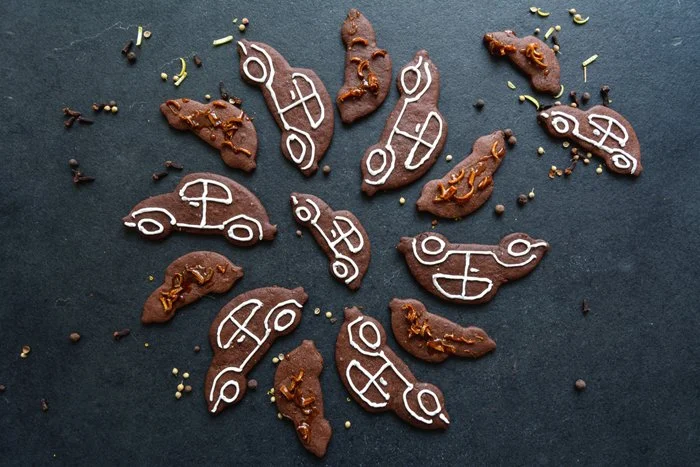
I must admit that decorating sweets is not one of my best talents. But I thought it would be nice to bake some cookies at this time of year that you can decorate - especially if there are kids around the baking table. And if you're as lazy as I am and you have a soft spot for citrus, I have a great alternative for you. Decorate half the batch of these delicious chocolate spice cookies with royal icing (I recommend you trust the pros and buy the mixture from a baking shop) and make your children happy. For the other half, caramelize lemon peel until sweet and crunchy, sprinkle this sticky golden mixture over the remaining cookies and make yourself happy. These are the adult cookies. They aren't as pretty as the cute hand decorated ones, but the combination of dark chocolate, cinnamon, cloves, coriander, aniseed, and candied lemon peel makes up for it. They taste so unbelievably good that you won't even mind the looks.
For more delicious recipes and kitchen inspiration, visit Volkswagen's Pinterest community board Food Bloggers for Volkswagen.

Chocolate Spice Christmas Cookies with Candied Lemon Peel
Makes about 50 cookies
For the cookies
plain flour 260g / 2 cups
unsweetened cocoa powder 50g / 1/2 cup
baking powder 1/4 teaspoon
freshly grated lemon zest 1 tablespoon (from 1 large lemon)
ground cinnamon, 1 teaspoon
cloves, ground in a mortar, 10 (about 1/2 teaspoon ground cloves)
coriander seeds, ground in a mortar, 2 teaspoons
aniseed, ground in a mortar, 1/2 teaspoon
allspice berries, ground in a mortar, 4
fine sea salt 1/8 teaspoon
butter, at room temperature, 130g / 1/2 cup plus 1 teaspoon
icing sugar 120g / 1 1/4 cups
organic egg 1
For the decoration
(if decorating half the cookies with royal icing and the other half with candied lemon peel)
royal icing mixture, whisked with a little water, about 60g / 2ounces
granulated sugar 50g / 1/4 cup
water 2 tablespoons
very thin strips of fresh lemon peel, 1 small handful
In a large bowl, combine flour, cocoa powder, baking powder, lemon zest, cinnamon, cloves, coriander, aniseed, allspice, and salt.
In the bowl of a stand mixer, fitted with the paddle attachment, beat the butter and icing sugar until fluffy. Add the egg and mix for about 1 minute or until well combined. Replace the paddle attachment with the dough hook, add the flour-spice mixture to the bowl with the butter, and mix until well combined. Form a thick disc, wrap in cling film and put in the freezer for about 20 minutes.
Preheat the oven to 160°C (325°F) and line 3 baking sheets with parchment paper.
In batches, roll the dough out thinly (about 3mm / 1/8" thick) between cling film and cut out cookies in whatever shape you like. Keep the remaining dough in the fridge while cutting the cookies. Arrange the cookies on the lined baking sheets and bake, one baking sheet at a time, for about 6 minutes or until golden. Let them cool for a few minutes before you transfer them to a cooling rack.
For the royal icing, whisk the royal icing mixture with a little water (following the instructions on the package) and, using a piping bag with the smallest attachment you can find, decorate half the cookies.
For the candied peel, in a small saucepan, bring the sugar and water to the boil. When it starts to caramelize add the lemon peel. Lower the heat to medium and cook for about 3 to 4 minutes or until the peel is golden and soft—mind that it doesn't burn. While the caramel is still liquid (you can leave the saucepan on lowest heat), quickly sprinkle the remaining cookies with the candied lemon peel.
Happy baking!


Persimmon Hazelnut Thumbprint Cookies

Around this time last year, I came up with a recipe that took my beloved persimmons and turned them into streusel bars - it was nothing less than divine. I'm a huge fan of this gorgeous fruit, especially when it's overly ripe, soft as jelly and honey-sweet. To use it in Christmas baking is tricky, as it can easily get lost under spices and butter, it needs a balanced composition that allows its fine fruitiness to shine.
When I last bought a bunch of persimmons from my local vegetable man, I could have just turned them into another batch of streusel bars. But I love creating new traditions and I decided to challenge myself to come up with a new persimmon Christmas cookie recipe every year. So in 2016, I'm celebrating my young tradition with a cookie classic, jam filled thumbprint cookies, called Husarenkrapfen in German. The buttery shortcrust is refined with hazelnuts, cinnamon, and vanilla - at least in my kitchen. The fruity filling in the middle is usually red, made of red currants or raspberries. But as I looked at the orange coloured fruits on my kitchen table, I decided to purée and cook the pulp of a persimmon with a generous amount of vanilla to enhance its flavour. It's an unfussy jam, a spoonful of honey, just a tablespoon of sugar, and 5 minutes on the heat. Perfect for my slightly nutty Husarenkrapfen.
Happy 2nd Advent!


Persimmon Hazelnut Thumbprint Cookies
You can either bake the cookies filled with the jam or bake the plain cookies first and drop a dollop of the jam into the holes once they are cool (which I prefer). It looks prettier and the taste of the fruit is more present.
Makes about 50 cookies
For the dough
plain flour 300g / 2 1/3 cups
ground hazelnuts 100g / 3/4 cup plus 2 tablespoons
baking powder 1/2 teaspoon
ground cinnamon 1/2 teaspoon
fine sea salt 1/8 teaspoon
butter, soft, 150g / 2/3 cup
granulated sugar 130g / 2/3 cup
vanilla bean, split and scraped, 1/2
organic eggs 2
For the jam filling
large ripe persimmon, peeled, 1 (250g / 9 ounces)
vanilla bean, split and scraped, 1/2
honey 1 teaspoon
granulated sugar 1 tablespoon
icing sugar, for dusting
For the dough, in a large bowl, combine the flour, hazelnuts, baking powder, cinnamon, and salt.
In the bowl of a stand mixer fitted with the paddle attachment, beat the butter, sugar, and vanilla seeds until creamy. Add the eggs, one at a time, and mix well in between. Add the flour mixture, change to the hook attachment, and mix until combined. The dough will be quite soft. Scrape onto a long layer of cling film, form a thick disc, wrap it, and put in the freezer for about 25 minutes.
Preheat the oven to 180°C / 350 (preferably convection setting). Line 2 baking sheets with parchment paper.
For the jam, purée the persimmon and vanilla seeds in a blender or food processor. Transfer to a small saucepan, stir in the honey and sugar, and bring to the boil. Cook over medium-high heat, it should be bubbling, stirring once in a while, for about 4 minutes or until it starts to thicken. Set aside and let the jam cool.
Cut off a slice off the dough, roll into a sausage shape, and cut off pieces, keep the remaining dough in the fridge. Using your hands, roll the pieces into 3cm / 1 1/4" balls. Press the end of a wooden spoon into the middle of each ball, pushing almost through to the bottom and leaving only a thin layer at the bottom of the cookie (otherwise the holes might close during baking). Transfer to the lined baking sheets and bake, one sheet after the other, for about 14 minutes or until golden. Let the cookies cool completely, then fill with the persimmon jam and dust with icing sugar.
If you want to store the cookies in a cookie box, I recommend adding the jam filling before serving. They become a bit softer after a day if they are filled and it's also easier to store them without the filling.


A Christmas treat - the famous German Chocolate Baumkuchen
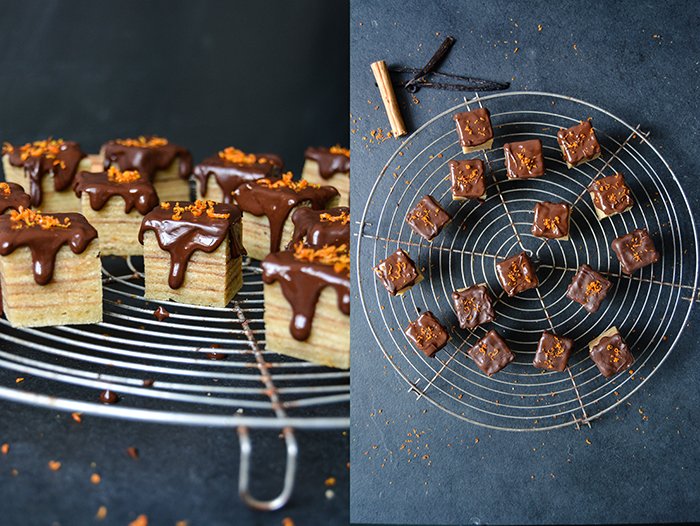
A few days ago, I walked through a little park that's close to my apartment. It's a very quite place, you don't see many people there. I like to go on my own when I need a break from the world, to feel some fresh air on my skin and think clearly again. That afternoon the air was crisp, the last golden leaves fell off the trees, and a trio of squirrels was busy collecting their nuts. I felt a bit chilly and as I pulled my scarf closer to my neck, I noticed a change, I could smell winter.
Winter brings many changes, I could sleep more, eat more, and bake more. Baking always plays an important role in my life, especially on the weekends, but during the Christmas season I become excessive. There are so many recipes on my list, my classics, but then I also want to try out new creations. The fabulous Baumkuchen has been on my mind since summer, I love this traditional German Christmas cake that's usually baked on a spit. The name means tree cake, referring to the fact that it looks like the growth rings of a tree. This cake takes time and it's a bit of work to prepare. First you bake a thin layer of batter for just a few minutes, then you brush on the next layer and continue until you end up with up to 20 layers (mine has 12, that's more than enough). It's a hit at Germany's Christmas markets where you can see it being baked on rotating spits, close to a grill (broiler) or wood fire.
Baumkuchen has always been one of my Christmas favorites, especially to sweeten my teatime in December's dark and cold afternoons. I usually buy the cake from the store, but then I had an idea. It was in summer. I don't remember why I gave it a thought in the heat of July (I guess I felt some Christmas longings), but never mind. It dawned on me that I don't need a spit and wood fire to enjoy this treat, that I could also bake it in a normal cake pan under the grill (broiler) of my oven. Cut into squares, it almost counts as Christmas cookies, but if you prefer, you can cover the whole Christmas beauty in chocolate and serve it as a cake.
My Baumkuchen is moist, refined with cinnamon and orange, with a strong taste of marzipan. If you have a free afternoon, get cozy next to your oven and bake a tree cake. I wish you a peaceful 1st advent!
For more recipes for Christmas baking, click here!

Chocolate Baumkuchen
Makes about 20 Baumkuchen squares
plain flour 60g / 1/2 cup
cornstarch 30g / 1/4 cup
organic eggs, divided, 6
fine sea salt 1/8 teaspoon
marzipan / almond paste, crumbled, 120g / 4 ounces
unsalted butter, soft, 200g / 3/4 cup plus 1 tablespoon
brandy 2 tablespoons
granulated sugar 200g / 1 cup
vanilla bean, split and scraped, 1
ground cinnamon 1/4 teaspoon
freshly grated orange zest 1 teaspoon
For the topping
bittersweet chocolate 100g / 3 1/2 ounces
butter 1 teaspoon
orange zest (optional)
Turn on the grill (broiler) of your oven or preheat to 220°C / 425°F (this only works if you can set the heat to come just from the top). Butter and line the bottom and sides of a 20cm / 8" springform pan or a tall 15 x 20cm / 6 x 8" cake pan with parchment paper.
Sieve together the flour and cornstarch.
Beat the egg whites and salt until stiff.
In a large bowl of a stand mixer, using the paddle attachment, beat the marzipan, butter, and brandy until creamy. Add the sugar, vanilla seeds, cinnamon, orange zest, and egg yolks and continue mixing for about 3 minutes or until fluffy. Add the flour mixture and, using a wooden spoon, stir until well combined. Gently fold the egg white into the flour-butter mixture until combined.
Add about 3 generous tablespoons of the batter to the lined springform pan, it should only be a thin layer to cover the bottom. Using a wide spatula, spread the batter evenly. Place the springfrom pan in the top third of the oven and bake for about 3-4 minutes or until golden/ light brown, but not dark. Watch well and mind that the batter can burn within seconds. Take the pan out of the oven, add 3 tablespoons of the batter on top of the first baked layer of cake, spread well, and bake for 3-4 minutes or until golden / light brown. Continue the same way until you have used all the batter, you should end up with about 12 layers. Let the cake cool in the pan for 10 minutes, take it out of the pan, and let it cool completely. Once cool, cut the cake into little squares.
In a small saucepan, heat the chocolate and butter over low heat or in a bain marie. Let it cool for a few minutes before you decorate the cake.
Drizzle the Baumkuchen squares with the chocolate and decorate with a little orange zest.


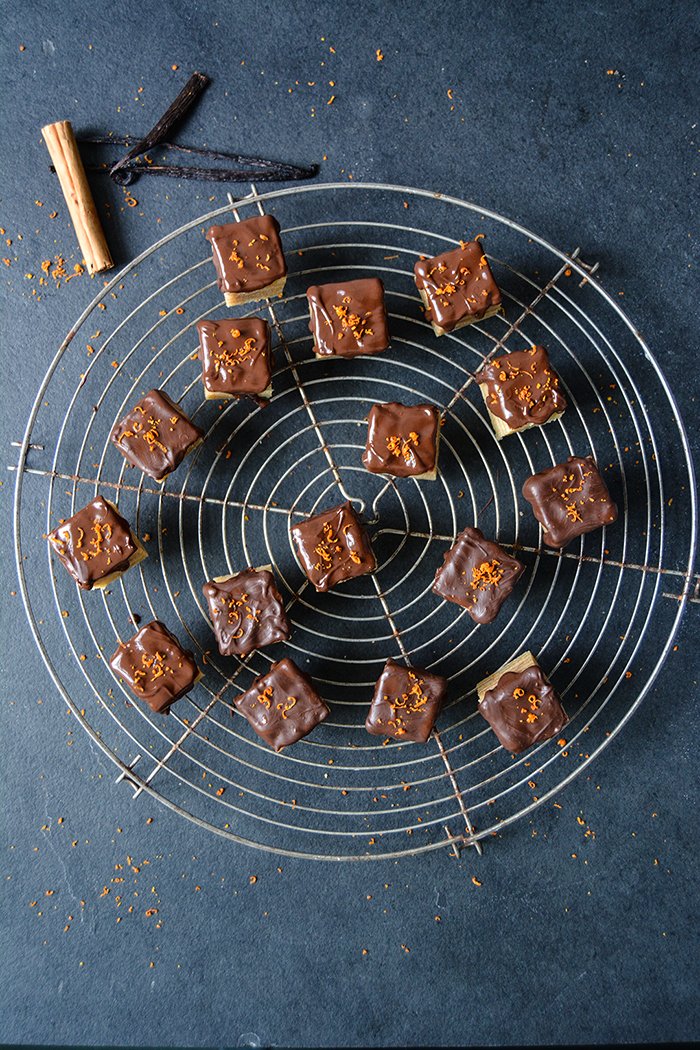


Lime Scones & my last book launch event in Washington D.C.

When we left our hotel in New York in the early morning it was still dark and I was too tired to realize that my Eat In My Kitchen book tour would soon come to an end. But after six weeks of being on the road in Europe and the US, I was somehow ready to close one of the most exciting chapters of my life in America's capital, in Washington D.C.
We celebrated the birth of my first cookbook with true feasts, in Berlin, Malta, London, New York, and Washington and there are no words to describe how I felt during this trip. It made me the happiest and - after a few weeks - the most tired person at the same time. To be able to write and publish a book, to travel and share my thoughts about these pages filled with my recipes makes me very thankful - and humble. I didn't know what to expect when my book was published on the 4th October, I didn't know if people would like or reject it. I just tried my best to create a collection of recipes that someone who loves cooking would pick up for inspiration. To see all the love, support, and positive response that this book keeps getting, is more than I ever dreamed of. I met so many incredible food-loving people at all my book launch events, we discussed with each other, we ate and drank Maltese wine together, and we gathered around the table, just like we do in my own kitchen. People keep asking me which event I enjoyed the most, but I can't even answer this question. Each celebration was unique, each of them was filled with countless magic moments, each event made my heart stop and jump, out of anxiety and pure happiness. Each celebration is a huge gift to my life.

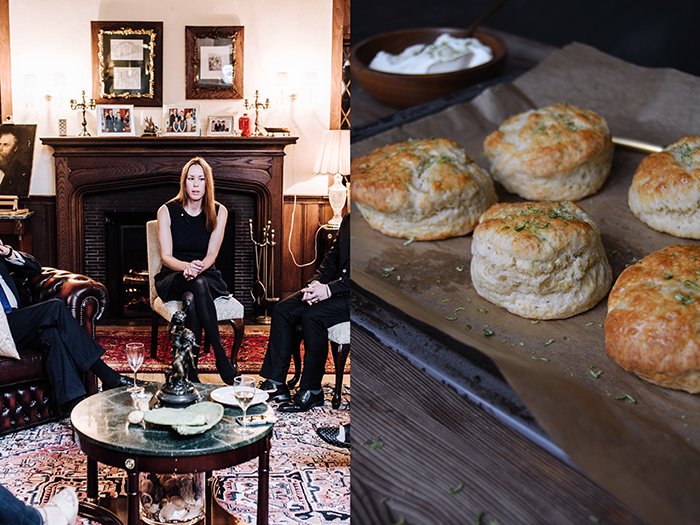
Washington felt a bit like the calm after the storm (please keep in mind that it was the week before the sobering elections!). New York is restless and that's how we felt, but in D.C. we got treated to the relaxing amenities of the wonderful Kimpton Mason & Rook Hotel and a luxuriously elegant room. We also had more time than expected, so we decided to jump on the hotel's bikes to ride to the Embassy of Malta in Washington and meet the ambassador, Clive Agius, the generous host of the last Eat In My Kitchen book launch event. It was only a quick visit to the embassy before we drove on - this time in the ambassador's car - to his private residence where our celebration was going to take place the next day. When I saw his house from afar, I knew that we had yet another unforgettable launch ahead of us.
The ambassador's house is located in a picturesque residential area a little outside the center. The quiet streets lined with old trees, their leaves painted in gold, orange, and red, it was an Indian summer's dream, almost too beautiful to be true. The house could have been straight from a fairytale, I couldn't help but think of Little Red Riding Hood. The coziest cottage, warm and welcoming, just like Mr. Agius' lovely family who shared their home with us. Mrs. Agius was so kind to let me use her kitchen to prepare the dishes for our big night and Vs Adass, the sweetest man who's been the residence's indispensable helping hand for two decades, assisted me. It was the only launch where I cooked and it went more smoothly than expected.
That night we treated ourselves to a scrumptious dinner at Le Diplomate, a relaxed French style Brasserie serving classics of exquisite quality. A glass of Champagne, clams, burger (the best in town), and a nice bottle of wine from Crozes Hermitage made us forget about the struggles that you face once in while when you're on a book tour. It was heavenly. My culinary highlight was the bread served with our meal. Homemade sourdough bread, baguette, and a fruit and nut loaf that were so good that I ordered a bunch of them for next day's book launch.

One of the breakfast treats I enjoyed during my stay in D.C. inspired me to share today's recipe. It was a wonderfully crumbly, fragrant lemon scone. In my recipe, I replaced the lemon with lime and added vanilla. It's one of the best scones I ever made, delicious for breakfast and perfectly fitting for my Sunday teatime.
My last book launch event was the most intimate of all of them. We sat at the fireplace, it was warm and cozy, a glass of wine in our hands, and we spoke about food. First, we picked up on our tradition of having a talk between me and my interviewer - my boyfriend took on this role that night - and then we moved on to an open discussion. And Washington, you impressed me, your people like to talk and ask questions! In no other city was I asked so much about my book, but also about food in general, I loved it. Thank you for welcoming us with open arms, thank you for your curiosity!


This night wouldn't have been possible without the generous support of Clive Agius and his lovely wife and daughters. Thank you so much for sharing your home with us and our guests. Thank you Karl Chetcuti and Meridiana Wine Estate for filling our glasses, Marisa Dobson for helping me organize our event, and Corinne Thompson for capturing all the beautiful moments in your pictures.
So, the Eat In My Kitchen book is out and it made it onto several Best Cookbooks of Fall 2016 lists (New York Times, InStyle US, Epicurious), you can see all the reviews here. I'm happy, relieved, and I'll definitely need some time to process all the excitement that came over my life in the past few months. The best place to do this is my kitchen in Berlin and in Malta. I want to get back to my routine, my normal life. I hope you had fun joining my book tour here on the blog and on Instagram and Facebook. My post-book tour life will bring back recipes and posts from my kitchen, very relaxed, and a slower pace.


Lime Scones
Makes 6 scones
plain flour 260g / 2 cups
granulated sugar 2 tablespoons
cream of tartar 2 teaspoons
baking soda 1 teaspoon
fine sea salt 3/4 teaspoon
freshly grated lime zest 1 1/2 tablespoons, plus 1 teaspoon for the topping
unsalted butter, cold, 60g / 1/4 cup
freshly squeezed lime juice 2 tablespoons
milk a bit less than 120ml / 1/2 cup
vanilla bean, split in half and scraped, 1/2
organic egg, lightly beaten, to glaze, 1
crème fraîche, clotted cream, or butter, for serving
Preheat the oven to 220°C / 425°F (conventional setting) and line a baking sheet with parchment paper.
In a large bowl, combine the flour, sugar, cream of tartar, baking soda, salt, and lime zest. Add the butter and use a knife to cut it into the flour until there are just small pieces left. Quickly rub the butter into the flour with your fingers until combined.
Add the lime juice to a measuring cup and fill with milk until it measures 120ml / 1/2 cup. Add the vanilla seeds and whisk quickly. Add to the flour mixture and, using a large spoon, mix until just combined.
Scrape the dough onto a floured kitchen counter, dust your hands with flour, and flatten the dough until it's about 2 1/2cm / 1" thick. Using a 6 1/2cm / 2 1/2" round cookie cutter, cut out 6 scones, reshape the dough for the last 2. Transfer to the lined baking sheet, brush the tops with the egg wash, and bake for about 10 minutes or until golden and risen. Sprinkle with additional lime zest (optional). Enjoy preferably warm with crème fraîche, clotted cream, or butter.


Ricotta Beetroot Doughnuts, New York and my 4th book launch

New York, November 2016:
The monotony of clouds and waves kept me in a daze while I crossed the Atlantic, but then, when I finally spotted Nova Scotia from high up in the skies, I was as excited as a little girl. Soon we'd land in New York JFK, to open the last two chapters of my overwhelming Eat In My Kitchen book tour. New York and Washington DC had been on my itinerary for months, but to know that I'd be there in just a few hours gave me shivers.
This trip was emotional, which I got used to after weeks of being on the road in London, Berlin, and Malta, my emotions seem to be tied to a rollercoaster. And now New York, this city filled with so many dreams and visions, vibrant, loud, and bright, it never rests. As I stumbled out of the subway, packed with all my bags and suitcases (I took a few pounds of Maltese sea salt with me), my view was drawn to the sky, along the shiny facades of the city's famous skyscrapers. Jet-lagged, happy, and with an espresso in my hands, I felt breathless as I stood on the vibrant streets of Greenwich Village.

Ten days on the East Coast allowed me to dive deep into this magical city, to meet and get to know so many people and to enjoy some of the most delicious treats. I hadn't seen my dear friend and editor Holly La Due in more than a year, and to step into her office on Broadway for the first time, to finally meet the entire team of Prestel Publishing that worked on my book, almost made me cry. And I ate - constantly! There was so much to discover, so much to try, it felt like traveling the world through food, but in one city. My palate enjoyed the most amazing Jamaican curry, Cuban stew and pies, Korean BBQ, Indian treats, and American classics. Breakfast was lush, every day: The richest Challah French toast, fluffy blueberry pancakes, huge muffins, crunchy cookies, fudgy brownies, perfect bagels, lobster roll, juicy burger, creamy clam chowder, and generously filled sandwiches.
New York is heaven on earth if you love food. The quality is outstanding, proven by the fact that I didn't experience a single bad meal, I can recommend almost every restaurant I went to as you can see in my list below. One of the treats that struck me on our last day was a gorgeous pink doughnut at Bryant Park Holiday Market filled with ricotta and covered in sticky beetroot glaze. This combination is so good that I decided to come up with my own recipe and share it with you. My version is a soft and spongy oven-baked yeast doughnut refined with orange zest and sprinkled with pistachios. Next time I'll fry them in oil, which adds that extra rich flavor plus calories.

There's no better way to explore a city than on foot, so as I ate my way through Manhattan and Brooklyn, I also got to walk on the elevated High Line, a 1.5 mile long city garden. It's an impressive green oasis along the closed tracks of the West Side Line.
I managed to see a live performance and also Nan Goldin's Ballad of Sexual Dependency at MoMA, and a fantastic show at The Met Breuer, by James Kerry Marshall called Mastry. And visiting Kenzi Wilbur at Food52's holy test kitchen in Chelsea (picture above) was another highlight.

I came to New York to present the Eat In My Kitchen book, at a wonderful book launch feast at Maman NYC and at a cozy book signing event at the beautiful - and so tempting - Whisk kitchenware shop on Broadway. It's my first book, and to have had these two unforgettable celebrations in New York makes me feel very humble. I can't thank everybody enough who's been involved in both of the events. Maman is a stunning space with high ceilings in TriBeCa, founded by Michelin starred French chef Armand Arnal, Elisa Marshall, and Benjamin Sormonte. They are the sweetest team and they did everything possible to turn our event into a very special night. Chef Hetty McKinnon from Arthur Street Kitchen, and author of the cookbook Neighbourhood, prepared the recipes from my book for this special event. She's a precious gem, as a chef and as a friend.
My trusted partner Meridiana Wine Estate shipped their glorious Maltese wine over the Atlantic just for our event - our American guests are already thinking about how they can get hold of this wine from Malta in the future. Marisa Dobson is the power woman who helped me so much, organizing all my events in the US, and she introduced me to Baked (see the list below). Photographer Maria Midões is the lovely woman who captured the magic of our night at Maman in her gorgeous pictures. I had a dream team in New York, accomplished by the support of my wonderful publisher Prestel. You can't create a book on your own, but you also can't send it out into the world on your own. Thank you, my friends!


Here are some of my favourite food spots:
Manhattan
Baked TriBeCa, American bakery (they bake Oprah Winfrey's favourite brownies)
Maman TriBeCa, coffee, bakery, and events
Tina's Cuban Cuisine
Luke's Lobster East Village (the best lobster and crab roll and clam chowder)
Clinton Street Baking (New York Magazine voted: the best blueberry pancakes)
ABC Kitchen (their spinach, chèvre, and dill pizza is a revelation)
Stick With Me (Susanna Yoon's finest confectionaries)
Black Seed Bagels (delicious tuna melt and salmon bagel!)
Pondicheri New York (acclaimed Indian restaurant)
Food market at Bryant Park, especially
The Doughnut Project
Salumeria Biellese Deli (the best sandwiches lusciously filled with Italian prosciutto and cheese)
Blue Bottle Coffee
Eileen's Special Cheesecake
Jongro BBQ (Korean BBQ, be prepared for loud! music)
Russ and Daughters
Compagnie des Vins Surnaturels
Hot Pot Under de Tree in Harlem (Jamaican Diner on Frederick Douglass Boulevard)
Williamsburg - Brooklyn:
Khao Sarn (delicious Thai soups and papaya salad)
The Rabbit Hole (cozy breakfast spot, try the challah french toast with strawberry mscarpone!)
Extra Fancy (American restaurant, seafood and burger)
Peter Luger Steakhouse (reservation needed!)
Vanessa's Dumpling House
Ricotta Beetroot Doughnuts
Makes about 16 doughnuts plus doughnut holes
For the dough
plain flour 325g / 2 1/2 cups, plus about 2 tablespoons if the dough is too sticky
fast-acting yeast 1 1/4 teaspoons
granulated sugar 50g / 1/4 cup
fine sea salt 1/2 teaspoon
orange zest 1/2 teaspoon
milk, lukewarm, 155ml / 2/3 cup
butter, melted and cooled, 20g / 1 1/2 tablespoons
vanilla bean, scraped, 1/2
organic egg 1
For the filling
fresh ricotta, whipped, 250g / 9 ounces
For the glaze
icing sugar 200g / 2 cups
beet juice 4-5 tablespoons
unsalted pistachios, chopped, a small handful
orange zest 1 tablespoon
For the dough, combine the flour, yeast, sugar, salt, and orange zest in the bowl of a stand mixer fitted with the dough hook. Whisk together the milk, butter, vanilla seeds, and egg - the mixture should be lukewarm - and add to the flour mixture. Knead on medium speed for a few minutes until well combined. The dough should be soft and moist, but not sticky. If it's too sticky, add a little more flour. Transfer the dough to a table or countertop and continue kneading and punching it down with your hands for about 4 minutes or until you have a smooth and elastic ball of dough. Place the dough back in a clean bowl, cover with a tea towel, and let rise in a warm place, or preferably in a 35°C / 100°F warm oven (conventional setting), for about 60 minutes or until almost doubled in size.
Line 2 baking sheets with parchment paper.
When the dough has almost doubled in size, punch it down, take it out of the bowl, and knead for 1 minute. On a lightly floured countertop, using a rolling pin, roll out the dough until it's about 1cm / 1/2" thick. Using a 7 1/2cm / 3" round cookie cutter or glass, gently cut out circles and transfer them to the lined baking sheets. Using a 3 1/2cm / 1 1/2" cookie cutter or shot glass, stamp out the smaller inner circles and arrange them around the doughnuts on the baking sheet. If you use a smaller cookie cutter for the inner circles, the hole in the middle will close while baking. Cover with cling film and let rise in a warm place for about 25-30 minutes or until puffy.
Preheat the oven to 190°C / 365°F (conventional setting).
Bake the doughnuts and the doughnut holes for about 6-8 minutes or until light golden and still soft. If you're not sure, take out one doughnut and cut it in half to see if it's baked through. Transfer to a cooling rack and let cool completely. Cut the doughnuts in half and spread each bottom with about 1 heaping teaspoon of ricotta.
For the glaze, whisk the icing sugar and beetroot juice until smooth, the mixture should be quite thick. Using a teaspoon, sprinkle the glaze generously over each doughnut and doughnut hole. Immediately sprinkle with pistachios and a little orange zest.